Hi Guys,
Today, I’ll be using another exciting installment of Computer Vision. The application will read the real-time human hand gesture to control WebCAM’s zoom-in or zoom-out capability.
Why don’t we see the demo first before jumping into the technical details?
Architecture:
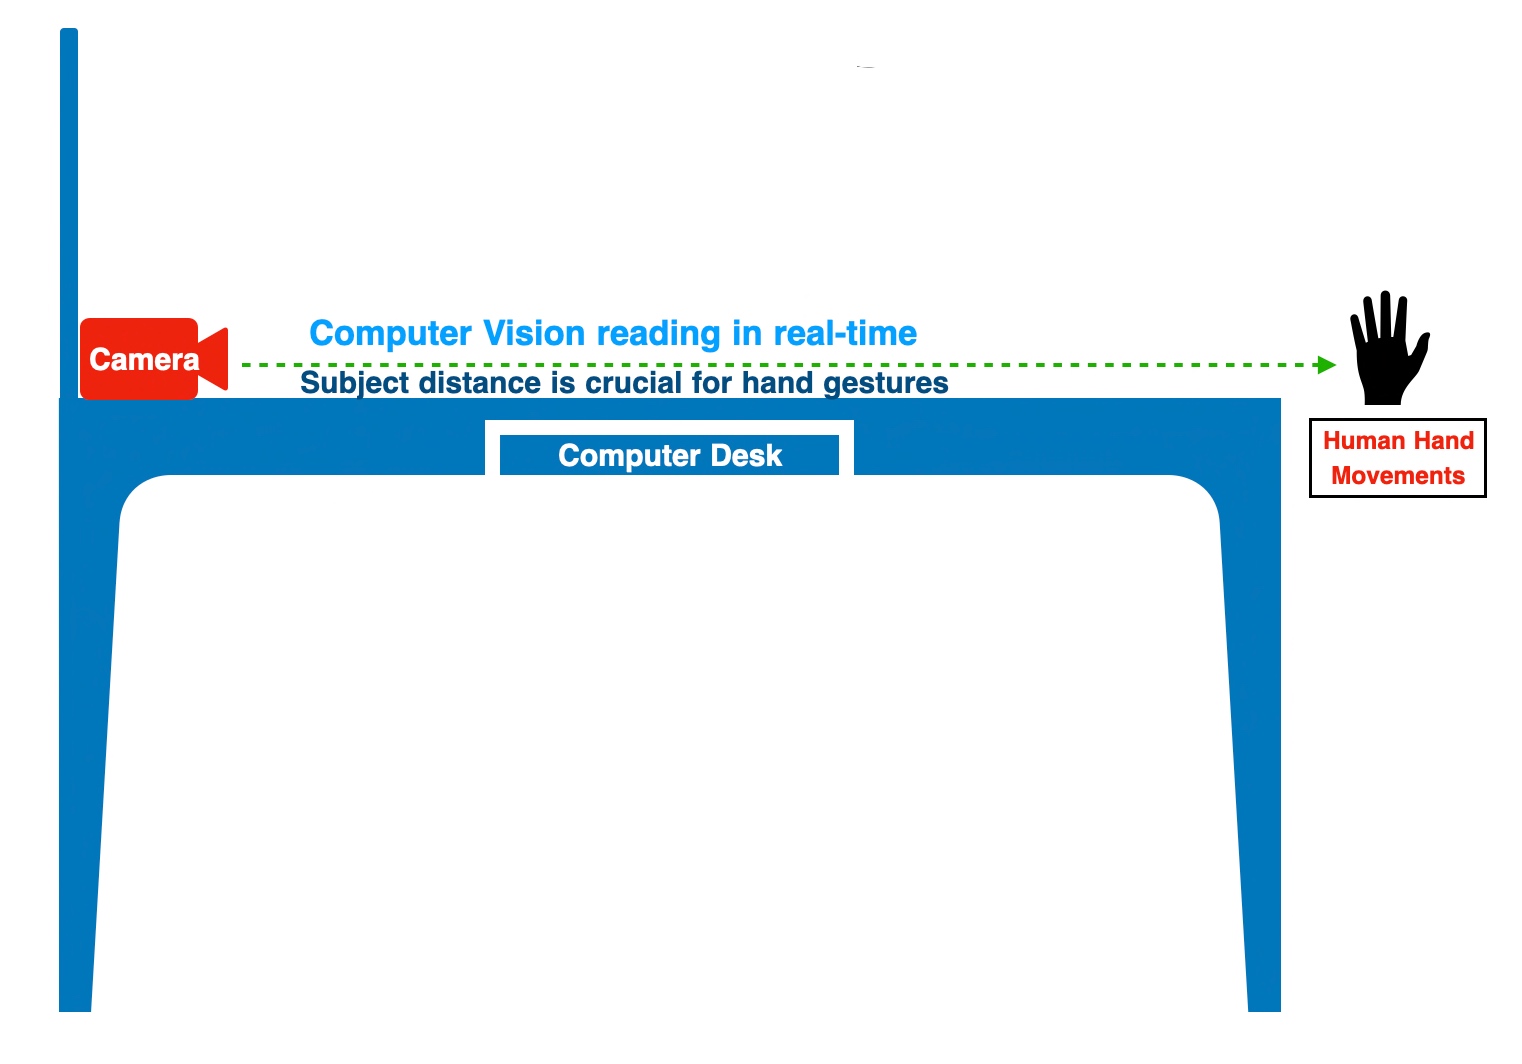
Let us understand the architecture –

As one can see, the application reads individual frames from WebCAM & then map the human hand gestures with a media pipe. And finally, calculate the distance between particular pipe points projected on human hands.
Let’s take another depiction of the experiment to better understand the above statement.
Python Packages:
Following are the python packages that are necessary to develop this brilliant use case –
pip install mediapipe
pip install opencv-python
CODE:
Let us now understand the code. For this use case, we will only discuss three python scripts. However, we need more than these three. However, we have already discussed them in some of the early posts. Hence, we will skip them here.
- clsConfig.py (Configuration script for the application.)
This file contains hidden or bidirectional Unicode text that may be interpreted or compiled differently than what appears below. To review, open the file in an editor that reveals hidden Unicode characters.
Learn more about bidirectional Unicode characters
| ################################################ | |
| #### Written By: SATYAKI DE #### | |
| #### Written On: 15-May-2020 #### | |
| #### Modified On: 24-May-2022 #### | |
| #### #### | |
| #### Objective: This script is a config #### | |
| #### file, contains all the keys for #### | |
| #### Machine-Learning & streaming dashboard.#### | |
| #### #### | |
| ################################################ | |
| import os | |
| import platform as pl | |
| class clsConfig(object): | |
| Curr_Path = os.path.dirname(os.path.realpath(__file__)) | |
| os_det = pl.system() | |
| if os_det == "Windows": | |
| sep = '\\' | |
| else: | |
| sep = '/' | |
| conf = { | |
| 'APP_ID': 1, | |
| 'ARCH_DIR': Curr_Path + sep + 'arch' + sep, | |
| 'PROFILE_PATH': Curr_Path + sep + 'profile' + sep, | |
| 'LOG_PATH': Curr_Path + sep + 'log' + sep, | |
| 'REPORT_PATH': Curr_Path + sep + 'report', | |
| 'SRC_PATH': Curr_Path + sep + 'data' + sep, | |
| 'FINAL_PATH': Curr_Path + sep + 'Target' + sep, | |
| 'APP_DESC_1': 'Hand Gesture Zoom Control!', | |
| 'DEBUG_IND': 'N', | |
| 'INIT_PATH': Curr_Path, | |
| 'SUBDIR': 'data', | |
| 'SEP': sep, | |
| 'TITLE': "Human Hand Gesture Controlling App", | |
| 'minVal':0.01, | |
| 'maxVal':1 | |
| } |
2. clsVideoZoom.py (This script will zoom the video streaming depending upon the hand gestures.)
This file contains hidden or bidirectional Unicode text that may be interpreted or compiled differently than what appears below. To review, open the file in an editor that reveals hidden Unicode characters.
Learn more about bidirectional Unicode characters
| ################################################## | |
| #### Written By: SATYAKI DE #### | |
| #### Written On: 23-May-2022 #### | |
| #### Modified On 24-May-2022 #### | |
| #### #### | |
| #### Objective: This is the main calling #### | |
| #### python script that will invoke the #### | |
| #### clsVideoZoom class to initiate #### | |
| #### the model to read the real-time #### | |
| #### human hand gesture from video #### | |
| #### Web-CAM & control zoom-in & zoom-out. #### | |
| ################################################## | |
| import mediapipe as mp | |
| import cv2 | |
| import time | |
| import clsHandMotionScanner as hms | |
| import math | |
| import imutils | |
| import numpy as np | |
| from clsConfig import clsConfig as cf | |
| class clsVideoZoom(): | |
| def __init__(self): | |
| self.title = str(cf.conf['TITLE']) | |
| self.minVal = float(cf.conf['minVal']) | |
| self.maxVal = int(cf.conf['maxVal']) | |
| def zoomVideo(self, image, Iscale=1): | |
| try: | |
| scale=Iscale | |
| #get the webcam size | |
| height, width, channels = image.shape | |
| #prepare the crop | |
| centerX,centerY=int(height/2),int(width/2) | |
| radiusX,radiusY= int(scale*centerX),int(scale*centerY) | |
| minX,maxX=centerX-radiusX,centerX+radiusX | |
| minY,maxY=centerY-radiusY,centerY+radiusY | |
| cropped = image[minX:maxX, minY:maxY] | |
| resized_cropped = cv2.resize(cropped, (width, height)) | |
| return resized_cropped | |
| except Exception as e: | |
| x = str(e) | |
| return image | |
| def runSensor(self): | |
| try: | |
| pTime = 0 | |
| cTime = 0 | |
| zRange = 0 | |
| zRangeBar = 0 | |
| cap = cv2.VideoCapture(0) | |
| detector = hms.clsHandMotionScanner(detectionCon=0.7) | |
| while True: | |
| success,img = cap.read() | |
| img = imutils.resize(img, width=720) | |
| #img = detector.findHands(img, draw=False) | |
| #lmList = detector.findPosition(img, draw=False) | |
| img = detector.findHands(img) | |
| lmList = detector.findPosition(img, draw=False) | |
| if len(lmList) != 0: | |
| print('*'*60) | |
| #print(lmList[4], lmList[8]) | |
| #print('*'*60) | |
| x1, y1 = lmList[4][1], lmList[4][2] | |
| x2, y2 = lmList[8][1], lmList[8][2] | |
| cx, cy = (x1+x2)//2, (y1+y2)//2 | |
| cv2.circle(img, (x1,y1), 15, (255,0,255), cv2.FILLED) | |
| cv2.circle(img, (x2,y2), 15, (255,0,255), cv2.FILLED) | |
| cv2.line(img, (x1,y1), (x2,y2), (255,0,255), 3) | |
| cv2.circle(img, (cx,cy), 15, (255,0,255), cv2.FILLED) | |
| lenVal = math.hypot(x2-x1, y2-y1) | |
| print('Length:', str(lenVal)) | |
| print('*'*60) | |
| # Hand Range is from 50 to 270 | |
| # Camera Zoom Range is 0.01, 1 | |
| minVal = self.minVal | |
| maxVal = self.maxVal | |
| zRange = np.interp(lenVal, [50, 270], [minVal, maxVal]) | |
| zRangeBar = np.interp(lenVal, [50, 270], [400, 150]) | |
| print('Range: ', str(zRange)) | |
| if lenVal < 50: | |
| cv2.circle(img, (cx,cy), 15, (0,255,0), cv2.FILLED) | |
| cv2.rectangle(img, (50, 150), (85, 400), (255,0,0), 3) | |
| cv2.rectangle(img, (50, int(zRangeBar)), (85, 400), (255,0,0), cv2.FILLED) | |
| cTime = time.time() | |
| fps = 1/(cTime-pTime) | |
| pTime = cTime | |
| image = cv2.flip(img, flipCode=1) | |
| cv2.putText(image, str(int(fps)), (10, 70), cv2.FONT_HERSHEY_PLAIN, 3, (255, 0, 255), 3) | |
| cv2.imshow("Original Source",image) | |
| # Creating the new zoom video | |
| cropImg = self.zoomVideo(img, zRange) | |
| cv2.putText(cropImg, str(int(fps)), (10, 70), cv2.FONT_HERSHEY_PLAIN, 3, (255, 0, 255), 3) | |
| cv2.imshow("Zoomed Source",cropImg) | |
| if cv2.waitKey(1) == ord('q'): | |
| break | |
| cap.release() | |
| cv2.destroyAllWindows() | |
| return 0 | |
| except Exception as e: | |
| x = str(e) | |
| print('Error:', x) | |
| return 1 |
Key snippets from the above scripts –
def zoomVideo(self, image, Iscale=1):
    try:
        scale=Iscale

        #get the webcam size
        height, width, channels = image.shape

        #prepare the crop
        centerX,centerY=int(height/2),int(width/2)
        radiusX,radiusY= int(scale*centerX),int(scale*centerY)

        minX,maxX=centerX-radiusX,centerX+radiusX
        minY,maxY=centerY-radiusY,centerY+radiusY

        cropped = image[minX:maxX, minY:maxY]
        resized_cropped = cv2.resize(cropped, (width, height))

        return resized_cropped

    except Exception as e:
        x = str(e)

        return image
The above method will zoom in & zoom out depending upon the scale value that the human hand gesture will receive.
cap = cv2.VideoCapture(0)
detector = hms.clsHandMotionScanner(detectionCon=0.7)
The following lines will read the individual frames from webCAM. Instantiate another open-source customized class, which will find the hand’s position.
img = detector.findHands(img)
lmList = detector.findPosition(img, draw=False)
And captured the hand position depending upon the movements.
x1, y1 = lmList[4][1], lmList[4][2]
x2, y2 = lmList[8][1], lmList[8][2]

cx, cy = (x1+x2)//2, (y1+y2)//2

cv2.circle(img, (x1,y1), 15, (255,0,255), cv2.FILLED)
cv2.circle(img, (x2,y2), 15, (255,0,255), cv2.FILLED)
To understand the above lines, let’s look into the following diagram –

As one can see, the thumbs tip value is 4 & Index fingertip is 8. The application will mark these points with a solid circle.
lenVal = math.hypot(x2-x1, y2-y1)
The above line will calculate the distance between the thumbs tip & index fingertip.
# Camera Zoom Range is 0.01, 1

minVal = self.minVal
maxVal = self.maxVal

zRange = np.interp(lenVal, [50, 270], [minVal, maxVal])
zRangeBar = np.interp(lenVal, [50, 270], [400, 150])
In the above lines, the application will translate the values captured between the two fingertips & then translate them into a more meaningful camera zoom range from 0.01 to 1.
if lenVal < 50:
    cv2.circle(img, (cx,cy), 15, (0,255,0), cv2.FILLED)
The application will not consider a value below 50 as 0.01 for the WebCAM start value.
cTime = time.time()
fps = 1/(cTime-pTime)
pTime = cTime


image = cv2.flip(img, flipCode=1)
cv2.putText(image, str(int(fps)), (10, 70), cv2.FONT_HERSHEY_PLAIN, 3, (255, 0, 255), 3)
cv2.imshow("Original Source",image)

# Creating the new zoom video
cropImg = self.zoomVideo(img, zRange)
cv2.putText(cropImg, str(int(fps)), (10, 70), cv2.FONT_HERSHEY_PLAIN, 3, (255, 0, 255), 3)
cv2.imshow("Zoomed Source",cropImg)
The application will capture the frame rate & share the original video frame and the test frame, where it will zoom in or out depending on the hand gesture.
3. clsHandMotionScanner.py (This is an enhance version of open source script, which will capture the hand position.)
This file contains hidden or bidirectional Unicode text that may be interpreted or compiled differently than what appears below. To review, open the file in an editor that reveals hidden Unicode characters.
Learn more about bidirectional Unicode characters
| ################################################## | |
| #### Written By: SATYAKI DE #### | |
| #### Modified On 23-May-2022 #### | |
| #### #### | |
| #### Objective: This is the main calling #### | |
| #### python class that will capture the #### | |
| #### human hand gesture on real-time basis #### | |
| #### and that will enable the video zoom #### | |
| #### capability of the feed directly coming #### | |
| #### out of a Web-CAM. #### | |
| ################################################## | |
| import mediapipe as mp | |
| import cv2 | |
| import time | |
| class clsHandMotionScanner(): | |
| def __init__(self, mode=False, maxHands=2, detectionCon=0.5, modelComplexity=1, trackCon=0.5): | |
| self.mode = mode | |
| self.maxHands = maxHands | |
| self.detectionCon = detectionCon | |
| self.modelComplex = modelComplexity | |
| self.trackCon = trackCon | |
| self.mpHands = mp.solutions.hands | |
| self.hands = self.mpHands.Hands(self.mode, self.maxHands,self.modelComplex,self.detectionCon, self.trackCon) | |
| # it gives small dots onhands total 20 landmark points | |
| self.mpDraw = mp.solutions.drawing_utils | |
| def findHands(self, img, draw=True): | |
| try: | |
| # Send rgb image to hands | |
| imgRGB = cv2.cvtColor(img,cv2.COLOR_BGR2RGB) | |
| self.results = self.hands.process(imgRGB) | |
| # process the frame | |
| if self.results.multi_hand_landmarks: | |
| for handLms in self.results.multi_hand_landmarks: | |
| if draw: | |
| #Draw dots and connect them | |
| self.mpDraw.draw_landmarks(img,handLms,self.mpHands.HAND_CONNECTIONS) | |
| return img | |
| except Exception as e: | |
| x = str(e) | |
| print('Error: ', x) | |
| return img | |
| def findPosition(self, img, handNo=0, draw=True): | |
| try: | |
| lmlist = [] | |
| # check wether any landmark was detected | |
| if self.results.multi_hand_landmarks: | |
| #Which hand are we talking about | |
| myHand = self.results.multi_hand_landmarks[handNo] | |
| # Get id number and landmark information | |
| for id, lm in enumerate(myHand.landmark): | |
| # id will give id of landmark in exact index number | |
| # height width and channel | |
| h,w,c = img.shape | |
| #find the position | |
| cx,cy = int(lm.x*w), int(lm.y*h) #center | |
| #print(id,cx,cy) | |
| lmlist.append([id,cx,cy]) | |
| # Draw circle for 0th landmark | |
| if draw: | |
| cv2.circle(img,(cx,cy), 15 , (255,0,255), cv2.FILLED) | |
| return lmlist | |
| except Exception as e: | |
| x = str(e) | |
| print('Error: ', x) | |
| lmlist = [] | |
| return lmlist |
Key snippets from the above script –
def findHands(self, img, draw=True):
    try:
        # Send rgb image to hands
        imgRGB = cv2.cvtColor(img,cv2.COLOR_BGR2RGB)
        self.results = self.hands.process(imgRGB)

        # process the frame
        if self.results.multi_hand_landmarks:
            for handLms in self.results.multi_hand_landmarks:

                if draw:
                    #Draw dots and connect them
                    self.mpDraw.draw_landmarks(img,handLms,self.mpHands.HAND_CONNECTIONS)

        return img
    except Exception as e:
        x = str(e)
        print('Error: ', x)

        return img
The above function will identify individual key points & marked them as dots on top of human hands.
def findPosition(self, img, handNo=0, draw=True):
      try:
          lmlist = []

          # check wether any landmark was detected
          if self.results.multi_hand_landmarks:
              #Which hand are we talking about
              myHand = self.results.multi_hand_landmarks[handNo]
              # Get id number and landmark information
              for id, lm in enumerate(myHand.landmark):
                  # id will give id of landmark in exact index number
                  # height width and channel
                  h,w,c = img.shape
                  #find the position - center
                  cx,cy = int(lm.x*w), int(lm.y*h)
                  lmlist.append([id,cx,cy])

              # Draw circle for 0th landmark
              if draw:
                  cv2.circle(img,(cx,cy), 15 , (255,0,255), cv2.FILLED)

          return lmlist
      except Exception as e:
          x = str(e)
          print('Error: ', x)

          lmlist = []
          return lmlist
The above line will capture the position of each media pipe point along with the x & y coordinate & store them in a list, which will be later parsed for main use case.
4. viewHandMotion.py (Main calling script.)
This file contains hidden or bidirectional Unicode text that may be interpreted or compiled differently than what appears below. To review, open the file in an editor that reveals hidden Unicode characters.
Learn more about bidirectional Unicode characters
| ################################################## | |
| #### Written By: SATYAKI DE #### | |
| #### Written On: 23-May-2022 #### | |
| #### Modified On 23-May-2022 #### | |
| #### #### | |
| #### Objective: This is the main calling #### | |
| #### python script that will invoke the #### | |
| #### clsVideoZoom class to initiate #### | |
| #### the model to read the real-time #### | |
| #### hand movements gesture that enables #### | |
| #### video zoom control. #### | |
| ################################################## | |
| import time | |
| import clsVideoZoom as vz | |
| from clsConfig import clsConfig as cf | |
| import datetime | |
| import logging | |
| ############################################### | |
| ### Global Section ### | |
| ############################################### | |
| # Instantiating the base class | |
| x1 = vz.clsVideoZoom() | |
| ############################################### | |
| ### End of Global Section ### | |
| ############################################### | |
| def main(): | |
| try: | |
| # Other useful variables | |
| debugInd = 'Y' | |
| var = datetime.datetime.now().strftime("%Y-%m-%d_%H-%M-%S") | |
| var1 = datetime.datetime.now() | |
| print('Start Time: ', str(var)) | |
| # End of useful variables | |
| # Initiating Log Class | |
| general_log_path = str(cf.conf['LOG_PATH']) | |
| # Enabling Logging Info | |
| logging.basicConfig(filename=general_log_path + 'visualZoom.log', level=logging.INFO) | |
| print('Started Visual-Zoom Emotions!') | |
| r1 = x1.runSensor() | |
| if (r1 == 0): | |
| print('Successfully identified visual zoom!') | |
| else: | |
| print('Failed to identify the visual zoom!') | |
| var2 = datetime.datetime.now() | |
| c = var2 – var1 | |
| minutes = c.total_seconds() / 60 | |
| print('Total difference in minutes: ', str(minutes)) | |
| print('End Time: ', str(var1)) | |
| except Exception as e: | |
| x = str(e) | |
| print('Error: ', x) | |
| if __name__ == "__main__": | |
| main() |
The above lines are self-explanatory. So, I’m not going to discuss anything on this script.
FOLDER STRUCTURE:
Here is the folder structure that contains all the files & directories in MAC O/S –

So, we’ve done it.
You will get the complete codebase in the following Github link.
I’ll bring some more exciting topic in the coming days from the Python verse. Please share & subscribe my post & let me know your feedback.
Till then, Happy Avenging! 🙂
Note: All the data & scenario posted here are representational data & scenarios & available over the internet & for educational purpose only. Some of the images (except my photo) that we’ve used are available over the net. We don’t claim the ownership of these images. There is an always room for improvement & especially the prediction quality.