
Today, I’m very excited to demonstrate an effortless & new way to extract the transcript from YouTube videos & then answer the questions based on the topics selected by the users. In this post, I plan to deal with the user inputs to consider the case first & then it can summarize the video content through useful advanced analytics with the help of the LangChain & OpenAI-based model.

In this post, I’ve directly subscribed to OpenAI & I’m not using OpenAI from Azure. However, I’ll explore that in the future as well.
Before I explain the process to invoke this new library, why not view the demo first & then discuss it?
Isn’t it very exciting? This will lead to a whole new ballgame, where one can get critical decision-making information from these human sources along with their traditional advanced analytical data.
How will it help?
Let’s say as per your historical data & analytics, the dashboard is recommending prod-A, prod-B & prod-C as the top three products for potential top-performing brands. Whereas, you are getting some alerts from the TV news on prod-B due to the recent incidents. So, in that case, you don’t want to continue with the prod-B investment. You may find a new product named prod-Z. That may reduce the risk of your investment.
What is LangChain?
LangChain is a framework for developing applications powered by language models. We believe that the most powerful and differentiated applications will not only call out to a language model but will also be:
- Data-aware: connect a language model to other sources of data
- Agentic: allow a language model to interact with its environment
The LangChain framework works around these principles.
To know more about this, please click the following link.
As you can see, this is one of the critical components in our solution, which will bind the OpenAI bot & it will feed the necessary data to provide the correct response.
What is FAISS?
Faiss is a library for efficient similarity search and clustering of dense vectors. It contains algorithms that search in sets of vectors of any size, up to ones that do not fit in RAM. It also has supporting code for evaluation and parameter tuning.
Faiss developed using C++ with complete wrappers for Python—some of the most beneficial algorithms available both on CPU & in GPU as well. Facebook AI Research develops it.
To know more about this, please click the following link.
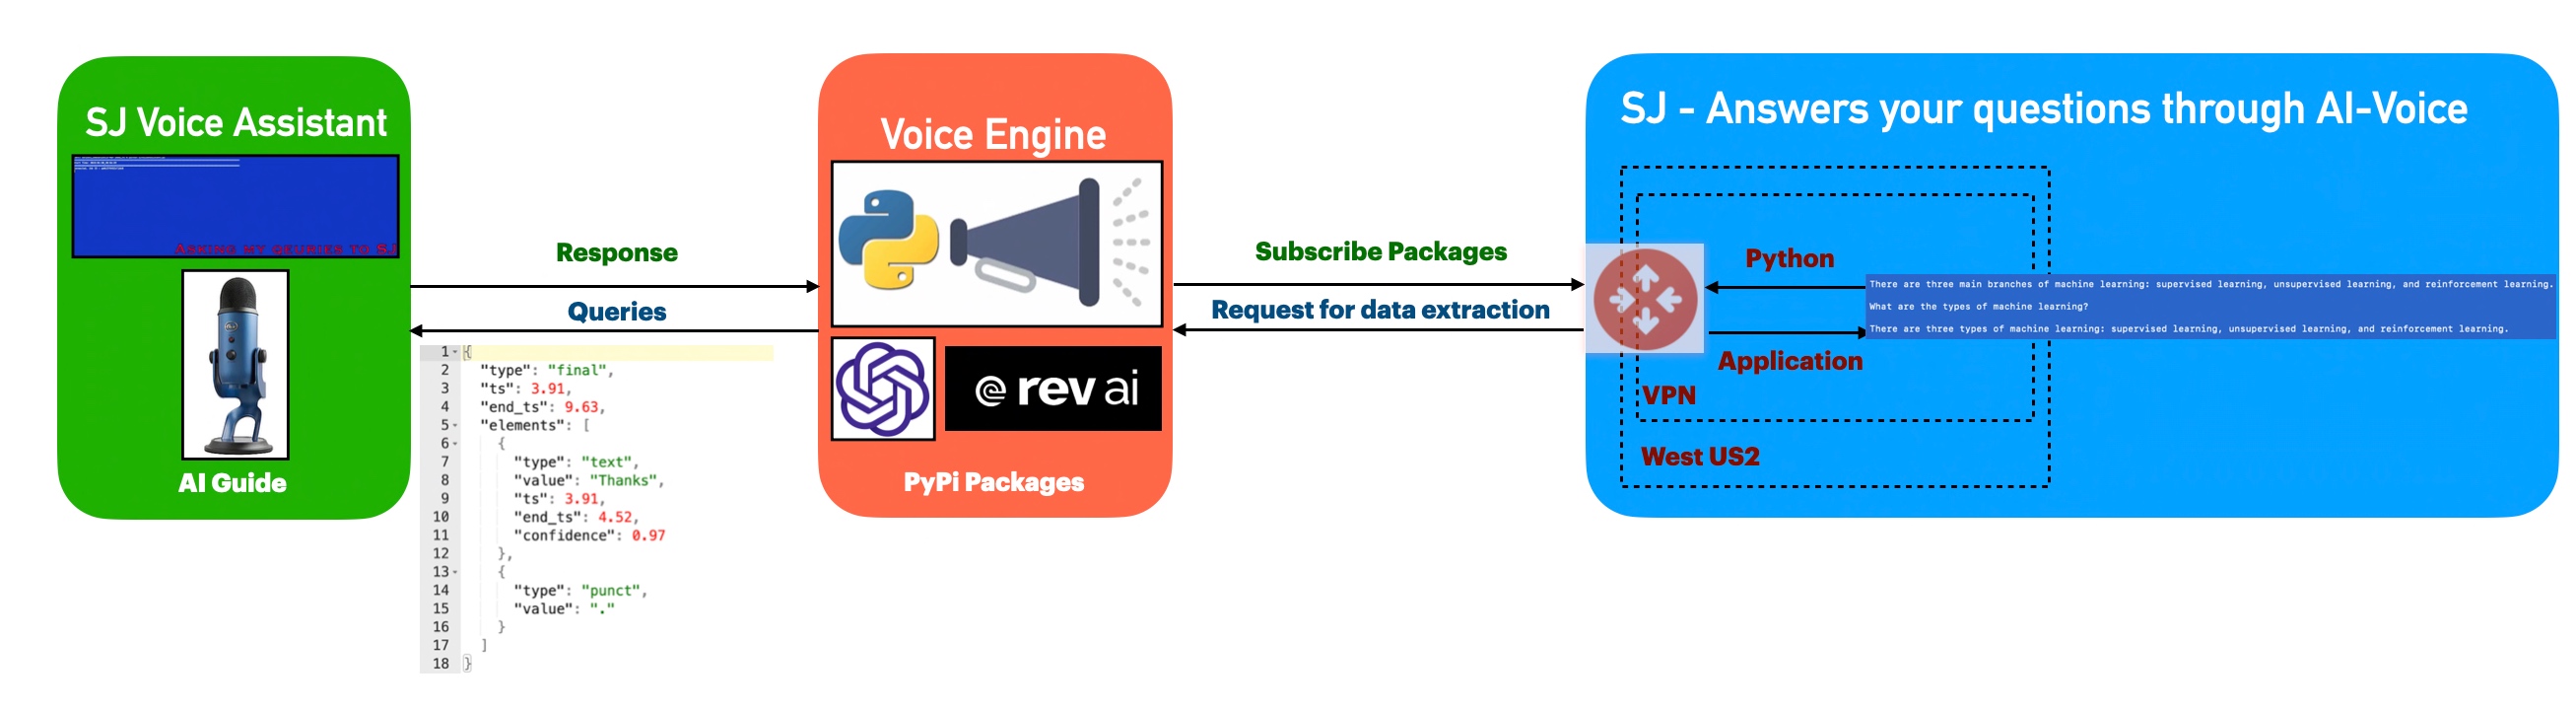
FLOW OF EVENTS:
Let us look at the flow diagram as it captures the sequence of events that unfold as part of the process.

Here are the steps that will follow in sequence –
- The application will first get the topic on which it needs to look from YouTube & find the top 5 videos using the YouTube data-API.
- Once the application returns a list of websites from the above step, LangChain will drive the application will extract the transcripts from the video & then optimize the response size in smaller chunks to address the costly OpenAI calls. During this time, it will invoke FAISS to create document DBs.
- Finally, it will send those chunks to OpenAI for the best response based on your supplied template that performs the final analysis with small data required for your query & gets the appropriate response with fewer costs.
CODE:
Why don’t we go through the code made accessible due to this new library for this particular use case?
- clsConfigClient.py (This is the main calling Python script for the input parameters.)
This file contains hidden or bidirectional Unicode text that may be interpreted or compiled differently than what appears below. To review, open the file in an editor that reveals hidden Unicode characters.
Learn more about bidirectional Unicode characters
| ################################################ | |
| #### Written By: SATYAKI DE #### | |
| #### Written On: 15-May-2020 #### | |
| #### Modified On: 28-May-2023 #### | |
| #### #### | |
| #### Objective: This script is a config #### | |
| #### file, contains all the keys for #### | |
| #### personal OpenAI-based video content #### | |
| #### enable bot. #### | |
| #### #### | |
| ################################################ | |
| import os | |
| import platform as pl | |
| class clsConfigClient(object): | |
| Curr_Path = os.path.dirname(os.path.realpath(__file__)) | |
| os_det = pl.system() | |
| if os_det == "Windows": | |
| sep = '\\' | |
| else: | |
| sep = '/' | |
| conf = { | |
| 'APP_ID': 1, | |
| 'ARCH_DIR': Curr_Path + sep + 'arch' + sep, | |
| 'PROFILE_PATH': Curr_Path + sep + 'profile' + sep, | |
| 'LOG_PATH': Curr_Path + sep + 'log' + sep, | |
| 'DATA_PATH': Curr_Path + sep + 'data' + sep, | |
| 'MODEL_PATH': Curr_Path + sep + 'model' + sep, | |
| 'TEMP_PATH': Curr_Path + sep + 'temp' + sep, | |
| 'MODEL_DIR': 'model', | |
| 'APP_DESC_1': 'LangChain Demo!', | |
| 'DEBUG_IND': 'N', | |
| 'INIT_PATH': Curr_Path, | |
| 'FILE_NAME': 'Output.csv', | |
| 'MODEL_NAME': 'gpt-3.5-turbo', | |
| 'OPEN_AI_KEY': "sk-kfrjfijdrkidjkfjd9474nbfjfkfjfhfhf84i84hnfhjdbv6Bgvv", | |
| 'YOUTUBE_KEY': "AIjfjfUYGe64hHJ-LOFO5u-mkso9pPOJGFU", | |
| 'TITLE': "LangChain Demo!", | |
| 'TEMP_VAL': 0.2, | |
| 'PATH' : Curr_Path, | |
| 'MAX_CNT' : 5, | |
| 'OUT_DIR': 'data' | |
| } |
Some of the key entries from the above scripts are as follows –
'MODEL_NAME': 'gpt-3.5-turbo',
'OPEN_AI_KEY': "sk-kfrjfijdrkidjkfjd9474nbfjfkfjfhfhf84i84hnfhjdbv6Bgvv",
'YOUTUBE_KEY': "AIjfjfUYGe64hHJ-LOFO5u-mkso9pPOJGFU",
'TEMP_VAL': 0.2,
From the above code snippet, one can understand that we need both the API keys for YouTube & OpenAI. And they have separate costs & usage, which I’ll share later in the post. Also, notice that the temperature sets to 0.2 ( range between 0 to 1). That means our AI bot will be consistent in response. And our application will use the GPT-3.5-turbo model for its analytic response.
- clsTemplate.py (Contains all the templates for OpenAI.)
This file contains hidden or bidirectional Unicode text that may be interpreted or compiled differently than what appears below. To review, open the file in an editor that reveals hidden Unicode characters.
Learn more about bidirectional Unicode characters
| ################################################ | |
| #### Written By: SATYAKI DE #### | |
| #### Written On: 27-May-2023 #### | |
| #### Modified On: 28-May-2023 #### | |
| #### #### | |
| #### Objective: This script is a config #### | |
| #### file, contains all the template for #### | |
| #### OpenAI prompts to get the correct #### | |
| #### response. #### | |
| #### #### | |
| ################################################ | |
| # Template to use for the system message prompt | |
| templateVal_1 = """ | |
| You are a helpful assistant that that can answer questions about youtube videos | |
| based on the video's transcript: {docs} | |
| Only use the factual information from the transcript to answer the question. | |
| If you feel like you don't have enough information to answer the question, say "I don't know". | |
| Your answers should be verbose and detailed. | |
| """ |
The above code is self-explanatory. Here, we’re keeping the correct instructions for our OpenAI to respond within these guidelines.
- clsVideoContentScrapper.py (Main class to extract the transcript from the YouTube videos & then answer the questions based on the topics selected by the users.)
This file contains hidden or bidirectional Unicode text that may be interpreted or compiled differently than what appears below. To review, open the file in an editor that reveals hidden Unicode characters.
Learn more about bidirectional Unicode characters
| ##################################################### | |
| #### Written By: SATYAKI DE #### | |
| #### Written On: 27-May-2023 #### | |
| #### Modified On 28-May-2023 #### | |
| #### #### | |
| #### Objective: This is the main calling #### | |
| #### python class that will invoke the #### | |
| #### LangChain of package to extract #### | |
| #### the transcript from the YouTube videos & #### | |
| #### then answer the questions based on the #### | |
| #### topics selected by the users. #### | |
| #### #### | |
| ##################################################### | |
| from langchain.document_loaders import YoutubeLoader | |
| from langchain.text_splitter import RecursiveCharacterTextSplitter | |
| from langchain.embeddings.openai import OpenAIEmbeddings | |
| from langchain.vectorstores import FAISS | |
| from langchain.chat_models import ChatOpenAI | |
| from langchain.chains import LLMChain | |
| from langchain.prompts.chat import ( | |
| ChatPromptTemplate, | |
| SystemMessagePromptTemplate, | |
| HumanMessagePromptTemplate, | |
| ) | |
| from googleapiclient.discovery import build | |
| import clsTemplate as ct | |
| from clsConfigClient import clsConfigClient as cf | |
| import os | |
| ############################################### | |
| ### Global Section ### | |
| ############################################### | |
| open_ai_Key = cf.conf['OPEN_AI_KEY'] | |
| os.environ["OPENAI_API_KEY"] = open_ai_Key | |
| embeddings = OpenAIEmbeddings(openai_api_key=open_ai_Key) | |
| YouTube_Key = cf.conf['YOUTUBE_KEY'] | |
| youtube = build('youtube', 'v3', developerKey=YouTube_Key) | |
| # Disbling Warning | |
| def warn(*args, **kwargs): | |
| pass | |
| import warnings | |
| warnings.warn = warn | |
| ############################################### | |
| ### End of Global Section ### | |
| ############################################### | |
| class clsVideoContentScrapper: | |
| def __init__(self): | |
| self.model_name = cf.conf['MODEL_NAME'] | |
| self.temp_val = cf.conf['TEMP_VAL'] | |
| self.max_cnt = int(cf.conf['MAX_CNT']) | |
| def createDBFromYoutubeVideoUrl(self, video_url): | |
| try: | |
| loader = YoutubeLoader.from_youtube_url(video_url) | |
| transcript = loader.load() | |
| text_splitter = RecursiveCharacterTextSplitter(chunk_size=1000, chunk_overlap=100) | |
| docs = text_splitter.split_documents(transcript) | |
| db = FAISS.from_documents(docs, embeddings) | |
| return db | |
| except Exception as e: | |
| x = str(e) | |
| print('Error: ', x) | |
| return '' | |
| def getResponseFromQuery(self, db, query, k=4): | |
| try: | |
| """ | |
| gpt-3.5-turbo can handle up to 4097 tokens. Setting the chunksize to 1000 and k to 4 maximizes | |
| the number of tokens to analyze. | |
| """ | |
| mod_name = self.model_name | |
| temp_val = self.temp_val | |
| docs = db.similarity_search(query, k=k) | |
| docs_page_content = " ".join([d.page_content for d in docs]) | |
| chat = ChatOpenAI(model_name=mod_name, temperature=temp_val) | |
| # Template to use for the system message prompt | |
| template = ct.templateVal_1 | |
| system_message_prompt = SystemMessagePromptTemplate.from_template(template) | |
| # Human question prompt | |
| human_template = "Answer the following question: {question}" | |
| human_message_prompt = HumanMessagePromptTemplate.from_template(human_template) | |
| chat_prompt = ChatPromptTemplate.from_messages( | |
| [system_message_prompt, human_message_prompt] | |
| ) | |
| chain = LLMChain(llm=chat, prompt=chat_prompt) | |
| response = chain.run(question=query, docs=docs_page_content) | |
| response = response.replace("\n", "") | |
| return response, docs | |
| except Exception as e: | |
| x = str(e) | |
| print('Error: ', x) | |
| return '', '' | |
| def topFiveURLFromYouTube(self, service, **kwargs): | |
| try: | |
| video_urls = [] | |
| channel_list = [] | |
| results = service.search().list(**kwargs).execute() | |
| for item in results['items']: | |
| print("Title: ", item['snippet']['title']) | |
| print("Description: ", item['snippet']['description']) | |
| channel = item['snippet']['channelId'] | |
| print("Channel Id: ", channel) | |
| # Fetch the channel name using the channel ID | |
| channel_response = service.channels().list(part='snippet',id=item['snippet']['channelId']).execute() | |
| channel_title = channel_response['items'][0]['snippet']['title'] | |
| print("Channel Title: ", channel_title) | |
| channel_list.append(channel_title) | |
| print("Video Id: ", item['id']['videoId']) | |
| vidURL = "https://www.youtube.com/watch?v=" + item['id']['videoId'] | |
| print("Video URL: " + vidURL) | |
| video_urls.append(vidURL) | |
| print("\n") | |
| return video_urls, channel_list | |
| except Exception as e: | |
| video_urls = [] | |
| channel_list = [] | |
| x = str(e) | |
| print('Error: ', x) | |
| return video_urls, channel_list | |
| def extractContentInText(self, topic, query): | |
| try: | |
| discussedTopic = [] | |
| strKeyText = '' | |
| cnt = 0 | |
| max_cnt = self.max_cnt | |
| urlList, channelList = self.topFiveURLFromYouTube(youtube, q=topic, part='id,snippet',maxResults=max_cnt,type='video') | |
| print('Returned List: ') | |
| print(urlList) | |
| print() | |
| for video_url in urlList: | |
| print('Processing Video: ') | |
| print(video_url) | |
| db = self.createDBFromYoutubeVideoUrl(video_url) | |
| response, docs = self.getResponseFromQuery(db, query) | |
| if len(response) > 0: | |
| strKeyText = 'As per the topic discussed in ' + channelList[cnt] + ', ' | |
| discussedTopic.append(strKeyText + response) | |
| cnt += 1 | |
| return discussedTopic | |
| except Exception as e: | |
| discussedTopic = [] | |
| x = str(e) | |
| print('Error: ', x) | |
| return discussedTopic |
Let us understand the key methods step by step in detail –
def topFiveURLFromYouTube(self, service, **kwargs):
    try:
        video_urls = []
        channel_list = []
        results = service.search().list(**kwargs).execute()

        for item in results['items']:
            print("Title: ", item['snippet']['title'])
            print("Description: ", item['snippet']['description'])
            channel = item['snippet']['channelId']
            print("Channel Id: ", channel)

            # Fetch the channel name using the channel ID
            channel_response = service.channels().list(part='snippet',id=item['snippet']['channelId']).execute()
            channel_title = channel_response['items'][0]['snippet']['title']
            print("Channel Title: ", channel_title)
            channel_list.append(channel_title)

            print("Video Id: ", item['id']['videoId'])
            vidURL = "https://www.youtube.com/watch?v=" + item['id']['videoId']
            print("Video URL: " + vidURL)
            video_urls.append(vidURL)
            print("\n")

        return video_urls, channel_list

    except Exception as e:
        video_urls = []
        channel_list = []
        x = str(e)
        print('Error: ', x)

        return video_urls, channel_list
The above code will fetch the most relevant YouTube URLs & bind them into a list along with the channel names & then share the lists with the main functions.
def createDBFromYoutubeVideoUrl(self, video_url):
    try:
        loader = YoutubeLoader.from_youtube_url(video_url)
        transcript = loader.load()

        text_splitter = RecursiveCharacterTextSplitter(chunk_size=1000, chunk_overlap=100)
        docs = text_splitter.split_documents(transcript)

        db = FAISS.from_documents(docs, embeddings)
        return db

    except Exception as e:
        x = str(e)
        print('Error: ', x)
        return ''
The provided Python code defines a function createDBFromYoutubeVideoUrl which appears to create a database of text documents from the transcript of a YouTube video. Here’s the explanation in simple English:
- The function createDBFromYoutubeVideoUrl has defined with one argument: video_url.
- The function uses a try-except block to handle any potential exceptions or errors that may occur.
- Inside the try block, the following steps are going to perform:
- First, it creates a YoutubeLoader object from the provided video_url. This object is likely responsible for interacting with the YouTube video specified by the URL.
- The loader object then loads the transcript of the video. This object is the text version of everything spoken in the video.
- It then creates a RecursiveCharacterTextSplitter object with a specified chunk_size of 1000 and chunk_overlap of 100. This object may split the transcript into smaller chunks (documents) of text for easier processing or analysis. Each piece will be around 1000 characters long, and there will overlap of 100 characters between consecutive chunks.
- The split_documents method of the text_splitter object will split the transcript into smaller documents. These documents are stored in the docs variable.
- The FAISS.from_documents method is then called with docs and embeddings as arguments to create a FAISS (Facebook AI Similarity Search) index. This index is a database used for efficient similarity search and clustering of high-dimensional vectors, which in this case, are the embeddings of the documents. The FAISS index is stored in the db variable.
- Finally, the db variable is returned, representing the created database from the video transcript.
4. If an exception occurs during the execution of the try block, the code execution moves to the except block:
- Here, it first converts the exception e to a string x.
- Then it prints an error message.
- Finally, it returns an empty string as an indication of the error.
def getResponseFromQuery(self, db, query, k=4):
      try:
          """
          gpt-3.5-turbo can handle up to 4097 tokens. Setting the chunksize to 1000 and k to 4 maximizes
          the number of tokens to analyze.
          """

          mod_name = self.model_name
          temp_val = self.temp_val

          docs = db.similarity_search(query, k=k)
          docs_page_content = " ".join([d.page_content for d in docs])

          chat = ChatOpenAI(model_name=mod_name, temperature=temp_val)

          # Template to use for the system message prompt
          template = ct.templateVal_1

          system_message_prompt = SystemMessagePromptTemplate.from_template(template)

          # Human question prompt
          human_template = "Answer the following question: {question}"
          human_message_prompt = HumanMessagePromptTemplate.from_template(human_template)

          chat_prompt = ChatPromptTemplate.from_messages(
              [system_message_prompt, human_message_prompt]
          )

          chain = LLMChain(llm=chat, prompt=chat_prompt)

          response = chain.run(question=query, docs=docs_page_content)
          response = response.replace("\n", "")
          return response, docs

      except Exception as e:
          x = str(e)
          print('Error: ', x)

          return '', ''
The Python function getResponseFromQuery is designed to search a given database (db) for a specific query and then generate a response using a language model (possibly GPT-3.5-turbo). The answer is based on the content found and the particular question. Here is a simple English summary:
- The function getResponseFromQuery takes three parameters: db, query, and k. The k parameter is optional and defaults to 4 if not provided. db is the database to search, the query is the question or prompts to analyze, and k is the number of similar items to return.
- The function initiates a try-except block for handling any errors that might occur.
- Inside the try block:
- The function retrieves the model name and temperature value from the instance of the class this function is a part of.
- The function then searches the db database for documents similar to the query and saves these in docs.
- It concatenates the content of the returned documents into a single string docs_page_content.
- It creates a ChatOpenAI object with the model name and temperature value.
- It creates a system message prompt from a predefined template.
- It creates a human message prompt, which is the query.
- It combines these two prompts to form a chat prompt.
- An LLMChain object is then created using the ChatOpenAI object and the chat prompt.
- This LLMChain object is used to generate a response to the query using the content of the documents found in the database. The answer is then formatted by replacing all newline characters with empty strings.
- Finally, the function returns this response along with the original documents.
- If any error occurs during these operations, the function goes to the except block where:
- The error message is printed.
- The function returns two empty strings to indicate an error occurred, and no response or documents could be produced.
def extractContentInText(self, topic, query):
    try:
        discussedTopic = []
        strKeyText = ''
        cnt = 0
        max_cnt = self.max_cnt

        urlList, channelList = self.topFiveURLFromYouTube(youtube, q=topic, part='id,snippet',maxResults=max_cnt,type='video')
        print('Returned List: ')
        print(urlList)
        print()

        for video_url in urlList:
            print('Processing Video: ')
            print(video_url)
            db = self.createDBFromYoutubeVideoUrl(video_url)

            response, docs = self.getResponseFromQuery(db, query)

            if len(response) > 0:
                strKeyText = 'As per the topic discussed in ' + channelList[cnt] + ', '
                discussedTopic.append(strKeyText + response)

            cnt += 1

        return discussedTopic
    except Exception as e:
        discussedTopic = []
        x = str(e)
        print('Error: ', x)

        return discussedTopic
This Python function, extractContentInText, is aimed to extract relevant content from the transcripts of top YouTube videos on a specific topic and generate responses to a given query. Here’s a simple English translation:
- The function extractContentInText is defined with topic and query as parameters.
- It begins with a try-except block to catch and handle any possible exceptions.
- In the try block:
- It initializes several variables: an empty list discussedTopic to store the extracted information, an empty string strKeyText to keep specific parts of the content, a counter cnt initialized at 0, and max_cnt retrieved from the self-object to specify the maximum number of YouTube videos to consider.
- It calls the topFiveURLFromYouTube function (defined previously) to get the URLs of the top videos on the given topic from YouTube. It also retrieves the list of channel names associated with these videos.
- It prints the returned list of URLs.
- Then, it starts a loop over each URL in the urlList.
- For each URL, it prints the URL, then creates a database from the transcript of the YouTube video using the function createDBFromYoutubeVideoUrl.
- It then uses the getResponseFromQuery function to get a response to the query based on the content of the database.
- If the length of the response is greater than 0 (meaning there is a response), it forms a string strKeyText to indicate the channel that the topic was discussed on and then appends the answer to this string. This entire string is then added to the discussedTopic list.
- It increments the counter cnt by one after each iteration.
- Finally, it returns the discussedTopic list, which now contains relevant content extracted from the videos.
- If any error occurs during these operations, the function goes into the except block:
- It first resets discussedTopic to an empty list.
- Then it converts the exception e to a string and prints the error message.
- Lastly, it returns the empty discussedTopic list, indicating that no content could be extracted due to the error.
- testLangChain.py (Main Python script to extract the transcript from the YouTube videos & then answer the questions based on the topics selected by the users.)
This file contains hidden or bidirectional Unicode text that may be interpreted or compiled differently than what appears below. To review, open the file in an editor that reveals hidden Unicode characters.
Learn more about bidirectional Unicode characters
| ##################################################### | |
| #### Written By: SATYAKI DE #### | |
| #### Written On: 27-May-2023 #### | |
| #### Modified On 28-May-2023 #### | |
| #### #### | |
| #### Objective: This is the main calling #### | |
| #### python script that will invoke the #### | |
| #### clsVideoContentScrapper class to extract #### | |
| #### the transcript from the YouTube videos. #### | |
| #### #### | |
| ##################################################### | |
| import clsL as cl | |
| from clsConfigClient import clsConfigClient as cf | |
| import datetime | |
| import textwrap | |
| import clsVideoContentScrapper as cvsc | |
| # Disbling Warning | |
| def warn(*args, **kwargs): | |
| pass | |
| import warnings | |
| warnings.warn = warn | |
| ###################################### | |
| ### Get your global values #### | |
| ###################################### | |
| debug_ind = 'Y' | |
| # Initiating Logging Instances | |
| clog = cl.clsL() | |
| data_path = cf.conf['DATA_PATH'] | |
| data_file_name = cf.conf['FILE_NAME'] | |
| cVCScrapper = cvsc.clsVideoContentScrapper() | |
| ###################################### | |
| #### Global Flag ######## | |
| ###################################### | |
| def main(): | |
| try: | |
| var = datetime.datetime.now().strftime("%Y-%m-%d_%H-%M-%S") | |
| print('*'*120) | |
| print('Start Time: ' + str(var)) | |
| print('*'*120) | |
| #query = "What are they saying about Microsoft?" | |
| print('Please share your topic!') | |
| inputTopic = input('User: ') | |
| print('Please ask your questions?') | |
| inputQry = input('User: ') | |
| print() | |
| retList = cVCScrapper.extractContentInText(inputTopic, inputQry) | |
| cnt = 0 | |
| for discussedTopic in retList: | |
| finText = str(cnt + 1) + ') ' + discussedTopic | |
| print() | |
| print(textwrap.fill(finText, width=150)) | |
| cnt += 1 | |
| r1 = len(retList) | |
| if r1 > 0: | |
| print() | |
| print('Successfully Scrapped!') | |
| else: | |
| print() | |
| print('Failed to Scrappe!') | |
| print('*'*120) | |
| var1 = datetime.datetime.now().strftime("%Y-%m-%d_%H-%M-%S") | |
| print('End Time: ' + str(var1)) | |
| except Exception as e: | |
| x = str(e) | |
| print('Error: ', x) | |
| if __name__ == "__main__": | |
| main() |
Please find the key snippet –
def main():
    try:
        var = datetime.datetime.now().strftime("%Y-%m-%d_%H-%M-%S")
        print('*'*120)
        print('Start Time: ' + str(var))
        print('*'*120)

        #query = "What are they saying about Microsoft?"
        print('Please share your topic!')
        inputTopic = input('User: ')
        print('Please ask your questions?')
        inputQry = input('User: ')
        print()

        retList = cVCScrapper.extractContentInText(inputTopic, inputQry)
        cnt = 0

        for discussedTopic in retList:
            finText = str(cnt + 1) + ') ' + discussedTopic
            print()
            print(textwrap.fill(finText, width=150))

            cnt += 1

        r1 = len(retList)

        if r1 > 0:
            print()
            print('Successfully Scrapped!')
        else:
            print()
            print('Failed to Scrappe!')

        print('*'*120)
        var1 = datetime.datetime.now().strftime("%Y-%m-%d_%H-%M-%S")
        print('End Time: ' + str(var1))

    except Exception as e:
        x = str(e)
        print('Error: ', x)

if __name__ == "__main__":
    main()
The above main application will capture the topics from the user & then will give the user a chance to ask specific questions on the topics, invoking the main class to extract the transcript from YouTube & then feed it as a source using ChainLang & finally deliver the response. If there is no response, then it will skip the overall options.
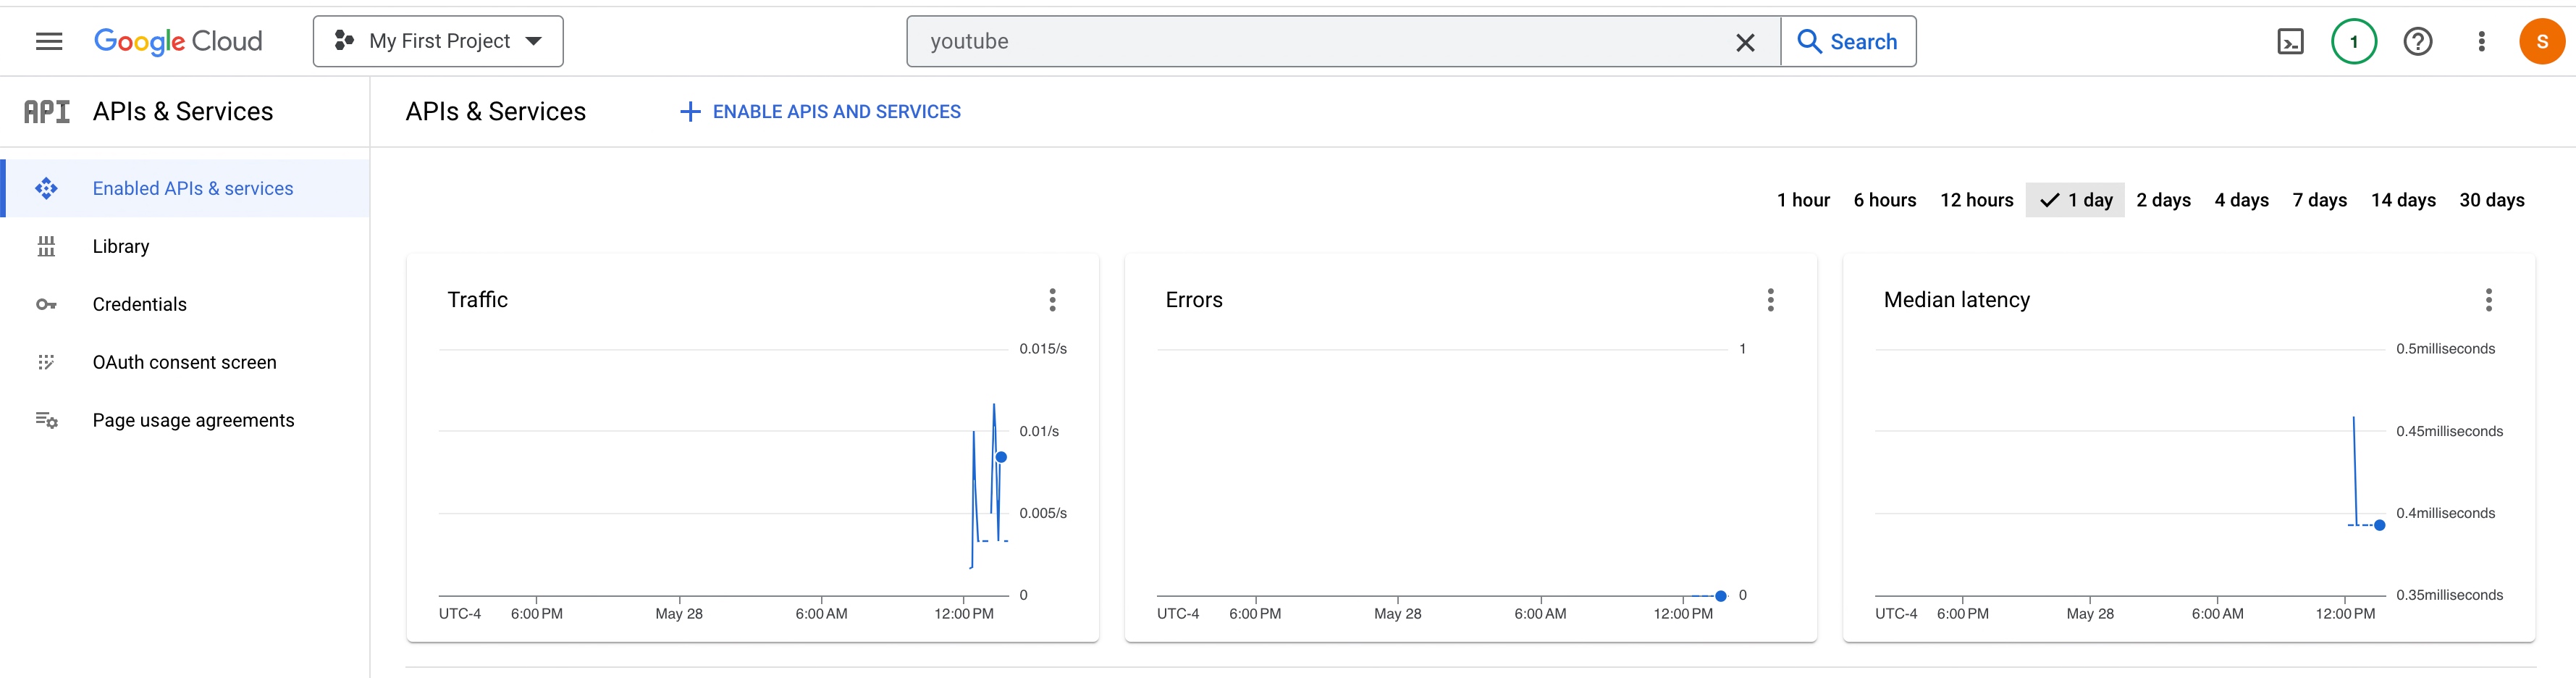
USAGE & COST FACTOR:
Please find the OpenAI usage –

Please find the YouTube API usage –
So, finally, we’ve done it.
I know that this post is relatively bigger than my earlier post. But, I think, you can get all the details once you go through it.
You will get the complete codebase in the following GitHub link.
I’ll bring some more exciting topics in the coming days from the Python verse. Please share & subscribe to my post & let me know your feedback.
Till then, Happy Avenging! 🙂
Note: All the data & scenarios posted here are representational data & scenarios & available over the internet & for educational purposes only. Some of the images (except my photo) we’ve used are available over the net. We don’t claim ownership of these images. There is always room for improvement & especially in the prediction quality. Sample video taken from Santrel Media & you would find the link over here.


You must be logged in to post a comment.