
Hi Team,
Today, I’m going to discuss another Computer Vision installment. I’ll discuss how to implement Augmented Reality using Open-CV Computer Vision with full audio. We will be using part of a Bengali OTT Series called “Feludar Goendagiri” entirely for educational purposes & also as a tribute to the great legendary director, late Satyajit Roy. To know more about him, please click the following link.
Why don’t we see the demo first before jumping into the technical details?
Architecture:
Let us understand the architecture –
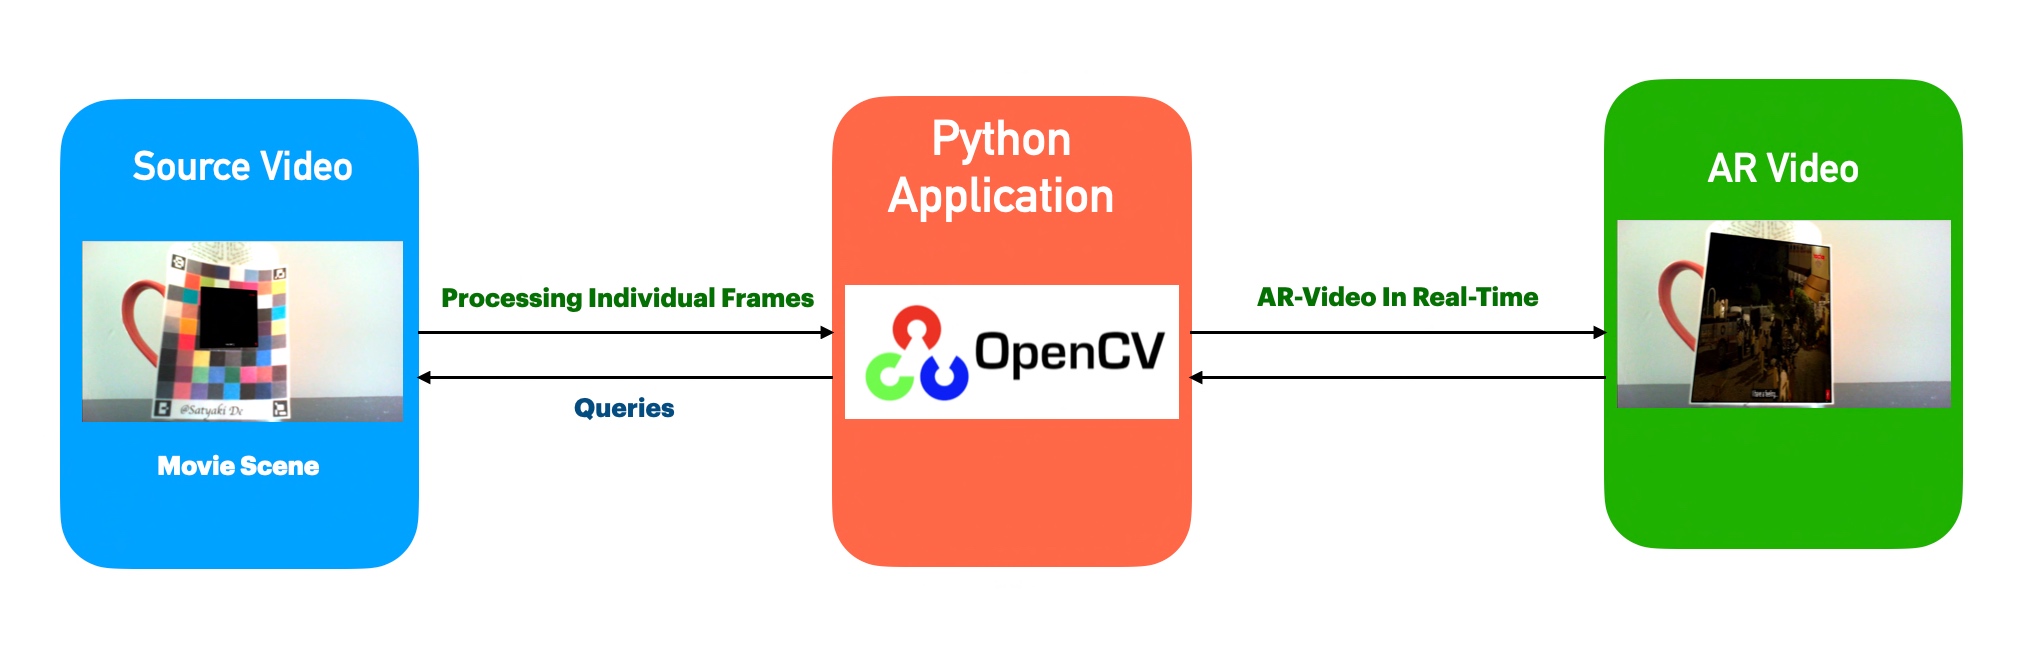
The above diagram shows that the application, which uses the Open-CV, analyzes individual frames from the source & blends that with the video trailer. Finally, it creates another video by correctly mixing the source audio.
Python Packages:
Following are the python packages that are necessary to develop this brilliant use case –
pip install opencv-python
pip install pygame
CODE:
Let us now understand the code. For this use case, we will only discuss three python scripts. However, we need more than these three. However, we have already discussed them in some of the early posts. Hence, we will skip them here.
- clsAugmentedReality.py (This is the main class of python script that will embed the source video with the WebCAM streams in real-time.)
This file contains hidden or bidirectional Unicode text that may be interpreted or compiled differently than what appears below. To review, open the file in an editor that reveals hidden Unicode characters.
Learn more about bidirectional Unicode characters
| ################################################## | |
| #### Written By: SATYAKI DE #### | |
| #### Written On: 20-Jun-2022 #### | |
| #### Modified On 25-Jun-2022 #### | |
| #### #### | |
| #### Objective: This is the main class of #### | |
| #### python script that will embed the source #### | |
| #### video with the WebCAM streams in #### | |
| #### real-time. #### | |
| ################################################## | |
| # Importing necessary packages | |
| import numpy as np | |
| import cv2 | |
| from clsConfig import clsConfig as cf | |
| # Initialize our cached reference points | |
| CACHED_REF_PTS = None | |
| class clsAugmentedReality: | |
| def __init__(self): | |
| self.TOP_LEFT_X = int(cf.conf['TOP_LEFT_X']) | |
| self.TOP_LEFT_Y = int(cf.conf['TOP_LEFT_Y']) | |
| self.TOP_RIGHT_X = int(cf.conf['TOP_RIGHT_X']) | |
| self.TOP_RIGHT_Y = int(cf.conf['TOP_RIGHT_Y']) | |
| self.BOTTOM_RIGHT_X = int(cf.conf['BOTTOM_RIGHT_X']) | |
| self.BOTTOM_RIGHT_Y = int(cf.conf['BOTTOM_RIGHT_Y']) | |
| self.BOTTOM_LEFT_X = int(cf.conf['BOTTOM_LEFT_X']) | |
| self.BOTTOM_LEFT_Y = int(cf.conf['BOTTOM_LEFT_Y']) | |
| def getWarpImages(self, frame, source, cornerIDs, arucoDict, arucoParams, zoomFlag, useCache=False): | |
| try: | |
| # Assigning values | |
| TOP_LEFT_X = self.TOP_LEFT_X | |
| TOP_LEFT_Y = self.TOP_LEFT_Y | |
| TOP_RIGHT_X = self.TOP_RIGHT_X | |
| TOP_RIGHT_Y = self.TOP_RIGHT_Y | |
| BOTTOM_RIGHT_X = self.BOTTOM_RIGHT_X | |
| BOTTOM_RIGHT_Y = self.BOTTOM_RIGHT_Y | |
| BOTTOM_LEFT_X = self.BOTTOM_LEFT_X | |
| BOTTOM_LEFT_Y = self.BOTTOM_LEFT_Y | |
| # Grab a reference to our cached reference points | |
| global CACHED_REF_PTS | |
| if source is None: | |
| raise | |
| # Grab the width and height of the frame and source image, | |
| # respectively | |
| # Extracting Frame from Camera | |
| # Exracting Source from Video | |
| (imgH, imgW) = frame.shape[:2] | |
| (srcH, srcW) = source.shape[:2] | |
| # Detect Aruco markers in the input frame | |
| (corners, ids, rejected) = cv2.aruco.detectMarkers(frame, arucoDict, parameters=arucoParams) | |
| print('Ids: ', str(ids)) | |
| print('Rejected: ', str(rejected)) | |
| # if we *did not* find our four ArUco markers, initialize an | |
| # empty IDs list, otherwise flatten the ID list | |
| print('Detecting Corners: ', str(len(corners))) | |
| ids = np.array([]) if len(corners) != 4 else ids.flatten() | |
| # Initialize our list of reference points | |
| refPts = [] | |
| refPtTL1 = [] | |
| # Loop over the IDs of the ArUco markers in Top-Left, Top-Right, | |
| # Bottom-Right, and Bottom-Left order | |
| for i in cornerIDs: | |
| # Grab the index of the corner with the current ID | |
| j = np.squeeze(np.where(ids == i)) | |
| # If we receive an empty list instead of an integer index, | |
| # then we could not find the marker with the current ID | |
| if j.size == 0: | |
| continue | |
| # Otherwise, append the corner (x, y)-coordinates to our list | |
| # of reference points | |
| corner = np.squeeze(corners[j]) | |
| refPts.append(corner) | |
| # Check to see if we failed to find the four ArUco markers | |
| if len(refPts) != 4: | |
| # If we are allowed to use cached reference points, fall | |
| # back on them | |
| if useCache and CACHED_REF_PTS is not None: | |
| refPts = CACHED_REF_PTS | |
| # Otherwise, we cannot use the cache and/or there are no | |
| # previous cached reference points, so return early | |
| else: | |
| return None | |
| # If we are allowed to use cached reference points, then update | |
| # the cache with the current set | |
| if useCache: | |
| CACHED_REF_PTS = refPts | |
| # Unpack our Aruco reference points and use the reference points | |
| # to define the Destination transform matrix, making sure the | |
| # points are specified in Top-Left, Top-Right, Bottom-Right, and | |
| # Bottom-Left order | |
| (refPtTL, refPtTR, refPtBR, refPtBL) = refPts | |
| dstMat = [refPtTL[0], refPtTR[1], refPtBR[2], refPtBL[3]] | |
| dstMat = np.array(dstMat) | |
| # For zoom option recalculating all the 4 points | |
| refPtTL1_L_X = refPtTL[0][0]-TOP_LEFT_X | |
| refPtTL1_L_Y = refPtTL[0][1]-TOP_LEFT_Y | |
| refPtTL1.append((refPtTL1_L_X,refPtTL1_L_Y)) | |
| refPtTL1_R_X = refPtTL[1][0]+TOP_RIGHT_X | |
| refPtTL1_R_Y = refPtTL[1][1]+TOP_RIGHT_Y | |
| refPtTL1.append((refPtTL1_R_X,refPtTL1_R_Y)) | |
| refPtTD1_L_X = refPtTL[2][0]+BOTTOM_RIGHT_X | |
| refPtTD1_L_Y = refPtTL[2][1]+BOTTOM_RIGHT_Y | |
| refPtTL1.append((refPtTD1_L_X,refPtTD1_L_Y)) | |
| refPtTD1_R_X = refPtTL[3][0]-BOTTOM_LEFT_X | |
| refPtTD1_R_Y = refPtTL[3][1]+BOTTOM_LEFT_Y | |
| refPtTL1.append((refPtTD1_R_X,refPtTD1_R_Y)) | |
| dstMatMod = [refPtTL1[0], refPtTL1[1], refPtTL1[2], refPtTL1[3]] | |
| dstMatMod = np.array(dstMatMod) | |
| # Define the transform matrix for the *source* image in Top-Left, | |
| # Top-Right, Bottom-Right, and Bottom-Left order | |
| srcMat = np.array([[0, 0], [srcW, 0], [srcW, srcH], [0, srcH]]) | |
| # Compute the homography matrix and then warp the source image to | |
| # the destination based on the homography depending upon the | |
| # zoom flag | |
| if zoomFlag == 1: | |
| (H, _) = cv2.findHomography(srcMat, dstMat) | |
| else: | |
| (H, _) = cv2.findHomography(srcMat, dstMatMod) | |
| warped = cv2.warpPerspective(source, H, (imgW, imgH)) | |
| # Construct a mask for the source image now that the perspective | |
| # warp has taken place (we'll need this mask to copy the source | |
| # image into the destination) | |
| mask = np.zeros((imgH, imgW), dtype="uint8") | |
| if zoomFlag == 1: | |
| cv2.fillConvexPoly(mask, dstMat.astype("int32"), (255, 255, 255), cv2.LINE_AA) | |
| else: | |
| cv2.fillConvexPoly(mask, dstMatMod.astype("int32"), (255, 255, 255), cv2.LINE_AA) | |
| # This optional step will give the source image a black | |
| # border surrounding it when applied to the source image, you | |
| # can apply a dilation operation | |
| rect = cv2.getStructuringElement(cv2.MORPH_RECT, (3, 3)) | |
| mask = cv2.dilate(mask, rect, iterations=2) | |
| # Create a three channel version of the mask by stacking it | |
| # depth-wise, such that we can copy the warped source image | |
| # into the input image | |
| maskScaled = mask.copy() / 255.0 | |
| maskScaled = np.dstack([maskScaled] * 3) | |
| # Copy the warped source image into the input image by | |
| # (1) Multiplying the warped image and masked together, | |
| # (2) Then multiplying the original input image with the | |
| # mask (giving more weight to the input where there | |
| # are not masked pixels), and | |
| # (3) Adding the resulting multiplications together | |
| warpedMultiplied = cv2.multiply(warped.astype("float"), maskScaled) | |
| imageMultiplied = cv2.multiply(frame.astype(float), 1.0 – maskScaled) | |
| output = cv2.add(warpedMultiplied, imageMultiplied) | |
| output = output.astype("uint8") | |
| # Return the output frame to the calling function | |
| return output | |
| except Exception as e: | |
| # Delibarately raising the issue | |
| # That way the control goes to main calling methods | |
| # exception section | |
| raise |
Please find the key snippet from the above script –
(imgH, imgW) = frame.shape[:2]
(srcH, srcW) = source.shape[:2]

# Detect Aruco markers in the input frame
(corners, ids, rejected) = cv2.aruco.detectMarkers(frame, arucoDict, parameters=arucoParams)
Identifying the Aruco markers are key here. The above lines help the program detect all four corners.
However, let us discuss more on the Aruco markers & strategies that I’ve used for several different surfaces.


As you can see, the right-hand side Aruco marker is tiny compared to the left one. Hence, that one will be ideal for a curve surface like Coffee Mug, Bottle rather than a flat surface.
Also, we’ve demonstrated the zoom capability with the smaller Aruco marker that will Augment almost double the original surface area.
Let us understand why we need that; as you know, any spherical surface like a bottle is round-shaped. Hence, detecting relatively more significant Aruco markers in four corners will be difficult for any camera to identify.
Hence, we need a process where close four corners can be extrapolated mathematically to relatively larger projected areas easily detectable by any WebCAM.
Let’s observe the following figure –
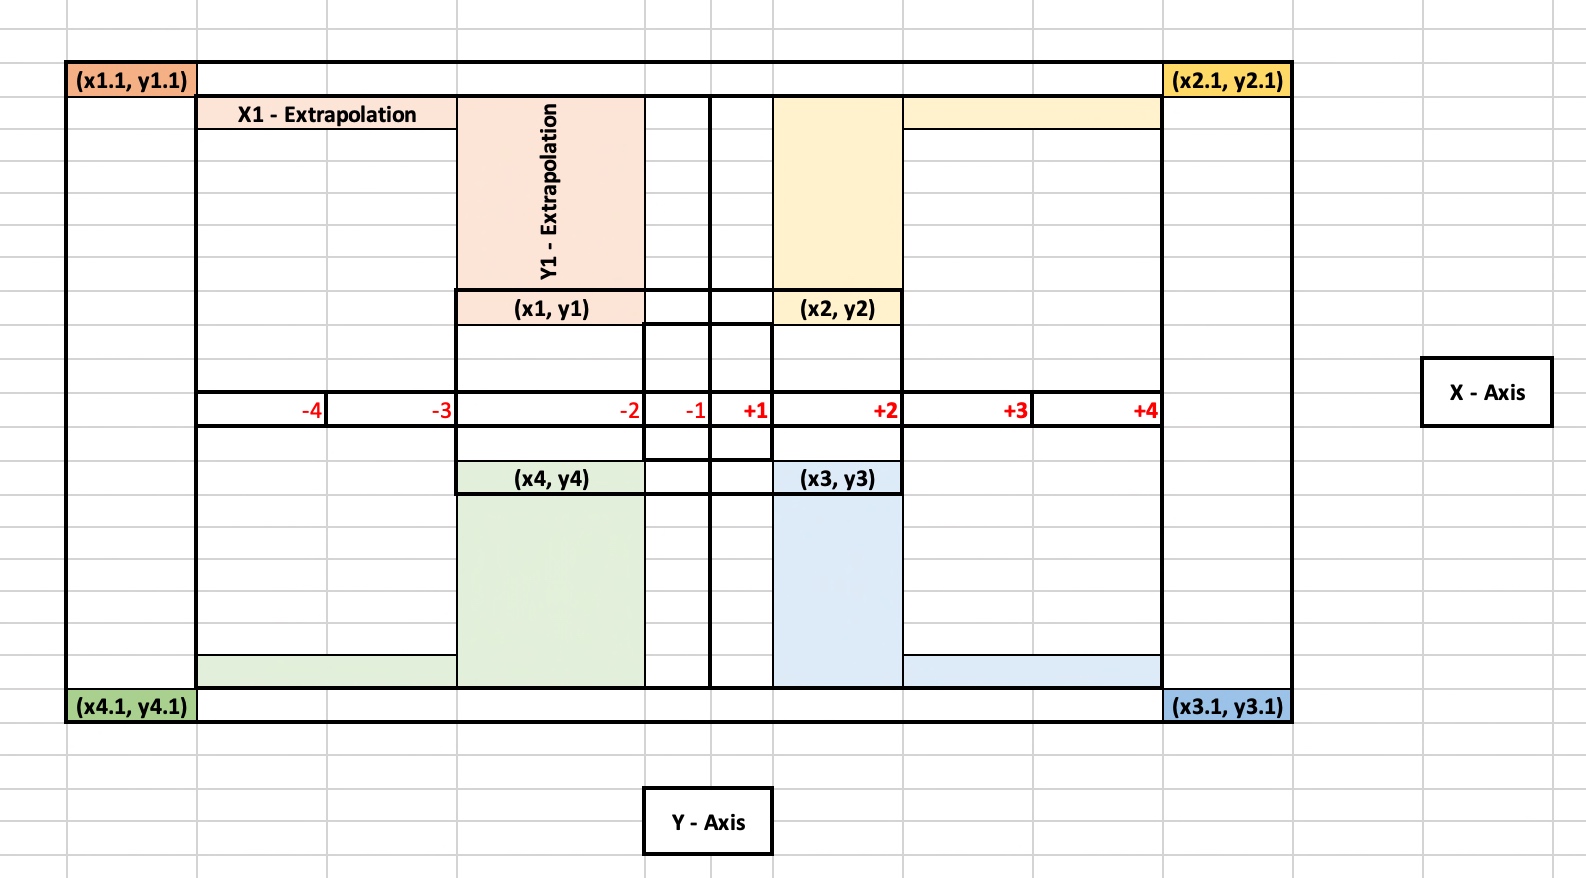
As you can see that the original position of the four corners is represented using the following points, i.e., (x1, y1), (x2, y2), (x3, y3) & (x4, y4).
And these positions are very close to each other. Hence, it will be easier for the camera to detect all the points (like a plain surface) without many retries.
And later, you can add specific values of x & y to them to get the derived four corners as shown in the above figures through the following points, i.e. (x1.1, y1.1), (x2.1, y2.1), (x3.1, y3.1) & (x4.1, y4.1).
# Loop over the IDs of the ArUco markers in Top-Left, Top-Right,
# Bottom-Right, and Bottom-Left order
for i in cornerIDs:
  # Grab the index of the corner with the current ID
  j = np.squeeze(np.where(ids == i))

  # If we receive an empty list instead of an integer index,
  # then we could not find the marker with the current ID
  if j.size == 0:
    continue

  # Otherwise, append the corner (x, y)-coordinates to our list
  # of reference points
  corner = np.squeeze(corners[j])
  refPts.append(corner)

# Check to see if we failed to find the four ArUco markers
if len(refPts) != 4:
  # If we are allowed to use cached reference points, fall
  # back on them
  if useCache and CACHED_REF_PTS is not None:
    refPts = CACHED_REF_PTS

  # Otherwise, we cannot use the cache and/or there are no
  # previous cached reference points, so return early
  else:
    return None

# If we are allowed to use cached reference points, then update
# the cache with the current set
if useCache:
  CACHED_REF_PTS = refPts

# Unpack our Aruco reference points and use the reference points
# to define the Destination transform matrix, making sure the
# points are specified in Top-Left, Top-Right, Bottom-Right, and
# Bottom-Left order
(refPtTL, refPtTR, refPtBR, refPtBL) = refPts
dstMat = [refPtTL[0], refPtTR[1], refPtBR[2], refPtBL[3]]
dstMat = np.array(dstMat)
In the above snippet, the application will scan through all the points & try to detect Aruco markers & then create a list of reference points, which will later be used to define the destination transformation matrix.
# For zoom option recalculating all the 4 points
refPtTL1_L_X = refPtTL[0][0]-TOP_LEFT_X
refPtTL1_L_Y = refPtTL[0][1]-TOP_LEFT_Y

refPtTL1.append((refPtTL1_L_X,refPtTL1_L_Y))

refPtTL1_R_X = refPtTL[1][0]+TOP_RIGHT_X
refPtTL1_R_Y = refPtTL[1][1]+TOP_RIGHT_Y

refPtTL1.append((refPtTL1_R_X,refPtTL1_R_Y))

refPtTD1_L_X = refPtTL[2][0]+BOTTOM_RIGHT_X
refPtTD1_L_Y = refPtTL[2][1]+BOTTOM_RIGHT_Y

refPtTL1.append((refPtTD1_L_X,refPtTD1_L_Y))

refPtTD1_R_X = refPtTL[3][0]-BOTTOM_LEFT_X
refPtTD1_R_Y = refPtTL[3][1]+BOTTOM_LEFT_Y

refPtTL1.append((refPtTD1_R_X,refPtTD1_R_Y))

dstMatMod = [refPtTL1[0], refPtTL1[1], refPtTL1[2], refPtTL1[3]]
dstMatMod = np.array(dstMatMod)
The above snippets calculate the revised points for the zoom-out capabilities as discussed in one of the earlier figures.
# Define the transform matrix for the *source* image in Top-Left,
# Top-Right, Bottom-Right, and Bottom-Left order
srcMat = np.array([[0, 0], [srcW, 0], [srcW, srcH], [0, srcH]])
The above snippet will create a transformation matrix for the video trailer.
# Compute the homography matrix and then warp the source image to
# the destination based on the homography depending upon the
# zoom flag
if zoomFlag == 1:
  (H, _) = cv2.findHomography(srcMat, dstMat)
else:
  (H, _) = cv2.findHomography(srcMat, dstMatMod)

warped = cv2.warpPerspective(source, H, (imgW, imgH))

# Construct a mask for the source image now that the perspective
# warp has taken place (we'll need this mask to copy the source
# image into the destination)
mask = np.zeros((imgH, imgW), dtype="uint8")
if zoomFlag == 1:
  cv2.fillConvexPoly(mask, dstMat.astype("int32"), (255, 255, 255), cv2.LINE_AA)
else:
  cv2.fillConvexPoly(mask, dstMatMod.astype("int32"), (255, 255, 255), cv2.LINE_AA)

# This optional step will give the source image a black
# border surrounding it when applied to the source image, you
# can apply a dilation operation
rect = cv2.getStructuringElement(cv2.MORPH_RECT, (3, 3))
mask = cv2.dilate(mask, rect, iterations=2)

# Create a three channel version of the mask by stacking it
# depth-wise, such that we can copy the warped source image
# into the input image
maskScaled = mask.copy() / 255.0
maskScaled = np.dstack([maskScaled] * 3)

# Copy the warped source image into the input image by
# (1) Multiplying the warped image and masked together,
# (2) Then multiplying the original input image with the
#     mask (giving more weight to the input where there
#     are not masked pixels), and
# (3) Adding the resulting multiplications together
warpedMultiplied = cv2.multiply(warped.astype("float"), maskScaled)
imageMultiplied = cv2.multiply(frame.astype(float), 1.0 - maskScaled)
output = cv2.add(warpedMultiplied, imageMultiplied)
output = output.astype("uint8")
Finally, depending upon the zoom flag, the application will create a warped image surrounded by an optionally black border.
- clsEmbedVideoWithStream.py (This is the main class of python script that will invoke the clsAugmentedReality class to initiate augment reality after splitting the audio & video & then project them via the Web-CAM with a seamless broadcast.)
This file contains hidden or bidirectional Unicode text that may be interpreted or compiled differently than what appears below. To review, open the file in an editor that reveals hidden Unicode characters.
Learn more about bidirectional Unicode characters
| ################################################## | |
| #### Written By: SATYAKI DE #### | |
| #### Written On: 22-Jun-2022 #### | |
| #### Modified On 25-Jun-2022 #### | |
| #### #### | |
| #### Objective: This is the main class of #### | |
| #### python script that will invoke the #### | |
| #### clsAugmentedReality class to initiate #### | |
| #### augment reality after splitting the #### | |
| #### audio & video & then project them via #### | |
| #### the Web-CAM with a seamless broadcast. #### | |
| ################################################## | |
| # Importing necessary packages | |
| import clsAugmentedReality as ar | |
| from clsConfig import clsConfig as cf | |
| from imutils.video import VideoStream | |
| from collections import deque | |
| import imutils | |
| import time | |
| import cv2 | |
| import subprocess | |
| import os | |
| import pygame | |
| import time | |
| import threading | |
| import sys | |
| ############################################### | |
| ### Global Section ### | |
| ############################################### | |
| # Instantiating the dependant class | |
| x1 = ar.clsAugmentedReality() | |
| ############################################### | |
| ### End of Global Section ### | |
| ############################################### | |
| class BreakLoop(Exception): | |
| pass | |
| class clsEmbedVideoWithStream: | |
| def __init__(self): | |
| self.sep = str(cf.conf['SEP']) | |
| self.Curr_Path = str(cf.conf['INIT_PATH']) | |
| self.FileName = str(cf.conf['FILE_NAME']) | |
| self.CacheL = int(cf.conf['CACHE_LIM']) | |
| self.FileName_1 = str(cf.conf['FILE_NAME_1']) | |
| self.audioLen = int(cf.conf['audioLen']) | |
| self.audioFreq = float(cf.conf['audioFreq']) | |
| self.videoFrame = float(cf.conf['videoFrame']) | |
| self.stopFlag=cf.conf['stopFlag'] | |
| self.zFlag=int(cf.conf['zoomFlag']) | |
| self.title = str(cf.conf['TITLE']) | |
| def playAudio(self, audioFile, audioLen, freq, stopFlag=False): | |
| try: | |
| pygame.mixer.init() | |
| pygame.init() | |
| pygame.mixer.music.load(audioFile) | |
| pygame.mixer.music.set_volume(10) | |
| val = int(audioLen) | |
| i = 0 | |
| while i < val: | |
| pygame.mixer.music.play(loops=0, start=float(i)) | |
| time.sleep(freq) | |
| i = i + 1 | |
| if (i >= val): | |
| raise BreakLoop | |
| if (stopFlag==True): | |
| raise BreakLoop | |
| return 0 | |
| except BreakLoop as s: | |
| return 0 | |
| except Exception as e: | |
| x = str(e) | |
| print(x) | |
| return 1 | |
| def extractAudio(self, video_file, output_ext="mp3"): | |
| try: | |
| """Converts video to audio directly using `ffmpeg` command | |
| with the help of subprocess module""" | |
| filename, ext = os.path.splitext(video_file) | |
| subprocess.call(["ffmpeg", "-y", "-i", video_file, f"{filename}.{output_ext}"], | |
| stdout=subprocess.DEVNULL, | |
| stderr=subprocess.STDOUT) | |
| return 0 | |
| except Exception as e: | |
| x = str(e) | |
| print('Error: ', x) | |
| return 1 | |
| def processStream(self, debugInd, var): | |
| try: | |
| sep = self.sep | |
| Curr_Path = self.Curr_Path | |
| FileName = self.FileName | |
| CacheL = self.CacheL | |
| FileName_1 = self.FileName_1 | |
| audioLen = self.audioLen | |
| audioFreq = self.audioFreq | |
| videoFrame = self.videoFrame | |
| stopFlag = self.stopFlag | |
| zFlag = self.zFlag | |
| title = self.title | |
| print('audioFreq:') | |
| print(str(audioFreq)) | |
| print('videoFrame:') | |
| print(str(videoFrame)) | |
| # Construct the source for Video & Temporary Audio | |
| videoFile = Curr_Path + sep + 'Video' + sep + FileName | |
| audioFile = Curr_Path + sep + 'Video' + sep + FileName_1 | |
| # Load the Aruco dictionary and grab the Aruco parameters | |
| print("[INFO] initializing marker detector…") | |
| arucoDict = cv2.aruco.Dictionary_get(cv2.aruco.DICT_ARUCO_ORIGINAL) | |
| arucoParams = cv2.aruco.DetectorParameters_create() | |
| # Initialize the video file stream | |
| print("[INFO] accessing video stream…") | |
| vf = cv2.VideoCapture(videoFile) | |
| x = self.extractAudio(videoFile) | |
| if x == 0: | |
| print('Successfully Audio extracted from the source file!') | |
| else: | |
| print('Failed to extract the source audio!') | |
| # Initialize a queue to maintain the next frame from the video stream | |
| Q = deque(maxlen=128) | |
| # We need to have a frame in our queue to start our augmented reality | |
| # pipeline, so read the next frame from our video file source and add | |
| # it to our queue | |
| (grabbed, source) = vf.read() | |
| Q.appendleft(source) | |
| # Initialize the video stream and allow the camera sensor to warm up | |
| print("[INFO] starting video stream…") | |
| vs = VideoStream(src=0).start() | |
| time.sleep(2.0) | |
| flg = 0 | |
| t = threading.Thread(target=self.playAudio, args=(audioFile, audioLen, audioFreq, stopFlag,)) | |
| t.daemon = True | |
| try: | |
| # Loop over the frames from the video stream | |
| while len(Q) > 0: | |
| try: | |
| # Grab the frame from our video stream and resize it | |
| frame = vs.read() | |
| frame = imutils.resize(frame, width=1020) | |
| # Attempt to find the ArUCo markers in the frame, and provided | |
| # they are found, take the current source image and warp it onto | |
| # input frame using our augmented reality technique | |
| warped = x1.getWarpImages( | |
| frame, source, | |
| cornerIDs=(923, 1001, 241, 1007), | |
| arucoDict=arucoDict, | |
| arucoParams=arucoParams, | |
| zoomFlag=zFlag, | |
| useCache=CacheL > 0) | |
| # If the warped frame is not None, then we know (1) we found the | |
| # four ArUCo markers and (2) the perspective warp was successfully | |
| # applied | |
| if warped is not None: | |
| # Set the frame to the output augment reality frame and then | |
| # grab the next video file frame from our queue | |
| frame = warped | |
| source = Q.popleft() | |
| if flg == 0: | |
| t.start() | |
| flg = flg + 1 | |
| # For speed/efficiency, we can use a queue to keep the next video | |
| # frame queue ready for us — the trick is to ensure the queue is | |
| # always (or nearly full) | |
| if len(Q) != Q.maxlen: | |
| # Read the next frame from the video file stream | |
| (grabbed, nextFrame) = vf.read() | |
| # If the frame was read (meaning we are not at the end of the | |
| # video file stream), add the frame to our queue | |
| if grabbed: | |
| Q.append(nextFrame) | |
| # Show the output frame | |
| cv2.imshow(title, frame) | |
| time.sleep(videoFrame) | |
| # If the `q` key was pressed, break from the loop | |
| if cv2.waitKey(2) & 0xFF == ord('q'): | |
| stopFlag = True | |
| break | |
| except BreakLoop: | |
| raise BreakLoop | |
| except Exception as e: | |
| pass | |
| if (len(Q) == Q.maxlen): | |
| time.sleep(2) | |
| break | |
| except BreakLoop as s: | |
| print('Processed completed!') | |
| # Performing cleanup at the end | |
| cv2.destroyAllWindows() | |
| vs.stop() | |
| except Exception as e: | |
| x = str(e) | |
| print(x) | |
| # Performing cleanup at the end | |
| cv2.destroyAllWindows() | |
| vs.stop() | |
| return 0 | |
| except Exception as e: | |
| x = str(e) | |
| print('Error:', x) | |
| return 1 |
Please find the key snippet from the above script –
def playAudio(self, audioFile, audioLen, freq, stopFlag=False):
  try:
    pygame.mixer.init()
    pygame.init()
    pygame.mixer.music.load(audioFile)

    pygame.mixer.music.set_volume(10)

    val = int(audioLen)
    i = 0

    while i < val:
      pygame.mixer.music.play(loops=0, start=float(i))
      time.sleep(freq)

      i = i + 1

      if (i >= val):
        raise BreakLoop

      if (stopFlag==True):
        raise BreakLoop

    return 0
  except BreakLoop as s:
    return 0
  except Exception as e:
    x = str(e)
    print(x)

    return 1
The above function will initiate the pygame library to run the sound of the video file that has been extracted as part of a separate process.
def extractAudio(self, video_file, output_ext="mp3"):
    try:
        """Converts video to audio directly using `ffmpeg` command
        with the help of subprocess module"""
        filename, ext = os.path.splitext(video_file)
        subprocess.call(["ffmpeg", "-y", "-i", video_file, f"{filename}.{output_ext}"],
                        stdout=subprocess.DEVNULL,
                        stderr=subprocess.STDOUT)

        return 0
    except Exception as e:
        x = str(e)
        print('Error: ', x)

        return 1
The above function temporarily extracts the audio file from the source trailer video.
# Initialize the video file stream
print("[INFO] accessing video stream...")
vf = cv2.VideoCapture(videoFile)

x = self.extractAudio(videoFile)

if x == 0:
    print('Successfully Audio extracted from the source file!')
else:
    print('Failed to extract the source audio!')

# Initialize a queue to maintain the next frame from the video stream
Q = deque(maxlen=128)

# We need to have a frame in our queue to start our augmented reality
# pipeline, so read the next frame from our video file source and add
# it to our queue
(grabbed, source) = vf.read()
Q.appendleft(source)

# Initialize the video stream and allow the camera sensor to warm up
print("[INFO] starting video stream...")
vs = VideoStream(src=0).start()

time.sleep(2.0)
flg = 0
The above snippets read the frames from the video file after invoking the audio extraction. Then, it uses a Queue method to store all the video frames for better performance. And finally, it starts consuming the standard streaming video from the WebCAM to augment the trailer video on top of it.
t = threading.Thread(target=self.playAudio, args=(audioFile, audioLen, audioFreq, stopFlag,))
t.daemon = True
Now, the application has instantiated an orphan thread to spin off the audio play function. The reason is to void the performance & video frame frequency impact on top of it.
while len(Q) > 0:
  try:
    # Grab the frame from our video stream and resize it
    frame = vs.read()
    frame = imutils.resize(frame, width=1020)

    # Attempt to find the ArUCo markers in the frame, and provided
    # they are found, take the current source image and warp it onto
    # input frame using our augmented reality technique
    warped = x1.getWarpImages(
      frame, source,
      cornerIDs=(923, 1001, 241, 1007),
      arucoDict=arucoDict,
      arucoParams=arucoParams,
      zoomFlag=zFlag,
      useCache=CacheL > 0)

    # If the warped frame is not None, then we know (1) we found the
    # four ArUCo markers and (2) the perspective warp was successfully
    # applied
    if warped is not None:
      # Set the frame to the output augment reality frame and then
      # grab the next video file frame from our queue
      frame = warped
      source = Q.popleft()

      if flg == 0:

        t.start()
        flg = flg + 1

    # For speed/efficiency, we can use a queue to keep the next video
    # frame queue ready for us -- the trick is to ensure the queue is
    # always (or nearly full)
    if len(Q) != Q.maxlen:
      # Read the next frame from the video file stream
      (grabbed, nextFrame) = vf.read()

      # If the frame was read (meaning we are not at the end of the
      # video file stream), add the frame to our queue
      if grabbed:
        Q.append(nextFrame)

    # Show the output frame
    cv2.imshow(title, frame)
    time.sleep(videoFrame)

    # If the `q` key was pressed, break from the loop
    if cv2.waitKey(2) & 0xFF == ord('q'):
      stopFlag = True
      break

  except BreakLoop:
    raise BreakLoop
  except Exception as e:
    pass

  if (len(Q) == Q.maxlen):
    time.sleep(2)
    break
The final segment will call the getWarpImages function to get the Augmented image on top of the video. It also checks for the upcoming frames & whether the source video is finished or not. In case of the end, the application will initiate a break method to come out from the infinite WebCAM read. Also, there is a provision for manual exit by pressing the ‘Q’ from the MacBook keyboard.
# Performing cleanup at the end
cv2.destroyAllWindows()
vs.stop()
It is always advisable to close your camera & remove any temporarily available windows that are still left once the application finishes the process.
- augmentedMovieTrailer.py (Main calling script)
This file contains hidden or bidirectional Unicode text that may be interpreted or compiled differently than what appears below. To review, open the file in an editor that reveals hidden Unicode characters.
Learn more about bidirectional Unicode characters
| ##################################################### | |
| #### Written By: SATYAKI DE #### | |
| #### Written On: 22-Jun-2022 #### | |
| #### Modified On 25-Jun-2022 #### | |
| #### #### | |
| #### Objective: This is the main calling #### | |
| #### python script that will invoke the #### | |
| #### clsEmbedVideoWithStream class to initiate #### | |
| #### the augmented reality in real-time #### | |
| #### & display a trailer on top of any surface #### | |
| #### via Web-CAM. #### | |
| ##################################################### | |
| # We keep the setup code in a different class as shown below. | |
| import clsEmbedVideoWithStream as evws | |
| from clsConfig import clsConfig as cf | |
| import datetime | |
| import logging | |
| ############################################### | |
| ### Global Section ### | |
| ############################################### | |
| # Instantiating all the main class | |
| x1 = evws.clsEmbedVideoWithStream() | |
| ############################################### | |
| ### End of Global Section ### | |
| ############################################### | |
| def main(): | |
| try: | |
| # Other useful variables | |
| debugInd = 'Y' | |
| var = datetime.datetime.now().strftime("%Y-%m-%d_%H-%M-%S") | |
| var1 = datetime.datetime.now() | |
| print('Start Time: ', str(var)) | |
| # End of useful variables | |
| # Initiating Log Class | |
| general_log_path = str(cf.conf['LOG_PATH']) | |
| # Enabling Logging Info | |
| logging.basicConfig(filename=general_log_path + 'augmentedMovieTrailer.log', level=logging.INFO) | |
| print('Started augmenting videos!') | |
| # Execute all the pass | |
| r1 = x1.processStream(debugInd, var) | |
| if (r1 == 0): | |
| print('Successfully identified human emotions!') | |
| else: | |
| print('Failed to identify the human emotions!') | |
| var2 = datetime.datetime.now() | |
| c = var2 – var1 | |
| minutes = c.total_seconds() / 60 | |
| print('Total difference in minutes: ', str(minutes)) | |
| print('End Time: ', str(var1)) | |
| except Exception as e: | |
| x = str(e) | |
| print('Error: ', x) | |
| if __name__ == "__main__": | |
| main() |
The above script will initially instantiate the main calling class & then invoke the processStream function to create the Augmented Reality.
FOLDER STRUCTURE:
Here is the folder structure that contains all the files & directories in MAC O/S –

You will get the complete codebase in the following Github link.
If you want to know more about this legendary director & his famous work, please visit the following link.
I’ll bring some more exciting topic in the coming days from the Python verse. Please share & subscribe my post & let me know your feedback.
Till then, Happy Avenging! 🙂
Note: All the data & scenario posted here are representational data & scenarios & available over the internet & for educational purpose only. Some of the images (except my photo) that we’ve used are available over the net. We don’t claim the ownership of these images. There is an always room for improvement & especially the prediction quality.
You must be logged in to post a comment.