Building an Azure Function using Python (Crossover between Reality Stone & Time Stone in Python Verse)

Hi Guys!

Today, we’ll be discussing a preview features from Microsoft Azure. Building an Azure function using Python on it’s Linux/Ubuntu VM. Since this is a preview feature, we cannot implement this to production till now. However, my example definitely has more detailed steps & complete code guide compared to whatever available over the internet.

In this post, I will take one of my old posts & enhance it as per this post. Hence, I’ll post those modified scripts. However, I won’t discuss the logic in details as most of these scripts have cosmetic changes to cater to this requirement.

In this post, we’ll only show Ubuntu run & there won’t be Windows or MAC comparison.

Initial Environment Preparation:

  1. Set-up new virtual machine on Azure.
  2. Set-up Azure function environments on that server.

Set-up new virtual machine on Azure:

I’m not going into the details of how to create Ubuntu VM on Microsoft Azure. You can refer the steps in more information here.

After successful creation, the VM will look like this –

Azure VM - Ubuntu

Detailed information you can get after clicking this hyperlink over the name of the VM.

Azure-VM Basic Details

You have to open port 7071 for application testing from the local using postman.

You can get it from the network option under VM as follows –

Network-Configuration

Make sure that you are restricting these ports to specific network & not open to ALL traffic.

So, your VM is ready now.

To update Azure CLI, you need to use the following commands –

sudo apt-get update && sudo apt-get install –only-upgrade -y azure-cli

Set-up Azure function environments on that server:

To set-up the environment, you don’t have to go for Python installation as by default Ubuntu in Microsoft Azure comes up with desired Python version, i.e., Python3.6. However, to run the python application, you need to install the following app –

  1. Microsoft SDK. You will get the details from this link.
  2. Installing node-js. You will get the details from this link.
  3. You need to install a docker. However, as per Microsoft official version, this is not required. But, you can create a Docker container to distribute the python function in Azure application. I would say you can install this just in case if you want to continue with this approach. You will get the details over here. If you want to know details about the Docker. And, how you want to integrate python application. You can refer to this link.
  4. Your desired python packages. In this case, we’ll be modifying this post – “Encryption/Decryption, JSON, API, Flask Framework in Python (Crossover between Reality Stone & Time Stone in Python Verse).” We’ll be modifying a couple of lines only to cater to this functionality & deploying the same as an Azure function.
  5. Creating an Azure function template on Ubuntu. The essential detail you’ll get it from here. However, over there, it was not shown in detailed steps of python packages & how you can add all the dependencies to publish it in details. It was an excellent post to start-up your knowledge.

Let’s see these components status & very brief details –

Microsoft SDK:

To check the dot net version. You need to type the following commands in Ubuntu –

dotnet –info

And, the output will look like this –

DotNet-Version

Node-Js:

Following is the way to verify your node-js version & details –

node -v

npm -v

And, the output looks like this –

Node-Js

Docker:

Following is the way to test your docker version –

docker -v

And, the output will look like this –

Docker-Version

Python Packages:

Following are the python packages that we need to run & publish that in Azure cloud as an Azure function –

pip freeze | grep -v “pkg-resources” > requirements.txt

And, the output is –

Requirements

You must be wondered that why have I used this grep commands here. I’ve witnessed that on many occassion in Microsoft Azure’s Linux VM it produces one broken package called resource=0.0.0, which will terminate the deployment process. Hence, this is very crucial to eliminate those broken packages.

Now, we’re ready for our python scripts. But, before that, let’s see the directory structure over here –

Win_Vs_Ubuntu-Cloud

Creating an Azure Function Template on Ubuntu: 

Before we post our python scripts, we’ll create these following components, which is essential for our Python-based Azure function –

  • Creating a group:

              Creating a group either through Azure CLI or using a docker, you can proceed. The commands for Azure CLI is as follows –

az group create –name “rndWestUSGrp” –location westus

It is advisable to use double quotes for parameters value. Otherwise, you might land-up getting the following error – “Error: “resourceGroupName” should satisfy the constraint – “Pattern”: /^[-w._]+$/“.

I’m sure. You don’t want to face that again. And, here is the output –

CreateDeploymentGroup

Note that, here I haven’t used the double-quotes. But, to avoid any unforeseen issues – you should use double-quotes. You can refer the docker command from the above link, which I’ve shared earlier.

Now, you need to create one storage account where the metadata information of your function will be stored. You will create that as follows –

az storage account create –name cryptpy2019 –location westus –resource-group rndWestUSGrp –sku Standard_LRS

And, the output will look like this –

AccountCreate_1

Great. Now, we’ll create a virtual environment for Python3.6.

python3.6 -m venv .env
source .env/bin/activate

Python-VM

Now, we’ll create a local function project.

func init encPro

And, the output you will get is as follows –

Local-Function

Inside this directory, you’ll see the following files –

Local-Function-Details

You need to edit the host.json with these default lines –

{
 “version”: “2.0”,
 “extensionBundle”: {
                                       “id”: “Microsoft.Azure.Functions.ExtensionBundle”,
                                       “version”: “[1.*, 2.0.0)”
                                     }
}

And, the final content of these two files (excluding the requirements.txt) will look like this –

Configuration

Finally, we’ll create the template function by this following command –

func new

This will follow with steps finish it. You need to choose Python as your programing language. You need to choose an HTTP trigger template. Once you created that successfully, you’ll see the following files –

func_New

Note that, our initial function name is -> getVal.

By default, Azure will generate some default code inside the __init__.py. The details of those two files can be found here.

Since we’re ready with our environment setup. We can now discuss our Python scripts –

1. clsConfigServer.py (This script contains all the parameters of the server.)

###########################################
#### Written By: SATYAKI DE        ########
#### Written On: 10-Feb-2019       ########
####                               ########
#### Objective: Parameter File     ########
###########################################

import os
import platform as pl

# Checking with O/S system
os_det = pl.system()

class clsConfigServer(object):
    Curr_Path = os.path.dirname(os.path.realpath(__file__))

    if os_det == "Windows":
        config = {
            'FILE': 'acct_addr_20180112.csv',
            'SRC_FILE_PATH': Curr_Path + '\\' + 'src_file\\',
            'PROFILE_FILE_PATH': Curr_Path + '\\' + 'profile\\',
            'HOST_IP_ADDR': '0.0.0.0',
            'DEF_SALT': 'iooquzKtqLwUwXG3rModqj_fIl409vemWg9PekcKh2o=',
            'ACCT_NBR_SALT': 'iooquzKtqLwUwXG3rModqj_fIlpp1vemWg9PekcKh2o=',
            'NAME_SALT': 'iooquzKtqLwUwXG3rModqj_fIlpp1026Wg9PekcKh2o=',
            'PHONE_SALT': 'iooquzKtqLwUwXG3rMM0F5_fIlpp1026Wg9PekcKh2o=',
            'EMAIL_SALT': 'iooquzKtqLwU0653rMM0F5_fIlpp1026Wg9PekcKh2o='
        }
    else:
        config = {
            'FILE': 'acct_addr_20180112.csv',
            'SRC_FILE_PATH': Curr_Path + '/' + 'src_file/',
            'PROFILE_FILE_PATH': Curr_Path + '/' + 'profile/',
            'HOST_IP_ADDR': '0.0.0.0',
            'DEF_SALT': 'iooquzKtqLwUwXG3rModqj_fIl409vemWg9PekcKh2o=',
            'ACCT_NBR_SALT': 'iooquzKtqLwUwXG3rModqj_fIlpp1vemWg9PekcKh2o=',
            'NAME_SALT': 'iooquzKtqLwUwXG3rModqj_fIlpp1026Wg9PekcKh2o=',
            'PHONE_SALT': 'iooquzKtqLwUwXG3rMM0F5_fIlpp1026Wg9PekcKh2o=',
            'EMAIL_SALT': 'iooquzKtqLwU0653rMM0F5_fIlpp1026Wg9PekcKh2o='
        }

2. clsEnDec.py (This script is a lighter version of encryption & decryption of our previously discussed scenario. Hence, we won’t discuss in details. You can refer my earlier post to understand the logic of this script.)

###########################################
#### Written By: SATYAKI DE        ########
#### Written On: 25-Jan-2019       ########
#### Package Cryptography needs to ########
#### install in order to run this  ########
#### script.                       ########
####                               ########
#### Objective: This script will   ########
#### encrypt/decrypt based on the  ########
#### hidden supplied salt value.   ########
###########################################

from cryptography.fernet import Fernet
import logging

from getVal.clsConfigServer import clsConfigServer as csf

class clsEnDec(object):

    def __init__(self):
        # Calculating Key
        self.token = str(csf.config['DEF_SALT'])

    def encrypt_str(self, data, token):
        try:
            # Capturing the Salt Information
            t1 = self.token
            t2 = token

            if t2 == '':
                salt = t1
            else:
                salt = t2

            logging.info("Encrypting the value!")

            # Checking Individual Types inside the Dataframe
            cipher = Fernet(salt)
            encr_val = str(cipher.encrypt(bytes(data,'utf8'))).replace("b'","").replace("'","")

            strV1 = "Encrypted value:: " + str(encr_val)
            logging.info(strV1)

            return encr_val

        except Exception as e:
            x = str(e)
            print(x)
            encr_val = ''

            return encr_val

    def decrypt_str(self, data, token):
        try:
            # Capturing the Salt Information
            t1 = self.token
            t2 = token

            if t2 == '':
                salt = t1
            else:
                salt = t2

            logging.info("Decrypting the value!")

            # Checking Individual Types inside the Dataframe
            cipher = Fernet(salt)
            decr_val = str(cipher.decrypt(bytes(data,'utf8'))).replace("b'","").replace("'","")

            strV2 = "Decrypted value:: " + str(decr_val)
            logging.info(strV2)

            return decr_val

        except Exception as e:
            x = str(e)
            print(x)
            decr_val = ''

            return decr_val

3. clsFlask.py (This is the main server script that will the encrypt/decrypt class from our previous scenario. This script will capture the requested JSON from the client, who posted from the clients like another python script or third-party tools like Postman.)

###########################################
#### Written By: SATYAKI DE            ####
#### Written On: 25-Jan-2019           ####
#### Package Flask package needs to    ####
#### install in order to run this      ####
#### script.                           ####
####                                   ####
#### Objective: This script will       ####
#### encrypt/decrypt based on the      ####
#### supplied salt value. Also,        ####
#### this will capture the individual  ####
#### element & stored them into JSON   ####
#### variables using flask framework.  ####
###########################################

from getVal.clsConfigServer import clsConfigServer as csf
from getVal.clsEnDec import clsEnDecAuth

getVal = clsEnDec()

import logging

class clsFlask(object):
    def __init__(self):
        self.xtoken = str(csf.config['DEF_SALT'])

    def getEncryptProcess(self, dGroup, input_data, dTemplate):
        try:
            # It is sending default salt value
            xtoken = self.xtoken

            # Capturing the individual element
            dGroup = dGroup
            input_data = input_data
            dTemplate = dTemplate

            # This will check the mandatory json elements
            if ((dGroup != '') & (dTemplate != '')):

                # Based on the Group & Element it will fetch the salt
                # Based on the specific salt it will encrypt the data
                if ((dGroup == 'GrDet') & (dTemplate == 'subGrAcct_Nbr')):
                    xtoken = str(csf.config['ACCT_NBR_SALT'])

                    strV1 = "xtoken: " + str(xtoken)
                    logging.info(strV1)
                    strV2 = "Flask Input Data: " + str(input_data)
                    logging.info(strV2)

                    #x = cen.clsEnDecAuth()
                    ret_val = getVal.encrypt_str(input_data, xtoken)
                elif ((dGroup == 'GrDet') & (dTemplate == 'subGrName')):
                    xtoken = str(csf.config['NAME_SALT'])

                    strV1 = "xtoken: " + str(xtoken)
                    logging.info(strV1)
                    strV2 = "Flask Input Data: " + str(input_data)
                    logging.info(strV2)

                    #x = cen.clsEnDecAuth()
                    ret_val = getVal.encrypt_str(input_data, xtoken)
                elif ((dGroup == 'GrDet') & (dTemplate == 'subGrPhone')):
                    xtoken = str(csf.config['PHONE_SALT'])

                    strV1 = "xtoken: " + str(xtoken)
                    logging.info(strV1)
                    strV2 = "Flask Input Data: " + str(input_data)
                    logging.info(strV2)

                    #x = cen.clsEnDecAuth()
                    ret_val = getVal.encrypt_str(input_data, xtoken)
                elif ((dGroup == 'GrDet') & (dTemplate == 'subGrEmail')):
                    xtoken = str(csf.config['EMAIL_SALT'])

                    strV1 = "xtoken: " + str(xtoken)
                    logging.info(strV1)
                    strV2 = "Flask Input Data: " + str(input_data)
                    logging.info(strV2)

                    #x = cen.clsEnDecAuth()
                    ret_val = getVal.encrypt_str(input_data, xtoken)
                else:
                    ret_val = ''
            else:
                ret_val = ''

            # Return value
            return ret_val

        except Exception as e:
            ret_val = ''
            # Return the valid json Error Response
            return ret_val

    def getDecryptProcess(self, dGroup, input_data, dTemplate):
        try:
            xtoken = self.xtoken

            # Capturing the individual element
            dGroup = dGroup
            input_data = input_data
            dTemplate = dTemplate

            # This will check the mandatory json elements
            if ((dGroup != '') & (dTemplate != '')):

                # Based on the Group & Element it will fetch the salt
                # Based on the specific salt it will decrypt the data
                if ((dGroup == 'GrDet') & (dTemplate == 'subGrAcct_Nbr')):
                    xtoken = str(csf.config['ACCT_NBR_SALT'])

                    strV1 = "xtoken: " + str(xtoken)
                    logging.info(strV1)
                    strV2 = "Flask Input Data: " + str(input_data)
                    logging.info(strV2)

                    #x = cen.clsEnDecAuth()
                    ret_val = getVal.decrypt_str(input_data, xtoken)
                elif ((dGroup == 'GrDet') & (dTemplate == 'subGrName')):
                    xtoken = str(csf.config['NAME_SALT'])

                    strV1 = "xtoken: " + str(xtoken)
                    logging.info(strV1)
                    strV2 = "Flask Input Data: " + str(input_data)
                    logging.info(strV2)

                    #x = cen.clsEnDecAuth()
                    ret_val = getVal.decrypt_str(input_data, xtoken)
                elif ((dGroup == 'GrDet') & (dTemplate == 'subGrPhone')):
                    xtoken = str(csf.config['PHONE_SALT'])

                    strV1 = "xtoken: " + str(xtoken)
                    logging.info(strV1)
                    strV2 = "Flask Input Data: " + str(input_data)
                    logging.info(strV2)

                    #x = cen.clsEnDecAuth()
                    ret_val = getVal.decrypt_str(input_data, xtoken)
                elif ((dGroup == 'GrDet') & (dTemplate == 'subGrEmail')):
                    xtoken = str(csf.config['EMAIL_SALT'])

                    strV1 = "xtoken: " + str(xtoken)
                    logging.info(strV1)
                    strV2 = "Flask Input Data: " + str(input_data)
                    logging.info(strV2)

                    #x = cen.clsEnDecAuth()
                    ret_val = getVal.decrypt_str(input_data, xtoken)
                else:
                    ret_val = ''
            else:
                ret_val = ''

            # Return value
            return ret_val

        except Exception as e:
            ret_val = ''
            # Return the valid Error Response
            return ret_val

4. __init__.py (This autogenerated script contains the primary calling methods of encryption & decryption based on the element header & values after enhanced as per the functionality.)

###########################################
#### Written By: SATYAKI DE            ####
#### Written On: 08-Jun-2019           ####
#### Package Flask package needs to    ####
#### install in order to run this      ####
#### script.                           ####
####                                   ####
#### Objective: Main Calling scripts.  ####
#### This is an autogenrate scripts.   ####
#### However, to meet the functionality####
#### we've enhanced as per our logic.  ####
###########################################
__all__ = ['clsFlask']

import logging
import azure.functions as func
import json

from getVal.clsFlask import clsFlask

getVal = clsFlask()

def main(req: func.HttpRequest) -> func.HttpResponse:
    logging.info('Python Encryption function processed a request.')

    str_val = 'Input Payload:: ' + str(req.get_json())
    str_1 = str(req.get_json())

    logging.info(str_val)

    ret_val = {}
    DataIn = ''
    dGroup = ''
    dTemplate = ''
    flg = ''

    if (str_1 != ''):
        try:
            req_body = req.get_json()
            dGroup = req_body.get('dataGroup')

            try:
                DataIn = req_body.get('data')
                strV15 = 'If Part:: ' + str(DataIn)

                logging.info(strV15)

                if ((DataIn == '') | (DataIn == None)):
                    raise ValueError

                flg = 'Y'
            except ValueError:
                DataIn = req_body.get('edata')
                strV15 = 'Else Part:: ' + str(DataIn)
                logging.info(strV15)
                flg = 'N'
            except:
                DataIn = req_body.get('edata')
                strV15 = 'Else Part:: ' + str(DataIn)
                logging.info(strV15)
                flg = 'N'

            dTemplate = req_body.get('dataTemplate')

        except ValueError:
            pass

    strV5 = "Encrypt Decrypt Flag:: " + flg
    logging.info(strV5)

    if (flg == 'Y'):

        if ((DataIn != '') & ((dGroup != '') & (dTemplate != ''))):

            logging.info("Encryption Started!")
            ret_val = getVal.getEncryptProcess(dGroup, DataIn, dTemplate)
            strVal2 = 'Return Payload:: ' + str(ret_val)
            logging.info(strVal2)

            xval = json.dumps(ret_val)

            return func.HttpResponse(xval)
        else:
            return func.HttpResponse(
                 "Please pass a data in the request body",
                 status_code=400
            )
    else:

        if ((DataIn != '') & ((dGroup != '') & (dTemplate != ''))):

            logging.info("Decryption Started!")
            ret_val2 = getVal.getDecryptProcess(dGroup, DataIn, dTemplate)
            strVal3 = 'Return Payload:: ' + str(ret_val)
            logging.info(strVal3)

            xval1 = json.dumps(ret_val2)

            return func.HttpResponse(xval1)
        else:
            return func.HttpResponse(
                "Please pass a data in the request body",
                status_code=400
            )

In this script, based on the value of an flg variable, we’re calling our encryption or decryption methods. And, the value of the flg variable is set based on the following logic –

try:
    DataIn = req_body.get('data')
    strV15 = 'If Part:: ' + str(DataIn)

    logging.info(strV15)

    if ((DataIn == '') | (DataIn == None)):
        raise ValueError

    flg = 'Y'
except ValueError:
    DataIn = req_body.get('edata')
    strV15 = 'Else Part:: ' + str(DataIn)
    logging.info(strV15)
    flg = 'N'
except:
    DataIn = req_body.get('edata')
    strV15 = 'Else Part:: ' + str(DataIn)
    logging.info(strV15)
    flg = 'N'

So, if the application gets the “data” element then – it will consider the data needs to be encrypted; otherwise, it will go for decryption. And, based on that – it is setting the value.

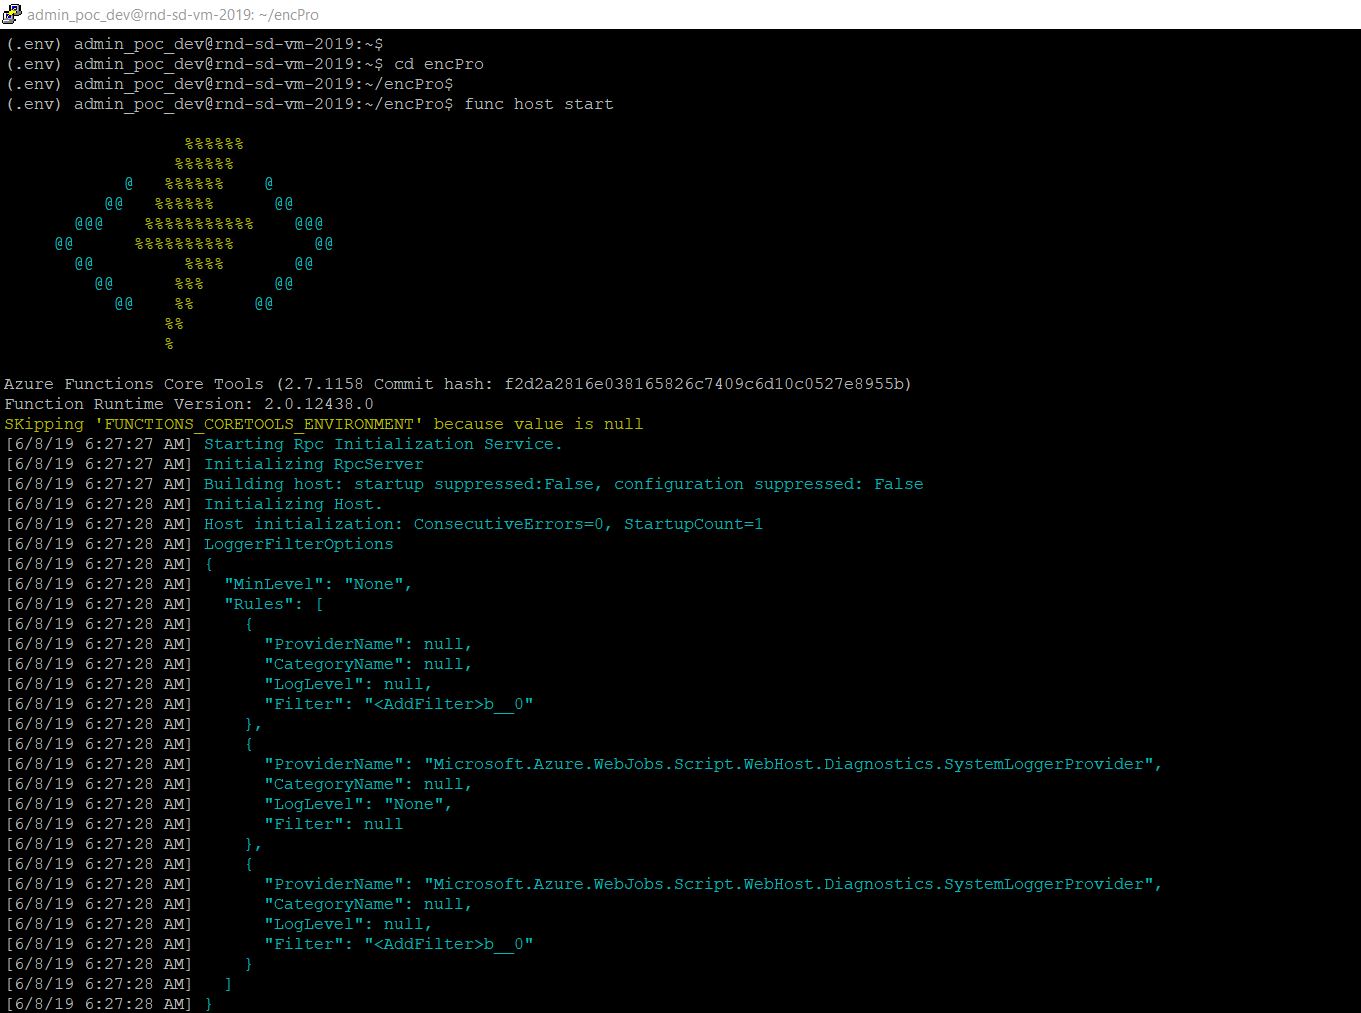
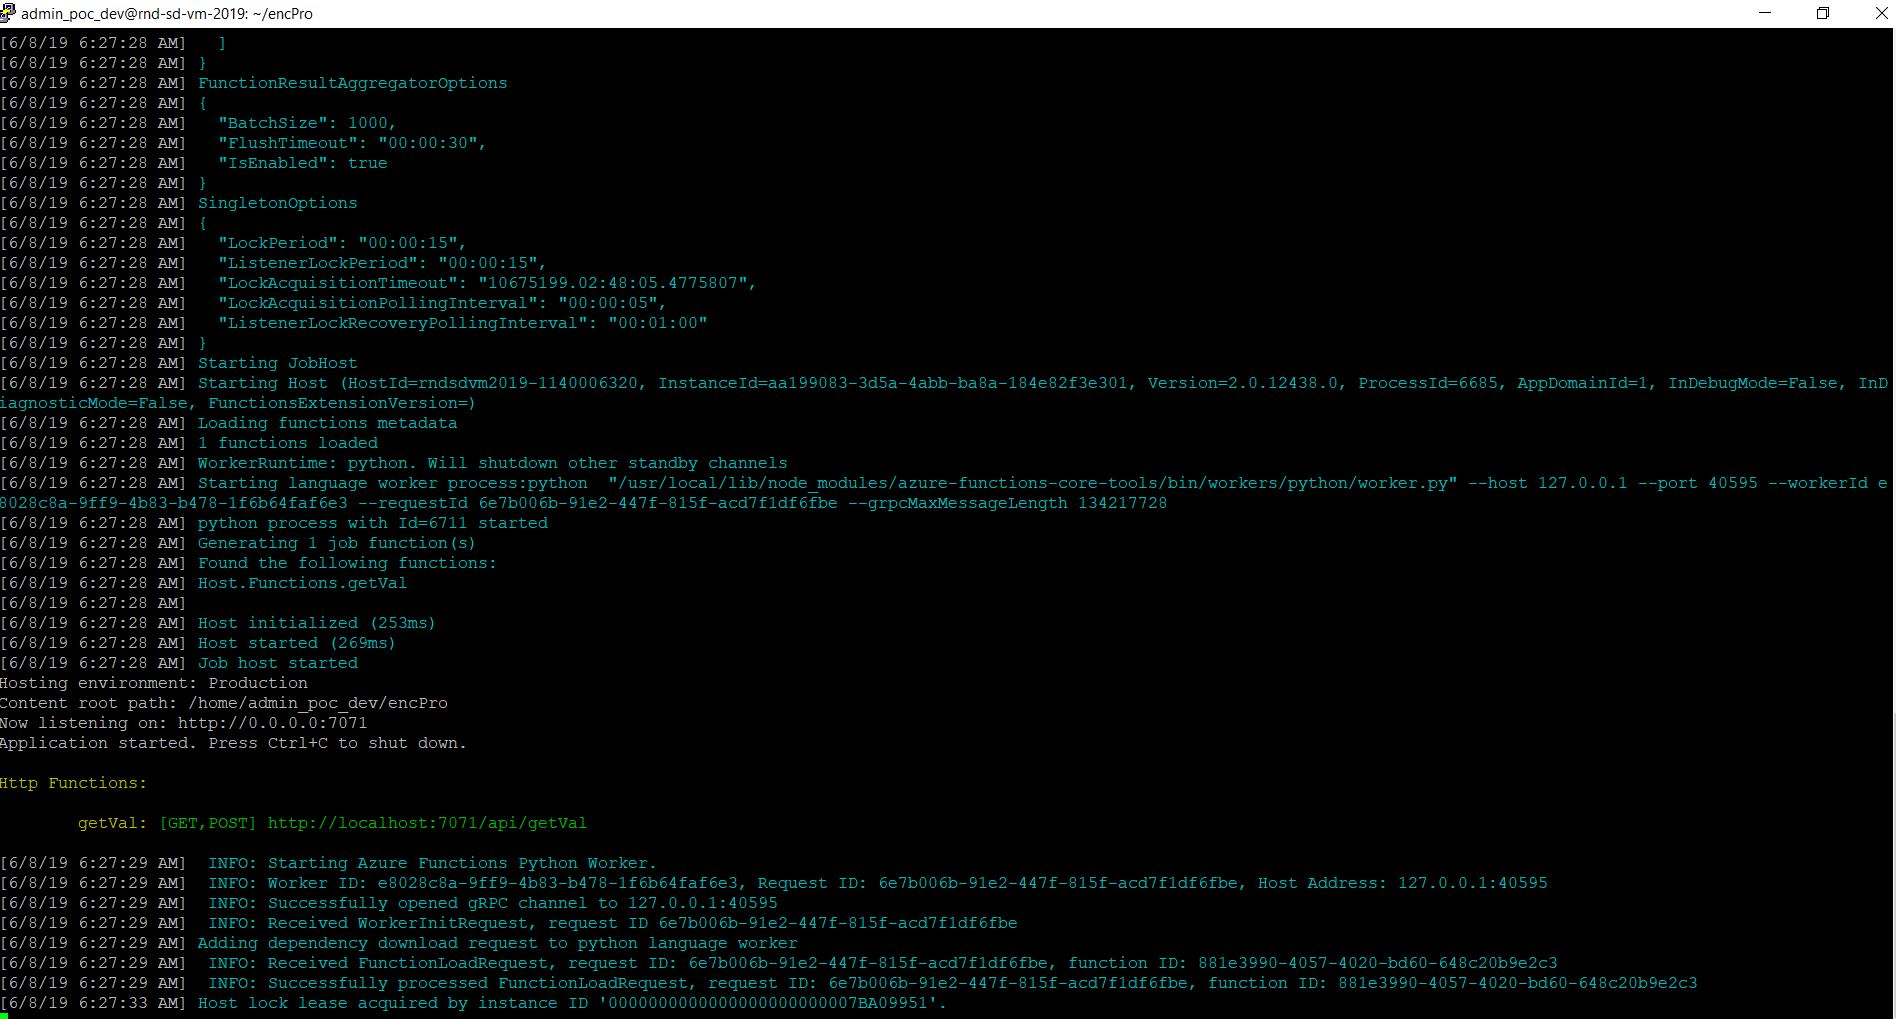
Now, we’re ready to locally run our application –

func host start

And, the output will look like this –

StartingAzureFunction-Python
StartingAzureFunction-Python 2

Let’s test it from postman –

Encrypt:

Postman-Encrypt

Decrypt:

Postman-Decrypt

Great. Now, we’re ready to publish this application to Azure cloud.

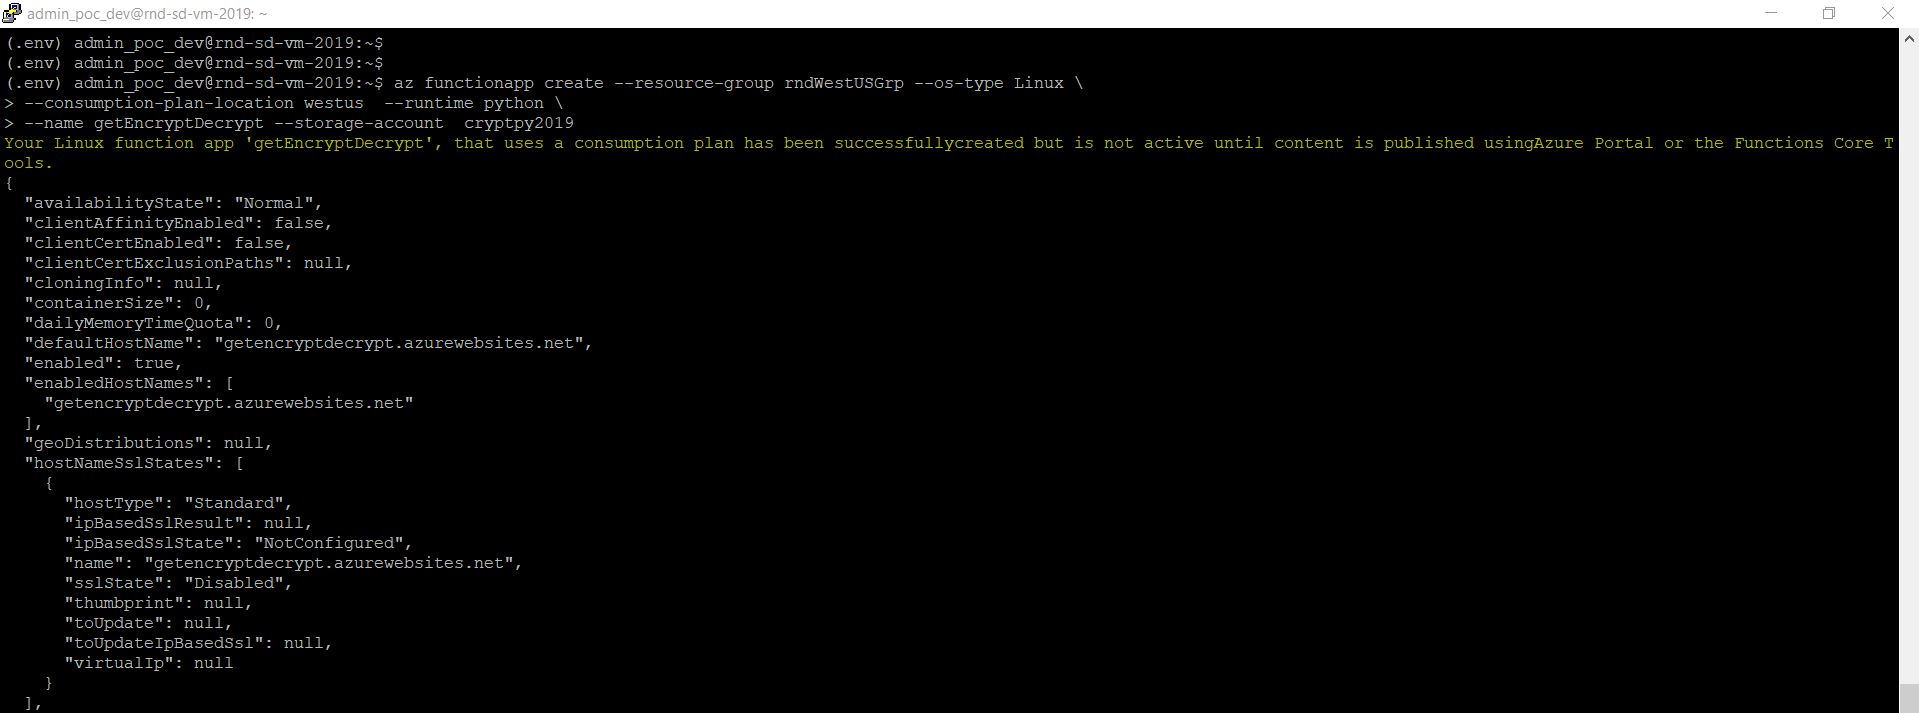
As in our earlier steps, we’ve already built our storage account for the metadata. Please scroll to top to view that again. Now, using that information, we’ll make the function app with a more meaningful name –

az functionapp create –resource-group rndWestUSGrp –os-type Linux \
–consumption-plan-location westus –runtime python \
–name getEncryptDecrypt –storage-account cryptpy2019

CreatingFunctionPython

Let’s publish the function –

sudo func azure functionapp publish “getEncryptDecrypt” –build-native-deps

On many occassion, without the use of “–build-native-deps” might leads to failure. Hence, I’ve added that to avoid such scenarios.

Publishing-Function

Now, we need to test our first published complex Azure function with Python through postman –

Encrypt:

PubishedFuncPostmanEncrypt

Decrypt:

PubishedFuncPostmanDecrypt

Wonderful! So, it is working.

You can see the function under the Azure portal –

Deployed-Function

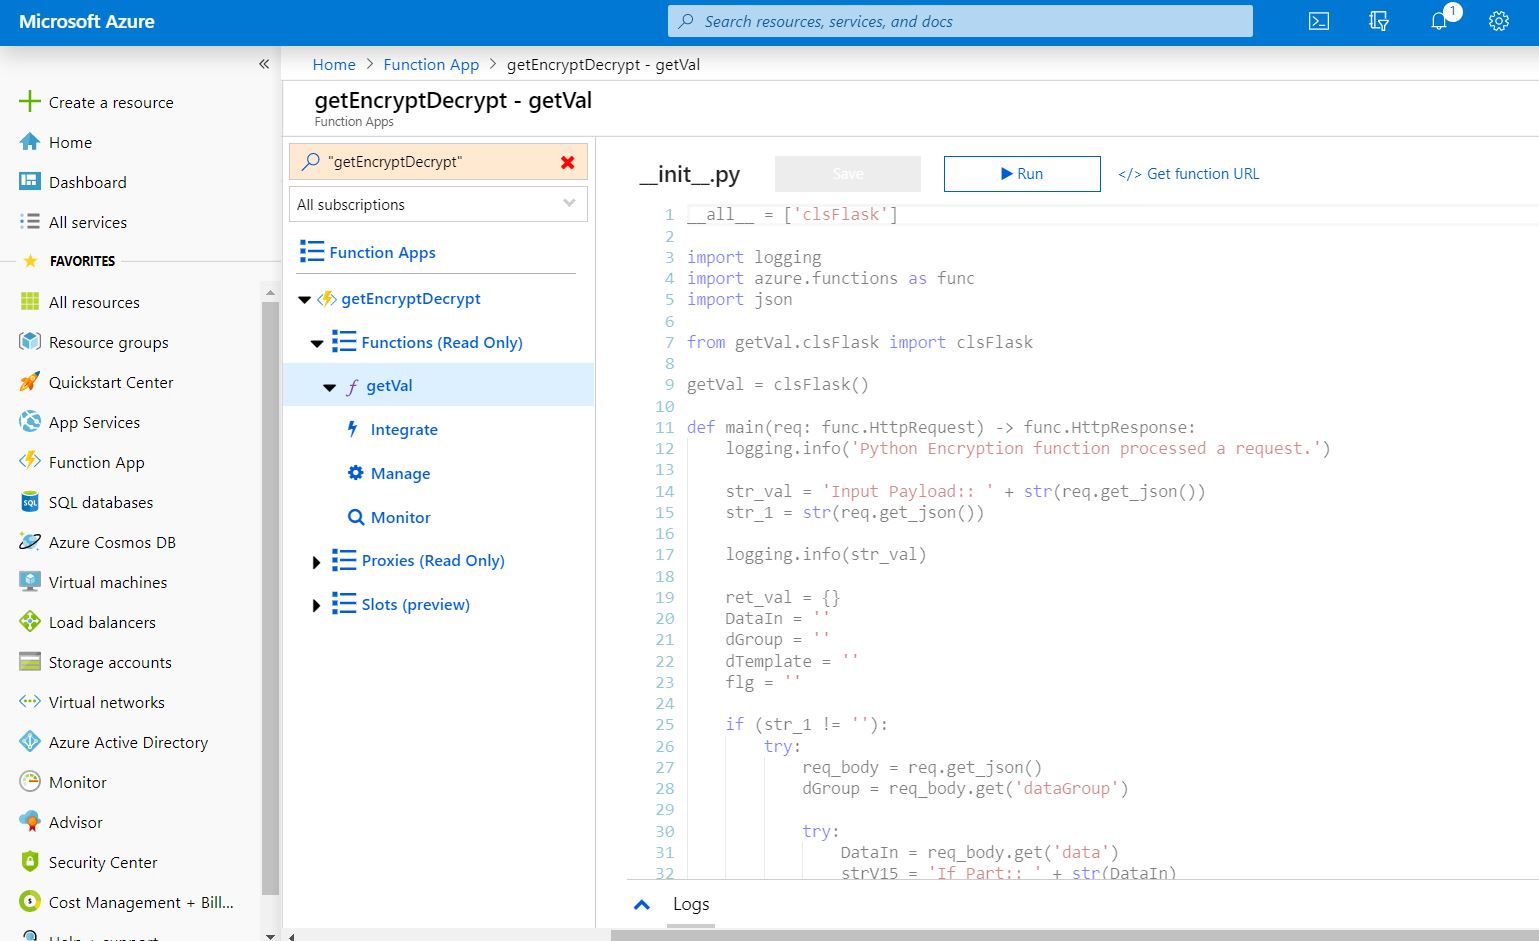
Let’s see some other important features of this function –

Monitor: You can monitor two ways. One is by clicking the monitor options you will get the individual requests level details & also get to see the log information over here –

Function-Monitor-Details-1

Clicking Application Insights will give you another level of detailed logs, which can be very useful for debugging. We’ll touch this at the end of this post with a very brief discussion.

Function-Monitor-Details-3.JPG

As you can see, clicking individual lines will show the details further.

Let’s quickly check the application insights –

Application-Insights-1

Application Insights will give you a SQL like an interface where you can get the log details of all your requests.

Application-Insights-2

You can expand the individual details for further information.

Application-Insights-3

You can change the parameter name & other details & click the run button to get all the log details for your debugging purpose.

So, finally, we’ve achieved our goal. This is relatively long posts. But, I’m sure this will help you to create your first python-based function on the Azure platform.

Hope, you will like this approach. Let me know your comment on the same.

I’ll bring some more exciting topic in the coming days from the Python verse.

Till then, Happy Avenging! 😀

Note: All the data posted here are representational data & available over the internet.

The advanced concept of Pandas & Numpy with an aggregate & lookup of file logging (A crossover over of Space Stone & Soul Stone from the Python verse)

Today, we’ll be implementing the advanced concept of Pandas & Numpy & how one can aggregate data & produce meaningful data insights into your business, which makes an impact on your overall profit.

First, let us understand the complexity of the problem & what we’re looking to achieve here. For that, you need to view the source data & lookup data & how you want to process the data.

Source Data:

sourcedata-e1554702920904-1

The above picture is a sample data-set from a Bank (Data available on U.S public forum), which captures the information of the customer’s current account balance. Let’s look into the look-up files sample data –

First File:

LookUp_1_Actual

Second File:

LookUp_2So, one can clearly see, Bank is trying to get a number of stories based on the existing data.

Challenges:

The first lookup file contains data in a manner where the column of our source file is row here. Hence, you need to somehow bring the source data as per the lookup file to get the other relevant information & then joining that with the second lookup file to bring all the data point for your storyline.

Look-Up Configuration:

In order to match the look-up data with our source data, we’ll be adding two new columns, which will help the application to process the correct row out of the entries provided in the look-up file 1.

LookUp_1

As you can see from the above picture, that two new columns i.e. Category & Stat have added in this context. Here, the category contains metadata information. If a column has a significant number of unique values, then we’re marking it as ‘D in the category. In this case, the bank doesn’t offer any scheme based on the customer’s name. Hence, these fields are marked with ‘I. For the Gender column, the application has less number of unique records i.e. either ‘Male‘ or ‘Female‘. As a result, we provided two corresponding entries. Remember, DateJoined is a key column here. Even though we marked its category as ‘I‘, which denote no transformation requires – ‘K‘ will denote that it is the driving column apart from one of the surrogate key [PKEY] that we’ll be generating during our application transformation process. I’ll discuss that in the respective snippet discussion.

Our Goal:

Based on the source data, We need to find the following story & published that in an excel sheet separately.

  1. The country, Gender wise Bank’s contribution.
  2. The country, Job-wise Bank’s contribution.
  3. The country & Age range wise Saving trends & Bank’s contribution.

A little note on Bank’s Contribution:

Let us explain, what exactly means by Bank’s contribution. Sometimes, bank want’s to encourage savings to an individual client based on all the available factors. So, let’s assume that – Bank contribute $1 for every $150 saving of a person. Again this $1 may vary based on the Age Range & gender to promote a specific group. Also, when someone opens any savings account with the bank, by default bank contributed a sum of $100 at the time when they open an account for a short period of time as part of their promotion strategy. These details you will get it from first lookup file. Second lookup file contains the age range category base on the Group that is available in First Lookup file.

Python Scripts:

In this installment, we’ll be reusing the following python scripts, which is already discussed in my earlier post

  • clsFindFile.py
  • clsL.py

So, I’m not going to discuss these scripts. 

1. clsParam.py (This script will create the split csv files or final merge file after the corresponding process. However, this can be used as normal verbose debug logging as well. Hence, the name comes into the picture.) 

 1
 2
 3
 4
 5
 6
 7
 8
 9
10
11
12
13
14
15
16
17
18
19
20
21
22
23
24
25
26
27
28
29
30
31
32
###########################################
#### Written By: SATYAKI DE        ########
#### Written On: 04-Apr-2019       ########
###########################################

import os
import platform as pl

class clsParam(object):
    os_det = pl.system()
    dir_sep = ''

    if os_det == "Windows":
        dir_sep = "\\"
    else:
        dir_sep = '/'

    config = {
        'MAX_RETRY' : 5,
        'PATH' : os.path.dirname(os.path.realpath(__file__)) + dir_sep,
        'SRC_DIR' : os.path.dirname(os.path.realpath(__file__)) + dir_sep + 'src_files' + dir_sep,
        'FIN_DIR': os.path.dirname(os.path.realpath(__file__)) + dir_sep + 'finished' + dir_sep,
        'LKP_DIR': os.path.dirname(os.path.realpath(__file__)) + dir_sep + 'lkp_files' + dir_sep,
        'LOG_DIR': os.path.dirname(os.path.realpath(__file__)) + dir_sep + 'log' + dir_sep,
        'LKP_FILE': 'DataLookUp',
        'LKP_CATG_FILE': 'CategoryLookUp',
        'LKP_FILE_DIR_NM': 'lkp_files',
        'SRC_FILE_DIR_NM': 'src_files',
        'FIN_FILE_DIR_NM': 'finished',
        'LOG_FILE_DIR_NM': 'log',
        'DEBUG_IND': 'Y'
    }


2. clsLookUpDataRead.py (This script will look into the lookup file & this will generate the combined lookup result as we’ve two different lookup files. Hence, the name comes into the picture.) 

  1
  2
  3
  4
  5
  6
  7
  8
  9
 10
 11
 12
 13
 14
 15
 16
 17
 18
 19
 20
 21
 22
 23
 24
 25
 26
 27
 28
 29
 30
 31
 32
 33
 34
 35
 36
 37
 38
 39
 40
 41
 42
 43
 44
 45
 46
 47
 48
 49
 50
 51
 52
 53
 54
 55
 56
 57
 58
 59
 60
 61
 62
 63
 64
 65
 66
 67
 68
 69
 70
 71
 72
 73
 74
 75
 76
 77
 78
 79
 80
 81
 82
 83
 84
 85
 86
 87
 88
 89
 90
 91
 92
 93
 94
 95
 96
 97
 98
 99
100
101
102
103
104
105
106
107
108
109
110
111
112
113
114
115
116
117
118
119
120
121
122
123
124
125
126
127
128
129
###########################################
#### Written By: SATYAKI DE        ########
#### Written On: 04-Apr-2019       ########
###########################################

import pandas as p
import clsFindFile as c
import clsL as log
from clsParam import clsParam as cf
import datetime

# Disbling Warnings
def warn(*args, **kwargs):
    pass
import warnings
warnings.warn = warn

class clsLookUpDataRead(object):

    def __init__(self, lkpFilename):
        self.lkpFilename = lkpFilename

        self.lkpCatgFilename = cf.config['LKP_CATG_FILE']
        self.path = cf.config['PATH']
        self.subdir = str(cf.config['LOG_FILE_DIR_NM'])

        # To disable logging info
        self.Ind = cf.config['DEBUG_IND']
        self.var = datetime.datetime.now().strftime(".%H.%M.%S")

    def getNaN2Null(self, row):
        try:
            str_val = ''
            str_val = str(row['Group']).replace('nan', '').replace('NaN','')

            return str_val
        except:
            str_val = ''

            return str_val

    def ReadTable(self):
        # Assigning Logging Info
        lkpF = []
        lkpF_2 = []
        var = self.var
        Ind = self.Ind
        subdir = self.subdir

        # Initiating Logging Instances
        clog = log.clsL()

        try:

            # Assinging Lookup file name
            lkpFilename = self.lkpFilename

            # Fetching the actual look-up file name
            f = c.clsFindFile(lkpFilename, str(cf.config['LKP_FILE_DIR_NM']))
            lkp_file_list = list(f.find_file())

            # Ideally look-up will be only one file
            # Later it will be converted to table
            for i in range(len(lkp_file_list)):
                lkpF = lkp_file_list[i]

            # Fetching the content of the look-up file
            df_lkpF = p.read_csv(lkpF, index_col=False)

            # Fetching Category LookUp File
            LkpCatgFileName = self.lkpCatgFilename

            f1 = c.clsFindFile(LkpCatgFileName, str(cf.config['LKP_FILE_DIR_NM']))
            lkp_file_list_2 = list(f1.find_file())

            # Ideally look-up will be only one file
            # Later it will be converted to table
            for j in range(len(lkp_file_list_2)):
                lkpF_2 = lkp_file_list_2[j]

            # Fetching the content of the look-up file
            df_lkpF_2 = p.read_csv(lkpF_2, index_col=False)

            # Changing both the column data type as same type
            df_lkpF['Group_1'] = df_lkpF['Group'].astype(str)
            df_lkpF_2['Group_1'] = df_lkpF_2['Group'].astype(str)

            # Dropping the old column
            df_lkpF.drop(['Group'], axis=1, inplace=True)
            df_lkpF_2.drop(['Group'], axis=1, inplace=True)

            # Renaming the changed data type column with the old column name
            df_lkpF.rename(columns={'Group_1':'Group'}, inplace=True)
            df_lkpF_2.rename(columns={'Group_1': 'Group'}, inplace=True)

            # Merging two lookup dataframes to form Final Consolidated Dataframe
            df_Lkp_Merge = p.merge(
                                    df_lkpF[['TableName', 'ColumnOrder', 'ColumnName', 'MappedColumnName',
                                             'Category', 'Stat', 'Group', 'BankContribution']],
                                    df_lkpF_2[['StartAgeRange', 'EndAgeRange', 'Group']],
                                    on=['Group'], how='left')

            # Converting NaN to Nul or empty string
            df_Lkp_Merge['GroupNew'] = df_Lkp_Merge.apply(lambda row: self.getNaN2Null(row), axis=1)

            # Dropping the old column & renaming the new column
            df_Lkp_Merge.drop(['Group'], axis=1, inplace=True)
            df_Lkp_Merge.rename(columns={'GroupNew': 'Group'}, inplace=True)

            clog.logr('1.df_Lkp_Merge' + var + '.csv', Ind, df_Lkp_Merge, subdir)

            return df_Lkp_Merge

        except(FileNotFoundError, IOError) as s:
            y = str(s)
            print(y)

            # Declaring Empty Dataframe
            df_error = p.DataFrame()

            return df_error
        except Exception as e:
            x = str(e)
            print(x)

            # Declaring Empty Dataframe
            df_error = p.DataFrame()

            return df_error


Key lines from this script –

# Fetching the actual look-up file name
f = c.clsFindFile(lkpFilename, str(cf.config['LKP_FILE_DIR_NM']))
lkp_file_list = list(f.find_file())

# Ideally look-up will be only one file
# Later it will be converted to table
for i in range(len(lkp_file_list)):
lkpF = lkp_file_list[i]

# Fetching the content of the look-up file
df_lkpF = p.read_csv(lkpF, index_col=False)

Here, the application will try to find out the lookup file based on the file name pattern & directory path. And, then load the data into the dataframe.

# Fetching Category LookUp File
LkpCatgFileName = self.lkpCatgFilename

f1 = c.clsFindFile(LkpCatgFileName, str(cf.config['LKP_FILE_DIR_NM']))
lkp_file_list_2 = list(f1.find_file())

# Ideally look-up will be only one file
# Later it will be converted to table
for j in range(len(lkp_file_list_2)):
lkpF_2 = lkp_file_list_2[j]

# Fetching the content of the look-up file
df_lkpF_2 = p.read_csv(lkpF_2, index_col=False)

In this step, the second lookup file will be loaded into the second dataframe.

# Changing both the column data type as same type
df_lkpF['Group_1'] = df_lkpF['Group'].astype(str)
df_lkpF_2['Group_1'] = df_lkpF_2['Group'].astype(str)

# Dropping the old column
df_lkpF.drop(['Group'], axis=1, inplace=True)
df_lkpF_2.drop(['Group'], axis=1, inplace=True)

# Renaming the changed data type column with the old column name
df_lkpF.rename(columns={'Group_1':'Group'}, inplace=True)
df_lkpF_2.rename(columns={'Group_1': 'Group'}, inplace=True)

It is always better to cast the same datatype for those columns, which will be used part of the joining key. The above snippet does exactly that.

# Merging two lookup dataframes to form Final Consolidated Dataframe
df_Lkp_Merge = p.merge(
df_lkpF[['TableName', 'ColumnOrder', 'ColumnName', 'MappedColumnName',
'Category', 'Stat', 'Group', 'BankContribution']],
df_lkpF_2[['StartAgeRange', 'EndAgeRange', 'Group']],
on=['Group'], how='left')

In this step, the first lookup file will be left join with the second lookup file based on Group column.

# Converting NaN to Nul or empty string
df_Lkp_Merge['GroupNew'] = df_Lkp_Merge.apply(lambda row: self.getNaN2Null(row), axis=1)

# Dropping the old column & renaming the new column
df_Lkp_Merge.drop(['Group'], axis=1, inplace=True)
df_Lkp_Merge.rename(columns={'GroupNew': 'Group'}, inplace=True)

Once merge is done, key columns need to suppress ‘NaN’ values to Null for better data process.

3. clsPivotLookUp.py (This script will actually contain the main logic to process & merge the data between source & lookup files & create group data & based on that data point will be produced & captured in the excel. Hence, the name comes into the picture.) 

  1
  2
  3
  4
  5
  6
  7
  8
  9
 10
 11
 12
 13
 14
 15
 16
 17
 18
 19
 20
 21
 22
 23
 24
 25
 26
 27
 28
 29
 30
 31
 32
 33
 34
 35
 36
 37
 38
 39
 40
 41
 42
 43
 44
 45
 46
 47
 48
 49
 50
 51
 52
 53
 54
 55
 56
 57
 58
 59
 60
 61
 62
 63
 64
 65
 66
 67
 68
 69
 70
 71
 72
 73
 74
 75
 76
 77
 78
 79
 80
 81
 82
 83
 84
 85
 86
 87
 88
 89
 90
 91
 92
 93
 94
 95
 96
 97
 98
 99
100
101
102
103
104
105
106
107
108
109
110
111
112
113
114
115
116
117
118
119
120
121
122
123
124
125
126
127
128
129
130
131
132
133
134
135
136
137
138
139
140
141
142
143
144
145
146
147
148
149
150
151
152
153
154
155
156
157
158
159
160
161
162
163
164
165
166
167
168
169
170
171
172
173
174
175
176
177
178
179
180
181
182
183
184
185
186
187
188
189
190
191
192
193
194
195
196
197
198
199
200
201
202
203
204
205
206
207
208
209
210
211
212
213
214
215
216
217
218
219
220
221
222
223
224
225
226
227
228
229
230
231
232
233
234
235
236
237
238
239
240
241
242
243
244
245
246
247
248
249
250
251
252
253
254
255
256
257
258
259
260
261
262
263
264
265
266
267
268
269
270
271
272
273
274
275
276
277
278
279
280
281
282
283
284
285
286
287
288
289
290
291
292
293
294
295
296
297
298
299
300
301
302
303
304
305
306
307
308
309
310
311
312
313
314
315
316
317
318
319
320
321
322
323
324
325
326
327
328
329
330
331
332
333
334
335
336
337
338
339
340
341
342
343
344
345
346
347
348
349
350
351
352
353
354
355
356
357
358
359
360
361
362
363
364
365
366
367
368
369
370
371
372
373
374
375
376
377
378
379
380
381
382
383
384
385
386
387
388
389
390
391
392
393
394
395
396
397
398
399
400
401
402
403
404
405
406
407
408
409
410
411
412
413
414
415
416
417
418
419
420
421
422
423
424
425
426
427
428
429
430
431
432
433
434
435
436
437
438
439
440
441
442
443
444
445
446
447
448
449
450
451
452
453
454
455
456
457
458
459
460
461
462
463
464
465
466
467
468
469
470
471
472
473
474
475
476
477
478
479
480
481
482
483
484
485
486
487
488
489
490
491
492
493
494
495
496
497
498
499
500
501
502
503
504
505
###########################################
#### Written By: SATYAKI DE        ########
#### Written On: 04-Apr-2019       ########
###########################################

import pandas as p
import numpy as np
import clsFindFile as c
import clsL as log
import datetime
from clsParam import clsParam as cf
from pandas import ExcelWriter

# Disbling Warnings
def warn(*args, **kwargs):
    pass
import warnings
warnings.warn = warn

class clsPivotLookUp(object):

    def __init__(self, srcFilename, tgtFileName, df_lkpF):
        self.srcFilename = srcFilename
        self.tgtFileName = tgtFileName
        self.df_lkpF = df_lkpF
        self.lkpCatgFilename = cf.config['LKP_CATG_FILE']

        self.path = cf.config['PATH']
        self.subdir = str(cf.config['LOG_FILE_DIR_NM'])
        self.subdir_2 = str(cf.config['FIN_FILE_DIR_NM'])
        # To disable logging info
        self.Ind = cf.config['DEBUG_IND']
        self.report_path = cf.config['FIN_DIR']

    def dfs_tabs(self, df_list, sheet_list, file_name):
        try:
            cnt = 0
            number_rows = 0

            writer = p.ExcelWriter(file_name, engine='xlsxwriter')

            for dataframe, sheet in zip(df_list, sheet_list):
                number_rows = int(dataframe.shape[0])
                number_cols = int(dataframe.shape[1])

                if cnt == 0:
                    dataframe.to_excel(writer, sheet_name=sheet, startrow=7, startcol=5)
                else:
                    dataframe.to_excel(writer, sheet_name=sheet, startrow=5, startcol=0)

                # Get the xlsxwriter workbook & worksheet objects
                workbook = writer.book
                worksheet = writer.sheets[sheet]
                worksheet.set_zoom(90)

                if cnt == 0:
                    worksheet.set_column('A:E', 4)
                    worksheet.set_column('F:F', 20)
                    worksheet.set_column('G:G', 10)
                    worksheet.set_column('H:J', 20)

                    # Insert an Image
                    worksheet.insert_image('E1', 'Logo.png', {'x_scale':0.6, 'y_scale':0.8})

                    # Add a number format for cells with money.
                    money_fmt = workbook.add_format({'num_format': '$#,##0', 'border': 1})
                    worksheet.set_column('H:H', 20, money_fmt)

                    # Define our range for color formatting
                    color_range = "F9:F{}".format(number_rows * 2 + 1)

                    # Add a format. Red fill with the dark red text
                    red_format = workbook.add_format({'bg_color':'#FEC7CE', 'font_color':'#0E0E08', 'border':1})

                    # Add a format. Green fill with the dark green text
                    green_format = workbook.add_format({'bg_color': '#D0FCA4', 'font_color': '#0E0E08', 'border': 1})

                    # Add a format. Cyan fill with the dark green text
                    mid_format = workbook.add_format({'bg_color': '#6FC2D8', 'font_color': '#0E0E08', 'border': 1})

                    # Add a format. Other fill with the dark green text
                    oth_format = workbook.add_format({'bg_color': '#AFC2D8', 'font_color': '#0E0E08', 'border': 1})

                    worksheet.conditional_format(color_range, {'type':'cell',
                                                               'criteria':'equal to',
                                                               'value':'"England"',
                                                               'format': green_format})

                    worksheet.conditional_format(color_range, {'type': 'cell',
                                                               'criteria': 'equal to',
                                                               'value': '"Northern Ireland"',
                                                               'format': mid_format})

                    worksheet.conditional_format(color_range, {'type': 'cell',
                                                               'criteria': 'equal to',
                                                               'value': '"Scotland"',
                                                               'format': red_format})

                    worksheet.conditional_format(color_range, {'type': 'cell',
                                                               'criteria': 'equal to',
                                                               'value': '"Wales"',
                                                               'format': oth_format})
                else:
                    first_row = 5
                    first_col = 0
                    last_row = first_row + (number_rows * 2)
                    last_col = number_cols - 1

                    if cnt == 1:
                        worksheet.set_column('A:D', 20)
                    else:
                        worksheet.set_column('A:E', 20)
                        worksheet.set_column('F:F', 20)


                    # Add a number format for cells with money.
                    # money_fmt = workbook.add_format({'num_format': '$#,##0', 'bold': True, 'border':1})
                    money_fmt = workbook.add_format({'num_format': '$#,##0', 'border': 1})

                    # Amount columns
                    if cnt == 1:
                        worksheet.set_row(6, 0, money_fmt)
                        worksheet.set_column('C:C', 20, money_fmt)
                    else:
                        worksheet.set_row(6, 0, money_fmt)
                        worksheet.set_column('D:F', 20, money_fmt)

                    # Insert an Image
                    worksheet.insert_image('B1', 'Logo.png', {'x_scale': 0.5, 'y_scale': 0.5})

                    # Add a format. Red fill with the dark red text
                    red_format = workbook.add_format({'bg_color': '#FEC7CE', 'font_color': '#0E0E08'})

                    # Add a format. Green fill with the dark green text
                    green_format = workbook.add_format({'bg_color': '#D0FCA4', 'font_color': '#0E0E08'})

                    # Add a format. Cyan fill with the dark green text
                    mid_format = workbook.add_format({'bg_color': '#6FC2D8', 'font_color': '#0E0E08'})

                    # Add a format. Other fill with the dark green text
                    oth_format = workbook.add_format({'bg_color': '#AFC2D8', 'font_color': '#0E0E08'})

                    # Fill colour based on formula
                    worksheet.conditional_format(first_row,
                                                 first_col,
                                                 last_row,
                                                 last_col,
                                                 {'type': 'formula',
                                                  'criteria': '=INDIRECT("A"&ROW())="England"',
                                                  'format': green_format})

                    worksheet.conditional_format(first_row,
                                                 first_col,
                                                 last_row,
                                                 last_col,
                                                 {'type': 'formula',
                                                  'criteria': '=INDIRECT("A"&ROW())="Northern Ireland"',
                                                  'format': mid_format})

                    worksheet.conditional_format(first_row,
                                                 first_col,
                                                 last_row,
                                                 last_col,
                                                 {'type': 'formula',
                                                  'criteria': '=INDIRECT("A"&ROW())="Scotland"',
                                                  'format': red_format})

                    worksheet.conditional_format(first_row,
                                                 first_col,
                                                 last_row,
                                                 last_col,
                                                 {'type': 'formula',
                                                  'criteria': '=INDIRECT("A"&ROW())="Wales"',
                                                  'format': oth_format})

                cnt += 1

            writer.save()
            writer.close()

            return 0
        except Exception as e:
            x = str(e)
            print(x)

            return 1

    def getIntVal(self, row):
        try:
            int_val = 0
            int_val = int(row['MCategory'])

            return int_val
        except:
            int_val = 0

            return int_val

    def getSavingsAmount(self, row):
        try:
            savings = 0.0
            savings = float(row['Balance']) - float(row['BankContribution'])

            return savings
        except:
            savings = 0

            return savings

    def getNaN2Zero_StartAgeRange(self, row):
        try:
            int_AgeRange = 0
            str_StartAgeRange = ''

            str_StartAgeRange = str(row['StartAgeRange']).replace('nan','').replace('NaN','')

            if (len(str_StartAgeRange) > 0):
                int_AgeRange = int(float(str_StartAgeRange))
            else:
                int_AgeRange = 0

            return int_AgeRange
        except:
            int_AgeRange = 0

            return int_AgeRange

    def getNaN2Zero_EndAgeRange(self, row):
        try:
            int_AgeRange = 0
            str_EndAgeRange = ''

            str_EndAgeRange = str(row['EndAgeRange']).replace('nan','').replace('NaN','')

            if (len(str_EndAgeRange) > 0):
                int_AgeRange = int(float(str_EndAgeRange))
            else:
                int_AgeRange = 0

            return int_AgeRange
        except:
            int_AgeRange = 0

            return int_AgeRange


    def parse_and_write_csv(self):

        # Assigning Logging Info
        Ind = self.Ind
        subdir = self.subdir
        subdir_2 = self.subdir_2
        lkpF = []
        lkpF_2 = []
        report_path = self.report_path

        #Initiating Logging Instances
        clog = log.clsL()

        if Ind == 'Y':
            print('Logging Enabled....')
        else:
            print('Logging Not Enabled....')

        # Assigning Source File Basic Name
        srcFileInit = self.srcFilename
        tgtFileName = self.tgtFileName
        df_lkpF = self.df_lkpF

        try:

            # Fetching the actual source file name
            d = c.clsFindFile(self.srcFilename, str(cf.config['SRC_FILE_DIR_NM']))
            src_file_list = d.find_file()

            # Ideally look-up will be only one file
            # Later it will be converted to table
            for i in range(len(src_file_list)):

                # Handling Multiple source files
                var = datetime.datetime.now().strftime(".%H.%M.%S")
                print('Target File Extension will contain the following:: ', var)

                srcF = src_file_list[i]

                # Reading Source File
                df = p.read_csv(srcF, index_col=False)

                # Adding a new surrogate key to the existing records
                df = df.assign(PKEY=[1 + i for i in range(len(df))])[['PKEY'] + df.columns.tolist()]

                clog.logr('2.DF_Assign' + var + '.csv', Ind, df, subdir)

                # Fetching only relevant rows from the Look-up Files
                # based on Filters with 'I' or No Token
                # 'K' for Key columns with No Token
                # 'D' for Single column Token
                df_lkpFile = df_lkpF[(df_lkpF['TableName'] == srcFileInit) &
                                     ((df_lkpF['Category'] == 'I') | (df_lkpF['Category'] == 'K'))]

                # Fetching the unique records from Look-up table
                id_list1 = list(df_lkpFile['ColumnName'].drop_duplicates())
                id_list2 = ['PKEY']

                id_list = id_list2 + id_list1

                # Pivoting part of the source file data to be join for merge
                df_melt = df.melt(id_vars=id_list, var_name='ColumnName')

                # Changing the generated column Value to Category for upcoming Merge
                # df_melt = df_tmp_melt.rename_by_col_index(idx_np,'Category')
                # df_melt.rename(columns={'value': 'Category'}, inplace=True)
                df_melt.rename(columns={'value': 'MCategory'}, inplace=True)

                #df_melt.to_csv(path+'1.DF_Melt.csv')
                clog.logr('3.DF_Melt' + var + '.csv', Ind, df_melt, subdir)

                # Now fetching look-up file one more time
                # filtering with the only Table Name
                # For merge with our temporary df_melt
                # to get the relevant lookup
                # information

                df_lkpFinFile = df_lkpF[(df_lkpF['TableName'] == srcFileInit) &
                                        ((df_lkpF['Category'] == 'D') | (df_lkpF['Category'] == 'Male') |
                                        (df_lkpF['Category'] == 'K') | (df_lkpF['Category'] == 'Female'))]

                clog.logr('4.DF_Finlkp' + var + '.csv', Ind, df_lkpFinFile, subdir)

                # Merging two files based on Keys
                # df_fin = df_melt.merge(df_lkpFinFile, on=['ColumnName', 'Category'], how='left')
                df_fin = df_melt.merge(df_lkpFinFile, on=['ColumnName'], how='left')

                clog.logr('5.DF_FIN_Basic_Merge' + var + '.csv', Ind, df_fin, subdir)

                df_fin2 = df_fin[((df_fin['MCategory'] == 'I') & (df_fin['Category'] == df_fin['MCategory'])) |
                                 ((df_fin['MCategory'] == 'Male') & (df_fin['Category'] == df_fin['MCategory'])) |
                                 ((df_fin['MCategory'] == 'Female') & (df_fin['Category'] == df_fin['MCategory'])) |
                                 (df_fin['MCategory'] == 'NaN') |
                                 (df_fin['MCategory'] == 'D') |
                                 (
                                     (df_fin['MCategory'] != 'I') & (df_fin['MCategory'] != 'Male') &
                                     (df_fin['MCategory'] != 'Female') & (df_fin['MCategory'] != 'D') &
                                     (df_fin['MCategory'] != 'NaN')
                                 )]

                clog.logr('6.Merge_After_Filter' + var + '.csv', Ind, df_fin2, subdir)

                # Identifying Integer Column for next step
                df_fin2['Catg'] = df_fin2.apply(lambda row: self.getIntVal(row), axis=1)
                df_fin2['StAge'] = df_fin2.apply(lambda row: self.getNaN2Zero_StartAgeRange(row), axis=1)
                df_fin2['EnAge'] = df_fin2.apply(lambda row: self.getNaN2Zero_EndAgeRange(row), axis=1)

                # Dropping the old Columns
                df_fin2.drop(['Category'], axis=1, inplace=True)
                df_fin2.drop(['StartAgeRange'], axis=1, inplace=True)
                df_fin2.drop(['EndAgeRange'], axis=1, inplace=True)

                # Renaming the new columns
                df_fin2.rename(columns={'Catg': 'Category'}, inplace=True)
                df_fin2.rename(columns={'StAge': 'StartAgeRange'}, inplace=True)
                df_fin2.rename(columns={'EnAge': 'EndAgeRange'}, inplace=True)

                clog.logr('7.Catg' + var + '.csv', Ind, df_fin2, subdir)

                # Handling special cases when Category from source & lookup file won't match
                # alternative way to implement left outer join due to specific data scenarios
                df_fin2['Flag'] = np.where(((df_fin2.StartAgeRange == 0) | (df_fin2.EndAgeRange == 0)) |
                                           (((df_fin2.StartAgeRange > 0) & (df_fin2.EndAgeRange > 0)) &
                                            ((df_fin2.Category >= df_fin2.StartAgeRange)
                                              & (df_fin2.Category <= df_fin2.EndAgeRange))), 'Y', 'N')

                clog.logr('8.After_Special_Filter' + var + '.csv', Ind, df_fin2, subdir)

                # Removing data where Flag is set to Y
                newDF = df_fin2[(df_fin2['Flag'] == 'Y')]

                clog.logr('9.Flag_Filter' + var + '.csv', Ind, newDF, subdir)

                # Need to drop column called ColumnName
                newDF.drop(['TableName'], axis=1, inplace=True)
                newDF.drop(['ColumnOrder'], axis=1, inplace=True)
                newDF.drop(['ColumnName'], axis=1, inplace=True)
                newDF.drop(['Category'], axis=1, inplace=True)
                newDF.drop(['Flag'], axis=1, inplace=True)
                newDF.drop(['Group'], axis=1, inplace=True)

                # Need to rename MappedColumnName to ColumnName
                newDF.rename(columns={'MappedColumnName': 'ColumnName'}, inplace=True)

                clog.logr('10.newDF' + var + '.csv', Ind, newDF, subdir)

                df_short = newDF[['PKEY', 'BankContribution', 'StartAgeRange', 'EndAgeRange']]

                clog.logr('11.df_short' + var + '.csv', Ind, df_short, subdir)

                # Aggregating information
                grouped = df_short.groupby(['PKEY'])
                dfGroup = grouped.aggregate(np.sum)

                clog.logr('12.dfGroup' + var + '.csv', Ind, dfGroup, subdir)

                # Let's merge to get evrything in row level
                df_rowlvl = df.merge(dfGroup, on=['PKEY'], how='inner')

                clog.logr('13.Rowlvl_Merge' + var + '.csv', Ind, df_rowlvl, subdir)

                # Dropping PKEY & Unnamed columns from the csv
                df_rowlvl.drop(['PKEY'], axis=1, inplace=True)

                clog.logr('14.Final_DF' + var + '.csv', Ind, df_rowlvl, subdir)

                ##############################################################
                #### Country & Gender wise Bank's Contribution           #####
                ##############################################################
                dfCountryGender = df_rowlvl[['Region', 'Gender', 'BankContribution']]

                grouped_CG = dfCountryGender.groupby(['Region', 'Gender'])
                dCountryGen = grouped_CG.aggregate(np.sum)

                print("-" * 60)
                print("Country & Gender wise Bank's Contribution")
                print("-" * 60)
                print(dCountryGen)

                clog.logr('15.dCountryGen' + var + '.csv', Ind, dCountryGen, subdir)

                ###############################################################
                ###### End Of Country & Gender wise Bank's Contribution  ######
                ###############################################################

                ##############################################################
                #### Country & Job wise Bank's Contribution              #####
                ##############################################################

                dfCountryJob = df_rowlvl[['Region', 'Job Classification', 'BankContribution']]

                grouped_CJ = dfCountryJob.groupby(['Region', 'Job Classification'])
                dCountryJob = grouped_CJ.aggregate(np.sum)

                print("-" * 60)
                print("Country & Job wise Bank's Contribution")
                print("-" * 60)
                print(dCountryJob)

                clog.logr('16.dCountryJob' + var + '.csv', Ind, dCountryJob, subdir)

                ###############################################################
                ###### End Of Country & Job wise Bank's Contribution     ######
                ###############################################################

                ##############################################################
                #### Country & Age wise Savings & Bank's Contribution    #####
                ##############################################################

                dfCountryAge = df_rowlvl[['Region', 'StartAgeRange', 'EndAgeRange', 'Balance', 'BankContribution']]
                dfCountryAge['SavingsAmount'] = dfCountryAge.apply(lambda row: self.getSavingsAmount(row), axis=1)

                grouped_CA = dfCountryAge.groupby(['Region', 'StartAgeRange', 'EndAgeRange'])
                dCountryAge = grouped_CA.aggregate(np.sum)

                print("-" * 60)
                print("Country & Job wise Bank's Contribution")
                print("-" * 60)
                print(dCountryAge)

                clog.logr('17.dCountryAge' + var + '.csv', Ind, dCountryAge, subdir)

                ##############################################################
                #### End Of Country & Age wise Savings & Bank's          #####
                #### Contribution                                        #####
                ##############################################################

                print('Writing to file!!')

                # Avoiding Index column of dataframe while copying to csv
                # df_token.to_csv(tgtFileName, index=False)
                # For Target File Ind should be always Yes/Y
                Ind = 'Y'

                FtgtFileName = tgtFileName + var + '.csv'
                clog.logr(FtgtFileName, Ind, df_rowlvl, subdir_2)

                ##############################################################
                ##### Writing to Excel File with Different Tabular Sheet #####
                ##############################################################
                dfs = [dCountryGen, dCountryJob, dCountryAge]
                sheets = ['Country-Gender-Stats', 'Country-Job-Stats', 'Country-Age-Stats']

                x = self.dfs_tabs(dfs, sheets, report_path+tgtFileName + var + '.xlsx')

                ##############################################################
                #####             End Of Excel Sheet Writing             #####
                ##############################################################

                # Resetting the Filename after every iteration
                # in case of Mulriple source file exists
                FtgtFileName = ""

            return 0

        except Exception as e:
            x = str(e)
            print(x)
            return 9


Key snippets from this script –

# Adding a new surrogate key to the existing records
df = df.assign(PKEY=[1 + i for i in range(len(df))])[['PKEY'] + df.columns.tolist()]

This is extremely crucial as the application will create its own unique key irrespective of data files, which will be used for most of the places for the data process.

df_lkpFile = df_lkpF[(df_lkpF['TableName'] == srcFileInit) &
((df_lkpF['Category'] == 'I') | (df_lkpF['Category'] == 'K'))]

# Fetching the unique records from Look-up table
id_list1 = list(df_lkpFile['ColumnName'].drop_duplicates())
id_list2 = ['PKEY']

id_list = id_list2 + id_list1

This steps will capture all the columns except our key columns in our source table, which will convert columns to rows & then it will be used to join with our look-up table.

# Pivoting part of the source file data to be join for merge
df_melt = df.melt(id_vars=id_list, var_name='ColumnName')

As in the above step, the application is converting key columns of our source file to rows.

df_lkpFinFile = df_lkpF[(df_lkpF['TableName'] == srcFileInit) &
((df_lkpF['Category'] == 'D') | (df_lkpF['Category'] == 'Male') |
(df_lkpF['Category'] == 'K') | (df_lkpF['Category'] == 'Female'))]

In this step, the application will consider all the rows based on source file name pattern & based on certain data, which will be used for lookup join.

df_fin = df_melt.merge(df_lkpFinFile, on=['ColumnName'], how='left')

In this step, the application will join the transformed data of source file with our lookup file.

df_fin2 = df_fin[((df_fin['MCategory'] == 'I') & (df_fin['Category'] == df_fin['MCategory'])) |
((df_fin['MCategory'] == 'Male') & (df_fin['Category'] == df_fin['MCategory'])) |
((df_fin['MCategory'] == 'Female') & (df_fin['Category'] == df_fin['MCategory'])) |
(df_fin['MCategory'] == 'NaN') |
(df_fin['MCategory'] == 'D') |
(
(df_fin['MCategory'] != 'I') & (df_fin['MCategory'] != 'Male') &
(df_fin['MCategory'] != 'Female') & (df_fin['MCategory'] != 'D') &
(df_fin['MCategory'] != 'NaN')
)]

This step brings the data, which will look like –

Imp_Step_1

# Identifying Integer Column for next step
df_fin2['Catg'] = df_fin2.apply(lambda row: self.getIntVal(row), axis=1)
df_fin2['StAge'] = df_fin2.apply(lambda row: self.getNaN2Zero_StartAgeRange(row), axis=1)
df_fin2['EnAge'] = df_fin2.apply(lambda row: self.getNaN2Zero_EndAgeRange(row), axis=1)

# Dropping the old Columns
df_fin2.drop(['Category'], axis=1, inplace=True)
df_fin2.drop(['StartAgeRange'], axis=1, inplace=True)
df_fin2.drop(['EndAgeRange'], axis=1, inplace=True)

# Renaming the new columns
df_fin2.rename(columns={'Catg': 'Category'}, inplace=True)
df_fin2.rename(columns={'StAge': 'StartAgeRange'}, inplace=True)
df_fin2.rename(columns={'EnAge': 'EndAgeRange'}, inplace=True)

Now, the application will remove NaN from these key columns for important upcoming step.

After this step, the new data looks like –

Imp_Step_2

So, now, it will be easier to filter out these data based on age range against customer age int the next step as follows –

# Handling special cases when Category from source & lookup file won't match
# alternative way to implement left outer join due to specific data scenarios
df_fin2['Flag'] = np.where(((df_fin2.StartAgeRange == 0) | (df_fin2.EndAgeRange == 0)) |
(((df_fin2.StartAgeRange > 0) & (df_fin2.EndAgeRange > 0)) &
((df_fin2.Category >= df_fin2.StartAgeRange)
& (df_fin2.Category <= df_fin2.EndAgeRange))), 'Y', 'N')

After this, new data looks like –

Imp_Step_3

Finally, filter out only records with ‘Y’. And, the data looks like as follows –

Imp_Step_4

Now, the application needs to consolidate Bank Contribution, Start & End Age Range & needs to re-pivot the data to make it a single row per customer. The data should look like this –

Imp_Step_5

Once this is done, our application is ready for all the aggregated data points.

Hence, three different categories of data transformations are self-explanatory –

Data Point – 1:

##############################################################
#### Country & Gender wise Bank's Contribution #####
##############################################################
dfCountryGender = df_rowlvl[['Region', 'Gender', 'BankContribution']]

grouped_CG = dfCountryGender.groupby(['Region', 'Gender'])
dCountryGen = grouped_CG.aggregate(np.sum)

print("-" * 60)
print("Country & Gender wise Bank's Contribution")
print("-" * 60)
print(dCountryGen)

clog.logr('15.dCountryGen' + var + '.csv', Ind, dCountryGen, subdir)

###############################################################
###### End Of Country & Gender wise Bank's Contribution ######
###############################################################

Data Point – 2:

##############################################################
#### Country & Job wise Bank's Contribution #####
##############################################################

dfCountryJob = df_rowlvl[['Region', 'Job Classification', 'BankContribution']]

grouped_CJ = dfCountryJob.groupby(['Region', 'Job Classification'])
dCountryJob = grouped_CJ.aggregate(np.sum)

print("-" * 60)
print("Country & Job wise Bank's Contribution")
print("-" * 60)
print(dCountryJob)

clog.logr('16.dCountryJob' + var + '.csv', Ind, dCountryJob, subdir)

###############################################################
###### End Of Country & Job wise Bank's Contribution ######
###############################################################

Data Point – 3:

##############################################################
#### Country & Age wise Savings & Bank's Contribution #####
##############################################################

dfCountryAge = df_rowlvl[['Region', 'StartAgeRange', 'EndAgeRange', 'Balance', 'BankContribution']]
dfCountryAge['SavingsAmount'] = dfCountryAge.apply(lambda row: self.getSavingsAmount(row), axis=1)

grouped_CA = dfCountryAge.groupby(['Region', 'StartAgeRange', 'EndAgeRange'])
dCountryAge = grouped_CA.aggregate(np.sum)

print("-" * 60)
print("Country & Job wise Bank's Contribution")
print("-" * 60)
print(dCountryAge)

clog.logr('17.dCountryAge' + var + '.csv', Ind, dCountryAge, subdir)

##############################################################
#### End Of Country & Age wise Savings & Bank's #####
#### Contribution #####
##############################################################

Finally, these datasets will invoke an excel generator function to capture all these data into different sheets & beautify the report are as follows –

##############################################################
##### Writing to Excel File with Different Tabular Sheet #####
##############################################################
dfs = [dCountryGen, dCountryJob, dCountryAge]
sheets = ['Country-Gender-Stats', 'Country-Job-Stats', 'Country-Age-Stats']

x = self.dfs_tabs(dfs, sheets, report_path+tgtFileName + var + '.xlsx')

##############################################################
##### End Of Excel Sheet Writing #####
##############################################################

Key snippets from this function –

writer = p.ExcelWriter(file_name, engine='xlsxwriter')

This step will initiate the excel engine.

for dataframe, sheet in zip(df_list, sheet_list):
number_rows = int(dataframe.shape[0])
number_cols = int(dataframe.shape[1])

In this step, the application will unpack one by one sheet & produce the result into excel.

if cnt == 0:
dataframe.to_excel(writer, sheet_name=sheet, startrow=7, startcol=5)
else:
dataframe.to_excel(writer, sheet_name=sheet, startrow=5, startcol=0)

In this step, this will create the data starting from row 7 into the first sheet, whereas the remaining two sheets will capture data from row 5.

worksheet.set_column('A:E', 4)
worksheet.set_column('F:F', 20)
worksheet.set_column('G:G', 10)
worksheet.set_column('H:J', 20)

This will set the length of these columns.

# Insert an Image
worksheet.insert_image('E1', 'Logo.png', {'x_scale':0.6, 'y_scale':0.8})

In this case, the application will insert my blog logo on top of every page of this excel.

# Add a number format for cells with money.
money_fmt = workbook.add_format({'num_format': '$#,##0', 'border': 1})
worksheet.set_column('H:H', 20, money_fmt)

Also, for the column with monetary information, it will generate a specific format.

# Define our range for color formatting
color_range = "F9:F{}".format(number_rows * 2 + 1)

# Add a format. Red fill with the dark red text
red_format = workbook.add_format({'bg_color':'#FEC7CE', 'font_color':'#0E0E08', 'border':1})

# Add a format. Green fill with the dark green text
green_format = workbook.add_format({'bg_color': '#D0FCA4', 'font_color': '#0E0E08', 'border': 1})

# Add a format. Cyan fill with the dark green text
mid_format = workbook.add_format({'bg_color': '#6FC2D8', 'font_color': '#0E0E08', 'border': 1})

# Add a format. Other fill with the dark green text
oth_format = workbook.add_format({'bg_color': '#AFC2D8', 'font_color': '#0E0E08', 'border': 1})

worksheet.conditional_format(color_range, {'type':'cell',
'criteria':'equal to',
'value':'"England"',
'format': green_format})

worksheet.conditional_format(color_range, {'type': 'cell',
'criteria': 'equal to',
'value': '"Northern Ireland"',
'format': mid_format})

worksheet.conditional_format(color_range, {'type': 'cell',
'criteria': 'equal to',
'value': '"Scotland"',
'format': red_format})

worksheet.conditional_format(color_range, {'type': 'cell',
'criteria': 'equal to',
'value': '"Wales"',
'format': oth_format})

In this step, the application will color-code individual start cell to highlight specific category for better decision making visually.

4. callPivotLookUp.py (This script will call the main pivot script & process the data as per business requirement. Hence, the name comes into the picture.)

 1
 2
 3
 4
 5
 6
 7
 8
 9
10
11
12
13
14
15
16
17
18
19
20
21
22
23
24
25
26
27
28
29
30
31
32
33
34
35
36
37
38
39
40
41
42
43
44
45
46
47
48
49
50
51
52
53
54
55
56
57
58
59
60
61
62
63
64
65
66
67
68
69
70
71
72
73
74
75
76
77
78
79
80
81
82
83
84
#####################################################
### Objective: Purpose of this Library is to call ###
### the parse_and_write_csv method to produce the ###
### tokenized columns based on the look-up file.  ###
###                                               ###
### Arguments are as follows:                     ###
### Source File, Target File & Lookup Files.      ###
###                                               ###
#####################################################

import clsPivotLookUp as ct
from clsParam import clsParam as cf
import sys
import pandas as p
import clsLookUpDataRead as cl

def main():
    print("Calling the custom Package..")

    cnt_lkp = 0

    try:
        #Default Look up table
        Lkp_Filename = cf.config['LKP_FILE']

        # Adding New DB Table for Lookup
        x = cl.clsLookUpDataRead(Lkp_Filename)
        df_lkpF = x.ReadTable()

        cnt_lkp = df_lkpF.shape[0]

        if cnt_lkp > 0:
            df_lkpF_copy = df_lkpF.copy()

            # Getting all the unique file names
            df_list_F1 = list(df_lkpF_copy['TableName'].drop_duplicates())

            # File list which has Tokenization
            df_lkpF_Int = df_lkpF[(df_lkpF['Group'].str.len() >= 1)]
            df_list_F2 = list(df_lkpF_Int['TableName'].drop_duplicates())

            for i in df_list_F1:
                if i in df_list_F2:
                    try:
                        inputFile = i

                        print("*"*30)
                        print("Reading from " + inputFile + ".csv")
                        print("*" * 30)

                        srcFileName = inputFile
                        tarFileName = srcFileName + '_processed'

                        x = ct.clsPivotLookUp(srcFileName, tarFileName, df_lkpF)

                        ret_val = x.parse_and_write_csv()

                        if ret_val == 0:
                            print("Writing to file -> (" + tarFileName + ".csv) Status: ", ret_val)
                        else:
                            if ret_val == 5:
                                print("File IO Error! Please check your directory whether the file exists with data!")
                            else:
                                print("Data Processing Issue!")

                        print("*" * 30)
                        print("Operation done for " + srcFileName + "!")
                        print("*" *30)
                    except Exception as e:
                        x = str(e)
                        srcFileName = inputFile
                        print('Check the status of ' + srcFileName + ' ' + x)
                else:
                    pass
        else:
            print("No Matching Data to process!")
    except Exception as e:
        x = str(e)
        print(x)

        print("No Matching Data to process!")

if __name__ == "__main__":
    main()


And, the key snippet from here –

# Getting all the unique file names
df_list_F1 = list(df_lkpF_copy['TableName'].drop_duplicates())

# File list which has Tokenization
df_lkpF_Int = df_lkpF[(df_lkpF['Group'].str.len() >= 1)]
df_list_F2 = list(df_lkpF_Int['TableName'].drop_duplicates())

This will identify all the source files, which as similar kind of cases & process them one by one.

x = ct.clsPivotLookUp(srcFileName, tarFileName, df_lkpF)
ret_val = x.parse_and_write_csv()

if ret_val == 0:
print("Writing to file -> (" + tarFileName + ".csv) Status: ", ret_val)
else:
if ret_val == 5:
print("File IO Error! Please check your directory whether the file exists with data!")
else:
print("Data Processing Issue!")

This will call the main application class & based on the return result – it will capture the status of success or failure.

Let’s check the directory of both the Windows & MAC.

Windows:

Win_Dir

MAC:

MAC_Dir

Let’s check the run process –

Windows:

Win_Run_1

Win_Run_2

MAC:

MAC_Run_1

MAC_Run_2

Let’s see – how it looks in Excel –

Windows:

Win_Sheet_1

Win_Sheet_2

Win_Sheet_3

MAC:

MAC_Sheet_1

MAC_Sheet_2

MAC_Sheet_3

So, finally, we’ve achieved our target. 

Horray! We’ve done it! 😀

I hope you’ll like this effort. 

Wait for the next installment. Till then, Happy Avenging. 🙂

[Note: All the sample data are available in public domain for research & study.]


Oracle SQL & PL/SQL Basics.

Hi!

Friends, this page mainly deals with the basic of oracle sql & pl/sql. Here, i’m going to present many useful Oracle snippets which can be plugged into your solution. Many of the snippets which are going to be part of this blog are conceptualize and coded by me and many cases i got the idea from our brilliant otn members. I’m sure you people will like all the snippets as useful bricks. Very soon i am going to post many oracle sql & pl/sql .

Here i’m posting some useful SQL snippets which can be plugged into your environment –

SQL:

1. Dynamic Table Alteration:

Here is the sample code that demonstrate this –

scott>select * from v$version;
BANNER
----------------------------------------------------------------
Oracle Database 10g Enterprise Edition Release 10.2.0.3.0 - Prod
PL/SQL Release 10.2.0.3.0 - Production
CORE 10.2.0.3.0 Production
TNS for 32-bit Windows: Version 10.2.0.3.0 - Production
NLSRTL Version 10.2.0.3.0 - Production

Elapsed: 00:00:00.09

scott>
scott>create table test_dummy
2 (
3 a varchar2(10)
4 );

Table created.

Elapsed: 00:00:05.00
scott>
scott>
scott>alter table &tab add (& col varchar2 ( 10 ));
Enter value for tab: test_dummy
Enter value for col: b
old 1: alter table &tab add (& col varchar2 ( 10 ))
new 1: alter table test_dummy add (b varchar2 ( 10 ))

Table altered.

Elapsed: 00:00:01.19

scott>
scott>desc test_dummy;
Name Null? Type
-------------------- -------- --------------
A VARCHAR2(10)
B VARCHAR2(10)


2. Alternative Of Break Command:

scott>
scott>SELECT lag(null, 1, d.dname)
over (partition by e.deptno order by e.ename) as dname,
2 e.ename
3 from emp e, dept d
4 where e.deptno = d.deptno
5 ORDER BY D.dname, e.ename;

DNAME ENAME
-------------- ----------
ACCOUNTING CLARK
KING
MILLER
RESEARCH ADAMS
FORD
JONES
SCOTT
SMITH
SALES ALLEN
BLAKE
JAMES

DNAME ENAME
-------------- ----------
MARTIN
TURNER
WARD

14 rows selected.

Elapsed: 00:00:00.52
scott>


3. Can we increase the size of a column for a View:

SQL> create or replace view v_emp
2 as
3 select ename
4 from emp
5 /
View created.

SQL> desc v_emp
Name Null? Type
----------------------------------------- -------- ----------------------------
ENAME VARCHAR2(10)
SQL>
SQL> create or replace view v_emp
2 as
3 select cast (ename as varchar2 (30)) ename
4 from emp
5 /
View created.

SQL> desc v_emp
Name Null? Type
----------------------------------------- -------- ----------------------------
ENAME VARCHAR2(30)

And here is the silly way to do this –

create or replace view temp_vv
as
select replace(ename,' ') ename
from (
select rpad(ename,100) ename
from emp
);

4. Combining two SQL Into One:

satyaki>
satyaki>select e.empno,e.deptno,d.loc "DEPT_10"
2 from emp e, dept d
3 where e.deptno = d.deptno
4 and d.deptno = 10;

EMPNO DEPTNO DEPT_10
---------- ---------- -------------
7782 10 NEW YORK
7839 10 NEW YORK
7934 10 NEW YORK

Elapsed: 00:00:00.04
satyaki>
satyaki>select e.empno,e.deptno,d.loc "DEPT_OTH"
2 from emp e, dept d
3 where e.deptno = d.deptno
4 and e.deptno not in (10);

EMPNO DEPTNO DEPT_OTH
---------- ---------- -------------
7369 20 DALLAS
7876 20 DALLAS
7566 20 DALLAS
7788 20 DALLAS
7902 20 DALLAS
7900 30 CHICAGO
7844 30 CHICAGO
7654 30 CHICAGO
7521 30 CHICAGO
7499 30 CHICAGO
7698 30 CHICAGO

11 rows selected.

Elapsed: 00:00:00.04
satyaki>
satyaki>
satyaki>select a.empno,(
2 select d.loc
3 from emp e, dept d
4 where e.deptno = d.deptno
5 and e.empno = a.empno
6 and d.deptno = 10
7 ) "DEPT_10" ,
8 (
9 select d.loc
10 from emp e, dept d
11 where e.deptno = d.deptno
12 and e.empno = a.empno
13 and d.deptno not in (10)
14 ) "DEPT_OTH"
15 from emp a
16 order by a.empno;

EMPNO DEPT_10 DEPT_OTH
---------- ------------- -------------
7369 DALLAS
7499 CHICAGO
7521 CHICAGO
7566 DALLAS
7654 CHICAGO
7698 CHICAGO
7782 NEW YORK
7788 DALLAS
7839 NEW YORK
7844 CHICAGO
7876 DALLAS

EMPNO DEPT_10 DEPT_OTH
---------- ------------- -------------
7900 CHICAGO
7902 DALLAS
7934 NEW YORK

14 rows selected.

Elapsed: 00:00:00.30
satyaki>

Regards.

Satyaki De.