Enabling OpenAI-based NLP engine with SIRI (MacBook/iPad/iPhone) through a proxy-driven restricted API using Python.

Today, I’m very excited to demonstrate an effortless & new way to integrate SIRI with a controlled Open-AI exposed through a proxy API. So, why this is important; this will give you options to control your ChatGPT environment as per your principles & then you can use a load-balancer (if you want) & exposed that through proxy.

In this post, I’ve directly subscribed to OpenAI & I’m not using OpenAI from Azure. However, I’ll explore that in the future as well.


Before I explain the process to invoke this new library, why not view the demo first & then discuss it?

Demo

Isn’t it fascinating? This approach will lead to a whole new ballgame, where you can add SIRI with an entirely new world of knowledge as per your requirements & expose them in a controlled way.

FLOW OF EVENTS:

Let us look at the flow diagram as it captures the sequence of events that unfold as part of the process.

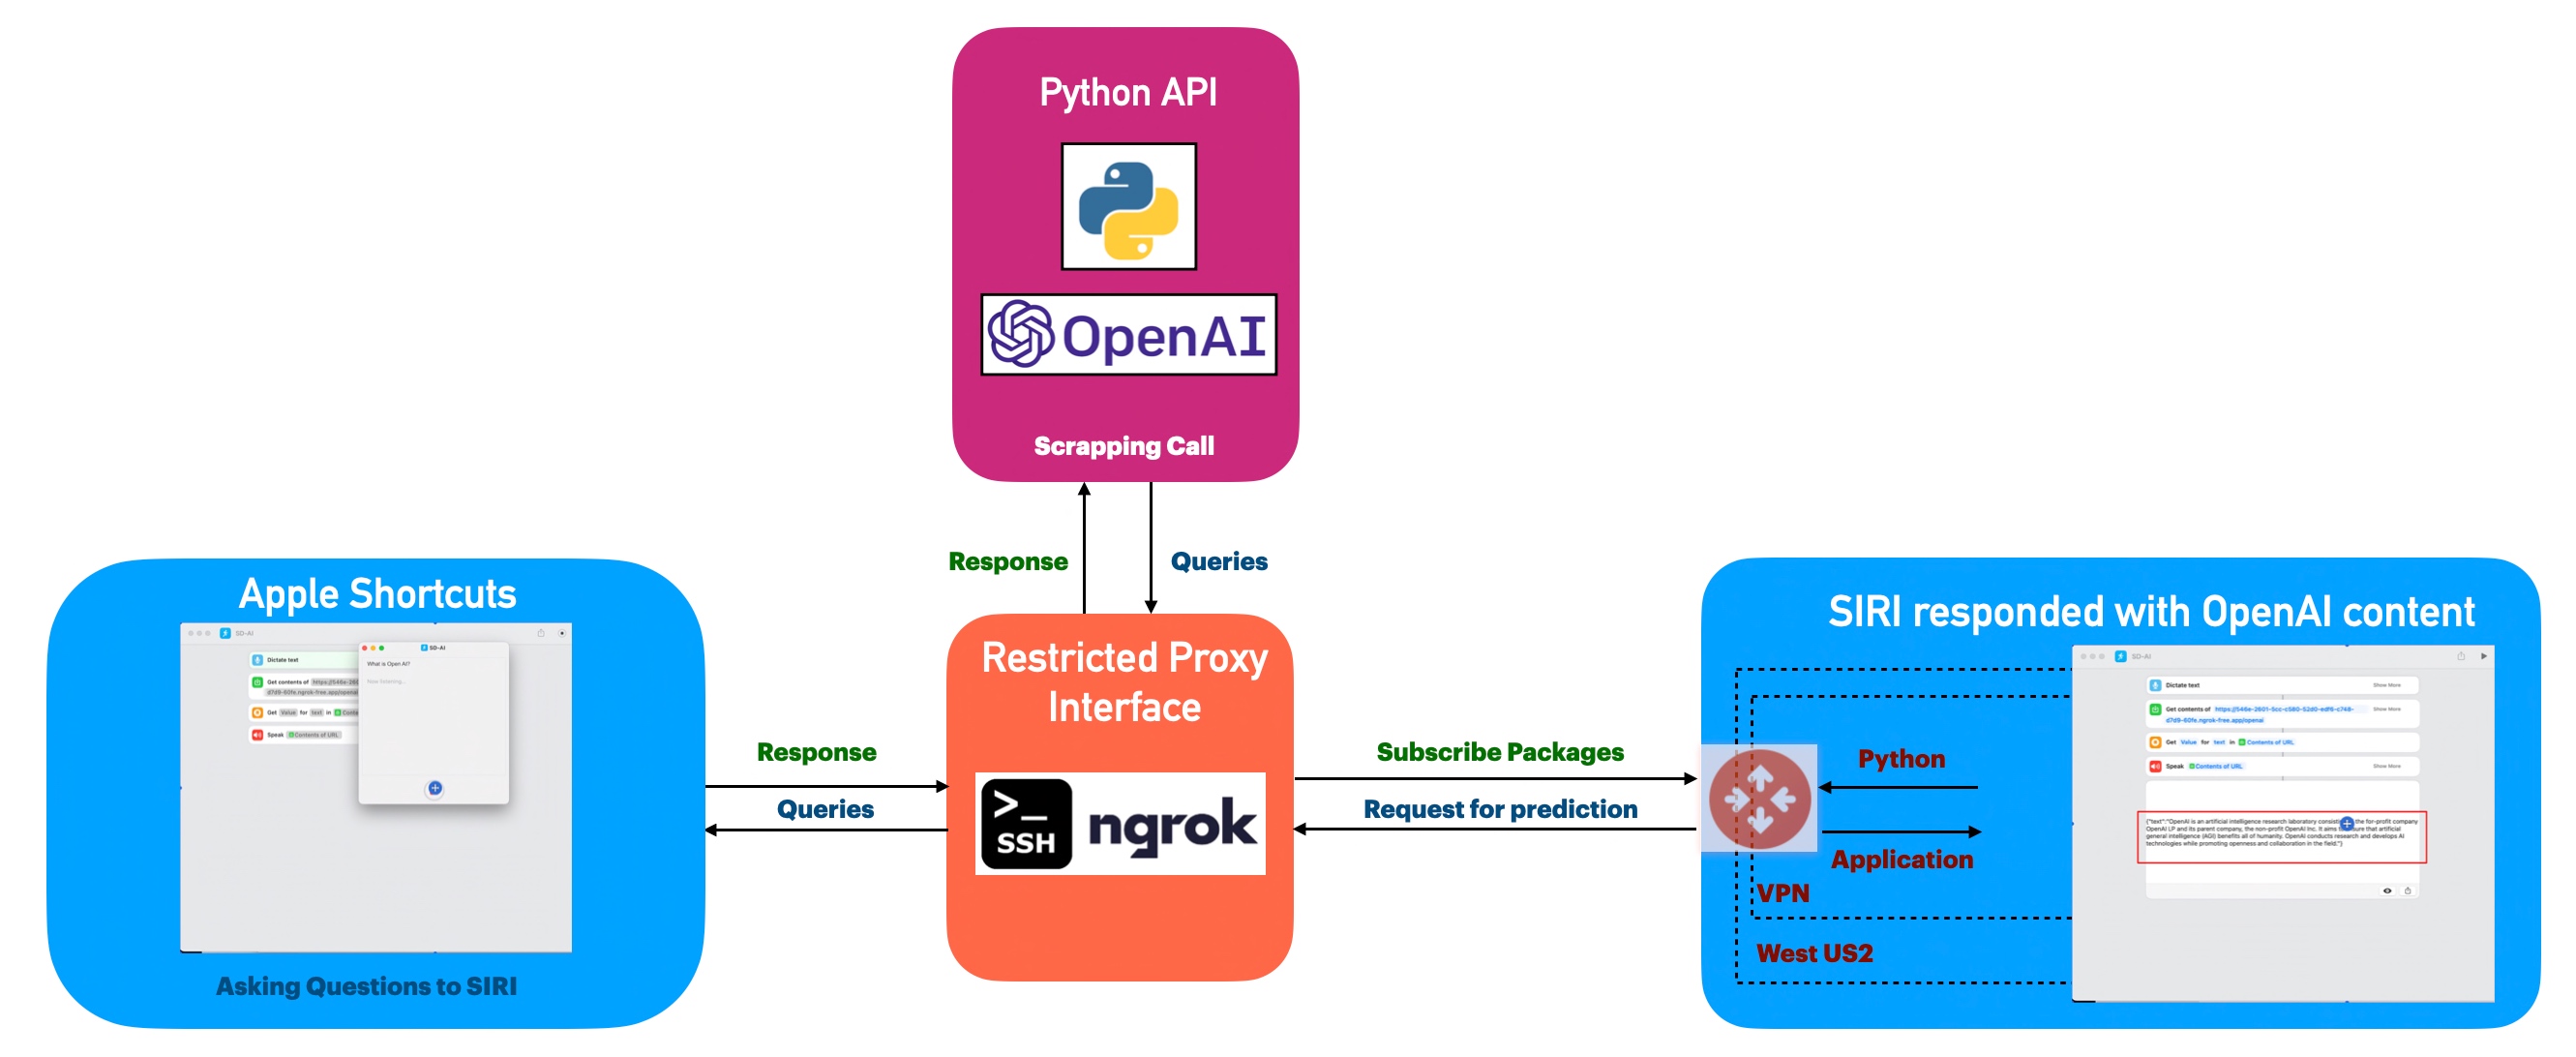
As you can see, Apple Shortcuts triggered the requests through its voice app, which then translates the question to text & then it will invoke the ngrok proxy API, which will eventually trigger the controlled custom API built using Flask & Python to start the Open AI API.


CODE:

Why don’t we go through the code made accessible due to this new library for this particular use case?

  • clsConfigClient.py (This is the main calling Python script for the input parameters.)


################################################
#### Written By: SATYAKI DE ####
#### Written On: 15-May-2020 ####
#### Modified On: 27-Jun-2023 ####
#### ####
#### Objective: This script is a config ####
#### file, contains all the keys for ####
#### personal OpenAI-based MAC-shortcuts ####
#### enable bot. ####
#### ####
################################################
import os
import platform as pl
class clsConfigClient(object):
Curr_Path = os.path.dirname(os.path.realpath(__file__))
os_det = pl.system()
if os_det == "Windows":
sep = '\\'
else:
sep = '/'
conf = {
'APP_ID': 1,
'ARCH_DIR': Curr_Path + sep + 'arch' + sep,
'PROFILE_PATH': Curr_Path + sep + 'profile' + sep,
'LOG_PATH': Curr_Path + sep + 'log' + sep,
'DATA_PATH': Curr_Path + sep + 'data' + sep,
'MODEL_PATH': Curr_Path + sep + 'model' + sep,
'TEMP_PATH': Curr_Path + sep + 'temp' + sep,
'MODEL_DIR': 'model',
'APP_DESC_1': 'LangChain Demo!',
'DEBUG_IND': 'N',
'INIT_PATH': Curr_Path,
'FILE_NAME': 'Output.csv',
'MODEL_NAME': 'gpt-3.5-turbo',
'OPEN_AI_KEY': "sk-Jdhfdyruru9383474HHFJFJFJO6jrlxPKbv6Bgvv",
'TITLE': "LangChain Demo!",
'TEMP_VAL': 0.2,
'PATH' : Curr_Path,
'MAX_TOKEN' : 60,
'OUT_DIR': 'data'
}

Some of the important entries from the above snippet are as follows –

        'MODEL_NAME': 'gpt-3.5-turbo',
        'OPEN_AI_KEY': "sk-Jdhfdyruru9383474HHFJFJFJO6jrlxPKbv6Bgvv",
        'TEMP_VAL': 0.2,

TEMP_VAL will help you to control the response in a more authentic manner. It varies between 0 to 1.

  • clsJarvis.py (This is the main calling Python script for the input parameters.)


#####################################################
#### Written By: SATYAKI DE ####
#### Written On: 27-Jun-2023 ####
#### Modified On 28-Jun-2023 ####
#### ####
#### Objective: This is the main calling ####
#### python class that will invoke the ####
#### Flask framework to expose the OpenAI ####
#### API with more control & encapsulate the ####
#### server IPs with proxy layers. ####
#### ####
#####################################################
import openai
from flask import request, jsonify
from clsConfigClient import clsConfigClient as cf
import os
import clsTemplate as ct
###############################################
### Global Section ###
###############################################
open_ai_Key = cf.conf['OPEN_AI_KEY']
openai.api_key = open_ai_Key
# Disbling Warning
def warn(*args, **kwargs):
pass
import warnings
warnings.warn = warn
###############################################
### End of Global Section ###
###############################################
class clsJarvis:
def __init__(self):
self.model_name = cf.conf['MODEL_NAME']
self.max_token = cf.conf['MAX_TOKEN']
self.temp_val = cf.conf['TEMP_VAL']
def extractContentInText(self, query):
try:
model_name = self.model_name
max_token = self.max_token
temp_val = self.temp_val
template = ct.templateVal_1
response = openai.ChatCompletion.create(model=model_name, temperature=temp_val, messages=[{"role": "system", "content": template},{"role": "user", "content": query}])
inputJson = {"text": response['choices'][0]['message']['content']}
return jsonify(inputJson)
except Exception as e:
discussedTopic = []
x = str(e)
print('Error: ', x)
template = ct.templateVal_2
inputJson = {"text": template}
return jsonify(inputJson)

view raw

clsJarvis.py

hosted with ❤ by GitHub

The key snippets from the above script are as follows –

def extractContentInText(self, query):
    try:
        model_name = self.model_name
        max_token = self.max_token
        temp_val = self.temp_val

        template = ct.templateVal_1

        response = openai.ChatCompletion.create(model=model_name, temperature=temp_val, messages=[{"role": "system", "content": template},{"role": "user", "content": query}])
        inputJson = {"text": response['choices'][0]['message']['content']}

        return jsonify(inputJson)
    except Exception as e:
        discussedTopic = []
        x = str(e)
        print('Error: ', x)
        template = ct.templateVal_2

        inputJson = {"text": template}

        return jsonify(inputJson)

The provided Python code snippet defines a method extractContentInText, which interacts with OpenAI’s API to generate a response from OpenAI’s chat model to a user’s query. Here’s a summary of what it does:

  1. It fetches some predefined model configurations (model_name, max_token, temp_val). These are class attributes defined elsewhere.
  2. It sets a system message template (initial instruction for the AI model) using ct.templateVal_1. The ct object isn’t defined within this snippet but is likely another predefined object or module in the more extensive program.
  3. It then calls openai.ChatCompletion.create() to send messages to the AI model and generate a response. The statements include an initial system message and a user’s query.
  4. The model’s response is extracted and formatted into a JSON object inputJson where the ‘text’ field holds the AI’s response.
  5. The input JSON object returns a JSON response.

If an error occurs at any stage of this process (caught in the except block), it prints the error, sets a fallback message template using ct.templateVal_2, formats this into a JSON object, and returns it as a JSON response.

Note: The max_token variable is fetched but not used within the function; it might be a remnant of previous code or meant to be used in further development. The code also assumes a predefined ct object and a method called jsonify(), possibly from Flask, for formatting Python dictionaries into JSON format.

  • testJarvis.py (This is the main calling Python script.)


#########################################################
#### Written By: SATYAKI DE ####
#### Written On: 27-Jun-2023 ####
#### Modified On 28-Jun-2023 ####
#### ####
#### Objective: This is the main calling ####
#### python script that will invoke the ####
#### shortcut application created inside MAC ####
#### enviornment including MacBook, IPad or IPhone. ####
#### ####
#########################################################
import clsL as cl
from clsConfigClient import clsConfigClient as cf
import clsJarvis as jv
import datetime
from flask import Flask, request, jsonify
app = Flask(__name__)
# Disbling Warning
def warn(*args, **kwargs):
pass
import warnings
warnings.warn = warn
######################################
### Get your global values ####
######################################
debug_ind = 'Y'
# Initiating Logging Instances
clog = cl.clsL()
cJarvis = jv.clsJarvis()
######################################
#### Global Flag ########
######################################
@app.route('/openai', methods=['POST'])
def openai_call():
try:
var = datetime.datetime.now().strftime("%Y-%m-%d_%H-%M-%S")
print('*'*120)
print('Start Time: ' + str(var))
print('*'*120)
data = request.get_json()
print('Data::')
print(data)
prompt = data.get('prompt', '')
print('Prompt::')
print(prompt)
res = cJarvis.extractContentInText(str(prompt))
return res
print('*'*120)
var1 = datetime.datetime.now().strftime("%Y-%m-%d_%H-%M-%S")
print('End Time: ' + str(var1))
except Exception as e:
x = str(e)
print('Error: ', x)
if __name__ == "__main__":
app.run(host='0.0.0.0')

view raw

testJarvis.py

hosted with ❤ by GitHub

Please find the key snippets –

@app.route('/openai', methods=['POST'])
def openai_call():
    try:
        var = datetime.datetime.now().strftime("%Y-%m-%d_%H-%M-%S")
        print('*'*120)
        print('Start Time: ' + str(var))
        print('*'*120)

        data = request.get_json()
        print('Data::')
        print(data)
        prompt = data.get('prompt', '')

        print('Prompt::')
        print(prompt)

        res = cJarvis.extractContentInText(str(prompt))

        return res

        print('*'*120)
        var1 = datetime.datetime.now().strftime("%Y-%m-%d_%H-%M-%S")
        print('End Time: ' + str(var1))

    except Exception as e:
        x = str(e)
        print('Error: ', x)

The provided Python code defines a route in a Flask web server that listens for POST requests at the ‘/openai’ endpoint. Here’s what it does in detail:

  1. It records and prints the current time, marking the start of the request handling.
  2. It retrieves the incoming data from the POST request as JSON with the request.get_json().
  3. It then extracts the ‘prompt’ from the JSON data. The request defaults to an empty string if no ‘prompt’ is provided in the request.
  4. The prompt is passed as an argument to the method extractContentInText() object cJarvis. This method is expected to use OpenAI’s API to generate a response from a model given the prompt (as discussed in your previous question). The result of this method call is stored in the variable res.
  5. The res variable (the model’s response) returns the answer to the client requesting the POST.
  6. It prints the current time again, marking the end of the request handling (However, this part of the code will never be executed as it places after a return statement).
  7. If an error occurs during this process, it catches the exception, converts it to a string, and prints the error message.

The cJarvis object used in the cJarvis.extractContentInText(str(prompt)) call is not defined within this code snippet. It is a global object likely defined elsewhere in the more extensive program. The extractContentInText method is the one you shared in your previous question.

Apple Shortcuts:

Now, let us understand the steps in Apple Shortcuts.

You can now set up a Siri Shortcut to call the URL provided by ngrok:

  1. Open the Shortcuts app on your iPhone.
  2. Tap the ‘+’ to create a new Shortcut.
  3. Add an action, search for “URL,” and select the URL action. Enter your ngrok URL here, with the /openai endpoint.
  4. Add another action, search for “Get Contents of URL.” This step will send a POST request to the URL from the previous activity. Set the method to POST and add a request body with type ‘JSON,’ containing a key ‘prompt’ and a value being the input you want to send to your OpenAI model.
  5. Optionally, you can add another action, “Show Result” or “Speak Text” to see/hear the result returned from your server.
  6. Save your Shortcut and give it a name.

You should now be able to activate Siri and say the name of your Shortcut to have it send a request to your server, which will then send a prompt to the OpenAI API and return the response.

Let us understand the “Get contents of” with easy postman screenshots –

As you can see that the newly exposed proxy-API will receive an input named prompt, which will be passed from “Dictate Text.”


So, finally, we’ve done it.

I know that this post is relatively bigger than my earlier post. But, I think, you can get all the details once you go through it.

You will get the complete codebase in the following GitHub link.

I’ll bring some more exciting topics in the coming days from the Python verse. Please share & subscribe to my post & let me know your feedback.

Till then, Happy Avenging! 🙂

Note: All the data & scenarios posted here are representational data & scenarios & available over the internet & for educational purposes only. Some of the images (except my photo) we’ve used are available over the net. We don’t claim ownership of these images. There is always room for improvement & especially in the prediction quality.

Azure-API calls from python-based OCI function through the oracle API-Gateway.

Today, I’ll be discussing Oracle Cloud Function interaction with Azure-API through Oracle API Gateway using native python. Again, I want to touch on this subject as I didn’t find lots of relevant material using python over the net.

Let’s explore our use case. For this use case, I’ll use an old Azure-API that I’ve developed in early 2019 & shared here during that time.

Now, we need to prepare our environment in Oracle-cloud.

Step 1:

We need to configure the virtual network as shown in the below collage picture, which will depict the step-by-step process to create it. For security reasons, I’ve masked sensitive information. It would help if you captured them from your cloud portal.

VCN creation process

Make sure you choose the correct options & validate at the end, as shown in the below picture.

VCN Creation – Final Step

If all the information provided is correct, then you should see the following screen.

VCN Creation – Final Screen

Step 2:

Now, we need to create an application. As per OCI guidelines, one cannot generate any function or group of functions without the container, known as application.

Creation of Application

From the above collage pic, you can see how we create the application by providing all the necessary inputs.

Step 3:

Now, you need to create the registry as shown below –

Creation of Registry

Your function-container will stay inside it after deployment. To know more about this, click the following link.

Step 4:

If you haven’t generated the auth-token already, then this is the time to render it as shown below –

Generation of Auth-Token

Step 5:

This next piece of information is highly crucial & on many occasions, you need this piece of information.

Object storage namespace

Just keep this information handy. I’ll refer to this step whenever we need it. You can get the details here.

Step 6:

Let’s create the gateway now. Please refer to the following collage pics, showing the step-by-step process.

Creation of Gateway

Make sure you have validated it before you proceed to the next step.

Step 7:

Let’s create the function under the application. I find this GUI option is relatively easier than configuring locally & then push it to the OCI. Let’s follow the process shown in the collage of pics mentioned here –

Creation of Function

So, you need to click executing series of commands as shown above. And, the good thing is the majority of the critical pieces of commands are automatically generated for you. So, you don’t need to spend lots of time finding out this information.

Here, we’ll be executing a series of commands as shown below –

Creation of function – continue

Few necessary commands that I want to discuss here –

fn init --runtime python <function-name>

This command will create a template of scripts based on your supplied language. You need to modify the main script (func.py) later, with your appropriate logic. You can add other scripts as class & refer to that class inside your func.py as well.

For a better deployment & control environment, it is always wise to create a virtual env.

Just like the Azure function, you need to update your requirements.txt file before your deployment command.

pip freeze>requirements.txt

Once we are satisfied with our development; we’ll deploy the application as shown below –

Deployment of function

Again, few relevant command that I want to discuss it here –

fn -v deploy --app <Application-Name>

This command will deploy all the oracle functions if they have any changes & push them to the OCI. During this time, it will check all the dependant packages that you are using & tried to install them one-by-one.

If you have already deployed & you want to upgrade your logic, then the deployment option will show something like this –

Deployment of function – continue

All the commands are pretty standard & marked with a red-square box. Few necessary commands to discuss –

fn invoke <Application-Name> <Function-Name>

And if you are not using any external API. Ideally, the above command should return the output with the default value. But, for our case, we have used Azure-API, which is outside the OCI. Hence, we need to update few more settings before it works.

Unlike, Azure-Function, you won’t get the link by default when running them locally using Visual Studio Code editor.

Here, you need to execute the following commands as shown in the above picture –

fn inspect function <Application-Name> <Function-Name>

If your deployment is successful, you will see your function docker-image inside your registry as shown below –

Deployment image of functions

To know more about fn-commands, click the following link.

Step 8:

Now, you need to update some policies, which will help API-Gateway to work.

Update of policy & logging feature

Also, you need to configure your default log for your function, as shown above.

Apart from that, we need to whitelist the port 443 as shown below –

Port whitelisting in VCN

Finally, we need to deploy our existing function into Oracle-Gateway. It would help if you prepared a deployable json object, which will create a channel for the function to interact through the API-gateway deployment.

Deployment of function inside API-Gateway

The deployment json file should looks something like this –

spec.json


{
"routes": [
{
"path": "/getdata",
"methods": [
"GET","POST"
],
"backend": {
"type": "ORACLE_FUNCTIONS_BACKEND",
"functionId": "ocid1.fnfunc.oc1.us-sanjose-1.aaaaxxxxxxxjdjfjfjfjfjfjfjfjfjfjfjfjfjfjfjdsssssss2dfjdfjdjd33376dq"
}
}
]
}

view raw

spec.json

hosted with ❤ by GitHub

You will get more on this from this link.

Make sure that your path prefix should be unique, as shown in the above picture. And, if you want to know the complete steps to prepare your oracle function, you need to go through this master link.

Now, we’re ready to test the application. But, before that, we want to explore the code-base.


Let us explore the codebase now.

1. clsConfig.py ( This is the configuration file for this demo-application)


###############################################
#### Written By: SATYAKI DE ####
#### Written On: 04-Apr-2020 ####
#### ####
#### Objective: This script is a config ####
#### file, contains all the keys for ####
#### Azure 2 OCI API. Application will ####
#### process these information & perform ####
#### the call to our newly developed Azure ####
#### API in OCI. ####
###############################################
import os
import platform as pl
class clsConfig(object):
Curr_Path = os.path.dirname(os.path.realpath(__file__))
os_det = pl.system()
if os_det == "Windows":
sep = '\\'
else:
sep = '/'
conf = {
'APP_ID': 1,
"comp": "ocid1.compartment.oc1..xxxxxxxxxxxxxxxxxxxxxxxxyyyyyyyyyyyyyyyyyyxxxxxx",
"URL":"https://xxxxxxxxxx.yyyyyyyyyyyyyyyy.net/api/getDynamicCovidStats&quot;,
"appType":"application/json",
"conType":"keep-alive",
"limRec":10,
"CACHE":"no-cache",
"colList": "date, state, positive, negative",
"typSel": "Cols",
"LOG_PATH":Curr_Path + sep + 'log' + sep,
"STREAM_NAME":"Covid19-Stream",
"PARTITIONS":1
}

view raw

clsConfig.py

hosted with ❤ by GitHub

2. clsAzureAPI.py ( This is the modified version of old AzureAPI class. We’ve added a new logger, which works inside OCI. No other changes in the man logic. )


##############################################
#### Written By: SATYAKI DE ####
#### Written On: 07-Mar-2021 ####
#### Modified On 07-Mar-2021 ####
#### ####
#### Objective: Calling Azure dynamic API ####
##############################################
import json
from clsConfig import clsConfig as cf
import requests
import logging
class clsAzureAPI:
def __init__(self):
self.url = cf.conf['URL']
self.azure_cache = cf.conf['CACHE']
self.azure_con = cf.conf['conType']
self.type = cf.conf['appType']
self.typSel = cf.conf['typSel']
self.typVal = cf.conf['colList']
def searchQry(self):
try:
url = self.url
api_cache = self.azure_cache
api_con = self.azure_con
type = self.type
typSel = self.typSel
typVal = self.typVal
querystring = {"typeSel": typSel, "typeVal": typVal}
strMsg = 'Input JSON: ' + str(querystring)
logging.getLogger().info(strMsg)
headers = {
'content-type': type,
'Cache-Control': api_cache,
'Connection': api_con
}
response = requests.request("GET", url, headers=headers, params=querystring)
ResJson = response.text
jdata = json.dumps(ResJson)
ResJson = json.loads(jdata)
return ResJson
except Exception as e:
ResJson = ''
x = str(e)
print(x)
logging.info(x)
ResJson = {'errorDetails': x}
return ResJson

view raw

clsAzureAPI.py

hosted with ❤ by GitHub

3. func.py ( Main calling script. This one auto-genarated by OCI, while creating the functions. We’ve modified it as per our logic. )


##############################################
#### Written By: SATYAKI DE ####
#### Written On: 20-Mar-2021 ####
#### Modified On 20-Mar-2021 ####
#### ####
#### Objective: Calling Azure dynamic API ####
##############################################
import io
import json
import logging
from fdk import response
import clsAzureAPI as ca
# Disbling Warning
def warn(*args, **kwargs):
pass
import warnings
warnings.warn = warn
def handler(ctx, data: io.BytesIO = None):
try:
email = "default@gmail.com"
# Checking individual elements
try:
body = json.loads(data.getvalue())
email = body.get("email")
except (Exception, ValueError) as ex:
logging.getLogger().info('error parsing json payload: ' + str(ex))
logging.getLogger().info("Calling Oracle Python getCovidData function!")
# Create the instance of the Mock Mulesoft API Class
x1 = ca.clsAzureAPI()
# Let's pass this to our map section
retJson = x1.searchQry()
# Converting JSon to Pandas Dataframe for better readability
# Capturing the JSON Payload
resJson = json.loads(retJson)
return response.Response(
ctx, response_data=json.dumps(
{"status":"Success", "message": resJson}),
headers={"Content-Type": "application/json"}
)
except Exception as e:
x = str(e)
return response.Response(
ctx, response_data=json.dumps(
{"status":"Failed", "message": x}),
headers={"Content-Type": "application/json"}
)

view raw

func.py

hosted with ❤ by GitHub

Key snippet that we want to discuss here –

        # Checking individual elements
        try:
            body = json.loads(data.getvalue())
            email = body.get("email")
        except (Exception, ValueError) as ex:
            logging.getLogger().info('error parsing json payload: ' + str(ex))

Checking the individual element in the input payload.

        # Create the instance of the Mock Mulesoft API Class
        x1 = ca.clsAzureAPI()

        # Let's pass this to our map section
        retJson = x1.searchQry()

        # Converting JSon to Pandas Dataframe for better readability
        # Capturing the JSON Payload
        resJson = json.loads(retJson)

Now, we’re calling the azure-API class & receiving the response into a JSON variable.

return response.Response(
            ctx, response_data=json.dumps(
                {"status":"Success", "message": resJson}),
            headers={"Content-Type": "application/json"}
        )

Sending final response to the client.

4. func.yaml ( Main configuration script. This one auto-genarated by OCI, while creating the functions. )


schema_version: 20180708
name: getcoviddata
version: 0.0.1
runtime: python
entrypoint: /python/bin/fdk /function/func.py handler
memory: 256

view raw

func.yaml

hosted with ❤ by GitHub


Let’s run it from postman –

Invoking OCI-Function from Postman

During this demo, I’ve realized that the Oracle function yet to get maturity compared to AWS Lambda or Azure function using python. I almost faced similar challenges, which I faced nearly two years back when I tried to implement Azure function using python. However, I’m optimistic that the Oracle Cloud function will mature itself & share an integrated GUI environment to deploy python-based components straight from the IDE, rather than implementing through a CLI-driven approach. Correct me in case if I missed the IDE, which supports this feature.


You can explore my Git associated with this project & download the code from here.

So, finally, we’ve done it. 😀

I’ll bring some more exciting topic in the coming days from the Python verse.

Till then, Happy Avenging! 😀

Note: All the data & scenarios posted here are representational data & scenarios that are available over the internet & for educational purpose only. Also, I’ve used template SDK provided by Oracle & customized it to satisfy our business cases.

Streaming Data from Azure to Oracle Clouds

Hello guys,

Today, I’m going to discuss a new notion – living between multi-cloud environments; as you might be aware that I’ve shared a dynamic API built inside Azure in my last post. Today, I want to use that covid-19 API, originally from another third-party source & publish it as streams inside the Oracle cloud. These are the ideal case to use integration software like Tibco or Mulesoft. However, this is more useful for any start-up kind of environment or anyone who wants to build their API-based eco-system.

First, you need to register in Oracle cloud as they give a $300 trial to everyone who registers their platform for the first time.

Step 1:

You will lead the main dashboard after successfully registering in the portal by providing the essential information.

Registration to Oracle Cloud

Step 2:

By default, it will show the following screen –

Display of root compartment

It would be best if you created the compartment as shown below.

Creation of sub-compartment

Step 3:

Now, you can create the stream, as shown in the next step, by choosing the desired compartment. You need to click – “Create Stream” blue button on top of your page after selecting the desired compartment.

Creation of stream – Initiation
Creation of Stream – Final Steps

Also, you can test the stream by manually uploading a few sample json shown in the below step.

Lower picture show us the sample Json to test the newly created Stream – Upper picture show us the final Stream with some previously tested JSON

Step 4:

Now, we need to add API-key as follows –

Adding the API-Key

This screen will prompt you to download the private key. We’ll use this in the later configuration of our python environment.

Step 5:

Now, you need to capture the content of the configuration file shown in the below figures –

Copying content of the Configuration file

You’ll get these important details under Identity marked in red-box.

Step 6:

Now, you’ll place the previously acquired private key & the content from Step-5 under the following location from where you are going to trigger the application –

Configuration File & Private Key addition

You will get more details on this from these links –

Now, we’ve finished with the basic Oracle cloud setup.


Let’s check the Azure API one more time using postman –

Testing Azure-API from Postman

Let us install some of the critical python packages –

Installing Key Python-packages

Now, we’re ready with our environment.


Let us explore the codebase now.

1. clsConfig.py ( This is the configuration file for this demo-application)


###############################################
#### Written By: SATYAKI DE ####
#### Written On: 04-Apr-2020 ####
#### ####
#### Objective: This script is a config ####
#### file, contains all the keys for ####
#### Azure 2 OCI API. Application will ####
#### process these information & perform ####
#### the call to our newly developed Azure ####
#### API in OCI. ####
###############################################
import os
import platform as pl
class clsConfig(object):
Curr_Path = os.path.dirname(os.path.realpath(__file__))
os_det = pl.system()
if os_det == "Windows":
sep = '\\'
else:
sep = '/'
conf = {
'APP_ID': 1,
"comp": "ocid1.compartment.oc1..xxxxxxxxxxxxxxxxxxxxxxxxyyyyyyyyyyyyyyyyyyxxxxxx",
"URL":"https://xxxxxxxxxx.yyyyyyyyyyyyyyyy.net/api/getDynamicCovidStats&quot;,
"appType":"application/json",
"conType":"keep-alive",
"limRec":10,
"CACHE":"no-cache",
"colList": "date, state, positive, negative",
"typSel": "Cols",
"LOG_PATH":Curr_Path + sep + 'log' + sep,
"STREAM_NAME":"Covid19-Stream",
"PARTITIONS":1
}

view raw

clsConfig.py

hosted with ❤ by GitHub

2. clsOCIConsume.py (This will consume from the designated stream created in Oracle-cloud)


##############################################
#### Enhancement By: SATYAKI DE ####
#### Enhancement On: 07-Mar-2021 ####
#### Modified On 08-Mar-2021 ####
#### ####
#### Objective: Consuming stream from OCI ####
##############################################
import oci
import sys
import time
import os
from base64 import b64encode, b64decode
import json
from clsConfig import clsConfig as cf
from oci.config import from_file
import pandas as p
class clsOCIConsume:
def __init__(self):
self.comp = str(cf.conf['comp'])
self.STREAM_NAME = str(cf.conf['STREAM_NAME'])
self.PARTITIONS = int(cf.conf['PARTITIONS'])
self.limRec = int(cf.conf['limRec'])
def get_cursor_by_partition(self, client, stream_id, partition):
print("Creating a cursor for partition {}".format(partition))
cursor_details = oci.streaming.models.CreateCursorDetails(
partition=partition,
type=oci.streaming.models.CreateCursorDetails.TYPE_TRIM_HORIZON)
response = client.create_cursor(stream_id, cursor_details)
cursor = response.data.value
return cursor
def simple_message_loop(self, client, stream_id, initial_cursor):
try:
cursor = initial_cursor
while True:
get_response = client.get_messages(stream_id, cursor, limit=10)
# No messages to process. return.
if not get_response.data:
return
# Process the messages
print(" Read {} messages".format(len(get_response.data)))
for message in get_response.data:
print("{}: {}".format(b64decode(message.key.encode()).decode(),
b64decode(message.value.encode()).decode()))
# get_messages is a throttled method; clients should retrieve sufficiently large message
# batches, as to avoid too many http requests.
time.sleep(1)
# use the next-cursor for iteration
cursor = get_response.headers["opc-next-cursor"]
return 0
except Exception as e:
x = str(e)
print('Error: ', x)
return 1
def get_stream(self, admin_client, stream_id):
return admin_client.get_stream(stream_id)
def get_or_create_stream(self, client, compartment_id, stream_name, partition, sac_composite):
try:
list_streams = client.list_streams(compartment_id=compartment_id, name=stream_name,
lifecycle_state=oci.streaming.models.StreamSummary.LIFECYCLE_STATE_ACTIVE)
if list_streams.data:
# If we find an active stream with the correct name, we'll use it.
print("An active stream {} has been found".format(stream_name))
sid = list_streams.data[0].id
return self.get_stream(sac_composite.client, sid)
print(" No Active stream {} has been found; Creating it now. ".format(stream_name))
print(" Creating stream {} with {} partitions.".format(stream_name, partition))
# Create stream_details object that need to be passed while creating stream.
stream_details = oci.streaming.models.CreateStreamDetails(name=stream_name, partitions=partition,
compartment_id=compartment, retention_in_hours=24)
# Since stream creation is asynchronous; we need to wait for the stream to become active.
response = sac_composite.create_stream_and_wait_for_state(stream_details, wait_for_states=[oci.streaming.models.StreamSummary.LIFECYCLE_STATE_ACTIVE])
return response
except Exception as e:
print(str(e))
def consumeStream(self):
try:
STREAM_NAME = self.STREAM_NAME
PARTITIONS = self.PARTITIONS
compartment = self.comp
print('Consuming sream from Oracle Cloud!')
# Load the default configuration
config = from_file(file_location="~/.oci/config.poc")
# Create a StreamAdminClientCompositeOperations for composite operations.
stream_admin_client = oci.streaming.StreamAdminClient(config)
stream_admin_client_composite = oci.streaming.StreamAdminClientCompositeOperations(stream_admin_client)
# We will reuse a stream if its already created.
# This will utilize list_streams() to determine if a stream exists and return it, or create a new one.
stream = self.get_or_create_stream(stream_admin_client, compartment, STREAM_NAME,
PARTITIONS, stream_admin_client_composite).data
print(" Created Stream {} with id : {}".format(stream.name, stream.id))
# Streams are assigned a specific endpoint url based on where they are provisioned.
# Create a stream client using the provided message endpoint.
stream_client = oci.streaming.StreamClient(config, service_endpoint=stream.messages_endpoint)
s_id = stream.id
# Use a cursor for getting messages; each get_messages call will return a next-cursor for iteration.
# There are a couple kinds of cursors.
# A cursor can be created at a given partition/offset.
# This gives explicit offset management control to the consumer.
print("Starting a simple message loop with a partition cursor")
partition_cursor = self.get_cursor_by_partition(stream_client, s_id, partition="0")
self.simple_message_loop(stream_client, s_id, partition_cursor)
return 0
except Exception as e:
x = str(e)
print(x)
logging.info(x)
return 1

Let’s explore the key snippet from the above code –

    def get_or_create_stream(self, client, compartment_id, stream_name, partition, sac_composite):
        try:

            list_streams = client.list_streams(compartment_id=compartment_id, name=stream_name,
                                               lifecycle_state=oci.streaming.models.StreamSummary.LIFECYCLE_STATE_ACTIVE)

            if list_streams.data:
                # If we find an active stream with the correct name, we'll use it.
                print("An active stream {} has been found".format(stream_name))
                sid = list_streams.data[0].id
                return self.get_stream(sac_composite.client, sid)

            print(" No Active stream  {} has been found; Creating it now. ".format(stream_name))
            print(" Creating stream {} with {} partitions.".format(stream_name, partition))

            # Create stream_details object that need to be passed while creating stream.
            stream_details = oci.streaming.models.CreateStreamDetails(name=stream_name, partitions=partition,
                                                                      compartment_id=compartment, retention_in_hours=24)

            # Since stream creation is asynchronous; we need to wait for the stream to become active.
            response = sac_composite.create_stream_and_wait_for_state(stream_details, wait_for_states=[oci.streaming.models.StreamSummary.LIFECYCLE_STATE_ACTIVE])
            return response
        except Exception as e:
            print(str(e))

The above function will check if there is already any existing stream available or not. If not, then it will create one.

    def get_cursor_by_partition(self, client, stream_id, partition):
        print("Creating a cursor for partition {}".format(partition))
        cursor_details = oci.streaming.models.CreateCursorDetails(
            partition=partition,
            type=oci.streaming.models.CreateCursorDetails.TYPE_TRIM_HORIZON)
        response = client.create_cursor(stream_id, cursor_details)
        cursor = response.data.value
        return cursor

In Oracle cloud, you need to create a cursor to consume the streaming messages. Please refer to the following link for more details.

    def simple_message_loop(self, client, stream_id, initial_cursor):
        try:
            cursor = initial_cursor
            while True:
                get_response = client.get_messages(stream_id, cursor, limit=10)
                # No messages to process. return.
                if not get_response.data:
                    return

                # Process the messages
                print(" Read {} messages".format(len(get_response.data)))
                for message in get_response.data:
                    print("{}: {}".format(b64decode(message.key.encode()).decode(),
                                          b64decode(message.value.encode()).decode()))

                # get_messages is a throttled method; clients should retrieve sufficiently large message
                # batches, as to avoid too many http requests.
                time.sleep(1)
                # use the next-cursor for iteration
                cursor = get_response.headers["opc-next-cursor"]

            return 0
        except Exception as e:
            x = str(e)
            print('Error: ', x)

            return 1

In this case, we’re looping through the channel & consuming the messages maintaining fewer HTTP requests in mind.

3. clsOCIPublish.py (This will publish msgs from the source Azure-API to designated stream created in Oracle-cloud)


##############################################
#### Enhancement By: SATYAKI DE ####
#### Enhancement On: 07-Mar-2021 ####
#### Modified On 07-Mar-2021 ####
#### ####
#### Objective: Publishing stream at OCI ####
##############################################
import oci
import sys
import time
import os
from base64 import b64encode, b64decode
import json
from clsConfig import clsConfig as cf
from oci.config import from_file
import pandas as p
class clsOCIPublish:
def __init__(self):
self.comp = str(cf.conf['comp'])
self.STREAM_NAME = str(cf.conf['STREAM_NAME'])
self.PARTITIONS = int(cf.conf['PARTITIONS'])
self.limRec = int(cf.conf['limRec'])
def get_stream(self, admin_client, stream_id):
return admin_client.get_stream(stream_id)
def publish_messages(self, client, stream_id, inputDF):
try:
limRec = self.limRec
# Converting dataframe to json
df = inputDF
# Calculating total number of records
cntRow = df.shape[0]
print('Actual Record counts: ', str(cntRow))
print('Supplied Record counts: ', str(limRec))
# Build up a PutMessagesDetails and publish some messages to the stream
message_list = []
start_pos = 0
end_pos = 0
interval = 1
for i in range(limRec):
split_df = p.DataFrame()
rJson = ''
# Preparing Data
# Getting Individual Element & convert them to Series
if ((start_pos + interval) <= cntRow):
end_pos = start_pos + interval
else:
end_pos = start_pos + (cntRow start_pos)
split_df = df.iloc[start_pos:end_pos]
rJson = split_df.to_json(orient ='records')
if ((start_pos > cntRow) | (start_pos == cntRow)):
pass
else:
start_pos = start_pos + interval
key = "key" + str(i)
value = "value" + str(rJson)
# End of data preparation
encoded_key = b64encode(key.encode()).decode()
encoded_value = b64encode(value.encode()).decode()
message_list.append(oci.streaming.models.PutMessagesDetailsEntry(key=encoded_key, value=encoded_value))
print("Publishing {} messages to the stream {} ".format(len(message_list), stream_id))
messages = oci.streaming.models.PutMessagesDetails(messages=message_list)
put_message_result = client.put_messages(stream_id, messages)
# The put_message_result can contain some useful metadata for handling failures
for entry in put_message_result.data.entries:
if entry.error:
print("Error ({}) : {}".format(entry.error, entry.error_message))
else:
print("Published message to partition {} , offset {}".format(entry.partition, entry.offset))
return 0
except Exception as e:
x = str(e)
print('Error: ', x)
return 1
def get_or_create_stream(self, client, compartment_id, stream_name, partition, sac_composite):
try:
list_streams = client.list_streams(compartment_id=compartment_id, name=stream_name,
lifecycle_state=oci.streaming.models.StreamSummary.LIFECYCLE_STATE_ACTIVE)
if list_streams.data:
# If we find an active stream with the correct name, we'll use it.
print("An active stream {} has been found".format(stream_name))
sid = list_streams.data[0].id
return self.get_stream(sac_composite.client, sid)
print(" No Active stream {} has been found; Creating it now. ".format(stream_name))
print(" Creating stream {} with {} partitions.".format(stream_name, partition))
# Create stream_details object that need to be passed while creating stream.
stream_details = oci.streaming.models.CreateStreamDetails(name=stream_name, partitions=partition,
compartment_id=compartment, retention_in_hours=24)
# Since stream creation is asynchronous; we need to wait for the stream to become active.
response = sac_composite.create_stream_and_wait_for_state(stream_details, wait_for_states=[oci.streaming.models.StreamSummary.LIFECYCLE_STATE_ACTIVE])
return response
except Exception as e:
print(str(e))
def publishStream(self, inputDf):
try:
STREAM_NAME = self.STREAM_NAME
PARTITIONS = self.PARTITIONS
compartment = self.comp
print('Publishing sream to Oracle Cloud!')
# Load the default configuration
config = from_file(file_location="~/.oci/config.poc")
# Create a StreamAdminClientCompositeOperations for composite operations.
stream_admin_client = oci.streaming.StreamAdminClient(config)
stream_admin_client_composite = oci.streaming.StreamAdminClientCompositeOperations(stream_admin_client)
# We will reuse a stream if its already created.
# This will utilize list_streams() to determine if a stream exists and return it, or create a new one.
stream = self.get_or_create_stream(stream_admin_client, compartment, STREAM_NAME,
PARTITIONS, stream_admin_client_composite).data
print(" Created Stream {} with id : {}".format(stream.name, stream.id))
# Streams are assigned a specific endpoint url based on where they are provisioned.
# Create a stream client using the provided message endpoint.
stream_client = oci.streaming.StreamClient(config, service_endpoint=stream.messages_endpoint)
s_id = stream.id
# Publish some messages to the stream
self.publish_messages(stream_client, s_id, inputDf)
return 0
except Exception as e:
x = str(e)
print(x)
logging.info(x)
return 1

Let’s explore the key snippet from the above script –

    def publish_messages(self, client, stream_id, inputDF):
        try:
            limRec = self.limRec
            # Converting dataframe to json
            df = inputDF

            # Calculating total number of records
            cntRow = df.shape[0]
            print('Actual Record counts: ', str(cntRow))
            print('Supplied Record counts: ', str(limRec))

            # Build up a PutMessagesDetails and publish some messages to the stream
            message_list = []
            start_pos = 0
            end_pos = 0
            interval = 1

            for i in range(limRec):
                split_df = p.DataFrame()
                rJson = ''
                # Preparing Data

                # Getting Individual Element & convert them to Series
                if ((start_pos + interval) <= cntRow):
                    end_pos = start_pos + interval
                else:
                    end_pos = start_pos + (cntRow - start_pos)

                split_df = df.iloc[start_pos:end_pos]
                rJson = split_df.to_json(orient ='records')

                if ((start_pos > cntRow) | (start_pos == cntRow)):
                    pass
                else:
                    start_pos = start_pos + interval

                key = "key" + str(i)
                value = "value" + str(rJson)

                # End of data preparation

                encoded_key = b64encode(key.encode()).decode()
                encoded_value = b64encode(value.encode()).decode()
                message_list.append(oci.streaming.models.PutMessagesDetailsEntry(key=encoded_key, value=encoded_value))

            print("Publishing {} messages to the stream {} ".format(len(message_list), stream_id))
            messages = oci.streaming.models.PutMessagesDetails(messages=message_list)
            put_message_result = client.put_messages(stream_id, messages)

            # The put_message_result can contain some useful metadata for handling failures
            for entry in put_message_result.data.entries:
                if entry.error:
                    print("Error ({}) : {}".format(entry.error, entry.error_message))
                else:
                    print("Published message to partition {} , offset {}".format(entry.partition, entry.offset))

            return 0
        except Exception as e:
            x = str(e)
            print('Error: ', x)
            return 1

In the above snippet, we’re fetching data captured from our Azure-API call & then send chunk-by-chunk data to the Oracle stream for publishing.

4. clsAzureAPI.py (This will fetch msgs from the source Azure-API)


##############################################
#### Written By: SATYAKI DE ####
#### Written On: 07-Mar-2021 ####
#### Modified On 07-Mar-2021 ####
#### ####
#### Objective: Calling Azure dynamic API ####
##############################################
import json
from clsConfig import clsConfig as cf
import requests
import logging
class clsAzureAPI:
def __init__(self):
self.url = cf.conf['URL']
self.azure_cache = cf.conf['CACHE']
self.azure_con = cf.conf['conType']
self.type = cf.conf['appType']
self.typSel = cf.conf['typSel']
self.typVal = cf.conf['colList']
def searchQry(self):
try:
url = self.url
api_cache = self.azure_cache
api_con = self.azure_con
type = self.type
typSel = self.typSel
typVal = self.typVal
querystring = {"typeSel": typSel, "typeVal": typVal}
print('Input JSON: ', str(querystring))
headers = {
'content-type': type,
'Cache-Control': api_cache,
'Connection': api_con
}
response = requests.request("GET", url, headers=headers, params=querystring)
ResJson = response.text
jdata = json.dumps(ResJson)
ResJson = json.loads(jdata)
return ResJson
except Exception as e:
ResJson = ''
x = str(e)
print(x)
logging.info(x)
ResJson = {'errorDetails': x}
return ResJson

view raw

clsAzureAPI.py

hosted with ❤ by GitHub

I think this one is pretty straightforward as we’re invoking the Azure-API response.

5. callAzure2OracleStreaming.py (Main calling script to invoke all the class for a end to end test)


#########################################################
#### Written By: SATYAKI DE ####
#### Written On: 06-Mar-2021 ####
#### Modified On 07-Mar-2021 ####
#### ####
#### Objective: Main calling scripts – ####
#### This Python script will consume an ####
#### source API data from Azure-Cloud & publish the ####
#### data into an Oracle Streaming platform, ####
#### which is compatible with Kafka. Later, another ####
#### consumer app will read the data from the stream.####
#########################################################
from clsConfig import clsConfig as cf
import clsL as cl
import logging
import datetime
import clsAzureAPI as ca
import clsOCIPublish as co
import clsOCIConsume as cc
import pandas as p
import json
# Disbling Warning
def warn(*args, **kwargs):
pass
import warnings
warnings.warn = warn
# Lookup functions from
# Azure cloud SQL DB
var = datetime.datetime.now().strftime("%Y-%m-%d_%H-%M-%S")
def main():
try:
# Declared Variable
ret_1 = 0
debug_ind = 'Y'
res_2 = ''
# Defining Generic Log File
general_log_path = str(cf.conf['LOG_PATH'])
# Enabling Logging Info
logging.basicConfig(filename=general_log_path + 'Azure2OCIStream.log', level=logging.INFO)
# Initiating Log Class
l = cl.clsL()
# Moving previous day log files to archive directory
log_dir = cf.conf['LOG_PATH']
tmpR0 = "*" * 157
logging.info(tmpR0)
tmpR9 = 'Start Time: ' + str(var)
logging.info(tmpR9)
logging.info(tmpR0)
print()
print("Log Directory::", log_dir)
tmpR1 = 'Log Directory::' + log_dir
logging.info(tmpR1)
print('Welcome to Azure to Oracle Cloud Streaming(OCI) Calling Program: ')
print('*' * 160)
print('Reading dynamic Covid data from Azure API: ')
print('https://xxxxxx.yyyyyyyyyy.net/api/getDynamicCovidStats&#39;)
print()
print('Selected Columns for this -> date, state, positive, negative')
print()
print('This will take few seconds depending upon the volume & network!')
print('-' * 160)
print()
# Create the instance of the Mock Mulesoft API Class
x1 = ca.clsAzureAPI()
# Let's pass this to our map section
retJson = x1.searchQry()
# Converting JSon to Pandas Dataframe for better readability
# Capturing the JSON Payload
#res_1 = json.dumps(retJson)
#res = json.loads(res_1)
res = json.loads(retJson)
# Converting dictionary to Pandas Dataframe
# df_ret = p.read_json(ret_2, orient='records')
df_ret = p.io.json.json_normalize(res)
df_ret.columns = df_ret.columns.map(lambda x: x.split(".")[1])
# Removing any duplicate columns
df_ret = df_ret.loc[:, ~df_ret.columns.duplicated()]
print()
print()
print("-" * 160)
print('Publishing Azure sample result: ')
print(df_ret.head())
# Logging Final Output
l.logr('1.df_ret' + var + '.csv', debug_ind, df_ret, 'log')
print("-" * 160)
print()
print('*' * 160)
print('Calling Oracle Cloud Infrustructure Publisher Program!')
print('Pushing Azure API to Oracle Kafka-Streaming using OCI!')
print('-' * 160)
# Create the instance of the Mock Mulesoft API Class
x2 = co.clsOCIPublish()
retVal = x2.publishStream(df_ret)
if retVal == 0:
print('Successfully streamed to Oracle Cloud!')
else:
print('Failed to stream!')
print()
print('*' * 160)
print('Calling Oracle Cloud Infrustructure Consumer Program!')
print('Getting Oracle Streaming captured in OCI!')
print('-' * 160)
# Create the instance of the Mock Mulesoft API Class
x3 = cc.clsOCIConsume()
retVal2 = x3.consumeStream()
if retVal2 == 0:
print('Successfully streamed captured from Oracle Cloud!')
else:
print('Failed to retrieve stream from OCI!')
print('Finished Analysis points..')
print("*" * 160)
logging.info('Finished Analysis points..')
logging.info(tmpR0)
tmpR10 = 'End Time: ' + str(var)
logging.info(tmpR10)
logging.info(tmpR0)
except ValueError as e:
print(str(e))
print("Invalid option!")
logging.info("Invalid option!")
except Exception as e:
print("Top level Error: args:{0}, message{1}".format(e.args, e.message))
if __name__ == "__main__":
main()

This one is the primary calling script, invoking all the Python classes one-by-one to run our test cases together.


Let us run our application –

Running end to end application

And, you can see the streaming data inside Oracle cloud as shown below –

Streaming data

You can explore my Git associated with this project & download the code from here.

So, finally, we’ve done it. 😀


I’ll bring some more exciting topic in the coming days from the Python verse.

Till then, Happy Avenging! 😀

Note: All the data & scenarios posted here are representational data & scenarios that are available over the internet & for educational purpose only. Also, I’ve used template SDK provided by Oracle & customized it to satisfy our business cases.

Creating a dynamic response of an API/Microservice

Hello Guys!

Today, I’m going to discuss a potential use case, where on many occasions, different teams need almost similar kinds of data through API. However, they are not identical. Creating a fresh API/Microservice after following-up with many processes will take significant time.

What if we can create an API in such a way so that we can get the response dynamically without needing to make another one. In this post, we’ll be demonstrating a similar approach.

I’ll be using open-source Covid-API, which will be useful for several posts starting from this one.

You will get plenty of useful data from here.

We’ve chosen the following one for our use case –

API-Reference

Let’s explore the sample data first.

[
   {
      "date":20210207,
      "state":"AK",
      "positive":53279.0,
      "probableCases":null,
      "negative":null,
      "pending":null,
      "totalTestResultsSource":"totalTestsViral",
      "totalTestResults":1536911.0,
      "hospitalizedCurrently":44.0,
      "hospitalizedCumulative":1219.0,
      "inIcuCurrently":null,
      "inIcuCumulative":null,
      "onVentilatorCurrently":11.0,
      "onVentilatorCumulative":null,
      "recovered":null,
      "dataQualityGrade":"A",
      "lastUpdateEt":"2\/5\/2021 03:59",
      "dateModified":"2021-02-05T03:59:00Z",
      "checkTimeEt":"02\/04 22:59",
      "death":279.0,
      "hospitalized":1219.0,
      "dateChecked":"2021-02-05T03:59:00Z",
      "totalTestsViral":1536911.0,
      "positiveTestsViral":64404.0,
      "negativeTestsViral":1470760.0,
      "positiveCasesViral":null,
      "deathConfirmed":null,
      "deathProbable":null,
      "totalTestEncountersViral":null,
      "totalTestsPeopleViral":null,
      "totalTestsAntibody":null,
      "positiveTestsAntibody":null,
      "negativeTestsAntibody":null,
      "totalTestsPeopleAntibody":null,
      "positiveTestsPeopleAntibody":null,
      "negativeTestsPeopleAntibody":null,
      "totalTestsPeopleAntigen":null,
      "positiveTestsPeopleAntigen":null,
      "totalTestsAntigen":null,
      "positiveTestsAntigen":null,
      "fips":"02",
      "positiveIncrease":0,
      "negativeIncrease":0,
      "total":53279,
      "totalTestResultsIncrease":0,
      "posNeg":53279,
      "deathIncrease":0,
      "hospitalizedIncrease":0,
      "hash":"07a5d43f958541e9cdabb5ea34c8fb481835e130",
      "commercialScore":0,
      "negativeRegularScore":0,
      "negativeScore":0,
      "positiveScore":0,
      "score":0,
      "grade":""
   }
]

Let’s take two cases. One, where one service might need to access all the elements, there might be another, where some other service requires specific details.

Let’s explore the code base first –

  1. init.py ( This native Python-based azure-function that will consume streaming data & dynamic API response. )
###########################################
#### Written By: SATYAKI DE            ####
#### Written On: 06-Feb-2021           ####
#### Package Flask package needs to    ####
#### install in order to run this      ####
#### script.                           ####
####                                   ####
#### Objective: Main Calling scripts.  ####
####                                   ####
#### However, to meet the functionality####
#### we've enhanced as per our logic.  ####
###########################################

import logging
import json
import requests
import os
import pandas as p
import numpy as np

import azure.functions as func


def main(req: func.HttpRequest) -> func.HttpResponse:
    logging.info('Dynamic-Covid-Status HTTP trigger function processed a request.')

    try:

        # Application Variable
        url = os.environ['URL']
        appType = os.environ['appType']
        conType = os.environ['conType']

        # API-Configuration
        payload={}
        headers = {
            "Connection": conType,
            "Content-Type": appType
        }

        # Validating input parameters
        typeSel = req.params.get('typeSel')
        if not typeSel:
            try:
                req_body = req.get_json()
            except ValueError:
                pass
            else:
                typeSel = req_body.get('typeSel')
        
        typeVal = req.params.get('typeVal')
        if not typeVal:
            try:
                req_body = req.get_json()
            except ValueError:
                pass
            else:
                typeVal = req_body.get('typeVal')

        # Printing Key-Element Values
        str1 = 'typeSel: ' + str(typeSel)
        logging.info(str1)

        str2 = 'typeVal: ' + str(typeVal)
        logging.info(str2)

        # End of API-Inputs

        # Getting Covid data from the REST-API
        response = requests.request("GET", url, headers=headers, data=payload)
        ResJson  = response.text

        if typeSel == '*':
            if typeVal != '':
                # Converting it to Json
                jdata = json.loads(ResJson)

                df_ret = p.io.json.json_normalize(jdata)
                df_ret.columns = df_ret.columns.map(lambda x: x.split(".")[-1])

                rJson = df_ret.to_json(orient ='records') 

                return func.HttpResponse(rJson, status_code=200)
            else:
                x_stat = 'Failed'
                x_msg = 'Important information is missing for all values!'

                rJson = {
                    "status": x_stat,
                    "details": x_msg
                }

                xval = json.dumps(rJson)
                return func.HttpResponse(xval, status_code=200)
        elif typeSel == 'Cols':
            if typeVal != '':
                # Converting it to Json
                jdata = json.loads(ResJson)

                df_ret = p.io.json.json_normalize(jdata)
                df_ret.columns = df_ret.columns.map(lambda x: x.split(".")[-1])

                # Fetching for the selected columns
                # Extracting the columns from the list
                lstHead = []

                listX = typeVal.split (",")

                for i in listX:
                    lstHead.append(str(i).strip())

                str3 = 'Main List: ' + str(lstHead)
                logging.info(str3)

                slice_df = df_ret[np.intersect1d(df_ret.columns, lstHead)]
                rJson = slice_df.to_json(orient ='records') 
                
                return func.HttpResponse(rJson, status_code=200)
            else:
                x_stat = 'Failed'
                x_msg = 'Important information is missing for selected values!'

                rJson = {
                    "status": x_stat,
                    "details": x_msg
                }

                xval = json.dumps(rJson)
                return func.HttpResponse(xval, status_code=200)
        else:
            x_stat = 'Failed'
            x_msg = 'Important information is missing for typeSel!'

            rJson = {
                "status": x_stat,
                "details": x_msg
            }

            xval = json.dumps(rJson)
            return func.HttpResponse(xval, status_code=200)
    except Exception as e:
        x_msg = str(e)
        x_stat = 'Failed'

        rJson = {
                    "status": x_stat,
                    "details": x_msg
                }

        xval = json.dumps(rJson)
        return func.HttpResponse(xval, status_code=200)

And, Inside the azure portal it looks like –

Dynamic Function inside the Azure portal

Let’s explain the key snippet –

jdata = json.loads(ResJson)

df_ret = p.io.json.json_normalize(jdata)
df_ret.columns = df_ret.columns.map(lambda x: x.split(".")[-1])

rJson = df_ret.to_json(orient ='records') 

return func.HttpResponse(rJson, status_code=200)

In the above lines, we’re converting the response & organizing it to a pandas dataframe before converting the response to JSON.

# Fetching for the selected columns
# Extracting the columns from the list
lstHead = []

listX = typeVal.split (",")

for i in listX:
    lstHead.append(str(i).strip())

str3 = 'Main List: ' + str(lstHead)
logging.info(str3)

#slice_df = df_ret[df_ret.columns.intersection(lstHead)]
slice_df = df_ret[np.intersect1d(df_ret.columns, lstHead)]

For the second case, the above additional logic will play a significant part. Based on the supplied input in the typeVal attribute, this time, the new response will display accordingly.

Let’s see how it looks –

Azure function in Visual Studio Code
<p value="<amp-fit-text layout="fixed-height" min-font-size="6" max-font-size="72" height="80">Let's test it using Postman -Let’s test it using Postman –

Case 1 (For all the columns):

For all elements

And, the formatted output is as follows –

Formatted output for all elements

Case 2 (For selected columns):

For selected elements
<p value="<amp-fit-text layout="fixed-height" min-font-size="6" max-font-size="72" height="80">And, the formatted output is as follows -And, the formatted output is as follows –
Formatted output of Selected element case

You can find the code in the Github using the following link.


So, finally, we have done it.

I’ll bring some more exciting topic in the coming days from the Python verse.

Till then, Happy Avenging! 😀

Note: All the data & scenario posted here are representational data & scenarios & available over the internet & for educational purpose only.

Creating a micro-service using integrated Azure Python-based function inside the Visual Studio Code

Hi Guys!

Today, We will revisit one of the previous posts & demonstrate the latest micro-service approach using the Integrated azure python function using Microsoft visual studio code. We will be using the same code base except for minor changes in our code. Please refer to the old post for a detailed discussion on the code-base.

We have created a new Microsoft Azure account & tested this for the audience. We want to thank Microsoft for testing their cool tools & allow us to explore & document them & even allow us to present our scenario here.

If you successfully register, you will be able to see the following page inside the azure function –

Right-hand side is showing the credit is given by the Microsoft

You need to install Microsoft Visual Studio Code, which you’ll get it from this link.

One can see the following landing page if they open this application –

Initial landing screen in Visual Studio Code

We need to install the above component marked with a white square box. After this, we need to install other important nuget from the Microsoft visual studio code. Among them, we need to first install – Azure Function by searching it as shown below –

Click the Green Install button to install this nuget

After installing, we can see the following screen –

Left-hand side shows azure available components after login

Microsoft suggests everyone for a two-stage authentication. In that way, after providing the essential credentials, the system will ask for the code that should have pushed to the registered, trusted device. After successful entry, one can see the following confirmation screen –

Two-Stage Authentication

At this moment, we can see the following screen if our two-stage authentication is successful –

Yellow-box depicting the subscription details

To create a new function, we’ll be creating a new project marked in the red-square box in the given picture –

Creating a new project under Azure Function

It will lead to a series of following screens, which will create a dummy template for our azure function –

1. We need to choose our preferred language i.e. Python in this case
2. We need to choose specific Python version out of multiple options
3. We need to choose the trigger type as HTTP
4. We need to give a meaningful name
5. We need select the authorization level. In this case, we’ll choose Anonymous

After these sequences mentioned above of steps, finally, we will come down to the next landing page –

6. Left-hand side contains the file explorer, right-hand side contains the code snippet

Visual Studio Code provides a handy interface to run or debug the azure function. Please refer the following screen for the reference –

This will generate a local end-point link marked in Red-Square box

Following is the way to test the azure application from Postman –

Test the local end-point captured from the previous step

Visual studio code puts all the existing debugging options available for the Azure function in Python, similar to all other Microsoft languages.

One might encounter failure when trying to run or debug the python function locally due to library binding issues with the azure virtual environment.

To solve the above problem, we need to update “Activate.ps1” – PATH variable as shown below –

Need to add the Library entry in-front of the bin path marked in RED

To deploy this function, the following series of steps that we need to follow –

The Green-box within the Red-Box shown the deployment options for the newly developed Azure function
We need to give a unique name for our Azure Function
Providing an unique name for the function
Selecting correct python version
Selecting the desired region i.e. West US 2

After this step, a series of the intermediate message will be shown at the bottom-right of the screen & finally the following message will be displayed if the deployment is successful –

See the bottom right-hand message enclosed within the green-square box

Now, we can see this created azure function from the portal itself –

Deployed function running successfully

Now, we can test this deployed function through postman as follows –

Successfully returned the response

However, we need to remember one thing before deploying the package that we need to capture all the dependent Python packages as shown in the following screen –

All the key packages should be placed inside your requirements.txt file

Similarly, we have converted our old Azure function as part of this new drive. Please find the main script, which we have modified –

  1. __init__.py
###########################################
#### Written By: SATYAKI DE            ####
#### Written On: 08-Jun-2019           ####
#### Package Flask package needs to    ####
#### install in order to run this      ####
#### script.                           ####
####                                   ####
#### Objective: Main Calling scripts.  ####
#### This is an autogenrate scripts.   ####
#### However, to meet the functionality####
#### we've enhanced as per our logic.  ####
###########################################
__all__ = ['clsFlask']

import logging
import azure.functions as func
import json

# from getVal.clsFlask import clsFlask
from . import clsFlask as cflask

getVal = cflask.clsFlask()

def main(req: func.HttpRequest) -> func.HttpResponse:
    logging.info('Python Encryption function processed a request.')

    str_val = 'Input Payload:: ' + str(req.get_json())
    str_1 = str(req.get_json())

    logging.info(str_val)

    ret_val = {}
    DataIn = ''
    dGroup = ''
    dTemplate = ''
    flg = ''

    if (str_1 != ''):
        try:
            req_body = req.get_json()
            dGroup = req_body.get('dataGroup')

            try:
                DataIn = req_body.get('data')
                strV15 = 'If Part:: ' + str(DataIn)

                logging.info(strV15)

                if ((DataIn == '') | (DataIn == None)):
                    raise ValueError

                flg = 'Y'
            except ValueError:
                DataIn = req_body.get('edata')
                strV15 = 'Else Part:: ' + str(DataIn)
                logging.info(strV15)
                flg = 'N'
            except:
                DataIn = req_body.get('edata')
                strV15 = 'Else Part:: ' + str(DataIn)
                logging.info(strV15)
                flg = 'N'

            dTemplate = req_body.get('dataTemplate')

        except ValueError:
            pass

    strV5 = "Encrypt Decrypt Flag:: " + flg
    logging.info(strV5)

    if (flg == 'Y'):

        if ((DataIn != '') & ((dGroup != '') & (dTemplate != ''))):

            logging.info("Encryption Started!")
            ret_val = getVal.getEncryptProcess(dGroup, DataIn, dTemplate)
            strVal2 = 'Return Payload:: ' + str(ret_val)
            logging.info(strVal2)

            # Forming Proper JSON
            encVal = {"dataEncrypt": ret_val}

            xval = json.dumps(encVal)

            return func.HttpResponse(xval)
        else:
            return func.HttpResponse(
                 "Please pass a data in the request body",
                 status_code=400
            )
    else:

        if ((DataIn != '') & ((dGroup != '') & (dTemplate != ''))):

            logging.info("Decryption Started!")
            ret_val2 = getVal.getDecryptProcess(dGroup, DataIn, dTemplate)
            strVal3 = 'Return Payload:: ' + str(ret_val)
            logging.info(strVal3)

            # Forming Proper JSON
            decVal = {"dataDecrypt": ret_val2}

            xval1 = json.dumps(decVal)

            return func.HttpResponse(xval1)
        else:
            return func.HttpResponse(
                "Please pass a data in the request body",
                status_code=400
            )

Only the change part, we are going to discuss here.

from . import clsFlask as cflask

getVal = cflask.clsFlask()

We will deploy our azure function after making necessary changes to the code & we can review our deployed encryption function from the following screen –

Newly deployed encryption function

We can test this newly deployed advanced Azure function from Postman as shown below –

Encryption API testing through Postman

Following are the sequence of steps, by which we can explore the Azure monitor & log analytics & can extract meaningful data point out of our Azure function execution details –

Getting debug info from the last executed event marked within the RED-square box
Retrieving individual execution debug details
Querying execution data point from Log Analytics

So, finally, we have done it. We have successfully incorporated our old azure function & convert that as per the latest platform provided by the Microsoft Azure cloud. 🙂

I’ll bring some more exciting topic in the coming days from the Python verse.

Till then, Happy Avenging! 😀

Note: All the data & scenario posted here are representational data & scenarios & available over the internet & for educational purpose only.

Join 77 other subscribers

Building Azure Databricks Cluster installing desired packages & with a demo run (Time stone from Python Verse)

Today, I’ll be showing how to prepare a cluster in Azure Databricks from command prompt & will demonstrate any sample csv file process using Pyspark. This can be useful, especially when you want to customize your environment & need to install specific packages inside the clusters with more options.

This is not like any of my earlier posts, where my primary attention is on the Python side. At the end of this post, I’ll showcase one use of Pyspark script & how we can execute them inside Azure Data bricks.

Let’s roll the dice!

Step -1:

Type Azure Databricks in your search folder inside the Azure portal.

0. Azure Search

As shown in the red box, you have to click these options. And, it will take the application to new data bricks sign-in page.

Step -2:

Next step would be clicking the “Add” button. For the first time, the application will ask you to create a storage account associated with this brick.

1. Create Storage

After creation, the screen should look like this –

2.5. Azure-Data-Bricks Options

Now, click the Azure command-line & chose bash as your work environment –

2. After Creation

For security reason, I’ve masked the details.

After successful creation, this page should look like this –

3. Azure Databricks

Once, you click the launch workspace, it will take you to this next page –

4. Detailed Bricks

As you can see that, there are no notebook or python scripts there under Recents tab.

Step -3:

Let’s verify it from the command line shell environment.

5. Python-Env

As you can see, by default python version in bricks is 3.5.2.

Step -4:

Now, we’ll prepare one environment by creating a local directory under the cloud.

The directory that we’ll be creating is – “rndBricks.”

6. Creating Directory

Step -5:

Let’s create the virtual environment here –

Using “virtualenv” function, we’ll be creating the virtual environment & it should look like this –

7. Creating Python-VM

As you can see, that – this will create the first python virtual environment along with the pip & wheel, which is essential for your python environment.

After creating the VM, you need to update Azure CLI, which is shown in the next screenshot given below –

8. Installing Databricks CLI in Python-VM

Before you create the cluster, you need to first generate the token, which will be used for the cluster –

9.1. Generating Token

As shown in the above screen, the “red” marked area is our primary interest. The “green” box, which represents the account image that you need to click & then you have to click “User Settings” marked in blue. Once you click that, you can see the “purple” area, where you need to click the Generate new token button in case if you are doing it for the first time.

Now, we’ll be using this newly generated token to configure data bricks are as follows –

9.2. Configuring with Token

Make sure, you need to mention the correct zone, i.e. westus2/westus or any region as per your geography & convenience.

Once, that is done. You can check the cluster list by the following command (In case, if you already created any clusters in your subscription) –

10. Checking Clusters List

Since we’re building it from scratch. There is no cluster information showing here.

Step -6:

Let’s create the clusters –

11. Creating-Clusters-From-Command

Please find the command that you will be using are as follows –

databricks clusters create –json ‘{ “autoscale”: {“min_workers”: 2, “max_workers”: 8}, “cluster_name”: “pyRnd”, “spark_version”: “5.3.x-scala2.11”, “spark_conf”: {}, “node_type_id”: “Standard_DS3_v2”, “driver_node_type_id”: “Standard_DS3_v2”, “ssh_public_keys”: [], “custom_tags”: {}, “spark_env_vars”: {“PYSPARK_PYTHON”: “/databricks/python3/bin/python3”}, “autotermination_minutes”: 20, “enable_elastic_disk”: true, “cluster_source”: “UI”, “init_scripts”: [] }’

As you can see, you need to pass the information in JSON format. For your better understanding, please find the JSON in a proper format –

11.5. JSON

And, the raw version –

{
  "autoscale": {
    "min_workers": 2,
    "max_workers": 8
  },
  "cluster_name": "pyRnd",
  "spark_version": "5.3.x-scala2.11",
  "spark_conf": {},
  "node_type_id": "Standard_DS3_v2",
  "driver_node_type_id": "Standard_DS3_v2",
  "ssh_public_keys": [],
  "custom_tags": {},
  "spark_env_vars": {
    "PYSPARK_PYTHON": "/databricks/python3/bin/python3"
  },
  "autotermination_minutes": 20,
  "enable_elastic_disk": true,
  "cluster_source": "UI",
  "init_scripts": []
}

Initially, the cluster status will show from the GUI are as follows –

12. Cluster-Status-In-Progress

After a few minutes, this will show the running state –

13. Cluster-Running Status

Let’s check the detailed configuration once the cluster created –

14. Initial Cluster Details

Step -7:

We need to check the library section. This is important as we might need to install many dependant python package to run your application on Azure data bricks. And, the initial Libraries will look like this –

15. Libraries

You can install libraries into an existing cluster either through GUI or through shell command prompt as well. Let’s explore the GUI option.

GUI Option:

First, click the Libraries tab under your newly created clusters, as shown in the above picture. Then you need to click “Install New” button. This will pop-up the following windows –

16. Installing Libraries

As you can see, you have many options along with the possibilities for your python (marked in red) application as well.

Case 1 (Installing PyPi packages):

19. Installing through GUI

Note: You can either mention the specific version or just simply name the package name.

Case 2 (Installing Wheel packages):

16.5. Installing Wheel Libraries

As you can see, from the upload options, you can upload your local libraries & then click the install button to install the same.

UI Option:

Here is another way, you can install your python libraries using the command line as shown in the below screenshots –

17. Running & Installing Libraries - Alternate Options

Few things to notice. The first command shows the current running cluster list. Second, command updating your pip packages. And, the third command, install your desired pypi packages.

Please find the raw commands –

databricks clusters list

pip install -U pip

databricks libraries install –cluster-id “XXXX-XXXXX-leech896” –pypi-package “pandas” –pypi-repo “https://pypi.org/project/pandas/&#8221;

After installing, the GUI page under the libraries section will look like this –

18. Installed Libraries

Note that, for any failed case, you can check the log in this way –

20. Installation-In-progress

If you click on the marked red area, it will pop-up the detailed error details, which is as follows –

19.5. Error Details

So, we’re done with our initial set-up.

Let’s upload one sample file into this environment & try to parse the data.

Step -8:

You can upload your sample file as follows –

23.1. First Step

First, click the “data” & then click the “add data” marked in the red box.

You can import this entire csv data as tables as shown in the next screenshot –

23.2. Uploading Data Files

Also, you can create a local directory here based on your requirements are explained as –

24. Creating Local Directory For Process

Step -9:

Let’s run the code.

Please find the following snippet in PySpark for our test –

1. DBFromFile.py (This script will call the Bricks script & process the data to create an SQL like a table for our task.)

###########################################
#### Written By: SATYAKI DE        ########
#### Written On: 10-Feb-2019       ########
####                               ########
#### Objective: Pyspark File to    ########
#### parse the uploaded csv file.  ########
###########################################

# File location and type
file_location = "/FileStore/tables/src_file/customer_addr_20180112.csv"
file_type = "csv"

# CSV options
infer_schema = "false"
first_row_is_header = "true"
delimiter = ","

# The applied options are for CSV files. For other file types, these will be ignored.
df = spark.read.format(file_type) \
  .option("inferSchema", infer_schema) \
  .option("header", first_row_is_header) \
  .option("sep", delimiter) \
  .load(file_location)

display(df)

# Create a view or table

temp_table_name = "customer_addr_20180112_csv"

df.createOrReplaceTempView(temp_table_name)

%sql

/* Query the created temp table in a SQL cell */

select * from `customer_addr_20180112_csv`

From the above sample snippet, one can see that the application is trying to parse the source data by providing all the parsing details & then use that csv as a table in SQL.

Let’s check step by step execution.

25. Working With Uploaded File

So, until this step, you can see that the application has successfully parsed the csv data.

And, finally, you can view the data –

25.1. Second Option

As the highlighted blue box shows that the application is using this csv file as a table. So, you have many options to analyze the information flexibly if you are familiar with SQL.

After your job run, make sure you terminate your cluster. Otherwise, you’ll receive a large & expensive usage bill, which you might not want!

So, finally, we’ve done it.

Let me know what do you think.

Till then, Happy Avenging! 😀

Note: All the data posted here are representational data & available over the internet & for educational purpose only.

Building an Azure Function using Python (Crossover between Reality Stone & Time Stone in Python Verse)

Hi Guys!

Today, we’ll be discussing a preview features from Microsoft Azure. Building an Azure function using Python on it’s Linux/Ubuntu VM. Since this is a preview feature, we cannot implement this to production till now. However, my example definitely has more detailed steps & complete code guide compared to whatever available over the internet.

In this post, I will take one of my old posts & enhance it as per this post. Hence, I’ll post those modified scripts. However, I won’t discuss the logic in details as most of these scripts have cosmetic changes to cater to this requirement.

In this post, we’ll only show Ubuntu run & there won’t be Windows or MAC comparison.

Initial Environment Preparation:

  1. Set-up new virtual machine on Azure.
  2. Set-up Azure function environments on that server.

Set-up new virtual machine on Azure:

I’m not going into the details of how to create Ubuntu VM on Microsoft Azure. You can refer the steps in more information here.

After successful creation, the VM will look like this –

Azure VM - Ubuntu

Detailed information you can get after clicking this hyperlink over the name of the VM.

Azure-VM Basic Details

You have to open port 7071 for application testing from the local using postman.

You can get it from the network option under VM as follows –

Network-Configuration

Make sure that you are restricting these ports to specific network & not open to ALL traffic.

So, your VM is ready now.

To update Azure CLI, you need to use the following commands –

sudo apt-get update && sudo apt-get install –only-upgrade -y azure-cli

Set-up Azure function environments on that server:

To set-up the environment, you don’t have to go for Python installation as by default Ubuntu in Microsoft Azure comes up with desired Python version, i.e., Python3.6. However, to run the python application, you need to install the following app –

  1. Microsoft SDK. You will get the details from this link.
  2. Installing node-js. You will get the details from this link.
  3. You need to install a docker. However, as per Microsoft official version, this is not required. But, you can create a Docker container to distribute the python function in Azure application. I would say you can install this just in case if you want to continue with this approach. You will get the details over here. If you want to know details about the Docker. And, how you want to integrate python application. You can refer to this link.
  4. Your desired python packages. In this case, we’ll be modifying this post – “Encryption/Decryption, JSON, API, Flask Framework in Python (Crossover between Reality Stone & Time Stone in Python Verse).” We’ll be modifying a couple of lines only to cater to this functionality & deploying the same as an Azure function.
  5. Creating an Azure function template on Ubuntu. The essential detail you’ll get it from here. However, over there, it was not shown in detailed steps of python packages & how you can add all the dependencies to publish it in details. It was an excellent post to start-up your knowledge.

Let’s see these components status & very brief details –

Microsoft SDK:

To check the dot net version. You need to type the following commands in Ubuntu –

dotnet –info

And, the output will look like this –

DotNet-Version

Node-Js:

Following is the way to verify your node-js version & details –

node -v

npm -v

And, the output looks like this –

Node-Js

Docker:

Following is the way to test your docker version –

docker -v

And, the output will look like this –

Docker-Version

Python Packages:

Following are the python packages that we need to run & publish that in Azure cloud as an Azure function –

pip freeze | grep -v “pkg-resources” > requirements.txt

And, the output is –

Requirements

You must be wondered that why have I used this grep commands here. I’ve witnessed that on many occassion in Microsoft Azure’s Linux VM it produces one broken package called resource=0.0.0, which will terminate the deployment process. Hence, this is very crucial to eliminate those broken packages.

Now, we’re ready for our python scripts. But, before that, let’s see the directory structure over here –

Win_Vs_Ubuntu-Cloud

Creating an Azure Function Template on Ubuntu: 

Before we post our python scripts, we’ll create these following components, which is essential for our Python-based Azure function –

  • Creating a group:

              Creating a group either through Azure CLI or using a docker, you can proceed. The commands for Azure CLI is as follows –

az group create –name “rndWestUSGrp” –location westus

It is advisable to use double quotes for parameters value. Otherwise, you might land-up getting the following error – “Error: “resourceGroupName” should satisfy the constraint – “Pattern”: /^[-w._]+$/“.

I’m sure. You don’t want to face that again. And, here is the output –

CreateDeploymentGroup

Note that, here I haven’t used the double-quotes. But, to avoid any unforeseen issues – you should use double-quotes. You can refer the docker command from the above link, which I’ve shared earlier.

Now, you need to create one storage account where the metadata information of your function will be stored. You will create that as follows –

az storage account create –name cryptpy2019 –location westus –resource-group rndWestUSGrp –sku Standard_LRS

And, the output will look like this –

AccountCreate_1

Great. Now, we’ll create a virtual environment for Python3.6.

python3.6 -m venv .env
source .env/bin/activate

Python-VM

Now, we’ll create a local function project.

func init encPro

And, the output you will get is as follows –

Local-Function

Inside this directory, you’ll see the following files –

Local-Function-Details

You need to edit the host.json with these default lines –

{
 “version”: “2.0”,
 “extensionBundle”: {
                                       “id”: “Microsoft.Azure.Functions.ExtensionBundle”,
                                       “version”: “[1.*, 2.0.0)”
                                     }
}

And, the final content of these two files (excluding the requirements.txt) will look like this –

Configuration

Finally, we’ll create the template function by this following command –

func new

This will follow with steps finish it. You need to choose Python as your programing language. You need to choose an HTTP trigger template. Once you created that successfully, you’ll see the following files –

func_New

Note that, our initial function name is -> getVal.

By default, Azure will generate some default code inside the __init__.py. The details of those two files can be found here.

Since we’re ready with our environment setup. We can now discuss our Python scripts –

1. clsConfigServer.py (This script contains all the parameters of the server.)

###########################################
#### Written By: SATYAKI DE        ########
#### Written On: 10-Feb-2019       ########
####                               ########
#### Objective: Parameter File     ########
###########################################

import os
import platform as pl

# Checking with O/S system
os_det = pl.system()

class clsConfigServer(object):
    Curr_Path = os.path.dirname(os.path.realpath(__file__))

    if os_det == "Windows":
        config = {
            'FILE': 'acct_addr_20180112.csv',
            'SRC_FILE_PATH': Curr_Path + '\\' + 'src_file\\',
            'PROFILE_FILE_PATH': Curr_Path + '\\' + 'profile\\',
            'HOST_IP_ADDR': '0.0.0.0',
            'DEF_SALT': 'iooquzKtqLwUwXG3rModqj_fIl409vemWg9PekcKh2o=',
            'ACCT_NBR_SALT': 'iooquzKtqLwUwXG3rModqj_fIlpp1vemWg9PekcKh2o=',
            'NAME_SALT': 'iooquzKtqLwUwXG3rModqj_fIlpp1026Wg9PekcKh2o=',
            'PHONE_SALT': 'iooquzKtqLwUwXG3rMM0F5_fIlpp1026Wg9PekcKh2o=',
            'EMAIL_SALT': 'iooquzKtqLwU0653rMM0F5_fIlpp1026Wg9PekcKh2o='
        }
    else:
        config = {
            'FILE': 'acct_addr_20180112.csv',
            'SRC_FILE_PATH': Curr_Path + '/' + 'src_file/',
            'PROFILE_FILE_PATH': Curr_Path + '/' + 'profile/',
            'HOST_IP_ADDR': '0.0.0.0',
            'DEF_SALT': 'iooquzKtqLwUwXG3rModqj_fIl409vemWg9PekcKh2o=',
            'ACCT_NBR_SALT': 'iooquzKtqLwUwXG3rModqj_fIlpp1vemWg9PekcKh2o=',
            'NAME_SALT': 'iooquzKtqLwUwXG3rModqj_fIlpp1026Wg9PekcKh2o=',
            'PHONE_SALT': 'iooquzKtqLwUwXG3rMM0F5_fIlpp1026Wg9PekcKh2o=',
            'EMAIL_SALT': 'iooquzKtqLwU0653rMM0F5_fIlpp1026Wg9PekcKh2o='
        }

2. clsEnDec.py (This script is a lighter version of encryption & decryption of our previously discussed scenario. Hence, we won’t discuss in details. You can refer my earlier post to understand the logic of this script.)

###########################################
#### Written By: SATYAKI DE        ########
#### Written On: 25-Jan-2019       ########
#### Package Cryptography needs to ########
#### install in order to run this  ########
#### script.                       ########
####                               ########
#### Objective: This script will   ########
#### encrypt/decrypt based on the  ########
#### hidden supplied salt value.   ########
###########################################

from cryptography.fernet import Fernet
import logging

from getVal.clsConfigServer import clsConfigServer as csf

class clsEnDec(object):

    def __init__(self):
        # Calculating Key
        self.token = str(csf.config['DEF_SALT'])

    def encrypt_str(self, data, token):
        try:
            # Capturing the Salt Information
            t1 = self.token
            t2 = token

            if t2 == '':
                salt = t1
            else:
                salt = t2

            logging.info("Encrypting the value!")

            # Checking Individual Types inside the Dataframe
            cipher = Fernet(salt)
            encr_val = str(cipher.encrypt(bytes(data,'utf8'))).replace("b'","").replace("'","")

            strV1 = "Encrypted value:: " + str(encr_val)
            logging.info(strV1)

            return encr_val

        except Exception as e:
            x = str(e)
            print(x)
            encr_val = ''

            return encr_val

    def decrypt_str(self, data, token):
        try:
            # Capturing the Salt Information
            t1 = self.token
            t2 = token

            if t2 == '':
                salt = t1
            else:
                salt = t2

            logging.info("Decrypting the value!")

            # Checking Individual Types inside the Dataframe
            cipher = Fernet(salt)
            decr_val = str(cipher.decrypt(bytes(data,'utf8'))).replace("b'","").replace("'","")

            strV2 = "Decrypted value:: " + str(decr_val)
            logging.info(strV2)

            return decr_val

        except Exception as e:
            x = str(e)
            print(x)
            decr_val = ''

            return decr_val

3. clsFlask.py (This is the main server script that will the encrypt/decrypt class from our previous scenario. This script will capture the requested JSON from the client, who posted from the clients like another python script or third-party tools like Postman.)

###########################################
#### Written By: SATYAKI DE            ####
#### Written On: 25-Jan-2019           ####
#### Package Flask package needs to    ####
#### install in order to run this      ####
#### script.                           ####
####                                   ####
#### Objective: This script will       ####
#### encrypt/decrypt based on the      ####
#### supplied salt value. Also,        ####
#### this will capture the individual  ####
#### element & stored them into JSON   ####
#### variables using flask framework.  ####
###########################################

from getVal.clsConfigServer import clsConfigServer as csf
from getVal.clsEnDec import clsEnDecAuth

getVal = clsEnDec()

import logging

class clsFlask(object):
    def __init__(self):
        self.xtoken = str(csf.config['DEF_SALT'])

    def getEncryptProcess(self, dGroup, input_data, dTemplate):
        try:
            # It is sending default salt value
            xtoken = self.xtoken

            # Capturing the individual element
            dGroup = dGroup
            input_data = input_data
            dTemplate = dTemplate

            # This will check the mandatory json elements
            if ((dGroup != '') & (dTemplate != '')):

                # Based on the Group & Element it will fetch the salt
                # Based on the specific salt it will encrypt the data
                if ((dGroup == 'GrDet') & (dTemplate == 'subGrAcct_Nbr')):
                    xtoken = str(csf.config['ACCT_NBR_SALT'])

                    strV1 = "xtoken: " + str(xtoken)
                    logging.info(strV1)
                    strV2 = "Flask Input Data: " + str(input_data)
                    logging.info(strV2)

                    #x = cen.clsEnDecAuth()
                    ret_val = getVal.encrypt_str(input_data, xtoken)
                elif ((dGroup == 'GrDet') & (dTemplate == 'subGrName')):
                    xtoken = str(csf.config['NAME_SALT'])

                    strV1 = "xtoken: " + str(xtoken)
                    logging.info(strV1)
                    strV2 = "Flask Input Data: " + str(input_data)
                    logging.info(strV2)

                    #x = cen.clsEnDecAuth()
                    ret_val = getVal.encrypt_str(input_data, xtoken)
                elif ((dGroup == 'GrDet') & (dTemplate == 'subGrPhone')):
                    xtoken = str(csf.config['PHONE_SALT'])

                    strV1 = "xtoken: " + str(xtoken)
                    logging.info(strV1)
                    strV2 = "Flask Input Data: " + str(input_data)
                    logging.info(strV2)

                    #x = cen.clsEnDecAuth()
                    ret_val = getVal.encrypt_str(input_data, xtoken)
                elif ((dGroup == 'GrDet') & (dTemplate == 'subGrEmail')):
                    xtoken = str(csf.config['EMAIL_SALT'])

                    strV1 = "xtoken: " + str(xtoken)
                    logging.info(strV1)
                    strV2 = "Flask Input Data: " + str(input_data)
                    logging.info(strV2)

                    #x = cen.clsEnDecAuth()
                    ret_val = getVal.encrypt_str(input_data, xtoken)
                else:
                    ret_val = ''
            else:
                ret_val = ''

            # Return value
            return ret_val

        except Exception as e:
            ret_val = ''
            # Return the valid json Error Response
            return ret_val

    def getDecryptProcess(self, dGroup, input_data, dTemplate):
        try:
            xtoken = self.xtoken

            # Capturing the individual element
            dGroup = dGroup
            input_data = input_data
            dTemplate = dTemplate

            # This will check the mandatory json elements
            if ((dGroup != '') & (dTemplate != '')):

                # Based on the Group & Element it will fetch the salt
                # Based on the specific salt it will decrypt the data
                if ((dGroup == 'GrDet') & (dTemplate == 'subGrAcct_Nbr')):
                    xtoken = str(csf.config['ACCT_NBR_SALT'])

                    strV1 = "xtoken: " + str(xtoken)
                    logging.info(strV1)
                    strV2 = "Flask Input Data: " + str(input_data)
                    logging.info(strV2)

                    #x = cen.clsEnDecAuth()
                    ret_val = getVal.decrypt_str(input_data, xtoken)
                elif ((dGroup == 'GrDet') & (dTemplate == 'subGrName')):
                    xtoken = str(csf.config['NAME_SALT'])

                    strV1 = "xtoken: " + str(xtoken)
                    logging.info(strV1)
                    strV2 = "Flask Input Data: " + str(input_data)
                    logging.info(strV2)

                    #x = cen.clsEnDecAuth()
                    ret_val = getVal.decrypt_str(input_data, xtoken)
                elif ((dGroup == 'GrDet') & (dTemplate == 'subGrPhone')):
                    xtoken = str(csf.config['PHONE_SALT'])

                    strV1 = "xtoken: " + str(xtoken)
                    logging.info(strV1)
                    strV2 = "Flask Input Data: " + str(input_data)
                    logging.info(strV2)

                    #x = cen.clsEnDecAuth()
                    ret_val = getVal.decrypt_str(input_data, xtoken)
                elif ((dGroup == 'GrDet') & (dTemplate == 'subGrEmail')):
                    xtoken = str(csf.config['EMAIL_SALT'])

                    strV1 = "xtoken: " + str(xtoken)
                    logging.info(strV1)
                    strV2 = "Flask Input Data: " + str(input_data)
                    logging.info(strV2)

                    #x = cen.clsEnDecAuth()
                    ret_val = getVal.decrypt_str(input_data, xtoken)
                else:
                    ret_val = ''
            else:
                ret_val = ''

            # Return value
            return ret_val

        except Exception as e:
            ret_val = ''
            # Return the valid Error Response
            return ret_val

4. __init__.py (This autogenerated script contains the primary calling methods of encryption & decryption based on the element header & values after enhanced as per the functionality.)

###########################################
#### Written By: SATYAKI DE            ####
#### Written On: 08-Jun-2019           ####
#### Package Flask package needs to    ####
#### install in order to run this      ####
#### script.                           ####
####                                   ####
#### Objective: Main Calling scripts.  ####
#### This is an autogenrate scripts.   ####
#### However, to meet the functionality####
#### we've enhanced as per our logic.  ####
###########################################
__all__ = ['clsFlask']

import logging
import azure.functions as func
import json

from getVal.clsFlask import clsFlask

getVal = clsFlask()

def main(req: func.HttpRequest) -> func.HttpResponse:
    logging.info('Python Encryption function processed a request.')

    str_val = 'Input Payload:: ' + str(req.get_json())
    str_1 = str(req.get_json())

    logging.info(str_val)

    ret_val = {}
    DataIn = ''
    dGroup = ''
    dTemplate = ''
    flg = ''

    if (str_1 != ''):
        try:
            req_body = req.get_json()
            dGroup = req_body.get('dataGroup')

            try:
                DataIn = req_body.get('data')
                strV15 = 'If Part:: ' + str(DataIn)

                logging.info(strV15)

                if ((DataIn == '') | (DataIn == None)):
                    raise ValueError

                flg = 'Y'
            except ValueError:
                DataIn = req_body.get('edata')
                strV15 = 'Else Part:: ' + str(DataIn)
                logging.info(strV15)
                flg = 'N'
            except:
                DataIn = req_body.get('edata')
                strV15 = 'Else Part:: ' + str(DataIn)
                logging.info(strV15)
                flg = 'N'

            dTemplate = req_body.get('dataTemplate')

        except ValueError:
            pass

    strV5 = "Encrypt Decrypt Flag:: " + flg
    logging.info(strV5)

    if (flg == 'Y'):

        if ((DataIn != '') & ((dGroup != '') & (dTemplate != ''))):

            logging.info("Encryption Started!")
            ret_val = getVal.getEncryptProcess(dGroup, DataIn, dTemplate)
            strVal2 = 'Return Payload:: ' + str(ret_val)
            logging.info(strVal2)

            xval = json.dumps(ret_val)

            return func.HttpResponse(xval)
        else:
            return func.HttpResponse(
                 "Please pass a data in the request body",
                 status_code=400
            )
    else:

        if ((DataIn != '') & ((dGroup != '') & (dTemplate != ''))):

            logging.info("Decryption Started!")
            ret_val2 = getVal.getDecryptProcess(dGroup, DataIn, dTemplate)
            strVal3 = 'Return Payload:: ' + str(ret_val)
            logging.info(strVal3)

            xval1 = json.dumps(ret_val2)

            return func.HttpResponse(xval1)
        else:
            return func.HttpResponse(
                "Please pass a data in the request body",
                status_code=400
            )

In this script, based on the value of an flg variable, we’re calling our encryption or decryption methods. And, the value of the flg variable is set based on the following logic –

try:
    DataIn = req_body.get('data')
    strV15 = 'If Part:: ' + str(DataIn)

    logging.info(strV15)

    if ((DataIn == '') | (DataIn == None)):
        raise ValueError

    flg = 'Y'
except ValueError:
    DataIn = req_body.get('edata')
    strV15 = 'Else Part:: ' + str(DataIn)
    logging.info(strV15)
    flg = 'N'
except:
    DataIn = req_body.get('edata')
    strV15 = 'Else Part:: ' + str(DataIn)
    logging.info(strV15)
    flg = 'N'

So, if the application gets the “data” element then – it will consider the data needs to be encrypted; otherwise, it will go for decryption. And, based on that – it is setting the value.

Now, we’re ready to locally run our application –

func host start

And, the output will look like this –

StartingAzureFunction-Python
StartingAzureFunction-Python 2

Let’s test it from postman –

Encrypt:

Postman-Encrypt

Decrypt:

Postman-Decrypt

Great. Now, we’re ready to publish this application to Azure cloud.

As in our earlier steps, we’ve already built our storage account for the metadata. Please scroll to top to view that again. Now, using that information, we’ll make the function app with a more meaningful name –

az functionapp create –resource-group rndWestUSGrp –os-type Linux \
–consumption-plan-location westus –runtime python \
–name getEncryptDecrypt –storage-account cryptpy2019

CreatingFunctionPython

Let’s publish the function –

sudo func azure functionapp publish “getEncryptDecrypt” –build-native-deps

On many occassion, without the use of “–build-native-deps” might leads to failure. Hence, I’ve added that to avoid such scenarios.

Publishing-Function

Now, we need to test our first published complex Azure function with Python through postman –

Encrypt:

PubishedFuncPostmanEncrypt

Decrypt:

PubishedFuncPostmanDecrypt

Wonderful! So, it is working.

You can see the function under the Azure portal –

Deployed-Function

Let’s see some other important features of this function –

Monitor: You can monitor two ways. One is by clicking the monitor options you will get the individual requests level details & also get to see the log information over here –

Function-Monitor-Details-1

Clicking Application Insights will give you another level of detailed logs, which can be very useful for debugging. We’ll touch this at the end of this post with a very brief discussion.

Function-Monitor-Details-3.JPG

As you can see, clicking individual lines will show the details further.

Let’s quickly check the application insights –

Application-Insights-1

Application Insights will give you a SQL like an interface where you can get the log details of all your requests.

Application-Insights-2

You can expand the individual details for further information.

Application-Insights-3

You can change the parameter name & other details & click the run button to get all the log details for your debugging purpose.

So, finally, we’ve achieved our goal. This is relatively long posts. But, I’m sure this will help you to create your first python-based function on the Azure platform.

Hope, you will like this approach. Let me know your comment on the same.

I’ll bring some more exciting topic in the coming days from the Python verse.

Till then, Happy Avenging! 😀

Note: All the data posted here are representational data & available over the internet.

Combining the NoSQL(Cosmos DB) & traditional Azure RDBMS in Azure (Time stone solo from Python verse)

Hi Guys!

Today, our main objective is to extend our last post & blending two different kinds of data using Python.

Please refer the earlier post if you didn’t go through it – “Building Azure cosmos application.“.

What is the Objective?

In this post, our objective is to combine traditional RDBMS from the cloud with Azure’s NO SQL, which is, in this case, is Cosmos DB. And, try to forecast some kind of blended information, which can be aggregated further.

Examining Source Data.

No SQL Data from Cosmos:

Let’s check one more time the No SQL data created in our last post.

CosmosData

Total, we’ve created 6 records in our last post.

As you can see in red marked areas. From item, one can check the total number of records created. You can also filter out specific record using the Edit Filter blue color button highlighted with blue box & you need to provide the “WHERE CLAUSE” inside it.

Azure SQL DB:

Let’s create some data in Azure SQL DB.

But, before that, you need to create SQL DB in the Azure cloud. Here is the official Microsoft link to create DB in Azure. You can refer to it here.

I won’t discuss the detailed steps of creating DB here.

From Azure portal, it looks like –

Azure SQL DB Main Screen

Let’s see how the data looks like in Azure DB. For our case, we’ll be using the hrMaster DB.

Let’s create the table & some sample data aligned as per our cosmos data.

Azure SQL DB

We will join both the data based on subscriberId & then extract our required columns in our final output.

CombinedData

Good. Now, we’re ready for python scripts.

Python Scripts:

In this installment, we’ll be reusing the following python scripts, which is already discussed in my earlier post –

  • clsL.py
  • clsColMgmt.py
  • clsCosmosDBDet.py

So, I’m not going to discuss these scripts.

Before we discuss our scripts, let’s look out the directory structures –

Win_Vs_MAC

Here is the detailed directory structure between the Windows & MAC O/S.

1. clsConfig.py (This script will create the split csv files or final merge file after the corresponding process. However, this can be used as usual verbose debug logging as well. Hence, the name comes into the picture.)

##############################################
#### Written By: SATYAKI DE               ####
#### Written On: 25-May-2019              ####
#### Updated On: 02-Jun-2019              ####
####                                      ####
#### Objective: This script is a config   ####
#### file, contains all the keys for      ####
#### azure cosmos db. Application will    ####
#### process these information & perform  ####
#### various CRUD operation on Cosmos DB. ####
##############################################

import os
import platform as pl

class clsConfig(object):
    Curr_Path = os.path.dirname(os.path.realpath(__file__))
    db_name = 'rnd-de01-usw2-vfa-cdb'
    db_link = 'dbs/' + db_name
    CONTAINER1 = "RealtimeEmail"
    CONTAINER2 = "RealtimeTwitterFeedback"
    CONTAINER3 = "RealtimeHR"

    os_det = pl.system()
    if os_det == "Windows":
        sep = '\\'
    else:
        sep = '/'

    config = {
        'SERVER': 'xxxx-xxx.database.windows.net',
        'DATABASE_1': 'SalesForceMaster',
        'DATABASE_2': 'hrMaster',
        'DATABASE_3': 'statMaster',
        'USERNAME': 'admin_poc_dev',
        'PASSWORD': 'xxxxx',
        'DRIVER': '{ODBC Driver 17 for SQL Server}',
        'ENV': 'pocdev-saty',
        'ENCRYPT_FLAG': "yes",
        'TRUST_FLAG': "no",
        'TIMEOUT_LIMIT': "30",
        'PROCSTAT': "'Y'",
        'APP_ID': 1,
        'EMAIL_SRC_JSON_FILE': Curr_Path + sep + 'src_file' + sep + 'srcEmail.json',
        'TWITTER_SRC_JSON_FILE': Curr_Path + sep + 'src_file' + sep + 'srcTwitter.json',
        'HR_SRC_JSON_FILE': Curr_Path + sep + 'src_file' + sep + 'srcHR.json',
        'COSMOSDB_ENDPOINT': 'https://rnd-de01-usw2-vfa-cdb.documents.azure.com:443/',
        'CONFIG_TABLE': 'ETL_CONFIG_TAB',
        'COSMOS_PRIMARYKEY': "XXXXXXXXXXXXXXXXXXXXXXXXXXXXXXXXXXXXXXXXXXXXXXXXXXXXXXXXXXXXIsI00AxKXXXXXgg==",
        'ARCH_DIR': Curr_Path + sep + 'arch' + sep,
        'COSMOSDB': db_name,
        'COSMOS_CONTAINER1': CONTAINER1,
        'COSMOS_CONTAINER2': CONTAINER2,
        'COSMOS_CONTAINER3': CONTAINER3,
        'CONFIG_ORIG': 'Config_orig.csv',
        'ENCRYPT_CSV': 'Encrypt_Config.csv',
        'DECRYPT_CSV': 'Decrypt_Config.csv',
        'PROFILE_PATH': Curr_Path + sep + 'profile' + sep,
        'LOG_PATH': Curr_Path + sep + 'log' + sep,
        'REPORT_PATH': Curr_Path + sep + 'report',
        'APP_DESC_1': 'Feedback Communication',
        'DEBUG_IND': 'N',
        'INIT_PATH': Curr_Path,
        'SQL_QRY_1': "SELECT c.subscriberId, c.sender, c.orderNo, c.orderDate, c.items.orderQty  FROM RealtimeEmail c",
        'SQL_QRY_2': "SELECT c.twitterId, c.Twit, c.DateCreated, c.Country FROM RealtimeTwitterFeedback c WHERE c.twitterId=@CrVal",
        'DB_QRY': "SELECT * FROM c",
        'AZURE_SQL_1': "SELECT DISTINCT subscriberId, state, country, annualIncome, customerType FROM dbo.onboardCustomer",
        'COLLECTION_QRY': "SELECT * FROM r",
        'database_link': db_link,
        'collection_link_1': db_link + '/colls/' + CONTAINER1,
        'collection_link_2': db_link + '/colls/' + CONTAINER2,
        'collection_link_3': db_link + '/colls/' + CONTAINER3,
        'options': {
            'offerThroughput': 1000,
            'enableCrossPartitionQuery': True,
            'maxItemCount': 2
        }
    }

Here, we’ve added a couple of more entries compared to the last time, which points the detailed configuration for Azure SQL DB.

‘SERVER’: ‘xxxx-xxx.database.windows.net’,
‘DATABASE_1’: ‘SalesForceMaster’,
‘DATABASE_2’: ‘hrMaster’,
‘DATABASE_3’: ‘statMaster’,
‘USERNAME’: ‘admin_poc_dev’,
‘PASSWORD’: ‘xxxxx’,
‘DRIVER’: ‘{ODBC Driver 17 for SQL Server}’,
‘ENV’: ‘pocdev-saty’,
‘ENCRYPT_FLAG’: “yes”,
‘TRUST_FLAG’: “no”,
‘TIMEOUT_LIMIT’: “30”,
‘PROCSTAT’: “‘Y'”, 

Here, you need to supply your DB credentials accordingly.

2. clsDBLookup.py (This script will look into the Azure SQL DB & fetch data from the traditional RDBMS of Azure environment.)

#####################################################
#### Written By: SATYAKI DE                      ####
#### Written On: 25-May-2019                     ####
####                                             ####
#### Objective: This script will check &         ####
#### test the connection with the Azure          ####
#### SQL DB & it will fetch all the records      ####
#### name resied under the same DB of a table.   ####
#####################################################

import pyodbc as py
import pandas as p
from clsConfig import clsConfig as cdc

class clsDBLookup(object):
    def __init__(self, lkpTableName = ''):
        self.server = cdc.config['SERVER']
        self.database = cdc.config['DATABASE_1']
        self.database1 = cdc.config['DATABASE_2']
        self.database2 = cdc.config['DATABASE_3']
        self.username = cdc.config['USERNAME']
        self.password = cdc.config['PASSWORD']
        self.driver = cdc.config['DRIVER']
        self.env = cdc.config['ENV']
        self.encrypt_flg = cdc.config['ENCRYPT_FLAG']
        self.trust_flg = cdc.config['TRUST_FLAG']
        self.timeout_limit = cdc.config['TIMEOUT_LIMIT']
        self.lkpTableName = cdc.config['CONFIG_TABLE']
        self.ProcStat = cdc.config['PROCSTAT']
        self.AppId = cdc.config['APP_ID']

    def LookUpData(self):
        try:
            # Assigning all the required values
            server = self.server
            database = self.database1
            username = self.username
            password = self.password
            driver = self.driver
            env = self.env
            encrypt_flg = self.encrypt_flg
            trust_flg = self.trust_flg
            timout_limit = self.timeout_limit
            lkpTableName = self.lkpTableName
            ProcStat = self.ProcStat
            AppId = self.AppId

            # Creating secure connection
            str_conn = 'Driver=' + driver + ';Server=tcp:' + server + ',1433;' \
                       'Database=' + database + ';Uid=' + username + '@' + env + ';' \
                       'Pwd=' + password + ';Encrypt=' + encrypt_flg + ';' \
                       'TrustServerCertificate=' + trust_flg + ';Connection Timeout=' + timout_limit + ';'

            db_con_azure = py.connect(str_conn)

            query = " SELECT [ruleId] as ruleId, [ruleName] as ruleName, [ruleSQL] as ruleSQL, " \
                    " [ruleFlag] as ruleFlag, [appId] as appId, [DBType] as DBType, " \
                    " [DBName] as DBName FROM [dbo][" + lkpTableName + "] WHERE ruleFLag = " + ProcStat + " " \
                    " and appId = " + AppId + " ORDER BY ruleId "

            df = p.read_sql(query, db_con_azure)

            # Closing the connection
            db_con_azure.close()

            return df
        except Exception as e:
            x = str(e)
            print(x)
            df = p.DataFrame()

            return df

    def azure_sqldb_read(self, sql):
        try:
            # Assigning all the required values
            server = self.server
            database = self.database1
            username = self.username
            password = self.password
            driver = self.driver
            env = self.env
            encrypt_flg = self.encrypt_flg
            trust_flg = self.trust_flg
            timout_limit = self.timeout_limit
            lkpTableName = self.lkpTableName
            ProcStat = self.ProcStat
            AppId = self.AppId

            # Creating secure connection
            str_conn = 'Driver=' + driver + ';Server=tcp:' + server + ',1433;' \
                       'Database=' + database + ';Uid=' + username + '@' + env + ';' \
                       'Pwd=' + password + ';Encrypt=' + encrypt_flg + ';' \
                       'TrustServerCertificate=' + trust_flg + ';Connection Timeout=' + timout_limit + ';'

            # print("Connection Details:: ", str_conn)
            db_con_azure = py.connect(str_conn)

            query = sql

            df = p.read_sql(query, db_con_azure)

            # Closing the connection
            db_con_azure.close()

            return df
        except Exception as e:
            x = str(e)
            print(x)
            df = p.DataFrame()

            return df

Major lines to discuss –

azure_sqldb_read(self, sql):

Getting the source SQL supplied from the configuration script.

db_con_azure = py.connect(str_conn)

query = sql

df = p.read_sql(query, db_con_azure)

After creating a successful connection, our application will read the SQL & fetch the data & store that into a pandas dataframe and return the output to the primary calling function.

3. callCosmosAPI.py (This is the main script, which will call all the methods to blend the data. Hence, the name comes into the picture.)

##############################################
#### Written By: SATYAKI DE               ####
#### Written On: 25-May-2019              ####
#### Modified On 02-Jun-2019              ####
####                                      ####
#### Objective: Main calling scripts.     ####
##############################################

import clsColMgmt as cm
import clsCosmosDBDet as cmdb
from clsConfig import clsConfig as cf
import pandas as p
import clsLog as cl
import logging
import datetime
import json
import clsDBLookup as dbcon

# Disbling Warning
def warn(*args, **kwargs):
    pass

import warnings
warnings.warn = warn

def getDate(row):
    try:
        d1 = row['orderDate']
        d1_str = str(d1)
        d1_dt_part, sec = d1_str.split('.')
        dt_part1 = d1_dt_part.replace('T', ' ')

        return dt_part1
    except Exception as e:
        x = str(e)
        print(x)
        dt_part1 = ''

        return dt_part1

# Lookup functions from
# Azure cloud SQL DB

var = datetime.datetime.now().strftime("%Y-%m-%d_%H-%M-%S")

def main():
    try:
        df_ret = p.DataFrame()
        df_ret_2 = p.DataFrame()
        df_ret_2_Mod = p.DataFrame()

        debug_ind = 'Y'

        # Initiating Log Class
        l = cl.clsLog()

        general_log_path = str(cf.config['LOG_PATH'])

        # Enabling Logging Info
        logging.basicConfig(filename=general_log_path + 'consolidated.log', level=logging.INFO)

        # Moving previous day log files to archive directory
        arch_dir = cf.config['ARCH_DIR']
        log_dir = cf.config['LOG_PATH']

        print("Archive Directory:: ", arch_dir)
        print("Log Directory::", log_dir)

        print("*" * 157)
        print("Testing COSMOS DB Connection!")
        print("*" * 157)

        # Checking Cosmos DB Azure
        y = cmdb.clsCosmosDBDet()
        ret_val = y.test_db_con()

        if ret_val == 0:
            print()
            print("Cosmos DB Connection Successful!")
            print("*" * 157)
        else:
            print()
            print("Cosmos DB Connection Failure!")
            print("*" * 157)
            raise Exception

        print("*" * 157)

        # Accessing from Azure SQL DB
        x1 = dbcon.clsDBLookup()
        act_df = x1.azure_sqldb_read(cf.config['AZURE_SQL_1'])

        print("Azure SQL DB::")
        print(act_df)
        print()

        print("-" * 157)

        # Calling the function 1
        print("RealtimeEmail::")

        # Fetching First collection data to dataframe
        print("Fethcing Comos Collection Data!")

        sql_qry_1 = cf.config['SQL_QRY_1']
        msg = "Documents generatd based on unique key"
        collection_flg = 1

        x = cm.clsColMgmt()
        df_ret = x.fetch_data(sql_qry_1, msg, collection_flg)

        l.logr('1.EmailFeedback_' + var + '.csv', debug_ind, df_ret, 'log')
        print('RealtimeEmail Data::')
        print(df_ret)
        print()

        # Checking execution status
        ret_val = int(df_ret.shape[0])

        if ret_val == 0:
            print("Cosmos DB Hans't returned any rows. Please check your queries!")
            print("*" * 157)
        else:
            print("Successfully fetched!")
            print("*" * 157)

        # Calling the 2nd Collection
        print("RealtimeTwitterFeedback::")

        # Fetching First collection data to dataframe
        print("Fethcing Cosmos Collection Data!")

        # Query using parameters
        sql_qry_2 = cf.config['SQL_QRY_2']
        msg_2 = "Documents generated based on RealtimeTwitterFeedback feed!"
        collection_flg = 2

        val = 'crazyGo'
        param_det = [{"name": "@CrVal", "value": val}]
        add_param = 2

        x1 = cm.clsColMgmt()
        df_ret_2 = x1.fetch_data(sql_qry_2, msg_2, collection_flg, add_param, param_det)

        l.logr('2.TwitterFeedback_' + var + '.csv', debug_ind, df_ret, 'log')
        print('Realtime Twitter Data:: ')
        print(df_ret_2)
        print()

        # Checking execution status
        ret_val_2 = int(df_ret_2.shape[0])

        if ret_val_2 == 0:
            print("Cosmos DB hasn't returned any rows. Please check your queries!")
            print("*" * 157)
        else:
            print("Successfuly row feteched!")
            print("*" * 157)

        # Merging NoSQL Data (Cosmos DB) with Relational DB (Azure SQL DB)
        df_Fin_temp = p.merge(df_ret, act_df, on='subscriberId', how='inner')

        df_fin = df_Fin_temp[['orderDate', 'orderNo', 'sender', 'state', 'country', 'customerType']]

        print("Initial Combined Data (From Cosmos & Azure SQL DB) :: ")
        print(df_fin)

        l.logr('3.InitCombine_' + var + '.csv', debug_ind, df_fin, 'log')

        # Transforming the orderDate as per standard format
        df_fin['orderDateM'] = df_fin.apply(lambda row: getDate(row), axis=1)

        # Dropping the old column & renaming the new column to old column
        df_fin.drop(columns=['orderDate'], inplace=True)
        df_fin.rename(columns={'orderDateM': 'orderDate'}, inplace=True)

        print("*" * 157)
        print()
        print("Final Combined & Transformed result:: ")
        print(df_fin)

        l.logr('4.Final_Combine_' + var + '.csv', debug_ind, df_fin, 'log')
        print("*" * 157)

    except ValueError:
        print("No relevant data to proceed!")

    except Exception as e:
        print("Top level Error: args:{0}, message{1}".format(e.args, e.message))

if __name__ == "__main__":
    main()

The key lines from this script –

def getDate(row):
    try:
        d1 = row['orderDate']
        d1_str = str(d1)
        d1_dt_part, sec = d1_str.split('.')
        dt_part1 = d1_dt_part.replace('T', ' ')

        return dt_part1
    except Exception as e:
        x = str(e)
        print(x)
        dt_part1 = ''

        return dt_part1

This function converts NoSQL date data type more familiar format.

NoSQL Date:
NoSQL_Date
Transformed Date:
Transformed Date
# Accessing from Azure SQL DB
x1 = dbcon.clsDBLookup()
act_df = x1.azure_sqldb_read(cf.config['AZURE_SQL_1'])

print("Azure SQL DB::")
print(act_df)
print()

Above lines are calling the Azure SQL DB method to retrieve the RDBMS data into our dataframe.

# Merging NoSQL Data (Cosmos DB) with Relational DB (Azure SQL DB)
df_Fin_temp = p.merge(df_ret, act_df, on='subscriberId', how='inner')

df_fin = df_Fin_temp[['orderDate', 'orderNo', 'sender', 'state', 'country', 'customerType']]

In these above lines, we’re joining the data retrieved from two different kinds of the database to prepare our initial combined dataframe. Also, we’ve picked only the desired column, which will be useful for us.

# Transforming the orderDate as per standard format
df_fin['orderDateM'] = df_fin.apply(lambda row: getDate(row), axis=1)

# Dropping the old column & renaming the new column to old column
df_fin.drop(columns=['orderDate'], inplace=True)
df_fin.rename(columns={'orderDateM': 'orderDate'}, inplace=True)

In the above lines, we’re transforming our date field, as shown above in one of our previous images by calling the getDate method.

Let’s see the directory structure of our program –

Win_Vs_MAC

Let’s see how it looks when it runs –

Windows:

Win_Run_1
Win_Run_2

MAC:

MAC_Run_1
MAC_Run_2

So, finally, we’ve successfully blended the data & make more meaningful data projection.

Following python packages are required to run this application –

pip install azure

pip install azure-cosmos

pip install pandas

pip install requests

pip install pyodbc

This application tested on Python3.7.1 & Python3.7.2 as well. As per Microsoft, their official supported version is Python3.5.

I hope you’ll like this effort.

Wait for the next installment. Till then, Happy Avenging. 😀

[Note: All the sample data are available/prepared in the public domain for research & study.]

Building Azure Cosmos solution using Python, Pandas ( A crossover of space stone, a reality stone, soul stone & time stone)

Hi Guys,

Here is the latest installment from the Python verse. For the first time, we’ll be dealing with Python with Azure cloud along with the help from Pandas & json.

Why post on this topic?

I always try to post something based on some kind of used cases, which might be useful in real-life scenarios. And, on top of that, I really don’t find significant posts on Azure dealing with Python. So, thought of sharing some first used cases, which will encourage others to join this club & used more python based application in the Azure platform.

First, let us check the complexity of today’s post & our objective.

What is the objective?

Today, our objective is to load a couple of json payload & stored them into multiple Cosmos Containers & finally fetch the data from the Cosmos DB & store the output into our log files apart from printing the same over the terminal screen.

Before we start discussing our post, let us explain some basic terminology of Azure Cosmos DB. So, that, next time whenever we refer them, it will be easier for you to understand those terminologies.

Learning basic azure terminology.

Since this is an unstructured DB, all the data will be stored in this following fashion –

Azure Cosmos DB -> Container -> Items

Let’s simplify this in words. So, each azure DB may have multiple containers, which you can compare with the table of any conventional RDBMS. And, under containers, you will have multiple items, which represents rows of an RDBMS table. The only difference is in each item you might have a different number of elements, which is equivalent to the columns in traditional RDBMS tables. The traditional table always has a fixed number of columns.

Input Payload:

Let’s review three different payloads, which we’ll be loading into three separate containers.

srcEmail.json
srcEmail_json

As you can see in the items, first sub-row has 3 elements, whereas the second one has 4 components. Traditional RDBMS, the table will always have the same number of columns.

srcTwitter.json
srcTwitter_json
srcHR.json
srcHR_json

So, from the above three sample payload, our application will try to put user’s feedback & consolidate at a single place for better product forecasts.

Azure Portal:

Let’s look into the Azure portal & we’ll be identifying a couple of crucial information, which will require in python scripts for authentication. But, before that, I’ll show – how to get those details in steps –

Azure_portal_home

As shown highlighted in Red, click the Azure Cosmos DB. You will find the following screen –

Azure_portal_1

If you click this, you will find all the collections/containers that are part of the same DB as follows –

Azure_portal_2

After, that we’ll be trying to extract the COSMOS Key & the Endpoint/URI from the portal. Without this, python application won’t be able to interact with the Azure portal. This is sensitive information. So, I’ll be providing some dummy details here just to show how to extract it. Never share these details with anyone outside of your project or group.

Cosmos_Keys

Good. Now, we’re ready for python scripts.

Python Scripts:

In this installment, we’ll be reusing the following python scripts, which is already discussed in my earlier post –

  • clsL.py

So, I’m not going to discuss these scripts.

Before we discuss our scripts, let’s look out the directory structures –

Win_Vs_MAC_Dir

1. clsConfig.py (This script will create the split csv files or final merge file after the corresponding process. However, this can be used as usual verbose debug logging as well. Hence, the name comes into the picture.)

##############################################
#### Written By: SATYAKI DE               ####
#### Written On: 25-May-2019              ####
####                                      ####
#### Objective: This script is a config   ####
#### file, contains all the keys for      ####
#### azure cosmos db. Application will    ####
#### process these information & perform  ####
#### various CRUD operation on Cosmos DB. ####
##############################################
import os
import platform as pl

class clsConfig(object):
    Curr_Path = os.path.dirname(os.path.realpath(__file__))
    db_name = 'rnd-de01-usw2-vfa-cdb'
    db_link = 'dbs/' + db_name
    CONTAINER1 = "RealtimeEmail"
    CONTAINER2 = "RealtimeTwitterFeedback"
    CONTAINER3 = "RealtimeHR"

    os_det = pl.system()
    if os_det == "Windows":
        sep = '\\'
    else:
        sep = '/'

    config = {
        'EMAIL_SRC_JSON_FILE': Curr_Path + sep + 'src_file' + sep + 'srcEmail.json',
        'TWITTER_SRC_JSON_FILE': Curr_Path + sep + 'src_file' + sep + 'srcTwitter.json',
        'HR_SRC_JSON_FILE': Curr_Path + sep + 'src_file' + sep + 'srcHR.json',
        'COSMOSDB_ENDPOINT': 'https://rnd-de01-usw2-vfa-cdb.documents.azure.com:443/',
        'COSMOS_PRIMARYKEY': "XXXXXXXXXXXXXXXXXXXXXXXXXXXXXXXXXXXXXXXXXXXXXXXXXXXXXXXXXXXXIsI00AxKXXXXXgg==",
        'ARCH_DIR': Curr_Path + sep + 'arch' + sep,
        'COSMOSDB': db_name,
        'COSMOS_CONTAINER1': CONTAINER1,
        'COSMOS_CONTAINER2': CONTAINER2,
        'COSMOS_CONTAINER3': CONTAINER3,
        'CONFIG_ORIG': 'Config_orig.csv',
        'ENCRYPT_CSV': 'Encrypt_Config.csv',
        'DECRYPT_CSV': 'Decrypt_Config.csv',
        'PROFILE_PATH': Curr_Path + sep + 'profile' + sep,
        'LOG_PATH': Curr_Path + sep + 'log' + sep,
        'REPORT_PATH': Curr_Path + sep + 'report',
        'APP_DESC_1': 'Feedback Communication',
        'DEBUG_IND': 'N',
        'INIT_PATH': Curr_Path,
        'SQL_QRY_1': "SELECT c.subscriberId, c.sender, c.orderNo, c.orderDate, c.items.orderQty  FROM RealtimeEmail c",
        'SQL_QRY_2': "SELECT c.twitterId, c.Twit, c.DateCreated, c.Country FROM RealtimeTwitterFeedback c WHERE c.twitterId=@CrVal",
        'DB_QRY': "SELECT * FROM c",
        'COLLECTION_QRY': "SELECT * FROM r",
        'database_link': db_link,
        'collection_link_1': db_link + '/colls/' + CONTAINER1,
        'collection_link_2': db_link + '/colls/' + CONTAINER2,
        'collection_link_3': db_link + '/colls/' + CONTAINER3,
        'options': {
            'offerThroughput': 1000,
            'enableCrossPartitionQuery': True,
            'maxItemCount': 2
        }
    }

2. clsCosmosDBDet (This script will test the necessary connection with the Azure cosmos DB from the python application. And, if it is successful, then it will fetch all the collection/containers details, which resided under the same DB. Hence, the name comes into the picture.)

##############################################
#### Written By: SATYAKI DE               ####
#### Written On: 25-May-2019              ####
####                                      ####
#### Objective: This script will check &  ####
#### test the connection with the Cosmos  ####
#### & it will fetch all the collection   ####
#### name resied under the same DB.       ####
##############################################

import azure.cosmos.cosmos_client as cosmos_client
import azure.cosmos.errors as errors

from clsConfig import clsConfig as cf

class IDisposable(cosmos_client.CosmosClient):
    def __init__(self, obj):
        self.obj = obj

    def __enter__(self):
        return self.obj

    def __exit__(self, exception_type, exception_val, trace):
        self = None

class clsCosmosDBDet:
    def __init__(self):
        self.endpoint = cf.config['COSMOSDB_ENDPOINT']
        self.primarykey = cf.config['COSMOS_PRIMARYKEY']
        self.db = cf.config['COSMOSDB']
        self.cont_1 = cf.config['COSMOS_CONTAINER1']
        self.cont_2 = cf.config['COSMOS_CONTAINER2']
        self.cont_3 = cf.config['COSMOS_CONTAINER3']
        self.database_link = cf.config['database_link']
        self.collection_link_1 = cf.config['collection_link_1']
        self.collection_link_2 = cf.config['collection_link_2']
        self.collection_link_3 = cf.config['collection_link_3']
        self.options = cf.config['options']
        self.db_qry = cf.config['DB_QRY']
        self.collection_qry = cf.config['COLLECTION_QRY']

    def list_Containers(self, client):
        try:
            database_link = self.database_link
            collection_qry = self.collection_qry
            print("1. Query for collection!")
            print()

            collections = list(client.QueryContainers(database_link, {"query": collection_qry}))

            if not collections:
                return

            for collection in collections:
                print(collection['id'])

            print()

        except errors.HTTPFailure as e:
            if e.status_code == 404:
                print("*" * 157)
                print('A collection with id \'{0}\' does not exist'.format(id))
                print("*" * 157)
            else:
                raise errors.HTTPFailure(e.status_code)

    def test_db_con(self):
        endpoint = self.endpoint
        primarykey = self.primarykey
        options_1 = self.options
        db_qry = self.db_qry

        with IDisposable(cosmos_client.CosmosClient(url_connection=endpoint, auth={'masterKey': primarykey})) as client:
            try:
                try:
                    options = {}
                    query = {"query": db_qry}
                    options = options_1

                    print("-" * 157)
                    print('Options:: ', options)
                    print()
                    print("Database details:: ")

                    result_iterable = client.QueryDatabases(query, options)

                    for item in iter(result_iterable):
                        print(item)

                    print("-" * 157)

                except errors.HTTPFailure as e:
                    if e.status_code == 409:
                        pass
                    else:
                        raise errors.HTTPFailure(e.status_code)

                self.list_Containers(client)

                return 0

            except errors.HTTPFailure as e:
                print("Application has caught an error. {0}".format(e.message))

                return 1

            finally:
                print("Application successfully completed!")

Key lines from the above scripts are –

with IDisposable(cosmos_client.CosmosClient(url_connection=endpoint, auth={'masterKey': primarykey})) as client:

In this step, the python application is building the connection object.

# Refer the entry in our config file
self.db_qry = cf.config['DB_QRY']
..
query = {"query": db_qry}
options = options_1
..
result_iterable = client.QueryDatabases(query, options)

Based on the supplied value from our configuration python script, this will extract the cosmos DB information.

self.list_Containers(client)

This is a function that will identify all the collection under this DB.

def list_Containers(self, client):
..
collections = list(client.QueryContainers(database_link, {"query": collection_qry}))

if not collections:
 return

for collection in collections:
 print(collection['id'])

In these above lines, our application will actually fetch the containers that are associated with this DB.

3. clsColMgmt.py (This script will create the split csv files or final merge file after the corresponding process. However, this can be used as usual verbose debug logging as well. Hence, the name comes into the picture.)

################################################
#### Written By: SATYAKI DE                 ####
#### Written On: 25-May-2019                ####
####                                        ####
#### Objective: This scripts has multiple   ####
#### features. You can create new items     ####
#### in azure cosmos db. Apart from that    ####
#### you can retrieve data from Cosmos just ####
#### for viewing purpose. You can display   ####
#### data based on specific filters or the  ####
#### entire dataset. Hence, three different ####
#### methods provided here to support this. ####
################################################

import azure.cosmos.cosmos_client as cosmos_client
import azure.cosmos.errors as errors
import pandas as p
import json

from clsConfig import clsConfig as cf

class IDisposable(cosmos_client.CosmosClient):
    def __init__(self, obj):
        self.obj = obj

    def __enter__(self):
        return self.obj

    def __exit__(self, exception_type, exception_val, trace):
        self = None

class clsColMgmt:
    def __init__(self):
        self.endpoint = cf.config['COSMOSDB_ENDPOINT']
        self.primarykey = cf.config['COSMOS_PRIMARYKEY']
        self.db = cf.config['COSMOSDB']
        self.cont_1 = cf.config['COSMOS_CONTAINER1']
        self.cont_2 = cf.config['COSMOS_CONTAINER2']
        self.cont_3 = cf.config['COSMOS_CONTAINER3']
        self.database_link = cf.config['database_link']
        self.collection_link_1 = cf.config['collection_link_1']
        self.collection_link_2 = cf.config['collection_link_2']
        self.collection_link_3 = cf.config['collection_link_3']
        self.options = cf.config['options']
        self.db_qry = cf.config['DB_QRY']
        self.collection_qry = cf.config['COLLECTION_QRY']

    # Creating cosmos items in container
    def CreateDocuments(self, inputJson, collection_flg = 1):
        try:
            # Declaring variable
            endpoint = self.endpoint
            primarykey = self.primarykey

            print('Creating Documents')

            with IDisposable(cosmos_client.CosmosClient(url_connection=endpoint, auth={'masterKey': primarykey})) as client:
                try:
                    if collection_flg == 1:
                        collection_link = self.collection_link_1
                    elif collection_flg == 2:
                        collection_link = self.collection_link_2
                    else:
                        collection_link = self.collection_link_3

                    container = client.ReadContainer(collection_link)

                    # Create a SalesOrder object. This object has nested properties and various types including numbers, DateTimes and strings.
                    # This can be saved as JSON as is without converting into rows/columns.
                    print('Input Json:: ', str(inputJson))
                    nSon = json.dumps(inputJson)
                    json_rec = json.loads(nSon)

                    client.CreateItem(container['_self'], json_rec)

                except errors.HTTPFailure as e:
                    print("Application has caught an error. {0}".format(e.status_code))

                finally:
                    print("Application successfully completed!")

            return 0
        except Exception as e:
            x = str(e)
            print(x)
            return 1

    def CosmosDBCustomQuery_PandasCSVWithParam(self, client, collection_link, query_with_optional_parameters, message="Documents found by query: ", options_sql = {}):
        try:
            # Reading data by SQL & convert it ot Pandas Dataframe
            results = list(client.QueryItems(collection_link, query_with_optional_parameters, options_sql))
            cnt = 0

            dfSrc = p.DataFrame()
            dfRes = p.DataFrame()
            dfSrc2 = p.DataFrame()
            json_data = ''

            for doc in results:
                cnt += 1

            dfSrc = p.io.json.json_normalize(results)
            dfSrc.columns = dfSrc.columns.map(lambda x: x.split(".")[-1])
            dfRes = dfSrc

            print("Total records fetched: ", cnt)
            print("*" * 157)

            return dfRes
        except errors.HTTPFailure as e:
            Df_Fin = p.DataFrame()
            if e.status_code == 404:
                print("*" *157)
                print("Document doesn't exists")
                print("*" *157)
                return Df_Fin
            elif e.status_code == 400:
                print("*" * 157)
                print("Bad request exception occuered: ", e)
                print("*" *157)
                return Df_Fin
            else:
                return Df_Fin
        finally:
            print()

    def CosmosDBCustomQuery_PandasCSV(self, client, collection_link, query_with_optional_parameters, message="Documents found by query: ", options_sql = {}):
        try:
            # Reading data by SQL & convert it ot Pandas Dataframe
            results = list(client.QueryItems(collection_link, query_with_optional_parameters, options_sql))
            cnt = 0

            dfSrc = p.DataFrame()
            dfRes = p.DataFrame()
            dfSrc2 = p.DataFrame()
            json_data = ''

            for doc in results:
                cnt += 1

            dfSrc = p.io.json.json_normalize(results)
            dfSrc.columns = dfSrc.columns.map(lambda x: x.split(".")[-1])
            dfRes = dfSrc

            print("Total records fetched: ", cnt)
            print("*" * 157)

            return dfRes
        except errors.HTTPFailure as e:
            Df_Fin = p.DataFrame()
            if e.status_code == 404:
                print("*" *157)
                print("Document doesn't exists")
                print("*" *157)
                return Df_Fin
            elif e.status_code == 400:
                print("*" * 157)
                print("Bad request exception occuered: ", e)
                print("*" *157)
                return Df_Fin
            else:
                return Df_Fin
        finally:
            print()

    def fetch_data(self, sql_qry, msg="", collection_flg = 1, additional_params = 1, param_det=[]):
        endpoint = self.endpoint
        primarykey = self.primarykey
        options_1 = self.options

        with IDisposable(cosmos_client.CosmosClient(url_connection=endpoint, auth={'masterKey': primarykey})) as client:
            try:
                if collection_flg == 1:
                    collection_link = self.collection_link_1
                elif collection_flg == 2:
                    collection_link = self.collection_link_2
                else:
                    collection_link = self.collection_link_3

                print("Additional parameters: ", additional_params)

                message = msg
                options = options_1

                if additional_params == 1:
                    query = {"query": sql_qry}
                    df_Fin = self.CosmosDBCustomQuery_PandasCSV(client, collection_link, query, message, options)
                else:
                    query = {"query": sql_qry, "parameters": param_det}
                    df_Fin = self.CosmosDBCustomQuery_PandasCSVWithParam(client, collection_link, query, message, options)

                return df_Fin
            except errors.HTTPFailure as e:
                print("Application has caught an error. {0}".format(e.message))

            finally:
                print("Application successfully completed!")

Key lines from the above script –

def CosmosDBCustomQuery_PandasCSV(self, client, collection_link, query_with_optional_parameters, message="Documents found by query: ", options_sql = {}):

This method is generic. It will fetch all the records of a cosmos container.

results = list(client.QueryItems(collection_link, query_with_optional_parameters, options_sql))
..
for doc in results:
cnt += 1

dfSrc = p.io.json.json_normalize(results)
dfSrc.columns = dfSrc.columns.map(lambda x: x.split(".")[-1])
dfRes = dfSrc

In this step, the application fetching the data in the form of json & then serialize them & flatten them & finally stored the result into pandas dataframe for return output. Function –

CosmosDBCustomQuery_PandasCSVWithParam

– Is the same as the previous function. The only thing it can process parameters to filter out the data.

def fetch_data(self, sql_qry, msg="", collection_flg = 1, additional_params = 1, param_det=[]):

This is the primary calling function. Let us find out the key lines –

if collection_flg == 1:
    collection_link = self.collection_link_1
elif collection_flg == 2:
    collection_link = self.collection_link_2
else:
    collection_link = self.collection_link_3

Based on the supplied collection_flag from the main scripts, our application is identifying the collection where we need to process/load our data.

if additional_params == 1:
    query = {"query": sql_qry}
    df_Fin = self.CosmosDBCustomQuery_PandasCSV(client, collection_link, query, message, options)
else:
    query = {"query": sql_qry, "parameters": param_det}
    df_Fin = self.CosmosDBCustomQuery_PandasCSVWithParam(client, collection_link, query, message, options)

Based on the supplied additiona_params value, python application process, the filter queries & based on that it will invoke the function.

def CreateDocuments(self, inputJson, collection_flg = 1):

This is the primary collection for creating items/rows.

if collection_flg == 1:
    collection_link = self.collection_link_1
elif collection_flg == 2:
    collection_link = self.collection_link_2
else:
    collection_link = self.collection_link_3

container = client.ReadContainer(collection_link)

Based on the collection, our application will points to a specific container & create a connection between python & itself.

nSon = json.dumps(inputJson)
json_rec = json.loads(nSon)

client.CreateItem(container['_self'], json_rec)

Once, you’ll receive the input payload. The application will convert it to valid JSON payload & then send it to create item method to insert records.

4. callCosmosAPI.py (This script is the main calling function. Hence, the name comes into the picture.)

##############################################
#### Written By: SATYAKI DE               ####
#### Written On: 25-May-2019              ####
####                                      ####
#### Objective: Main calling scripts.     ####
##############################################

import clsColMgmt as cm
import clsCosmosDBDet as cmdb
from clsConfig import clsConfig as cf
import pandas as p
import clsL as cl
import logging
import datetime
import json

# Disbling Warning
def warn(*args, **kwargs):
    pass

import warnings
warnings.warn = warn

# Lookup functions from
# Azure cloud SQL DB


def main():
    try:
        df_ret = p.DataFrame()
        df_ret_2 = p.DataFrame()
        df_ret_2_Mod = p.DataFrame()

        debug_ind = 'Y'

        # Initiating Log Class
        l = cl.clsL()

        general_log_path = str(cf.config['LOG_PATH'])

        # Enabling Logging Info
        logging.basicConfig(filename=general_log_path + 'consolidated.log', level=logging.INFO)

        # Moving previous day log files to archive directory
        arch_dir = cf.config['ARCH_DIR']
        log_dir = cf.config['LOG_PATH']

        print("Archive Directory:: ", arch_dir)
        print("Log Directory::", log_dir)

        print("*" * 157)
        print("Testing COSMOS DB Connection!")
        print("*" * 157)

        # Checking Cosmos DB Azure
        y = cmdb.clsCosmosDBDet()
        ret_val = y.test_db_con()

        if ret_val == 0:
            print()
            print("Cosmos DB Connection Successful!")
            print("*" * 157)
        else:
            print()
            print("Cosmos DB Connection Failure!")
            print("*" * 157)
            raise Exception

        print("*" * 157)

        # Creating Data in Cosmos DB
        print()
        print('Fetching data from Json!')
        print('Creating data for Email..')
        print("-" * 157)

        emailFile = cf.config['EMAIL_SRC_JSON_FILE']
        flg = 1

        with open(emailFile) as json_file:
            dataEmail = json.load(json_file)

        # Creating documents
        a1 = cm.clsColMgmt()
        ret_cr_val1 = a1.CreateDocuments(dataEmail, flg)

        if ret_cr_val1 == 0:
            print('Successful data creation!')
        else:
            print('Failed create data!')

        print("-" * 157)

        print()
        print('Creating data for Twitter..')
        print("-" * 157)

        twitFile = cf.config['TWITTER_SRC_JSON_FILE']
        flg = 2

        with open(twitFile) as json_file:
            dataTwitter = json.load(json_file)

        # Creating documents
        a2 = cm.clsColMgmt()
        ret_cr_val2 = a2.CreateDocuments(dataTwitter, flg)

        if ret_cr_val2 == 0:
            print('Successful data creation!')
        else:
            print('Failed create data!')

        print("-" * 157)

        print()
        print('Creating data for HR..')
        print("-" * 157)

        hrFile = cf.config['HR_SRC_JSON_FILE']
        flg = 3

        with open(hrFile) as json_file:
            hrTwitter = json.load(json_file)

        # Creating documents
        a3 = cm.clsColMgmt()
        ret_cr_val3 = a3.CreateDocuments(hrTwitter, flg)

        if ret_cr_val3 == 0:
            print('Successful data creation!')
        else:
            print('Failed create data!')

        print("-" * 157)

        # Calling the function 1
        print("RealtimeEmail::")

        # Fetching First collection data to dataframe
        print("Fethcing Comos Collection Data!")

        sql_qry_1 = cf.config['SQL_QRY_1']
        msg = "Documents generatd based on unique key"
        collection_flg = 1

        x = cm.clsColMgmt()
        df_ret = x.fetch_data(sql_qry_1, msg, collection_flg)

        l.logr('1.EmailFeedback_' + var + '.csv', debug_ind, df_ret, 'log')
        print('RealtimeEmail Data::')
        print(df_ret)
        print()

        # Checking execution status
        ret_val = int(df_ret.shape[0])

        if ret_val == 0:
            print("Cosmos DB Hans't returned any rows. Please check your queries!")
            print("*" * 157)
        else:
            print("Successfully fetched!")
            print("*" * 157)

        # Calling the 2nd Collection
        print("RealtimeTwitterFeedback::")

        # Fetching First collection data to dataframe
        print("Fethcing Cosmos Collection Data!")

        # Query using parameters
        sql_qry_2 = cf.config['SQL_QRY_2']
        msg_2 = "Documents generated based on RealtimeTwitterFeedback feed!"
        collection_flg = 2

        val = 'crazyGo'
        param_det = [{"name": "@CrVal", "value": val}]
        add_param = 2

        x1 = cm.clsColMgmt()
        df_ret_2 = x1.fetch_data(sql_qry_2, msg_2, collection_flg, add_param, param_det)

        l.logr('2.TwitterFeedback_' + var + '.csv', debug_ind, df_ret, 'log')
        print('Realtime Twitter Data:: ')
        print(df_ret_2)
        print()

        # Checking execution status
        ret_val_2 = int(df_ret_2.shape[0])

        if ret_val_2 == 0:
            print("Cosmos DB hasn't returned any rows. Please check your queries!")
            print("*" * 157)
        else:
            print("Successfuly row feteched!")
            print("*" * 157)

    except ValueError:
        print("No relevant data to proceed!")

    except Exception as e:
        print("Top level Error: args:{0}, message{1}".format(e.args, e.message))

if __name__ == "__main__":
    main()

Key lines from the above script –

with open(twitFile) as json_file:
    dataTwitter = json.load(json_file)

Reading a json file.

val = 'crazyGo'
param_det = [{"name": "@CrVal", "value": val}]
add_param = 2

Passing a specific parameter value to filter out the record, while fetching it from the Cosmos DB.

Now, let’s look at the runtime stats.

Windows:

Win_Run_1
Win_Run_2

MAC:

MAC_Run_1
MAC_Run_2

Let’s compare the output log directory –

Windows:

Win_Log_Dir

MAC:

MAC_Log_Dir

Let’s verify the data from Cosmos DB.

Sample_Cosmos_Qry_Output_1

Here, subscriberId starting with ‘M‘ denotes data inserted from the MAC environment. Other one inserted through Windows.

Let’s see one more example from Cosmos –

Sample_Cosmos_Qry_Output_2

So, I guess – we’ve achieved our final goal here. Successfully, inserted data into Azure Cosmos DB from the python application & retrieve it successfully.

Following python packages are required in order to run this application –

pip install azure

pip install azure-cosmos

pip install pandas

pip install requests

This application tested on Python3.7.1 & Python3.7.2 as well. As per Microsoft, their official supported version is Python3.5.

I hope you’ll like this effort.

Wait for the next installment. Till then, Happy Avenging. 😀

[Note: All the sample data are available/prepared in the public domain for research & study.]