This site mainly deals with various use cases demonstrated using Python, Data Science, Cloud basics, SQL Server, Oracle, Teradata along with SQL & their implementation. Expecting yours active participation & time. This blog can be access from your TP, Tablet & mobile also. Please provide your feedback.
This is a continuation of my previous post, which can be found here.
Let us recap the key takaways from our previous post –
The Model Context Protocol (MCP) standardizes how AI agents use tools and data. Instead of fragile, custom connectors (N×M problem), teams build one MCP server per system; any MCP-compatible agent can use it, reducing cost and breakage. Unlike RAG, which retrieves static, unstructured documents for context, MCP enables live, structured, and actionable operations (e.g., query databases, create tickets). Compared with proprietary plugins, MCP is open, model-agnostic (JSON-RPC 2.0), and minimizes vendor lock-in. Cloud patterns: Azure “agent factory,” AWS “serverless agents,” and GCP “unified workbench”—each hosting agents with MCP servers securely fronting enterprise services.
Today, we’ll try to understand some of the popular pattern from the world of cloud & we’ll explore them in this post & the next post.
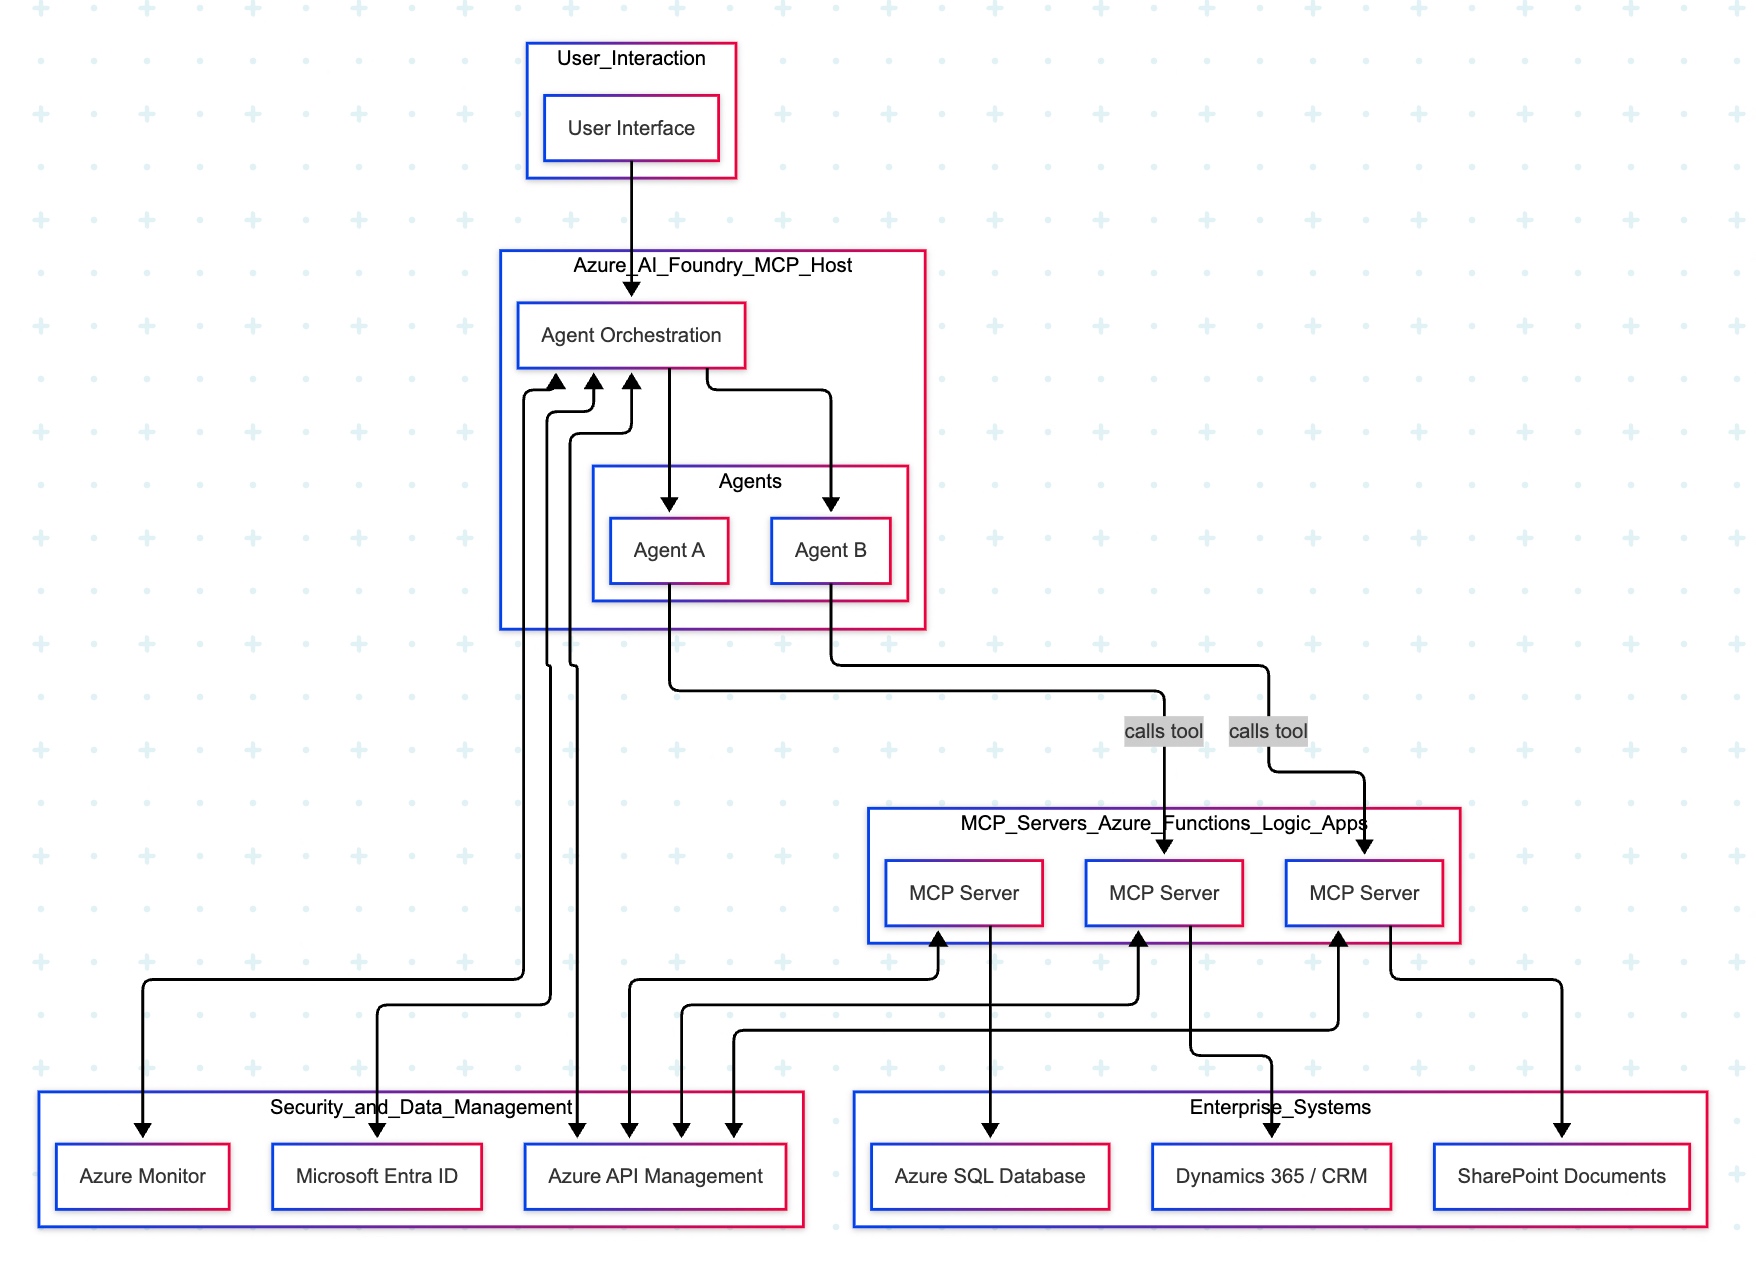
Agent Factory Pattern (Azure):
The Azure “agent factory” pattern leverages the Azure AI Foundry to serve as a secure, managed hub for creating and orchestrating multiple specialized AI agents. This pattern emphasizes enterprise-grade security, governance, and seamless integration with the Microsoft ecosystem, making it ideal for organizations that use Microsoft products extensively.
Let’s explore the following diagram based on this –
Imagine you ask a question in Microsoft Teams—“Show me the latest HR policy” or “What is our current sales pipeline?” Your message is sent to Azure AI Foundry, which acts as an expert dispatcher. Foundry chooses a specialist AI agent—for example, an HR agent for policies or a Sales agent for the pipeline.
That agent does not rummage through your systems directly. Instead, it uses a safe, preapproved tool (an “MCP Server”) that knows how to talk to one system—such as Dynamics 365/CRM, SharePoint, or an Azure SQL database. The tool gets the information, sends it back to the agent, who then explains the answer clearly to you in Teams.
Throughout the process, three guardrails keep everything safe and reliable:
Microsoft Entra ID checks identity and permissions.
Azure API Management (APIM) is the controlled front door for all tool calls.
Azure Monitor watches performance and creates an audit trail.
Let us now understand the technical events that is going on underlying this request –
Control plane: Azure AI Foundry (MCP Host) orchestrates intent, tool selection, and multi-agent flows.
Execution plane: Agents invoke MCP Servers (Azure Functions/Logic Apps) via APIM; each server encapsulates a single domain integration (CRM, SharePoint, SQL).
Data plane:
MCP Server (CRM) ↔ Dynamics 365/CRM
MCP Server (SharePoint) ↔ SharePoint
MCP Server (SQL) ↔ Azure SQL Database
Identity & access:Entra ID issues tokens and enforces least-privilege access; Foundry, APIM, and MCP Servers validate tokens.
Observability:Azure Monitor for metrics, logs, distributed traces, and auditability across agents and tool calls.
Traffic pattern in diagram:
User → Foundry → Agent (Sales/HR).
Agent —tool call→ MCP Server (CRM/SharePoint/SQL).
MCP Server → Target system; response returns along the same path.
Note: The SQL MCP Server is shown connected to Azure SQL; agents can call it in the same fashion as CRM/SharePoint when a use case requires relational data.
Why does this design work?
Safety by design: Agents never directly touch back-end systems; MCP Servers mediate access with APIM and Entra ID.
Clarity & maintainability: Each tool maps to one system; changes are localized and testable.
Scalability: Add new agents or systems by introducing another MCP Server behind APIM.
Auditability: Every action is observable in Azure Monitor for compliance and troubleshooting.
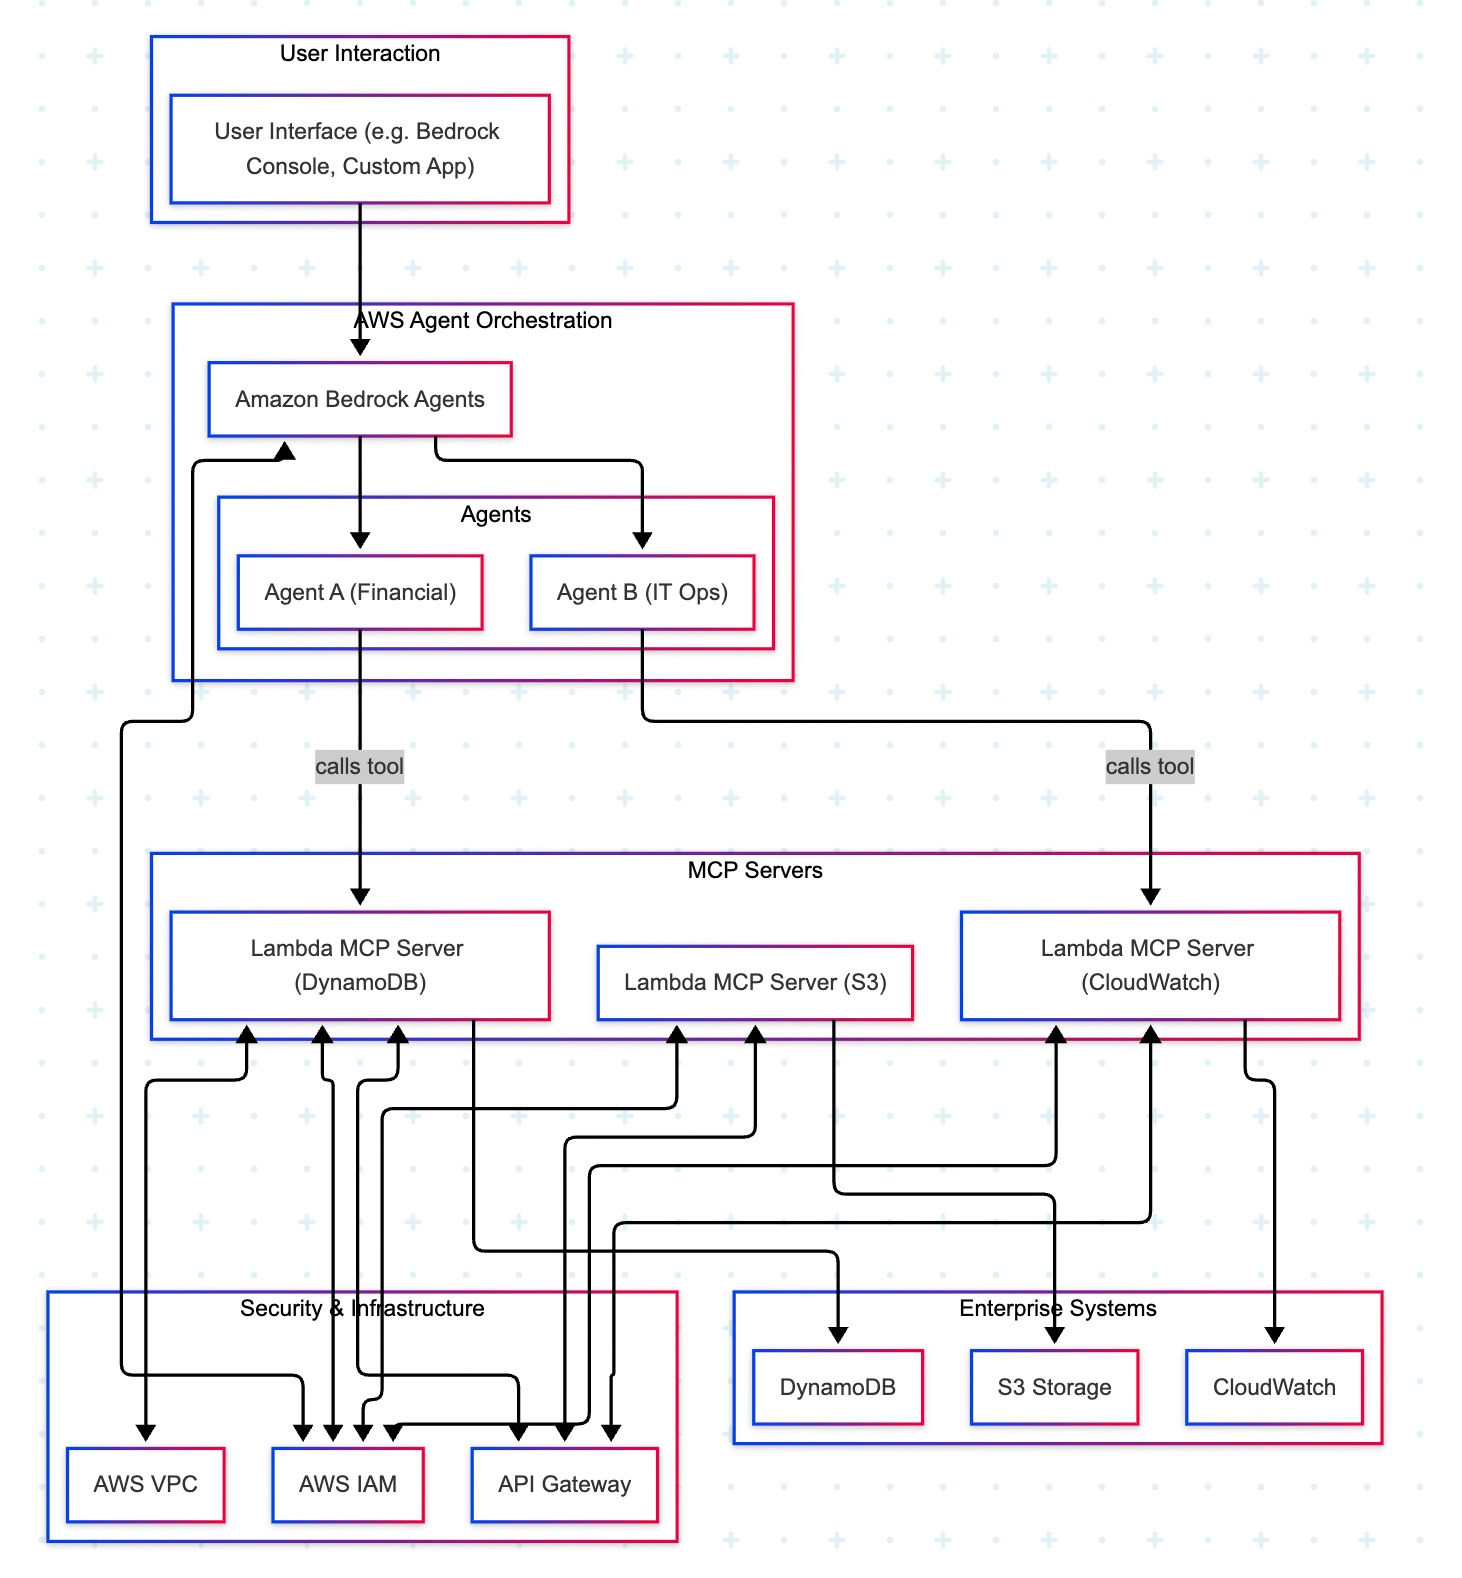
AWS MCP Architecture:
The AWS “composable serverless agent” pattern focuses on building lightweight, modular, and event-driven AI agents using Bedrock and serverless technologies. It prioritizes customization, scalability, and leveraging AWS’s deep service portfolio, making it a strong choice for enterprises that value flexibility and granular control.
A manager opens a familiar app (the Bedrock console or a simple web app) and types, “Show me last quarter’s approved purchase requests.” The request goes to Amazon Bedrock Agents, which acts like an intelligent dispatcher. It chooses the Financial Agent—a specialist in finance tasks. That agent uses a safe, pre-approved tool to fetch data from the company’s DynamoDB records. Moments later, the manager sees a clear summary, without ever touching databases or credentials.
Actors & guardrails. UI (Bedrock console or custom app) → Amazon Bedrock Agents (MCP host/orchestrator) → Domain Agents (Financial, IT Ops) → MCP Servers on AWS Lambda (one tool per AWS service) → Enterprise Services (DynamoDB, S3, CloudWatch). Access is governed by IAM (least-privilege roles, agent→tool→service), ingress/policy by API Gateway (front door to each Lambda tool), and network isolation by VPC where required.
Agent–tool mappings:
Agent A (Financial) → Lambda MCP (DynamoDB)
Agent B (IT Ops) → Lambda MCP (CloudWatch)
Optional: Lambda MCP (S3) for file/object operations
End-to-end sequence:
UI → Bedrock Agents: User submits a prompt.
Agent selection: Bedrock dispatches to the appropriate domain agent (Financial or IT Ops).
Tool invocation: The agent calls the required Lambda MCP Server via API Gateway.
Authorization: The tool executes only permitted actions under its IAM role (least privilege).
Safer by default: Agents never handle raw credentials; tools enforce least privilege with IAM.
Clear boundaries: Each tool maps to one service, making audits and changes simpler.
Scalable & maintainable:Lambda and API Gateway scale on demand; adding a new tool (e.g., a Cost Explorer tool) does not require changing the UI or existing agents.
Faster delivery: Specialists (agents) focus on logic; tools handle system specifics.
In the next post, we’ll conclude the final thread on this topic.
Till then, Happy Avenging! 🙂
Note: All the data & scenarios posted here are representational data & scenarios & available over the internet & for educational purposes only. There is always room for improvement in this kind of model & the solution associated with it. I’ve shown the basic ways to achieve the same for educational purposes only.
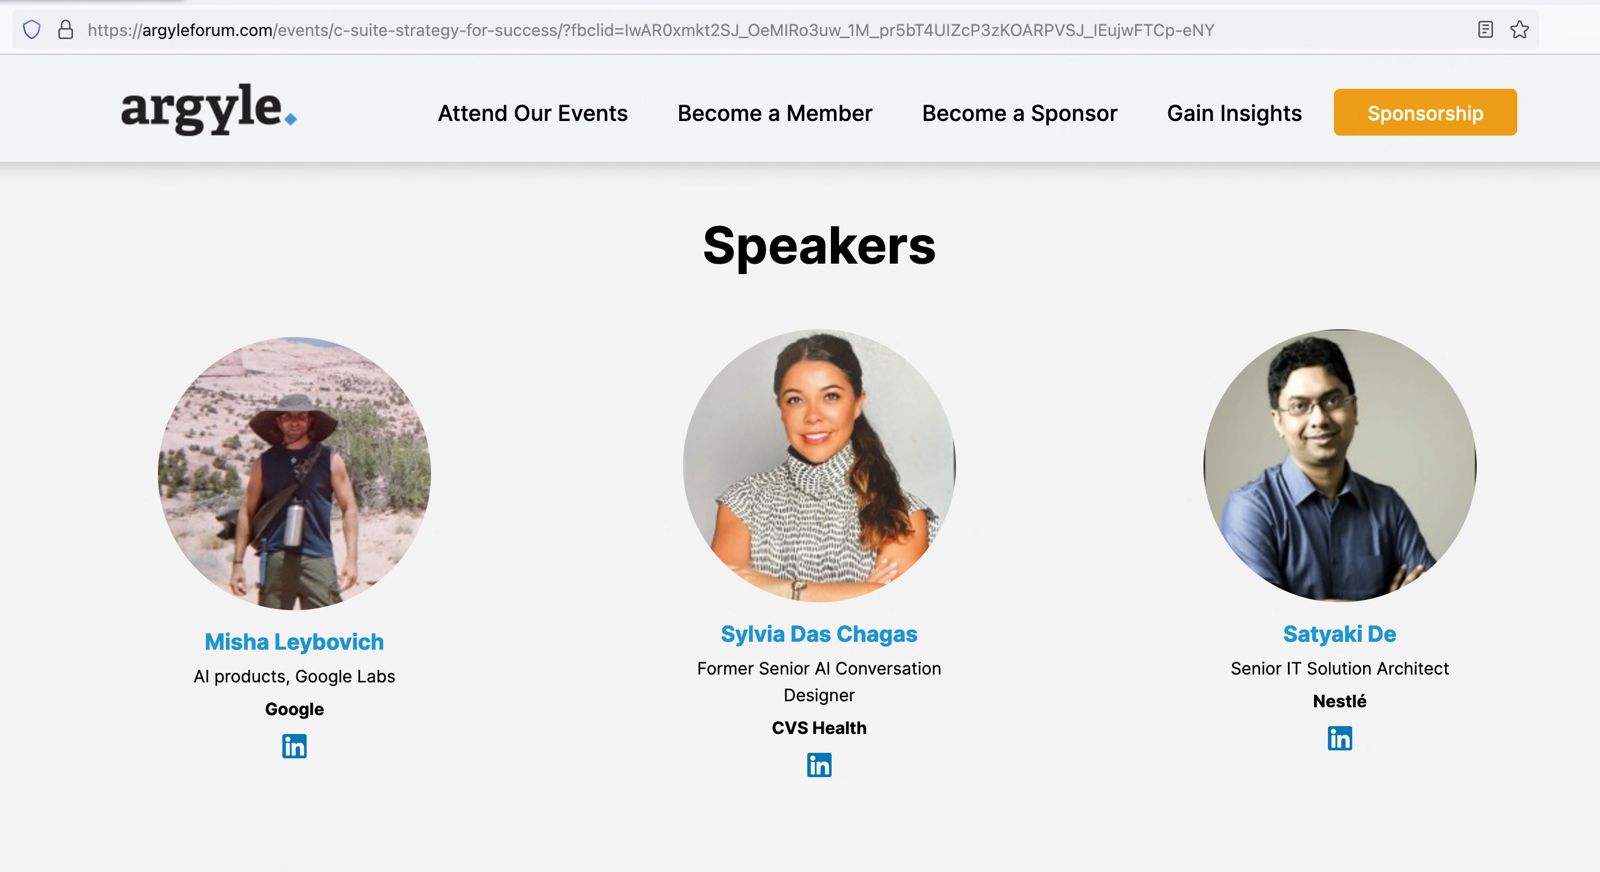
At the recent Argyle AI Summit, a prestigious event in the AI industry, I had the honor of participating as a speaker alongside esteemed professionals like Misha Leybovich from Google Labs. The summit, coordinated by Sylvia Das Chagas, a former senior AI conversation designer at CVS Health, provided an enlightening platform to discuss the evolving role of AI in talent management. Our session focused on the theme “Driving Talent with AI,” addressing some of the most pressing questions in the field. Frequently, relevant use cases were shared in detail to support these threads.
To view the actual page, please click the following link.
Impact of AI on Talent Management
One of the critical topics we explored was AI’s impact on talent management in the upcoming year. AI’s influence in hiring and retention is becoming increasingly significant. For example, AI-powered tools can now analyze vast amounts of data to identify the best candidates for a role, going beyond traditional resume screening. In retention, AI is instrumental in identifying patterns that indicate an employee’s likelihood to leave, enabling proactive measures.
Dispelling Fears Around AI Replacing Jobs
A burning question in AI is how leaders address fears that AI might replace manual jobs. We discussed the importance of leaders framing AI as a complement to human skills rather than a replacement. AI enhances employee capabilities by automating mundane tasks, allowing employees to focus on more creative and strategic work.
Innovative AI Tools for Organizations
Regarding new AI tools that organizations should watch out for, the conversation highlighted tools that enhance remote collaboration and workplace inclusivity. Tools like virtual meeting assistants that can transcribe, translate, and summarize meetings in real time are becoming invaluable in today’s global work environment.
AI in Boosting Employee Motivation and Productivity
AI’s role in boosting employee motivation and productivity was another focal point. We discussed how AI-driven career development programs can offer personalized learning paths, helping employees grow and stay motivated.
Incorporating Multilingual Capabilities in AI Tools
Incorporating multiple languages in tools like ChatGPT was highlighted as a critical step towards inclusivity. This expansion allows a broader range of employees to interact with AI tools in their native language, fostering a more inclusive workplace environment.
Addressing Reluctance to Change
Lastly, we tackled the challenge of addressing employees’ reluctance to change. Emphasizing the importance of transparent communication and education about AI’s benefits was identified as key. Organizations can alleviate fears and encourage a more accepting attitude towards AI by involving employees in the AI implementation process and providing training.
Conclusion
The Argyle AI Summit offered a compelling glimpse into the future of AI in talent management. The session provided valuable insights for leaders looking to harness AI’s potential to enhance talent management strategies by discussing real-world examples and strategies. To gain more in-depth knowledge and perspectives shared during this summit, I encourage interested parties to visit the recorded session link for a more comprehensive understanding.
Or, you can directly view it from here –
Feedback Request
I would greatly appreciate your feedback on the insights shared during the summit. Your thoughts and perspectives are invaluable as we continue to explore and navigate the evolving landscape of AI in the workplace.
Note: Video content hosted at a third-party site by the summit organizer & not by me.
In this post, our objective is to combine traditional RDBMS from the cloud with Azure’s NO SQL, which is, in this case, is Cosmos DB. And, try to forecast some kind of blended information, which can be aggregated further.
Examining Source Data.
No SQL Data from Cosmos:
Let’s check one more time the No SQL data created in our last post.
Total, we’ve created 6 records in our last post.
As you can see in red marked areas. From item, one can check the total number of records created. You can also filter out specific record using the Edit Filter blue color button highlighted with blue box & you need to provide the “WHERE CLAUSE” inside it.
Azure SQL DB:
Let’s create some data in Azure SQL DB.
But, before that, you need to create SQL DB in the Azure cloud. Here is the official Microsoft link to create DB in Azure. You can refer to it here.
I won’t discuss the detailed steps of creating DB here.
From Azure portal, it looks like –
Let’s see how the data looks like in Azure DB. For our case, we’ll be using the hrMaster DB.
Let’s create the table & some sample data aligned as per our cosmos data.
We will join both the data based on subscriberId & then extract our required columns in our final output.
Good. Now, we’re ready for python scripts.
Python Scripts:
In this installment, we’ll be reusing the following python scripts, which is already discussed in my earlier post –
clsL.py
clsColMgmt.py
clsCosmosDBDet.py
So, I’m not going to discuss these scripts.
Before we discuss our scripts, let’s look out the directory structures –
Here is the detailed directory structure between the Windows & MAC O/S.
1. clsConfig.py (This script will create the split csv files or final merge file after the corresponding process. However, this can be used as usual verbose debug logging as well. Hence, the name comes into the picture.)
After creating a successful connection, our application will read the SQL & fetch the data & store that into a pandas dataframe and return the output to the primary calling function.
3. callCosmosAPI.py (This is the main script, which will call all the methods to blend the data. Hence, the name comes into the picture.)
##############################################
#### Written By: SATYAKI DE               ####
#### Written On: 25-May-2019              ####
#### Modified On 02-Jun-2019              ####
####                                      ####
#### Objective: Main calling scripts.     ####
##############################################

import clsColMgmt as cm
import clsCosmosDBDet as cmdb
from clsConfig import clsConfig as cf
import pandas as p
import clsLog as cl
import logging
import datetime
import json
import clsDBLookup as dbcon

# Disbling Warning
def warn(*args, **kwargs):
    pass

import warnings
warnings.warn = warn

def getDate(row):
    try:
        d1 = row['orderDate']
        d1_str = str(d1)
        d1_dt_part, sec = d1_str.split('.')
        dt_part1 = d1_dt_part.replace('T', ' ')

        return dt_part1
    except Exception as e:
        x = str(e)
        print(x)
        dt_part1 = ''

        return dt_part1

# Lookup functions from
# Azure cloud SQL DB

var = datetime.datetime.now().strftime("%Y-%m-%d_%H-%M-%S")

def main():
    try:
        df_ret = p.DataFrame()
        df_ret_2 = p.DataFrame()
        df_ret_2_Mod = p.DataFrame()

        debug_ind = 'Y'

        # Initiating Log Class
        l = cl.clsLog()

        general_log_path = str(cf.config['LOG_PATH'])

        # Enabling Logging Info
        logging.basicConfig(filename=general_log_path + 'consolidated.log', level=logging.INFO)

        # Moving previous day log files to archive directory
        arch_dir = cf.config['ARCH_DIR']
        log_dir = cf.config['LOG_PATH']

        print("Archive Directory:: ", arch_dir)
        print("Log Directory::", log_dir)

        print("*" * 157)
        print("Testing COSMOS DB Connection!")
        print("*" * 157)

        # Checking Cosmos DB Azure
        y = cmdb.clsCosmosDBDet()
        ret_val = y.test_db_con()

        if ret_val == 0:
            print()
            print("Cosmos DB Connection Successful!")
            print("*" * 157)
        else:
            print()
            print("Cosmos DB Connection Failure!")
            print("*" * 157)
            raise Exception

        print("*" * 157)

        # Accessing from Azure SQL DB
        x1 = dbcon.clsDBLookup()
        act_df = x1.azure_sqldb_read(cf.config['AZURE_SQL_1'])

        print("Azure SQL DB::")
        print(act_df)
        print()

        print("-" * 157)

        # Calling the function 1
        print("RealtimeEmail::")

        # Fetching First collection data to dataframe
        print("Fethcing Comos Collection Data!")

        sql_qry_1 = cf.config['SQL_QRY_1']
        msg = "Documents generatd based on unique key"
        collection_flg = 1

        x = cm.clsColMgmt()
        df_ret = x.fetch_data(sql_qry_1, msg, collection_flg)

        l.logr('1.EmailFeedback_' + var + '.csv', debug_ind, df_ret, 'log')
        print('RealtimeEmail Data::')
        print(df_ret)
        print()

        # Checking execution status
        ret_val = int(df_ret.shape[0])

        if ret_val == 0:
            print("Cosmos DB Hans't returned any rows. Please check your queries!")
            print("*" * 157)
        else:
            print("Successfully fetched!")
            print("*" * 157)

        # Calling the 2nd Collection
        print("RealtimeTwitterFeedback::")

        # Fetching First collection data to dataframe
        print("Fethcing Cosmos Collection Data!")

        # Query using parameters
        sql_qry_2 = cf.config['SQL_QRY_2']
        msg_2 = "Documents generated based on RealtimeTwitterFeedback feed!"
        collection_flg = 2

        val = 'crazyGo'
        param_det = [{"name": "@CrVal", "value": val}]
        add_param = 2

        x1 = cm.clsColMgmt()
        df_ret_2 = x1.fetch_data(sql_qry_2, msg_2, collection_flg, add_param, param_det)

        l.logr('2.TwitterFeedback_' + var + '.csv', debug_ind, df_ret, 'log')
        print('Realtime Twitter Data:: ')
        print(df_ret_2)
        print()

        # Checking execution status
        ret_val_2 = int(df_ret_2.shape[0])

        if ret_val_2 == 0:
            print("Cosmos DB hasn't returned any rows. Please check your queries!")
            print("*" * 157)
        else:
            print("Successfuly row feteched!")
            print("*" * 157)

        # Merging NoSQL Data (Cosmos DB) with Relational DB (Azure SQL DB)
        df_Fin_temp = p.merge(df_ret, act_df, on='subscriberId', how='inner')

        df_fin = df_Fin_temp[['orderDate', 'orderNo', 'sender', 'state', 'country', 'customerType']]

        print("Initial Combined Data (From Cosmos & Azure SQL DB) :: ")
        print(df_fin)

        l.logr('3.InitCombine_' + var + '.csv', debug_ind, df_fin, 'log')

        # Transforming the orderDate as per standard format
        df_fin['orderDateM'] = df_fin.apply(lambda row: getDate(row), axis=1)

        # Dropping the old column & renaming the new column to old column
        df_fin.drop(columns=['orderDate'], inplace=True)
        df_fin.rename(columns={'orderDateM': 'orderDate'}, inplace=True)

        print("*" * 157)
        print()
        print("Final Combined & Transformed result:: ")
        print(df_fin)

        l.logr('4.Final_Combine_' + var + '.csv', debug_ind, df_fin, 'log')
        print("*" * 157)

    except ValueError:
        print("No relevant data to proceed!")

    except Exception as e:
        print("Top level Error: args:{0}, message{1}".format(e.args, e.message))

if __name__ == "__main__":
    main()
Above lines are calling the Azure SQL DB method to retrieve the RDBMS data into our dataframe.
# Merging NoSQL Data (Cosmos DB) with Relational DB (Azure SQL DB)df_Fin_temp = p.merge(df_ret, act_df, on='subscriberId', how='inner')df_fin = df_Fin_temp[['orderDate', 'orderNo', 'sender', 'state', 'country', 'customerType']]
In these above lines, we’re joining the data retrieved from two different kinds of the database to prepare our initial combined dataframe. Also, we’ve picked only the desired column, which will be useful for us.
# Transforming the orderDate as per standard formatdf_fin['orderDateM'] = df_fin.apply(lambda row: getDate(row), axis=1)# Dropping the old column & renaming the new column to old columndf_fin.drop(columns=['orderDate'], inplace=True)df_fin.rename(columns={'orderDateM': 'orderDate'}, inplace=True)
In the above lines, we’re transforming our date field, as shown above in one of our previous images by calling the getDate method.
Let’s see the directory structure of our program –
Let’s see how it looks when it runs –
Windows:
MAC:
So, finally, we’ve successfully blended the data & make more meaningful data projection.
Following python packages are required to run this application –
pip install azure
pip install azure-cosmos
pip install pandas
pip install requests
pip install pyodbc
This application tested on Python3.7.1 & Python3.7.2 as well. As per Microsoft, their official supported version is Python3.5.
I hope you’ll like this effort.
Wait for the next installment. Till then, Happy Avenging. 😀
[Note: All the sample data are available/prepared in the public domain for research & study.]
In the previous post we have discussed about generating an XML file using Oracle SQL XML functions. Today we will do that in reverse manner. That means we will load the data generated by that query in the database tables.
At the end of this post (Which is a continue of the previous post) – you will be successfully generate an XML file from Oracle Tables & also able to load the data from XML on that same structured tables. So, that will complete the full life cycle of XML in oracle(Obviously concentrate on some basics).
Lets see –
Our main ingredients for this class – is the XML file named – emp_oracle.xml
And, it looks like –
      200
      <First>Whalen</First>
      4400
      1987-09-17


      201
      <First>Billy</First>
      4500
      1985-06-10


      202
      <First>Bireswar</First>
      9000
      1978-06-10
We need to create one Oracle Directories to map with the Operating System directories in the following manner ->
sys@ORCL>
sys@ORCL>select * from v$version;

BANNER
----------------------------------------------------------------------------
Oracle Database 11g Enterprise Edition Release 11.1.0.6.0 - Production
PL/SQL Release 11.1.0.6.0 - Production
CORE    11.1.0.6.0      Production
TNS for 32-bit Windows: Version 11.1.0.6.0 - Production
NLSRTL Version 11.1.0.6.0 - Production

Elapsed: 00:00:00.00
sys@ORCL>
sys@ORCL>
sys@ORCL>CREATE OR REPLACE DIRECTORY SATY_DIR AS 'D:\XML_Output'
  2  /

Directory created.

Elapsed: 00:00:00.23
sys@ORCL>
sys@ORCL>GRANT READ, WRITE ON DIRECTORY SATY_DIR TO SCOTT, HR;

Grant succeeded.

Elapsed: 00:00:00.08
sys@ORCL>
Once you have created the directory successfully and give the proper privileges to the users like Scott or Hr – you have completed one important component of today’s test. Still we are far to go. Now the second part is –
scott@ORCL> scott@ORCL>select * from v$version;
BANNER -------------------------------------------------------------------------------- Oracle Database 11g Enterprise Edition Release 11.1.0.6.0 - Production PL/SQL Release 11.1.0.6.0 - Production CORE 11.1.0.6.0 Production TNS for 32-bit Windows: Version 11.1.0.6.0 - Production NLSRTL Version 11.1.0.6.0 - Production
Elapsed: 00:00:00.16 scott@ORCL> scott@ORCL>set long 5000 scott@ORCL> scott@ORCL>set pagesize 0 scott@ORCL> scott@ORCL>select xml from t;
200 Whalen 4400 1987-09-17
201 Billy 4500 1985-06-10
202 Bireswar 9000 1978-06-10
Elapsed: 00:00:00.10 scott@ORCL>
Ok. So, we’ve initially load the data into the temp table t. But, we need to load the data from this temp table t to our target table revive_xml which will look like –


You must be logged in to post a comment.