Anything not like your other LLM Stack – Part 3

Welcome back! As you have now understood our objectives for the new initiative that we have explored in the other two posts, this post will show the actual implementation of the framework in a simple step-by-step process. But before that, why don’t you see the final LLM environment and the response from it?

But before that, here are the previous two posts in case you directly land on this page –

Isn’t it exciting?

Great! Now, let us dive into the actual setup & implementation.


Before we proceed, let us understand what the target architecture should look like –

EXTERNAL SSD / NVMe
/Volumes/ColibriSSD/
│
├── AI/
│ ├── colibri/ ← Colibrì source + executable
│ ├── models/
│ │ └── glm52_i4/ ← ~372 GB MODEL
│ │ ├── *.safetensors
│ │ ├── config.json
│ │ ├── tokenizer...
│ │ ├── .coli_usage
│ │ ├── .coli_ssd
│ │ └── .coli_kv
│ │
│ ├── huggingface/ ← HF cache/download metadata
│ ├── config/ ← Colibrì tuning profiles
│ └── venv/ ← optional Python environment
│
│ USB4 / Thunderbolt / USB-C
│ │
│ ▼
│ Your Apple-Silicon Mac
│
│ ┌─────────────────┐
│ │ Unified Memory │
│ │ e.g. 24/48/64GB │
│ └────────┬────────┘
│ │
│ Metal GPU
│ │
│ ▼
│ Colibrì inference
│ │
│ localhost:8000
│ │
│ ┌──────────┼──────────┐
│ ▼ ▼ ▼
│ Python RAG app AI Agent
│ app etc. etc.

Connect the external SSD and run:

ls /Volumes

And the response –

Then define one variable:

export COLI_DRIVE="/Volumes/SD_BLACK"

Verify that macOS sees it:

df -h "$COLI_DRIVE"

And verify available space:

diskutil info "$COLI_DRIVE"

Create a clean directory structure:

mkdir -p "$COLI_DRIVE/AI"
mkdir -p "$COLI_DRIVE/AI/models"
mkdir -p "$COLI_DRIVE/AI/huggingface"
mkdir -p "$COLI_DRIVE/AI/config"

Validate the output –

ls -la "$COLI_DRIVE/AI"

The following components may already exists in your Mac. So, install them based on your availability.

xcode-select --install
brew install libomp git python

Now clone Colibrì directly onto the external SSD:

cd "$COLI_DRIVE/AI"

git clone https://github.com/JustVugg/colibri.git

Your source will therefore be located at:

You can also build it using the following command –

cd "$COLI_DRIVE/AI/colibri/c"

./setup.sh

Because you’re on Apple Silicon, you should use Colibrì’s Metal backend rather than staying CPU-only.

From the above directory, runt he following command:

make colibri METAL=1

You can then confirm that Colibrì exists:

ls -lh colibri

And the output is as follows –

Now define:

export COLI_MODEL="$COLI_DRIVE/AI/models/glm52_i4"

mkdir -p "$COLI_MODEL"

And verify it

echo "$COLI_MODEL"

I would use the project’s currently recommended preconverted GLM-5.2 model instead of downloading the approximately 756 GB FP8 source and converting it unless you specifically want to experiment with quantization.

Colibrì currently recommends:

mastouri/GLM-5.2-colibri-int4-g64-with-int8-mtp

and specifically recommends its group-scaled gs64 configuration.  For more information, you can refer to the following link.

Create an optional Python environment on the external SSD:

python3 -m venv "$COLI_DRIVE/AI/venv"

Activate it:

source "$COLI_DRIVE/AI/venv/bin/activate"

Install the Hugging Face client:

pip install -U huggingface_hub

Now keep Hugging Face’s standard cache on the external drive too:

export HF_HOME="$COLI_DRIVE/AI/huggingface"

HF_HOME controls the root of Hugging Face’s cache; otherwise, it normally defaults to your user cache on the internal drive. 

Now, we are in a position to start downloading the model with the given command –

unset HF_HUB_DISABLE_XET
unset HF_XET_HIGH_PERFORMANCE

export HF_XET_NUM_CONCURRENT_RANGE_GETS=8

HF_HUB_DISABLE_XET=1 \
hf download \
  mastouri/GLM-5.2-colibri-int4-g64-with-int8-mtp \
  --local-dir "$COLI_MODEL" \
  --max-workers 4

And you will see something like the following –

Now, with the following command, you can verify whether all the models downloaded successfully or not –

hf download \
  mastouri/GLM-5.2-colibri-int4-g64-with-int8-mtp \
  --local-dir "$COLI_MODEL" \
  --dry-run

You would see something like this –

As you can see, those models that are already downloaded won’t show the model size beside their name. Otherwise, it will show the name of the model along with its size, as shown below –

Run the following command –

du -sh "$COLI_MODEL"

And you will see something like this –

Then verify the underlying volume:

df -h "$COLI_MODEL"

Now let Colibrì verify the model:

cd "$COLI_DRIVE/AI/colibri/c"

./coli doctor --model "$COLI_MODEL"

Or,

./coli doctor --deep --model "$COLI_MODEL"

doctor --deep validates safetensors headers, tensor layouts, shard completeness, required tensors, and other model-layout details.

Then:

./coli info --model "$COLI_MODEL"

And most importantly:

./coli plan --model "$COLI_MODEL"

coli plan is designed to show the computed disk/RAM/VRAM placement plan. 

This is the command I would use before actually loading the model.

Suppose, purely as an example, you had 64 GB of unified memory.

Instead of telling Colibrì to consume almost everything, you could initially give it:

COLI_METAL=1 \
./coli chat \
  --model "$COLI_MODEL" \
  --ram 48

This means –

~372 GB model
│
└──────────── External SSD
~48 GB max working/cache budget
│
└──────────── Mac unified memory
Compute
│
└──────────── Apple Metal GPU + CPU

The --ram parameter is explicitly Colibrì’s RAM budget for the expert working set; leaving it at 0 lets the software choose an automatic value based on available memory. For more information, you can refer to the following link.

Therefore, you can also start more safely with:

COLI_METAL=1 \
./coli chat \
  --model "$COLI_MODEL"

However, I’ll use some of the more advanced options to get the best performance out of this. “chat” means you will be triggering the chat interface.

This part is particularly useful on a Mac.

On Metal/macOS, Colibrì automatically performs an F_NOCACHE storage test against the model volume and writes the result into:

$COLI_MODEL/.coli_ssd

The file contains the measured throughput and volume identity. Colibrì uses this information when selecting caching behavior.

You can inspect it after the first successful startup:

cat "$COLI_MODEL/.coli_ssd"

would represent a measured storage throughput value used by Colibrì.

This is particularly useful because an external enclosure advertised as “10 Gbps” or “40 Gbps” does not guarantee that the actual SSD delivers that performance under Colibrì’s workload.

For your applications, I recommend running Colibrì as a server rather than launching the model separately for every script.

You need to be in the following path –

cd "$COLI_DRIVE/AI/colibri/c"

Now, set the following variables –

export COLI_DRIVE="/Volumes/SD_BLACK"
export COLI_MODEL="$COLI_DRIVE/AI/models/glm52_i4"
export XDG_CONFIG_HOME="$COLI_DRIVE/AI/config"
export HF_HOME="$COLI_DRIVE/AI/huggingface"

Enable Metal:

export COLI_METAL=1

Then run:

./coli serve \
  --model "$COLI_MODEL" \
  --host 127.0.0.1 \
  --port 8000 \
  --model-id glm-5.2-colibri
  • Note that this will enable the service mode, which can be accessed from any application as an API.

Colibrì’s API documentation defines the OpenAI-compatible base URL as:

http://localhost:8000/v1

and exposes endpoints such as /v1/chat/completions. 

So, the architecture become –

External SSD
│
│ 372 GB model weights
│
▼
Colibrì
│
│ streams active experts
▼
RAM ⇄ Metal GPU
│
▼
localhost:8000/v1
│
┌───┼───────────┬───────────┐
▼ ▼ ▼ ▼
RAG Python AutoGen Your App
App script agent

Now, you can test the application in the following ways –

curl http://127.0.0.1:8000/v1/chat/completions \
  -H 'Content-Type: application/json' \
  -d '{
    "model":"glm-5.2-colibri",
    "messages":[
      {
        "role":"user",
        "content":"Explain mixture-of-experts architecture."
      }
    ]
  }'
from openai import OpenAI

client = OpenAI(
    base_url="http://127.0.0.1:8000/v1",
    api_key="local"
)

response = client.chat.completions.create(
    model="glm-5.2-colibri",
    messages=[
        {
            "role": "user",
            "content": "Explain retrieval-augmented generation."
        }
    ]
)

print(response.choices[0].message.content)

Now, let us understand the command that I used –

PROF=1 \
COLI_METAL=1 \
COLI_METAL_PREFILL=1 \
DIRECT=1 \
PIPE=1 \
PIPE_WORKERS=6 \
COLI_NO_OMP_TUNE=1 \
MTP=0 \
./coli chat \
  --model "$COLI_MODEL" \
  --ram 96

And you would see & then ask some questions to get your answer, which should look like this –

Now, let us ask some questions & validate the response –
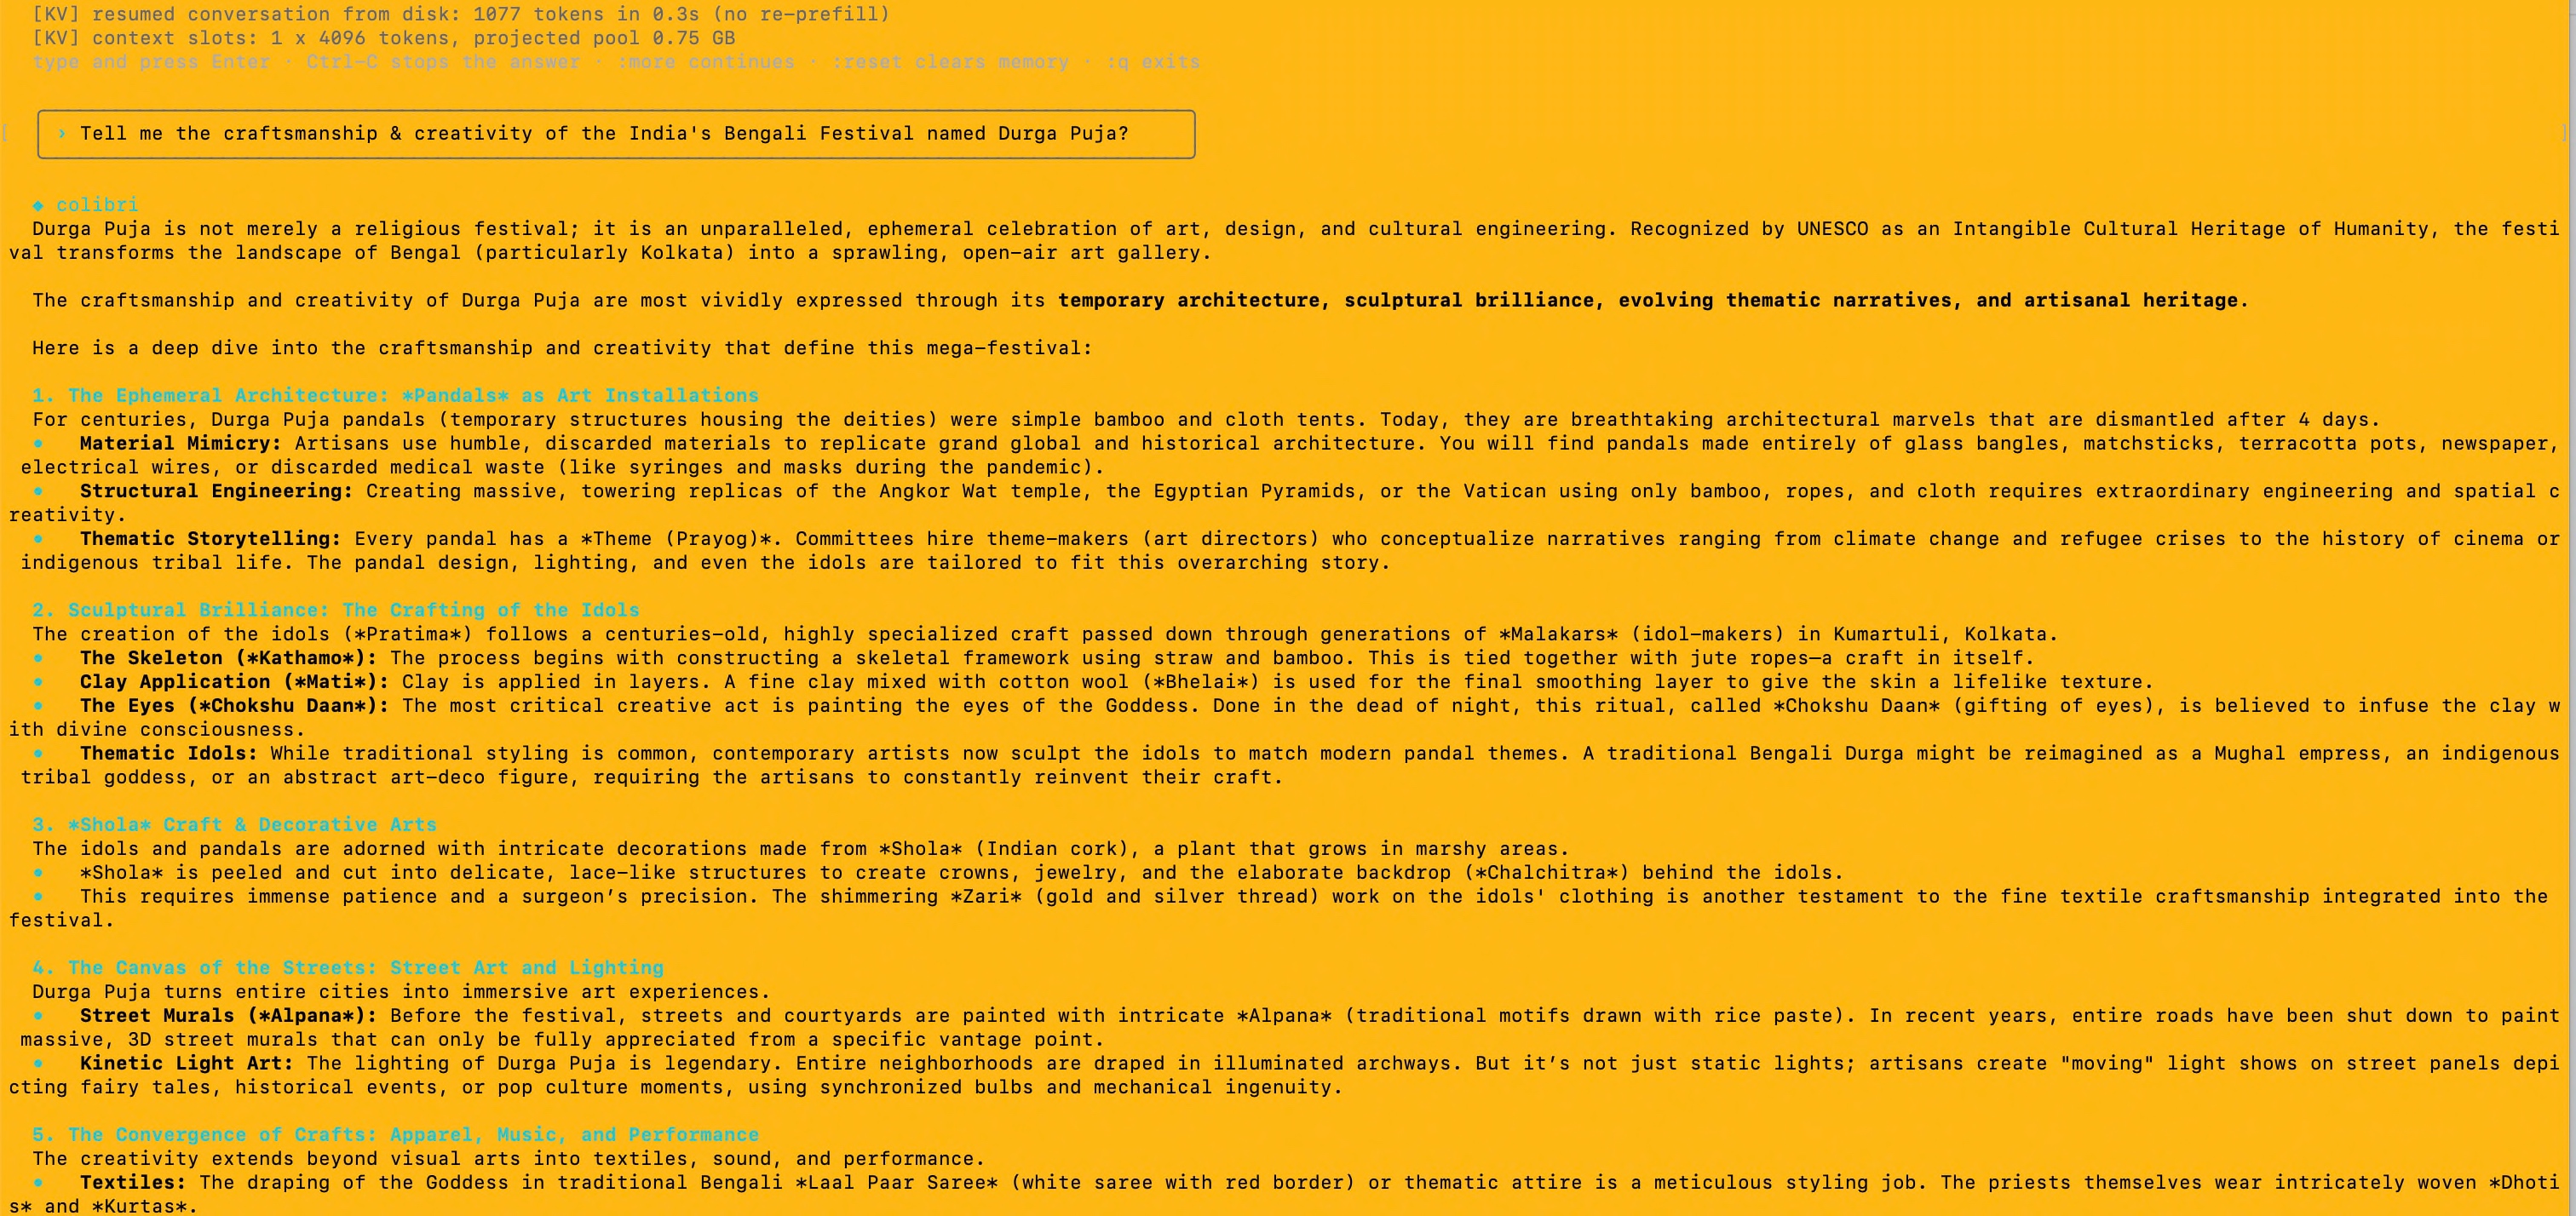
The performance is quite better. Now, based on your external SSD’s USB speed, you can get close to your MacBook Pro’s SSD speed.

In the next post, we’ll explore a more advanced combination to explore even better & faster response with the introduction of a custom script. And there will be some upgraded architecture that follows it. However, in this post, we conclude the basic concept of the Colibri framework.

The screenshot below shows the successful run without any GPU on an old legacy MacBook that has Intel Core processors. And you can see the LLM framework is utilizing the CPU cores extensively rather than relying on the GPU.

Below is the command to run Colibri on an Intel MacBook –

./coli chat \
--model "$COLI_MODEL" \
--ram 64

Now, if you want to use the legacy MacBook’s GPU, then you need to run the following command –

make colibri METAL=1 ARCH=native
PROF=1 \
COLI_METAL=1 \
MTP=0 \
./coli chat \
--model "$COLI_MODEL" \
--ram 64

The first command will rebuild Colibri & optimize it & then you can run the chat interface.

So, we’ve done it.  🙂

I hope you all like this effort & let me know your feedback. I’ll be back with another topic. Until then, Happy Avenging!

Anything not like your other LLM Stack – Part 1

Hi Guys,

Today, I’ll be presenting a brand new LLM that you can configure locally & based on your computation, I/O & other factors. We’re going to understand the open-source project named -> Colibri.

We’ll be presenting a series of simple & complex process, which will be partially optimized based on various scenarious.

Colibrì is an open-source inference engine for running very large Mixture-of-Experts (MoE) AI models locally. Its central idea is unusual: instead of requiring hundreds of gigabytes—or even terabytes—of model weights to fit entirely in RAM or GPU VRAM, it treats VRAM + RAM + NVMe storage as one memory hierarchy.

The router determines which experts are needed for each token, and Colibrì loads or caches those experts as required. In other words, it effectively performs just-in-time loading of model weights.


Let us understand the overall capability in a simpler form –

CapabilityWhat Colibrì provides
Local large-model inferenceRuns very large MoE models locally rather than requiring a hosted API.
Models larger than RAM/VRAMStreams routed experts from SSD/NVMe instead of loading the full model into memory.
CPU-only operationA GPU is not mandatory. CPU-only operation is supported.
GPU accelerationSupports heterogeneous acceleration paths including CUDA, Metal, Vulkan, and AMD/HIP in documented configurations.
Memory multitieringModel weights can be distributed across VRAM → RAM → NVMe according to available hardware.
Large open modelsCurrently documents support for nine MoE model families, including GLM, Kimi, DeepSeek, Qwen, Inkling, and OLMoE.
Local Chat interfacecoli chat provides direct interactive inference.
Web UIcoli web provides a browser-based interface with performance information and model visualization.
OpenAI-compatible APIcoli serve exposes endpoints such as /v1/chat/completions and /v1/models.
Anthropic-compatible APIAlso provides /v1/messages, allowing some Anthropic-compatible software to communicate with Colibrì.
Tool/function callingAvailable for certain supported engines, including GLM, DeepSeek V4, and Kimi K3.
Coding-tool integrationCan act as a local backend for compatible coding applications that accept an OpenAI-compatible endpoint.
Persistent KV cacheConversation state can be persisted and reused rather than completely prefilling the model again.
Multi-machine experimentsIncludes an experimental/local cluster mechanism in which other Macs can execute routed expert FFNs.
Research/observabilityProvides expert routing telemetry, profiling, Brain visualization, Atlas visualization, benchmarking, and experimentation facilities.
Open sourceEngine is released under Apache 2.0.

For more information, please refer to the following link.

Let us understand how this works for the larger models –

For the project’s reference GLM-5.2 model, the approximately 430 GB quantized model does not need 430 GB of RAM. The documentation describes keeping roughly 9.9 GB of dense components resident while streaming routed experts from storage as needed.

Please go throught he following link for more details.

Let us calculate it –

Model → must largely fit RAM/VRAM → inference
NVMe ↔ RAM ↔ VRAM → dynamically selected experts → inference

Colibrì calls this a multitier hierarchy. Fast memory affects performance, but the design aims to avoid changing the model merely because less VRAM/RAM is available. For more information, let us understand it from the official link.

That architectural concept is probably the project’s most significant contribution.

Model familyApprox. total parametersApprox. storage/RAM characteristics documented by Colibrì
GLM-5.2 / GLM-5.3744B~372 GB disk; 16 GB minimum RAM
GLM-5.3-Flash321B~195 GB converted; ~25 GB RAM
Inkling975B~469 GB; ~25 GB RAM with int4 dense container
Kimi K32.8T~1.6 TB disk; 32 GB+ RAM
DeepSeek V4 Flash284B~167 GB; 16 GB minimum
DeepSeek V4.1 Flash552Bseparate current engine implementation
Qwen3.8-Flash-Next125B + 51B n-gram~185.5 GB; 16 GB minimum
Qwen3.6-35B-A3B35B / ~3B active~20 GB; ~24 GB RAM
OLMoE7B~7 GB; ~8 GB RAM

The current repository specifically describes Kimi K3 at 2.8 trillion parameters, which illustrates how far the storage-streaming approach is intended to scale. One important distinction: Colibrì does not create these models. It is the inference engine that runs compatible open-weight models.

This is another major difference from frameworks primarily designed around GPU residency. The official quick-start says the baseline requirements for GLM-5.2 are approximately:

~16 GB RAM minimum, ~380 GB free storage, with fast NVMe recommended.

A GPU is optional. Refer to this link.

A GPU can significantly accelerate inference, but Colibrì’s architecture intentionally allows CPU + RAM + SSD operation. The repository currently contains backends for CUDA, Metal, Vulkan, and AMD/HIP-related configurations. Please refer the following link.

This makes Colibrì particularly interesting for heterogeneous hardware rather than only expensive data-center GPU configurations.

So, you don’t need the GPU to run any model.


This could be one of its most useful practical capabilities.

Run the following command:

coli serve

Creates an OpenAI-compatible HTTP API. The official documentation currently lists endpoints, including:

GET /v1/models

GET /v1/models/{model}

POST /v1/chat/completions

POST /v1/completions

It supports streaming responses, token usage, temperature, top-p, maximum-token parameters, and stop sequences.

So, you can use the application either from the postman or using API-based call or from using a curl statement while invoking the following entries –

http://localhost:8000/v1

That makes Colibrì much more than a command-line model runner.

Interestingly, Colibrì now exposes:

/v1/messages

for software built around the Anthropic Messages API.

The documentation specifically discusses using this interface with compatible clients, including Claude Code-style integrations. For more information, please refer the following link.

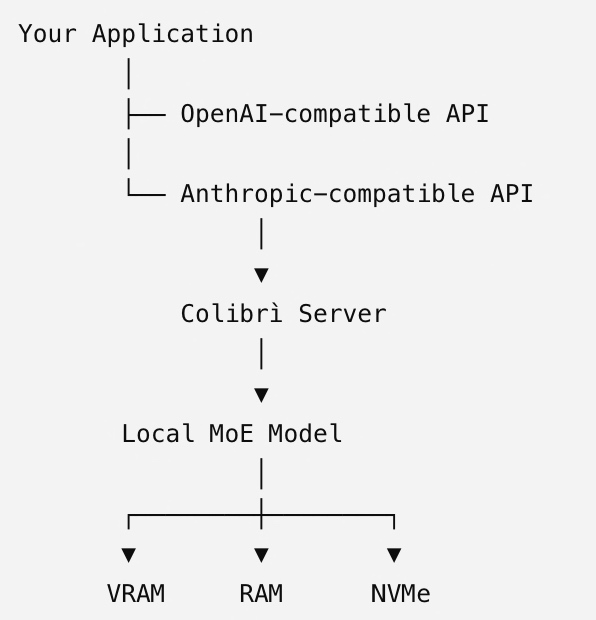
Therefore, the architecture can look approximately like:

This opens some interesting possibilities for private local AI applications, coding assistants, RAG systems, research environments, and experimental agents.


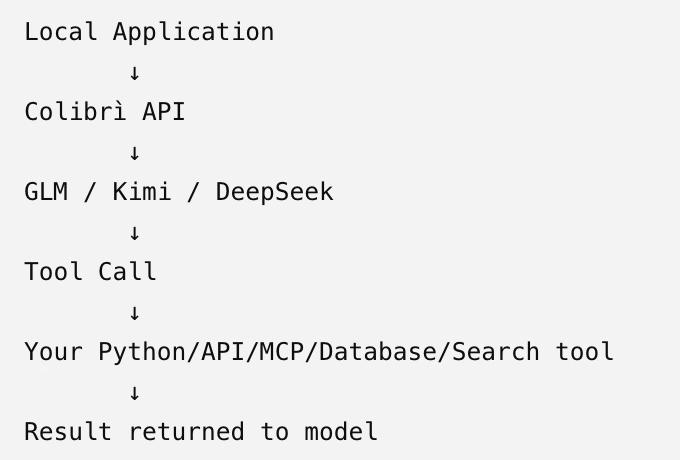
Some of the models support tool/function calling. This is particularly relevent if you are thinking of agentic systems. So, Colibri potentially provides the LLM reasoing/tool-call layer of a local agent architecture.

Colibrì itself isn’t a complete agent orchestration framework like AutoGen or similar systems; it provides the model inference/API layer on which an agent framework could operate.

Colibri also offered web dashboard accessible through:

coli web

The project describes three particularly interesting views –

Dashboard provides token-generation and performance metrics, including time breakdowns and VRAM/RAM/disk utilization.

Brain visualizes the model’s experts and shows which experts activate during generation.

Atlas visualizes measured expert specialization and routing affinities as a three-dimensional representation.

That makes Colibrì interesting not only for inference but also for studying how MoE models route information internally.

For more information, you can refer the following link.


Let us continue this topic in our next series.

Until then, Happy Avenging! 🙂

Creating a local LLM Cluster Server using Apple Silicon GPU

Today, we’re going to discuss creating a local LLM server and then utilizing it to execute various popular LLM models. We will club the local Apple GPUs together via a new framework that binds all the available Apple Silicon devices into one big LLM server. This enables people to run many large models, which was otherwise not possible due to the lack of GPUs.

This is certainly a new way; One can create virtual computation layers by adding nodes to the resource pool, increasing the computation capacity.

Why not witness a small demo to energize ourselves –

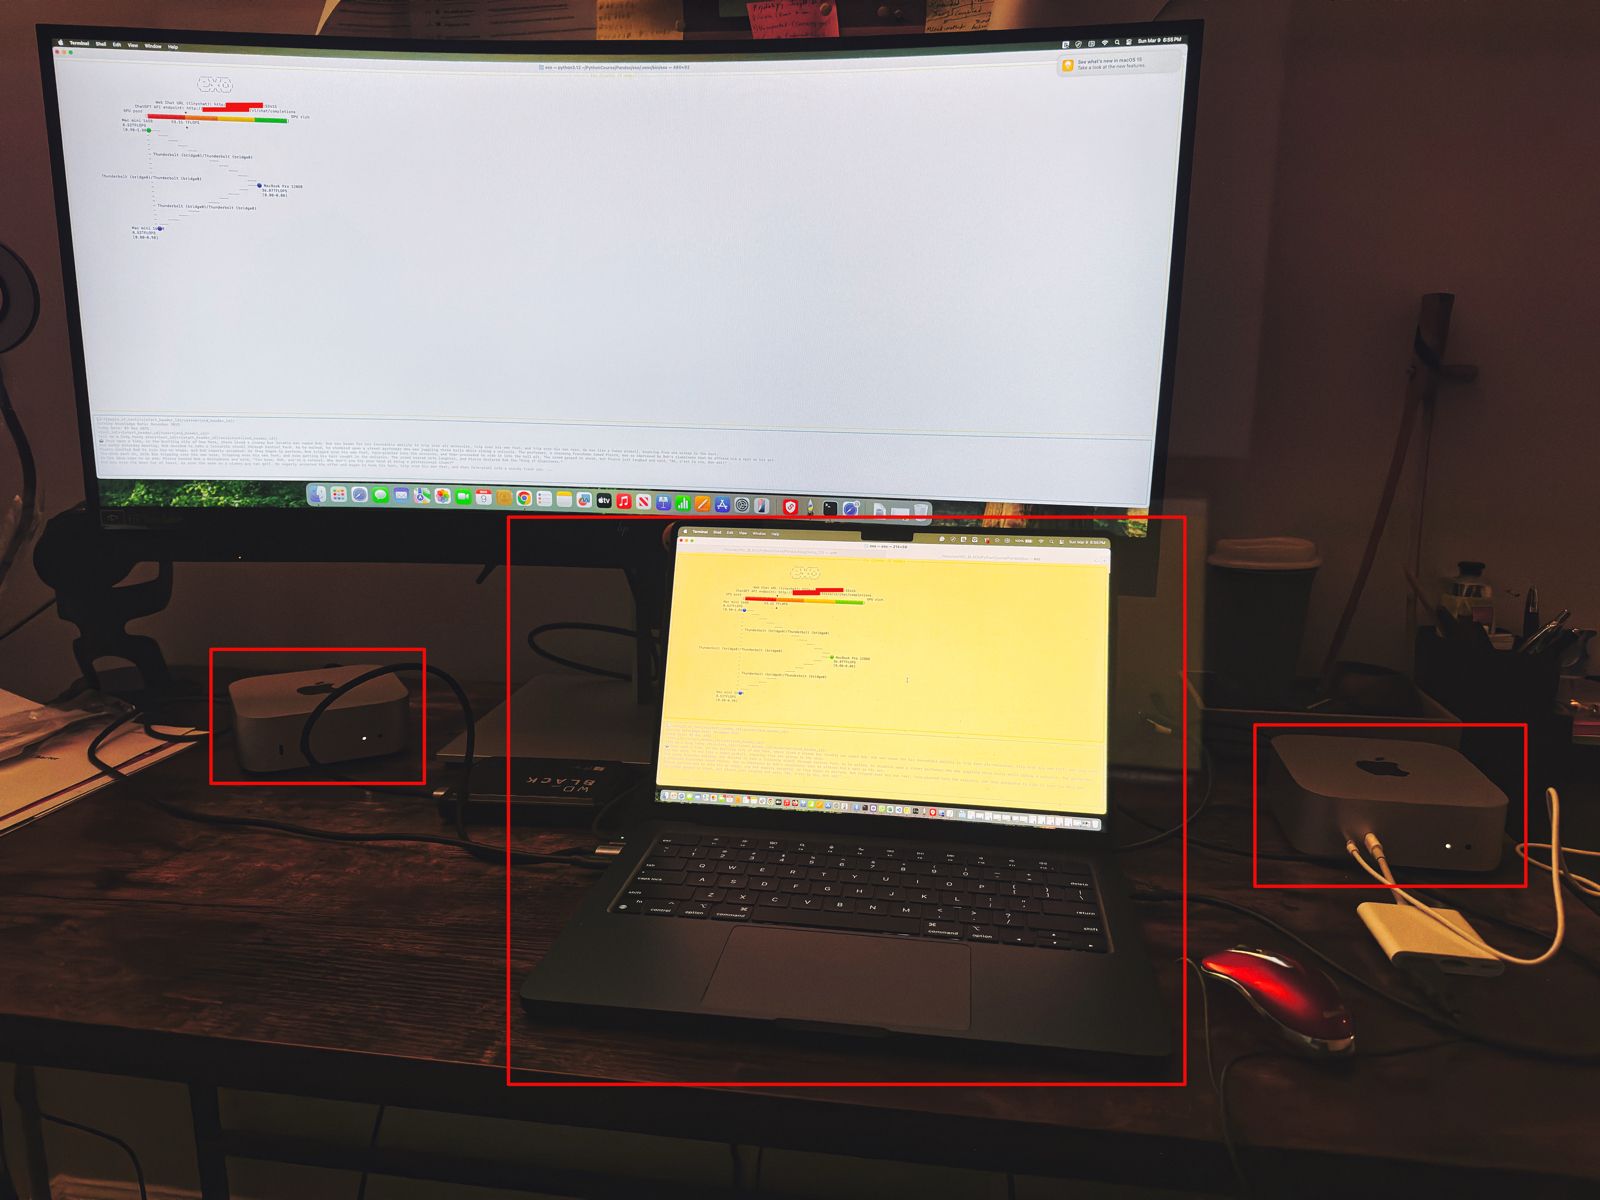
Let us understand the scenario. I’ve one Mac Book Pro M4 & 2 Mac Mini Pro M4 (Base models). So, I want to add them & expose them as a cluster as follows –

As you can see, I’ve connected my MacBook Pro with both the Mac Mini using high-speed thunderbolt cables for better data transmissions. And, I’ll be using an open-source framework called “Exo” to create it.

Also, you can see that my total computing capacity is 53.11 TFlops, which is slightly more than the last category.

“Exo” is an open-source framework that helps you merge all your available devices into a large cluster of available resources. This extracts all the computing juice needed to handle complex tasks, including the big LLMs, which require very expensive GPU-based servers.

For more information on “Exo”, please refer to the following link.

In our previous diagram, we can see that the framework also offers endpoints.

  • One option is a local ChatGPT interface, where any question you ask will receive a response from models by combining all available computing power.
  • The other endpoint offers users a choice of any standard LLM API endpoint, which helps them integrate it into their solutions.

Let us see, how the devices are connected together –


To proceed with this, you need to have at least Python 3.12, Anaconda or Miniconda & Xcode installed in all of your machines. Also, you need to install some Apple-specific MLX packages or libraries to get the best performance.

Depending on your choice, you need to use the following link to download Anaconda or Miniconda.

You can download the following link to download the Python 3.12. However, I’ve used Python 3.13 on some machines & some machines, I’ve used Python 3.12. And it worked without any problem.

Sometimes, after installing Anaconda or Miniconda, the environment may not implicitly be activated after successful installation. In that case, you may need to use the following commands in the terminal -> source ~/.bash_profile

To verify, whether the conda has been successfully installed & activated, you need to type the following command –

(base) satyaki_de@Satyakis-MacBook-Pro-Max Pandas % conda --version
conda 24.11.3
(base) satyaki_de@Satyakis-MacBook-Pro-Max Pandas % 

Once you verify it. Now, we need to install the following supplemental packages in all the machines as –

satyaki_de@Satyakis-MacBook-Pro-Max Pandas % 
satyaki_de@Satyakis-MacBook-Pro-Max Pandas % conda install anaconda::m4
Channels:
 - defaults
 - anaconda
Platform: osx-arm64
Collecting package metadata (repodata.json): done
Solving environment: done

## Package Plan ##

  environment location: /opt/anaconda3

  added / updated specs:
    - anaconda::m4


The following packages will be downloaded:

    package                    |            build
    ---------------------------|-----------------
    m4-1.4.18                  |       h1230e6a_1         202 KB  anaconda
    ------------------------------------------------------------
                                           Total:         202 KB

The following NEW packages will be INSTALLED:

  m4                 anaconda/osx-arm64::m4-1.4.18-h1230e6a_1 


Proceed ([y]/n)? y


Downloading and Extracting Packages:
                                                                                                                                                                                                                      
Preparing transaction: done
Verifying transaction: done
Executing transaction: done

Also, you can use this package to install in your machines –

(base) satyakidemini2@Satyakis-Mac-mini-2 exo % 
(base) satyakidemini2@Satyakis-Mac-mini-2 exo % pip install mlx
Collecting mlx
  Downloading mlx-0.23.2-cp312-cp312-macosx_14_0_arm64.whl.metadata (5.3 kB)
Downloading mlx-0.23.2-cp312-cp312-macosx_14_0_arm64.whl (27.6 MB)
   ━━━━━━━━━━━━━━━━━━━━━━━━━━━━━━━━━━━━━━━━ 27.6/27.6 MB 8.8 MB/s eta 0:00:00
Installing collected packages: mlx
Successfully installed mlx-0.23.2
(base) satyakidemini2@Satyakis-Mac-mini-2 exo % 

Till now, we’ve installed all the important packages. Now, we need to setup the final “eco” framework in all the machines like our previous steps.

Now, we’ll first clone the “eco” framework by the following commands –

(base) satyaki_de@Satyakis-MacBook-Pro-Max Pandas % 
(base) satyaki_de@Satyakis-MacBook-Pro-Max Pandas % git clone https://github.com/exo-explore/exo.git
Cloning into 'exo'...
remote: Enumerating objects: 9736, done.
remote: Counting objects: 100% (411/411), done.
remote: Compressing objects: 100% (148/148), done.
remote: Total 9736 (delta 333), reused 263 (delta 263), pack-reused 9325 (from 3)
Receiving objects: 100% (9736/9736), 12.18 MiB | 8.41 MiB/s, done.
Resolving deltas: 100% (5917/5917), done.
Updating files: 100% (178/178), done.
Filtering content: 100% (9/9), 3.16 MiB | 2.45 MiB/s, done.
(base) satyaki_de@Satyakis-MacBook-Pro-Max Pandas % 

And, the content of the “Exo” folder should look like this –

total 28672
drwx------  1 satyaki_de  staff  1048576 Mar  9 17:06 docs
-rwx------  1 satyaki_de  staff     1337 Mar  9 17:06 configure_mlx.sh
-rwx------  1 satyaki_de  staff    11107 Mar  9 17:06 README.md
-rwx------  1 satyaki_de  staff    35150 Mar  9 17:06 LICENSE
drwx------  1 satyaki_de  staff  1048576 Mar  9 17:06 examples
drwx------  1 satyaki_de  staff  1048576 Mar  9 17:06 exo
drwx------  1 satyaki_de  staff  1048576 Mar  9 17:06 extra
drwx------  1 satyaki_de  staff  1048576 Mar  9 17:06 scripts
-rwx------  1 satyaki_de  staff      390 Mar  9 17:06 install.sh
-rwx------  1 satyaki_de  staff      792 Mar  9 17:06 format.py
drwx------  1 satyaki_de  staff  1048576 Mar  9 17:06 test
-rwx------  1 satyaki_de  staff     2476 Mar  9 17:06 setup.py
drwx------  1 satyaki_de  staff  1048576 Mar  9 17:10 build
drwx------  1 satyaki_de  staff  1048576 Mar  9 17:17 exo.egg-info

Similar commands need to fire to other devices. Here, I’m showing one Mac-Mini examples –

(base) satyakidemini2@Satyakis-Mac-mini-2 Pandas % 
(base) satyakidemini2@Satyakis-Mac-mini-2 Pandas % git clone https://github.com/exo-explore/exo.git
Cloning into 'exo'...
remote: Enumerating objects: 9736, done.
remote: Counting objects: 100% (424/424), done.
remote: Compressing objects: 100% (146/146), done.
remote: Total 9736 (delta 345), reused 278 (delta 278), pack-reused 9312 (from 4)
Receiving objects: 100% (9736/9736), 12.18 MiB | 6.37 MiB/s, done.
Resolving deltas: 100% (5920/5920), done.
(base) satyakidemini2@Satyakis-Mac-mini-2 Pandas % 

After that, I’ll execute the following sets of commands to install the framework –

(base) satyaki_de@Satyakis-MacBook-Pro-Max Pandas % cd exo
(base) satyaki_de@Satyakis-MacBook-Pro-Max exo % 
(base) satyaki_de@Satyakis-MacBook-Pro-Max exo % conda create --name exo1 python=3.13
WARNING: A conda environment already exists at '/opt/anaconda3/envs/exo1'

Remove existing environment?
This will remove ALL directories contained within this specified prefix directory, including any other conda environments.

 (y/[n])? y

Channels:
 - defaults
Platform: osx-arm64
Collecting package metadata (repodata.json): done
Solving environment: done

## Package Plan ##

  environment location: /opt/anaconda3/envs/exo1

  added / updated specs:
    - python=3.13


The following NEW packages will be INSTALLED:

  bzip2              pkgs/main/osx-arm64::bzip2-1.0.8-h80987f9_6 
  ca-certificates    pkgs/main/osx-arm64::ca-certificates-2025.2.25-hca03da5_0 
  expat              pkgs/main/osx-arm64::expat-2.6.4-h313beb8_0 
  libcxx             pkgs/main/osx-arm64::libcxx-14.0.6-h848a8c0_0 
  libffi             pkgs/main/osx-arm64::libffi-3.4.4-hca03da5_1 
  libmpdec           pkgs/main/osx-arm64::libmpdec-4.0.0-h80987f9_0 
  ncurses            pkgs/main/osx-arm64::ncurses-6.4-h313beb8_0 
  openssl            pkgs/main/osx-arm64::openssl-3.0.16-h02f6b3c_0 
  pip                pkgs/main/osx-arm64::pip-25.0-py313hca03da5_0 
  python             pkgs/main/osx-arm64::python-3.13.2-h4862095_100_cp313 
  python_abi         pkgs/main/osx-arm64::python_abi-3.13-0_cp313 
  readline           pkgs/main/osx-arm64::readline-8.2-h1a28f6b_0 
  setuptools         pkgs/main/osx-arm64::setuptools-75.8.0-py313hca03da5_0 
  sqlite             pkgs/main/osx-arm64::sqlite-3.45.3-h80987f9_0 
  tk                 pkgs/main/osx-arm64::tk-8.6.14-h6ba3021_0 
  tzdata             pkgs/main/noarch::tzdata-2025a-h04d1e81_0 
  wheel              pkgs/main/osx-arm64::wheel-0.45.1-py313hca03da5_0 
  xz                 pkgs/main/osx-arm64::xz-5.6.4-h80987f9_1 
  zlib               pkgs/main/osx-arm64::zlib-1.2.13-h18a0788_1 


Proceed ([y]/n)? y


Downloading and Extracting Packages:

Preparing transaction: done
Verifying transaction: done
Executing transaction: done
#
# To activate this environment, use
#
#     $ conda activate exo1
#
# To deactivate an active environment, use
#
#     $ conda deactivate

(base) satyaki_de@Satyakis-MacBook-Pro-Max exo % conda activate exo1
(exo1) satyaki_de@Satyakis-MacBook-Pro-Max exo % 
(exo1) satyaki_de@Satyakis-MacBook-Pro-Max exo % ls -lrt
total 24576
drwx------  1 satyaki_de  staff  1048576 Mar  9 17:06 docs
-rwx------  1 satyaki_de  staff     1337 Mar  9 17:06 configure_mlx.sh
-rwx------  1 satyaki_de  staff    11107 Mar  9 17:06 README.md
-rwx------  1 satyaki_de  staff    35150 Mar  9 17:06 LICENSE
drwx------  1 satyaki_de  staff  1048576 Mar  9 17:06 examples
drwx------  1 satyaki_de  staff  1048576 Mar  9 17:06 exo
drwx------  1 satyaki_de  staff  1048576 Mar  9 17:06 extra
drwx------  1 satyaki_de  staff  1048576 Mar  9 17:06 scripts
-rwx------  1 satyaki_de  staff      390 Mar  9 17:06 install.sh
-rwx------  1 satyaki_de  staff      792 Mar  9 17:06 format.py
drwx------  1 satyaki_de  staff  1048576 Mar  9 17:06 test
-rwx------  1 satyaki_de  staff     2476 Mar  9 17:06 setup.py
(exo1) satyaki_de@Satyakis-MacBook-Pro-Max exo % 
(exo1) satyaki_de@Satyakis-MacBook-Pro-Max exo % pip install .
Processing /Volumes/WD_BLACK/PythonCourse/Pandas/exo
  Preparing metadata (setup.py) ... done
Collecting tinygrad@ git+https://github.com/tinygrad/tinygrad.git@ec120ce6b9ce8e4ff4b5692566a683ef240e8bc8 (from exo==0.0.1)
  Cloning https://github.com/tinygrad/tinygrad.git (to revision ec120ce6b9ce8e4ff4b5692566a683ef240e8bc8) to /private/var/folders/26/dj11b57559b8r8rl6ztdpc840000gn/T/pip-install-q18fzk3r/tinygrad_7917114c483a4d9c83c795b69dbeb5c7
  Running command git clone --filter=blob:none --quiet https://github.com/tinygrad/tinygrad.git /private/var/folders/26/dj11b57559b8r8rl6ztdpc840000gn/T/pip-install-q18fzk3r/tinygrad_7917114c483a4d9c83c795b69dbeb5c7
  Running command git rev-parse -q --verify 'sha^ec120ce6b9ce8e4ff4b5692566a683ef240e8bc8'
  Running command git fetch -q https://github.com/tinygrad/tinygrad.git ec120ce6b9ce8e4ff4b5692566a683ef240e8bc8
  Running command git checkout -q ec120ce6b9ce8e4ff4b5692566a683ef240e8bc8
  Resolved https://github.com/tinygrad/tinygrad.git to commit ec120ce6b9ce8e4ff4b5692566a683ef240e8bc8
  Preparing metadata (setup.py) ... done
Collecting aiohttp==3.10.11 (from exo==0.0.1)
.
.
(Installed many more dependant packages)
.
.
Downloading propcache-0.3.0-cp313-cp313-macosx_11_0_arm64.whl (44 kB)
Building wheels for collected packages: exo, nuitka, numpy, uuid, tinygrad
  Building wheel for exo (setup.py) ... done
  Created wheel for exo: filename=exo-0.0.1-py3-none-any.whl size=901357 sha256=5665297f8ea09d06670c9dea91e40270acc4a3cf99a560bf8d268abb236050f7
  Stored in directory: /private/var/folders/26/dj118r8rl6ztdpc840000gn/T/pip-ephem-wheel-cache-0k8zloo3/wheels/b6/91/fb/c1c7d8ca90cf16b9cd8203c11bb512614bee7f6d34
  Building wheel for nuitka (pyproject.toml) ... done
  Created wheel for nuitka: filename=nuitka-2.5.1-cp313-cp313-macosx_11_0_arm64.whl size=3432720 sha256=ae5a280a1684fde98c334516ee8a99f9f0acb6fc2f625643b7f9c5c0887c2998
  Stored in directory: /Users/satyaki_de/Library/Caches/pip/wheels/f6/c9/53/9e37c6fb34c27e892e8357aaead46da610f82117ab2825
  Building wheel for numpy (pyproject.toml) ... done
  Created wheel for numpy: filename=numpy-2.0.0-cp313-cp313-macosx_15_0_arm64.whl size=4920701 sha256=f030b0aa51ec6628f708fab0af14ff765a46d210df89aa66dd8d9482e59b5
  Stored in directory: /Users/satyaki_de/Library/Caches/pip/wheels/e0/d3/66/30d07c18e56ac85e8d3ceaf22f093a09bae124a472b85d1
  Building wheel for uuid (setup.py) ... done
  Created wheel for uuid: filename=uuid-1.30-py3-none-any.whl size=6504 sha256=885103a90d1dc92d9a75707fc353f4154597d232f2599a636de1bc6d1c83d
  Stored in directory: /Users/satyaki_de/Library/Caches/pip/wheels/cc/9d/72/13ff6a181eacfdbd6d761a4ee7c5c9f92034a9dc8a1b3c
  Building wheel for tinygrad (setup.py) ... done
  Created wheel for tinygrad: filename=tinygrad-0.10.0-py3-none-any.whl size=1333964 sha256=1f08c5ce55aa3c87668675beb80810d609955a81b99d416459d2489b36a
  Stored in directory: /Users/satyaki_de/Library/Caches/pip/wheels/c7/bd/02/bd91c1303002619dad23f70f4c1f1c15d0c24c60b043e
Successfully built exo nuitka numpy uuid tinygrad
Installing collected packages: uuid, sentencepiece, nvidia-ml-py, zstandard, uvloop, urllib3, typing-extensions, tqdm, tinygrad, scapy, safetensors, regex, pyyaml, pygments, psutil, protobuf, propcache, prometheus-client, pillow, packaging, ordered-set, numpy, multidict, mlx, mdurl, MarkupSafe, idna, grpcio, fsspec, frozenlist, filelock, charset-normalizer, certifi, attrs, annotated-types, aiohappyeyeballs, aiofiles, yarl, requests, pydantic-core, opencv-python, nuitka, markdown-it-py, Jinja2, grpcio-tools, aiosignal, rich, pydantic, huggingface-hub, aiohttp, tokenizers, aiohttp_cors, transformers, mlx-lm, exo
Successfully installed Jinja2-3.1.4 MarkupSafe-3.0.2 aiofiles-24.1.0 aiohappyeyeballs-2.5.0 aiohttp-3.10.11 aiohttp_cors-0.7.0 aiosignal-1.3.2 annotated-types-0.7.0 attrs-25.1.0 certifi-2025.1.31 charset-normalizer-3.4.1 exo-0.0.1 filelock-3.17.0 frozenlist-1.5.0 fsspec-2025.3.0 grpcio-1.67.0 grpcio-tools-1.67.0 huggingface-hub-0.29.2 idna-3.10 markdown-it-py-3.0.0 mdurl-0.1.2 mlx-0.22.0 mlx-lm-0.21.1 multidict-6.1.0 nuitka-2.5.1 numpy-2.0.0 nvidia-ml-py-12.560.30 opencv-python-4.10.0.84 ordered-set-4.1.0 packaging-24.2 pillow-10.4.0 prometheus-client-0.20.0 propcache-0.3.0 protobuf-5.28.1 psutil-6.0.0 pydantic-2.9.2 pydantic-core-2.23.4 pygments-2.19.1 pyyaml-6.0.2 regex-2024.11.6 requests-2.32.3 rich-13.7.1 safetensors-0.5.3 scapy-2.6.1 sentencepiece-0.2.0 tinygrad-0.10.0 tokenizers-0.20.3 tqdm-4.66.4 transformers-4.46.3 typing-extensions-4.12.2 urllib3-2.3.0 uuid-1.30 uvloop-0.21.0 yarl-1.18.3 zstandard-0.23.0
(exo1) satyaki_de@Satyakis-MacBook-Pro-Max exo % 

And, you need to perform the same process in other available devices as well.

Now, we’re ready to proceed with the final command –

(.venv) (exo1) satyaki_de@Satyakis-MacBook-Pro-Max exo % exo
/opt/anaconda3/envs/exo1/lib/python3.13/site-packages/google/protobuf/runtime_version.py:112: UserWarning: Protobuf gencode version 5.27.2 is older than the runtime version 5.28.1 at node_service.proto. Please avoid checked-in Protobuf gencode that can be obsolete.
  warnings.warn(
None of PyTorch, TensorFlow >= 2.0, or Flax have been found. Models won't be available and only tokenizers, configuration and file/data utilities can be used.
Selected inference engine: None

  _____  _____  
 / _ \ \/ / _ \ 
|  __/>  < (_) |
 \___/_/\_\___/ 
    
Detected system: Apple Silicon Mac
Inference engine name after selection: mlx
Using inference engine: MLXDynamicShardInferenceEngine with shard downloader: SingletonShardDownloader
[60771, 54631, 54661]
Chat interface started:
 - http://127.0.0.1:52415
 - http://XXX.XXX.XX.XX:52415
 - http://XXX.XXX.XXX.XX:52415
 - http://XXX.XXX.XXX.XXX:52415
ChatGPT API endpoint served at:
 - http://127.0.0.1:52415/v1/chat/completions
 - http://XXX.XXX.X.XX:52415/v1/chat/completions
 - http://XXX.XXX.XXX.XX:52415/v1/chat/completions
 - http://XXX.XXX.XXX.XXX:52415/v1/chat/completions
has_read=True, has_write=True
╭────────────────────────────────────────────────────────────────────────────────────────────── Exo Cluster (2 nodes) ───────────────────────────────────────────────────────────────────────────────────────────────╮
Received exit signal SIGTERM...
Thank you for using exo.

  _____  _____  
 / _ \ \/ / _ \ 
|  __/>  < (_) |
 \___/_/\_\___/ 
    

Note that I’ve masked the IP addresses for security reasons.


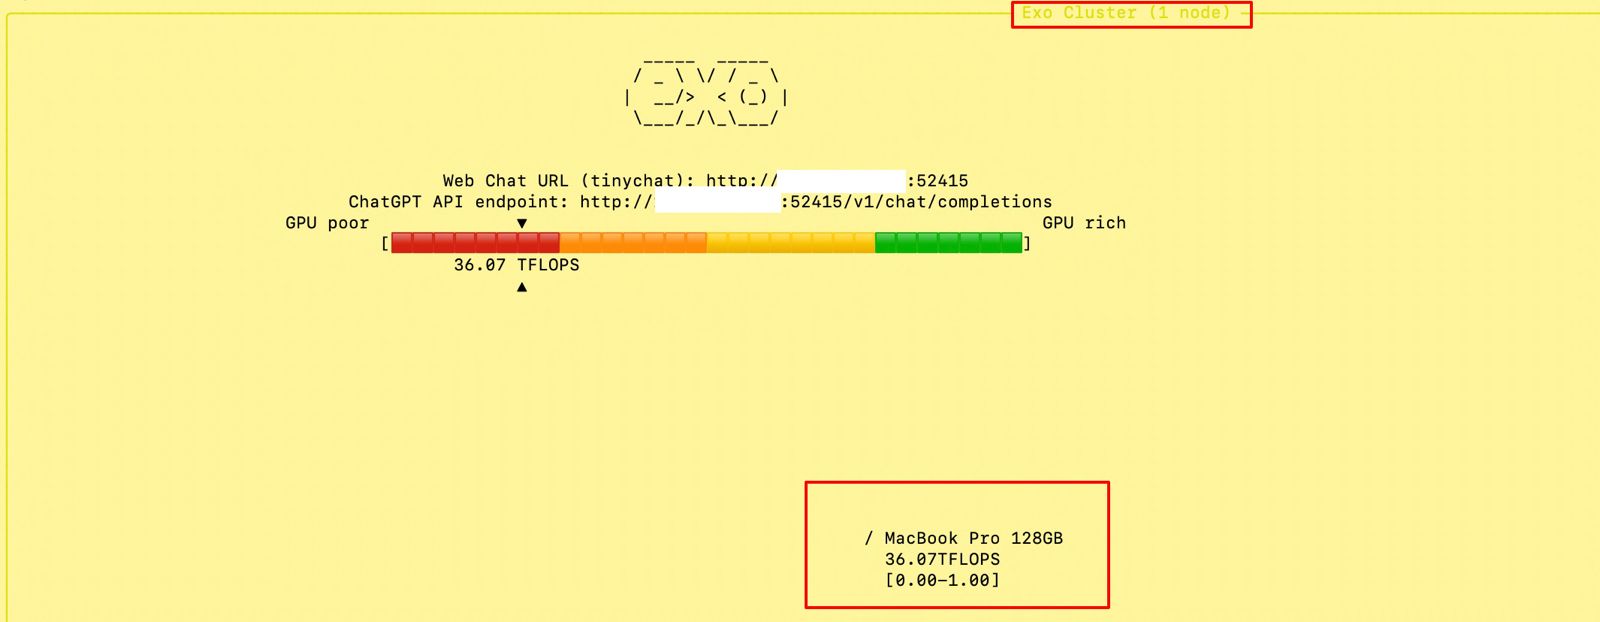
At the beginning, if we trigger the main MacBook Pro Max, the “Exo” screen should looks like this –

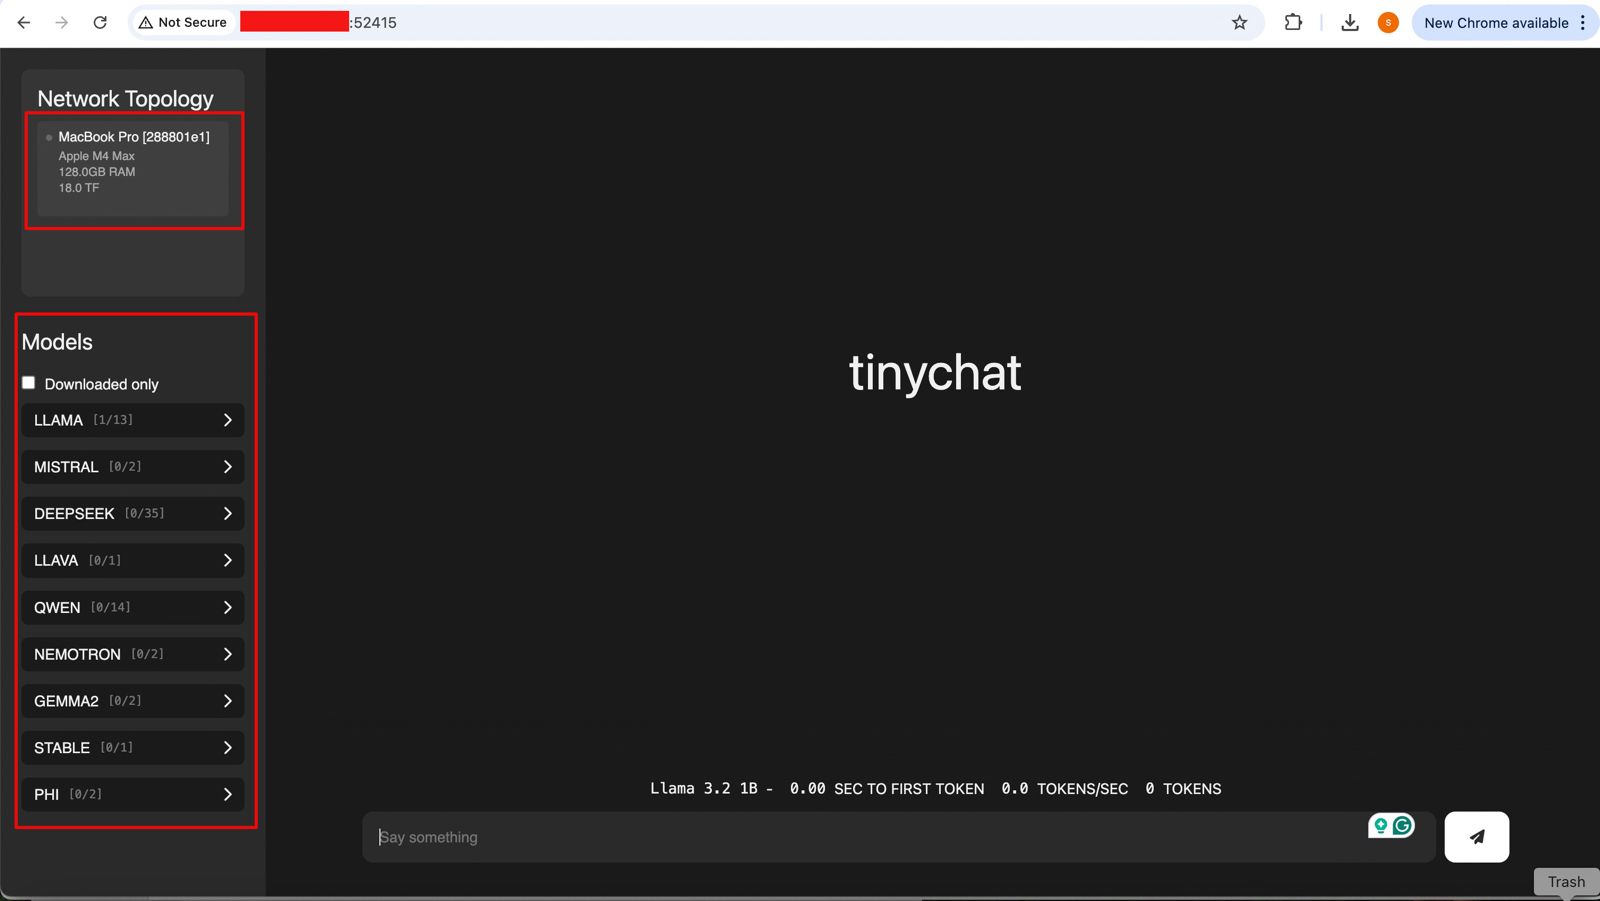
And if you open the URL, you will see the following ChatGPT-like interface –

Connecting without the Thunderbolt bridge with the relevant port or a hub may cause performance degradation. Hence, how you connect will play a major role in the success of this intention. However, this is certainly a great idea to proceed with.


So, we’ve done it.

We’ll cover the detailed performance testing, Optimized configurations & many other useful details in our next post.

Till then, Happy Avenging! 🙂

Monitoring & evaluating the leading LLMs (both the established & new) by Python-based evaluator

As we’re leaping more & more into the field of Generative AI, one of the frequent questions or challenges people are getting more & more is the performance & other evaluation factors. These factors will eventually bring the fruit of this technology; otherwise, you will end up in technical debt.

This post will discuss the key snippets of the monitoring app based on the Python-based AI app. But before that, let us first view the demo.

Isn’t it exciting?


Let us deep dive into it. But, here is the flow this solution will follow.

So, the current application will invoke the industry bigshots and some relatively unknown or new LLMs.

In this case, we’ll evaluate Anthropic, Open AI, DeepSeek, and Bharat GPT’s various models. However, Bharat GPT is open source, so we’ll use the Huggingface library and execute it locally against my MacBook Pro M4 Max.

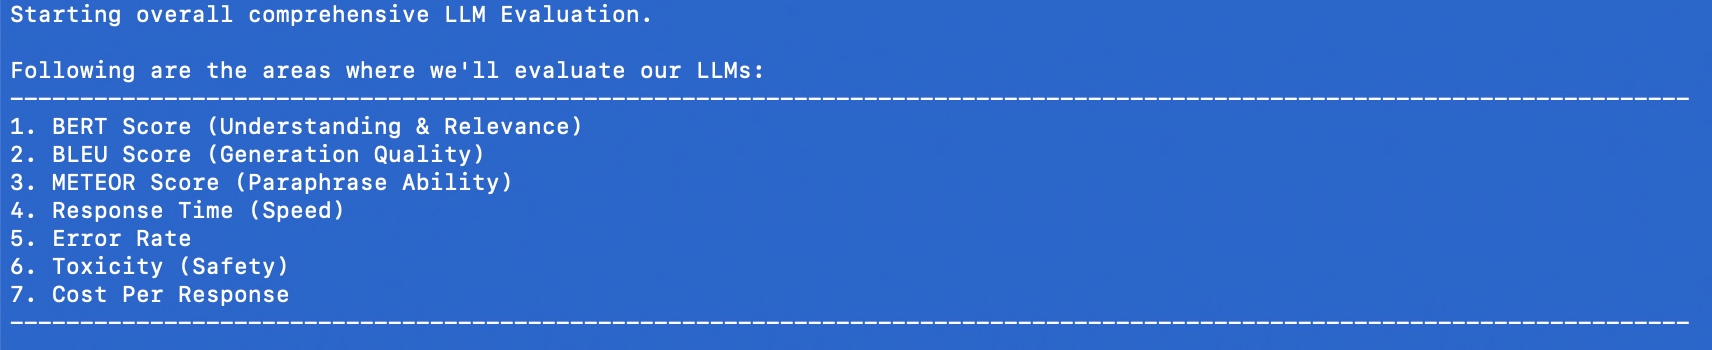
The following are the KPIs we’re going to evaluate:

Here are the lists of dependant python packages that is require to run this application –

pip install certifi==2024.8.30
pip install anthropic==0.42.0
pip install huggingface-hub==0.27.0
pip install nltk==3.9.1
pip install numpy==2.2.1
pip install moviepy==2.1.1
pip install numpy==2.1.3
pip install openai==1.59.3
pip install pandas==2.2.3
pip install pillow==11.1.0
pip install pip==24.3.1
pip install psutil==6.1.1
pip install requests==2.32.3
pip install rouge_score==0.1.2
pip install scikit-learn==1.6.0
pip install setuptools==70.2.0
pip install tokenizers==0.21.0
pip install torch==2.6.0.dev20250104
pip install torchaudio==2.6.0.dev20250104
pip install torchvision==0.22.0.dev20250104
pip install tqdm==4.67.1
pip install transformers==4.47.1
    @retry(stop=stop_after_attempt(3), wait=wait_exponential(multiplier=1, min=4, max=10))
    def get_claude_response(self, prompt: str) -> str:
        response = self.anthropic_client.messages.create(
            model=anthropic_model,
            max_tokens=maxToken,
            messages=[{"role": "user", "content": prompt}]
        )
        return response.content[0].text
  1. The Retry Mechanism
    • The @retry line means this function will automatically try again if it fails.
    • It will stop retrying after 3 attempts (stop_after_attempt(3)).
    • It will wait longer between retries, starting at 4 seconds and increasing up to 10 seconds (wait_exponential(multiplier=1, min=4, max=10)).
  2. The Function Purpose
    • The function takes a message, called prompt, as input (a string of text).
    • It uses a service (likely an AI system like Claude) to generate a response to this prompt.
  3. Sending the Message
    • Inside the function, the code self.anthropic_client.messages.create is the part that actually sends the prompt to the AI.
    • It specifies:Which AI model to use (e.g., anthropic_model).
    • The maximum length of the response (controlled by maxToken).
    • The input message for the AI has a “role” (user), as well as the content of the prompt.
  4. Getting the Response
    • Once the AI generates a response, it’s saved as response.
    • The code retrieves the first part of the response (response.content[0].text) and sends it back to whoever called the function.

Similarly, it will work for Open AI as well.

    @retry(stop=stop_after_attempt(3), wait=wait_exponential(multiplier=1, min=4, max=10))
    def get_deepseek_response(self, prompt: str) -> tuple:
        deepseek_api_key = self.deepseek_api_key

        headers = {
            "Authorization": f"Bearer {deepseek_api_key}",
            "Content-Type": "application/json"
            }
        
        payload = {
            "model": deepseek_model,  
            "messages": [{"role": "user", "content": prompt}],
            "max_tokens": maxToken
            }
        
        response = requests.post(DEEPSEEK_API_URL, headers=headers, json=payload)

        if response.status_code == 200:
            res = response.json()["choices"][0]["message"]["content"]
        else:
            res = "API request failed with status code " + str(response.status_code) + ":" + str(response.text)

        return res
  1. Retry Mechanism:
    • The @retry line ensures the function will try again if it fails.
    • It will stop retrying after 3 attempts (stop_after_attempt(3)).
    • It waits between retries, starting at 4 seconds and increasing up to 10 seconds (wait_exponential(multiplier=1, min=4, max=10)).

  1. What the Function Does:
    • The function takes one input, prompt, which is the message or question you want to send to the AI.
    • It returns the AI’s response or an error message.

  1. Preparing to Communicate with the API:
    • API Key: It gets the API key for the DeepSeek service from self.deepseek_api_key.
    • Headers: These tell the API that the request will use the API key (for security) and that the data format is JSON (structured text).
    • Payload: This is the information sent to the AI. It includes:
      • Model: Specifies which version of the AI to use (deepseek_model).
      • Messages: The input message with the role “user” and your prompt.
      • Max Tokens: Defines the maximum size of the AI’s response (maxToken).

  1. Sending the Request:
    • It uses the requests.post() method to send the payload and headers to the DeepSeek API using the URL DEEPSEEK_API_URL.

  1. Processing the Response:
    • If the API responds successfully (status_code == 200):
      • It extracts the AI’s reply from the response data.
      • Specifically, it gets the first choice’s message content: response.json()["choices"][0]["message"]["content"].
    • If there’s an error:
      • It constructs an error message with the status code and detailed error text from the API.

  1. Returning the Result:
    • The function outputs either the AI’s response or the error message.
    @retry(stop=stop_after_attempt(3), wait=wait_exponential(multiplier=1, min=4, max=10))
    def get_bharatgpt_response(self, prompt: str) -> tuple:
        try:
            messages = [[{"role": "user", "content": prompt}]]
            
            response = pipe(messages, max_new_tokens=maxToken,)

            # Extract 'content' field safely
            res = next((entry.get("content", "")
                        for entry in response[0][0].get("generated_text", [])
                        if isinstance(entry, dict) and entry.get("role") == "assistant"
                        ),
                        None,
                        )
            
            return res
        except Exception as e:
            x = str(e)
            print('Error: ', x)

            return ""
  1. Retry Mechanism:The @retry ensures the function will try again if it fails.
    • It will stop retrying after 3 attempts (stop_after_attempt(3)).
    • The waiting time between retries starts at 4 seconds and increases exponentially up to 10 seconds (wait_exponential(multiplier=1, min=4, max=10)).
  2. What the Function Does:The function takes one input, prompt, which is the message or question you want to send to BharatGPT.
    • It returns the AI’s response or an empty string if something goes wrong.
  3. Sending the Prompt:Messages Structure: The function wraps the user’s prompt in a format that the BharatGPT AI understands:
    • messages = [[{"role": "user", "content": prompt}]]
    • This tells the AI that the prompt is coming from the “user.”
  4. Pipe Function: It uses a pipe() method to send the messages to the AI system.
    • max_new_tokens=maxToken: Limits how long the AI’s response can be.
  5. Extracting the Response:The response from the AI is in a structured format. The code looks for the first piece of text where:
    • The role is “assistant” (meaning it’s the AI’s reply).
    • The text is in the “content” field.
    • The next() function safely extracts this “content” field or returns None if it can’t find it.
  6. Error Handling:If something goes wrong (e.g., the AI doesn’t respond or there’s a technical issue), the code:
    • Captures the error message in e.
    • Prints the error message: print('Error: ', x).
    • Returns an empty string ("") instead of crashing.
  7. Returning the Result:If everything works, the function gives you the AI’s response as plain text.
    • If there’s an error, it gives you an empty string, indicating no response was received.

    def get_model_response(self, model_name: str, prompt: str) -> ModelResponse:
        """Get response from specified model with metrics"""
        start_time = time.time()
        start_memory = psutil.Process(os.getpid()).memory_info().rss / 1024 / 1024

        try:
            if model_name == "claude-3":
                response_content = self.get_claude_response(prompt)
            elif model_name == "gpt4":
                response_content = self.get_gpt4_response(prompt)
            elif model_name == "deepseek-chat":
                response_content = self.get_deepseek_response(prompt)
            elif model_name == "bharat-gpt":
                response_content = self.get_bharatgpt_response(prompt)

            # Model-specific API calls 
            token_count = len(self.bert_tokenizer.encode(response_content))
            
            end_memory = psutil.Process(os.getpid()).memory_info().rss / 1024 / 1024
            memory_usage = end_memory - start_memory
            
            return ModelResponse(
                content=response_content,
                response_time=time.time() - start_time,
                token_count=token_count,
                memory_usage=memory_usage
            )
        except Exception as e:
            logging.error(f"Error getting response from {model_name}: {str(e)}")
            return ModelResponse(
                content="",
                response_time=0,
                token_count=0,
                memory_usage=0,
                error=str(e)
            )

Start Tracking Time and Memory:

    • The function starts a timer (start_time) to measure how long it takes to get a response.
    • It also checks how much memory is being used at the beginning (start_memory).

    Choose the AI Model:

    • Based on the model_name provided, the function selects the appropriate method to get a response:
      • "claude-3" → Calls get_claude_response(prompt).
      • "gpt4" → Calls get_gpt4_response(prompt).
      • "deepseek-chat" → Calls get_deepseek_response(prompt).
      • "bharat-gpt" → Calls get_bharatgpt_response(prompt).

    Process the Response:

    • Once the response is received, the function calculates:
      • Token Count: The number of tokens (small chunks of text) in the response using a tokenizer.
      • Memory Usage: The difference between memory usage after the response (end_memory) and before it (start_memory).

    Return the Results:

    • The function bundles all the information into a ModelResponse object:
      • The AI’s reply (content).
      • How long the response took (response_time).
      • The number of tokens in the reply (token_count).
      • How much memory was used (memory_usage).

    Handle Errors:

    • If something goes wrong (e.g., the AI doesn’t respond), the function:
      • Logs the error message.
      • Returns an empty response with default values and the error message.
        def evaluate_text_quality(self, generated: str, reference: str) -> Dict[str, float]:
            """Evaluate text quality metrics"""
            # BERTScore
            gen_embedding = self.sentence_model.encode([generated])
            ref_embedding = self.sentence_model.encode([reference])
            bert_score = cosine_similarity(gen_embedding, ref_embedding)[0][0]
    
            # BLEU Score
            generated_tokens = word_tokenize(generated.lower())
            reference_tokens = word_tokenize(reference.lower())
            bleu = sentence_bleu([reference_tokens], generated_tokens)
    
            # METEOR Score
            meteor = meteor_score([reference_tokens], generated_tokens)
    
            return {
                'bert_score': bert_score,
                'bleu_score': bleu,
                'meteor_score': meteor
            }

    Inputs:

    • generated: The text produced by the AI.
    • reference: The correct or expected version of the text.

    Calculating BERTScore:

    • Converts the generated and reference texts into numerical embeddings (mathematical representations) using a pre-trained model (self.sentence_model.encode).
    • Measures the similarity between the two embeddings using cosine similarity. This gives the bert_score, which ranges from -1 (completely different) to 1 (very similar).

    Calculating BLEU Score:

    • Breaks the generated and reference texts into individual words (tokens) using word_tokenize.
    • Converts both texts to lowercase for consistent comparison.
    • Calculates the BLEU Score (sentence_bleu), which checks how many words or phrases in the generated text overlap with the reference. BLEU values range from 0 (no match) to 1 (perfect match).

    Calculating METEOR Score:

    • Also uses the tokenized versions of generated and reference texts.
    • Calculates the METEOR Score (meteor_score), which considers exact matches, synonyms, and word order. Scores range from 0 (no match) to 1 (perfect match).

    Returning the Results:

    • Combines the three scores into a dictionary with the keys 'bert_score', 'bleu_score', and 'meteor_score'.

    Similarly, other functions are developed.

        def run_comprehensive_evaluation(self, evaluation_data: List[Dict]) -> pd.DataFrame:
            """Run comprehensive evaluation on all metrics"""
            results = []
            
            for item in evaluation_data:
                prompt = item['prompt']
                reference = item['reference']
                task_criteria = item.get('task_criteria', {})
                
                for model_name in self.model_configs.keys():
                    # Get multiple responses to evaluate reliability
                    responses = [
                        self.get_model_response(model_name, prompt)
                        for _ in range(3)  # Get 3 responses for reliability testing
                    ]
                    
                    # Use the best response for other evaluations
                    best_response = max(responses, key=lambda x: len(x.content) if not x.error else 0)
                    
                    if best_response.error:
                        logging.error(f"Error in model {model_name}: {best_response.error}")
                        continue
                    
                    # Gather all metrics
                    metrics = {
                        'model': model_name,
                        'prompt': prompt,
                        'response': best_response.content,
                        **self.evaluate_text_quality(best_response.content, reference),
                        **self.evaluate_factual_accuracy(best_response.content, reference),
                        **self.evaluate_task_performance(best_response.content, task_criteria),
                        **self.evaluate_technical_performance(best_response),
                        **self.evaluate_reliability(responses),
                        **self.evaluate_safety(best_response.content)
                    }
                    
                    # Add business impact metrics using task performance
                    metrics.update(self.evaluate_business_impact(
                        best_response,
                        metrics['task_completion']
                    ))
                    
                    results.append(metrics)
            
            return pd.DataFrame(results)
    • Input:
      • evaluation_data: A list of test cases, where each case is a dictionary containing:
        • prompt: The question or input to the AI model.
        • reference: The ideal or expected answer.
        • task_criteria (optional): Additional rules or requirements for the task.
    • Initialize Results:
      • An empty list results is created to store the evaluation metrics for each model and test case.
    • Iterate Through Test Cases:
      • For each item in the evaluation_data:
        • Extract the prompt, reference, and task_criteria.
    • Evaluate Each Model:
      • Loop through all available AI models (self.model_configs.keys()).
      • Generate three responses for each model to test reliability.
    • Select the Best Response:
      • Out of the three responses, pick the one with the most content (best_response), ignoring responses with errors.
    • Handle Errors:
      • If a response has an error, log the issue and skip further evaluation for that model.
    • Evaluate Metrics:
      • Using the best_response, calculate a variety of metrics, including:
        • Text Quality: How similar the response is to the reference.
        • Factual Accuracy: Whether the response is factually correct.
        • Task Performance: How well it meets task-specific criteria.
        • Technical Performance: Evaluate time, memory, or other system-related metrics.
        • Reliability: Check consistency across multiple responses.
        • Safety: Ensure the response is safe and appropriate.
    • Evaluate Business Impact:
      • Add metrics for business impact (e.g., how well the task was completed, using task_completion as a key factor).
    • Store Results:
      • Add the calculated metrics for this model and prompt to the results list.
    • Return Results as a DataFrame:
      • Convert the results list into a structured table (a pandas DataFrame) for easy analysis and visualization.

    Great! So, now, we’ve explained the code.

    Let us understand the final outcome of this run & what we can conclude from that.

    1. BERT Score (Semantic Understanding):
      • GPT4 leads slightly at 0.8322 (83.22%)
      • Bharat-GPT close second at 0.8118 (81.18%)
      • Claude-3 at 0.8019 (80.19%)
      • DeepSeek-Chat at 0.7819 (78.19%) Think of this like a “comprehension score” – how well the models understand the context. All models show strong understanding, with only a 5% difference between best and worst.
    2. BLEU Score (Word-for-Word Accuracy):
      • Bharat-GPT leads at 0.0567 (5.67%)
      • Claude-3 at 0.0344 (3.44%)
      • GPT4 at 0.0306 (3.06%)
      • DeepSeek-Chat lowest at 0.0189 (1.89%) These low scores suggest models use different wording than references, which isn’t necessarily bad.
    3. METEOR Score (Meaning Preservation):
      • Bharat-GPT leads at 0.4684 (46.84%)
      • Claude-3 close second at 0.4507 (45.07%)
      • GPT4 at 0.2960 (29.60%)
      • DeepSeek-Chat at 0.2652 (26.52%) This shows how well models maintain meaning while using different words.
    4. Response Time (Speed):
      • Claude-3 fastest: 4.40 seconds
      • Bharat-GPT: 6.35 seconds
      • GPT4: 6.43 seconds
      • DeepSeek-Chat slowest: 8.52 seconds
    5. Safety and Reliability:
      • Error Rate: Perfect 0.0 for all models
      • Toxicity: All very safe (below 0.15%) 
        • Claude-3 safest at 0.0007GPT4 at 0.0008Bharat-GPT at 0.0012
        • DeepSeek-Chat at 0.0014
    6. Cost Efficiency:
      • Claude-3 most economical: $0.0019 per response
      • Bharat-GPT close: $0.0021
      • GPT4: $0.0038
      • DeepSeek-Chat highest: $0.0050

    Key Takeaways by Model:

    1. Claude-3: ✓ Fastest responses ✓ Most cost-effective ✓ Excellent meaning preservation ✓ Lowest toxicity
    2. Bharat-GPT: ✓ Best BLEU and METEOR scores ✓ Strong semantic understanding ✓ Cost-effective ✗ Moderate response time
    3. GPT4: ✓ Best semantic understanding ✓ Good safety metrics ✗ Higher cost ✗ Moderate response time
    4. DeepSeek-Chat: ✗ Generally lower performance ✗ Slowest responses ✗ Highest cost ✗ Slightly higher toxicity

    Reliability of These Statistics:

    Strong Points:

    • Comprehensive metric coverage
    • Consistent patterns across evaluations
    • Zero error rates show reliability
    • Clear differentiation between models

    Limitations:

    • BLEU scores are quite low across all models
    • Doesn’t measure creative or innovative responses
    • May not reflect specific use case performance
    • Single snapshot rather than long-term performance

    Final Observation:

    1. Best Overall Value: Claude-3
      • Fast, cost-effective, safe, good performance
    2. Best for Accuracy: Bharat-GPT
      • Highest meaning preservation and precision
    3. Best for Understanding: GPT4
      • Strongest semantic comprehension
    4. Consider Your Priorities: 
      • Speed → Choose Claude-3
      • Cost → Choose Claude-3 or Bharat-GPT
      • Accuracy → Choose Bharat-GPT
      • Understanding → Choose GPT4

    These statistics provide reliable comparative data but should be part of a broader decision-making process that includes your specific needs, budget, and use cases.


    For the Bharat GPT model, we’ve tested this locally on my MacBook Pro 4 Max. And, the configuration is as follows –

    I’ve tried the API version locally, & it provided a similar performance against the stats that we received by running locally. Unfortunately, they haven’t made the API version public yet.

    So, apart from the Anthropic & Open AI, I’ll watch this new LLM (Bharat GPT) for overall stats in the coming days.


    So, we’ve done it.

    You can find the detailed code at the GitHub link.

    I’ll bring some more exciting topics in the coming days from the Python verse.

    Till then, Happy Avenging! 🙂

    Enabling & Exploring Stable Defussion – Part 3

    Before we dive into the details of this post, let us provide the previous two links that precede it.

    Enabling & Exploring Stable Defussion – Part 1

    Enabling & Exploring Stable Defussion – Part 2

    For, reference, we’ll share the demo before deep dive into the actual follow-up analysis in the below section –


    Now, let us continue our discussions from where we left.

    class clsText2Image:
        def __init__(self, pipe, output_path, filename):
    
            self.pipe = pipe
            
            # More aggressive attention slicing
            self.pipe.enable_attention_slicing(slice_size=1)
    
            self.output_path = f"{output_path}{filename}"
            
            # Warm up the pipeline
            self._warmup()
        
        def _warmup(self):
            """Warm up the pipeline to optimize memory allocation"""
            with torch.no_grad():
                _ = self.pipe("warmup", num_inference_steps=1, height=512, width=512)
            torch.mps.empty_cache()
            gc.collect()
        
        def generate(self, prompt, num_inference_steps=12, guidance_scale=3.0):
            try:
                torch.mps.empty_cache()
                gc.collect()
                
                with torch.autocast(device_type="mps"):
                    with torch.no_grad():
                        image = self.pipe(
                            prompt,
                            num_inference_steps=num_inference_steps,
                            guidance_scale=guidance_scale,
                            height=1024,
                            width=1024,
                        ).images[0]
                
                image.save(self.output_path)
                return 0
            except Exception as e:
                print(f'Error: {str(e)}')
                return 1
            finally:
                torch.mps.empty_cache()
                gc.collect()
    
        def genImage(self, prompt):
            try:
    
                # Initialize generator
                x = self.generate(prompt)
    
                if x == 0:
                    print('Successfully processed first pass!')
                else:
                    print('Failed complete first pass!')
                    raise 
    
                return 0
    
            except Exception as e:
                print(f"\nAn unexpected error occurred: {str(e)}")
    
                return 1

    This is the initialization method for the clsText2Image class:

    • Takes a pre-configured pipe (text-to-image pipeline), an output_path, and a filename.
    • Enables more aggressive memory optimization by setting “attention slicing.”
    • Prepares the full file path for saving generated images.
    • Calls a _warmup method to pre-load the pipeline and optimize memory allocation.

    This private method warms up the pipeline:

    • Sends a dummy “warmup” request with basic parameters to allocate memory efficiently.
    • Clears any cached memory (torch.mps.empty_cache()) and performs garbage collection (gc.collect()).
    • Ensures smoother operation for future image generation tasks.

    This method generates an image from a text prompt:

    • Clears memory cache and performs garbage collection before starting.
    • Uses the text-to-image pipeline (pipe) to generate an image:
      • Takes the prompt, number of inference steps, and guidance scale as input.
      • Outputs an image at 1024×1024 resolution.
    • Saves the generated image to the specified output path.
    • Returns 0 on success or 1 on failure.
    • Ensures cleanup by clearing memory and collecting garbage, even in case of errors.

    This method simplifies image generation:

    • Calls the generate method with the given prompt.
    • Prints a success message if the image is generated (0 return value).
    • On failure, logs the error and raises an exception.
    • Returns 0 on success or 1 on failure.
    class clsImage2Video:
        def __init__(self, pipeline):
            
            # Optimize model loading
            torch.mps.empty_cache()
            self.pipeline = pipeline
    
        def generate_frames(self, pipeline, init_image, prompt, duration_seconds=10):
            try:
                torch.mps.empty_cache()
                gc.collect()
    
                base_frames = []
                img = Image.open(init_image).convert("RGB").resize((1024, 1024))
                
                for _ in range(10):
                    result = pipeline(
                        prompt=prompt,
                        image=img,
                        strength=0.45,
                        guidance_scale=7.5,
                        num_inference_steps=25
                    ).images[0]
    
                    base_frames.append(np.array(result))
                    img = result
                    torch.mps.empty_cache()
    
                frames = []
                for i in range(len(base_frames)-1):
                    frame1, frame2 = base_frames[i], base_frames[i+1]
                    for t in np.linspace(0, 1, int(duration_seconds*24/10)):
                        frame = (1-t)*frame1 + t*frame2
                        frames.append(frame.astype(np.uint8))
                
                return frames
            except Exception as e:
                frames = []
                print(f'Error: {str(e)}')
    
                return frames
            finally:
                torch.mps.empty_cache()
                gc.collect()
    
        # Main method
        def genVideo(self, prompt, inputImage, targetVideo, fps):
            try:
                print("Starting animation generation...")
                
                init_image_path = inputImage
                output_path = targetVideo
                fps = fps
                
                frames = self.generate_frames(
                    pipeline=self.pipeline,
                    init_image=init_image_path,
                    prompt=prompt,
                    duration_seconds=20
                )
                
                imageio.mimsave(output_path, frames, fps=30)
    
                print("Animation completed successfully!")
    
                return 0
            except Exception as e:
                x = str(e)
                print('Error: ', x)
    
                return 1

    This initializes the clsImage2Video class:

    • Clears the GPU cache to optimize memory before loading.
    • Sets up the pipeline for generating frames, which uses an image-to-video transformation model.

    This function generates frames for a video:

    • Starts by clearing GPU memory and running garbage collection.
    • Loads the init_image, resizes it to 1024×1024 pixels, and converts it to RGB format.
    • Iteratively applies the pipeline to transform the image:
      • Uses the prompt and specified parameters like strength, guidance_scale, and num_inference_steps.
      • Stores the resulting frames in a list.
    • Interpolates between consecutive frames to create smooth transitions:
      • Uses linear blending for smooth animation across a specified duration and frame rate (24 fps for 10 segments).
    • Returns the final list of generated frames or an empty list if an error occurs.
    • Always clears memory after execution.

    This is the main function for creating a video from an image and text prompt:

    • Logs the start of the animation generation process.
    • Calls generate_frames() with the given pipeline, inputImage, and prompt to create frames.
    • Saves the generated frames as a video using the imageio library, setting the specified frame rate (fps).
    • Logs a success message and returns 0 if the process is successful.
    • On error, logs the issue and returns 1.

    Now, let us understand the performance. But, before that let us explore the device on which we’ve performed these stress test that involves GPU & CPUs as well.

    And, here is the performance stats –

    From the above snapshot, we can clearly communicate that the GPU is 100% utilized. However, the CPU has shown a significant % of availability.

    As you can see, the first pass converts the input prompt to intermediate images within 1 min 30 sec. However, the second pass constitutes multiple hops (11 hops) on an avg 22 seconds. Overall, the application will finish in 5 minutes 36 seconds for a 10-second video clip.


    So, we’ve done it.

    You can find the detailed code at the GitHub link.

    I’ll bring some more exciting topics in the coming days from the Python verse.

    Till then, Happy Avenging! 🙂

    Enabling & Exploring Stable Defussion – Part 2

    As we’ve started explaining, the importance & usage of Stable Defussion in our previous post:

    Enabling & Exploring Stable Defussion – Part 1

    In today’s post, we’ll discuss another approach, where we built the custom Python-based SDK solution that consumes HuggingFace Library, which generates video out of the supplied prompt.

    But, before that, let us view the demo generated from a custom solution.

    Isn’t it exciting? Let us dive deep into the details.


    Let us understand basic flow of events for the custom solution –

    So, the application will interact with the python-sdk like “stable-diffusion-3.5-large” & “dreamshaper-xl-1-0”, which is available in HuggingFace. As part of the process, these libraries will load all the large models inside the local laptop that require some time depend upon the bandwidth of your internet.

    Before we even deep dive into the code, let us understand the flow of Python scripts as shown below:

    From the above diagram, we can understand that the main application will be triggered by “generateText2Video.py”. As you can see that “clsConfigClient.py” has all the necessary parameter information that will be supplied to all the scripts.

    “generateText2Video.py” will trigger the main class named “clsText2Video.py”, which then calls all the subsequent classes.

    Great! Since we now have better visibility of the script flow, let’s examine the key snippets individually.


    class clsText2Video:
        def __init__(self, model_id_1, model_id_2, output_path, filename, vidfilename, fps, force_cpu=False):
            self.model_id_1 = model_id_1
            self.model_id_2 = model_id_2
            self.output_path = output_path
            self.filename = filename
            self.vidfilename = vidfilename
            self.force_cpu = force_cpu
            self.fps = fps
    
            # Initialize in main process
            os.environ["TOKENIZERS_PARALLELISM"] = "true"
            self.r1 = cm.clsMaster(force_cpu)
            self.torch_type = self.r1.getTorchType()
            
            torch.mps.empty_cache()
            self.pipe = self.r1.getText2ImagePipe(self.model_id_1, self.torch_type)
            self.pipeline = self.r1.getImage2VideoPipe(self.model_id_2, self.torch_type)
    
            self.text2img = cti.clsText2Image(self.pipe, self.output_path, self.filename)
            self.img2vid = civ.clsImage2Video(self.pipeline)
    
        def getPrompt2Video(self, prompt):
            try:
                input_image = self.output_path + self.filename
                target_video = self.output_path + self.vidfilename
    
                if self.text2img.genImage(prompt) == 0:
                    print('Pass 1: Text to intermediate images generated!')
                    
                    if self.img2vid.genVideo(prompt, input_image, target_video, self.fps) == 0:
                        print('Pass 2: Successfully generated!')
                        return 0
                return 1
            except Exception as e:
                print(f"\nAn unexpected error occurred: {str(e)}")
                return 1

    Now, let us interpret:

    This is the initialization method for the class. It does the following:

    • Sets up configurations like model IDs, output paths, filenames, video filename, frames per second (fps), and whether to use the CPU (force_cpu).
    • Configures an environment variable for tokenizer parallelism.
    • Initializes helper classes (clsMaster) to manage system resources and retrieve appropriate PyTorch settings.
    • Creates two pipelines:
      • pipe: For converting text to images using the first model.
      • pipeline: For converting images to video using the second model.
    • Initializes text2img and img2vid objects:
      • text2img handles text-to-image conversions.
      • img2vid handles image-to-video conversions.

    This method generates a video from a text prompt in two steps:

    1. Text-to-Image Conversion:
      • Calls genImage(prompt) using the text2img object to create an intermediate image file.
      • If successful, it prints confirmation.
    2. Image-to-Video Conversion:
      • Uses the img2vid object to convert the intermediate image into a video file.
      • Includes the input image path, target video path, and frames per second (fps).
      • If successful, it prints confirmation.
    • If either step fails, the method returns 1.
    • Logs any unexpected errors and returns 1 in such cases.
    # Set device for Apple Silicon GPU
    def setup_gpu(force_cpu=False):
        if not force_cpu and torch.backends.mps.is_available() and torch.backends.mps.is_built():
            print('Running on Apple Silicon MPS GPU!')
            return torch.device("mps")
        return torch.device("cpu")
    
    ######################################
    ####         Global Flag      ########
    ######################################
    
    class clsMaster:
        def __init__(self, force_cpu=False):
            self.device = setup_gpu(force_cpu)
    
        def getTorchType(self):
            try:
                # Check if MPS (Apple Silicon GPU) is available
                if not torch.backends.mps.is_available():
                    torch_dtype = torch.float32
                    raise RuntimeError("MPS (Metal Performance Shaders) is not available on this system.")
                else:
                    torch_dtype = torch.float16
                
                return torch_dtype
            except Exception as e:
                torch_dtype = torch.float16
                print(f'Error: {str(e)}')
    
                return torch_dtype
    
        def getText2ImagePipe(self, model_id, torchType):
            try:
                device = self.device
    
                torch.mps.empty_cache()
                self.pipe = StableDiffusion3Pipeline.from_pretrained(model_id, torch_dtype=torchType, use_safetensors=True, variant="fp16",).to(device)
    
                return self.pipe
            except Exception as e:
                x = str(e)
                print('Error: ', x)
    
                torch.mps.empty_cache()
                self.pipe = StableDiffusion3Pipeline.from_pretrained(model_id, torch_dtype=torchType,).to(device)
    
                return self.pipe
            
        def getImage2VideoPipe(self, model_id, torchType):
            try:
                device = self.device
    
                torch.mps.empty_cache()
                self.pipeline = StableDiffusionXLImg2ImgPipeline.from_pretrained(model_id, torch_dtype=torchType, use_safetensors=True, use_fast=True).to(device)
    
                return self.pipeline
            except Exception as e:
                x = str(e)
                print('Error: ', x)
    
                torch.mps.empty_cache()
                self.pipeline = StableDiffusionXLImg2ImgPipeline.from_pretrained(model_id, torch_dtype=torchType).to(device)
    
                return self.pipeline

    Let us interpret:

    This function determines whether to use the Apple Silicon GPU (MPS) or the CPU:

    • If force_cpu is False and the MPS GPU is available, it sets the device to “mps” (Apple GPU) and prints a message.
    • Otherwise, it defaults to the CPU.

    This is the initializer for the clsMaster class:

    • It sets the device to either GPU or CPU using the setup_gpu function (mentioned above) based on the force_cpu flag.

    This method determines the PyTorch data type to use:

    • Checks if MPS GPU is available:
      • If available, uses torch.float16 for optimized performance.
      • If unavailable, defaults to torch.float32 and raises a warning.
    • Handles errors gracefully by defaulting to torch.float16 and printing the error.

    This method initializes a text-to-image pipeline:

    • Loads the Stable Diffusion model with the given model_id and torchType.
    • Configures it for MPS GPU or CPU, based on the device.
    • Clears the GPU cache before loading the model to optimize memory usage.
    • If an error occurs, attempts to reload the pipeline without safetensors.

    This method initializes an image-to-video pipeline:

    • Similar to getText2ImagePipe, it loads the Stable Diffusion XL Img2Img pipeline with the specified model_id and torchType.
    • Configures it for MPS GPU or CPU and clears the cache before loading.
    • On error, reloads the pipeline without additional optimization settings and prints the error.

    Let us continue this in the next post:

    Enabling & Exploring Stable Defussion – Part 3

    Till then, Happy Avenging! 🙂

    Building solutions using LLM AutoGen in Python – Part 3

    Before we dive into the details of this post, let us provide the previous two links that precede it.

    Building solutions using LLM AutoGen in Python – Part 1

    Building solutions using LLM AutoGen in Python – Part 2

    For, reference, we’ll share the demo before deep dive into the actual follow-up analysis in the below section –


    In this post, we will understand the initial code generated & then the revised code to compare them for a better understanding of the impact of revised prompts.

    But, before that let us broadly understand the communication types between the agents.

    • Agents Involved: Agent1, Agent2
    • Flow:
      • Agent1 sends a request directly to Agent2.
      • Agent2 processes the request and sends the response back to Agent1.
    • Use Case: Simple query-response interactions without intermediaries.
    • Agents Involved: UserAgent, Mediator, SpecialistAgent1, SpecialistAgent2
    • Flow:
      • UserAgent sends input to Mediator.
      • Mediator delegates tasks to SpecialistAgent1 and SpecialistAgent2.
      • Specialists process tasks and return results to Mediator.
      • Mediator consolidates results and sends them back to UserAgent.
    • Agents Involved: Broadcaster, AgentA, AgentB, AgentC
    • Flow:
      • Broadcaster sends a message to multiple agents simultaneously.
      • Agents that find the message relevant (AgentA, AgentC) acknowledge or respond.
    • Use Case: System-wide notifications or alerts.
    • Agents Involved: Supervisor, Worker1, Worker2
    • Flow:
      • Supervisor assigns tasks to Worker1 and Worker2.
      • Workers execute tasks and report progress back to Supervisor.
    • Use Case: Task delegation in structured organizations.
    • Agents Involved: Publisher, Subscriber1, Topic
    • Flow:
      • Publisher publishes an event or message to a Topic.
      • Subscriber1, who is subscribed to the Topic, receives the event.
    • Use Case: Decoupled systems where publishers and subscribers do not need direct knowledge of each other.
    • Agents Involved: TriggerEvent, ReactiveAgent, NextStep
    • Flow:
      • An event occurs (TriggerEvent).
      • ReactiveAgent detects the event and acts.
      • The action leads to the NextStep in the process.
    • Use Case: Systems that need to respond to asynchronous events or changes in the environment.

    Since, we now understand the basic communication types. Let us understand the AutoGen generated first code & the last code (That satisfies our need) –

    # filename: simple_snake.py (Generated by AutoGen)
    
    import pygame
    import time
    import random
     
    snake_speed = 15
     
    # Window color
    white = pygame.Color(255, 255, 255)
     
    # Snake color
    green = pygame.Color(0, 255, 0)
     
    snake_position = [100, 50]
     
    # defining first 4 blocks 
    # of snake body
    snake_body = [ [100, 50], 
                   [90, 50],
                   [80, 50],
                   [70, 50]
                ]
    # fruit position
    fruit_position = [random.randrange(1, (1000//10)) * 10, 
                      random.randrange(1, (600//10)) * 10]
    fruit_spawn = True
     
    direction = 'RIGHT'
    change_to = direction
     
    score = 0
     
    # Initialising pygame
    pygame.init()
     
    # Initialise game window
    win = pygame.display.set_mode((1000, 600))
    pygame.display.set_caption("Snake game for kids")
     
    # FPS (frames per second) controller
    fps_controller = pygame.time.Clock()
     
      
    while True:
        # handling key events
        for event in pygame.event.get():
            if event.type == pygame.KEYDOWN:
                if event.key == pygame.K_UP:
                    change_to = 'UP'
                if event.key == pygame.K_DOWN:
                    change_to = 'DOWN'
                if event.key == pygame.K_LEFT:
                    change_to = 'LEFT'
                if event.key == pygame.K_RIGHT:
                    change_to = 'RIGHT'
    
        # If two keys pressed simultaneously
        # we don't want snake to move into two
        # directions simultaneously
        if change_to == 'UP' and direction != 'DOWN':
            direction = 'UP'
        if change_to == 'DOWN' and direction != 'UP':
            direction = 'DOWN'
        if change_to == 'LEFT' and direction != 'RIGHT':
            direction = 'LEFT'
        if change_to == 'RIGHT' and direction != 'LEFT':
            direction = 'RIGHT'
     
        # Moving the snake
        if direction == 'UP':
            snake_position[1] -= 10
        if direction == 'DOWN':
            snake_position[1] += 10
        if direction == 'LEFT':
            snake_position[0] -= 10
        if direction == 'RIGHT':
            snake_position[0] += 10
     
        # Snake body growing mechanism
        # if fruits and snakes collide then scores
        # will increase by 10
        snake_body.insert(0, list(snake_position))
        if snake_position[0] == fruit_position[0] and snake_position[1] == fruit_position[1]:
            score += 10
            fruit_spawn = False
        else:
            snake_body.pop()
             
        if not fruit_spawn:
            fruit_position = [random.randrange(1, (1000//10)) * 10, 
                              random.randrange(1, (600//10)) * 10]
             
        fruit_spawn = True
        win.fill(white)
        
        for pos in snake_body:
            pygame.draw.rect(win, green, pygame.Rect(pos[0], pos[1], 10, 10))
        pygame.draw.rect(win, white, pygame.Rect(
        fruit_position[0], fruit_position[1], 10, 10))
     
        # Game Over conditions
        if snake_position[0] < 0 or snake_position[0] > 1000-10:
            break
        if snake_position[1] < 0 or snake_position[1] > 600-10:
            break
     
        # Touching the snake body
        for block in snake_body[1:]:
            if snake_position[0] == block[0] and snake_position[1] == block[1]:
                break
        
        # refresh game screen
        pygame.display.update()
    
        # Frame Per Second /Refresh rate
        fps_controller.tick(snake_speed)
    
    # displaying final score after game over
    print(f"You scored {score} in the game.")

    Now, let us remember the prompt refinement that we’ve done (We’ve already posted that in our last post as well) –

    I want to place the snake within the boundary of the visual wall & it should bounce each wall & then hit the target. And, it should increase the size. And, every time when it hits the target it will increase the score by 10. And, the application will run for 2 minutes, which will be displayed on the screen. This will exit once 2 minute is over.
    # filename: simple_snake.py (Generated by AutoGen)
    
    import pygame
    import time
    import random
    import math
    
    pygame.init()
    
    white = (255, 255, 255)
    yellow = (255, 255, 102)
    green = (0, 255, 0)
    red = (255, 0, 0)
    black = (0, 0, 0)
    blue = (0, 0, 255)
    
    dis_width = 800
    dis_height = 600
    
    dis = pygame.display.set_mode((dis_width, dis_height))
    pygame.display.set_caption('Snake Game')
    
    clock = pygame.time.Clock()
    snake_block = 10
    snake_speed = 30
    font_style = pygame.font.SysFont(None, 50)
    score_font = pygame.font.SysFont(None, 35)
    
    def our_snake(snake_block, snake_List):
        for x in snake_List:
            pygame.draw.rect(dis, green, [x[0], x[1], snake_block, snake_block])
    
    def message(msg,color):
        mesg = font_style.render(msg, True, color)
        dis.blit(mesg, [dis_width / 3, dis_height / 3])
    
    def gameLoop():  # creating a function
        game_over = False
        game_close = False
    
        # snake starting coordinates
        x1 = dis_width / 2
        y1 = dis_height / 2
    
        # snake initial movement direction
        x1_change = 0
        y1_change = 0
    
        # initialize snake length and list of coordinates
        snake_List = []
        Length_of_snake = 1
    
        # random starting point for the food
        foodx = round(random.randrange(0, dis_width - snake_block) / 10.0) * 10.0
        foody = round(random.randrange(0, dis_height - snake_block) / 10.0) * 10.0
    
        # initialize score
        score = 0
    
        # store starting time
        start_time = time.time()
    
        while not game_over:
    
            # Remaining time
            elapsed_time = time.time() - start_time
            remaining_time = 120 - elapsed_time  # 2 minutes game
            if remaining_time <= 0:
                game_over = True
    
            # event handling loop
            for event in pygame.event.get():
                if event.type == pygame.QUIT:
                    game_over = True  # when closing window
                if event.type == pygame.MOUSEBUTTONUP:
                    # get mouse click coordinates
                    pos = pygame.mouse.get_pos()
    
                    # calculate new direction vector from snake to click position
                    x1_change = pos[0] - x1
                    y1_change = pos[1] - y1
    
                    # normalize direction vector
                    norm = math.sqrt(x1_change ** 2 + y1_change ** 2)
                    if norm != 0:
                        x1_change /= norm
                        y1_change /= norm
    
                    # multiply direction vector by step size
                    x1_change *= snake_block
                    y1_change *= snake_block
    
            x1 += x1_change
            y1 += y1_change
            dis.fill(white)
            pygame.draw.rect(dis, red, [foodx, foody, snake_block, snake_block])
            pygame.draw.rect(dis, green, [x1, y1, snake_block, snake_block])
            snake_Head = []
            snake_Head.append(x1)
            snake_Head.append(y1)
            snake_List.append(snake_Head)
            if len(snake_List) > Length_of_snake:
                del snake_List[0]
    
            our_snake(snake_block, snake_List)
    
            # Bounces the snake back if it hits the edge
            if x1 < 0 or x1 > dis_width:
                x1_change *= -1
            if y1 < 0 or y1 > dis_height:
                y1_change *= -1
    
            # Display score
            value = score_font.render("Your Score: " + str(score), True, black)
            dis.blit(value, [0, 0])
    
            # Display remaining time
            time_value = score_font.render("Remaining Time: " + str(int(remaining_time)), True, blue)
            dis.blit(time_value, [0, 30])
    
            pygame.display.update()
    
            # Increase score and length of snake when snake gets the food
            if abs(x1 - foodx) < snake_block and abs(y1 - foody) < snake_block:
                foodx = round(random.randrange(0, dis_width - snake_block) / 10.0) * 10.0
                foody = round(random.randrange(0, dis_height - snake_block) / 10.0) * 10.0
                Length_of_snake += 1
                score += 10
    
            # Snake movement speed
            clock.tick(snake_speed)
    
        pygame.quit()
        quit()
    
    gameLoop()
    

    Now, let us understand the difference here –

    The first program is a snake game controlled by arrow keys that end if the Snake hits a wall or itself. The second game uses mouse clicks for control, bounces off walls instead of ending, includes a 2-minute timer, and displays the remaining time.

    So, we’ve done it. 🙂

    You can find the detailed code in the following Github link.


    I’ll bring some more exciting topics in the coming days from the Python verse.

    Till then, Happy Avenging! 🙂

    Building & deploying a RAG architecture rapidly using Langflow & Python

    I’ve been looking for a solution that can help deploy any RAG solution involving Python faster. It would be more effective if an available UI helped deliver the solution faster. And, here comes the solution that does exactly what I needed – “LangFlow.”

    Before delving into the details, I strongly recommend taking a look at the demo. It’s a great way to get a comprehensive understanding of LangFlow and its capabilities in deploying RAG architecture rapidly.

    Demo

    This describes the entire architecture; hence, I’ll share the architecture components I used to build the solution.

    To know more about RAG-Architecture, please refer to the following link.

    As we all know, we can parse the data from the source website URL (in this case, I’m referring to my photography website to extract the text of one of my blogs) and then embed it into the newly created Astra DB & new collection, where I will be storing the vector embeddings.

    As you can see from the above diagram, the flow that I configured within 5 minutes and the full functionality of writing a complete solution (underlying Python application) within no time that extracts chunks, converts them into embeddings, and finally stores them inside the Astra DB.

    Now, let us understand the next phase, where, based on the ask from a chatbot, I need to convert that question into Vector DB & then find the similarity search to bring the relevant vectors as shown below –

    You need to configure this entire flow by dragging the necessary widgets from the left-side panel as marked in the Blue-Box shown below –

    For this specific use case, we’ve created an instance of Astra DB & then created an empty vector collection. Also, we need to ensure that we generate the API-Key & and provide the right roles assigned with the token. After successfully creating the token, you need to copy the endpoint, token & collection details & paste them into the desired fields of the Astra-DB components inside the LangFlow. Think of it as a framework where one needs to provide all the necessary information to build & run the entire flow successfully.

    Following are some of the important snapshots from the Astra-DB –

    Step – 1

    Step – 2

    Once you run the vector DB population, this will insert extracted text & then convert it into vectors, which will show in the following screenshot –

    You can see the sample vectors along with the text chunks inside the Astra DB data explorer as shown below –

    Some of the critical components are highlighted in the Blue-box which is important for us to monitor the vector embeddings.

    Now, here is how you can modify the current Python code of any available widgets or build your own widget by using the custom widget.

    The first step is to click the code button highlighted in the Red-box as shown below –

    The next step is when you click that button, which will open the detailed Python code representing the entire widget build & its functionality. This button is the place where you can add, modify, or keep it as it is depending upon your need, which will shown below –

    Once one builds the entire solution, you must click the final compile button (shown in the red box), which will eventually compile all the individual widgets. However, you can build the compile button for the individual widgets as soon as you make the solution. So you can pinpoint any potential problems at that very step.

    Let us understand one sample code of a widget. In this case, we will take vector embedding insertion into the Astra DB. Let us see the code –

    from typing import List, Optional, Union
    from langchain_astradb import AstraDBVectorStore
    from langchain_astradb.utils.astradb import SetupMode
    
    from langflow.custom import CustomComponent
    from langflow.field_typing import Embeddings, VectorStore
    from langflow.schema import Record
    from langchain_core.retrievers import BaseRetriever
    
    
    class AstraDBVectorStoreComponent(CustomComponent):
        display_name = "Astra DB"
        description = "Builds or loads an Astra DB Vector Store."
        icon = "AstraDB"
        field_order = ["token", "api_endpoint", "collection_name", "inputs", "embedding"]
    
        def build_config(self):
            return {
                "inputs": {
                    "display_name": "Inputs",
                    "info": "Optional list of records to be processed and stored in the vector store.",
                },
                "embedding": {"display_name": "Embedding", "info": "Embedding to use"},
                "collection_name": {
                    "display_name": "Collection Name",
                    "info": "The name of the collection within Astra DB where the vectors will be stored.",
                },
                "token": {
                    "display_name": "Token",
                    "info": "Authentication token for accessing Astra DB.",
                    "password": True,
                },
                "api_endpoint": {
                    "display_name": "API Endpoint",
                    "info": "API endpoint URL for the Astra DB service.",
                },
                "namespace": {
                    "display_name": "Namespace",
                    "info": "Optional namespace within Astra DB to use for the collection.",
                    "advanced": True,
                },
                "metric": {
                    "display_name": "Metric",
                    "info": "Optional distance metric for vector comparisons in the vector store.",
                    "advanced": True,
                },
                "batch_size": {
                    "display_name": "Batch Size",
                    "info": "Optional number of records to process in a single batch.",
                    "advanced": True,
                },
                "bulk_insert_batch_concurrency": {
                    "display_name": "Bulk Insert Batch Concurrency",
                    "info": "Optional concurrency level for bulk insert operations.",
                    "advanced": True,
                },
                "bulk_insert_overwrite_concurrency": {
                    "display_name": "Bulk Insert Overwrite Concurrency",
                    "info": "Optional concurrency level for bulk insert operations that overwrite existing records.",
                    "advanced": True,
                },
                "bulk_delete_concurrency": {
                    "display_name": "Bulk Delete Concurrency",
                    "info": "Optional concurrency level for bulk delete operations.",
                    "advanced": True,
                },
                "setup_mode": {
                    "display_name": "Setup Mode",
                    "info": "Configuration mode for setting up the vector store, with options like “Sync”, “Async”, or “Off”.",
                    "options": ["Sync", "Async", "Off"],
                    "advanced": True,
                },
                "pre_delete_collection": {
                    "display_name": "Pre Delete Collection",
                    "info": "Boolean flag to determine whether to delete the collection before creating a new one.",
                    "advanced": True,
                },
                "metadata_indexing_include": {
                    "display_name": "Metadata Indexing Include",
                    "info": "Optional list of metadata fields to include in the indexing.",
                    "advanced": True,
                },
                "metadata_indexing_exclude": {
                    "display_name": "Metadata Indexing Exclude",
                    "info": "Optional list of metadata fields to exclude from the indexing.",
                    "advanced": True,
                },
                "collection_indexing_policy": {
                    "display_name": "Collection Indexing Policy",
                    "info": "Optional dictionary defining the indexing policy for the collection.",
                    "advanced": True,
                },
            }
    
        def build(
            self,
            embedding: Embeddings,
            token: str,
            api_endpoint: str,
            collection_name: str,
            inputs: Optional[List[Record]] = None,
            namespace: Optional[str] = None,
            metric: Optional[str] = None,
            batch_size: Optional[int] = None,
            bulk_insert_batch_concurrency: Optional[int] = None,
            bulk_insert_overwrite_concurrency: Optional[int] = None,
            bulk_delete_concurrency: Optional[int] = None,
            setup_mode: str = "Sync",
            pre_delete_collection: bool = False,
            metadata_indexing_include: Optional[List[str]] = None,
            metadata_indexing_exclude: Optional[List[str]] = None,
            collection_indexing_policy: Optional[dict] = None,
        ) -> Union[VectorStore, BaseRetriever]:
            try:
                setup_mode_value = SetupMode[setup_mode.upper()]
            except KeyError:
                raise ValueError(f"Invalid setup mode: {setup_mode}")
            if inputs:
                documents = [_input.to_lc_document() for _input in inputs]
    
                vector_store = AstraDBVectorStore.from_documents(
                    documents=documents,
                    embedding=embedding,
                    collection_name=collection_name,
                    token=token,
                    api_endpoint=api_endpoint,
                    namespace=namespace,
                    metric=metric,
                    batch_size=batch_size,
                    bulk_insert_batch_concurrency=bulk_insert_batch_concurrency,
                    bulk_insert_overwrite_concurrency=bulk_insert_overwrite_concurrency,
                    bulk_delete_concurrency=bulk_delete_concurrency,
                    setup_mode=setup_mode_value,
                    pre_delete_collection=pre_delete_collection,
                    metadata_indexing_include=metadata_indexing_include,
                    metadata_indexing_exclude=metadata_indexing_exclude,
                    collection_indexing_policy=collection_indexing_policy,
                )
            else:
                vector_store = AstraDBVectorStore(
                    embedding=embedding,
                    collection_name=collection_name,
                    token=token,
                    api_endpoint=api_endpoint,
                    namespace=namespace,
                    metric=metric,
                    batch_size=batch_size,
                    bulk_insert_batch_concurrency=bulk_insert_batch_concurrency,
                    bulk_insert_overwrite_concurrency=bulk_insert_overwrite_concurrency,
                    bulk_delete_concurrency=bulk_delete_concurrency,
                    setup_mode=setup_mode_value,
                    pre_delete_collection=pre_delete_collection,
                    metadata_indexing_include=metadata_indexing_include,
                    metadata_indexing_exclude=metadata_indexing_exclude,
                    collection_indexing_policy=collection_indexing_policy,
                )
    
            return vector_store
    

    Method: build_config:

    • This method defines the configuration options for the component.
    • Each configuration option includes a display_name and info, which provides details about the option.
    • Some options are marked as advanced, indicating they are optional and more complex.

    Method: build:

    • This method is used to create an instance of the Astra DB Vector Store.
    • It takes several parameters, including embedding, token, api_endpoint, collection_name, and various optional parameters.
    • It converts the setup_mode string to an enum value.
    • If inputs are provided, they are converted to a format suitable for storing in the vector store.
    • Depending on whether inputs are provided, a new vector store from documents can be created, or an empty vector store can be initialized with the given configurations.
    • Finally, it returns the created vector store instance.

    And, here is the the screenshot of your run –

    And, this is the last steps to run the Integrated Chatbot as shown below –

    As one can see the left side highlighted shows the reference text & chunks & the right side actual response.


    So, we’ve done it. And, you know the fun fact. I did this entire workflow within 35 minutes alone. 😛

    I’ll bring some more exciting topics in the coming days from the Python verse.

    To learn more about LangFlow, please click here.

    To learn about Astra DB, you need to click the following link.

    To learn about my blog & photography, you can click the following url.

    Till then, Happy Avenging!  🙂

    Building a real-time Gen AI Improvement Matrices (GAIIM) using Python, UpTrain, Open AI & React

    How does the RAG work better for various enterprise-level Gen AI use cases? What needs to be there to make the LLM model work more efficiently & able to check the response & validate their response, including the bias, hallucination & many more?

    This is my post (after a slight GAP), which will capture and discuss some of the burning issues that many AI architects are trying to explore. In this post, I’ve considered a newly formed AI start-up from India, which developed an open-source framework that can easily evaluate all the challenges that one is facing with their LLMs & easily integrate with your existing models for better understanding including its limitations. You will get plenty of insights about it.

    But, before we dig deep, why not see the demo first –

    Isn’t it exciting? Let’s deep dive into the flow of events.


    Let’s explore the broad-level architecture/flow –

    Let us understand the steps of the above architecture. First, our Python application needs to trigger and enable the API, which will interact with the Open AI and UpTrain AI to fetch all the LLM KPIs based on the input from the React app named “Evaluation.”

    Once the response is received from UpTrain AI, the Python application then organizes the results in a better readable manner without changing the core details coming out from their APIs & then shares that back with the react interface.

    Let’s examine the react app’s sample inputs to better understand the input that will be passed to the Python-based API solution, which is wrapper capability to call multiple APIs from the UpTrain & then accumulate them under one response by parsing the data & reorganizing the data with the help of Open AI & sharing that back.

    Highlighted in RED are some of the critical inputs you need to provide to get most of the KPIs. And, here are the sample text inputs for your reference –

    Q. Enter input question.
    A. What are the four largest moons of Jupiter?
    Q. Enter the context document.
    A. Jupiter, the largest planet in our solar system, boasts a fascinating array of moons. Among these, the four largest are collectively known as the Galilean moons, named after the renowned astronomer Galileo Galilei, who first observed them in 1610. These four moons, Io, Europa, Ganymede, and Callisto, hold significant scientific interest due to their unique characteristics and diverse geological features.
    Q. Enter LLM response.
    A. The four largest moons of Jupiter, known as the Galilean moons, are Io, Europa, Ganymede, and Marshmello.
    Q. Enter the persona response.
    A. strict and methodical teacher
    Q. Enter the guideline.
    A. Response shouldn’t contain any specific numbers
    Q. Enter the ground truth.
    A. The Jupiter is the largest & gaseous planet in the solar system.
    Q. Choose the evaluation method.
    A. llm

    Once you fill in the App should look like this –

    Once you fill in, the app should look like the below screenshot –


    Let us understand the sample packages that are required for this task.

    pip install Flask==3.0.3
    pip install Flask-Cors==4.0.0
    pip install numpy==1.26.4
    pip install openai==1.17.0
    pip install pandas==2.2.2
    pip install uptrain==0.6.13

    Note that, we’re not going to discuss the entire script here. Only those parts are relevant. However, you can get the complete scripts in the GitHub repository.

    def askFeluda(context, question):
        try:
            # Combine the context and the question into a single prompt.
            prompt_text = f"{context}\n\n Question: {question}\n Answer:"
    
            # Retrieve conversation history from the session or database
            conversation_history = []
    
            # Add the new message to the conversation history
            conversation_history.append(prompt_text)
    
            # Call OpenAI API with the updated conversation
            response = client.with_options(max_retries=0).chat.completions.create(
                messages=[
                    {
                        "role": "user",
                        "content": prompt_text,
                    }
                ],
                model=cf.conf['MODEL_NAME'],
                max_tokens=150,  # You can adjust this based on how long you expect the response to be
                temperature=0.3,  # Adjust for creativity. Lower values make responses more focused and deterministic
                top_p=1,
                frequency_penalty=0,
                presence_penalty=0
            )
    
            # Extract the content from the first choice's message
            chat_response = response.choices[0].message.content
    
            # Print the generated response text
            return chat_response.strip()
        except Exception as e:
            return f"An error occurred: {str(e)}"

    This function will ask the supplied questions with contexts or it will supply the UpTrain results to summarize the JSON into more easily readable plain texts. For our test, we’ve used “gpt-3.5-turbo”.

    def evalContextRelevance(question, context, resFeluda, personaResponse):
        try:
            data = [{
                'question': question,
                'context': context,
                'response': resFeluda
            }]
    
            results = eval_llm.evaluate(
                data=data,
                checks=[Evals.CONTEXT_RELEVANCE, Evals.FACTUAL_ACCURACY, Evals.RESPONSE_COMPLETENESS, Evals.RESPONSE_RELEVANCE, CritiqueTone(llm_persona=personaResponse), Evals.CRITIQUE_LANGUAGE, Evals.VALID_RESPONSE, Evals.RESPONSE_CONCISENESS]
            )
    
            return results
        except Exception as e:
            x = str(e)
    
            return x

    The above methods initiate the model from UpTrain to get all the stats, which will be helpful for your LLM response. In this post, we’ve captured the following KPIs –

    - Context Relevance Explanation
    - Factual Accuracy Explanation
    - Guideline Adherence Explanation
    - Response Completeness Explanation
    - Response Fluency Explanation
    - Response Relevance Explanation
    - Response Tonality Explanation
    # Function to extract and print all the keys and their values
    def extractPrintedData(data):
        for entry in data:
            print("Parsed Data:")
            for key, value in entry.items():
    
    
                if key == 'score_context_relevance':
                    s_1_key_val = value
                elif key == 'explanation_context_relevance':
                    cleaned_value = preprocessParseData(value)
                    print(f"{key}: {cleaned_value}\n")
                    s_1_val = cleaned_value
                elif key == 'score_factual_accuracy':
                    s_2_key_val = value
                elif key == 'explanation_factual_accuracy':
                    cleaned_value = preprocessParseData(value)
                    print(f"{key}: {cleaned_value}\n")
                    s_2_val = cleaned_value
                elif key == 'score_response_completeness':
                    s_3_key_val = value
                elif key == 'explanation_response_completeness':
                    cleaned_value = preprocessParseData(value)
                    print(f"{key}: {cleaned_value}\n")
                    s_3_val = cleaned_value
                elif key == 'score_response_relevance':
                    s_4_key_val = value
                elif key == 'explanation_response_relevance':
                    cleaned_value = preprocessParseData(value)
                    print(f"{key}: {cleaned_value}\n")
                    s_4_val = cleaned_value
                elif key == 'score_critique_tone':
                    s_5_key_val = value
                elif key == 'explanation_critique_tone':
                    cleaned_value = preprocessParseData(value)
                    print(f"{key}: {cleaned_value}\n")
                    s_5_val = cleaned_value
                elif key == 'score_fluency':
                    s_6_key_val = value
                elif key == 'explanation_fluency':
                    cleaned_value = preprocessParseData(value)
                    print(f"{key}: {cleaned_value}\n")
                    s_6_val = cleaned_value
                elif key == 'score_valid_response':
                    s_7_key_val = value
                elif key == 'score_response_conciseness':
                    s_8_key_val = value
                elif key == 'explanation_response_conciseness':
                    print('Raw Value: ', value)
                    cleaned_value = preprocessParseData(value)
                    print(f"{key}: {cleaned_value}\n")
                    s_8_val = cleaned_value
    
        print('$'*200)
    
        results = {
            "Factual_Accuracy_Score": s_2_key_val,
            "Factual_Accuracy_Explanation": s_2_val,
            "Context_Relevance_Score": s_1_key_val,
            "Context_Relevance_Explanation": s_1_val,
            "Response_Completeness_Score": s_3_key_val,
            "Response_Completeness_Explanation": s_3_val,
            "Response_Relevance_Score": s_4_key_val,
            "Response_Relevance_Explanation": s_4_val,
            "Response_Fluency_Score": s_6_key_val,
            "Response_Fluency_Explanation": s_6_val,
            "Response_Tonality_Score": s_5_key_val,
            "Response_Tonality_Explanation": s_5_val,
            "Guideline_Adherence_Score": s_8_key_val,
            "Guideline_Adherence_Explanation": s_8_val,
            "Response_Match_Score": s_7_key_val
            # Add other evaluations similarly
        }
    
        return results

    The above method parsed the initial data from UpTrain before sending it to OpenAI for a better summary without changing any text returned by it.

    @app.route('/evaluate', methods=['POST'])
    def evaluate():
        data = request.json
    
        if not data:
            return {jsonify({'error': 'No data provided'}), 400}
    
        # Extracting input data for processing (just an example of logging received data)
        question = data.get('question', '')
        context = data.get('context', '')
        llmResponse = ''
        personaResponse = data.get('personaResponse', '')
        guideline = data.get('guideline', '')
        groundTruth = data.get('groundTruth', '')
        evaluationMethod = data.get('evaluationMethod', '')
    
        print('question:')
        print(question)
    
        llmResponse = askFeluda(context, question)
        print('='*200)
        print('Response from Feluda::')
        print(llmResponse)
        print('='*200)
    
        # Getting Context LLM
        cLLM = evalContextRelevance(question, context, llmResponse, personaResponse)
    
        print('&'*200)
        print('cLLM:')
        print(cLLM)
        print(type(cLLM))
        print('&'*200)
    
        results = extractPrintedData(cLLM)
    
        print('JSON::')
        print(results)
    
        resJson = jsonify(results)
    
        return resJson

    The above function is the main method, which first receives all the input parameters from the react app & then invokes one-by-one functions to get the LLM response, and LLM performance & finally summarizes them before sending it to react-app.

    For any other scripts, please refer to the above-mentioned GitHub link.


    Let us see some of the screenshots of the test run –


    So, we’ve done it.

    I’ll bring some more exciting topics in the coming days from the Python verse.

    Till then, Happy Avenging! 🙂

    Enabling & Exploring Stable Defussion – Part 1

    This new solution will evaluate the power of Stable Defussion, which is created solutions as we progress & refine our prompt from scratch by using Stable Defussion & Python. This post opens new opportunities for IT companies & business start-ups looking to deliver solutions & have better performance compared to the paid version of Stable Defussion AI’s API performance. This project is for the advanced Python, Stable Defussion for data Science Newbies & AI evangelists.

    In a series of posts, I’ll explain and focus on the Stable Defussion API and custom solution using the Python-based SDK of Stable Defussion.

    But, before that, let us view the video that it generates from the prompt by using the third-party API:

    Prompt to Video

    And, let us understand the prompt that we supplied to create the above video –

    Isn’t it exciting?

    However, I want to stress this point: the video generated by the Stable Defusion (Stability AI) API was able to partially apply the animation effect. Even though the animation applies to the cloud, It doesn’t apply the animation to the wave. But, I must admit, the quality of the video is quite good.


    Let us understand the code and how we run the solution, and then we can try to understand its performance along with the other solutions later in the subsequent series.

    As you know, we’re exploring the code base of the third-party API, which will actually execute a series of API calls that create a video out of the prompt.

    Let us understand some of the important snippet –

    class clsStabilityAIAPI:
        def __init__(self, STABLE_DIFF_API_KEY, OUT_DIR_PATH, FILE_NM, VID_FILE_NM):
            self.STABLE_DIFF_API_KEY = STABLE_DIFF_API_KEY
            self.OUT_DIR_PATH = OUT_DIR_PATH
            self.FILE_NM = FILE_NM
            self.VID_FILE_NM = VID_FILE_NM
    
        def delFile(self, fileName):
            try:
                # Deleting the intermediate image
                os.remove(fileName)
    
                return 0 
            except Exception as e:
                x = str(e)
                print('Error: ', x)
    
                return 1
    
        def generateText2Image(self, inputDescription):
            try:
                STABLE_DIFF_API_KEY = self.STABLE_DIFF_API_KEY
                fullFileName = self.OUT_DIR_PATH + self.FILE_NM
                
                if STABLE_DIFF_API_KEY is None:
                    raise Exception("Missing Stability API key.")
                
                response = requests.post(f"{api_host}/v1/generation/{engine_id}/text-to-image",
                                        headers={
                                            "Content-Type": "application/json",
                                            "Accept": "application/json",
                                            "Authorization": f"Bearer {STABLE_DIFF_API_KEY}"
                                            },
                                            json={
                                                "text_prompts": [{"text": inputDescription}],
                                                "cfg_scale": 7,
                                                "height": 1024,
                                                "width": 576,
                                                "samples": 1,
                                                "steps": 30,
                                                },)
                
                if response.status_code != 200:
                    raise Exception("Non-200 response: " + str(response.text))
                
                data = response.json()
    
                for i, image in enumerate(data["artifacts"]):
                    with open(fullFileName, "wb") as f:
                        f.write(base64.b64decode(image["base64"]))      
                
                return fullFileName
    
            except Exception as e:
                x = str(e)
                print('Error: ', x)
    
                return 'N/A'
    
        def image2VideoPassOne(self, imgNameWithPath):
            try:
                STABLE_DIFF_API_KEY = self.STABLE_DIFF_API_KEY
    
                response = requests.post(f"https://api.stability.ai/v2beta/image-to-video",
                                        headers={"authorization": f"Bearer {STABLE_DIFF_API_KEY}"},
                                        files={"image": open(imgNameWithPath, "rb")},
                                        data={"seed": 0,"cfg_scale": 1.8,"motion_bucket_id": 127},
                                        )
                
                print('First Pass Response:')
                print(str(response.text))
                
                genID = response.json().get('id')
    
                return genID 
            except Exception as e:
                x = str(e)
                print('Error: ', x)
    
                return 'N/A'
    
        def image2VideoPassTwo(self, genId):
            try:
                generation_id = genId
                STABLE_DIFF_API_KEY = self.STABLE_DIFF_API_KEY
                fullVideoFileName = self.OUT_DIR_PATH + self.VID_FILE_NM
    
                response = requests.request("GET", f"https://api.stability.ai/v2beta/image-to-video/result/{generation_id}",
                                            headers={
                                                'accept': "video/*",  # Use 'application/json' to receive base64 encoded JSON
                                                'authorization': f"Bearer {STABLE_DIFF_API_KEY}"
                                                },) 
                
                print('Retrieve Status Code: ', str(response.status_code))
                
                if response.status_code == 202:
                    print("Generation in-progress, try again in 10 seconds.")
    
                    return 5
                elif response.status_code == 200:
                    print("Generation complete!")
                    with open(fullVideoFileName, 'wb') as file:
                        file.write(response.content)
    
                    print("Successfully Retrieved the video file!")
    
                    return 0
                else:
                    raise Exception(str(response.json()))
                
            except Exception as e:
                x = str(e)
                print('Error: ', x)
    
                return 1

    Now, let us understand the code –

    This function is called when an object of the class is created. It initializes four properties:

    • STABLE_DIFF_API_KEY: the API key for Stability AI services.
    • OUT_DIR_PATH: the folder path to save files.
    • FILE_NM: the name of the generated image file.
    • VID_FILE_NM: the name of the generated video file.

    This function deletes a file specified by fileName.

    • If successful, it returns 0.
    • If an error occurs, it logs the error and returns 1.

    This function generates an image based on a text description:

    • Sends a request to the Stability AI text-to-image endpoint using the API key.
    • Saves the resulting image to a file.
    • Returns the file’s path on success or 'N/A' if an error occurs.

    This function uploads an image to create a video in its first phase:

    • Sends the image to Stability AI’s image-to-video endpoint.
    • Logs the response and extracts the id (generation ID) for the next phase.
    • Returns the id if successful or 'N/A' on failure.

    This function retrieves the video created in the second phase using the genId:

    • Checks the video generation status from the Stability AI endpoint.
    • If complete, saves the video file and returns 0.
    • If still processing, returns 5.
    • Logs and returns 1 for any errors.

    As you can see, the code is pretty simple to understand & we’ve taken all the necessary actions in case of any unforeseen network issues or even if the video is not ready after our job submission in the following lines of the main calling script (generateText2VideoAPI.py) –

    waitTime = 10
    time.sleep(waitTime)
    
    # Failed case retry
    retries = 1
    success = False
    
    try:
        while not success:
            try:
                z = r1.image2VideoPassTwo(gID)
            except Exception as e:
                success = False
    
            if z == 0:
                success = True
            else:
                wait = retries * 2 * 15
                str_R1 = "retries Fail! Waiting " + str(wait) + " seconds and retrying!"
    
                print(str_R1)
    
                time.sleep(wait)
                retries += 1
    
            # Checking maximum retries
            if retries >= maxRetryNo:
                success = True
                raise  Exception
    except:
        print()

    And, let us see how the run looks like –

    Let us understand the CPU utilization –

    As you can see, CPU utilization is minimal since most tasks are at the API end.


    So, we’ve done it. 🙂

    Please find the next series on this topic below:

    Enabling & Exploring Stable Defussion – Part 2

    Enabling & Exploring Stable Defussion – Part 3

    Please let me know your feedback after reviewing all the posts! 🙂