
Small Does Not Have to Mean Simple
A common misunderstanding is that smaller software must be less capable. The source materials present the opposite argument. NullClaw is described as small not because it removes architectural discipline, but because it reduces avoidable overhead.
The framework is presented as a 678 KB binary with approximately 1 MB peak memory, yet it still supports modular providers, communication channels, memory backends, tunnels, observability, and direct hardware peripherals. The key architectural idea is not minimalism as limitation. It is minimalism as control.

Security Through Minimalism
The main reasons the Claw-family ecosystem dependency-heavy model is described as having a large attack surface, including more than 500,000 lines of code and a plugin marketplace associated with the source, with a 10.8% malware rate. The document also references CVE-2026-25253, described as a dynamic token leak that exposed more than 40,000 active instances.
NullClaw’s security model is framed as layered and local-first:
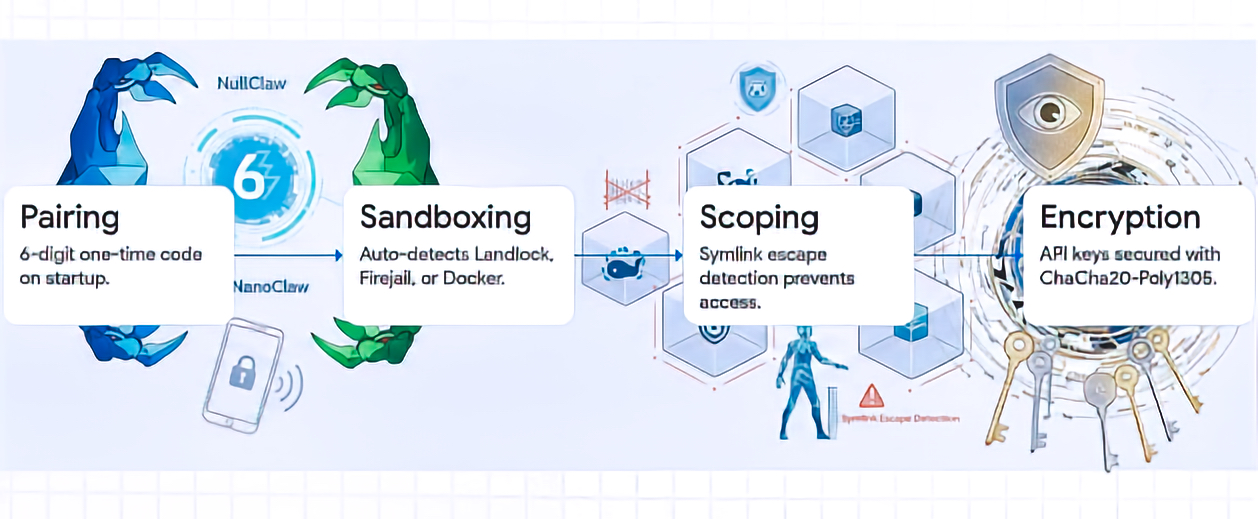
- PIN-pairing authentication for initial bearer token exchange:
- NullClaw uses a 6-digit one-time pairing code, exchanged through
POST /pair, to obtain a bearer token. The docs call it a “pairing code,” not necessarily a persistent PIN. Pairing codes are single-use and expire after a configurable period; bearer tokens persist until revoked.
- NullClaw uses a 6-digit one-time pairing code, exchanged through
- ChaCha20-Poly1305 encryption for API keys and sensitive credentials:
- NullClaw documents API-key encryption at rest using ChaCha20-Poly1305 AEAD, with encrypted fields using an
enc2:prefix. It also notes that decrypted values are used at runtime and are not written back in plaintext.
- NullClaw documents API-key encryption at rest using ChaCha20-Poly1305 AEAD, with encrypted fields using an
- Memory zeroing for specific private-key material:
- This is documented specifically for Nostr private keys: they are encrypted at rest, decrypted only while the channel runs, and zeroed on channel stop. I would avoid implying that every secret or every private key in every subsystem is zeroed unless you verify that in code or docs.
- Kernel-level sandboxing through Landlock, Firejail, Bubblewrap, or Docker:
- NullClaw supports Landlock, Firejail, Bubblewrap, and Docker. However, only Landlock is specifically kernel-level LSM. Firejail uses seccomp and namespaces, Bubblewrap uses user namespaces, and Docker uses container isolation. Better wording: “OS-level or container-based sandboxing through Landlock, Firejail, Bubblewrap, or Docker.”
- Filesystem scoping through
workspace_onlyand path-resolution checks:- The docs state that file operations are restricted to
~/.nullclaw/workspace/by default withworkspace_only = true, and path validation includes null-byte blocking, absolute path resolution, workspace-boundary checks, additional allowed paths, and symlink escape detection through realpath resolution.
- The docs state that file operations are restricted to
- Marketplace-free deployment to reduce centralized plugin supply-chain exposure:
- This is a reasonable architectural interpretation, but I would not present it as an officially documented NullClaw security control. The docs support adjacent ideas—static binary, no runtime/framework overhead, pluggable systems, no lock-in, and configurable providers/tools—but I did not find official wording that frames “marketplace-free deployment” as a security layer or supply-chain mitigation.
The principle is straightforward: fewer moving parts can mean fewer places for vulnerabilities to hide. For technical readers, the security value comes from auditability, scoped execution, deterministic behavior, local secret protection, and a reduced dependency chain.
Swappable Everything Without Recompiling
The NullClaw’s vtable interface architecture is a way to preserve modularity without returning to heavy runtime dependencies. In practice, this means subsystems can be swapped through configuration rather than by changing the core code.
| Subsystem | Source-Based Examples |
| AI providers | OpenRouter, Anthropic, Ollama, DeepSeek, Groq, Venice |
| Communication channels | Telegram, Discord, Nostr, Signal, WhatsApp |
| Unified memory | SQLite Hybrid, Markdown, Redis, PostgreSQL, ClickHouse |
| Tunnels | Cloudflare, Tailscale, ngrok, custom tunnels |
| Observability | Prometheus, OpenTelemetry, multi-logging |
| Hardware peripherals | Arduino, Raspberry Pi GPIO, STM32/Nucleo |
This means an organization can change the “brain,” messaging channel, memory layer, or deployment route without rebuilding the whole system.
The design reflects interface-based modularity: concrete implementations depend inward on stable boundaries. The source emphasizes that this keeps the agent provider-agnostic and reduces vendor lock-in. It also notes an important constraint: strict manual memory management creates risk when ownership rules are violated.
RAG Without a Heavy External Database
Retrieval-Augmented Generation, or RAG, is often associated with external vector databases and heavier cloud infrastructure; however, RAG does not require that architecture. NullClaw uses a SQLite-backed local memory layer that combines semantic and lexical retrieval, allowing the agent to retrieve information by both meaning and exact wording.
NullClaw’s hybrid memory strategy uses two retrieval signals:
- Vector subsystem: Stores embeddings as BLOBs in SQLite and uses cosine similarity to capture semantic intent.
- Keyword subsystem: Uses SQLite FTS5 virtual tables with BM25 scoring to preserve exact identifiers, names, IDs, commands, and domain-specific terminology.
Conceptually, the default weighted merge can be expressed as:
S_hybrid = (0.7 × S_vector_normalized) + (0.3 × S_keyword_normalized)
This should be understood as a weighted blend of normalized retrieval scores, because vector similarity and BM25 scores are not naturally on the same scale. In particular, SQLite FTS5’s BM25 ranking gives better matches numerically lower scores, so keyword scores need to be transformed or normalized before being combined with cosine similarity.
The value of this hybrid approach is that the agent can retrieve both the meaning and the exact wording of prior information. For example, it can understand the intent of a question while still recognizing a specific product name, ticket number, file path, command, or technical identifier.
When NullClaw uses its default SQLite memory backend, the memory engine can run locally with the agent. This reduces dependency on a separate vector database service and can lower network overhead and infrastructure complexity, especially in local-first or edge-oriented deployments.
From Chatbots to Robotic Companions
The Claw-family evolution can be framed as a movement from screen-based chatbot interaction toward agents that operate closer to the “point of action.” ROSClaw extends this direction by integrating the OpenClaw agent runtime with ROS 2, enabling foundation models to interact with ROS-enabled robots through a structured executive layer. NullClaw extends the edge-computing side of this evolution by providing lightweight agent infrastructure with peripheral interfaces for Serial, Arduino, Raspberry Pi GPIO, and STM32/Nucleo platforms.
This matters because an autonomous agent running on low-cost edge hardware is no longer limited to a conversational interface. It can become part of a local physical workflow: reading sensor inputs, interacting with device interfaces, managing hardware-adjacent tasks, and supporting robotics or IoT scenarios where reasoning, action, safety controls, and local execution need to operate close to the device.
Matching Architecture to Need for Deployment
This can be translated into a practical decision model:
| Decision Question | Source-Grounded Direction |
| Do you require massive pre-built ecosystems and visual GUIs? | Consider OpenClaw, while accepting hardware bloat and securing through containers. |
| Are you operating in a regulated industry requiring strict audit logs? | Consider NanoClaw or Motis, prioritizing compliance and observability. |
| Are you deploying on edge devices or requiring 24/7 low-power background operations? | Consider ZeroClaw or NullClaw, prioritizing resource efficiency and compiled binaries. |
Zig 0.16.0 is described as mandatory for NullClaw builds. The $5 ARM/RISC-V tier is positioned as a baseline for cloud-routed workflows where heavy inference is offloaded. For local LLM throughput, the source references workstation-class options such as Apple M4 Max and RTX 4090 Mobile configurations.
Strategic Trade-Offs
The recommendation is favorable to NullClaw for security-sensitive local deployments and edge-based automation, but it should not be presented as a universal replacement for all agent platforms.
The stated advantages include:
- Extreme resource efficiency, including a small static binary and low memory footprint.
- Sub-2 millisecond startup on Apple Silicon, according to the project’s benchmark claims.
- Hardened local-security controls, including pairing, sandboxing, allowlists, workspace scoping, and encrypted secrets.
- Low-cost edge deployment potential.
- Static binary portability across ARM, x86, and RISC-V.
- A pluggable architecture across providers, channels, tools, memory, tunnels, peripherals, observers, and runtimes.
The stated limitations include:
- Core CLI/config-first management, with graphical setup and orchestration support handled separately through the beta NullHub layer.
- Not primarily positioned as a mature, visual, enterprise-grade swarm-orchestration platform out of the box, even though it supports subagents, named agent profiles, routing, and A2A interoperability.
- An evolving ecosystem compared with larger, more mature agent frameworks.
- Documentation is available, but advanced customization may still require comfort with the codebase, configuration model, and Zig-based implementation.
- Zig 0.16.0 is required for building from source or contributing, although users who install a ready-to-run binary may not need Zig expertise.
This makes NullClaw strongest where the constraints are clear: small footprint, low power, security sensitivity, local control, portability, and edge deployment. It may be less suitable where teams need a polished visual administration layer, large pre-built marketplace ecosystems, mature enterprise governance tooling, or visual multi-agent orchestration available out of the box.
Takeaway:
In this post, we’ve observed NullClaw positioning itself in a solid footprint within the field of efficiency-first AI architecture. Its value is not simply that it is small. Its value is that its smallness enables different operating assumptions: fast event-driven startup, lower hardware barriers, smaller security surfaces, local memory, and deployment closer to physical systems.
The broader lesson is that autonomous AI infrastructure is maturing. The future described is not one monolithic agent framework. It is a specialized ecosystem where architecture follows context: OpenClaw for breadth, NanoClaw and Motis for regulated observability, ZeroClaw for compiled edge performance, and NullClaw for the smallest viable autonomous footprint.
So, we’ve done it. 🙂
I hope you all like this effort & let me know your feedback. I’ll be back with another topic. Until then, Happy Avenging!
Note: All the data & scenarios posted here are representative of data & scenarios available on the internet for educational purposes only. There is always room for improvement in this kind of model & the solution associated with it. This article is for educational purposes only. The techniques described should only be used for authorized security testing and research. Unauthorized access to computer systems is illegal and unethical & not encouraged.


You must be logged in to post a comment.