This site mainly deals with various use cases demonstrated using Python, Data Science, Cloud basics, SQL Server, Oracle, Teradata along with SQL & their implementation. Expecting yours active participation & time. This blog can be access from your TP, Tablet & mobile also. Please provide your feedback.
This is a continuation of my previous post, which can be found here.
Let us recap the key takaways from our previous post –
Agentic AI refers to autonomous systems that pursue goals with minimal supervision by planning, reasoning about next steps, utilizing tools, and maintaining context across sessions. Core capabilities include goal-directed autonomy, interaction with tools and environments (e.g., APIs, databases, devices), multi-step planning and reasoning under uncertainty, persistence, and choiceful decision-making.
Architecturally, three modules coordinate intelligent behavior: Sensing (perception pipelines that acquire multimodal data, extract salient patterns, and recognize entities/events); Observation/Deliberation (objective setting, strategy formation, and option evaluation relative to resources and constraints); and Action (execution via software interfaces, communications, or physical actuation to deliver outcomes). These functions are enabled by machine learning, deep learning, computer vision, natural language processing, planning/decision-making, uncertainty reasoning, and simulation/modeling.
At enterprise scale, open standards align autonomy with governance: the Model Context Protocol (MCP) grants an agent secure, principled access to enterprise tools and data (vertical integration), while Agent-to-Agent (A2A) enables specialized agents to coordinate, delegate, and exchange information (horizontal collaboration). Together, MCP and A2A help organizations transition from isolated pilots to scalable programs, delivering end-to-end automation, faster integration, enhanced security and auditability, vendor-neutral interoperability, and adaptive problem-solving that responds to real-time context.
Great! Let’s dive into this topic now.
Enterprise AI with MCP refers to the application of the Model Context Protocol (MCP), an open standard, to enable AI systems to securely and consistently access external enterprise data and applications.
The problem MCP solves in enterprise AI:
Before MCP, enterprise AI integration was characterized by a “many-to-many” or “N x M” problem. Companies had to build custom, fragile, and costly integrations between each AI model and every proprietary data source, which was not scalable. These limitations left AI agents with limited, outdated, or siloed information, restricting their potential impact. MCP addresses this by offering a standardized architecture for AI and data systems to communicate with each other.
How does MCP work?
The MCP framework uses a client-server architecture to enable communication between AI models and external tools and data sources.
MCP Host: The AI-powered application or environment, such as an AI-enhanced IDE or a generative AI chatbot like Anthropic’s Claude or OpenAI’s ChatGPT, where the user interacts.
MCP Client: A component within the host application that manages the connection to MCP servers.
MCP Server: A lightweight service that wraps around an external system (e.g., a CRM, database, or API) and exposes its capabilities to the AI client in a standardized format, typically using JSON-RPC 2.0.
An MCP server provides AI clients with three key resources:
Resources: Structured or unstructured data that an AI can access, such as files, documents, or database records.
Tools: The functionality to perform specific actions within an external system, like running a database query or sending an email.
Prompts: Pre-defined text templates or workflows to help guide the AI’s actions.
Benefits of MCP for enterprise AI:
Standardized integration: Developers can build integrations against a single, open standard, which dramatically reduces the complexity and time required to deploy and scale AI initiatives.
Enhanced security and governance: MCP incorporates native support for security and compliance measures. It provides permission models, access control, and auditing capabilities to ensure AI systems only access data and tools within specified boundaries.
Real-time contextual awareness: By connecting AI agents to live enterprise data sources, MCP ensures they have access to the most current and relevant information, which reduces hallucinations and improves the accuracy of AI outputs.
Greater interoperability: MCP is model-agnostic & can be used with a variety of AI models (e.g., Anthropic’s Claude or OpenAI’s models) and across different cloud environments. This approach helps enterprises avoid vendor lock-in.
Accelerated development: The “build once, integrate everywhere” approach enables internal teams to focus on innovation instead of writing custom connectors for every system.
Flow of activities:
Let us understand one sample case & the flow of activities.
A customer support agent uses an AI assistant to get information about a customer’s recent orders. The AI assistant utilizes an MCP-compliant client to communicate with an MCP server, which is connected to the company’s PostgreSQL database.
The interaction flow:
1. User request: The support agent asks the AI assistant, “What was the most recent order placed by Priyanka Chopra Jonas?”
2. AI model processes intent: The AI assistant, running on an MCP host, analyzes the natural language query. It recognizes that to answer this question, it needs to perform a database query. It then identifies the appropriate tool from the MCP server’s capabilities.
3. Client initiates tool call: The AI assistant’s MCP client sends a JSON-RPC request to the MCP server connected to the PostgreSQL database. The request specifies the tool to be used, such as get_customer_orders, and includes the necessary parameters:
5. Database returns data: The PostgreSQL database executes the query and returns the requested data to the MCP server.
6. Server formats the response: The MCP server receives the raw database output and formats it into a standardized JSON response that the MCP client can understand.
7. Client returns data to the model: The MCP client receives the JSON response and passes it back to the AI assistant’s language model.
8. AI model generates final response: The language model incorporates this real-time data into its response and presents it to the user in a natural, conversational format.
“Priyanka Chopra Jonas’s most recent order was placed on August 25, 2025, with an order ID of 98765, for a total of $11025.50.”
What are the performance implications of using MCP for database access?
Using the Model Context Protocol (MCP) for database access introduces a layer of abstraction that affects performance in several ways. While it adds some latency and processing overhead, strategic implementation can mitigate these effects. For AI applications, the benefits often outweigh the costs, particularly in terms of improved accuracy, security, and scalability.
Sources of performance implications::
Added latency and processing overhead:
The MCP architecture introduces extra communication steps between the AI agent and the database, each adding a small amount of latency.
RPC overhead: The JSON-RPC call from the AI’s client to the MCP server adds a small processing and network delay. This is an out-of-process request, as opposed to a simple local function call.
JSON serialization: Request and response data must be serialized and deserialized into JSON format, which requires processing time.
Network transit: For remote MCP servers, the data must travel over the network, adding latency. However, for a local or on-premise setup, this is minimal. The physical location of the MCP server relative to the AI model and the database is a significant factor.
Scalability and resource consumption:
The performance impact scales with the complexity and volume of the AI agent’s interactions.
High request volume: A single AI agent working on a complex task might issue dozens of parallel database queries. In high-traffic scenarios, managing numerous simultaneous connections can strain system resources and require robust infrastructure.
Excessive data retrieval: A significant performance risk is an AI agent retrieving a massive dataset in a single query. This process can consume a large number of tokens, fill the AI’s context window, and cause bottlenecks at the database and client levels.
Context window usage: Tool definitions and the results of tool calls consume space in the AI’s context window. If a large number of tools are in use, this can limit the AI’s “working memory,” resulting in slower and less effective reasoning.
Optimizations for high performance::
Caching:
Caching is a crucial strategy for mitigating the performance overhead of MCP.
In-memory caching: The MCP server can cache results from frequent or expensive database queries in memory (e.g., using Redis or Memcached). This approach enables repeat requests to be served almost instantly without requiring a database hit.
Semantic caching: Advanced techniques can cache the results of previous queries and serve them for semantically similar future requests, reducing token consumption and improving speed for conversational applications.
Efficient queries and resource management:
Designing the MCP server and its database interactions for efficiency is critical.
Optimized SQL: The MCP server should generate optimized SQL queries. Database indexes should be utilized effectively to expedite lookups and minimize load.
Pagination and filtering: To prevent a single query from overwhelming the system, the MCP server should implement pagination. The AI agent can be prompted to use filtering parameters to retrieve only the necessary data.
Connection pooling: This technique reuses existing database connections instead of opening a new one for each request, thereby reducing latency and database load.
Load balancing and scaling:
For large-scale enterprise deployments, scaling is essential for maintaining performance.
Multiple servers: The workload can be distributed across various MCP servers. One server could handle read requests, and another could handle writes.
Load balancing: A reverse proxy or other load-balancing solution can distribute incoming traffic across MCP server instances. Autoscaling can dynamically add or remove servers in response to demand.
The performance trade-off in perspective:
For AI-driven tasks, a slight increase in latency for database access is often a worthwhile trade-off for significant gains.
Improved accuracy: Accessing real-time, high-quality data through MCP leads to more accurate and relevant AI responses, reducing “hallucinations”.
Scalable ecosystem: The standardization of MCP reduces development overhead and allows for a more modular, scalable ecosystem, which saves significant engineering resources compared to building custom integrations.
Decoupled architecture: The MCP server decouples the AI model from the database, allowing each to be optimized and scaled independently.
We’ll go ahead and conclude this post here & continue discussing on a further deep dive in the next post.
Till then, Happy Avenging! 🙂
Note: All the data & scenarios posted here are representational data & scenarios & available over the internet & for educational purposes only. There is always room for improvement in this kind of model & the solution associated with it. I’ve shown the basic ways to achieve the same for educational purposes only.
Today, we won’t be discussing any solutions. Today, we’ll be discussing the Agentic AI & its implementation in the Enterprise landscape in a series of upcoming posts.
So, hang tight! We’re about to launch a new venture as part of our knowledge drive.
What is Agentic AI?
Agentic AI refers to artificial intelligence systems that can act autonomously to achieve goals, making decisions and taking actions without constant human oversight. Unlike traditional AI, which responds to prompts, agentic AI can plan, reason about next steps, utilize tools, and work toward objectives over extended periods of time.
Key characteristics of agentic AI include:
Autonomy and Goal-Directed Behavior: These systems can pursue objectives independently, breaking down complex tasks into smaller steps and executing them sequentially.
Tool Use and Environment Interaction: Agentic AI can interact with external systems, APIs, databases, and software tools to gather information and perform actions in the real world.
Planning and Reasoning: They can develop multi-step strategies, adapt their approach based on feedback, and reason through problems to find solutions.
Persistence: Unlike single-interaction AI, agentic systems can maintain context and continue working on tasks across multiple interactions or sessions.
Decision Making: They can evaluate options, weigh trade-offs, and make choices about how to proceed when faced with uncertainty.
Foundational Elements of Agentic AI Architectures:
Agentic AI systems have several interconnected components that work together to enable intelligent behaviour. Each element plays a crucial role in the overall functioning of the AI system, and they must interact seamlessly to achieve desired outcomes. Let’s explore each of these components in more detail.
Sensing:
The sensing module serves as the AI’s eyes and ears, enabling it to understand its surroundings and make informed decisions. Think of it as the system that helps the AI “see” and “hear” the world around it, much like how humans use their senses.
Gathering Information: The system collects data from multiple sources, including cameras for visual information, microphones for audio, sensors for physical touch, and digital systems for data. This step provides the AI with a comprehensive understanding of what’s happening.
Making Sense of Data: Raw information from sensors can be messy and overwhelming. This component processes the data to identify the essential patterns and details that actually matter for making informed decisions.
Recognizing What’s Important: Utilizing advanced techniques such as computer vision (for images), natural language processing (for text and speech), and machine learning (for data patterns), the system identifies and understands objects, people, events, and situations within the environment.
This sensing capability enables AI systems to transition from merely following pre-programmed instructions to genuinely understanding their environment and making informed decisions based on real-world conditions. It’s the difference between a basic automated system and an intelligent agent that can adapt to changing situations.
Observation:
The observation module serves as the AI’s decision-making center, where it sets objectives, develops strategies, and selects the most effective actions to take. This step is where the AI transforms what it perceives into purposeful action, much like humans think through problems and devise plans.
Setting Clear Objectives: The system establishes specific goals and desired outcomes, giving the AI a clear sense of direction and purpose. This approach helps ensure all actions are working toward meaningful results rather than random activity.
Strategic Planning: Using information about its own capabilities and the current situation, the AI creates step-by-step plans to reach its goals. It considers potential obstacles, available resources, and different approaches to find the most effective path forward.
Intelligent Decision-Making: When faced with multiple options, the system evaluates each choice against the current circumstances, established goals, and potential outcomes. It then selects the action most likely to move the AI closer to achieving its objectives.
This observation capability is what transforms an AI from a simple tool that follows commands into an intelligent system that can work independently toward business goals. It enables the AI to handle complex, multi-step tasks and adapt its approach when conditions change, making it valuable for a wide range of applications, from customer service to project management.
Action:
The action module serves as the AI’s hands and voice, turning decisions into real-world results. This step is where the AI actually puts its thinking and planning into action, carrying out tasks that make a tangible difference in the environment.
Control Systems: The system utilizes various tools to interact with the world, including motors for physical movement, speakers for communication, network connections for digital tasks, and software interfaces for system operation. These serve as the AI’s means of reaching out and making adjustments.
Task Implementation: Once the cognitive module determines the action to take, this component executes the actual task. Whether it’s sending an email, moving a robotic arm, updating a database, or scheduling a meeting, this module handles the execution from start to finish.
This action capability is what makes AI systems truly useful in business environments. Without it, an AI could analyze data and make significant decisions, but it couldn’t help solve problems or complete tasks. The action module bridges the gap between artificial intelligence and real-world impact, enabling AI to automate processes, respond to customers, manage systems, and deliver measurable business value.
Technology that is primarily involved in the Agentic AI is as follows –
1. Machine Learning
2. Deep Learning
3. Computer Vision
4. Natural Language Processing (NLP)
5. Planning and Decision-Making
6. Uncertainty and Reasoning
7. Simulation and Modeling
Agentic AI at Scale: MCP + A2A:
In an enterprise setting, agentic AI systems utilize the Model Context Protocol (MCP) and the Agent-to-Agent (A2A) protocol as complementary, open standards to achieve autonomous, coordinated, and secure workflows. An MCP-enabled agent gains the ability to access and manipulate enterprise tools and data. At the same time, A2A allows a network of these agents to collaborate on complex tasks by delegating and exchanging information.
This combined approach allows enterprises to move from isolated AI experiments to strategic, scalable, and secure AI programs.
How do the protocols work together in an enterprise?
Protocol
Function in Agentic AI
Focus
Example use case
Model Context Protocol (MCP)
Equips a single AI agent with the tools and data it needs to perform a specific job.
Vertical integration: connecting agents to enterprise systems like databases, CRMs, and APIs.
A sales agent uses MCP to query the company CRM for a client’s recent purchase history.
Agent-to-Agent (A2A)
Enables multiple specialized agents to communicate, delegate tasks, and collaborate on a larger, multi-step goal.
Horizontal collaboration: allowing agents from different domains to work together seamlessly.
An orchestrating agent uses A2A to delegate parts of a complex workflow to specialized HR, IT, and sales agents.
Advantages for the enterprise:
End-to-end automation: Agents can handle tasks from start to finish, including complex, multi-step workflows, autonomously.
Greater agility and speed: Enterprise-wide adoption of these protocols reduces the cost and complexity of integrating AI, accelerating deployment timelines for new applications.
Enhanced security and governance: Enterprise AI platforms built on these open standards incorporate robust security policies, centralized access controls, and comprehensive audit trails.
Vendor neutrality and interoperability: As open standards, MCP and A2A allow AI agents to work together seamlessly, regardless of the underlying vendor or platform.
Adaptive problem-solving: Agents can dynamically adjust their strategies and collaborate based on real-time data and contextual changes, leading to more resilient and efficient systems.
We will discuss this topic further in our upcoming posts.
Till then, Happy Avenging! 🙂
Note: All the data & scenarios posted here are representational data & scenarios & available over the internet & for educational purposes only. There is always room for improvement in this kind of model & the solution associated with it. I’ve shown the basic ways to achieve the same for educational purposes only.
As a continuation of the previous post, I would like to continue my discussion about the implementation of MCP protocols among agents. But before that, I want to add the quick demo one more time to recap our objectives.
Let us recap the process flow –
Also, understand the groupings of scripts by each group as posted in the previous post –
Great! Now, we’ll continue with the main discussion.
CODE:
clsYouTubeVideoProcessor.py (This class processes the transcripts from YouTube. It may also translate them into English for non-native speakers.)
defextract_youtube_id(youtube_url):"""Extract YouTube video ID from URL""" youtube_id_match = re.search(r'(?:v=|\/)([0-9A-Za-z_-]{11}).*', youtube_url)if youtube_id_match:return youtube_id_match.group(1)returnNonedefget_youtube_transcript(youtube_url):"""Get transcript from YouTube video""" video_id =extract_youtube_id(youtube_url)ifnot video_id:return{"error":"Invalid YouTube URL or ID"}try: transcript_list = YouTubeTranscriptApi.list_transcripts(video_id)# First try to get manual transcriptstry: transcript = transcript_list.find_manually_created_transcript(["en"]) transcript_data = transcript.fetch()print(f"Debug - Manual transcript format: {type(transcript_data)}")if transcript_data andlen(transcript_data)>0:print(f"Debug - First item type: {type(transcript_data[0])}")print(f"Debug - First item sample: {transcript_data[0]}")return{"text": transcript_data,"language":"en","auto_generated":False}exceptExceptionas e:print(f"Debug - No manual transcript: {str(e)}")# If no manual English transcript, try any available transcripttry: available_transcripts =list(transcript_list)if available_transcripts: transcript = available_transcripts[0]print(f"Debug - Using transcript in language: {transcript.language_code}") transcript_data = transcript.fetch()print(f"Debug - Auto transcript format: {type(transcript_data)}")if transcript_data andlen(transcript_data)>0:print(f"Debug - First item type: {type(transcript_data[0])}")print(f"Debug - First item sample: {transcript_data[0]}")return{"text": transcript_data,"language": transcript.language_code,"auto_generated": transcript.is_generated}else:return{"error":"No transcripts available for this video"}exceptExceptionas e:return{"error":f"Error getting transcript: {str(e)}"}exceptExceptionas e:return{"error":f"Error getting transcript list: {str(e)}"}# ----------------------------------------------------------------------------------# YouTube Video Processor# ----------------------------------------------------------------------------------classclsYouTubeVideoProcessor:"""Process YouTube videos using the agent system"""def__init__(self,documentation_agent,translation_agent,research_agent):self.documentation_agent = documentation_agentself.translation_agent = translation_agentself.research_agent = research_agentdefprocess_youtube_video(self,youtube_url):"""Process a YouTube video"""print(f"Processing YouTube video: {youtube_url}")# Extract transcript transcript_result =get_youtube_transcript(youtube_url)if"error"in transcript_result:return{"error": transcript_result["error"]}# Start a new conversation conversation_id =self.documentation_agent.start_processing()# Process transcript segments transcript_data = transcript_result["text"] transcript_language = transcript_result["language"]print(f"Debug - Type of transcript_data: {type(transcript_data)}")# For each segment, detect language and translate if needed processed_segments =[]try:# Make sure transcript_data is a list of dictionaries with text and start fieldsifisinstance(transcript_data,list):for idx, segment inenumerate(transcript_data):print(f"Debug - Processing segment {idx}, type: {type(segment)}")# Extract text properly based on the typeifisinstance(segment,dict)and"text"in segment: text = segment["text"] start = segment.get("start",0)else:# Try to access attributes for non-dict typestry: text = segment.text start =getattr(segment,"start",0)exceptAttributeError:# If all else fails, convert to string text =str(segment) start = idx *5# Arbitrary timestampprint(f"Debug - Extracted text: {text[:30]}...")# Create a standardized segment std_segment ={"text": text,"start": start}# Process through translation agent translation_result =self.translation_agent.process_text(text, conversation_id)# Update segment with translation information segment_with_translation ={**std_segment,"translation_info": translation_result}# Use translated text for documentationif"final_text"in translation_result and translation_result["final_text"]!= text: std_segment["processed_text"]= translation_result["final_text"]else: std_segment["processed_text"]= text processed_segments.append(segment_with_translation)else:# If transcript_data is not a list, treat it as a single text blockprint(f"Debug - Transcript is not a list, treating as single text") text =str(transcript_data) std_segment ={"text": text,"start":0} translation_result =self.translation_agent.process_text(text, conversation_id) segment_with_translation ={**std_segment,"translation_info": translation_result}if"final_text"in translation_result and translation_result["final_text"]!= text: std_segment["processed_text"]= translation_result["final_text"]else: std_segment["processed_text"]= text processed_segments.append(segment_with_translation)exceptExceptionas e:print(f"Debug - Error processing transcript: {str(e)}")return{"error":f"Error processing transcript: {str(e)}"}# Process the transcript with the documentation agent documentation_result =self.documentation_agent.process_transcript( processed_segments, conversation_id)return{"youtube_url": youtube_url,"transcript_language": transcript_language,"processed_segments": processed_segments,"documentation": documentation_result,"conversation_id": conversation_id}
Let us understand this step-by-step:
Part 1: Getting the YouTube Transcript
defextract_youtube_id(youtube_url): ...
This extracts the unique video ID from any YouTube link.
defget_youtube_transcript(youtube_url): ...
This gets the actual spoken content of the video.
It tries to get a manual transcript first (created by humans).
If not available, it falls back to an auto-generated version (created by YouTube’s AI).
If nothing is found, it gives back an error message like: “Transcript not available.”
Part 2: Processing the Video with Agents
classclsYouTubeVideoProcessor: ...
This is like the control center that tells each intelligent agent what to do with the transcript. Here are the detailed steps:
1. Start the Process
defprocess_youtube_video(self,youtube_url): ...
The system starts with a YouTube video link.
It prints a message like: “Processing YouTube video: [link]”
2. Extract the Transcript
The system runs the get_youtube_transcript() function.
If it fails, it returns an error (e.g., invalid link or no subtitles available).
3. Start a “Conversation”
The documentation agent begins a new session, tracked by a unique conversation ID.
Think of this like opening a new folder in a shared team workspace to store everything related to this video.
4. Go Through Each Segment of the Transcript
The spoken text is often broken into small parts (segments), like subtitles.
For each part:
It checks the text.
It finds out the time that part was spoken.
It sends it to the translation agent to clean up or translate the text.
5. Translate (if needed)
If the translation agent finds a better or translated version, it replaces the original.
Otherwise, it keeps the original.
6. Prepare for Documentation
After translation, the segment is passed to the documentation agent.
This agent might:
Summarize the content,
Highlight important terms,
Structure it into a readable format.
7. Return the Final Result
The system gives back a structured package with:
The video link
The original language
The transcript in parts (processed and translated)
A documentation summary
The conversation ID (for tracking or further updates)
clsDocumentationAgent.py (This is the main class that will be part of the document agents.)
classclsDocumentationAgent:"""Documentation Agent built with LangChain"""def__init__(self,agent_id:str,broker: clsMCPBroker):self.agent_id = agent_idself.broker = brokerself.broker.register_agent(agent_id)# Initialize LangChain componentsself.llm =ChatOpenAI(model="gpt-4-0125-preview",temperature=0.1,api_key=OPENAI_API_KEY)# Create toolsself.tools =[clsSendMessageTool(sender_id=self.agent_id,broker=self.broker)]# Set up LLM with toolsself.llm_with_tools =self.llm.bind(tools=[tool.tool_config for tool inself.tools])# Setup memoryself.memory =ConversationBufferMemory(memory_key="chat_history",return_messages=True)# Create promptself.prompt = ChatPromptTemplate.from_messages([("system","""You are a Documentation Agent for YouTube video transcripts. Your responsibilities include: 1. Process YouTube video transcripts 2. Identify key points, topics, and main ideas 3. Organize content into a coherent and structured format 4. Create concise summaries 5. Request research information when necessary When you need additional context or research, send a request to the Research Agent. Always maintain a professional tone and ensure your documentation is clear and organized."""),MessagesPlaceholder(variable_name="chat_history"),("human","{input}"),MessagesPlaceholder(variable_name="agent_scratchpad"),])# Create agentself.agent =({"input":lambdax: x["input"],"chat_history":lambdax:self.memory.load_memory_variables({})["chat_history"],"agent_scratchpad":lambdax:format_to_openai_tool_messages(x["intermediate_steps"]),}|self.prompt|self.llm_with_tools|OpenAIToolsAgentOutputParser())# Create agent executorself.agent_executor =AgentExecutor(agent=self.agent,tools=self.tools,verbose=True,memory=self.memory)# Video dataself.current_conversation_id =Noneself.video_notes ={}self.key_points =[]self.transcript_segments =[]defstart_processing(self)->str:"""Start processing a new video"""self.current_conversation_id =str(uuid.uuid4())self.video_notes ={}self.key_points =[]self.transcript_segments =[]returnself.current_conversation_iddefprocess_transcript(self,transcript_segments,conversation_id=None):"""Process a YouTube transcript"""ifnot conversation_id: conversation_id =self.start_processing()self.current_conversation_id = conversation_id# Store transcript segmentsself.transcript_segments = transcript_segments# Process segments processed_segments =[]for segment in transcript_segments: processed_result =self.process_segment(segment) processed_segments.append(processed_result)# Generate summary summary =self.generate_summary()return{"processed_segments": processed_segments,"summary": summary,"conversation_id": conversation_id}defprocess_segment(self,segment):"""Process individual transcript segment""" text = segment.get("text","") start = segment.get("start",0)# Use LangChain agent to process the segment result =self.agent_executor.invoke({"input":f"Process this video transcript segment at timestamp {start}s: {text}. If research is needed, send a request to the research_agent."})# Update video notes timestamp = startself.video_notes[timestamp]={"text": text,"analysis": result["output"]}return{"timestamp": timestamp,"text": text,"analysis": result["output"]}defhandle_mcp_message(self,message: clsMCPMessage)-> Optional[clsMCPMessage]:"""Handle an incoming MCP message"""if message.message_type =="research_response":# Process research information received from Research Agent research_info = message.content.get("text","") result =self.agent_executor.invoke({"input":f"Incorporate this research information into video analysis: {research_info}"})# Send acknowledgment back to Research Agent response =clsMCPMessage(sender=self.agent_id,receiver=message.sender,message_type="acknowledgment",content={"text":"Research information incorporated into video analysis."},reply_to=message.id,conversation_id=message.conversation_id)self.broker.publish(response)return responseelif message.message_type =="translation_response":# Process translation response from Translation Agent translation_result = message.content# Process the translated textif"final_text"in translation_result: text = translation_result["final_text"] original_text = translation_result.get("original_text","") language_info = translation_result.get("language",{}) result =self.agent_executor.invoke({"input":f"Process this translated text: {text}\nOriginal language: {language_info.get('language','unknown')}\nOriginal text: {original_text}"})# Update notes with translation informationfor timestamp, note inself.video_notes.items():if note["text"]== original_text: note["translated_text"]= text note["language"]= language_infobreakreturnNonereturnNonedefrun(self):"""Run the agent to listen for MCP messages"""print(f"Documentation Agent {self.agent_id} is running...")whileTrue: message =self.broker.get_message(self.agent_id,timeout=1)if message:self.handle_mcp_message(message) time.sleep(0.1)defgenerate_summary(self)->str:"""Generate a summary of the video"""ifnotself.video_notes:return"No video data available to summarize." all_notes ="\n".join([f"{ts}: {note['text']}"for ts, note inself.video_notes.items()]) result =self.agent_executor.invoke({"input":f"Generate a concise summary of this YouTube video, including key points and topics:\n{all_notes}"})return result["output"]
Let us understand the key methods in a step-by-step manner:
The Documentation Agent is like a smart assistant that watches a YouTube video, takes notes, pulls out important ideas, and creates a summary — almost like a professional note-taker trained to help educators, researchers, and content creators. It works with a team of other assistants, like a Translator Agent and a Research Agent, and they all talk to each other through a messaging system.
1. Starting to Work on a New Video
defstart_processing(self)->str
When a new video is being processed:
A new project ID is created.
Old notes and transcripts are cleared to start fresh.
2. Processing the Whole Transcript
defprocess_transcript(...)
This is where the assistant:
Takes in the full transcript (what was said in the video).
Breaks it into small parts (like subtitles).
Sends each part to the smart brain for analysis.
Collects the results.
Finally, a summary of all the main ideas is created.
3. Processing One Transcript Segment at a Time
defprocess_segment(self,segment)
For each chunk of the video:
The assistant reads the text and timestamp.
It asks GPT-4 to analyze it and suggest important insights.
It saves that insight along with the original text and timestamp.
4. Handling Incoming Messages from Other Agents
defhandle_mcp_message(self,message)
The assistant can also receive messages from teammates (other agents):
If the message is from the Research Agent:
It reads new information and adds it to its notes.
It replies with a thank-you message to say it got the research.
If the message is from the Translation Agent:
It takes the translated version of a transcript.
Updates its notes to reflect the translated text and its language.
This is like a team of assistants emailing back and forth to make sure the notes are complete and accurate.
5. Summarizing the Whole Video
defgenerate_summary(self)
After going through all the transcript parts, the agent asks GPT-4 to create a short, clean summary — identifying:
Main ideas
Key talking points
Structure of the content
The final result is clear, professional, and usable in learning materials or documentation.
clsResearchAgent.py (This is the main class that implements the research agent.)
classclsResearchAgent:"""Research Agent built with AutoGen"""def__init__(self,agent_id:str,broker: clsMCPBroker):self.agent_id = agent_idself.broker = brokerself.broker.register_agent(agent_id)# Configure AutoGen directly with API keyifnot OPENAI_API_KEY:print("Warning: OPENAI_API_KEY not set for ResearchAgent")# Create config list directly instead of loading from file config_list =[{"model":"gpt-4-0125-preview","api_key": OPENAI_API_KEY}]# Create AutoGen assistant for researchself.assistant =AssistantAgent(name="research_assistant",system_message="""You are a Research Agent for YouTube videos. Your responsibilities include: 1. Research topics mentioned in the video 2. Find relevant information, facts, references, or context 3. Provide concise, accurate information to support the documentation 4. Focus on delivering high-quality, relevant information Respond directly to research requests with clear, factual information.""",llm_config={"config_list": config_list,"temperature":0.1})# Create user proxy to handle message passingself.user_proxy =UserProxyAgent(name="research_manager",human_input_mode="NEVER",code_execution_config={"work_dir":"coding","use_docker":False},default_auto_reply="Working on the research request...")# Current conversation trackingself.current_requests ={}defhandle_mcp_message(self,message: clsMCPMessage)-> Optional[clsMCPMessage]:"""Handle an incoming MCP message"""if message.message_type =="request":# Process research request from Documentation Agent request_text = message.content.get("text","")# Use AutoGen to process the research requestdefresearch_task():self.user_proxy.initiate_chat(self.assistant,message=f"Research request for YouTube video content: {request_text}. Provide concise, factual information.")# Return last assistant messagereturnself.assistant.chat_messages[self.user_proxy.name][-1]["content"]# Execute research task research_result =research_task()# Send research results back to Documentation Agent response =clsMCPMessage(sender=self.agent_id,receiver=message.sender,message_type="research_response",content={"text": research_result},reply_to=message.id,conversation_id=message.conversation_id)self.broker.publish(response)return responsereturnNonedefrun(self):"""Run the agent to listen for MCP messages"""print(f"Research Agent {self.agent_id} is running...")whileTrue: message =self.broker.get_message(self.agent_id,timeout=1)if message:self.handle_mcp_message(message) time.sleep(0.1)
Let us understand the key methods in detail.
1. Receiving and Responding to Research Requests
defhandle_mcp_message(self,message)
When the Research Agent gets a message (like a question or request for info), it:
Reads the message to see what needs to be researched.
Asks GPT-4 to find helpful, accurate info about that topic.
Sends the answer back to whoever asked the question (usually the Documentation Agent).
clsTranslationAgent.py (This is the main class that represents the translation agent)
classclsTranslationAgent:"""Agent for language detection and translation"""def__init__(self,agent_id:str,broker: clsMCPBroker):self.agent_id = agent_idself.broker = brokerself.broker.register_agent(agent_id)# Initialize language detectorself.language_detector =clsLanguageDetector()# Initialize translation serviceself.translation_service =clsTranslationService()defprocess_text(self,text,conversation_id=None):"""Process text: detect language and translate if needed, handling mixed language content"""ifnot conversation_id: conversation_id =str(uuid.uuid4())# Detect language with support for mixed language content language_info =self.language_detector.detect(text)# Decide if translation is needed needs_translation =True# Pure English content doesn't need translationif language_info["language_code"]=="en-IN"or language_info["language_code"]=="unknown": needs_translation =False# For mixed language, check if it's primarily Englishif language_info.get("is_mixed",False)and language_info.get("languages",[]): english_langs =[ lang for lang in language_info.get("languages",[])if lang["language_code"]=="en-IN"or lang["language_code"].startswith("en-")]# If the highest confidence language is English and > 60% confident, don't translateif english_langs and english_langs[0].get("confidence",0)>0.6: needs_translation =Falseif needs_translation:# Translate using the appropriate service based on language detection translation_result =self.translation_service.translate(text, language_info)return{"original_text": text,"language": language_info,"translation": translation_result,"final_text": translation_result.get("translated_text", text),"conversation_id": conversation_id}else:# Already English or unknown language, return as isreturn{"original_text": text,"language": language_info,"translation":{"provider":"none"},"final_text": text,"conversation_id": conversation_id}defhandle_mcp_message(self,message: clsMCPMessage)-> Optional[clsMCPMessage]:"""Handle an incoming MCP message"""if message.message_type =="translation_request":# Process translation request from Documentation Agent text = message.content.get("text","")# Process the text result =self.process_text(text, message.conversation_id)# Send translation results back to requester response =clsMCPMessage(sender=self.agent_id,receiver=message.sender,message_type="translation_response",content=result,reply_to=message.id,conversation_id=message.conversation_id)self.broker.publish(response)return responsereturnNonedefrun(self):"""Run the agent to listen for MCP messages"""print(f"Translation Agent {self.agent_id} is running...")whileTrue: message =self.broker.get_message(self.agent_id,timeout=1)if message:self.handle_mcp_message(message) time.sleep(0.1)
Let us understand the key methods in step-by-step manner:
1. Understanding and Translating Text:
defprocess_text(...)
This is the core job of the agent. Here’s what it does with any piece of text:
Step 1: Detect the Language
It tries to figure out the language of the input text.
It can handle cases where more than one language is mixed together, which is common in casual speech or subtitles.
Step 2: Decide Whether to Translate
If the text is clearly in English, or it’s unclear what the language is, it decides not to translate.
If the text is mostly in another language or has less than 60% confidence in being English, it will translate it into English.
Step 3: Translate (if needed)
If translation is required, it uses the translation service to do the job.
Then it packages all the information: the original text, detected language, the translated version, and a unique conversation ID.
Step 4: Return the Results
If no translation is needed, it returns the original text and a note saying “no translation was applied.”
2. Receiving Messages and Responding
defhandle_mcp_message(...)
The agent listens for messages from other agents. When someone asks it to translate something:
It takes the text from the message.
Runs it through the process_text function (as explained above).
Sends the translated (or original) result to the person who asked.
clsTranslationService.py (This is the actual work process of translation by the agent)
classclsTranslationService:"""Translation service using multiple providers with support for mixed languages"""def__init__(self):# Initialize Sarvam AI clientself.sarvam_api_key = SARVAM_API_KEYself.sarvam_url ="https://api.sarvam.ai/translate"# Initialize Google Cloud Translation client using simple HTTP requestsself.google_api_key = GOOGLE_API_KEYself.google_translate_url ="https://translation.googleapis.com/language/translate/v2"deftranslate_with_sarvam(self,text,source_lang,target_lang="en-IN"):"""Translate text using Sarvam AI (for Indian languages)"""ifnotself.sarvam_api_key:return{"error":"Sarvam API key not set"} headers ={"Content-Type":"application/json","api-subscription-key":self.sarvam_api_key} payload ={"input": text,"source_language_code": source_lang,"target_language_code": target_lang,"speaker_gender":"Female","mode":"formal","model":"mayura:v1"}try: response = requests.post(self.sarvam_url,headers=headers,json=payload)if response.status_code ==200:return{"translated_text": response.json().get("translated_text",""),"provider":"sarvam"}else:return{"error":f"Sarvam API error: {response.text}","provider":"sarvam"}exceptExceptionas e:return{"error":f"Error calling Sarvam API: {str(e)}","provider":"sarvam"}deftranslate_with_google(self,text,target_lang="en"):"""Translate text using Google Cloud Translation API with direct HTTP request"""ifnotself.google_api_key:return{"error":"Google API key not set"}try:# Using the translation API v2 with API key params ={"key":self.google_api_key,"q": text,"target": target_lang} response = requests.post(self.google_translate_url,params=params)if response.status_code ==200: data = response.json() translation = data.get("data",{}).get("translations",[{}])[0]return{"translated_text": translation.get("translatedText",""),"detected_source_language": translation.get("detectedSourceLanguage",""),"provider":"google"}else:return{"error":f"Google API error: {response.text}","provider":"google"}exceptExceptionas e:return{"error":f"Error calling Google Translation API: {str(e)}","provider":"google"}deftranslate(self,text,language_info):"""Translate text to English based on language detection info"""# If already English or unknown language, return as isif language_info["language_code"]=="en-IN"or language_info["language_code"]=="unknown":return{"translated_text": text,"provider":"none"}# Handle mixed language contentif language_info.get("is_mixed",False)and language_info.get("languages",[]):# Strategy for mixed language: # 1. If one of the languages is English, don't translate the entire text, as it might distort English portions# 2. If no English but contains Indian languages, use Sarvam as it handles code-mixing better# 3. Otherwise, use Google Translate for the primary detected language has_english =False has_indian =Falsefor lang in language_info.get("languages",[]):if lang["language_code"]=="en-IN"or lang["language_code"].startswith("en-"): has_english =Trueif lang.get("is_indian",False): has_indian =Trueif has_english:# Contains English - use Google for full text as it handles code-mixing wellreturnself.translate_with_google(text)elif has_indian:# Contains Indian languages - use Sarvam# Use the highest confidence Indian language as source indian_langs =[lang for lang in language_info.get("languages",[])if lang.get("is_indian",False)]if indian_langs:# Sort by confidence indian_langs.sort(key=lambdax: x.get("confidence",0),reverse=True) source_lang = indian_langs[0]["language_code"]returnself.translate_with_sarvam(text, source_lang)else:# Fallback to primary languageif language_info["is_indian"]:returnself.translate_with_sarvam(text, language_info["language_code"])else:returnself.translate_with_google(text)else:# No English, no Indian languages - use Google for primary languagereturnself.translate_with_google(text)else:# Not mixed language - use standard approachif language_info["is_indian"]:# Use Sarvam AI for Indian languagesreturnself.translate_with_sarvam(text, language_info["language_code"])else:# Use Google for other languagesreturnself.translate_with_google(text)
This Translation Service is like a smart translator that knows how to:
Detect what language the text is written in,
Choose the best translation provider depending on the language (especially for Indian languages),
And then translate the text into English.
It supports mixed-language content (such as Hindi-English in one sentence) and uses either Google Translate or Sarvam AI, a translation service designed for Indian languages.
Now, let us understand the key methods in a step-by-step manner:
1. Translating Using Google Translate
deftranslate_with_google(...)
This function uses Google Translate:
It sends the text, asks for English as the target language, and gets a translation back.
It also detects the source language automatically.
If successful, it returns the translated text and the detected original language.
If there’s an error, it returns a message saying what went wrong.
Best For: Non-Indian languages (like Spanish, French, Chinese) and content that is not mixed with English.
2. Main Translation Logic
deftranslate(self,text,language_info)
This is the decision-maker. Here’s how it works:
Case 1: No Translation Needed
If the text is already in English or the language is unknown, it simply returns the original text.
Case 2: Mixed Language (e.g., Hindi + English)
If the text contains more than one language:
✅ If one part is English → use Google Translate (it’s good with mixed languages).
✅ If it includes Indian languages only → use Sarvam AI (better at handling Indian content).
✅ If it’s neither English nor Indian → use Google Translate.
The service checks how confident it is about each language in the mix and chooses the most likely one to translate from.
Case 3: Single Language
If the text is only in one language:
✅ If it’s an Indian language (like Bengali, Tamil, or Marathi), use Sarvam AI.
✅ If it’s any other language, use Google Translate.
So, we’ve done it.
I’ve included the complete working solutions for you in the GitHub Link.
We’ll cover the detailed performance testing, Optimized configurations & many other useful details in our next post.
Till then, Happy Avenging! 🙂
Note: All the data & scenarios posted here are representational data & scenarios & available over the internet & for educational purposes only. There is always room for improvement in this kind of model & the solution associated with it. I’ve shown the basic ways to achieve the same for educational purposes only.
Today, we’re going to discuss creating a local LLM server and then utilizing it to execute various popular LLM models. We will club the local Apple GPUs together via a new framework that binds all the available Apple Silicon devices into one big LLM server. This enables people to run many large models, which was otherwise not possible due to the lack of GPUs.
This is certainly a new way; One can create virtual computation layers by adding nodes to the resource pool, increasing the computation capacity.
Why not witness a small demo to energize ourselves –
Let us understand the scenario. I’ve one Mac Book Pro M4 & 2 Mac Mini Pro M4 (Base models). So, I want to add them & expose them as a cluster as follows –
As you can see, I’ve connected my MacBook Pro with both the Mac Mini using high-speed thunderbolt cables for better data transmissions. And, I’ll be using an open-source framework called “Exo” to create it.
Also, you can see that my total computing capacity is 53.11 TFlops, which is slightly more than the last category.
What is Exo?
“Exo” is an open-source framework that helps you merge all your available devices into a large cluster of available resources. This extracts all the computing juice needed to handle complex tasks, including the big LLMs, which require very expensive GPU-based servers.
For more information on “Exo”, please refer to the following link.
In our previous diagram, we can see that the framework also offers endpoints.
One option is a local ChatGPT interface, where any question you ask will receive a response from models by combining all available computing power.
The other endpoint offers users a choice of any standard LLM API endpoint, which helps them integrate it into their solutions.
Let us see, how the devices are connected together –
How to establish the Cluster?
To proceed with this, you need to have at least Python 3.12, Anaconda or Miniconda & Xcode installed in all of your machines. Also, you need to install some Apple-specific MLX packages or libraries to get the best performance.
Depending on your choice, you need to use the following link to download Anaconda or Miniconda.
You can download the following link to download the Python 3.12. However, I’ve used Python 3.13 on some machines & some machines, I’ve used Python 3.12. And it worked without any problem.
Sometimes, after installing Anaconda or Miniconda, the environment may not implicitly be activated after successful installation. In that case, you may need to use the following commands in the terminal -> source ~/.bash_profile
To verify, whether the conda has been successfully installed & activated, you need to type the following command –
And, you need to perform the same process in other available devices as well.
Now, we’re ready to proceed with the final command –
(.venv) (exo1) satyaki_de@Satyakis-MacBook-Pro-Maxexo%exo/opt/anaconda3/envs/exo1/lib/python3.13/site-packages/google/protobuf/runtime_version.py:112: UserWarning:Protobufgencodeversion5.27.2isolderthantheruntimeversion5.28.1atnode_service.proto.Pleaseavoidchecked-inProtobufgencodethatcanbeobsolete.warnings.warn(NoneofPyTorch,TensorFlow>=2.0,orFlaxhavebeenfound.Modelswon't be available and only tokenizers, configuration and file/data utilities can be used.NoneofPyTorch,TensorFlow>=2.0,orFlaxhavebeenfound.Modelswon't be available and only tokenizers, configuration and file/data utilities can be used.Selectedinferenceengine: None__________/_ \ \//_ \ |__/>< (_) | \___/_/\_\___/Detectedsystem: AppleSiliconMacInferenceenginenameafterselection: mlxUsinginferenceengine: MLXDynamicShardInferenceEnginewithsharddownloader: SingletonShardDownloader[60771,54631,54661]Chatinterfacestarted:-http://127.0.0.1:52415-http://XXX.XXX.XX.XX:52415-http://XXX.XXX.XXX.XX:52415-http://XXX.XXX.XXX.XXX:52415ChatGPTAPIendpointservedat:-http://127.0.0.1:52415/v1/chat/completions-http://XXX.XXX.X.XX:52415/v1/chat/completions-http://XXX.XXX.XXX.XX:52415/v1/chat/completions-http://XXX.XXX.XXX.XXX:52415/v1/chat/completionshas_read=True,has_write=True╭────────────────────────────────────────────────────────────────────────────────────────────── ExoCluster (2nodes) ───────────────────────────────────────────────────────────────────────────────────────────────╮ReceivedexitsignalSIGTERM...Thankyouforusingexo.__________/_ \ \//_ \ |__/>< (_) | \___/_/\_\___/
Note that I’ve masked the IP addresses for security reasons.
Run Time:
At the beginning, if we trigger the main MacBook Pro Max, the “Exo” screen should looks like this –
And if you open the URL, you will see the following ChatGPT-like interface –
Connecting without the Thunderbolt bridge with the relevant port or a hub may cause performance degradation. Hence, how you connect will play a major role in the success of this intention. However, this is certainly a great idea to proceed with.
So, we’ve done it.
We’ll cover the detailed performance testing, Optimized configurations & many other useful details in our next post.
Till then, Happy Avenging! 🙂
Note: All the data & scenarios posted here are representational data & scenarios & available over the internet & for educational purposes only. There is always room for improvement in this kind of model & the solution associated with it. I’ve shown the basic ways to achieve the same for educational purposes only.
I’ll bring an exciting streamlit app that will reflect the real-time dashboard by consuming all the events from the Ably channel.
One more time, I’ll be utilizing my IoT emulator that will feed the real-time events based on the user inputs to the Ably channel, which will be subscribed to by the Streamlit-based app.
However, I would like to share the run before we dig deep into this.
Demo
Isn’t this exciting? How we can use our custom-built IoT emulator & capture real-time events to Ably Queue, then transform those raw events into more meaningful KPIs? Let’s deep dive then.
Architecture:
Let’s explore the broad-level architecture/flow –
As you can see, the green box is a demo IoT application that generates events & pushes them into the Ably Queue. At the same time, the streamlit-based Dashboard app consumes the events & transforms them into more meaningful metrics.
Package Installation:
Let us understand the sample packages that are required for this task.
Since this is an extension to our previous post, we’re not going to discuss other scripts, which we’ve already discussed over there. Instead, we will talk about the enhanced scripts & the new scripts that are required for this use case.
1. app.py (This script will consume real-time streaming data coming out from a hosted API source using another popular third-party service named Ably. Ably mimics the pub sub-streaming concept, which might be extremely useful for any start-up. This will then translate into many meaningful KPIs in a streamlit-based dashboard app.)
Note that, we’re not going to discuss the entire script here. Only those parts are relevant. However, you can get the complete scripts in the GitHub repository.
The above function creates a customized humidity gauge that visually represents a given humidity value, making it easy to read and understand at a glance.
This code defines a function “createHumidityGauge“ that creates a visual gauge (like a meter) to display a humidity value. Here’s a simple breakdown of what it does:
Function Definition: It starts by defining a function named createHumidityGauge that takes one parameter, humidity_value, which is the humidity level you want to display on the gauge.
Creating the Gauge: Inside the function, it creates a figure using Plotly (a plotting library) with a specific type of chart called an Indicator. This Indicator is set to display in “gauge+number” mode, meaning it shows both a gauge visual and the numeric value of the humidity.
Setting Gauge Properties:
The value is set to the humidity_value parameter, so the gauge shows this humidity level.
The domain sets the position of the gauge on the plot, which is set to fill the available space ([0, 1] for both x and y axes).
The title is set to “Humidity” with a font size of 24, labeling the gauge.
The gauge section defines the appearance and behavior of the gauge, including:
An axis that goes from 0 to 100 (assuming humidity is measured as a percentage from 0% to 100%).
The color and style of the gauge’s bar and background.
Colored steps indicating different ranges of humidity (cyan for 0-50% and royal blue for 50-100%).
A threshold line that appears at the value of the humidity, marked in red to stand out.
Finalizing the Gauge Appearance: The function then updates the layout of the figure to set its height, background color, font style, and margins to make sure the gauge looks nice and is visible.
Returning the Figure: Finally, the function returns the fig object, which is the fully configured gauge, ready to be displayed.
Other similar functions will repeat the same steps.
defcreateTemperatureLineChart(data): # Assuming'data'isaDataFramewitha'Timestamp'indexanda'Temperature'columnfig=px.line(data,x=data.index,y='Temperature',title='Temperature Vs Time')fig.update_layout(height=270) # Specifythedesiredheightherereturnfig
The above function takes a set of temperature data indexed by timestamp and creates a line chart that visually represents how the temperature changes over time.
This code defines a function “createTemperatureLineChart” that creates a line chart to display temperature data over time. Here’s a simple summary of what it does:
Function Definition: It starts with defining a function named “createTemperatureLineChart“ that takes one parameter, data, which is expected to be a DataFrame (a type of data structure used in pandas, a Python data analysis library). This data frame should have a ‘Timestamp’ as its index (meaning each row represents a different point in time) and a ‘Temperature’ column containing temperature values.
Creating the Line Chart: The function uses Plotly Express (a plotting library) to create a line chart with the following characteristics:
The x-axis represents time, taken from the DataFrame’s index (‘Timestamp’).
The y-axis represents temperature, taken from the ‘Temperature’ column in the DataFrame.
The chart is titled ‘Temperature Vs Time’, clearly indicating what the chart represents.
Customizing the Chart: It then updates the layout of the chart to set a specific height (270 pixels) for the chart, making it easier to view.
Returning the Chart: Finally, the function returns the fig object, which is the fully prepared line chart, ready to be displayed.
The above code will create a sidebar with drop-down lists, which will show the KPIs (“Temperature”, “Humidity”, “Pressure”).
# SplitthelayoutintocolumnsforKPIsandgraphsgauge_col,kpi_col,graph_col=st.columns(3) # Auto-refreshsetupst_autorefresh(interval=7000,key='data_refresh') # Fetchingreal-timedatadata=getData(var1,DInd)st.markdown(""" <style>.stEcharts{ margin-bottom:-50px; }/* Class might differ, inspect the HTML to find the correct class name */</style>""",unsafe_allow_html=True ) # Displaygaugesatthetopofthepagegauges=st.container()with gauges:col1,col2,col3=st.columns(3)with col1:humidity_value=round(data['Humidity'].iloc[-1],2)humidity_gauge_fig=createHumidityGauge(humidity_value)st.plotly_chart(humidity_gauge_fig,use_container_width=True)with col2:temp_value=round(data['Temperature'].iloc[-1],2)temp_gauge_fig=createTempGauge(temp_value)st.plotly_chart(temp_gauge_fig,use_container_width=True)with col3:pressure_value=round(data['Pressure'].iloc[-1],2)pressure_gauge_fig=createPressureGauge(pressure_value)st.plotly_chart(pressure_gauge_fig,use_container_width=True) # Nextrowforactualreadingsandchartsside-by-sidereadings_charts=st.container() # DisplayKPIsandtheirtrendswith readings_charts:readings_col,graph_col=st.columns([1,2])with readings_col:st.subheader("Latest Readings")if"Temperature"in selected_kpis:st.metric("Temperature",f"{temp_value:.2f}%")if"Humidity"in selected_kpis:st.metric("Humidity",f"{humidity_value:.2f}%")if"Pressure"in selected_kpis:st.metric("Pressure",f"{pressure_value:.2f}%") # GraphplaceholdersforeachKPIwith graph_col:if"Temperature"in selected_kpis:temperature_fig=createTemperatureLineChart(data.set_index("Timestamp")) # DisplaythePlotlychartinStreamlitwithspecifieddimensionsst.plotly_chart(temperature_fig,use_container_width=True)if"Humidity"in selected_kpis:humidity_fig=createHumidityLineChart(data.set_index("Timestamp")) # DisplaythePlotlychartinStreamlitwithspecifieddimensionsst.plotly_chart(humidity_fig,use_container_width=True)if"Pressure"in selected_kpis:pressure_fig=createPressureLineChart(data.set_index("Timestamp")) # DisplaythePlotlychartinStreamlitwithspecifieddimensionsst.plotly_chart(pressure_fig,use_container_width=True)
The code begins by splitting the Streamlit web page layout into three columns to separately display Key Performance Indicators (KPIs), gauges, and graphs.
It sets up an auto-refresh feature with a 7-second interval, ensuring the data displayed is regularly updated without manual refreshes.
Real-time data is fetched using a function called getData, which takes unspecified parameters var1 and DInd.
A CSS style is injected into the Streamlit page to adjust the margin of Echarts elements, which may be used to improve the visual layout of the page.
A container for gauges is created at the top of the page, with three columns inside it dedicated to displaying humidity, temperature, and pressure gauges.
Each gauge (humidity, temperature, and pressure) is created by rounding the last value from the fetched data to two decimal places and then visualized using respective functions that create Plotly gauge charts.
Below the gauges, another container is set up for displaying the latest readings and their corresponding graphs in a side-by-side layout, using two columns.
The left column under “Latest Readings” displays the latest values for selected KPIs (temperature, humidity, pressure) as metrics.
In the right column, for each selected KPI, a line chart is created using data with timestamps as indices and displayed using Plotly charts, allowing for a visual trend analysis.
This structured approach enables a dynamic and interactive dashboard within Streamlit, offering real-time insights into temperature, humidity, and pressure with both numeric metrics and graphical trends, optimized for regular data refreshes and user interactivity.
Run:
Let us understand some of the important screenshots of this application –
So, we’ve done it.
I’ll bring some more exciting topics in the coming days from the Python verse.
Till then, Happy Avenging! 🙂
Note: All the data & scenarios posted here are representational data & scenarios & available over the internet & for educational purposes only.
There is always room for improvement in this kind of model & the solution associated with it. I’ve shown the basic ways to achieve the same for educational purposes only.
At the recent Argyle AI Summit, a prestigious event in the AI industry, I had the honor of participating as a speaker alongside esteemed professionals like Misha Leybovich from Google Labs. The summit, coordinated by Sylvia Das Chagas, a former senior AI conversation designer at CVS Health, provided an enlightening platform to discuss the evolving role of AI in talent management. Our session focused on the theme “Driving Talent with AI,” addressing some of the most pressing questions in the field. Frequently, relevant use cases were shared in detail to support these threads.
To view the actual page, please click the following link.
Impact of AI on Talent Management
One of the critical topics we explored was AI’s impact on talent management in the upcoming year. AI’s influence in hiring and retention is becoming increasingly significant. For example, AI-powered tools can now analyze vast amounts of data to identify the best candidates for a role, going beyond traditional resume screening. In retention, AI is instrumental in identifying patterns that indicate an employee’s likelihood to leave, enabling proactive measures.
Dispelling Fears Around AI Replacing Jobs
A burning question in AI is how leaders address fears that AI might replace manual jobs. We discussed the importance of leaders framing AI as a complement to human skills rather than a replacement. AI enhances employee capabilities by automating mundane tasks, allowing employees to focus on more creative and strategic work.
Innovative AI Tools for Organizations
Regarding new AI tools that organizations should watch out for, the conversation highlighted tools that enhance remote collaboration and workplace inclusivity. Tools like virtual meeting assistants that can transcribe, translate, and summarize meetings in real time are becoming invaluable in today’s global work environment.
AI in Boosting Employee Motivation and Productivity
AI’s role in boosting employee motivation and productivity was another focal point. We discussed how AI-driven career development programs can offer personalized learning paths, helping employees grow and stay motivated.
Incorporating Multilingual Capabilities in AI Tools
Incorporating multiple languages in tools like ChatGPT was highlighted as a critical step towards inclusivity. This expansion allows a broader range of employees to interact with AI tools in their native language, fostering a more inclusive workplace environment.
Addressing Reluctance to Change
Lastly, we tackled the challenge of addressing employees’ reluctance to change. Emphasizing the importance of transparent communication and education about AI’s benefits was identified as key. Organizations can alleviate fears and encourage a more accepting attitude towards AI by involving employees in the AI implementation process and providing training.
Conclusion
The Argyle AI Summit offered a compelling glimpse into the future of AI in talent management. The session provided valuable insights for leaders looking to harness AI’s potential to enhance talent management strategies by discussing real-world examples and strategies. To gain more in-depth knowledge and perspectives shared during this summit, I encourage interested parties to visit the recorded session link for a more comprehensive understanding.
Or, you can directly view it from here –
Feedback Request
I would greatly appreciate your feedback on the insights shared during the summit. Your thoughts and perspectives are invaluable as we continue to explore and navigate the evolving landscape of AI in the workplace.
Note: Video content hosted at a third-party site by the summit organizer & not by me.
Today, I will share a new post in a part series about creating end-end LLMs that feed source data with RAG implementation. I’ll also use OpenAI python-based SDK and Haystack embeddings in this case.
In this post, I’ve directly subscribed to OpenAI & I’m not using OpenAI from Azure. However, I’ll explore that in the future as well.
Before I explain the process to invoke this new library, why not view the demo first & then discuss it?
Demo
FLOW OF EVENTS:
Let us look at the flow diagram as it captures the sequence of events that unfold as part of the process.
As you can see, to enable this large & complex solution, we must first establish the capabilities to build applications powered by LLMs, Transformer models, vector search, and more. You can use state-of-the-art NLP models to perform question-answering, answer generation, semantic document search, or build tools capable of complex decision-making and query resolution. Hence, steps no. 1 & 2 showcased the data embedding & creating that informed repository. We’ll be discussing that in our second part.
Once you have the informed repository, the system can interact with the end-users. As part of the query (shown in step 3), the prompt & the question are shared with the process engine, which then turned to reduce the volume & get relevant context from our informed repository & get the tuned context as part of the response (Shown in steps 4, 5 & 6).
Then, this tuned context is shared with the OpenAI for better response & summary & concluding remarks that are very user-friendly & easier to understand for end-users (Shown in steps 8 & 9).
IMPORTANT PACKAGES:
The following are the important packages that are essential to this project –
Let us understand some of the important sections of the above script –
Function – login():
The login function retrieves a ‘username’ and ‘password’ from a JSON request and prints them. It checks if the provided credentials are missing from users or password lists, returning a failure JSON response if so. It creates and returns an access token in a JSON response if valid.
Function – get_chat():
The get_chat function retrieves the running session count and user input from a JSON request. Based on the session count, it extracts catalog data or processes the user’s message from the RAG framework that finally receives the refined response from the OpenAI, extracting hash values, image URLs, and wiki URLs. If an error arises, the function captures and returns the error as a JSON message.
Function – updateCounter():
The updateCounter function checks if a given CSV file exists and retrieves its counter value. It then increments the counter and writes it back to the CSV. If any errors occur, an error message is printed, and the function returns a value of 1.
Function – extractRemoveUrls():
The extractRemoveUrls function attempts to filter a data frame, resDf, based on a provided hash value to extract image and wiki URLs. If the data frame contains matching entries, it retrieves the corresponding URLs. Any errors encountered are printed, but the function always returns the image and wiki URLs, even if they are empty.
clsContentScrapper.py (This is the main class that brings the default options for the users if they agree with the initial prompt by the bot.)
Let us understand the the core part that require from this class.
Function – extractCatalog():
The extractCatalog function uses specific headers to make a GET request to a constructed URL. The URL is derived by appending ‘/departments’ to a base_url, and a header token is used in the request headers. If successful, it returns the text of the response; if there’s an exception, it prints the error and returns the error message.
clsRAGOpenAI.py (This is the main class that brings the RAG-enabled context that is fed to OpenAI for fine-tuned response with less cost.)
############################################################# Written By:SATYAKIDE ######## Written On:27-Jun-2023 ######## ModifiedOn28-Jun-2023 ######## ######## Objective:Thisisthemaincalling ######## pythonscriptthatwillinvokethe ######## shortcutapplicationcreatedinsideMAC ######## enviornmentincludingMacBook,IPadorIPhone. ######## #############################################################fromhaystack.document_stores.faissimportFAISSDocumentStorefromhaystack.nodesimportDensePassageRetrieverimportopenaifromclsConfigClientimportclsConfigClientascfimportclsLaslog# DisblingWarningdefwarn(*args,**kwargs):passimportwarningswarnings.warn = warnimportosimportre################################################## GlobalSection ##################################################Ind = cf.conf['DEBUG_IND']queryModel = cf.conf['QUERY_MODEL']passageModel = cf.conf['PASSAGE_MODEL']#InitiatingLoggingInstancesclog = log.clsL()os.environ["TOKENIZERS_PARALLELISM"] = "false"vectorDBFileName = cf.conf['VECTORDB_FILE_NM']indexFile = "vectorDB/" + str(vectorDBFileName) + '.faiss'indexConfig = "vectorDB/" + str(vectorDBFileName) + ".json"print('File: ',str(indexFile))print('Config: ',str(indexConfig))# Also,provide`config_path`parameterifyousetitwhencallingthe`save()`method:new_document_store = FAISSDocumentStore.load(index_path=indexFile,config_path=indexConfig)# InitializeRetrieverretriever = DensePassageRetriever(document_store=new_document_store,query_embedding_model=queryModel,passage_embedding_model=passageModel,use_gpu=False)################################################## EndofGlobalSection ##################################################classclsRAGOpenAI:def__init__(self):self.basePath = cf.conf['DATA_PATH']self.fileName = cf.conf['FILE_NAME']self.Ind = cf.conf['DEBUG_IND']self.subdir = str(cf.conf['OUT_DIR'])self.base_url = cf.conf['BASE_URL']self.outputPath = cf.conf['OUTPUT_PATH']self.vectorDBPath = cf.conf['VECTORDB_PATH']self.openAIKey = cf.conf['OPEN_AI_KEY']self.temp = cf.conf['TEMP_VAL']self.modelName = cf.conf['MODEL_NAME']self.maxToken = cf.conf['MAX_TOKEN']defextractHash(self,text):try: # Regularexpressionpatterntomatch'Ref: {'followedbyanumberandthen'}'pattern = r"Ref: \{'(\d+)'\}"match = re.search(pattern,text)ifmatch:returnmatch.group(1)else:returnNoneexceptExceptionase:x = str(e)print('Error: ',x)returnNonedefremoveSentencesWithNaN(self,text):try: # Splittextintosentencesusingregularexpressionsentences = re.split('(?<!\w\.\w.)(?<![A-Z][a-z]\.)(?<=\.|\?)\s',text) # Filteroutsentencescontaining'nan'filteredSentences = [sentenceforsentenceinsentencesif'nan'notinsentence] # Rejointhesentencesreturn''.join(filteredSentences)exceptExceptionase:x = str(e)print('Error: ',x)return''defretrieveDocumentsReader(self,question,top_k=9):returnretriever.retrieve(question,top_k=top_k)defgenerateAnswerWithGPT3(self,retrieved_docs,question):try:openai.api_key = self.openAIKeytemp = self.tempmodelName = self.modelNamemaxToken = self.maxTokendocumentsText = "".join([doc.contentfordocinretrieved_docs])filteredDocs = self.removeSentencesWithNaN(documentsText)hashValue = self.extractHash(filteredDocs)print('RAG Docs:: ')print(filteredDocs) #prompt = f"Given the following documents: {documentsText}, answer the question accurately based on the above data with the supplied http urls: {question}" # Setupachat-stylepromptwithyourdatamessages = [{"role": "system", "content": "Youareahelpfulassistant,answerthequestionaccuratelybasedontheabovedatawiththesuppliedhttpurls. Onlyrelevantcontentneedstopublish. Pleasedonotprovidethefactsorthetextsthatresultscrossingthemax_tokenlimits."},{"role": "user", "content": filteredDocs} ] # Chatstyleinvokingthelatestmodelresponse = openai.ChatCompletion.create(model=modelName,messages=messages,temperature = temp,max_tokens=maxToken )returnhashValue,response.choices[0].message['content'].strip().replace('\n','\\n')exceptExceptionase:x = str(e)print('failed to get from OpenAI: ',x)return'Not Available!'defragAnswerWithHaystackAndGPT3(self,question):retrievedDocs = self.retrieveDocumentsReader(question)returnself.generateAnswerWithGPT3(retrievedDocs,question)defgetData(self,strVal):try:print('*'*120)print('Index Your Data for Retrieval:')print('*'*120)print('Response from New Docs: ')print()hashValue,answer = self.ragAnswerWithHaystackAndGPT3(strVal)print('GPT3 Answer::')print(answer)print('Hash Value:')print(str(hashValue))print('*'*240)print('End Of Use RAG to Generate Answers:')print('*'*240)returnhashValue,answerexceptExceptionase:x = str(e)print('Error: ',x)answer = xhashValue = 1returnhashValue,answer
Let us understand some of the important block –
Function – ragAnswerWithHaystackAndGPT3():
The ragAnswerWithHaystackAndGPT3 function retrieves relevant documents for a given question using the retrieveDocumentsReader method. It then generates an answer for the query using GPT-3 with the retrieved documents via the generateAnswerWithGPT3 method. The final response is returned.
Function – generateAnswerWithGPT3():
The generateAnswerWithGPT3 function, given a list of retrieved documents and a question, communicates with OpenAI’s GPT-3 to generate an answer. It first processes the documents, filtering and extracting a hash value. Using a chat-style format, it prompts GPT-3 with the processed documents and captures its response. If an error occurs, an error message is printed, and “Not Available!” is returned.
Function – retrieveDocumentsReader():
The retrieveDocumentsReader function takes in a question and an optional parameter, top_k (defaulted to 9). It is called the retriever.retrieve method with the given parameters. The result of the retrieval will generate at max nine responses from the RAG engine, which will be fed to OpenAI.
React:
App.js (This is the main react script, that will create the interface & parse the data apart from the authentication)
// App.jsimportReact,{useState}from'react';importaxiosfrom'axios';import'./App.css';constApp=()=>{const[isLoggedIn,setIsLoggedIn]=useState(false);const[username,setUsername]=useState('');const[password,setPassword]=useState('');const[message,setMessage]=useState('');const[chatLog,setChatLog]=useState([{sender:'MuBot',message:'Welcome to MuBot! Please explore the world of History from our brilliant collections! Do you want to proceed to see the catalog?'}]);consthandleLogin=async(e)=>{e.preventDefault();try{constresponse=awaitaxios.post('http://localhost:5000/login',{username,password});if (response.status===200) {setIsLoggedIn(true);}}catch (error) {console.error('Login error:',error);}};constsendMessage=async(username)=>{if (message.trim() ==='') return;// Create a new chat entryconstnewChatEntry={sender:'user',message:message.trim(),};// Clear the input fieldsetMessage('');try{// Make API request to Python-based APIconstresponse=awaitaxios.post('http://localhost:5000/chat',{message:newChatEntry.message});// Replace with your API endpoint URLconstresponseData=response.data;// Print the response to the console for debuggingconsole.log('API Response:',responseData);// Parse the nested JSON from the 'message' attributeconstjsonData=JSON.parse(responseData.message);// Check if the data contains 'departments'if (jsonData.departments) {// Extract the 'departments' attribute from the parsed dataconstdepartments=jsonData.departments;// Extract the department names and create a single string with line breaksconstbotResponseText=departments.reduce((acc,department)=>{returnacc+department.departmentId+''+department.displayName+'\n';},'');// Update the chat log with the bot's responsesetChatLog((prevChatLog)=> [...prevChatLog,{sender:'user',message:message},{sender:'bot',message:botResponseText},]);}elseif (jsonData.records){// Data structure 2: Artwork informationconstrecords=jsonData.records;// Prepare chat entriesconstchatEntries= [];// Iterate through records and extract text, image, and wiki informationrecords.forEach((record)=>{consttextInfo=Object.entries(record).map(([key,value])=>{if (key!=='Image'&&key!=='Wiki') {return`${key}: ${value}`;}returnnull;}).filter((info)=>info!==null).join('\n');constimageLink=record.Image;//const wikiLinks = JSON.parse(record.Wiki.replace(/'/g, '"'));//const wikiLinks = record.Wiki;constwikiLinks=record.Wiki.split(',').map(link=>link.trim());console.log('Wiki:',wikiLinks);// Check if there is a valid image linkconsthasValidImage=imageLink&&imageLink!=='[]';constimageElement=hasValidImage? (<imgsrc={imageLink}alt="Artwork"style={{maxWidth:'100%'}}/> ) :null;// Create JSX elements for rendering the wiki links (if available)constwikiElements=wikiLinks.map((link,index)=> (<divkey={index}><ahref={link}target="_blank"rel="noopener noreferrer"> Wiki Link {index+1}</a></div> ));if (textInfo) {chatEntries.push({sender:'bot',message:textInfo});}if (imageElement) {chatEntries.push({sender:'bot',message:imageElement});}if (wikiElements.length >0) {chatEntries.push({sender:'bot',message:wikiElements});}});// Update the chat log with the bot's responsesetChatLog((prevChatLog)=> [...prevChatLog,{sender:'user',message},...chatEntries, ]);}}catch (error) {console.error('Error sending message:',error);}};if (!isLoggedIn) {return (<divclassName="login-container"><h2>Welcome to the MuBot</h2><formonSubmit={handleLogin}className="login-form"><inputtype="text"placeholder="Enter your name"value={username}onChange={(e)=>setUsername(e.target.value)}required/><inputtype="password"placeholder="Enter your password"value={password}onChange={(e)=>setPassword(e.target.value)}required/><buttontype="submit">Login</button></form></div> );}return (<divclassName="chat-container"><divclassName="chat-header"><h2>Hello, {username}</h2><h3>Chat with MuBot</h3></div><divclassName="chat-log">{chatLog.map((chatEntry,index)=> (<divkey={index}className={`chat-entry ${chatEntry.sender==='user'?'user':'bot'}`}><spanclassName="user-name">{chatEntry.sender==='user'?username:'MuBot'}</span><pclassName="chat-message">{chatEntry.message}</p></div> ))}</div><divclassName="chat-input"><inputtype="text"placeholder="Type your message..."value={message}onChange={(e)=>setMessage(e.target.value)}onKeyPress={(e)=>{if (e.key==='Enter') {sendMessage();}}}/><buttononClick={sendMessage}>Send</button></div></div> );};exportdefaultApp;
Please find some of the important logic –
Function – handleLogin():
The handleLogin asynchronous function responds to an event by preventing its default action. It attempts to post a login request with a username and password to a local server endpoint. If the response is successful with a status of 200, it updates a state variable to indicate a successful login; otherwise, it logs any encountered errors.
Function – sendMessage():
The sendMessage asynchronous function is designed to handle the user’s chat interaction:
If the message is empty (after trimming spaces), the function exits without further action.
A chat entry object is created with the sender set as ‘user’ and the trimmed message.
The input field’s message is cleared, and an API request is made to a local server endpoint with the chat message.
If the API responds with a ‘departments’ attribute in its JSON, a bot response is crafted by iterating over department details.
If the API responds with ‘records’ indicating artwork information, the bot crafts responses for each record, extracting text, images, and wiki links, and generating JSX elements for rendering them.
After processing the API response, the chat log state is updated with the user’s original message and the bot’s responses.
Errors, if encountered, are logged to the console.
This function enables interactive chat with bot responses that vary based on the nature of the data received from the API.
DIRECTORY STRUCTURES:
Let us explore the directory structure starting from the parent to some of the important child folder should look like this –
So, finally, we’ve done it.
I know that this post is relatively bigger than my earlier post. But, I think, you can get all the details once you go through it.
You will get the complete codebase in the following GitHub link.
I’ll bring some more exciting topics in the coming days from the Python verse. Please share & subscribe to my post & let me know your feedback.
Till then, Happy Avenging! 🙂
Note: All the data & scenarios posted here are representational data & scenarios & available over the internet & for educational purposes only. Some of the images (except my photo) we’ve used are available over the net. We don’t claim ownership of these images. There is always room for improvement & especially in the prediction quality.
Today, I’m very excited to demonstrate an effortless & new way to extract the transcript from YouTube videos & then answer the questions based on the topics selected by the users. In this post, I plan to deal with the user inputs to consider the case first & then it can summarize the video content through useful advanced analytics with the help of the LangChain & OpenAI-based model.
In this post, I’ve directly subscribed to OpenAI & I’m not using OpenAI from Azure. However, I’ll explore that in the future as well. Before I explain the process to invoke this new library, why not view the demo first & then discuss it?
Demo
Isn’t it very exciting? This will lead to a whole new ballgame, where one can get critical decision-making information from these human sources along with their traditional advanced analytical data.
How will it help?
Let’s say as per your historical data & analytics, the dashboard is recommending prod-A, prod-B & prod-C as the top three products for potential top-performing brands. Whereas, you are getting some alerts from the TV news on prod-B due to the recent incidents. So, in that case, you don’t want to continue with the prod-B investment. You may find a new product named prod-Z. That may reduce the risk of your investment.
What is LangChain?
LangChain is a framework for developing applications powered by language models. We believe that the most powerful and differentiated applications will not only call out to a language model but will also be:
Data-aware: connect a language model to other sources of data
Agentic: allow a language model to interact with its environment
The LangChain framework works around these principles.
To know more about this, please click the following link.
As you can see, this is one of the critical components in our solution, which will bind the OpenAI bot & it will feed the necessary data to provide the correct response.
What is FAISS?
Faiss is a library for efficient similarity search and clustering of dense vectors. It contains algorithms that search in sets of vectors of any size, up to ones that do not fit in RAM. It also has supporting code for evaluation and parameter tuning.
Faiss developed using C++ with complete wrappers for Python—some of the most beneficial algorithms available both on CPU & in GPU as well. Facebook AI Research develops it.
To know more about this, please click the following link.
FLOW OF EVENTS:
Let us look at the flow diagram as it captures the sequence of events that unfold as part of the process.
Here are the steps that will follow in sequence –
The application will first get the topic on which it needs to look from YouTube & find the top 5 videos using the YouTube data-API.
Once the application returns a list of websites from the above step, LangChain will drive the application will extract the transcripts from the video & then optimize the response size in smaller chunks to address the costly OpenAI calls. During this time, it will invoke FAISS to create document DBs.
Finally, it will send those chunks to OpenAI for the best response based on your supplied template that performs the final analysis with small data required for your query & gets the appropriate response with fewer costs.
CODE:
Why don’t we go through the code made accessible due to this new library for this particular use case?
clsConfigClient.py (This is the main calling Python script for the input parameters.)
This file contains hidden or bidirectional Unicode text that may be interpreted or compiled differently than what appears below. To review, open the file in an editor that reveals hidden Unicode characters. Learn more about bidirectional Unicode characters
From the above code snippet, one can understand that we need both the API keys for YouTube & OpenAI. And they have separate costs & usage, which I’ll share later in the post. Also, notice that the temperature sets to 0.2 ( range between 0 to 1). That means our AI bot will be consistent in response. And our application will use the GPT-3.5-turbo model for its analytic response.
clsTemplate.py (Contains all the templates for OpenAI.)
This file contains hidden or bidirectional Unicode text that may be interpreted or compiled differently than what appears below. To review, open the file in an editor that reveals hidden Unicode characters. Learn more about bidirectional Unicode characters
The above code is self-explanatory. Here, we’re keeping the correct instructions for our OpenAI to respond within these guidelines.
clsVideoContentScrapper.py (Main class to extract the transcript from the YouTube videos & then answer the questions based on the topics selected by the users.)
This file contains hidden or bidirectional Unicode text that may be interpreted or compiled differently than what appears below. To review, open the file in an editor that reveals hidden Unicode characters. Learn more about bidirectional Unicode characters
The above code will fetch the most relevant YouTube URLs & bind them into a list along with the channel names & then share the lists with the main functions.
The provided Python code defines a function createDBFromYoutubeVideoUrl which appears to create a database of text documents from the transcript of a YouTube video. Here’s the explanation in simple English:
The function createDBFromYoutubeVideoUrl has defined with one argument: video_url.
The function uses a try-except block to handle any potential exceptions or errors that may occur.
Inside the try block, the following steps are going to perform:
First, it creates a YoutubeLoader object from the provided video_url. This object is likely responsible for interacting with the YouTube video specified by the URL.
The loader object then loads the transcript of the video. This object is the text version of everything spoken in the video.
It then creates a RecursiveCharacterTextSplitter object with a specified chunk_size of 1000 and chunk_overlap of 100. This object may split the transcript into smaller chunks (documents) of text for easier processing or analysis. Each piece will be around 1000 characters long, and there will overlap of 100 characters between consecutive chunks.
The split_documents method of the text_splitter object will split the transcript into smaller documents. These documents are stored in the docs variable.
The FAISS.from_documents method is then called with docs and embeddings as arguments to create a FAISS (Facebook AI Similarity Search) index. This index is a database used for efficient similarity search and clustering of high-dimensional vectors, which in this case, are the embeddings of the documents. The FAISS index is stored in the db variable.
Finally, the db variable is returned, representing the created database from the video transcript.
4. If an exception occurs during the execution of the try block, the code execution moves to the except block:
Here, it first converts the exception e to a string x.
Then it prints an error message.
Finally, it returns an empty string as an indication of the error.
defgetResponseFromQuery(self,db,query,k=4):try:""" gpt-3.5-turbo can handle up to 4097 tokens. Setting the chunksize to 1000 and k to 4 maximizesthenumberoftokenstoanalyze.""" mod_name = self.model_nametemp_val=self.temp_valdocs=db.similarity_search(query,k=k)docs_page_content="".join([d.page_contentfordindocs])chat=ChatOpenAI(model_name=mod_name,temperature=temp_val) # Templatetouseforthesystemmessageprompttemplate=ct.templateVal_1system_message_prompt=SystemMessagePromptTemplate.from_template(template) # Humanquestionprompthuman_template="Answer the following question: {question}"human_message_prompt=HumanMessagePromptTemplate.from_template(human_template)chat_prompt=ChatPromptTemplate.from_messages( [system_message_prompt,human_message_prompt] )chain=LLMChain(llm=chat,prompt=chat_prompt)response=chain.run(question=query,docs=docs_page_content)response=response.replace("\n","")returnresponse,docsexceptExceptionas e:x=str(e)print('Error: ',x)return'',''
The Python function getResponseFromQuery is designed to search a given database (db) for a specific query and then generate a response using a language model (possibly GPT-3.5-turbo). The answer is based on the content found and the particular question. Here is a simple English summary:
The function getResponseFromQuery takes three parameters: db, query, and k. The k parameter is optional and defaults to 4 if not provided. db is the database to search, the query is the question or prompts to analyze, and k is the number of similar items to return.
The function initiates a try-except block for handling any errors that might occur.
Inside the try block:
The function retrieves the model name and temperature value from the instance of the class this function is a part of.
The function then searches the db database for documents similar to the query and saves these in docs.
It concatenates the content of the returned documents into a single string docs_page_content.
It creates a ChatOpenAI object with the model name and temperature value.
It creates a system message prompt from a predefined template.
It creates a human message prompt, which is the query.
It combines these two prompts to form a chat prompt.
An LLMChain object is then created using the ChatOpenAI object and the chat prompt.
This LLMChain object is used to generate a response to the query using the content of the documents found in the database. The answer is then formatted by replacing all newline characters with empty strings.
Finally, the function returns this response along with the original documents.
If any error occurs during these operations, the function goes to the except block where:
The error message is printed.
The function returns two empty strings to indicate an error occurred, and no response or documents could be produced.
defextractContentInText(self,topic,query):try:discussedTopic= []strKeyText=''cnt=0max_cnt=self.max_cnturlList,channelList=self.topFiveURLFromYouTube(youtube,q=topic,part='id,snippet',maxResults=max_cnt,type='video')print('Returned List: ')print(urlList)print()forvideo_urlin urlList:print('Processing Video: ')print(video_url)db=self.createDBFromYoutubeVideoUrl(video_url)response,docs=self.getResponseFromQuery(db,query)iflen(response) >0:strKeyText='As per the topic discussed in '+channelList[cnt] +', 'discussedTopic.append(strKeyText+response)cnt+=1returndiscussedTopicexceptExceptionas e:discussedTopic= []x=str(e)print('Error: ',x)returndiscussedTopic
This Python function, extractContentInText, is aimed to extract relevant content from the transcripts of top YouTube videos on a specific topic and generate responses to a given query. Here’s a simple English translation:
The function extractContentInText is defined with topic and query as parameters.
It begins with a try-except block to catch and handle any possible exceptions.
In the try block:
It initializes several variables: an empty list discussedTopic to store the extracted information, an empty string strKeyText to keep specific parts of the content, a counter cnt initialized at 0, and max_cnt retrieved from the self-object to specify the maximum number of YouTube videos to consider.
It calls the topFiveURLFromYouTube function (defined previously) to get the URLs of the top videos on the given topic from YouTube. It also retrieves the list of channel names associated with these videos.
It prints the returned list of URLs.
Then, it starts a loop over each URL in the urlList.
For each URL, it prints the URL, then creates a database from the transcript of the YouTube video using the function createDBFromYoutubeVideoUrl.
It then uses the getResponseFromQuery function to get a response to the query based on the content of the database.
If the length of the response is greater than 0 (meaning there is a response), it forms a string strKeyText to indicate the channel that the topic was discussed on and then appends the answer to this string. This entire string is then added to the discussedTopic list.
It increments the counter cnt by one after each iteration.
Finally, it returns the discussedTopic list, which now contains relevant content extracted from the videos.
If any error occurs during these operations, the function goes into the except block:
It first resets discussedTopic to an empty list.
Then it converts the exception e to a string and prints the error message.
Lastly, it returns the empty discussedTopic list, indicating that no content could be extracted due to the error.
testLangChain.py (Main Python script to extract the transcript from the YouTube videos & then answer the questions based on the topics selected by the users.)
This file contains hidden or bidirectional Unicode text that may be interpreted or compiled differently than what appears below. To review, open the file in an editor that reveals hidden Unicode characters. Learn more about bidirectional Unicode characters
defmain():try:var=datetime.datetime.now().strftime("%Y-%m-%d_%H-%M-%S")print('*'*120)print('Start Time: '+str(var))print('*'*120) #query="What are they saying about Microsoft?"print('Please share your topic!')inputTopic=input('User: ')print('Please ask your questions?')inputQry=input('User: ')print()retList=cVCScrapper.extractContentInText(inputTopic,inputQry)cnt=0fordiscussedTopicin retList:finText=str(cnt+1) +') '+discussedTopicprint()print(textwrap.fill(finText,width=150))cnt+=1r1=len(retList)ifr1>0:print()print('Successfully Scrapped!')else:print()print('Failed to Scrappe!')print('*'*120)var1=datetime.datetime.now().strftime("%Y-%m-%d_%H-%M-%S")print('End Time: '+str(var1))exceptExceptionas e:x=str(e)print('Error: ',x)if__name__=="__main__":main()
The above main application will capture the topics from the user & then will give the user a chance to ask specific questions on the topics, invoking the main class to extract the transcript from YouTube & then feed it as a source using ChainLang & finally deliver the response. If there is no response, then it will skip the overall options.
USAGE & COST FACTOR:
Please find the OpenAI usage –
Please find the YouTube API usage –
So, finally, we’ve done it.
I know that this post is relatively bigger than my earlier post. But, I think, you can get all the details once you go through it.
You will get the complete codebase in the following GitHub link.
I’ll bring some more exciting topics in the coming days from the Python verse. Please share & subscribe to my post & let me know your feedback.
Till then, Happy Avenging! 🙂
Note: All the data & scenarios posted here are representational data & scenarios & available over the internet & for educational purposes only. Some of the images (except my photo) we’ve used are available over the net. We don’t claim ownership of these images. There is always room for improvement & especially in the prediction quality. Sample video taken from Santrel Media & you would find the link over here.
Today, I will discuss another very impressive & innovative new AI, which is now operational in Python. We’ll document a dummy python code with no comment captured through OpenAI’s ChatGPT model. But before we start, don’t we see the demo first?
Demo
Great! Let us understand we can leverage this by writing a tiny snippet using this new AI model.
Architecture:
Let us understand the flow of events –
The above diagram represents the newly released OpenAI ChatGPT, where one needs to supply the code, which was missed to capture the logic earlier due to whatever may be the reasons. We need to provide these scripts (maybe in parts) as source code to be analyzed. Then it will use this new model & translate that into English-like language & capture the logic/comments for that specific snippet.
Python Packages:
Following are the python packages that are necessary to develop this brilliant use case –
pip install pandas
pip install openai
To know more, please click the below – “Continue Reading” link –
Today, I’m going to discuss another Computer Vision installment. I’ll use Open CV & Kalman filter to predict a live ball movement of Cricket, one of the most popular sports in the Indian sub-continent, along with the UK & Australia. But before we start a deep dive, why don’t we first watch the demo?
Demo
Isn’t it exciting? Let’s explore it in detail.
Architecture:
Let us understand the flow of events –
The above diagram shows that the application, which uses Open CV, analyzes individual frames. It detects the cricket ball & finally, it tracks every movement by analyzing each frame & then it predicts (pink line) based on the supplied data points.
Python Packages:
Following are the python packages that are necessary to develop this brilliant use case –
Let us now understand the code. For this use case, we will only discuss three python scripts. However, we need more than these three. However, we have already discussed them in some of the early posts. Hence, we will skip them here.
clsPredictBodyLine.py (The main class that will handle the prediction of Cricket balls in the real-time video feed.)
This file contains hidden or bidirectional Unicode text that may be interpreted or compiled differently than what appears below. To review, open the file in an editor that reveals hidden Unicode characters. Learn more about bidirectional Unicode characters
Please find the key snippet from the above script –
kf = clsKalmanFilter()
The application is instantiating the modified Kalman filter.
myColorFinder = ColorFinder(False)
This command has more purpose than creating a proper mask in debug mode if you want to isolate the color of any object you want to track. To debug this property, one needs to set the flag to True. And you will see the following screen. Click the next video to get the process to generate the accurate HSV.
In the end, you will get a similar entry to the below one –
And you can see the entry that is available in the config for the following parameter –
The four points mentioned above will help us determine the best region for the ball, forcing the batsman to play the shots & a 90% chance of getting caught behind.
The snippets below will apply the mask & identify the contour of the objects which the program intends to track. In this case, we are talking about the pink cricket ball.
#Find the color ball
imgColor, mask = myColorFinder.update(img, hsvVals)

#Find location of the red_ball
imgContours, contours = cvzone.findContours(img, mask, minArea=500)

if contours:
    posListX.append(contours[0]['center'][0])
    posListY.append(contours[0]['center'][1])
The next key snippets are as follows –
if posListX:
    # Find the Coefficients
    A, B, C = np.polyfit(posListX, posListY, 2)

    for i, (posX, posY) in enumerate(zip(posListX, posListY)):
        pos = (posX, posY)
        cv2.circle(imgContours, pos, 10, (0,255,0), cv2.FILLED)

        # Using Karman Filter Prediction
        predicted = kf.predict(posX, posY)
        cv2.circle(imgContours, (predicted[0], predicted[1]), 12, (255,0,255), cv2.FILLED)

        ballDetectFlag = True
        if ballDetectFlag:
            print('Balls Detected!')

        if i == 0:
            cv2.line(imgContours, pos, pos, (0,255,0), 5)
            cv2.line(imgContours, predicted, predicted, (255,0,255), 5)
        else:
            predictedM = kf.predict(posListX[i-1], posListY[i-1])

            cv2.line(imgContours, pos, (posListX[i-1], posListY[i-1]), (0,255,0), 5)
            cv2.line(imgContours, predicted, predictedM, (255,0,255), 5)
The above lines will track the original & predicted lines & then it will plot on top of the frame in real time.
The next line will be as follows –
if len(posListX) < 10:

    # Calculation for best place to ball
    a1 = A
    b1 = B
    c1 = C - pT1

    X1 = int((- b1 - math.sqrt(b1**2 - (4*a1*c1)))/(2*a1))
    prediction1 = pT2 < X1 < pT3

    a2 = A
    b2 = B
    c2 = C - pT4

    X2 = int((- b2 - math.sqrt(b2**2 - (4*a2*c2)))/(2*a2))
    prediction2 = pT2 < X2 < pT3

    prediction = prediction1 | prediction2

if prediction:
    print('Good Length Ball!')
    sMsg = "Good Length Ball - (" + str(FrNo) + ")"
    cvzone.putTextRect(imgContours, sMsg, (50,150), scale=5, thickness=5, colorR=(0,200,0), offset=20)
else:
    print('Loose Ball!')
    sMsg = "Loose Ball - (" + str(FrNo) + ")"
    cvzone.putTextRect(imgContours, sMsg, (50,150), scale=5, thickness=5, colorR=(0,0,200), offset=20)
predictBodyLine.py (The main python script that will invoke the class to predict Cricket balls in the real-time video feed.)
This file contains hidden or bidirectional Unicode text that may be interpreted or compiled differently than what appears below. To review, open the file in an editor that reveals hidden Unicode characters. Learn more about bidirectional Unicode characters
# Passing source data csv file
x1 = pbdl.clsPredictBodyLine()

# Execute all the pass
r1 = x1.processVideo(debugInd, var)

if (r1 == 0):
    print('Successfully predicted body-line deliveries!')
else:
    print('Failed to predict body-line deliveries!')
The above lines will first instantiate the main class & then invoke it.
You can find it here if you want to know more about the Kalman filter.
So, finally, we’ve done it.
FOLDER STRUCTURE:
You will get the complete codebase in the following GitHub link.
I’ll bring some more exciting topics in the coming days from the Python verse. Please share & subscribe to my post & let me know your feedback.
Till then, Happy Avenging! 🙂
Note: All the data & scenarios posted here are representational data & scenarios & available over the internet & for educational purposes only. Some of the images (except my photo) we’ve used are available over the net. We don’t claim ownership of these images. There is always room for improvement & especially in the prediction quality.


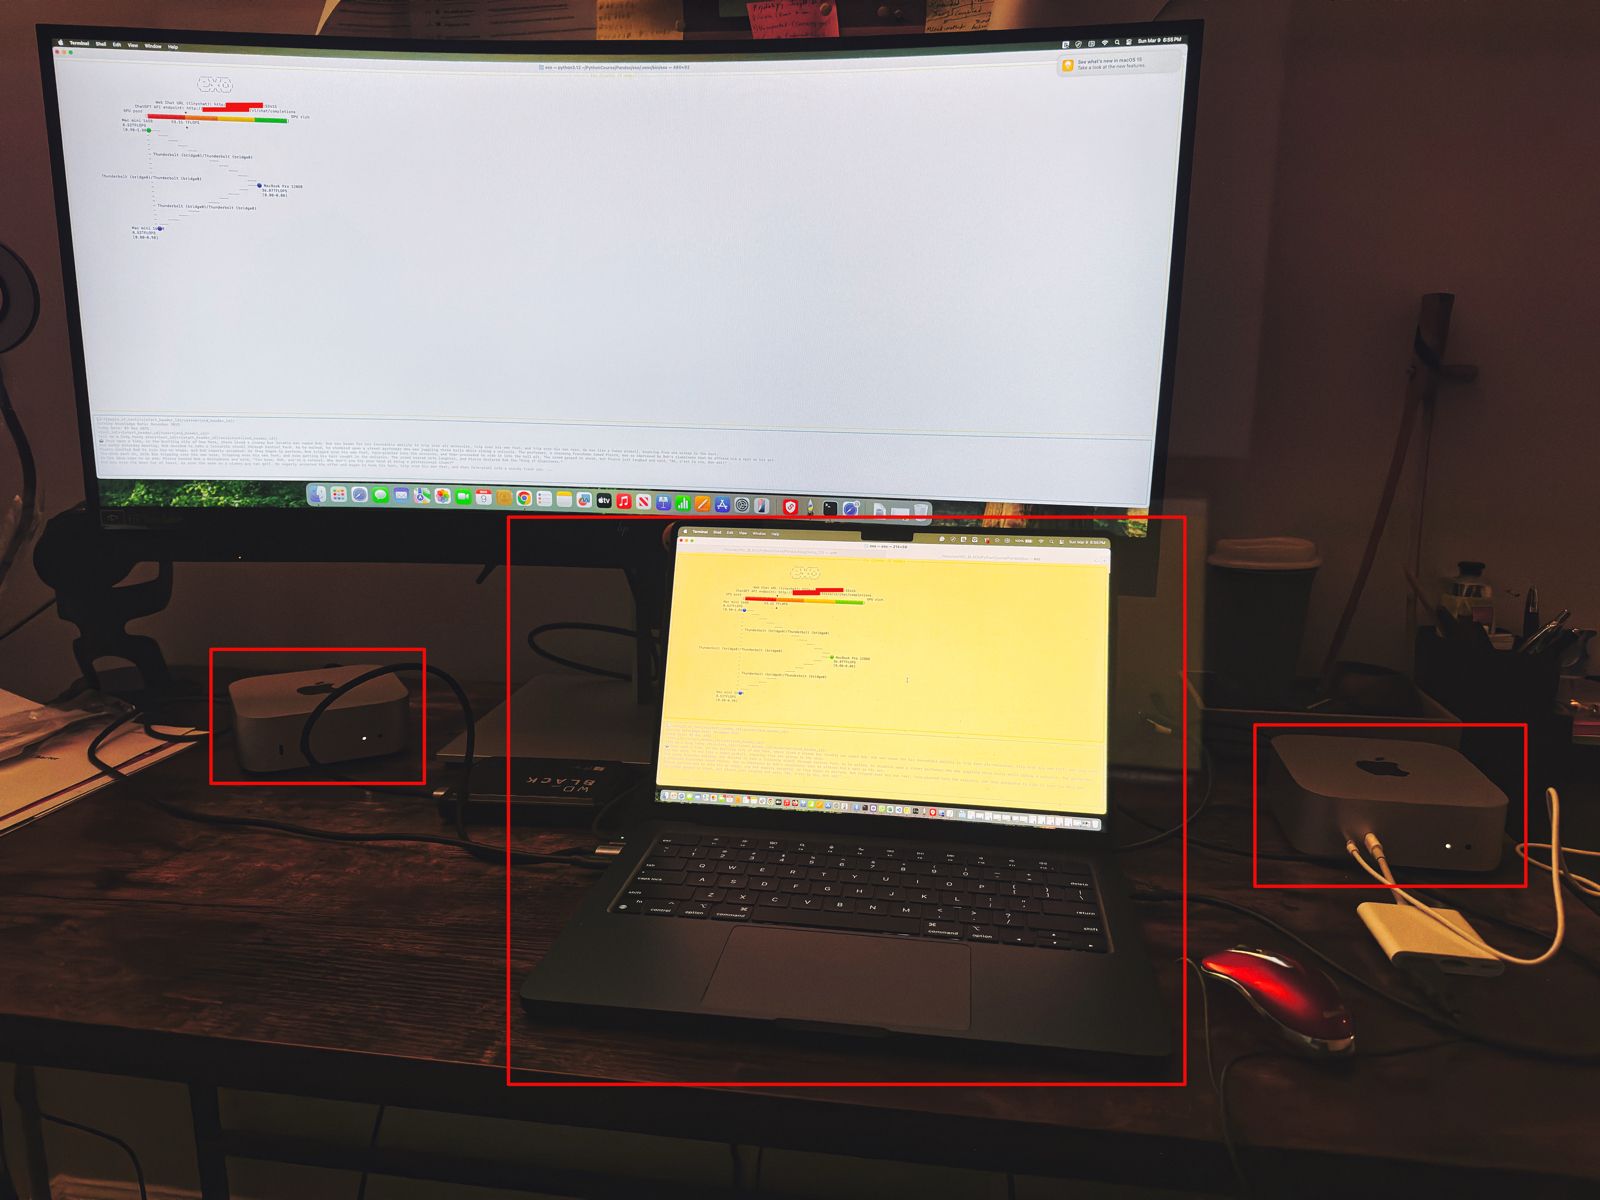
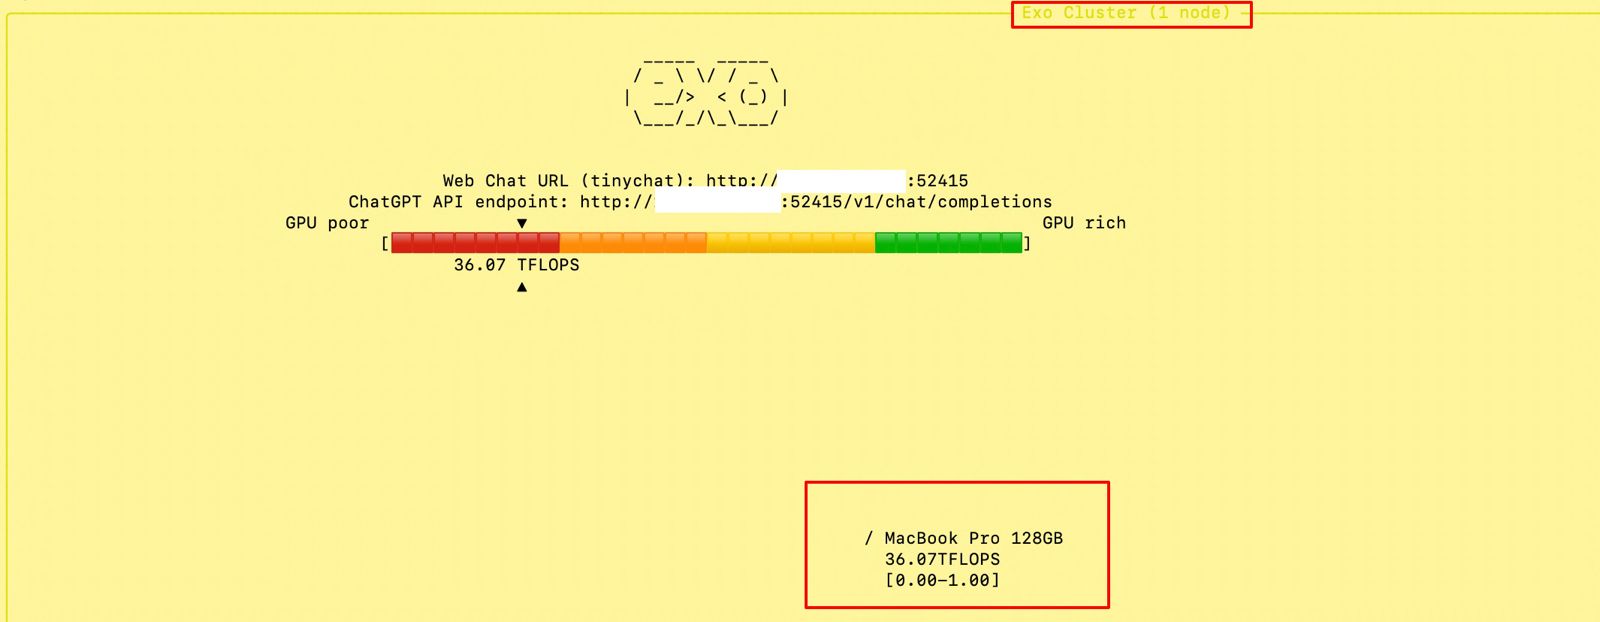


You must be logged in to post a comment.