
Today, I’ll be presenting another exciting capability of architecture in the world of LLMs, where you need to answer one crucial point & that is how valid the response generated by these LLMs is against your data. This response is critical when discussing business growth & need to take the right action at the right time.
Why not view the demo before going through it?
Isn’t it exciting? Great! Let us understand this in detail.
Flow of Architecture:

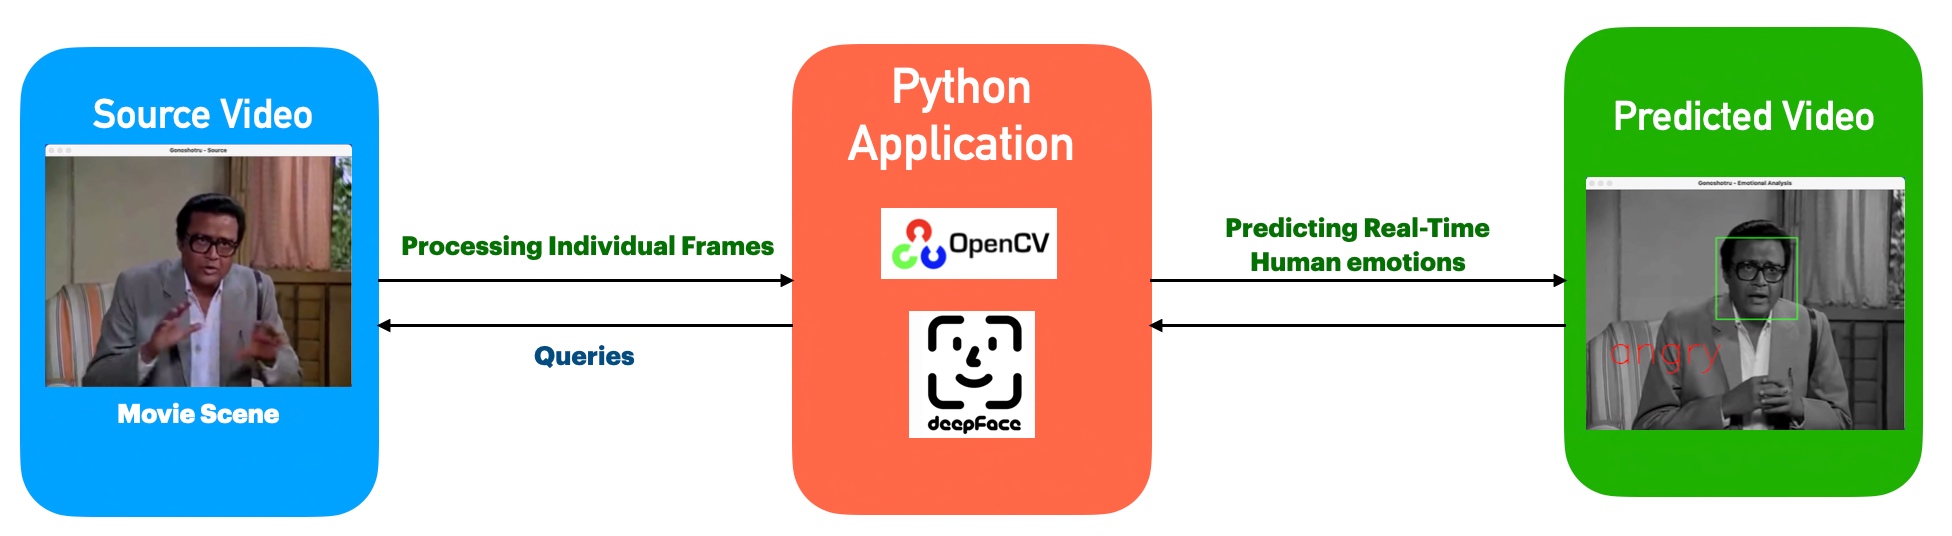
The first dotted box (extreme-left) represents the area that talks about the data ingestion from different sources, including third-party PDFs. It is expected that organizations should have ready-to-digest data sources. Examples: Data Lake, Data Mart, One Lake, or any other equivalent platforms. Those PDFs will provide additional insights beyond the conventional advanced analytics.
You need to have some kind of OCR solution that will extract all the relevant information in the form of text from the documents.

The next important part is how you define the chunking & embedding of data chunks into Vector DB. Chunking & indexing strategies, along with the overlapping chain, play a crucial importance in tying that segregated piece of context into a single context that will be fed into the source for your preferred LLMs.
This system employs a vector similarity search to browse through unstructured information and concurrently accesses the database to retrieve the context, ensuring that the responses are not only comprehensive but also anchored in validated knowledge.
This approach is particularly vital for addressing multi-hop questions, where a single query can be broken down into multiple sub-questions and may require information from numerous documents to generate an accurate answer.
Python Packages:
pip install openai==0.27.8
pip install pandas==2.0.3
pip install tensorflow==2.11.1
pip install faiss-cpu==1.7.4
pip install gensim==4.3.2
Let us understand the key class & snippets.
- clsFeedVectorDB.py (This is the main class that will invoke the Faiss framework to contextualize the docs inside the vector DB with the source file name to validate the answer from Gen AI using Globe.6B embedding models.)
Let us understand some of the key snippets from the above script (Full scripts will be available in the GitHub Repo) –
# Sample function to convert text to a vector
def text2Vector(self, text):
    # Encode the text using the tokenizer
    words = [word for word in text.lower().split() if word in self.model]

    # If no words in the model, return a zero vector
    if not words:
        return np.zeros(self.model.vector_size)

    # Compute the average of the word vectors
    vector = np.mean([self.model[word] for word in words], axis=0)
    return vector.reshape(1, -1)
This code is for a function called “text2Vector” that takes some text as input and converts it into a numerical vector. Let me break it down step by step:
- It starts by taking some text as input, and this text is expected to be a sentence or a piece of text.
- The text is then split into individual words, and each word is converted to lowercase.
- It checks if each word is present in a pre-trained language model (probably a word embedding model like Word2Vec or GloVe). If a word is not in the model, it’s ignored.
- If none of the words from the input text are found in the model, the function returns a vector filled with zeros. This vector has the same size as the word vectors in the model.
- If there are words from the input text in the model, the function calculates the average vector of these words. It does this by taking the word vectors for each word found in the model and computing their mean (average). This results in a single vector that represents the input text.
- Finally, the function reshapes this vector into a 2D array with one row and as many columns as there are elements in the vector. The reason for this reshaping is often related to compatibility with other parts of the code or libraries used in the project.
So, in simple terms, this function takes a piece of text, looks up the word vectors for the words in that text, and calculates the average of those vectors to create a single numerical representation of the text. If none of the words are found in the model, it returns a vector of zeros.
    def genData(self):
        try:
            basePath = self.basePath
            modelFileName = self.modelFileName
            vectorDBPath = self.vectorDBPath
            vectorDBFileName = self.vectorDBFileName

            # Create a FAISS index
            dimension = int(cf.conf['NO_OF_MODEL_DIM'])  # Assuming 100-dimensional vectors
            index = faiss.IndexFlatL2(dimension)

            print('*' * 240)
            print('Vector Index Your Data for Retrieval:')
            print('*' * 240)

            FullVectorDBname = vectorDBPath + vectorDBFileName
            indexFile = str(vectorDBPath) + str(vectorDBFileName) + '.index'

            print('File: ', str(indexFile))

            data = {}
            # List all files in the specified directory
            files = os.listdir(basePath)

            # Filter out files that are not text files
            text_files = [file for file in files if file.endswith('.txt')]

            # Read each text file
            for file in text_files:
                file_path = os.path.join(basePath, file)
                print('*' * 240)
                print('Processing File:')
                print(str(file_path))
                try:
                    # Attempt to open with utf-8 encoding
                    with open(file_path, 'r', encoding='utf-8') as file:
                        for line_number, line in enumerate(file, start=1):
                            # Assume each line is a separate document
                            vector = self.text2Vector(line)
                            vector = vector.reshape(-1)
                            index_id = index.ntotal

                            index.add(np.array([vector]))  # Adding the vector to the index
                            data[index_id] = {'text': line, 'line_number': line_number, 'file_name': file_path}  # Storing the line and file name
                except UnicodeDecodeError:
                    # If utf-8 fails, try a different encoding
                    try:
                        with open(file_path, 'r', encoding='ISO-8859-1') as file:
                            for line_number, line in enumerate(file, start=1):
                                # Assume each line is a separate document
                                vector = self.text2Vector(line)
                                vector = vector.reshape(-1)
                                index_id = index.ntotal
                                index.add(np.array([vector]))  # Adding the vector to the index
                                data[index_id] = {'text': line, 'line_number': line_number, 'file_name': file_path}  # Storing the line and file name
                    except Exception as e:
                        print(f"Could not read file {file}: {e}")
                        continue

                print('*' * 240)

            # Save the data dictionary using pickle
            dataCache = vectorDBPath + modelFileName
            with open(dataCache, 'wb') as f:
                pickle.dump(data, f)

            # Save the index and data for later use
            faiss.write_index(index, indexFile)

            print('*' * 240)

            return 0

        except Exception as e:
            x = str(e)
            print('Error: ', x)

return 1- This code defines a function called genData, and its purpose is to prepare and store data for later retrieval using a FAISS index. Let’s break down what it does step by step:
- It starts by assigning several variables, such as basePath, modelFileName, vectorDBPath, and vectorDBFileName. These variables likely contain file paths and configuration settings.
- It creates a FAISS index with a specified dimension (assuming 100-dimensional vectors in this case) using faiss.IndexFlatL2. FAISS is a library for efficient similarity search and clustering of high-dimensional data.
- It prints the file name and lines where the index will be stored. It initializes an empty dictionary called data to store information about the processed text data.
- It lists all the files in a directory specified by basePath. It filters out only the files that have a “.txt” extension as text files.
- It then reads each of these text files one by one. For each file:
- It attempts to open the file with UTF-8 encoding.
- It reads the file line by line.
- For each line, it calls a function text2Vector to convert the text into a numerical vector representation. This vector is added to the FAISS index.
- It also stores some information about the line, such as the line number and the file name, in the data dictionary.
- If there is an issue with UTF-8 encoding, it tries to open the file with a different encoding, “ISO-8859-1”. The same process of reading and storing data continues.
- If there are any exceptions (errors) during this process, it prints an error message but continues processing other files.
- Once all the files are processed, it saves the data dictionary using the pickle library to a file specified by dataCache.
- It also saves the FAISS index to a file specified by indexFile.
- Finally, it returns 0 if the process completes successfully or 1 if there was an error during execution.
In summary, this function reads text files, converts their contents into numerical vectors, and builds a FAISS index for efficient similarity search. It also saves the processed data and the index for later use. If there are any issues during the process, it prints error messages but continues processing other files.
- clsRAGOpenAI.py (This is the main class that will invoke the RAG class, which will get the contexts with references including source files, line numbers, and source texts. This will help the customer to validate the source against the OpenAI response to understand & control the data bias & other potential critical issues.)
Let us understand some of the key snippets from the above script (Full scripts will be available in the GitHub Repo) –
def ragAnswerWithHaystackAndGPT3(self, queryVector, k, question):
    modelName = self.modelName
    maxToken = self.maxToken
    temp = self.temp

    # Assuming getTopKContexts is a method that returns the top K contexts
    contexts = self.getTopKContexts(queryVector, k)
    messages = []

    # Add contexts as system messages
    for file_name, line_number, text in contexts:
        messages.append({"role": "system", "content": f"Document: {file_name} \nLine Number: {line_number} \nContent: {text}"})

    prompt = self.generateOpenaiPrompt(queryVector, k)
    prompt = prompt + "Question: " + str(question) + ". \n Answer based on the above documents."

    # Add user question
    messages.append({"role": "user", "content": prompt})

    # Create chat completion
    completion = client.chat.completions.create(
    model=modelName,
    messages=messages,
    temperature = temp,
    max_tokens = maxToken
    )

    # Assuming the last message in the response is the answer
    last_response = completion.choices[0].message.content
    source_refernces = ['FileName: ' + str(context[0]) + ' - Line Numbers: ' + str(context[1]) + ' - Source Text (Reference): ' + str(context[2]) for context in contexts]

return last_response, source_refernces- This code defines a function called ragAnswerWithHaystackAndGPT3. Its purpose is to use a combination of the Haystack search method and OpenAI’s GPT-3 model to generate an answer to a user’s question. Let’s break down what it does step by step:
- It starts by assigning several variables, such as modelName, maxToken, and temp. These variables likely contain model-specific information and settings for GPT-3.
- It calls a method getTopKContexts to retrieve the top K contexts (which are likely documents or pieces of text) related to the user’s query. These contexts are stored in the contexts variable.
- It initializes an empty list called messages to store messages that will be used in the conversation with the GPT-3 model.
- It iterates through each context and adds them as system messages to the messages list. These system messages provide information about the documents or sources being used in the conversation.
- It creates a prompt that combines the query, retrieved contexts, and the user’s question. This prompt is then added as a user message to the messages list. It effectively sets up the conversation for GPT-3, where the user’s question is followed by context.
- It makes a request to the GPT-3 model using the client.chat.completions.create method, passing in the model name, the constructed messages, and other settings such as temperature and maximum tokens.
- After receiving a response from GPT-3, it assumes that the last message in the response contains the answer generated by the model.
- It also constructs source_references, which is a list of references to the documents or sources used in generating the answer. This information includes the file name, line numbers, and source text for each context.
- Finally, it returns the generated answer (last_response) and the source references to the caller.
In summary, this function takes a user’s query, retrieves relevant contexts or documents, sets up a conversation with GPT-3 that includes the query and contexts, and then uses GPT-3 to generate an answer. It also provides references to the sources used in generating the answer.
    def getTopKContexts(self, queryVector, k):
        try:
            distances, indices = index.search(queryVector, k)
            resDict = [(data[i]['file_name'], data[i]['line_number'], data[i]['text']) for i in indices[0]]
            return resDict
        except Exception as e:
            x = str(e)
            print('Error: ', x)

            return x
This code defines a function called getTopKContexts. Its purpose is to retrieve the top K relevant contexts or pieces of information from a pre-built index based on a query vector. Here’s a breakdown of what it does:
- It takes two parameters as input:
queryVector, which is a numerical vector representing a query, andk, which specifies how many relevant contexts to retrieve. - Inside a try-except block, it attempts the following steps:
- It uses the
index.searchmethod to find the top K closest contexts to the givenqueryVector. This method returns two arrays:distances(measuring how similar the contexts are to the query) andindices(indicating the positions of the closest contexts in the data). - It creates a list called “
resDict", which contains tuples for each of the top K contexts. Each tuple contains three pieces of information: the file name (file_name), the line number (line_number), and the text content (text) of the context. These details are extracted from a data dictionary.
- It uses the
- If the process completes successfully, it returns the list of top K contexts (
resDict) to the caller. - If there’s an exception (an error) during this process, it captures the error message as a string (
x), prints the error message, and then returns the error message itself.
In summary, this function takes a query vector and finds the K most relevant contexts or pieces of information based on their similarity to the query. It returns these contexts as a list of tuples containing file names, line numbers, and text content. If there’s an error, it prints an error message and returns the error message string.
def generateOpenaiPrompt(self, queryVector, k):
    contexts = self.getTopKContexts(queryVector, k)
    template = ct.templateVal_1
    prompt = template
    for file_name, line_number, text in contexts:
        prompt += f"Document: {file_name}\n Line Number: {line_number} \n Content: {text}\n\n"
    return prompt
This code defines a function called generateOpenaiPrompt. Its purpose is to create a prompt or a piece of text that combines a template with information from the top K relevant contexts retrieved earlier. Let’s break down what it does:
- It starts by calling the
getTopKContextsfunction to obtain the top K relevant contexts based on a givenqueryVector. - It initializes a variable called
templatewith a predefined template value (likely defined elsewhere in the code). - It sets the
promptvariable to the initialtemplate. - Then, it enters a loop where it iterates through each of the relevant contexts retrieved earlier (contexts are typically documents or text snippets).
- For each context, it appends information to the
prompt. Specifically, it adds lines to thepromptthat include:- The document’s file name (
Document: [file_name]). - The line number within the document (
Line Number: [line_number]). - The content of the context itself (
Content: [text]).
- The document’s file name (
- It adds some extra spacing (newlines) between each context to ensure readability.
- Finally, it returns the complete –
prompt, which is a combination of the template and information from the relevant contexts.
In summary, this function takes a query vector, retrieves relevant contexts, and creates a prompt by combining a template with information from these contexts. This prompt can then be used as input for an AI model or system, likely for generating responses or answers based on the provided context.
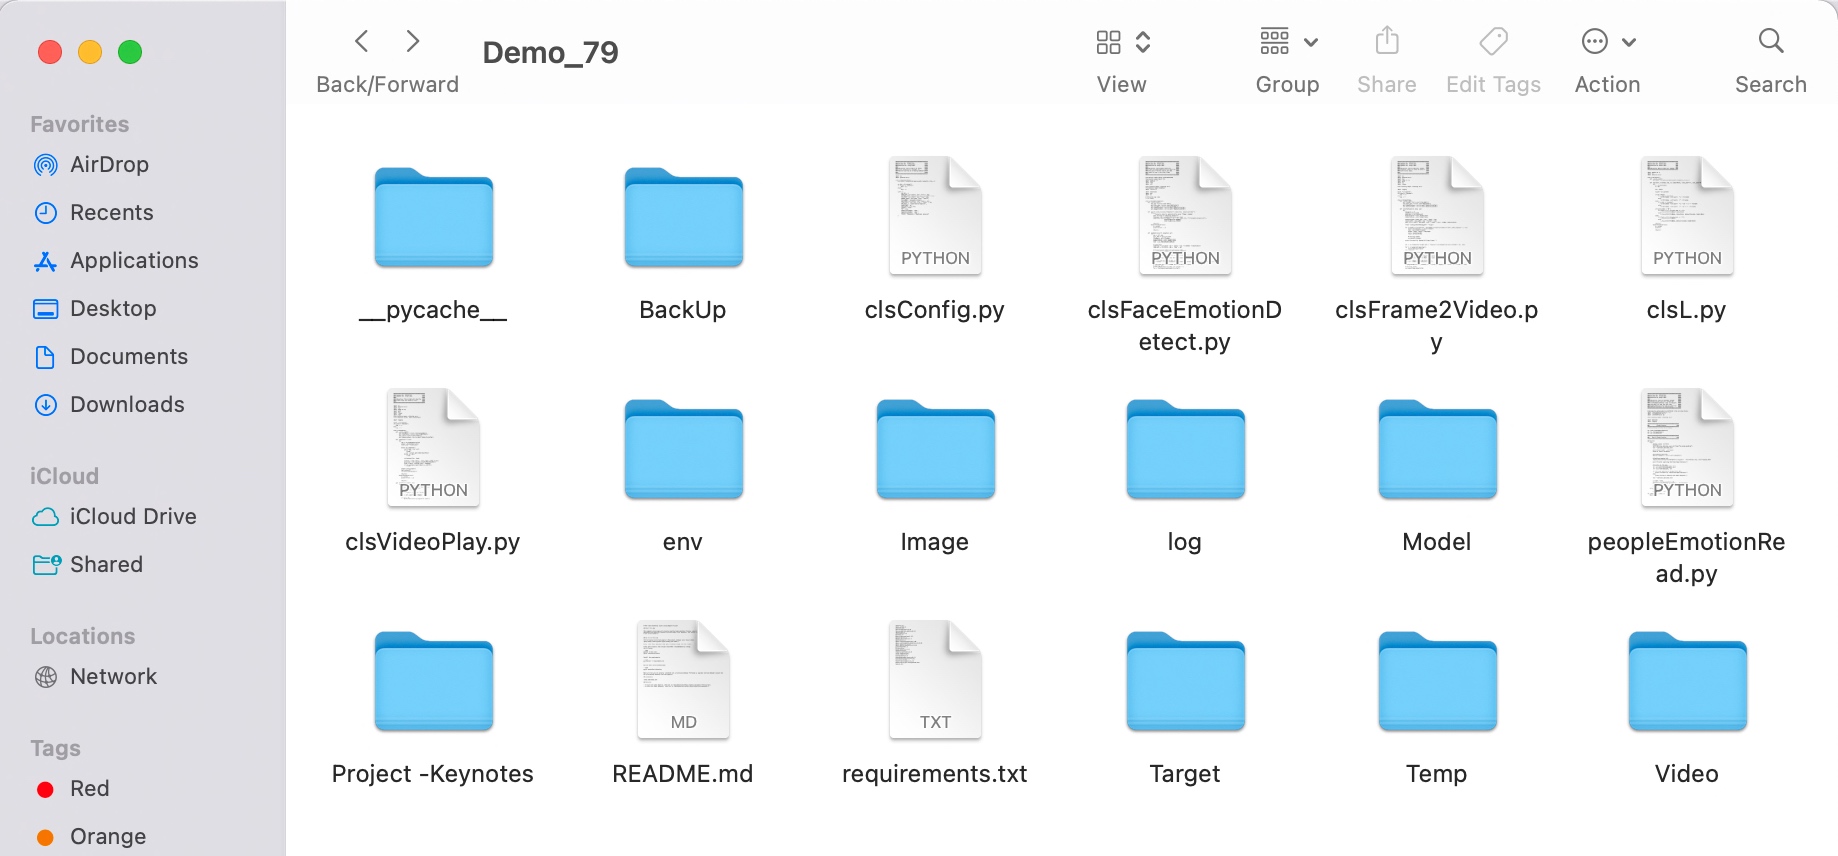
Let us understand the directory structure of this entire application –

To learn more about this package, please visit the following GitHub link.
So, finally, we’ve done it. I know that this post is relatively smaller than my earlier post. But, I think, you can get a good hack to improve some of your long-running jobs by applying this trick.
I’ll bring some more exciting topics in the coming days from the Python verse. Please share & subscribe to my post & let me know your feedback.
Till then, Happy Avenging! 🙂
Note: All the data & scenarios posted here are representational data & scenarios & available over the internet & for educational purposes only. Some of the images (except my photo) we’ve used are available over the net. We don’t claim ownership of these images. There is always room for improvement & especially in the prediction quality.


You must be logged in to post a comment.