This site mainly deals with various use cases demonstrated using Python, Data Science, Cloud basics, SQL Server, Oracle, Teradata along with SQL & their implementation. Expecting yours active participation & time. This blog can be access from your TP, Tablet & mobile also. Please provide your feedback.
It’s time to share another installment of fun & exciting posts from the world of Python-verse.
Today, We’ll be leveraging the Twilio voice API to send custom messages through phone calls directly. This service is beneficial on many occasions, including alerting the customer of potential payment reminders to pending product delivery calls to warehouse managers.
Dependent Packages:
Let us explore what packages we need for this –
Dependent Package Installation
The commands for your reference –
pip install twilio
pip install pandas
Also, you need to subscribe/register in Twilio. I’ve already shown you what to do about that. You can refer to my old post to know more about it. However, you need to reserve one phone number from which you will be calling your customers.
Buying phone numbers
As you can see, I’ve reserved one phone number to demonstrate this use case.
Let us explore the key codebase –
clsVoiceAPI.py (Main class invoking the voice API)
This file contains hidden or bidirectional Unicode text that may be interpreted or compiled differently than what appears below. To review, open the file in an editor that reveals hidden Unicode characters. Learn more about bidirectional Unicode characters
We’re invoking the Twilio API in the above block by giving both the calling & Callee numbers. And, we’re receiving the desired messages from our primary calling program, which the IVR will spell while calling to the customers.
2. callTwilioVoice.py (Main calling script)
This file contains hidden or bidirectional Unicode text that may be interpreted or compiled differently than what appears below. To review, open the file in an editor that reveals hidden Unicode characters. Learn more about bidirectional Unicode characters
        # Create the instance of the Twilio Voice API Class
        x1 = ca.clsVoiceAPI()

        # Let's pass this to our map section
        resSID = x1.sendCall(voiceCallText)
As you can see, we’re first instantiating the class & then calling the method from it by providing the appropriate messages that will eventually deliver to our customer. You can configure dynamic content & pass it to this class.
Let us explore the directory structure –
Directory Structures
Let us see how it runs –
Running Applications
You need to make sure that you are checking your balance of your Twilio account diligently.
Checking Balance
And, here is the sneak peak of how it looks like in an video –
Actual execution
For more information on IVR, please check the following link.
Today, We’re going to discuss the way to send SMS through popular 3rd-party API (Twilio) using Python 3.7.
Before that, you need to register with Twilio. By default, they will give you some credit in order to explore their API.
And, then you can get a virtual number from them, which will be used to exchange SMS between your trusted numbers for trial Account.
The basic architecture can be depicted are as follows –
How to get a verified number for your trial account?
Here is the way, you have to do that –
You can create your own trial account by using this link.
Apart from that, you need to download & install Ngrok. This is available for multi-platform. For our case, we’re using Windows.
The purpose is to run your local web service through a global API like interface. I’ll explain that later.
You need to register & install that on your computer –
Once, you download & install you need to use the global link of any running local server application like this –
This is the dummy link. I’ll hide the original link. However, every time when you restart the application, you’ll get a new link. So, you will be safe anyway. 🙂
Once, you get the link, you have to update that global link under the messaging section. Remember that, you have to keep the “/sms” part after that.
Let’s see our sample code. here, I would be integrating my custom developed BOT developed in Python. However, I’ll be only calling that library. We’re not going post any script or explain that over here.
1. serverSms.py ( This script is a server script, which is using flask framework & it will respond to the user’s text message by my custom developed BOT using Python)
# /usr/bin/env python
##############################################
#### Written By: SATYAKI DE               ####
#### Written On: 03-Nov-2019              ####
####                                      ####
#### Objective: This script will respond  ####
#### by BOT created by me. And, reply to  ####
#### sender about their queries.          ####
#### We're using Twillio API for this.    ####
####                                      ####
##############################################

from flask import Flask, request, redirect
from twilio import twiml
from twilio.twiml.messaging_response import Message, MessagingResponse
import logging
from flask import request
from SDChatbots.clsTalk2Bot import clsTalk2Bot

app = Flask(__name__)

@app.route("/sms", methods=['GET', 'POST'])
def sms_ahoy_reply():
    """Respond to incoming messages with a friendly SMS."""
    # Start our response
    # resp = twiml.Response()
    message_body = request.form['Body']

    print(message_body)
    logging.info(message_body)

    y = clsTalk2Bot()
    ret_val = y.TalkNow(message_body)
    zMsg = str(ret_val)
    print('Response: ', str(zMsg))

    resp = MessagingResponse()

    # Add a message
    resp.message(zMsg)

    return str(resp)

if __name__ == "__main__":
    app.run(debug=True)
Key lines from the above scripts are –
@app.route("/sms", methods=['GET', 'POST'])
The route is a way to let your application understand to trigger the appropriate functionalities inside your API.
message_body = request.form['Body']
Here, the application is capturing the incoming SMS & print that in your server log. We’ll see that when we run our application.
y = clsTalk2Bot()ret_val = y.TalkNow(message_body)zMsg = str(ret_val)
Now, the application is calling my developed python BOT & retrieve the response & convert it as a string before pushing the response SMS to the user, who originally send the SMS.
resp = MessagingResponse() --This is for Python 3.7 +# Add a messageresp.message(zMsg)return str(resp)
Finally, you are preparing the return SMS & send it back to the user.
For the old version, the following line might work –
resp=twiml.Response()
But, just check with the Twilio API.
Let’s run our server application. You will see the following screen –
Let’s see, if one someone ask some question. How the application will respond –
And, let’s explore how our server application is receiving it & the response from the server –
Note that, we’ll be only sending the text to SMS, not the statistics sent by my BOT marked in RED. 😀
Let’s check the response from the BOT –
Yes! We did it. 😀
But, make sure you are regularly checking your billing as this will cost you money. Always, check the current balance –
You can check the usage from the following tab –
You can create a billing alarm to monitor your usage –
Let me know, how do you like it.
So, we’ll come out with another exciting post in the coming days!
N.B.: This is demonstrated for RnD/study purposes. All the data posted here are representational data & available over the internet.
Today, we’ll be discussing one new post of converting text into a voice using some third-party APIs. This is particularly very useful in many such cases, where you can use this method to get more realistic communication.
There are many such providers, where you can get an almost realistic voice for both males & females. However, most of them are subscription-based. So, you have to be very careful about your budget & how to proceed.
For testing purposes, I’ll be using voice.org to simulate this.
Let’s look out the architecture of this process –
As you can see, the user-initiated the application & provide some input in the form of plain text. Once the data is given, the app will send it to the third-party API for the process. Now, the Third-party API will verify the authentication & then it will check all the associate parameters before it starting to generate the audio response. After that, it will send the payload & that will be received by the calling python application. Here, it will be decoded & create the audio file & finally, that will be played at the invoking computer.
This third-party API has lots of limitations. However, they are giving you the platform to test your concept.
As of now, they support the following languages – English, Chinese, Catalan, French, Finnish, Dutch, Danish, German, Italian, Japanese, Korean, Polish, Norwegian, Portuguese, Russian, Spanish & Sweedish.
In our case, we’ll be checking with English.
To work with this, you need to have the following modules installed in python –
playsound
requests
base64
Let’s see the directory structure –
Again, we are not going to discuss any script, which we’ve already discussed here.
Hence, we’re skipping clsL.py here.
1. clsConfig.py (This script contains all the parameters of the server.)
##############################################
#### Written By: SATYAKI DE               ####
#### Written On: 12-Oct-2019              ####
####                                      ####
#### Objective: This script is a config   ####
#### file, contains all the keys for      ####
#### azure cosmos db. Application will    ####
#### process these information & perform  ####
#### various CRUD operation on Cosmos DB. ####
##############################################

import os
import platform as pl

class clsConfig(object):
    Curr_Path = os.path.dirname(os.path.realpath(__file__))

    os_det = pl.system()
    if os_det == "Windows":
        sep = '\\'
    else:
        sep = '/'

    config = {
        'APP_ID': 1,
        'url': "https://voicerss-text-to-speech.p.rapidapi.com/",
        'host': "voicerss-text-to-speech.p.rapidapi.com",
        'api_key': "xxxxxxxxxxxxxxxxxxxxxxxxxxxxxxxxxxxxx",
        'targetFile': "Bot_decode.mp3",
        'pitch_speed': "-6",
        'bot_language': "en-us",
        'audio_type': "mp3",
        'audio_freq': "22khz_8bit_stereo",
        'query_string_api': "hhhhhhhhhhhhhhhhhhhhhhhhhhhh",
        'b64_encoding': True,
        'APP_DESC_1': 'Text to voice conversion.',
        'DEBUG_IND': 'N',
        'INIT_PATH': Curr_Path,
        'LOG_PATH': Curr_Path + sep + 'log' + sep
    }
For security reasons, sensitive information masked with the dummy value.
This two information is private to each subscriber. Hence, I’ve removed them & updated with some dummy values.
You have to fill-up with your subscribed information.
2. clsText2Voice.py (This script will convert the text data into an audio file using a GET API request from the third-party API & then play that using the web media player.)
###############################################
#### Written By: SATYAKI DE                ####
#### Written On: 27-Oct-2019               ####
#### Modified On 27-Oct-2019               ####
####                                       ####
#### Objective: Main class converting      ####
#### text to voice using third-party API.  ####
###############################################

from playsound import playsound
import requests
import base64
from clsConfig import clsConfig as cf

class clsText2Voice:
    def __init__(self):
        self.url = cf.config['url']
        self.api_key = cf.config['api_key']
        self.targetFile = cf.config['targetFile']
        self.pitch_speed = cf.config['pitch_speed']
        self.bot_language = cf.config['bot_language']
        self.audio_type = cf.config['audio_type']
        self.audio_freq = cf.config['audio_freq']
        self.b64_encoding = cf.config['b64_encoding']
        self.query_string_api = cf.config['query_string_api']
        self.host = cf.config['host']

    def getAudio(self, srcString):
        try:
            url = self.url
            api_key = self.api_key
            tarFile = self.targetFile
            pitch_speed = self.pitch_speed
            bot_language = self.bot_language
            audio_type = self.audio_type
            audio_freq = self.audio_freq
            b64_encoding = self.b64_encoding
            query_string_api = self.query_string_api
            host = self.host

            querystring = {
                "r": pitch_speed,
                "c": audio_type,
                "f": audio_freq,
                "src": srcString,
                "hl": bot_language,
                "key": query_string_api,
                "b64": b64_encoding
            }

            headers = {
                'x-rapidapi-host': host,
                'x-rapidapi-key': api_key
            }

            response = requests.request("GET", url, headers=headers, params=querystring)

            # Converting to MP3
            targetFile = tarFile
            mp3File_64_decode = base64.decodebytes(bytes(response.text, encoding="utf-8"))
            mp3File_result = open(targetFile, 'wb')

            # create a writable mp3File and write the decoding result
            mp3File_result.write(mp3File_64_decode)
            mp3File_result.close()

            playsound(targetFile)

            return 0
        except Exception as e:
            x = str(e)
            print('Error: ', x)

            return 1
You can configure the voice of the audio by adjusting all the configurations. And, the text content will receive at srcString. So, whatever user will be typing that will be directly captured here & form the JSON payload accordingly.
In this case, you will be receiving the audio file in the form of a base64 text file. Hence, you need to convert them back to the sound file by these following lines –
# Converting to MP3targetFile = tarFilemp3File_64_decode = base64.decodebytes(bytes(response.text, encoding="utf-8"))mp3File_result = open(targetFile, 'wb')# create a writable mp3File and write the decoding resultmp3File_result.write(mp3File_64_decode)mp3File_result.close()
As you can see that, we’ve extracted the response.text & then we’ve decoded that to byte object to form the mp3 sound file at the receiving end.
Once we have our mp3 file ready, the following line simply plays the audio record.
playsound(targetFile)
Thus you can hear the actual voice.
3. callText2Voice.py (This is the main script that will invoke the text to voice API & then playback the audio once it gets the response from the third-party API.)
###############################################
#### Written By: SATYAKI DE                ####
#### Written On: 27-Oct-2019               ####
#### Modified On 27-Oct-2019               ####
####                                       ####
#### Objective: Main class converting      ####
#### text to voice using third-party API.  ####
###############################################

from clsConfig import clsConfig as cf
import clsL as cl
import logging
import datetime
import clsText2Voice as ct

# Disbling Warning
def warn(*args, **kwargs):
    pass

import warnings
warnings.warn = warn

var = datetime.datetime.now().strftime("%Y-%m-%d_%H-%M-%S")

def main():
    try:
        ret_2 = ''
        debug_ind = 'Y'

        general_log_path = str(cf.config['LOG_PATH'])

        # Enabling Logging Info
        logging.basicConfig(filename=general_log_path + 'consolidatedTwitter.log', level=logging.INFO)

        # Initiating Log Class
        l = cl.clsL()

        # Moving previous day log files to archive directory
        log_dir = cf.config['LOG_PATH']

        tmpR0 = "*" * 157

        logging.info(tmpR0)
        tmpR9 = 'Start Time: ' + str(var)
        logging.info(tmpR9)
        logging.info(tmpR0)

        print("Log Directory::", log_dir)
        tmpR1 = 'Log Directory::' + log_dir
        logging.info(tmpR1)

        # Query using parameters
        rawQry = str(input('Enter your string:'))

        x1 = ct.clsText2Voice()
        ret_2 = x1.getAudio(rawQry)

        if ret_2 == 0:
            print("Successfully converted from text to voice!")
            logging.info("Successfully converted from text to voice!")
            print("*" * 157)
            logging.info(tmpR0)
        else:
            print("Successfuly converted!")
            logging.info("Successfuly converted!")
            print("*" * 157)
            logging.info(tmpR0)

        print("*" * 157)
        logging.info(tmpR0)

        tmpR10 = 'End Time: ' + str(var)
        logging.info(tmpR10)
        logging.info(tmpR0)

    except ValueError:
        print("No relevant data to proceed!")
        logging.info("No relevant data to proceed!")

    except Exception as e:
        print("Top level Error: args:{0}, message{1}".format(e.args, e.message))

if __name__ == "__main__":
    main()
Essential lines from the above script –
# Query using parametersrawQry = str(input('Enter your string:'))x1 = ct.clsText2Voice()ret_2 = x1.getAudio(rawQry)
As you can see, here the user will be passing the text content, which will be given to our class & then it will project the audio sound of that text.
Let’s see how it runs –
Input Text:Welcome to Satyaki De’s blog. This site mainly deals with the Python, SQL from different DBs & many useful areas from the leading cloud providers.
And, here is the run command under Windows OS looks like –
And, please find the sample voice that it generates –
So, We’ve done it! 😀
Let us know your comment on this.
So, we’ll come out with another exciting post in the coming days!
N.B.: This is demonstrated for RnD/study purposes. All the data posted here are representational data & available over the internet.
Today, we’ll be discussing a preview features from Microsoft Azure. Building an Azure function using Python on it’s Linux/Ubuntu VM. Since this is a preview feature, we cannot implement this to production till now. However, my example definitely has more detailed steps & complete code guide compared to whatever available over the internet.
In this post, I will take one of my old posts & enhance it as per this post. Hence, I’ll post those modified scripts. However, I won’t discuss the logic in details as most of these scripts have cosmetic changes to cater to this requirement.
In this post, we’ll only show Ubuntu run & there won’t be Windows or MAC comparison.
Initial Environment Preparation:
Set-up new virtual machine on Azure.
Set-up Azure function environments on that server.
Set-up new virtual machine on Azure:
I’m not going into the details of how to create Ubuntu VM on Microsoft Azure. You can refer the steps in more information here.
After successful creation, the VM will look like this –
Detailed information you can get after clicking this hyperlink over the name of the VM.
You have to open port 7071 for application testing from the local using postman.
You can get it from the network option under VM as follows –
Make sure that you are restricting these ports to specific network & not open to ALL traffic.
So, your VM is ready now.
To update Azure CLI, you need to use the following commands –
Set-up Azure function environments on that server:
To set-up the environment, you don’t have to go for Python installation as by default Ubuntu in Microsoft Azure comes up with desired Python version, i.e., Python3.6. However, to run the python application, you need to install the following app –
Microsoft SDK. You will get the details from this link.
Installing node-js. You will get the details from this link.
You need to install a docker. However, as per Microsoft official version, this is not required. But, you can create a Docker container to distribute the python function in Azure application. I would say you can install this just in case if you want to continue with this approach. You will get the details over here. If you want to know details about the Docker. And, how you want to integrate python application. You can refer to this link.
Creating an Azure function template on Ubuntu. The essential detail you’ll get it from here. However, over there, it was not shown in detailed steps of python packages & how you can add all the dependencies to publish it in details. It was an excellent post to start-up your knowledge.
Let’s see these components status & very brief details –
Microsoft SDK:
To check the dot net version. You need to type the following commands in Ubuntu –
dotnet –info
And, the output will look like this –
Node-Js:
Following is the way to verify your node-js version & details –
node -v
npm -v
And, the output looks like this –
Docker:
Following is the way to test your docker version –
docker -v
And, the output will look like this –
Python Packages:
Following are the python packages that we need to run & publish that in Azure cloud as an Azure function –
You must be wondered that why have I used this grep commands here. I’ve witnessed that on many occassion in Microsoft Azure’s Linux VM it produces one broken package called resource=0.0.0, which will terminate the deployment process. Hence, this is very crucial to eliminate those broken packages.
Now, we’re ready for our python scripts. But, before that, let’s see the directory structure over here –
Creating an Azure Function Template on Ubuntu:
Before we post our python scripts, we’ll create these following components, which is essential for our Python-based Azure function –
Creating a group:
Creating a group either through Azure CLI or using a docker, you can proceed. The commands for Azure CLI is as follows –
az group create –name “rndWestUSGrp” –location westus
I’m sure. You don’t want to face that again. And, here is the output –
Note that, here I haven’t used the double-quotes. But, to avoid any unforeseen issues – you should use double-quotes. You can refer the docker command from the above link, which I’ve shared earlier.
Now, you need to create one storage account where the metadata information of your function will be stored. You will create that as follows –
And, the final content of these two files (excluding the requirements.txt) will look like this –
Finally, we’ll create the template function by this following command –
func new
This will follow with steps finish it. You need to choose Python as your programing language. You need to choose an HTTP trigger template. Once you created that successfully, you’ll see the following files –
Note that, our initial function name is -> getVal.
By default, Azure will generate some default code inside the __init__.py. The details of those two files can be found here.
Since we’re ready with our environment setup. We can now discuss our Python scripts –
1. clsConfigServer.py (This script contains all the parameters of the server.)
2. clsEnDec.py (This script is a lighter version of encryption & decryption of our previously discussed scenario. Hence, we won’t discuss in details. You can refer my earlier post to understand the logic of this script.)
###########################################
#### Written By: SATYAKI DE        ########
#### Written On: 25-Jan-2019       ########
#### Package Cryptography needs to ########
#### install in order to run this  ########
#### script.                       ########
####                               ########
#### Objective: This script will   ########
#### encrypt/decrypt based on the  ########
#### hidden supplied salt value.   ########
###########################################

from cryptography.fernet import Fernet
import logging

from getVal.clsConfigServer import clsConfigServer as csf

class clsEnDec(object):

    def __init__(self):
        # Calculating Key
        self.token = str(csf.config['DEF_SALT'])

    def encrypt_str(self, data, token):
        try:
            # Capturing the Salt Information
            t1 = self.token
            t2 = token

            if t2 == '':
                salt = t1
            else:
                salt = t2

            logging.info("Encrypting the value!")

            # Checking Individual Types inside the Dataframe
            cipher = Fernet(salt)
            encr_val = str(cipher.encrypt(bytes(data,'utf8'))).replace("b'","").replace("'","")

            strV1 = "Encrypted value:: " + str(encr_val)
            logging.info(strV1)

            return encr_val

        except Exception as e:
            x = str(e)
            print(x)
            encr_val = ''

            return encr_val

    def decrypt_str(self, data, token):
        try:
            # Capturing the Salt Information
            t1 = self.token
            t2 = token

            if t2 == '':
                salt = t1
            else:
                salt = t2

            logging.info("Decrypting the value!")

            # Checking Individual Types inside the Dataframe
            cipher = Fernet(salt)
            decr_val = str(cipher.decrypt(bytes(data,'utf8'))).replace("b'","").replace("'","")

            strV2 = "Decrypted value:: " + str(decr_val)
            logging.info(strV2)

            return decr_val

        except Exception as e:
            x = str(e)
            print(x)
            decr_val = ''

            return decr_val
3. clsFlask.py (This is the main server script that will the encrypt/decrypt class from our previous scenario. This script will capture the requested JSON from the client, who posted from the clients like another python script or third-party tools like Postman.)
###########################################
#### Written By: SATYAKI DE            ####
#### Written On: 25-Jan-2019           ####
#### Package Flask package needs to    ####
#### install in order to run this      ####
#### script.                           ####
####                                   ####
#### Objective: This script will       ####
#### encrypt/decrypt based on the      ####
#### supplied salt value. Also,        ####
#### this will capture the individual  ####
#### element & stored them into JSON   ####
#### variables using flask framework.  ####
###########################################

from getVal.clsConfigServer import clsConfigServer as csf
from getVal.clsEnDec import clsEnDecAuth

getVal = clsEnDec()

import logging

class clsFlask(object):
    def __init__(self):
        self.xtoken = str(csf.config['DEF_SALT'])

    def getEncryptProcess(self, dGroup, input_data, dTemplate):
        try:
            # It is sending default salt value
            xtoken = self.xtoken

            # Capturing the individual element
            dGroup = dGroup
            input_data = input_data
            dTemplate = dTemplate

            # This will check the mandatory json elements
            if ((dGroup != '') & (dTemplate != '')):

                # Based on the Group & Element it will fetch the salt
                # Based on the specific salt it will encrypt the data
                if ((dGroup == 'GrDet') & (dTemplate == 'subGrAcct_Nbr')):
                    xtoken = str(csf.config['ACCT_NBR_SALT'])

                    strV1 = "xtoken: " + str(xtoken)
                    logging.info(strV1)
                    strV2 = "Flask Input Data: " + str(input_data)
                    logging.info(strV2)

                    #x = cen.clsEnDecAuth()
                    ret_val = getVal.encrypt_str(input_data, xtoken)
                elif ((dGroup == 'GrDet') & (dTemplate == 'subGrName')):
                    xtoken = str(csf.config['NAME_SALT'])

                    strV1 = "xtoken: " + str(xtoken)
                    logging.info(strV1)
                    strV2 = "Flask Input Data: " + str(input_data)
                    logging.info(strV2)

                    #x = cen.clsEnDecAuth()
                    ret_val = getVal.encrypt_str(input_data, xtoken)
                elif ((dGroup == 'GrDet') & (dTemplate == 'subGrPhone')):
                    xtoken = str(csf.config['PHONE_SALT'])

                    strV1 = "xtoken: " + str(xtoken)
                    logging.info(strV1)
                    strV2 = "Flask Input Data: " + str(input_data)
                    logging.info(strV2)

                    #x = cen.clsEnDecAuth()
                    ret_val = getVal.encrypt_str(input_data, xtoken)
                elif ((dGroup == 'GrDet') & (dTemplate == 'subGrEmail')):
                    xtoken = str(csf.config['EMAIL_SALT'])

                    strV1 = "xtoken: " + str(xtoken)
                    logging.info(strV1)
                    strV2 = "Flask Input Data: " + str(input_data)
                    logging.info(strV2)

                    #x = cen.clsEnDecAuth()
                    ret_val = getVal.encrypt_str(input_data, xtoken)
                else:
                    ret_val = ''
            else:
                ret_val = ''

            # Return value
            return ret_val

        except Exception as e:
            ret_val = ''
            # Return the valid json Error Response
            return ret_val

    def getDecryptProcess(self, dGroup, input_data, dTemplate):
        try:
            xtoken = self.xtoken

            # Capturing the individual element
            dGroup = dGroup
            input_data = input_data
            dTemplate = dTemplate

            # This will check the mandatory json elements
            if ((dGroup != '') & (dTemplate != '')):

                # Based on the Group & Element it will fetch the salt
                # Based on the specific salt it will decrypt the data
                if ((dGroup == 'GrDet') & (dTemplate == 'subGrAcct_Nbr')):
                    xtoken = str(csf.config['ACCT_NBR_SALT'])

                    strV1 = "xtoken: " + str(xtoken)
                    logging.info(strV1)
                    strV2 = "Flask Input Data: " + str(input_data)
                    logging.info(strV2)

                    #x = cen.clsEnDecAuth()
                    ret_val = getVal.decrypt_str(input_data, xtoken)
                elif ((dGroup == 'GrDet') & (dTemplate == 'subGrName')):
                    xtoken = str(csf.config['NAME_SALT'])

                    strV1 = "xtoken: " + str(xtoken)
                    logging.info(strV1)
                    strV2 = "Flask Input Data: " + str(input_data)
                    logging.info(strV2)

                    #x = cen.clsEnDecAuth()
                    ret_val = getVal.decrypt_str(input_data, xtoken)
                elif ((dGroup == 'GrDet') & (dTemplate == 'subGrPhone')):
                    xtoken = str(csf.config['PHONE_SALT'])

                    strV1 = "xtoken: " + str(xtoken)
                    logging.info(strV1)
                    strV2 = "Flask Input Data: " + str(input_data)
                    logging.info(strV2)

                    #x = cen.clsEnDecAuth()
                    ret_val = getVal.decrypt_str(input_data, xtoken)
                elif ((dGroup == 'GrDet') & (dTemplate == 'subGrEmail')):
                    xtoken = str(csf.config['EMAIL_SALT'])

                    strV1 = "xtoken: " + str(xtoken)
                    logging.info(strV1)
                    strV2 = "Flask Input Data: " + str(input_data)
                    logging.info(strV2)

                    #x = cen.clsEnDecAuth()
                    ret_val = getVal.decrypt_str(input_data, xtoken)
                else:
                    ret_val = ''
            else:
                ret_val = ''

            # Return value
            return ret_val

        except Exception as e:
            ret_val = ''
            # Return the valid Error Response
            return ret_val
4. __init__.py (This autogenerated script contains the primary calling methods of encryption & decryption based on the element header & values after enhanced as per the functionality.)
###########################################
#### Written By: SATYAKI DE            ####
#### Written On: 08-Jun-2019           ####
#### Package Flask package needs to    ####
#### install in order to run this      ####
#### script.                           ####
####                                   ####
#### Objective: Main Calling scripts.  ####
#### This is an autogenrate scripts.   ####
#### However, to meet the functionality####
#### we've enhanced as per our logic.  ####
###########################################
__all__ = ['clsFlask']

import logging
import azure.functions as func
import json

from getVal.clsFlask import clsFlask

getVal = clsFlask()

def main(req: func.HttpRequest) -> func.HttpResponse:
    logging.info('Python Encryption function processed a request.')

    str_val = 'Input Payload:: ' + str(req.get_json())
    str_1 = str(req.get_json())

    logging.info(str_val)

    ret_val = {}
    DataIn = ''
    dGroup = ''
    dTemplate = ''
    flg = ''

    if (str_1 != ''):
        try:
            req_body = req.get_json()
            dGroup = req_body.get('dataGroup')

            try:
                DataIn = req_body.get('data')
                strV15 = 'If Part:: ' + str(DataIn)

                logging.info(strV15)

                if ((DataIn == '') | (DataIn == None)):
                    raise ValueError

                flg = 'Y'
            except ValueError:
                DataIn = req_body.get('edata')
                strV15 = 'Else Part:: ' + str(DataIn)
                logging.info(strV15)
                flg = 'N'
            except:
                DataIn = req_body.get('edata')
                strV15 = 'Else Part:: ' + str(DataIn)
                logging.info(strV15)
                flg = 'N'

            dTemplate = req_body.get('dataTemplate')

        except ValueError:
            pass

    strV5 = "Encrypt Decrypt Flag:: " + flg
    logging.info(strV5)

    if (flg == 'Y'):

        if ((DataIn != '') & ((dGroup != '') & (dTemplate != ''))):

            logging.info("Encryption Started!")
            ret_val = getVal.getEncryptProcess(dGroup, DataIn, dTemplate)
            strVal2 = 'Return Payload:: ' + str(ret_val)
            logging.info(strVal2)

            xval = json.dumps(ret_val)

            return func.HttpResponse(xval)
        else:
            return func.HttpResponse(
                 "Please pass a data in the request body",
                 status_code=400
            )
    else:

        if ((DataIn != '') & ((dGroup != '') & (dTemplate != ''))):

            logging.info("Decryption Started!")
            ret_val2 = getVal.getDecryptProcess(dGroup, DataIn, dTemplate)
            strVal3 = 'Return Payload:: ' + str(ret_val)
            logging.info(strVal3)

            xval1 = json.dumps(ret_val2)

            return func.HttpResponse(xval1)
        else:
            return func.HttpResponse(
                "Please pass a data in the request body",
                status_code=400
            )
In this script, based on the value of an flg variable, we’re calling our encryption or decryption methods. And, the value of the flg variable is set based on the following logic –
So, if the application gets the “data” element then – it will consider the data needs to be encrypted; otherwise, it will go for decryption. And, based on that – it is setting the value.
Now, we’re ready to locally run our application –
func host start
And, the output will look like this –
Let’s test it from postman –
Encrypt:
Decrypt:
Great. Now, we’re ready to publish this application to Azure cloud.
As in our earlier steps, we’ve already built our storage account for the metadata. Please scroll to top to view that again. Now, using that information, we’ll make the function app with a more meaningful name –
az functionapp create –resource-group rndWestUSGrp –os-type Linux \ –consumption-plan-location westus –runtime python \ –name getEncryptDecrypt –storage-account cryptpy2019
On many occassion, without the use of “–build-native-deps” might leads to failure. Hence, I’ve added that to avoid such scenarios.
Now, we need to test our first published complex Azure function with Python through postman –
Encrypt:
Decrypt:
Wonderful! So, it is working.
You can see the function under the Azure portal –
Let’s see some other important features of this function –
Monitor: You can monitor two ways. One is by clicking the monitor options you will get the individual requests level details & also get to see the log information over here –
Clicking Application Insights will give you another level of detailed logs, which can be very useful for debugging. We’ll touch this at the end of this post with a very brief discussion.
As you can see, clicking individual lines will show the details further.
Let’s quickly check the application insights –
Application Insights will give you a SQL like an interface where you can get the log details of all your requests.
You can expand the individual details for further information.
You can change the parameter name & other details & click the run button to get all the log details for your debugging purpose.
So, finally, we’ve achieved our goal. This is relatively long posts. But, I’m sure this will help you to create your first python-based function on the Azure platform.
Hope, you will like this approach. Let me know your comment on the same.
I’ll bring some more exciting topic in the coming days from the Python verse.
Till then, Happy Avenging! 😀
Note: All the data posted here are representational data & available over the internet.
In this post, our objective is to combine traditional RDBMS from the cloud with Azure’s NO SQL, which is, in this case, is Cosmos DB. And, try to forecast some kind of blended information, which can be aggregated further.
Examining Source Data.
No SQL Data from Cosmos:
Let’s check one more time the No SQL data created in our last post.
Total, we’ve created 6 records in our last post.
As you can see in red marked areas. From item, one can check the total number of records created. You can also filter out specific record using the Edit Filter blue color button highlighted with blue box & you need to provide the “WHERE CLAUSE” inside it.
Azure SQL DB:
Let’s create some data in Azure SQL DB.
But, before that, you need to create SQL DB in the Azure cloud. Here is the official Microsoft link to create DB in Azure. You can refer to it here.
I won’t discuss the detailed steps of creating DB here.
From Azure portal, it looks like –
Let’s see how the data looks like in Azure DB. For our case, we’ll be using the hrMaster DB.
Let’s create the table & some sample data aligned as per our cosmos data.
We will join both the data based on subscriberId & then extract our required columns in our final output.
Good. Now, we’re ready for python scripts.
Python Scripts:
In this installment, we’ll be reusing the following python scripts, which is already discussed in my earlier post –
clsL.py
clsColMgmt.py
clsCosmosDBDet.py
So, I’m not going to discuss these scripts.
Before we discuss our scripts, let’s look out the directory structures –
Here is the detailed directory structure between the Windows & MAC O/S.
1. clsConfig.py (This script will create the split csv files or final merge file after the corresponding process. However, this can be used as usual verbose debug logging as well. Hence, the name comes into the picture.)
After creating a successful connection, our application will read the SQL & fetch the data & store that into a pandas dataframe and return the output to the primary calling function.
3. callCosmosAPI.py (This is the main script, which will call all the methods to blend the data. Hence, the name comes into the picture.)
##############################################
#### Written By: SATYAKI DE               ####
#### Written On: 25-May-2019              ####
#### Modified On 02-Jun-2019              ####
####                                      ####
#### Objective: Main calling scripts.     ####
##############################################

import clsColMgmt as cm
import clsCosmosDBDet as cmdb
from clsConfig import clsConfig as cf
import pandas as p
import clsLog as cl
import logging
import datetime
import json
import clsDBLookup as dbcon

# Disbling Warning
def warn(*args, **kwargs):
    pass

import warnings
warnings.warn = warn

def getDate(row):
    try:
        d1 = row['orderDate']
        d1_str = str(d1)
        d1_dt_part, sec = d1_str.split('.')
        dt_part1 = d1_dt_part.replace('T', ' ')

        return dt_part1
    except Exception as e:
        x = str(e)
        print(x)
        dt_part1 = ''

        return dt_part1

# Lookup functions from
# Azure cloud SQL DB

var = datetime.datetime.now().strftime("%Y-%m-%d_%H-%M-%S")

def main():
    try:
        df_ret = p.DataFrame()
        df_ret_2 = p.DataFrame()
        df_ret_2_Mod = p.DataFrame()

        debug_ind = 'Y'

        # Initiating Log Class
        l = cl.clsLog()

        general_log_path = str(cf.config['LOG_PATH'])

        # Enabling Logging Info
        logging.basicConfig(filename=general_log_path + 'consolidated.log', level=logging.INFO)

        # Moving previous day log files to archive directory
        arch_dir = cf.config['ARCH_DIR']
        log_dir = cf.config['LOG_PATH']

        print("Archive Directory:: ", arch_dir)
        print("Log Directory::", log_dir)

        print("*" * 157)
        print("Testing COSMOS DB Connection!")
        print("*" * 157)

        # Checking Cosmos DB Azure
        y = cmdb.clsCosmosDBDet()
        ret_val = y.test_db_con()

        if ret_val == 0:
            print()
            print("Cosmos DB Connection Successful!")
            print("*" * 157)
        else:
            print()
            print("Cosmos DB Connection Failure!")
            print("*" * 157)
            raise Exception

        print("*" * 157)

        # Accessing from Azure SQL DB
        x1 = dbcon.clsDBLookup()
        act_df = x1.azure_sqldb_read(cf.config['AZURE_SQL_1'])

        print("Azure SQL DB::")
        print(act_df)
        print()

        print("-" * 157)

        # Calling the function 1
        print("RealtimeEmail::")

        # Fetching First collection data to dataframe
        print("Fethcing Comos Collection Data!")

        sql_qry_1 = cf.config['SQL_QRY_1']
        msg = "Documents generatd based on unique key"
        collection_flg = 1

        x = cm.clsColMgmt()
        df_ret = x.fetch_data(sql_qry_1, msg, collection_flg)

        l.logr('1.EmailFeedback_' + var + '.csv', debug_ind, df_ret, 'log')
        print('RealtimeEmail Data::')
        print(df_ret)
        print()

        # Checking execution status
        ret_val = int(df_ret.shape[0])

        if ret_val == 0:
            print("Cosmos DB Hans't returned any rows. Please check your queries!")
            print("*" * 157)
        else:
            print("Successfully fetched!")
            print("*" * 157)

        # Calling the 2nd Collection
        print("RealtimeTwitterFeedback::")

        # Fetching First collection data to dataframe
        print("Fethcing Cosmos Collection Data!")

        # Query using parameters
        sql_qry_2 = cf.config['SQL_QRY_2']
        msg_2 = "Documents generated based on RealtimeTwitterFeedback feed!"
        collection_flg = 2

        val = 'crazyGo'
        param_det = [{"name": "@CrVal", "value": val}]
        add_param = 2

        x1 = cm.clsColMgmt()
        df_ret_2 = x1.fetch_data(sql_qry_2, msg_2, collection_flg, add_param, param_det)

        l.logr('2.TwitterFeedback_' + var + '.csv', debug_ind, df_ret, 'log')
        print('Realtime Twitter Data:: ')
        print(df_ret_2)
        print()

        # Checking execution status
        ret_val_2 = int(df_ret_2.shape[0])

        if ret_val_2 == 0:
            print("Cosmos DB hasn't returned any rows. Please check your queries!")
            print("*" * 157)
        else:
            print("Successfuly row feteched!")
            print("*" * 157)

        # Merging NoSQL Data (Cosmos DB) with Relational DB (Azure SQL DB)
        df_Fin_temp = p.merge(df_ret, act_df, on='subscriberId', how='inner')

        df_fin = df_Fin_temp[['orderDate', 'orderNo', 'sender', 'state', 'country', 'customerType']]

        print("Initial Combined Data (From Cosmos & Azure SQL DB) :: ")
        print(df_fin)

        l.logr('3.InitCombine_' + var + '.csv', debug_ind, df_fin, 'log')

        # Transforming the orderDate as per standard format
        df_fin['orderDateM'] = df_fin.apply(lambda row: getDate(row), axis=1)

        # Dropping the old column & renaming the new column to old column
        df_fin.drop(columns=['orderDate'], inplace=True)
        df_fin.rename(columns={'orderDateM': 'orderDate'}, inplace=True)

        print("*" * 157)
        print()
        print("Final Combined & Transformed result:: ")
        print(df_fin)

        l.logr('4.Final_Combine_' + var + '.csv', debug_ind, df_fin, 'log')
        print("*" * 157)

    except ValueError:
        print("No relevant data to proceed!")

    except Exception as e:
        print("Top level Error: args:{0}, message{1}".format(e.args, e.message))

if __name__ == "__main__":
    main()
Above lines are calling the Azure SQL DB method to retrieve the RDBMS data into our dataframe.
# Merging NoSQL Data (Cosmos DB) with Relational DB (Azure SQL DB)df_Fin_temp = p.merge(df_ret, act_df, on='subscriberId', how='inner')df_fin = df_Fin_temp[['orderDate', 'orderNo', 'sender', 'state', 'country', 'customerType']]
In these above lines, we’re joining the data retrieved from two different kinds of the database to prepare our initial combined dataframe. Also, we’ve picked only the desired column, which will be useful for us.
# Transforming the orderDate as per standard formatdf_fin['orderDateM'] = df_fin.apply(lambda row: getDate(row), axis=1)# Dropping the old column & renaming the new column to old columndf_fin.drop(columns=['orderDate'], inplace=True)df_fin.rename(columns={'orderDateM': 'orderDate'}, inplace=True)
In the above lines, we’re transforming our date field, as shown above in one of our previous images by calling the getDate method.
Let’s see the directory structure of our program –
Let’s see how it looks when it runs –
Windows:
MAC:
So, finally, we’ve successfully blended the data & make more meaningful data projection.
Following python packages are required to run this application –
pip install azure
pip install azure-cosmos
pip install pandas
pip install requests
pip install pyodbc
This application tested on Python3.7.1 & Python3.7.2 as well. As per Microsoft, their official supported version is Python3.5.
I hope you’ll like this effort.
Wait for the next installment. Till then, Happy Avenging. 😀
[Note: All the sample data are available/prepared in the public domain for research & study.]
Today, we’ll discuss how to improve your panda’s data processing power using Multi-threading. Note that, we are not going to use any third party python package. Also, we’ll be using a couple of python scripts, which we’ve already discussed in our previous posts. Hence, this time, I won’t post them here.
Please refer the following scripts –
a. callClient.pyb. callRunServer.pyc. clsConfigServer.pyd. clsEnDec.pye. clsFlask.pyf. clsL.pyg. clsParam.pyh. clsSerial.pyi. clsWeb.py
Please find the above scripts described here with details.
So, today, we’ll be looking into how the multi-threading really helps the application to gain some performance over others.
Let’s go through our existing old sample files –
And, we’ve four columns that are applicable for encryption. This file contains 10K records. That means the application will make 40K calls to the server for a different kind of encryption for each column.
Now, if you are going with the serial approach, which I’ve already discussed here, will take significant time for data processing. However, if we could club a few rows as one block & in this way we can create multiple blocks out of our data csv like this –
As you can see that blocks are marked with a different color. So, now if you send each block of data in parallel & send the data for encryption. Ideally, you will be able to process data much faster than the usual serial process. And, this what we would be looking for with the help of python’s multi-threading & queue. Without the queue, this program won’t be possible as the queue maintains the data & process integrity.
One more thing we would like to explain here. Whenever this application is sending the block of data. It will be posting that packed into a (key, value) dictionary randomly. Key will be the thread name. The reason, we’re not expecting data after process might arrive in some random order wrapped with the dictionary as well. Once the application received all the dictionary with dataframe with encrypted/decrypted data, the data will be rearranged based on the key & then joined back with the rest of the data.
Let’s see one sample way of sending & receiving random thread –
The left-hand side, the application is splitting the recordset into small chunks of a group. Once, those group created, using python multi-threading the application is now pushing them into the queue for the producer to produce the encrypted/decrypted value. Similar way, after processing the application will push the final product into the queue for consuming the final output.
This is the pictorial representation of dictionary ordering based on the key-value & then the application will extract the entire data to form the target csv file.
Let’s explore the script –
1. clsParallel.py (This script will consume the split csv files & send the data blocks in the form of the dictionary using multi-threading to the API for encryption in parallel. Hence, the name comes into the picture.)
As we’ve already described the logic of these methods in our previous post.
# Checking total count of rowscount_row = df_input.shape[0]print('Total number of records to process:: ', count_row)interval = int(count_row / num_worker_threads) + 1actual_worker_task = int(count_row / interval) + 1
Fetching the total number of rows from the dataframe. Based on the row count, the application will derive the actual number of threads that will be used for parallelism.
for i in range(actual_worker_task):
    t = threading.Thread(target=self.getEncryptWQ)
    t.start()
    threads.append(t)
    name = str(t.getName())

    if ((start_pos + interval) < count_row):
        end_pos = start_pos + interval
    else:
        end_pos = start_pos + (count_row - start_pos)

    split_df = df_input.iloc[start_pos:end_pos]
    l_dict[name] = split_df

    if ((start_pos > count_row) | (start_pos == count_row)):
        break
    else:
        start_pos = start_pos + interval

    q.put(l_dict)
    cnt += 1
Here, the application is splitting the data into multiple groups of smaller data packs & then combining them into (key, value) dictionary & finally placed them into the individual queue.
# block until all tasks are doneq.join()
This will join the queue process. This will ensure that queues are free after consuming the data.
# stop workersfor i in range(actual_worker_task): c_dict['TEND'] = p.DataFrame() q.put(c_dict)for t in threads: t.join()
The above lines are essential. As this will help the process to identify that no more data are left to send at the queue. And, the main thread will wait until all the threads are done.
for k, v in fin_dict.items(): min_val_list[int(k.replace('Thread-',''))] = vmin_val = min(min_val_list, key=int)
Once, all the jobs are done. The application will find the minimum thread value & based on that we can sequence all the data chunks as explained in our previous image & finally clubbed them together to form the complete csv.
for k, v in sorted(fin_dict.items(), key=lambda k:int(k[0].replace('Thread-',''))):
    if int(k.replace('Thread-','')) == min_val:
        df_ret = fin_dict[k]
    else:
        d_frames = [df_ret, fin_dict[k]]
        df_ret = p.concat(d_frames)
As already explained, using the starting point of our data dictionary element, the application is clubbing the data back to the main csv.
Next method, which we’ll be explaining is –
getEncryptWQ
Please find the key lines –
while True:
    try:
        #item_dict = q.get()
        item_dict = q.get_nowait()

        for k, v in item_dict.items():
            # Assigning Target File Basic Name
            item = str(k)

        if ((item == 'TEND') | (item == '')):
            break

        if ((item != 'TEND') | (item != '')):
            self.getEncrypt(item_dict)

        q.task_done()
    except Exception:
        break
This method will consume the data & processing it for encryption or decryption. This will continue to do the work until or unless it receives the key value as TEND or the queue is empty.
Let’s compare the statistics between Windows & MAC.
Let’s see the file structure first –
Windows (16 GB – Core 2) Vs Mac (10 GB – Core 2):
Windows (16 GB – Core 2):
Mac (10 GB – Core 2):
Find the complete directory from both the machine.
Windows (16 GB – Core 2):
Mac (10 GB – Core 2):
Here is the final output –
So, we’ve achieved our target goal.
Let me know – how do you like this post. Please share your suggestion & comments.
I’ll be back with another installment from the Python verse.
Today, we’ll be discussing a new cross-over between API, JSON, Encryption along with data distribution through Queue.
The primary objective here is to distribute one csv file through API service & access our previously deployed Encryption/Decryption methods by accessing the parallel call through Queue. In this case, our primary objective is to allow asynchronous calls to Queue for data distributions & at this point we’re not really looking for performance improvement. Instead, our goal to achieve the target.
My upcoming posts will discuss the improvement of performance using Parallel calls.
Let’s discuss it now.
Please find the structure of our Windows & MAC directory are as follows –
We’re not going to discuss any scripts, which we’ve already discussed in my previous posts. Please refer the relevant earlier posts from my blogs.
1. clsL.py (This script will create the split csv files or final merge file after the corresponding process. However, this can be used as usual verbose debug logging as well. Hence, the name comes into the picture.)
############################################### Written By: SATYAKI DE ############ Written On: 25-Jan-2019 ############ ############ Objective: Log File ###################################################importpandasaspimportplatformasplfromclsParamimport clsParam as cf
classclsL(object):
def__init__(self):
self.path = cf.config['PATH']
deflogr(self, Filename, Ind, df, subdir=None):
try:
x = p.DataFrame()
x = df
sd = subdir
os_det = pl.system()
if sd ==None:
if os_det =="Windows":
fullFileName =self.path +'\\'+ Filename
else:
fullFileName =self.path +'/'+ Filename
else:
if os_det =="Windows":
fullFileName =self.path +'\\'+ sd +"\\"+ Filename
else:
fullFileName =self.path +'/'+ sd +"/"+ Filename
if Ind =='Y':
x.to_csv(fullFileName, index=False)
return0exceptExceptionas e:
y =str(e)
print(y)
return3
2. callRunServer.py (This script will create an instance of a server. Once, it is running – it will emulate the Server API functionalities. Hence, the name comes into the picture.)
################################################ Written By: SATYAKI DE ######## Written On: 10-Feb-2019 ######## Package Flask package needs to ######## install in order to run this ######## script. ######## ######## Objective: This script will ######## initiate the encrypt/decrypt class ######## based on client supplied data. ######## Also, this will create an instance ######## of the server & create an endpoint ######## or API using flask framework. ################################################fromflaskimport Flask
fromflaskimport jsonify
fromflaskimport request
fromflaskimport abort
fromclsConfigServerimport clsConfigServer as csf
importclsFlaskasclf
app = Flask(__name__)
@app.route('/process/getEncrypt', methods=['POST'])
defgetEncrypt():
try:
# If the server application doesn't have# valid json, it will throw 400 errorifnot request.get_json:
abort(400)
# Capturing the individual element
content = request.get_json()
dGroup = content['dataGroup']
input_data = content['data']
dTemplate = content['dataTemplate']
# For debug purpose onlyprint("-"*157)
print("Group: ", dGroup)
print("Data: ", input_data)
print("Template: ", dTemplate)
print("-"*157)
ret_val =''if ((dGroup !='') & (dTemplate !='')):
y = clf.clsFlask()
ret_val = y.getEncryptProcess(dGroup, input_data, dTemplate)
else:
abort(500)
return jsonify({'status': 'success', 'encrypt_val': ret_val})
exceptExceptionas e:
x =str(e)
return jsonify({'status': 'error', 'detail': x})
@app.route('/process/getDecrypt', methods=['POST'])
defgetDecrypt():
try:
# If the server application doesn't have# valid json, it will throw 400 errorifnot request.get_json:
abort(400)
# Capturing the individual element
content = request.get_json()
dGroup = content['dataGroup']
input_data = content['data']
dTemplate = content['dataTemplate']
# For debug purpose onlyprint("-"*157)
print("Group: ", dGroup)
print("Data: ", input_data)
print("Template: ", dTemplate)
print("-"*157)
ret_val =''if ((dGroup !='') & (dTemplate !='')):
y = clf.clsFlask()
ret_val = y.getDecryptProcess(dGroup, input_data, dTemplate)
else:
abort(500)
return jsonify({'status': 'success', 'decrypt_val': ret_val})
exceptExceptionas e:
x =str(e)
return jsonify({'status': 'error', 'detail': x})
defmain():
try:
print('Starting Encrypt/Decrypt Application!')
# Calling Server Start-Up Script
app.run(debug=True, host=str(csf.config['HOST_IP_ADDR']))
ret_val =0if ret_val ==0:
print("Finished Returning Message!")
else:
raiseIOErrorexceptExceptionas e:
print("Server Failed To Start!")
if __name__ =='__main__':
main()
3. clsFlask.py (This script is part of the server process, which will categorize the encryption logic based on different groups. Hence, the name comes into the picture.)
############################################### Written By: SATYAKI DE ######## Written On: 25-Jan-2019 ######## Package Flask package needs to ######## install in order to run this ######## script. ######## ######## Objective: This script will ######## encrypt/decrypt based on the ######## supplied salt value. Also, ######## this will capture the individual ######## element & stored them into JSON ######## variables using flask framework. ###############################################fromclsConfigServerimport clsConfigServer as csf
importclsEnDecAuthascenclassclsFlask(object):
def__init__(self):
self.xtoken =str(csf.config['DEF_SALT'])
defgetEncryptProcess(self, dGroup, input_data, dTemplate):
try:
# It is sending default salt value
xtoken =self.xtoken
# Capturing the individual element
dGroup = dGroup
input_data = input_data
dTemplate = dTemplate
# This will check the mandatory json elementsif ((dGroup !='') & (dTemplate !='')):
# Based on the Group & Element it will fetch the salt# Based on the specific salt it will encrypt the dataif ((dGroup =='GrDet') & (dTemplate =='subGrAcct_Nbr')):
xtoken =str(csf.config['ACCT_NBR_SALT'])
print("xtoken: ", xtoken)
print("Flask Input Data: ", input_data)
x = cen.clsEnDec(xtoken)
ret_val = x.encrypt_str(input_data)
elif ((dGroup =='GrDet') & (dTemplate =='subGrName')):
xtoken =str(csf.config['NAME_SALT'])
print("xtoken: ", xtoken)
print("Flask Input Data: ", input_data)
x = cen.clsEnDec(xtoken)
ret_val = x.encrypt_str(input_data)
elif ((dGroup =='GrDet') & (dTemplate =='subGrPhone')):
xtoken =str(csf.config['PHONE_SALT'])
print("xtoken: ", xtoken)
print("Flask Input Data: ", input_data)
x = cen.clsEnDec(xtoken)
ret_val = x.encrypt_str(input_data)
elif ((dGroup =='GrDet') & (dTemplate =='subGrEmail')):
xtoken =str(csf.config['EMAIL_SALT'])
print("xtoken: ", xtoken)
print("Flask Input Data: ", input_data)
x = cen.clsEnDec(xtoken)
ret_val = x.encrypt_str(input_data)
else:
ret_val =''else:
ret_val =''# Return valuereturn ret_val
exceptExceptionas e:
ret_val =''# Return the valid json Error Responsereturn ret_val
defgetDecryptProcess(self, dGroup, input_data, dTemplate):
try:
xtoken =self.xtoken
# Capturing the individual element
dGroup = dGroup
input_data = input_data
dTemplate = dTemplate
# This will check the mandatory json elementsif ((dGroup !='') & (dTemplate !='')):
# Based on the Group & Element it will fetch the salt# Based on the specific salt it will decrypt the dataif ((dGroup =='GrDet') & (dTemplate =='subGrAcct_Nbr')):
xtoken =str(csf.config['ACCT_NBR_SALT'])
print("xtoken: ", xtoken)
print("Flask Input Data: ", input_data)
x = cen.clsEnDec(xtoken)
ret_val = x.decrypt_str(input_data)
elif ((dGroup =='GrDet') & (dTemplate =='subGrName')):
xtoken =str(csf.config['NAME_SALT'])
print("xtoken: ", xtoken)
print("Flask Input Data: ", input_data)
x = cen.clsEnDec(xtoken)
ret_val = x.decrypt_str(input_data)
elif ((dGroup =='GrDet') & (dTemplate =='subGrPhone')):
xtoken =str(csf.config['PHONE_SALT'])
print("xtoken: ", xtoken)
print("Flask Input Data: ", input_data)
x = cen.clsEnDec(xtoken)
ret_val = x.decrypt_str(input_data)
elif ((dGroup =='GrDet') & (dTemplate =='subGrEmail')):
xtoken =str(csf.config['EMAIL_SALT'])
print("xtoken: ", xtoken)
print("Flask Input Data: ", input_data)
x = cen.clsEnDec(xtoken)
ret_val = x.decrypt_str(input_data)
else:
ret_val =''else:
ret_val =''# Return valuereturn ret_val
exceptExceptionas e:
ret_val =''# Return the valid Error Responsereturn ret_val
4. clsEnDec.py (This script will convert the string to encryption or decryption from its previous states based on the supplied group. Hence, the name comes into the picture.)
############################################### Written By: SATYAKI DE ############ Written On: 25-Jan-2019 ############ Package Cryptography needs to ############ install in order to run this ############ script. ############ ############ Objective: This script will ############ encrypt/decrypt based on the ############ hidden supplied salt value. ###################################################fromcryptography.fernetimport Fernet
classclsEnDec(object):
def__init__(self, token):
# Calculating Keyself.token = token
defencrypt_str(self, data):
try:
# Capturing the Salt Information
salt =self.token
# Checking Individual Types inside the Dataframe
cipher = Fernet(salt)
encr_val =str(cipher.encrypt(bytes(data,'utf8'))).replace("b'","").replace("'","")
return encr_val
exceptExceptionas e:
x =str(e)
print(x)
encr_val =''return encr_val
defdecrypt_str(self, data):
try:
# Capturing the Salt Information
salt =self.token
# Checking Individual Types inside the Dataframe
cipher = Fernet(salt)
decr_val =str(cipher.decrypt(bytes(data,'utf8'))).replace("b'","").replace("'","")
return decr_val
exceptExceptionas e:
x =str(e)
print(x)
decr_val =''return decr_val
5. clsConfigServer.py (This script contains all the main parameter details of your emulated API server. Hence, the name comes into the picture.)
6. clsWeb.py (This script will receive the input Pandas dataframe & then convert it to JSON & then send it back to our Flask API Server for encryption/decryption. Hence, the name comes into the picture.)
################################################ Written By: SATYAKI DE ######## Written On: 09-Mar-2019 ######## Package Flask package needs to ######## install in order to run this ######## script. ######## ######## Objective: This script will ######## initiate API based JSON requests ######## at the server & receive the ######## response from it & transform it ######## back to the data-frame. ################################################importjsonimportrequestsimportdatetimeimporttimeimportsslimportosfromclsParamimport clsParam as cf
classclsWeb(object):
def__init__(self, payload):
self.payload = payload
self.path =str(cf.config['PATH'])
self.max_retries =int(cf.config['MAX_RETRY'])
self.encrypt_ulr =str(cf.config['ENCRYPT_URL'])
self.decrypt_ulr =str(cf.config['DECRYPT_URL'])
defgetResponse(self, mode):
# Assigning Logging Info
max_retries =self.max_retries
encrypt_ulr =self.encrypt_ulr
decrypt_ulr =self.decrypt_ulr
En_Dec_Mode = mode
try:
# Bypassing SSL Authenticationtry:
_create_unverified_https_context = ssl._create_unverified_context
exceptAttributeError:
# Legacy python that doesn't verify HTTPS certificates by defaultpasselse:
# Handle target environment that doesn't support HTTPS verification
ssl._create_default_https_context = _create_unverified_https_context
# Providing the urlif En_Dec_Mode =='En':
url = encrypt_ulr
else:
url = decrypt_ulr
print("URL::", url)
# Capturing the payload
data =self.payload
# Converting String to Json# json_data = json.loads(data)
json_data = json.loads(data)
print("JSON:::::::", str(json_data))
headers = {"Content-type": "application/json"}
param = headers
var1 = datetime.datetime.now().strftime("%H:%M:%S")
print('Json Fetch Start Time:', var1)
retries =1
success =Falsewhilenot success:
# Getting response from web service# response = requests.post(url, params=param, json=data, auth=(login, password), verify=False)
response = requests.post(url, params=param, json=json_data, verify=False)
print("Complete Return Code:: ", str(response.status_code))
print("Return Code Initial::", str(response.status_code)[:1])
ifstr(response.status_code)[:1] =='2':
# response = s.post(url, params=param, json=json_data, verify=False)
success =Trueelse:
wait = retries *2print("Retry fails! Waiting "+str(wait) +" seconds and retrying.")
time.sleep(wait)
retries +=1# print('Return Service::')# Checking Maximum Retriesif retries == max_retries:
success =TrueraiseValueErrorprint("JSON RESPONSE:::", response.text)
var2 = datetime.datetime.now().strftime("%H:%M:%S")
print('Json Fetch End Time:', var2)
# Capturing the response json from Web Service
response_json = response.text
load_val = json.loads(response_json)
# Based on the mode application will send the return valueif En_Dec_Mode =='En':
encrypt_ele =str(load_val['encrypt_val'])
return_ele = encrypt_ele
else:
decrypt_ele =str(load_val['decrypt_val'])
return_ele = decrypt_ele
return return_ele
exceptValueErroras v:
raiseValueErrorexceptExceptionas e:
x =str(e)
print(x)
return'Error'
Let’s discuss the key lines –
try: _create_unverified_https_context = ssl._create_unverified_contextexcept AttributeError: # Legacy python that doesn't verify HTTPS certificates by default passelse: # Handle target environment that doesn't support HTTPS verification ssl._create_default_https_context = _create_unverified_https_context
If you are running in a secure environment. Sometimes, your proxy or firewall blocks you from accessing the API server – if they are using different networks. Hence, we need to bypass that. However, it is advisable not to use this in Prod environment for obvious reasons.
# Capturing the payloaddata = self.payload# Converting String to Jsonjson_data = json.loads(data)
This snippet will convert your data frame into a JSON object.
In the first 3 lines, the application is building a JSON response, which will be sent to the API Server. And, it will capture the response from the server.
Next 8 lines will check the status code. And, based on the status code, it will continue or retry the requests in case if there is any failure or lousy response from the server.
Last 3 lines say if the application crosses the maximum allowable error limit, it will terminate the process by raising it as an error.
# Capturing the response json from Web Serviceresponse_json = response.textload_val = json.loads(response_json)
Once, it receives the valid response, the application will convert it back to the dataframe & send it to the calling methods.
7. clsParam.py (This script contains the fundamental parameter values to run your client application. Hence, the name comes into the picture.)
############################################### Written By: SATYAKI DE ############ Written On: 20-Jan-2019 ###################################################importosclassclsParam(object):
config = {
'MAX_RETRY' : 5,
'ENCRYPT_MODE' : 'En',
'DECRYPT_MODE': 'De',
'PATH' : os.path.dirname(os.path.realpath(__file__)),
'SRC_DIR' : os.path.dirname(os.path.realpath(__file__)) +'/'+'src_files/',
'FIN_DIR': os.path.dirname(os.path.realpath(__file__)) +'/'+'finished/',
'ENCRYPT_URL': "http://192.168.0.13:5000/process/getEncrypt",
'DECRYPT_URL': "http://192.168.0.13:5000/process/getDecrypt",
'NUM_OF_THREAD': 20
}
8. clsSerial.py (This script will show the usual or serial way to convert your data into encryption & then to decrypts & store the result into two separate csv files. Hence, the name comes into the picture.)
################################################ Written By: SATYAKI DE ######## Written On: 10-Feb-2019 ######## Package Flask package needs to ######## install in order to run this ######## script. ######## ######## Objective: This script will ######## initiate the encrypt/decrypt class ######## based on client supplied data ######## using serial mode operation. ################################################importpandasaspimportclsWebascwimportdatetimefromclsParamimport clsParam as cf
# Disbling Warningsdefwarn(*args, **kwargs):
passimportwarnings
warnings.warn = warn
classclsSerial(object):
def__init__(self):
self.path = cf.config['PATH']
self.EncryptMode =str(cf.config['ENCRYPT_MODE'])
self.DecryptMode =str(cf.config['DECRYPT_MODE'])
# Lookup Methods for Encryptiondefencrypt_acctNbr(self, row):
# Declaring Local Variable
en_AcctNbr =''
json_source_str =''# Capturing essential values
EncryptMode =self.EncryptMode
lkp_acctNbr = row['Acct_Nbr']
str_acct_nbr =str(lkp_acctNbr)
fil_acct_nbr = str_acct_nbr.strip()
# Forming JSON String for this field
json_source_str ='{"dataGroup":"GrDet","data":"'+ fil_acct_nbr +'","dataTemplate":"subGrAcct_Nbr"}'# Identifying Length of the field
len_acct_nbr =len(fil_acct_nbr)
# This will trigger the service if it has valid dataif len_acct_nbr >0:
x = cw.clsWeb(json_source_str)
en_AcctNbr = x.getResponse(EncryptMode)
else:
en_AcctNbr =''
fil_acct_nbr =''
fil_acct_nbr =''return en_AcctNbr
defencrypt_Name(self, row):
# Declaring Local Variable
en_AcctName =''# Capturing essential values
EncryptMode =self.EncryptMode
lkp_acctName = row['Name']
str_acct_name =str(lkp_acctName)
fil_acct_name = str_acct_name.strip()
# Forming JSON String for this field
json_source_str ='{"dataGroup":"GrDet","data":"'+ fil_acct_name +'","dataTemplate":"subGrName"}'# Identifying Length of the field
len_acct_nbr =len(fil_acct_name)
# This will trigger the service if it has valid dataif len_acct_nbr >0:
x = cw.clsWeb(json_source_str)
en_AcctName = x.getResponse(EncryptMode)
else:
en_AcctName =''return en_AcctName
defencrypt_Phone(self, row):
# Declaring Local Variable
en_Phone =''# Capturing essential values
EncryptMode =self.EncryptMode
lkp_phone = row['Phone']
str_phone =str(lkp_phone)
fil_phone = str_phone.strip()
# Forming JSON String for this field
json_source_str ='{"dataGroup":"GrDet","data":"'+ fil_phone +'","dataTemplate":"subGrPhone"}'# Identifying Length of the field
len_acct_nbr =len(fil_phone)
# This will trigger the service if it has valid dataif len_acct_nbr >0:
x = cw.clsWeb(json_source_str)
en_Phone = x.getResponse(EncryptMode)
else:
en_Phone =''return en_Phone
defencrypt_Email(self, row):
# Declaring Local Variable
en_Email =''# Capturing essential values
EncryptMode =self.EncryptMode
lkp_email = row['Email']
str_email =str(lkp_email)
fil_email = str_email.strip()
# Forming JSON String for this field
json_source_str ='{"dataGroup":"GrDet","data":"'+ fil_email +'","dataTemplate":"subGrEmail"}'# Identifying Length of the field
len_acct_nbr =len(fil_email)
# This will trigger the service if it has valid dataif len_acct_nbr >0:
x = cw.clsWeb(json_source_str)
en_Email = x.getResponse(EncryptMode)
else:
en_Email =''return en_Email
# Lookup Methods for Decryptiondefdecrypt_acctNbr(self, row):
# Declaring Local Variable
de_AcctNbr =''
json_source_str =''# Capturing essential values
EncryptMode =self.DecryptMode
lkp_acctNbr = row['Acct_Nbr']
str_acct_nbr =str(lkp_acctNbr)
fil_acct_nbr = str_acct_nbr.strip()
# Forming JSON String for this field
json_source_str ='{"dataGroup":"GrDet","data":"'+ fil_acct_nbr +'","dataTemplate":"subGrAcct_Nbr"}'# Identifying Length of the field
len_acct_nbr =len(fil_acct_nbr)
# This will trigger the service if it has valid dataif len_acct_nbr >0:
x = cw.clsWeb(json_source_str)
de_AcctNbr = x.getResponse(EncryptMode)
else:
de_AcctNbr =''return de_AcctNbr
defdecrypt_Name(self, row):
# Declaring Local Variable
de_AcctName =''# Capturing essential values
EncryptMode =self.DecryptMode
lkp_acctName = row['Name']
str_acct_name =str(lkp_acctName)
fil_acct_name = str_acct_name.strip()
# Forming JSON String for this field
json_source_str ='{"dataGroup":"GrDet","data":"'+ fil_acct_name +'","dataTemplate":"subGrName"}'# Identifying Length of the field
len_acct_nbr =len(fil_acct_name)
# This will trigger the service if it has valid dataif len_acct_nbr >0:
x = cw.clsWeb(json_source_str)
de_AcctName = x.getResponse(EncryptMode)
else:
de_AcctName =''return de_AcctName
defdecrypt_Phone(self, row):
# Declaring Local Variable
de_Phone =''# Capturing essential values
EncryptMode =self.DecryptMode
lkp_phone = row['Phone']
str_phone =str(lkp_phone)
fil_phone = str_phone.strip()
# Forming JSON String for this field
json_source_str ='{"dataGroup":"GrDet","data":"'+ fil_phone +'","dataTemplate":"subGrPhone"}'# Identifying Length of the field
len_acct_nbr =len(fil_phone)
# This will trigger the service if it has valid dataif len_acct_nbr >0:
x = cw.clsWeb(json_source_str)
de_Phone = x.getResponse(EncryptMode)
else:
de_Phone =''return de_Phone
defdecrypt_Email(self, row):
# Declaring Local Variable
de_Email =''# Capturing essential values
EncryptMode =self.DecryptMode
lkp_email = row['Email']
str_email =str(lkp_email)
fil_email = str_email.strip()
# Forming JSON String for this field
json_source_str ='{"dataGroup":"GrDet","data":"'+ fil_email +'","dataTemplate":"subGrEmail"}'# Identifying Length of the field
len_acct_nbr =len(fil_email)
# This will trigger the service if it has valid dataif len_acct_nbr >0:
x = cw.clsWeb(json_source_str)
de_Email = x.getResponse(EncryptMode)
else:
de_Email =''return de_Email
defgetEncrypt(self, df_payload):
try:
df_input = p.DataFrame()
df_fin = p.DataFrame()
# Assigning Target File Basic Name
df_input = df_payload
# Checking total count of rows
count_row = df_input.shape[0]
print('Total number of records to process:: ', count_row)
# Deriving rows
df_input['Encrypt_Acct_Nbr'] = df_input.apply(lambda row: self.encrypt_acctNbr(row), axis=1)
df_input['Encrypt_Name'] = df_input.apply(lambda row: self.encrypt_Name(row), axis=1)
df_input['Encrypt_Phone'] = df_input.apply(lambda row: self.encrypt_Phone(row), axis=1)
df_input['Encrypt_Email'] = df_input.apply(lambda row: self.encrypt_Email(row), axis=1)
# Dropping original columns
df_input.drop(['Acct_Nbr', 'Name', 'Phone', 'Email'], axis=1, inplace=True)
# Renaming new columns with the old column names
df_input.rename(columns={'Encrypt_Acct_Nbr':'Acct_Nbr'}, inplace=True)
df_input.rename(columns={'Encrypt_Name': 'Name'}, inplace=True)
df_input.rename(columns={'Encrypt_Phone': 'Phone'}, inplace=True)
df_input.rename(columns={'Encrypt_Email': 'Email'}, inplace=True)
# New Column List Orders
column_order = ['Acct_Nbr', 'Name', 'Acct_Addr_1', 'Acct_Addr_2', 'Phone', 'Email', 'Serial_No']
df_fin = df_input.reindex(column_order, axis=1)
return df_fin
exceptExceptionas e:
df_error = p.DataFrame({'Acct_Nbr':str(e), 'Name':'', 'Acct_Addr_1':'', 'Acct_Addr_2':'', 'Phone':'', 'Email':'', 'Serial_No':''})
return df_error
defgetDecrypt(self, df_encrypted_payload):
try:
df_input = p.DataFrame()
df_fin = p.DataFrame()
# Assigning Target File Basic Name
df_input = df_encrypted_payload
# Checking total count of rows
count_row = df_input.shape[0]
print('Total number of records to process:: ', count_row)
# Deriving rows
df_input['Decrypt_Acct_Nbr'] = df_input.apply(lambda row: self.decrypt_acctNbr(row), axis=1)
df_input['Decrypt_Name'] = df_input.apply(lambda row: self.decrypt_Name(row), axis=1)
df_input['Decrypt_Phone'] = df_input.apply(lambda row: self.decrypt_Phone(row), axis=1)
df_input['Decrypt_Email'] = df_input.apply(lambda row: self.decrypt_Email(row), axis=1)
# Dropping original columns
df_input.drop(['Acct_Nbr', 'Name', 'Phone', 'Email'], axis=1, inplace=True)
# Renaming new columns with the old column names
df_input.rename(columns={'Decrypt_Acct_Nbr':'Acct_Nbr'}, inplace=True)
df_input.rename(columns={'Decrypt_Name': 'Name'}, inplace=True)
df_input.rename(columns={'Decrypt_Phone': 'Phone'}, inplace=True)
df_input.rename(columns={'Decrypt_Email': 'Email'}, inplace=True)
# New Column List Orders
column_order = ['Acct_Nbr', 'Name', 'Acct_Addr_1', 'Acct_Addr_2', 'Phone', 'Email']
df_fin = df_input.reindex(column_order, axis=1)
return df_fin
exceptExceptionas e:
df_error = p.DataFrame({'Acct_Nbr':str(e), 'Name':'', 'Acct_Addr_1':'', 'Acct_Addr_2':'', 'Phone':'', 'Email':''})
return df_error
Key lines to discuss –
Main two methods, we’ll be looking into & they are –
a. getEncrypt
b. getDecrypt
However, these two functions constructions are identical in nature. One is for encryption & the other one is decryption.
As you can see, the application is processing row-by-row & column-by-column data transformations using look-up functions.
# Dropping original columnsdf_input.drop(['Acct_Nbr', 'Name', 'Phone', 'Email'], axis=1, inplace=True)
As the comment suggested, the application is dropping all the unencrypted source columns.
# Renaming new columns with the old column namesdf_input.rename(columns={'Encrypt_Acct_Nbr':'Acct_Nbr'}, inplace=True)df_input.rename(columns={'Encrypt_Name': 'Name'}, inplace=True)df_input.rename(columns={'Encrypt_Phone': 'Phone'}, inplace=True)df_input.rename(columns={'Encrypt_Email': 'Email'}, inplace=True)
Once, the application drops all the source columns, it will rename the new column names back to old columns & based on this data will be merged with the rest of the data from the source csv.
# New Column List Orderscolumn_order = ['Acct_Nbr', 'Name', 'Acct_Addr_1', 'Acct_Addr_2', 'Phone', 'Email', 'Serial_No']df_fin = df_input.reindex(column_order, axis=1)
Once, the application finished doing all these transformations, it will now re-sequence the order of the columns, which will create the same column order as it’s source csv files.
Similar logic is applicable for the decryption as well.
As we know, there are many look-up methods take part as part of this drive.
From the row, our application is extracting the relevant column. In this case, it is Acct_Nbr. And, then converts it to string & remove any unnecessary white space from it.
# Forming JSON String for this fieldjson_source_str = '{"dataGroup":"GrDet","data":"' + fil_acct_nbr + '","dataTemplate":"subGrAcct_Nbr"}'
Once extracted, the application will build the target JON string as per column data.
# Identifying Length of the fieldlen_acct_nbr = len(fil_acct_nbr)# This will trigger the service if it has valid dataif len_acct_nbr > 0: x = cw.clsWeb(json_source_str) en_AcctNbr = x.getResponse(EncryptMode)else: en_AcctNbr = ''
Based on the length of the extracted value, our application will trigger the individual JSON requests & will receive the data frame in response.
9. clsParallel.py (This script will use the queue to make asynchronous calls & perform the same encryption & decryption. Hence, the name comes into the picture.)
################################################ Written By: SATYAKI DE ######## Written On: 10-Feb-2019 ######## Package Flask package needs to ######## install in order to run this ######## script. ######## ######## Objective: This script will ######## initiate the encrypt/decrypt class ######## based on client supplied data. ######## This script will use the advance ######## queue & asynchronus calls to the ######## API Server to process Encryption & ######## Decryption on our csv files. ################################################importpandasaspimportclsWebServiceascwimportdatetimefromclsParamimport clsParam as cf
frommultiprocessingimport Lock, Process, Queue, freeze_support, JoinableQueue
importgcimportsignalimporttimeimportosimportqueueimportasyncio# Declaring Global Variable
q = Queue()
lock = Lock()
finished_task = JoinableQueue()
pending_task = JoinableQueue()
sp_fin_dict = {}
dp_fin_dict = {}
# Disbling Warningsdefwarn(*args, **kwargs):
passimportwarnings
warnings.warn = warn
classclsParallel(object):
def__init__(self):
self.path = cf.config['PATH']
self.EncryptMode =str(cf.config['ENCRYPT_MODE'])
self.DecryptMode =str(cf.config['DECRYPT_MODE'])
self.num_worker_process =int(cf.config['NUM_OF_THREAD'])
self.lock = Lock()
# Lookup Methods for Encryptiondefencrypt_acctNbr(self, row):
# Declaring Local Variable
en_AcctNbr =''
json_source_str =''# Capturing essential values
EncryptMode =self.EncryptMode
lkp_acctNbr = row['Acct_Nbr']
str_acct_nbr =str(lkp_acctNbr)
fil_acct_nbr = str_acct_nbr.strip()
# Forming JSON String for this field
json_source_str ='{"dataGroup":"GrDet","data":"'+ fil_acct_nbr +'","dataTemplate":"subGrAcct_Nbr"}'# Identifying Length of the field
len_acct_nbr =len(fil_acct_nbr)
# This will trigger the service if it has valid dataif len_acct_nbr >0:
x = cw.clsWeb(json_source_str)
en_AcctNbr = x.getResponse(EncryptMode)
else:
en_AcctNbr =''
fil_acct_nbr =''return en_AcctNbr
defencrypt_Name(self, row):
# Declaring Local Variable
en_AcctName =''# Capturing essential values
EncryptMode =self.EncryptMode
lkp_acctName = row['Name']
str_acct_name =str(lkp_acctName)
fil_acct_name = str_acct_name.strip()
# Forming JSON String for this field
json_source_str ='{"dataGroup":"GrDet","data":"'+ fil_acct_name +'","dataTemplate":"subGrName"}'# Identifying Length of the field
len_acct_nbr =len(fil_acct_name)
# This will trigger the service if it has valid dataif len_acct_nbr >0:
x = cw.clsWeb(json_source_str)
en_AcctName = x.getResponse(EncryptMode)
else:
en_AcctName =''return en_AcctName
defencrypt_Phone(self, row):
# Declaring Local Variable
en_Phone =''# Capturing essential values
EncryptMode =self.EncryptMode
lkp_phone = row['Phone']
str_phone =str(lkp_phone)
fil_phone = str_phone.strip()
# Forming JSON String for this field
json_source_str ='{"dataGroup":"GrDet","data":"'+ fil_phone +'","dataTemplate":"subGrPhone"}'# Identifying Length of the field
len_acct_nbr =len(fil_phone)
# This will trigger the service if it has valid dataif len_acct_nbr >0:
x = cw.clsWeb(json_source_str)
en_Phone = x.getResponse(EncryptMode)
else:
en_Phone =''return en_Phone
defencrypt_Email(self, row):
# Declaring Local Variable
en_Email =''# Capturing essential values
EncryptMode =self.EncryptMode
lkp_email = row['Email']
str_email =str(lkp_email)
fil_email = str_email.strip()
# Forming JSON String for this field
json_source_str ='{"dataGroup":"GrDet","data":"'+ fil_email +'","dataTemplate":"subGrEmail"}'# Identifying Length of the field
len_acct_nbr =len(fil_email)
# This will trigger the service if it has valid dataif len_acct_nbr >0:
x = cw.clsWeb(json_source_str)
en_Email = x.getResponse(EncryptMode)
else:
en_Email =''return en_Email
# Lookup Methods for Decryptiondefdecrypt_acctNbr(self, row):
# Declaring Local Variable
de_AcctNbr =''
json_source_str =''# Capturing essential values
EncryptMode =self.DecryptMode
lkp_acctNbr = row['Acct_Nbr']
str_acct_nbr =str(lkp_acctNbr)
fil_acct_nbr = str_acct_nbr.strip()
# Forming JSON String for this field
json_source_str ='{"dataGroup":"GrDet","data":"'+ fil_acct_nbr +'","dataTemplate":"subGrAcct_Nbr"}'# Identifying Length of the field
len_acct_nbr =len(fil_acct_nbr)
# This will trigger the service if it has valid dataif len_acct_nbr >0:
x = cw.clsWeb(json_source_str)
de_AcctNbr = x.getResponse(EncryptMode)
else:
de_AcctNbr =''return de_AcctNbr
defdecrypt_Name(self, row):
# Declaring Local Variable
de_AcctName =''# Capturing essential values
EncryptMode =self.DecryptMode
lkp_acctName = row['Name']
str_acct_name =str(lkp_acctName)
fil_acct_name = str_acct_name.strip()
# Forming JSON String for this field
json_source_str ='{"dataGroup":"GrDet","data":"'+ fil_acct_name +'","dataTemplate":"subGrName"}'# Identifying Length of the field
len_acct_nbr =len(fil_acct_name)
# This will trigger the service if it has valid dataif len_acct_nbr >0:
x = cw.clsWeb(json_source_str)
de_AcctName = x.getResponse(EncryptMode)
else:
de_AcctName =''return de_AcctName
defdecrypt_Phone(self, row):
# Declaring Local Variable
de_Phone =''# Capturing essential values
EncryptMode =self.DecryptMode
lkp_phone = row['Phone']
str_phone =str(lkp_phone)
fil_phone = str_phone.strip()
# Forming JSON String for this field
json_source_str ='{"dataGroup":"GrDet","data":"'+ fil_phone +'","dataTemplate":"subGrPhone"}'# Identifying Length of the field
len_acct_nbr =len(fil_phone)
# This will trigger the service if it has valid dataif len_acct_nbr >0:
x = cw.clsWeb(json_source_str)
de_Phone = x.getResponse(EncryptMode)
else:
de_Phone =''return de_Phone
defdecrypt_Email(self, row):
# Declaring Local Variable
de_Email =''# Capturing essential values
EncryptMode =self.DecryptMode
lkp_email = row['Email']
str_email =str(lkp_email)
fil_email = str_email.strip()
# Forming JSON String for this field
json_source_str ='{"dataGroup":"GrDet","data":"'+ fil_email +'","dataTemplate":"subGrEmail"}'# Identifying Length of the field
len_acct_nbr =len(fil_email)
# This will trigger the service if it has valid dataif len_acct_nbr >0:
x = cw.clsWeb(json_source_str)
de_Email = x.getResponse(EncryptMode)
else:
de_Email =''return de_Email
defgetEncrypt(self, df_dict):
try:
en_fin_dict = {}
df_input = p.DataFrame()
df_fin = p.DataFrame()
# Assigning Target File Basic Namefor k, v in df_dict.items():
Process_Name = k
df_input = v
# Checking total count of rows
count_row =int(df_input.shape[0])
print('Part number of records to process:: ', count_row)
if count_row >0:
# Deriving rows
df_input['Encrypt_Acct_Nbr'] = df_input.apply(lambda row: self.encrypt_acctNbr(row), axis=1)
df_input['Encrypt_Name'] = df_input.apply(lambda row: self.encrypt_Name(row), axis=1)
df_input['Encrypt_Phone'] = df_input.apply(lambda row: self.encrypt_Phone(row), axis=1)
df_input['Encrypt_Email'] = df_input.apply(lambda row: self.encrypt_Email(row), axis=1)
# Dropping original columns
df_input.drop(['Acct_Nbr', 'Name', 'Phone', 'Email'], axis=1, inplace=True)
# Renaming new columns with the old column names
df_input.rename(columns={'Encrypt_Acct_Nbr':'Acct_Nbr'}, inplace=True)
df_input.rename(columns={'Encrypt_Name': 'Name'}, inplace=True)
df_input.rename(columns={'Encrypt_Phone': 'Phone'}, inplace=True)
df_input.rename(columns={'Encrypt_Email': 'Email'}, inplace=True)
# New Column List Orders
column_order = ['Acct_Nbr', 'Name', 'Acct_Addr_1', 'Acct_Addr_2', 'Phone', 'Email', 'Serial_No']
df_fin = df_input.reindex(column_order, axis=1)
sp_fin_dict[Process_Name] = df_fin
return sp_fin_dict
exceptExceptionas e:
df_error = p.DataFrame({'Acct_Nbr':str(e), 'Name':'', 'Acct_Addr_1':'', 'Acct_Addr_2':'', 'Phone':'', 'Email':'', 'Serial_No':''})
sp_fin_dict[Process_Name] = df_error
return sp_fin_dict
async defproduceEncr(self, queue, l_dict):
m_dict = {}
m_dict =self.getEncrypt(l_dict)
for k, v in m_dict.items():
item = k
print('producing {}...'.format(item))
await queue.put(m_dict)
async defconsumeEncr(self, queue):
result_dict = {}
whileTrue:
# wait for an item from the producer
sp_fin_dict.update(await queue.get())
# process the itemfor k, v in sp_fin_dict.items():
item = k
print('consuming {}...'.format(item))
# Notify the queue that the item has been processed
queue.task_done()
async defrunEncrypt(self, n, df_input):
l_dict = {}
queue = asyncio.Queue()
# schedule the consumer
consumer = asyncio.ensure_future(self.consumeEncr(queue))
start_pos =0
end_pos =0
num_worker_process = n
count_row = df_input.shape[0]
print('Total number of records to process:: ', count_row)
interval =int(count_row / num_worker_process) +1
actual_worker_task =int(count_row / interval) +1for i inrange(actual_worker_task):
name ='Task-'+str(i)
if ((start_pos + interval) < count_row):
end_pos = start_pos + interval
else:
end_pos = start_pos + (count_row - start_pos)
print("start_pos: ", start_pos)
print("end_pos: ", end_pos)
split_df = df_input.iloc[start_pos:end_pos]
l_dict[name] = split_df
if ((start_pos > count_row) | (start_pos == count_row)):
breakelse:
start_pos = start_pos + interval
# run the producer and wait for completion
await self.produceEncr(queue, l_dict)
# wait until the consumer has processed all items
await queue.join()
# the consumer is still awaiting for an item, cancel it
consumer.cancel()
return sp_fin_dict
defgetEncryptParallel(self, df_payload):
l_dict = {}
data_dict = {}
min_val_list = {}
cnt =1
num_worker_process =self.num_worker_process
actual_worker_task =0
number_of_processes =4
processes = []
split_df = p.DataFrame()
df_ret = p.DataFrame()
dummy_df = p.DataFrame()
# Assigning Target File Basic Name
df_input = df_payload
# Checking total count of rows
count_row = df_input.shape[0]
print('Total number of records to process:: ', count_row)
interval =int(count_row / num_worker_process) +1
actual_worker_task =int(count_row/interval) +1
loop = asyncio.get_event_loop()
loop.run_until_complete(self.runEncrypt(actual_worker_task, df_input))
loop.close()
for k, v in sp_fin_dict.items():
min_val_list[int(k.replace('Task-', ''))] = v
min_val =min(min_val_list, key=int)
print("Minimum Index Value: ", min_val)
for k, v insorted(sp_fin_dict.items(), key=lambda k: int(k[0].replace('Task-', ''))):
ifint(k.replace('Task-', '')) == min_val:
df_ret = sp_fin_dict[k]
else:
d_frames = [df_ret, sp_fin_dict[k]]
df_ret = p.concat(d_frames)
return df_ret
defgetDecrypt(self, df_encrypted_dict):
try:
de_fin_dict = {}
df_input = p.DataFrame()
df_fin = p.DataFrame()
# Assigning Target File Basic Namefor k, v in df_encrypted_dict.items():
Process_Name = k
df_input = v
# Checking total count of rows
count_row =int(df_input.shape[0])
print('Part number of records to process:: ', count_row)
if count_row >0:
# Deriving rows
df_input['Decrypt_Acct_Nbr'] = df_input.apply(lambda row: self.decrypt_acctNbr(row), axis=1)
df_input['Decrypt_Name'] = df_input.apply(lambda row: self.decrypt_Name(row), axis=1)
df_input['Decrypt_Phone'] = df_input.apply(lambda row: self.decrypt_Phone(row), axis=1)
df_input['Decrypt_Email'] = df_input.apply(lambda row: self.decrypt_Email(row), axis=1)
# Dropping original columns
df_input.drop(['Acct_Nbr', 'Name', 'Phone', 'Email'], axis=1, inplace=True)
# Renaming new columns with the old column names
df_input.rename(columns={'Decrypt_Acct_Nbr':'Acct_Nbr'}, inplace=True)
df_input.rename(columns={'Decrypt_Name': 'Name'}, inplace=True)
df_input.rename(columns={'Decrypt_Phone': 'Phone'}, inplace=True)
df_input.rename(columns={'Decrypt_Email': 'Email'}, inplace=True)
# New Column List Orders
column_order = ['Acct_Nbr', 'Name', 'Acct_Addr_1', 'Acct_Addr_2', 'Phone', 'Email', 'Serial_No']
df_fin = df_input.reindex(column_order, axis=1)
de_fin_dict[Process_Name] = df_fin
return de_fin_dict
exceptExceptionas e:
df_error = p.DataFrame({'Acct_Nbr': str(e), 'Name': '', 'Acct_Addr_1': '', 'Acct_Addr_2': '', 'Phone': '', 'Email': '', 'Serial_No': ''})
de_fin_dict[Process_Name] = df_error
return de_fin_dict
async defproduceDecr(self, queue, l_dict):
m_dict = {}
m_dict =self.getDecrypt(l_dict)
for k, v in m_dict.items():
item = k
print('producing {}...'.format(item))
await queue.put(m_dict)
async defconsumeDecr(self, queue):
result_dict = {}
whileTrue:
# wait for an item from the producer
dp_fin_dict.update(await queue.get())
# process the itemfor k, v in dp_fin_dict.items():
item = k
print('consuming {}...'.format(item))
# Notify the queue that the item has been processed
queue.task_done()
async defrunDecrypt(self, n, df_input):
l_dict = {}
queue = asyncio.Queue()
# schedule the consumer
consumerDe = asyncio.ensure_future(self.consumeDecr(queue))
start_pos =0
end_pos =0
num_worker_process = n
count_row = df_input.shape[0]
print('Total number of records to process:: ', count_row)
interval =int(count_row / num_worker_process) +1
actual_worker_task =int(count_row / interval) +1for i inrange(actual_worker_task):
name ='Task-'+str(i)
if ((start_pos + interval) < count_row):
end_pos = start_pos + interval
else:
end_pos = start_pos + (count_row - start_pos)
print("start_pos: ", start_pos)
print("end_pos: ", end_pos)
split_df = df_input.iloc[start_pos:end_pos]
l_dict[name] = split_df
if ((start_pos > count_row) | (start_pos == count_row)):
breakelse:
start_pos = start_pos + interval
# run the producer and wait for completion
await self.produceDecr(queue, l_dict)
# wait until the consumer has processed all items
await queue.join()
# the consumer is still awaiting for an item, cancel it
consumerDe.cancel()
return dp_fin_dict
defgetDecryptParallel(self, df_payload):
l_dict = {}
data_dict = {}
min_val_list = {}
cnt =1
num_worker_process =self.num_worker_process
actual_worker_task =0
number_of_processes =4
processes = []
split_df = p.DataFrame()
df_ret_1 = p.DataFrame()
dummy_df = p.DataFrame()
# Assigning Target File Basic Name
df_input = df_payload
# Checking total count of rows
count_row = df_input.shape[0]
print('Total number of records to process:: ', count_row)
interval =int(count_row / num_worker_process) +1
actual_worker_task =int(count_row/interval) +1
loop_1 = asyncio.new_event_loop()
asyncio.set_event_loop(asyncio.new_event_loop())
loop_2 = asyncio.get_event_loop()
loop_2.run_until_complete(self.runDecrypt(actual_worker_task, df_input))
loop_2.close()
for k, v in dp_fin_dict.items():
min_val_list[int(k.replace('Task-', ''))] = v
min_val =min(min_val_list, key=int)
print("Minimum Index Value: ", min_val)
for k, v insorted(dp_fin_dict.items(), key=lambda k: int(k[0].replace('Task-', ''))):
ifint(k.replace('Task-', '')) == min_val:
df_ret_1 = dp_fin_dict[k]
else:
d_frames = [df_ret_1, dp_fin_dict[k]]
df_ret_1 = p.concat(d_frames)
return df_ret_1
I don’t want to discuss any more look-up methods as the post is already pretty big. Only address a few critical lines
Under getEncryptParallel, the following lines are essential –
# Checking total count of rowscount_row = df_input.shape[0]print('Total number of records to process:: ', count_row)interval = int(count_row / num_worker_process) + 1actual_worker_task = int(count_row/interval) + 1
Based on the dataframe total number of records, our application will split that main dataframe into parts of sub dataframe & then pass them using queue by asynchronous queue calls.
Initiating our queue methods & passing our dataframe to it.
for k, v in sorted(sp_fin_dict.items(), key=lambda k: int(k[0].replace('Task-', ''))):
    if int(k.replace('Task-', '')) == min_val:
        df_ret = sp_fin_dict[k]
    else:
        d_frames = [df_ret, sp_fin_dict[k]]
        df_ret = p.concat(d_frames)
Our application is sending & receiving data using the dictionary. The reason is – we’re not expecting data that we may get it from our server in sequence. Instead, we’re hoping the data will be random. Hence, using keys, we’re maintaining our final sequence & that will ensure our application to joining back to the correct sets of source data, which won’t be the candidate for any encryption/decryption.
Let’s discuss runEncrypt method.
for i in range(actual_worker_task):
    name = 'Task-' + str(i)

    if ((start_pos + interval) < count_row):
        end_pos = start_pos + interval
    else:
        end_pos = start_pos + (count_row - start_pos)

    print("start_pos: ", start_pos)
    print("end_pos: ", end_pos)

    split_df = df_input.iloc[start_pos:end_pos]
    l_dict[name] = split_df

    if ((start_pos > count_row) | (start_pos == count_row)):
        break
    else:
        start_pos = start_pos + interval
Here, our application is splitting our source data frame into multiple sub dataframe & then it can be processed in parallel using queues.
# run the producer and wait for completionawait self.produceEncr(queue, l_dict)# wait until the consumer has processed all itemsawait queue.join()
Invoking the encryption-decryption process using queues. The last line is significant. The queue will not destroy until all the item produced/place into the queue are not consumed. Hence, your main program will wait until it processes all the records of your dataframe.
Two methods named produceEncr & consumeEncr mainly used for placing an item inside the queue & then after encryption/decryption it will retrieve it from the queue.
Few important lines from both the methods are –
#produceEncrawait queue.put(m_dict)#consumeEncr# wait for an item from the producersp_fin_dict.update(await queue.get())
# Notify the queue that the item has been processedqueue.task_done()
From the first two lines, one can see that the application will place its item into the queue. Rests are the lines from the other methods. Our application is pouring the data into the dictionary, which will be returned to our calling methods. The last line is significantly essential. Without the task_done process, the queue will continue to wait for upcoming items. Hence, that will trigger infinite wait or sometimes deadlock.
10. callClient.py (This script will trigger both the serial & parallel process of encryption one by one & finally capture some statistics. Hence, the name comes into the picture.)
Today, we’ll be looking into another exciting installment of cross-over between Reality Stone & Timestone from the python verse.
We’ll be exploring Encryption/Decryption implemented using the Flask Framework Server component. We would like to demonstrate this Encrypt/Decrypt features as Server API & then we can call it from clients like Postman to view the response.
So, here are primary focus will be implementing this in Server-side rather than the client-side.
However, there is a catch. We would like to implement different kind of encryption or decryption based on our source data.
Let’s look into the sample data first –
As you can see, we intend to encrypt Account Number encryption with different salt compared to Name or Phone or Email. Hence, we would be using different salt to encrypt our sample data & get the desired encrypt/decrypt output.
From the above data, we can create the following types of JSON payload –
Let’s explore –
Before we start, we would like to show you the directory structure of Windows & MAC as we did the same in my earlier post as well.
Following are the scripts that we’re using to develop this server applications & they are as follows –
1. clsConfigServer.py (This script contains all the parameters of the server.)
As mentioned, the different salt key’s defined for different kind of data.
2. clsEnDec.py (This script is a lighter version of encryption & decryption of our previously discussed script. Hence, we won’t discuss in details. You can refer my earlier post to understand the logic of this script.)
############################################### Written By: SATYAKI DE ############ Written On: 25-Jan-2019 ############ Package Cryptography needs to ############ install in order to run this ############ script. ############ ############ Objective: This script will ############ encrypt/decrypt based on the ############ hidden supplied salt value. ###################################################fromcryptography.fernetimport Fernet
classclsEnDec(object):
def__init__(self, token):
# Calculating Keyself.token = token
defencrypt_str(self, data):
try:
# Capturing the Salt Information
salt =self.token
# Checking Individual Types inside the Dataframe
cipher = Fernet(salt)
encr_val =str(cipher.encrypt(bytes(data,'utf8'))).replace("b'","").replace("'","")
return encr_val
exceptExceptionas e:
x =str(e)
print(x)
encr_val =''return encr_val
defdecrypt_str(self, data):
try:
# Capturing the Salt Information
salt =self.token
# Checking Individual Types inside the Dataframe
cipher = Fernet(salt)
decr_val =str(cipher.decrypt(bytes(data,'utf8'))).replace("b'","").replace("'","")
return decr_val
exceptExceptionas e:
x =str(e)
print(x)
decr_val =''return decr_val
3. clsFlask.py (This is the main server script that will the encrypt/decrypt class from our previous script. This script will capture the requested JSON from the client, who posted from the clients like another python script or third-party tools like Postman.)
############################################### Written By: SATYAKI DE ######## Written On: 25-Jan-2019 ######## Package Flask package needs to ######## install in order to run this ######## script. ######## ######## Objective: This script will ######## encrypt/decrypt based on the ######## supplied salt value. Also, ######## this will capture the individual ######## element & stored them into JSON ######## variables using flask framework. ###############################################fromclsConfigServerimport clsConfigServer as csf
importclsEnDecascenclassclsFlask(object):
def__init__(self):
self.xtoken =str(csf.config['DEF_SALT'])
defgetEncryptProcess(self, dGroup, input_data, dTemplate):
try:
# It is sending default salt value
xtoken =self.xtoken
# Capturing the individual element
dGroup = dGroup
input_data = input_data
dTemplate = dTemplate
# This will check the mandatory json elementsif ((dGroup !='') & (dTemplate !='')):
# Based on the Group & Element it will fetch the salt# Based on the specific salt it will encrypt the dataif ((dGroup =='GrDet') & (dTemplate =='subGrAcct_Nbr')):
xtoken =str(csf.config['ACCT_NBR_SALT'])
print("xtoken: ", xtoken)
print("Flask Input Data: ", input_data)
x = cen.clsEnDec(xtoken)
ret_val = x.encrypt_str(input_data)
elif ((dGroup =='GrDet') & (dTemplate =='subGrName')):
xtoken =str(csf.config['NAME_SALT'])
print("xtoken: ", xtoken)
print("Flask Input Data: ", input_data)
x = cen.clsEnDec(xtoken)
ret_val = x.encrypt_str(input_data)
elif ((dGroup =='GrDet') & (dTemplate =='subGrPhone')):
xtoken =str(csf.config['PHONE_SALT'])
print("xtoken: ", xtoken)
print("Flask Input Data: ", input_data)
x = cen.clsEnDec(xtoken)
ret_val = x.encrypt_str(input_data)
elif ((dGroup =='GrDet') & (dTemplate =='subGrEmail')):
xtoken =str(csf.config['EMAIL_SALT'])
print("xtoken: ", xtoken)
print("Flask Input Data: ", input_data)
x = cen.clsEnDec(xtoken)
ret_val = x.encrypt_str(input_data)
else:
ret_val =''else:
ret_val =''# Return valuereturn ret_val
exceptExceptionas e:
ret_val =''# Return the valid json Error Responsereturn ret_val
defgetDecryptProcess(self, dGroup, input_data, dTemplate):
try:
xtoken =self.xtoken
# Capturing the individual element
dGroup = dGroup
input_data = input_data
dTemplate = dTemplate
# This will check the mandatory json elementsif ((dGroup !='') & (dTemplate !='')):
# Based on the Group & Element it will fetch the salt# Based on the specific salt it will decrypt the dataif ((dGroup =='GrDet') & (dTemplate =='subGrAcct_Nbr')):
xtoken =str(csf.config['ACCT_NBR_SALT'])
print("xtoken: ", xtoken)
print("Flask Input Data: ", input_data)
x = cen.clsEnDec(xtoken)
ret_val = x.decrypt_str(input_data)
elif ((dGroup =='GrDet') & (dTemplate =='subGrName')):
xtoken =str(csf.config['NAME_SALT'])
print("xtoken: ", xtoken)
print("Flask Input Data: ", input_data)
x = cen.clsEnDec(xtoken)
ret_val = x.decrypt_str(input_data)
elif ((dGroup =='GrDet') & (dTemplate =='subGrPhone')):
xtoken =str(csf.config['PHONE_SALT'])
print("xtoken: ", xtoken)
print("Flask Input Data: ", input_data)
x = cen.clsEnDec(xtoken)
ret_val = x.decrypt_str(input_data)
elif ((dGroup =='GrDet') & (dTemplate =='subGrEmail')):
xtoken =str(csf.config['EMAIL_SALT'])
print("xtoken: ", xtoken)
print("Flask Input Data: ", input_data)
x = cen.clsEnDec(xtoken)
ret_val = x.decrypt_str(input_data)
else:
ret_val =''else:
ret_val =''# Return valuereturn ret_val
exceptExceptionas e:
ret_val =''# Return the valid Error Responsereturn ret_val
Key lines to check –
# This will check the mandatory json elementsif ((dGroup != '') & (dTemplate != '')):
Encrypt & Decrypt will only work on the data when the key element contains valid values. In this case, we are looking for values stored in dGroup & dTemplate, which will denote the specific encryption type.
# Based on the Group & Element it will fetch the salt# Based on the specific salt it will encrypt the dataif ((dGroup == 'GrDet') & (dTemplate == 'subGrAcct_Nbr')): xtoken = str(csf.config['ACCT_NBR_SALT']) print("xtoken: ", xtoken) print("Flask Input Data: ", input_data) x = cen.clsEnDec(xtoken) ret_val = x.encrypt_str(input_data)elif ((dGroup == 'GrDet') & (dTemplate == 'subGrName')): xtoken = str(csf.config['NAME_SALT']) print("xtoken: ", xtoken) print("Flask Input Data: ", input_data) x = cen.clsEnDec(xtoken) ret_val = x.encrypt_str(input_data)elif ((dGroup == 'GrDet') & (dTemplate == 'subGrPhone')): xtoken = str(csf.config['PHONE_SALT']) print("xtoken: ", xtoken) print("Flask Input Data: ", input_data) x = cen.clsEnDec(xtoken) ret_val = x.encrypt_str(input_data)elif ((dGroup == 'GrDet') & (dTemplate == 'subGrEmail')): xtoken = str(csf.config['EMAIL_SALT']) print("xtoken: ", xtoken) print("Flask Input Data: ", input_data) x = cen.clsEnDec(xtoken) ret_val = x.encrypt_str(input_data)
Here, as you can see that based on dGroup & dTemplate, the application is using specific salt to encrypt or decrypt the corresponding data. Highlighted dark brown showed a particular salt against dGroup & dTemplate.
4. callRunServer.py (This script will create an instance of Flask Server & serve encrypt/decrypt facilities & act as an endpoint or server API & provide the response made to it by clients such as another python or any third-party application.)
Based on the path & method, this will trigger either encrypt or decrypt methods.
# If the server application doesn't have
# valid json, it will throw 400 error
if not request.get_json:
    abort(400)
As the comments suggested, this will check whether the sample data send to the server application is a valid JSON or not. And, based on that, it will proceed or abort the request & send the response back to the client.
# Capturing the individual element
content = request.get_json()dGroup = content['dataGroup']input_data = content['data']dTemplate = content['dataTemplate']
Here, the application is capturing the json into individual elements.
if ((dGroup != '') & (dTemplate != '')): y = clf.clsFlask() ret_val = y.getEncryptProcess(dGroup, input_data, dTemplate)else: abort(500)
The server will process only when both the dGroup & dTemplate will contains no null values. The same logic is applicable for both the encrypt & decrypt process.
return jsonify({'status': 'success', 'encrypt_val': ret_val})except Exception as e: x = str(e) return jsonify({'status': 'error', 'detail': x})
If the process is successful, then it will send a json response, or else it will return json with error details. Similar logic is applicable for decrypt as well.
Based on the supplied IP address from our configuration file, this server will create an instance on that specific IP address when triggers. Please refer clsConfigServer.py for particular parameter values.
Let’s run the server application & see the debug encrypt & decrypt screen looks from the server-side –
Windows (64 bit):
And, we’re using Postman Third-party app to invoke this & please find the authentication details & JSON Payload for encrypting are as follows –
Let’s see the decrypt from the server-side & how it looks like from the Postman –
Mac (32 bit):
Let’s look from MAC’s perspective & how the encryption debug looks like from the server.
Please find the screen from postman along with the necessary authentication –
Let’s discover how the decrypt looks like both from server & Postman as well –
So, from this post, we’ve achieved our goal. We’ve successfully demonstrated of a creating a server component using Flask framework & we’ve incorporated our custom encryption/decryption script to create a simulated API for the third-party clients or any other application.
Hope, you will like this approach.
Let me know your comment on the same.
I’ll bring some more exciting topic in the coming days from the Python verse.
So, here we come up with another crossover of Space Stone, Reality Stone & Mind Stone of Python-Verse. It is indeed exciting & I cannot wait to explore that part further. Today, in this post, we’ll see how one application can integrate all these key ingredients in Python to serve the purpose. Our key focus will be involving popular packages like Pandas, Numpy & Popular Encryption-Decryption techniques, which include some hidden files as well.
So, our objective here is to proceed with the encryption & decryption technique. But, there is a catch. We need to store some salt or tokenized value inside a hidden file. Our application will extract the salt value from it & then based on that it will perform Encrypt/Decrypt on the data.
Why do we need this approach?
The answer is simple. On many occasions, we don’t want to store our right credentials in configuration files. Also, we don’t want to keep our keys to open to other developers. There are many ways you can achieve this kind of security. Today, I’ll be showing a different approach to make the same.
Let’s explore.
As usual, I’ll provide the solution, which is tested in Windows & MAC & provide the script. Also, I’ll explain the critical lines of those scripts to understand it from a layman point of view. And, I won’t explain any script, which I’ve already explained in my earlier post. So, you have to refer my old post for that.
To encrypt & decrypt, we need the following files, which contains credentials in a csv. Please find the sample data –
Config_orig.csv
Please see the file, which will be hidden by the application process.
As you can see, this column contains the salt, which will be used in our Encryption/Decryption.
1. clsL.py (This script will create the csv files or any intermediate debug csv file after the corresponding process. Hence, the name comes into the picture.)
The above two lines under doit() functions are changing the file attributes in Windows OS to the hidden mode by assigning the FILE_ATTRIBUTE_HIDDEN property.
As the script suggested, the application is setting the file attribute of a hidden file to FILE_ATTRIBUTE_NORMAL & set the correct flag from parameters, which leads to the file appears as a normal windows file.
4. clsOSXHide.py (This script contains the core logic of hiding/unhiding a file under OSX, i.e., MAC OS. Hence, the name comes into the picture.)
In this case, our application simply renaming a file with its the original file to get the file as a normal file.
Let’s understand that in Linux or MAC, you have a lot of other ways to restrict any files as it has much more granular level access control. But, I thought, why not take a slightly different & fun way to achieve the same. After all, we’re building an Infinity War for Python verse. A little bit of fun will certainly make some sense. 🙂
5. clsProcess.py (This script will invoke any of the hide scripts, i.e. clsWinHide.py or clsOSXHide.py based on the OS platform. Hence, the name comes into the picture.)
############################################### Written By: SATYAKI DE ########## Written On: 25-Jan-2019 ########## ########## Objective: Based on the OS, this########## script calls the actual script. #################################################fromclsParamimport clsParam as cp
plat_det = cp.config['OS_DET']
# Based on the platform# Application is loading subprocess# in order to avoid library missing# case against cross platformif plat_det =="Windows":
importclsWinHideaswinelse:
importclsOSXHideasosx# End of conditional class loadclassclsProcess(object):
def__init__(self):
self.os_det = plat_det
defdoit(self):
try:
os_det =self.os_det
print("OS Info: ", os_det)
if os_det =="Windows":
win_doit = win.clsWinHide()
ret_val = win_doit.doit()
else:
osx_doit = osx.clsOSXHide()
ret_val = osx_doit.doit()
return ret_val
exceptExceptionas e:
x =str(e)
print(x)
return1defundoit(self):
try:
os_det =self.os_det
print("OS Info: ", os_det)
if os_det =="Windows":
win_doit = win.clsWinHide()
ret_val = win_doit.undoit()
else:
osx_doit = osx.clsOSXHide()
ret_val = osx_doit.undoit()
return ret_val
exceptExceptionas e:
x =str(e)
print(x)
return1
Key lines to explores are as follows –
from clsParam import clsParam as cpplat_det = cp.config['OS_DET']# Based on the platform# Application is loading subprocess# in order to avoid library missing# case against cross platformif plat_det == "Windows": import clsWinHide as winelse: import clsOSXHide as osx
This step is very essential to run the same python scripts in both the environments, e.g. in this case like MAC & Windows.
So, based on the platform details, which the application is getting from the clsParam class, it is loading the specific class to the application. And why it is so important.
Under Windows OS, this will work if you load both the class. But, under MAC, this will fail as the first program will try to load all the libraries & it may happen that the pywin32/pypiwin32 package might not available under MAC. Anyway, you are not even using that package. So, this conditional class loading is significant.
As you can see that, based on the OS, it is invoking the correct function of that corresponding class.
6. clsEnDec.py (This script will read the credentials from a csv file & then based on the salt captured from the hidden file, it will either encrypt or decrypt the content. Hence, the name comes into the picture.)
############################################### Written By: SATYAKI DE ############ Written On: 25-Jan-2019 ############ Package Cryptography needs to ############ install in order to run this ############ script. ############ ############ Objective: This script will ############ encrypt/decrypt based on the ############ hidden supplied salt value. ###################################################importpandasaspfromcryptography.fernetimport Fernet
classclsEnDec(object):
def__init__(self, token):
# Calculating Keyself.token = token
defencrypt_str(self):
try:
# Capturing the Salt Information
salt =self.token
# Fetching the content of lookup file
df_orig = p.read_csv('Config_orig.csv', index_col=False)
# Checking Individual Types inside the Dataframe
cipher = Fernet(salt)

df_orig['User'] = df_orig['User'].apply(lambda x1: cipher.encrypt(bytes(x1,'utf8')))
df_orig['Pwd'] = df_orig['Pwd'].apply(lambda x2: cipher.encrypt(bytes(x2,'utf8')))
# Writing to the File
df_orig.to_csv('Encrypt_Config.csv', index=False)
return0exceptExceptionas e:
x =str(e)
print(x)
return1defdecrypt_str(self):
try:
# Capturing the Salt Information
salt =self.token
# Checking Individual Types inside the Dataframe
cipher = Fernet(salt)

# Fetching the Encrypted csv file
df_orig = p.read_csv('Encrypt_Config.csv', index_col=False)

df_orig['User'] = df_orig['User'].apply(lambda x1: str(cipher.decrypt(bytes(x1[2:-1],'utf8'))).replace("b'","").replace("'",""))
df_orig['Pwd'] = df_orig['Pwd'].apply(lambda x2: str(cipher.decrypt(bytes(x2[2:-1],'utf8'))).replace("b'","").replace("'",""))
# Writing to the file
df_orig.to_csv('Decrypt_Config.csv', index=False)
return0exceptExceptionas e:
x =str(e)
print(x)
return1
So, once you captured the salt from that hidden file, the application is capturing that value over here. And, based on that both the field will be encrypted. But, note that cryptography package is required for this. And, you need to pass bytes value to work this thing. Hence, we’ve used bytes() function over here.
Again, in this step, our application is extracting the salt & then it retrieves the encrypted values of corresponding fields & applies the decryption logic on top of it. Note that, since we need to pass bytes value to get it to work. Hence, your output will be appended with (b’xxxxx’). To strip that, we’ve used the replace() functions. You can use regular expression using pattern matching as well.
7. callEnDec.py (This script will create the split csv files or final merge file after the corresponding process. However, this can be used as normal verbose debug logging as well. Hence, the name comes into the picture.)
############################################### Written By: SATYAKI DE ######### Written On: 25-Jan-2019 ######### ######### Objective: Main calling function ################################################importclsEnDecasedimportclsProcessashfromclsParamimport clsParam as cp
importtimeastimportpandasaspdefmain():
print("")
print("#"*60)
print("Calling (Encryption/Decryption) Package!!")
print("#"*60)
print("")
# Unhiding the file
x = h.clsProcess()
ret_val_unhide = x.undoit()
if ret_val_unhide ==0:
print("Successfully Unhide the file!")
else:
print("Unsuccessful to Unhide the file!")
# To See the Unhide file
t.sleep(10)
print("*"*60)
print("Proceeding with Encryption...")
print("*"*60)
# Getting Salt Value from the hidden files# by temporarily making it available
FileName = cp.config['FILENAME']
df = p.read_csv(FileName, index_col=False)
salt =str(df.iloc[0]['Token_Salt'])
print("-"*60)
print("Salt: ", salt)
print("-"*60)
# Calling the Encryption Method
x = ed.clsEnDec(salt)
ret_val = x.encrypt_str()
if ret_val ==0:
print("Encryption Successful!")
else:
print("Encryption Failure!")
print("")
print("*"*60)
print("Checking Decryption Now...")
print("*"*60)
# Calling the Decryption Method
ret_val1 = x.decrypt_str()
if ret_val1 ==0:
print("Decryption Successful!")
else:
print("Decryption Failure!")
# Hiding the salt file
x = h.clsProcess()
ret_val_hide = x.doit()
if ret_val_hide ==0:
print("Successfully Hide the file!")
else:
print("Unsuccessful to Hide the file!")
print("*"*60)
print("Operation Done!")
print("*"*60)
if __name__ =='__main__':
main()
And, here comes the final calling methods.
The key lines that we would like to discuss –
# Getting Salt Value from the hidden files# by temporarily making it availableFileName = cp.config['FILENAME']df = p.read_csv(FileName, index_col=False)salt = str(df.iloc[0]['Token_Salt'])
As I’ve shown that, we have our hidden files that contain only 1 row & 1 column. To extract the specific value we’ve used iloc with the row number as 0 along with the column name, i.e. Token_Salt.
Now, let’s see how it runs –
Windows (64 bit):
Mac (32 bit):
So, from the screenshot, we can see our desired output & you can calculate the aggregated value based on our sample provided in the previous screenshot.
Let’s check the Encrypted & Decrypted values –
Encrypted Values (Encrypt_Config.csv):
Decrypted Values (Decrypt_Config.csv):
So, finally, we’ve achieved our target.
I hope this will give you some more idea about more insights into the Python verse. Let me know – how do you think about this post.


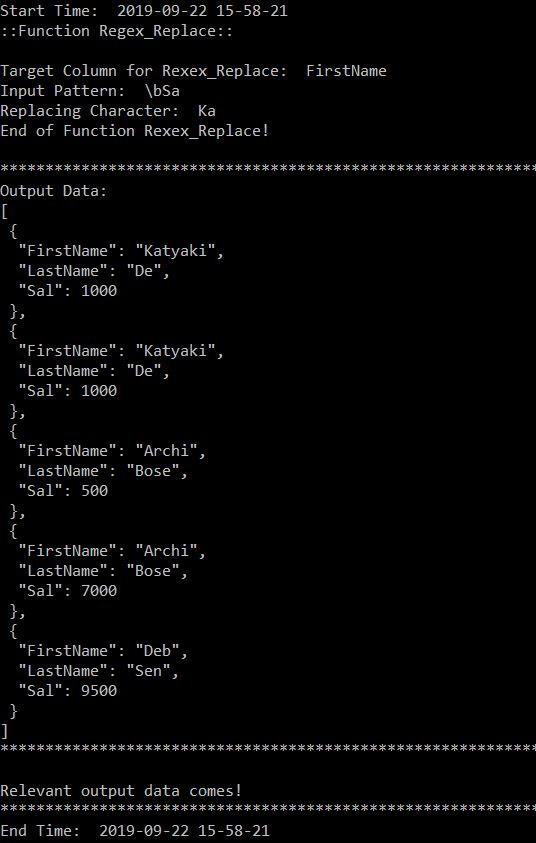


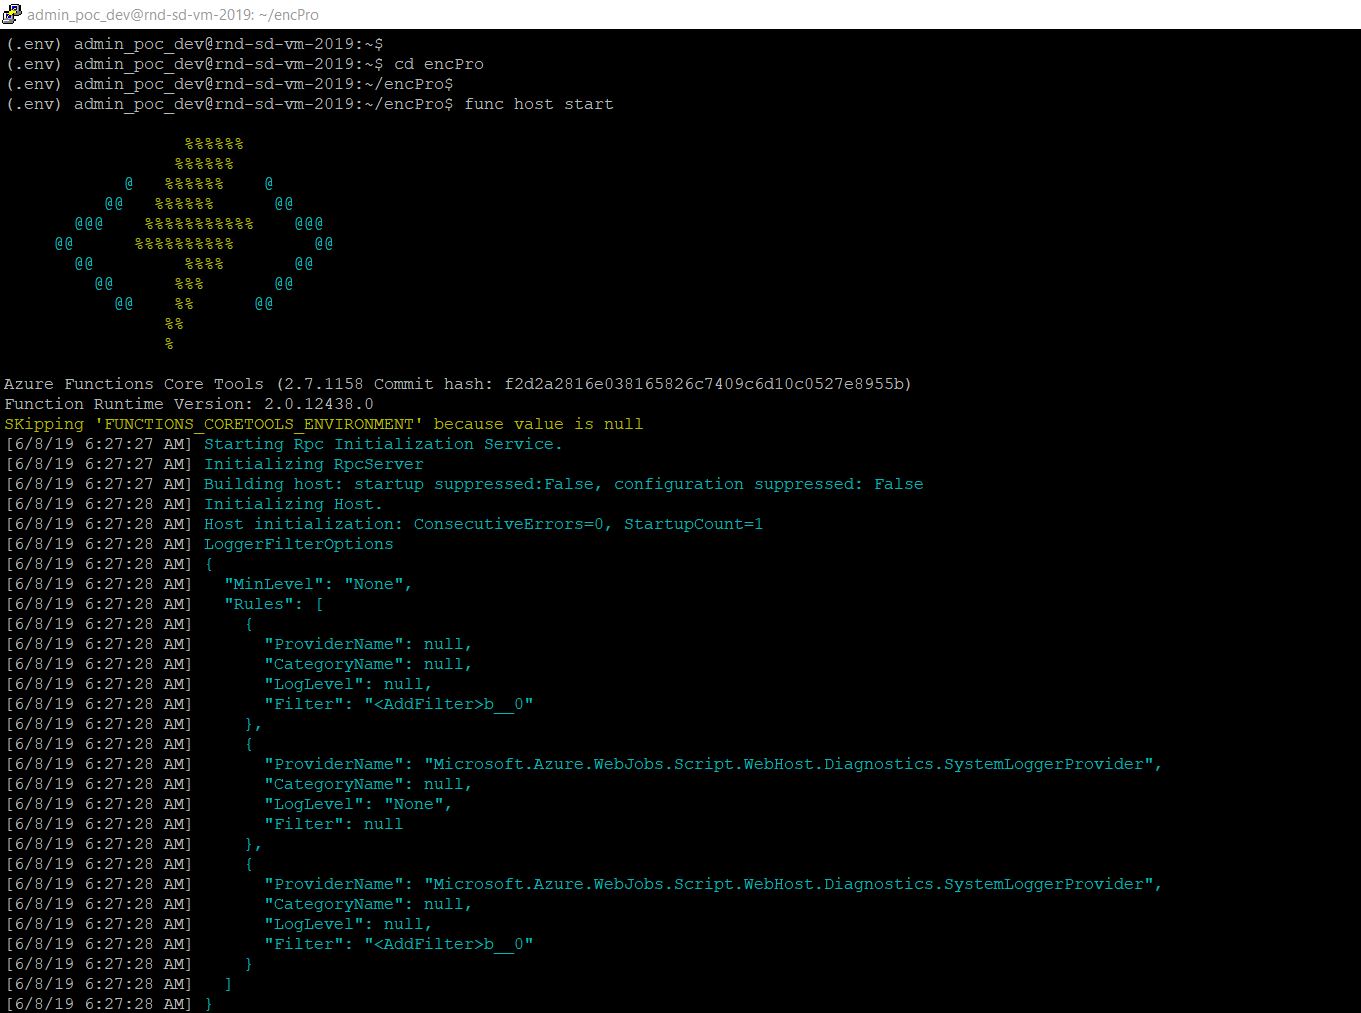
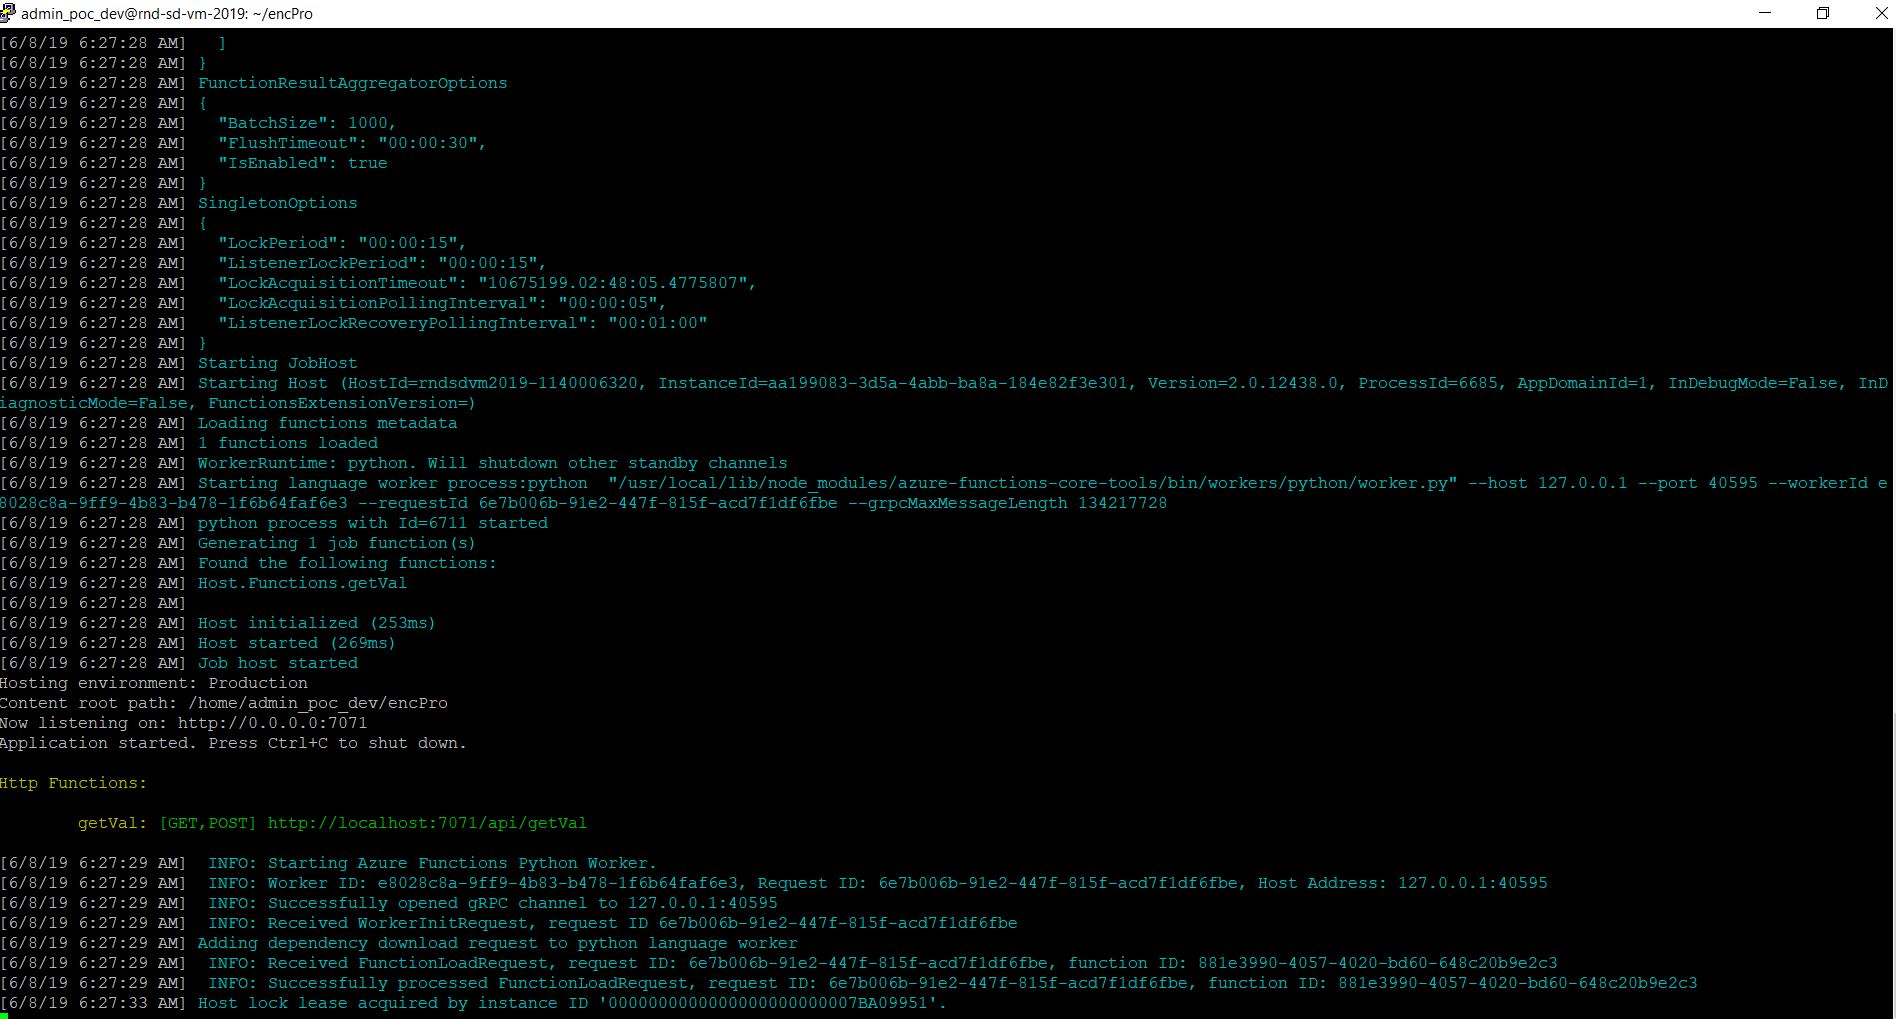


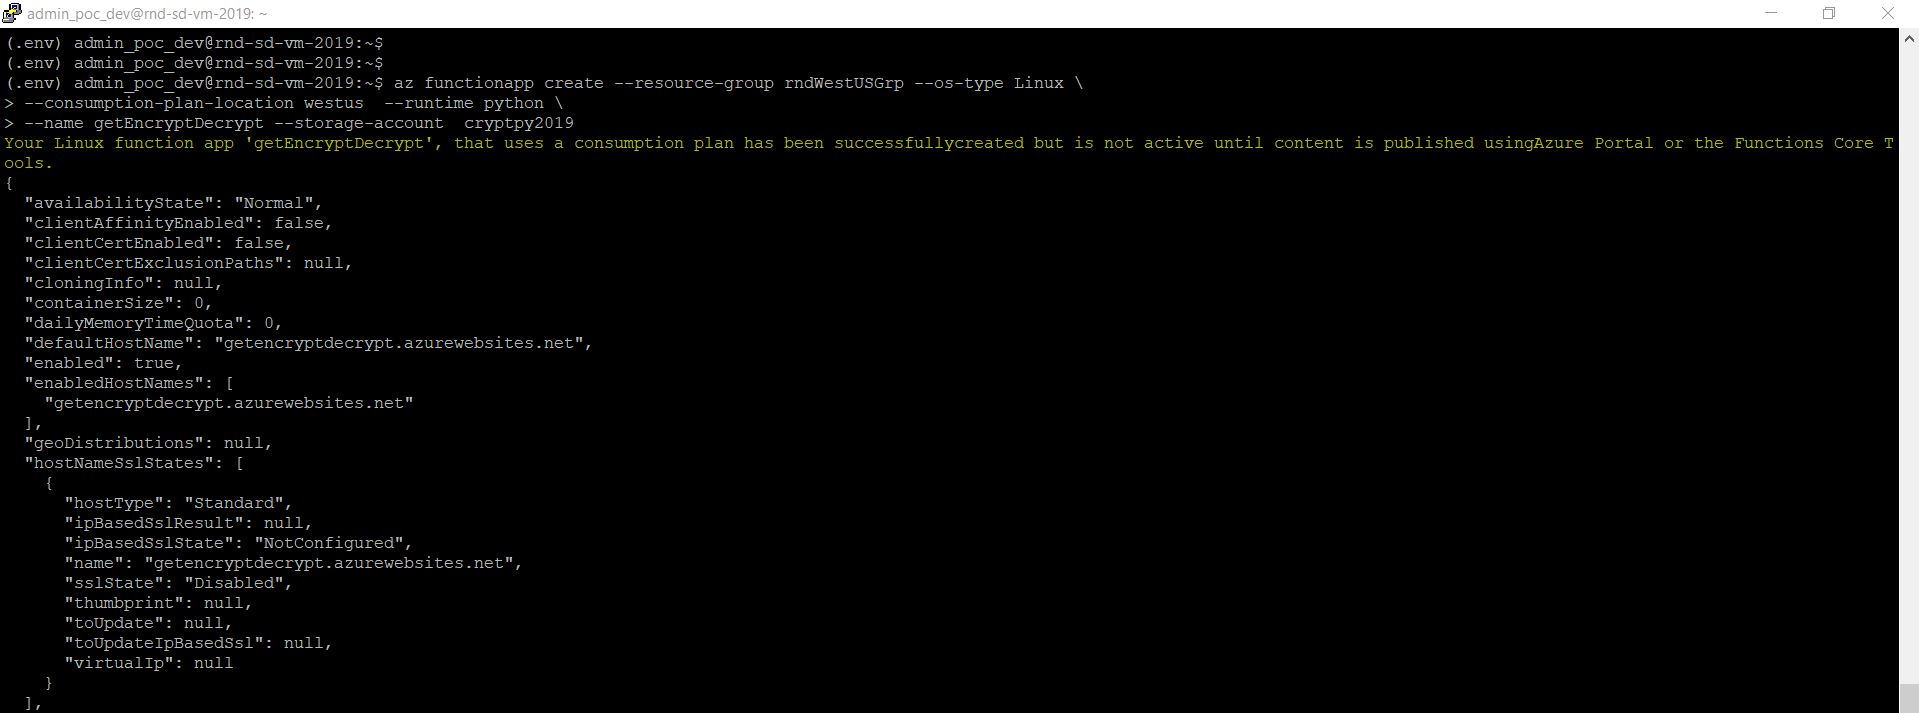


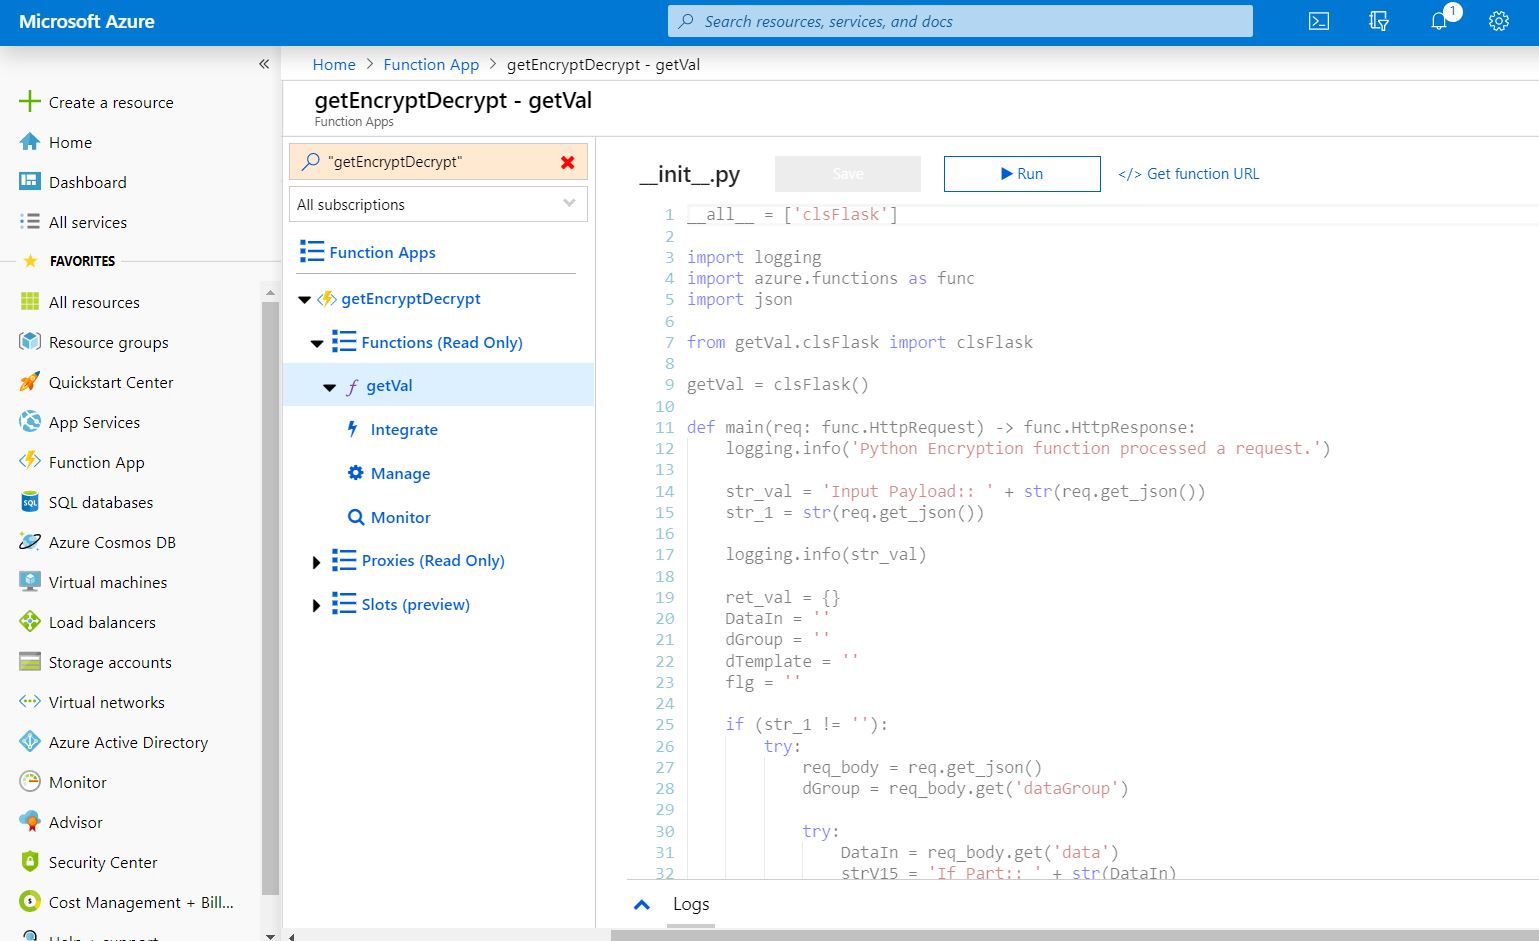


You must be logged in to post a comment.