
Today, I will present some valid Python packages where you can explore most of the complex SQLs by using this new package named “Polars,” which can be extremely handy on many occasions.
This post will be short posts where I’ll prepare something new on LLMs for the upcoming posts for the next month.
Why not view the demo before going through it?
Python Packages:
pip install polars
pip install pandas
Code:
Let us understand the key class & snippets.
- clsConfigClient.py (Key entries that will be discussed later)
################################################
#### Written By: SATYAKI DE                 ####
#### Written On:  15-May-2020               ####
#### Modified On: 28-Oct-2023               ####
####                                        ####
#### Objective: This script is a config     ####
#### file, contains all the keys for        ####
#### personal OpenAI-based MAC-shortcuts    ####
#### enable bot.                            ####
####                                        ####
################################################

import os
import platform as pl

class clsConfigClient(object):
    Curr_Path = os.path.dirname(os.path.realpath(__file__))

    os_det = pl.system()
    if os_det == "Windows":
        sep = '\\'
    else:
        sep = '/'

    conf = {
        'APP_ID': 1,
        'ARCH_DIR': Curr_Path + sep + 'arch' + sep,
        'LOG_PATH': Curr_Path + sep + 'log' + sep,
        'DATA_PATH': Curr_Path + sep + 'data' + sep,
        'TEMP_PATH': Curr_Path + sep + 'temp' + sep,
        'OUTPUT_DIR': 'model',
        'APP_DESC_1': 'Polars Demo!',
        'DEBUG_IND': 'Y',
        'INIT_PATH': Curr_Path,
        'TITLE': "Polars Demo!",
        'PATH' : Curr_Path,
        'OUT_DIR': 'data',
        'MERGED_FILE': 'mergedFile.csv',
        'ACCT_FILE': 'AccountAddress.csv',
        'ORDER_FILE': 'Orders.csv',
        'CUSTOMER_FILE': 'CustomerDetails.csv',
        'STATE_CITY_WISE_REPORT_FILE': 'StateCityWiseReport.csv'
    }
- clsSQL.py (Main class file that contains how to use the SQL)
#####################################################
#### Written By: SATYAKI DE                      ####
#### Written On: 27-May-2023                     ####
#### Modified On 28-Oct-2023                     ####
####                                             ####
#### Objective: This is the main calling         ####
#### python class that will invoke the           ####
#### Polar class, which will enable SQL          ####
#### capabilitites.                              ####
####                                             ####
#####################################################

import polars as pl
import os
from clsConfigClient import clsConfigClient as cf
import pandas as p

###############################################
###           Global Section                ###
###############################################

# Disbling Warning
def warn(*args, **kwargs):
    pass

import warnings
warnings.warn = warn

###############################################
###    End of Global Section                ###
###############################################

class clsSQL:
    def __init__(self):
        self.acctFile = cf.conf['ACCT_FILE']
        self.orderFile = cf.conf['ORDER_FILE']
        self.stateWiseReport = cf.conf['STATE_CITY_WISE_REPORT_FILE']
        self.custFile = cf.conf['CUSTOMER_FILE']
        self.dataPath = cf.conf['DATA_PATH']

    def execSQL(self):
        try:
            dataPath = self.dataPath
            acctFile = self.acctFile
            orderFile = self.orderFile
            stateWiseReport = self.stateWiseReport
            custFile = self.custFile

            fullAcctFile = dataPath + acctFile
            fullOrderFile = dataPath + orderFile
            fullStateWiseReportFile = dataPath + stateWiseReport
            fullCustomerFile = dataPath + custFile

            ctx = pl.SQLContext(accountMaster = pl.scan_csv(fullAcctFile),
            orderMaster = pl.scan_csv(fullOrderFile),
            stateMaster = pl.scan_csv(fullStateWiseReportFile))

            querySQL = """
            SELECT orderMaster.order_id,
            orderMaster.total,
            stateMaster.state,
            accountMaster.Acct_Nbr,
            accountMaster.Name,
            accountMaster.Email,
            accountMaster.user_id,
            COUNT(*) TotalCount
            FROM orderMaster
            JOIN stateMaster USING (city)
            JOIN accountMaster USING (user_id)
            ORDER BY stateMaster.state
            """

            res = ctx.execute(querySQL, eager=True)
            res_Pandas = res.to_pandas()

            print('Result:')
            print(res_Pandas)
            print(type(res_Pandas))

            ctx_1 = pl.SQLContext(customerMaster = pl.scan_csv(fullCustomerFile),
            tempMaster=pl.from_pandas(res_Pandas))

            querySQL_1 = """
            SELECT tempMaster.order_id,
            tempMaster.total,
            tempMaster.state,
            tempMaster.Acct_Nbr,
            tempMaster.Name,
            tempMaster.Email,
            tempMaster.TotalCount,
            tempMaster.user_id,
            COUNT(*) OVER(PARTITION BY tempMaster.state ORDER BY tempMaster.state, tempMaster.Acct_Nbr) StateWiseCount,
            MAX(tempMaster.Acct_Nbr) OVER(PARTITION BY tempMaster.state ORDER BY tempMaster.state, tempMaster.Acct_Nbr) MaxAccountByState,
            MIN(tempMaster.Acct_Nbr) OVER(PARTITION BY tempMaster.state ORDER BY tempMaster.state, tempMaster.Acct_Nbr) MinAccountByState,
            CASE WHEN tempMaster.total < 70 THEN 'SILVER' ELSE 'GOLD' END CategoryStat,
            SUM(customerMaster.Balance) OVER(PARTITION BY tempMaster.state) SumBalance
            FROM tempMaster
            JOIN customerMaster USING (user_id)
            ORDER BY tempMaster.state
            """

            res_1 = ctx_1.execute(querySQL_1, eager=True)

            finDF = res_1.to_pandas()

            print('Result 2:')
            print(finDF)

            return 0
        except Exception as e:
            discussedTopic = []
            x = str(e)
            print('Error: ', x)

            return 1
If we go through some of the key lines, we will understand how this entire package works.
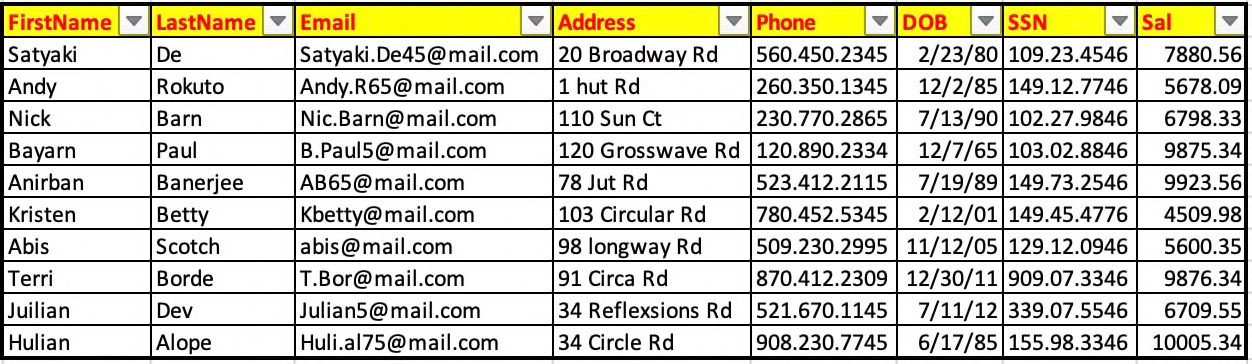
But, before that, let us understand the source data –

Let us understand the steps –
- Join orderMaster, stateMaster & accountMaster and fetch the selected attributes. Store this in a temporary data frame named tempMaster.
- Join tempMaster & customerMaster and fetch the relevant attributes with some more aggregation, which is required for the business KPIs.
ctx = pl.SQLContext(accountMaster = pl.scan_csv(fullAcctFile),
orderMaster = pl.scan_csv(fullOrderFile),
stateMaster = pl.scan_csv(fullStateWiseReportFile))
The above method will create three temporary tables by reading the source files – AccountAddress.csv, Orders.csv & StateCityWiseReport.csv.
And, let us understand the supported SQLs –
SELECT  orderMaster.order_id,
        orderMaster.total,
        stateMaster.state,
        accountMaster.Acct_Nbr,
        accountMaster.Name,
        accountMaster.Email,
        accountMaster.user_id,
        COUNT(*) TotalCount
FROM orderMaster
JOIN stateMaster USING (city)
JOIN accountMaster USING (user_id)
ORDER BY stateMaster.state
In this step, we’re going to store the output of the above query into a temporary view named – tempMaster data frame.
Since this is a polar data frame, we’re converting it to the pandas data frame.
res_Pandas = res.to_pandas()Finally, let us understand the next part –
ctx_1 = pl.SQLContext(customerMaster = pl.scan_csv(fullCustomerFile),
tempMaster=pl.from_pandas(res_Pandas))
In the above section, one source is getting populated from the CSV file, whereas the other source is feeding from a pandas data frame populated in the previous step.
Now, let us understand the SQL supported by this package, which is impressive –
SELECT  tempMaster.order_id,
        tempMaster.total,
        tempMaster.state,
        tempMaster.Acct_Nbr,
        tempMaster.Name,
        tempMaster.Email,
        tempMaster.TotalCount,
        tempMaster.user_id,
        COUNT(*) OVER(PARTITION BY tempMaster.state ORDER BY tempMaster.state, tempMaster.Acct_Nbr) StateWiseCount,
        MAX(tempMaster.Acct_Nbr) OVER(PARTITION BY tempMaster.state ORDER BY tempMaster.state, tempMaster.Acct_Nbr) MaxAccountByState,
        MIN(tempMaster.Acct_Nbr) OVER(PARTITION BY tempMaster.state ORDER BY tempMaster.state, tempMaster.Acct_Nbr) MinAccountByState,
        CASE WHEN tempMaster.total < 70 THEN 'SILVER' ELSE 'GOLD' END CategoryStat,
        SUM(customerMaster.Balance) OVER(PARTITION BY tempMaster.state) SumBalance
FROM tempMaster
JOIN customerMaster USING (user_id)
ORDER BY tempMaster.state
As you can see it has the capability of all the advanced analytics SQL using partitions, and CASE statements.
The only problem with COUNT(*) with the partition is not working as expected. Not sure, whether that is related to any version issues or not.
COUNT(*) OVER(PARTITION BY tempMaster.state ORDER BY tempMaster.state, tempMaster.Acct_Nbr) StateWiseCountI’m trying to get more information on this. Except for this statement, everything works perfectly.
- 1_testSQL.py (Main class file that contains how to use the SQL)
#########################################################
#### Written By: SATYAKI DE                          ####
#### Written On: 27-Jun-2023                         ####
#### Modified On 28-Oct-2023                         ####
####                                                 ####
#### Objective: This is the main class that invokes  ####
#### advanced analytic SQL in python.                ####
####                                                 ####
#########################################################

from clsConfigClient import clsConfigClient as cf
import clsL as log
import clsSQL as ccl

from datetime import datetime, timedelta

# Disbling Warning
def warn(*args, **kwargs):
    pass

import warnings
warnings.warn = warn

###############################################
###           Global Section                ###
###############################################

#Initiating Logging Instances
clog = log.clsL()
cl = ccl.clsSQL()

var = datetime.now().strftime(".%H.%M.%S")

documents = []

###############################################
###    End of Global Section                ###
###############################################
def main():
    try:
        var = datetime.now().strftime("%Y-%m-%d_%H-%M-%S")
        print('*'*120)
        print('Start Time: ' + str(var))
        print('*'*120)

        r1 = cl.execSQL()

        if r1 == 0:
            print()
            print('Successfully SQL-enabled!')
        else:
            print()
            print('Failed to senable SQL!')

        print('*'*120)
        var1 = datetime.now().strftime("%Y-%m-%d_%H-%M-%S")
        print('End Time: ' + str(var1))

    except Exception as e:
        x = str(e)
        print('Error: ', x)

if __name__ == '__main__':
    main()
As this is extremely easy to understand & self-explanatory.
To learn more about this package, please visit the following link.
So, finally, we’ve done it. I know that this post is relatively smaller than my earlier post. But, I think, you can get a good hack to improve some of your long-running jobs by applying this trick.
I’ll bring some more exciting topics in the coming days from the Python verse. Please share & subscribe to my post & let me know your feedback.
Till then, Happy Avenging! 🙂
Note: All the data & scenarios posted here are representational data & scenarios & available over the internet & for educational purposes only. Some of the images (except my photo) we’ve used are available over the net. We don’t claim ownership of these images. There is always room for improvement & especially in the prediction quality.


You must be logged in to post a comment.