Handling unique data using the python-based FastDataMask Package package

Today, I’ll discuss one widespread use case of handling unique & critical data using a new python-based FastDataMask package. But before going through the details, why don’t we view the demo & then go through it?

Demo

Great! Let us understand in detail.

Architecture:

Let us understand the flow of events –

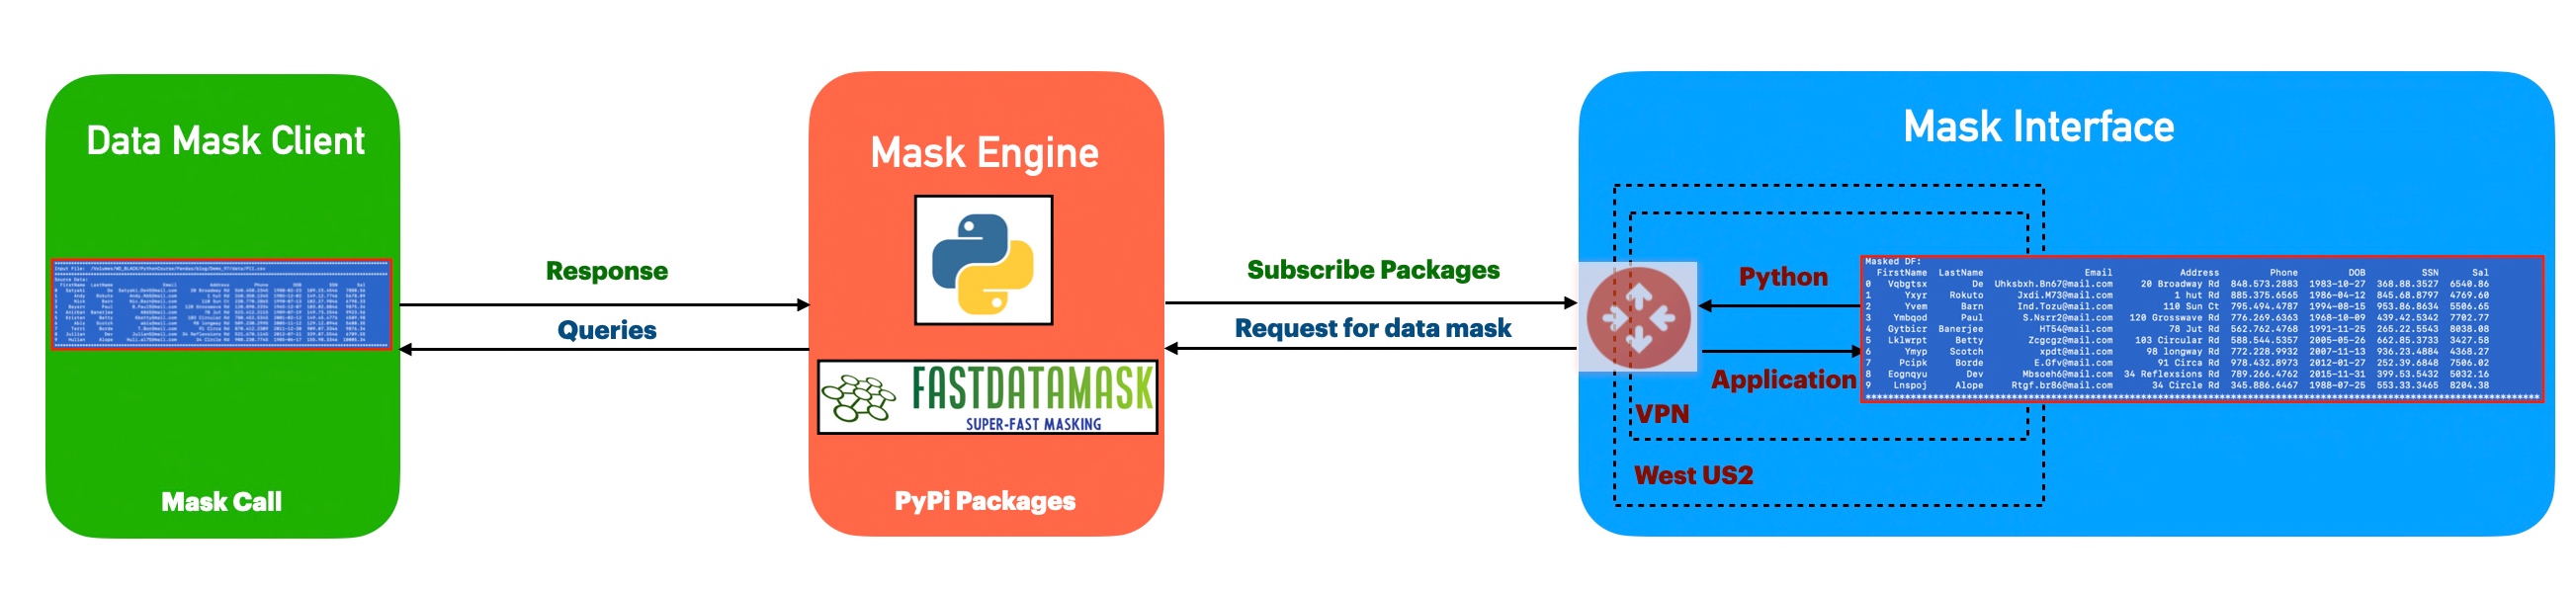
The application first invokes the FastDataMask python package, which accepts individual data in nature & then generates non-recoverable masked data, keeping the data pattern & nature in mind. Hence, anyone can still use the data for their analysis, whereas you can encapsulate the information from unauthorized pairs of eyes. Yet, they can get the essence & close data patterns to decide from any data analysis.

Python Packages:

Following are the python packages that are necessary to develop this brilliant use case –

pip install FastDataMask==0.0.6
pip install imutils==0.5.3
pip install numpy==1.23.2
pip install pandas==1.4.3

CODE:

Let us now understand the code. For this use case, we will only discuss three python scripts. However, we need more than these three. However, we have already discussed them in some of the early posts. Hence, we will skip them here.

  • clsConfigClient.py (Main configuration file)


################################################
#### Written By: SATYAKI DE ####
#### Written On: 15-May-2020 ####
#### Modified On: 15-Feb-2023 ####
#### ####
#### Objective: This script is a config ####
#### file, contains all the keys for ####
#### personal AI-driven voice assistant. ####
#### ####
################################################
import os
import platform as pl
class clsConfigClient(object):
Curr_Path = os.path.dirname(os.path.realpath(__file__))
os_det = pl.system()
if os_det == "Windows":
sep = '\\'
else:
sep = '/'
conf = {
'APP_ID': 1,
'ARCH_DIR': Curr_Path + sep + 'arch' + sep,
'PROFILE_PATH': Curr_Path + sep + 'profile' + sep,
'LOG_PATH': Curr_Path + sep + 'log' + sep,
'REPORT_PATH': Curr_Path + sep + 'output' + sep,
'REPORT_DIR': 'output',
'SRC_PATH': Curr_Path + sep + 'data' + sep,
'APP_DESC_1': 'Masking PII Data!',
'DEBUG_IND': 'N',
'INIT_PATH': Curr_Path,
'FILE_NAME': 'PII.csv',
'TITLE': "Masking PII Data!",
'PATH' : Curr_Path
}

Key entries from the above scripts are as follows –

'FILE_NAME': 'PII.csv',

This excel is a dummy input file, which looks like this –

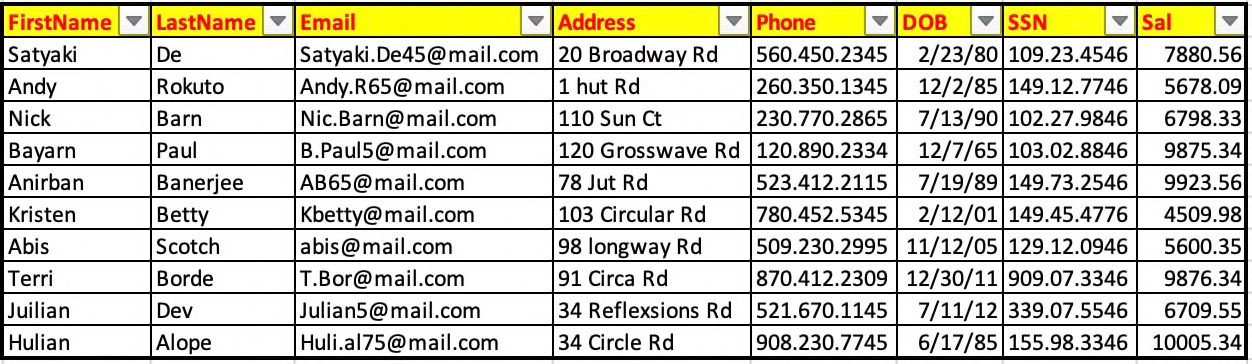
In the above screenshot, our applications will use critical information like – First Name, Email, Address, Phone, Date Of Birth, SSN & Sal.

  • playPII.py (Main calling python script)


#####################################################
#### Written By: SATYAKI DE ####
#### Written On: 12-Feb-2023 ####
#### Modified On 16-Feb-2023 ####
#### ####
#### Objective: This is the main calling ####
#### python script that will invoke the ####
#### newly created light data masking class. ####
#### ####
#####################################################
import pandas as p
import clsL as cl
from clsConfigClient import clsConfigClient as cf
import datetime
from FastDataMask import clsCircularList as ccl
# Disbling Warning
def warn(*args, **kwargs):
pass
import warnings
warnings.warn = warn
######################################
### Get your global values ####
######################################
debug_ind = 'Y'
charList = ccl.clsCircularList()
CurrPath = cf.conf['SRC_PATH']
FileName = cf.conf['FILE_NAME']
######################################
#### Global Flag ########
######################################
######################################
### Wrapper functions to invoke ###
### the desired class from newly ###
### built class. ###
######################################
def mask_email(email):
try:
maskedEmail = charList.maskEmail(email)
return maskedEmail
except:
return ''
def mask_phone(phone):
try:
maskedPhone = charList.maskPhone(phone)
return maskedPhone
except:
return ''
def mask_name(flname):
try:
maskedFLName = charList.maskFLName(flname)
return maskedFLName
except:
return ''
def mask_date(dt):
try:
maskedDate = charList.maskDate(dt)
return maskedDate
except:
return ''
def mask_uniqueid(unqid):
try:
maskedUnqId = charList.maskSSN(unqid)
return maskedUnqId
except:
return ''
def mask_sal(sal):
try:
maskedSal = charList.maskSal(sal)
return maskedSal
except:
return ''
######################################
### End of wrapper functions. ###
######################################
def main():
try:
var = datetime.datetime.now().strftime("%Y-%m-%d_%H-%M-%S")
print('*'*120)
print('Start Time: ' + str(var))
print('*'*120)
inputFile = CurrPath + FileName
print('Input File: ', inputFile)
df = p.read_csv(inputFile)
print('*'*120)
print('Source Data: ')
print(df)
print('*'*120)
hdr = list(df.columns.values)
print('Headers:', hdr)
df["MaskedFirstName"] = df["FirstName"].apply(mask_name)
df["MaskedEmail"] = df["Email"].apply(mask_email)
df["MaskedPhone"] = df["Phone"].apply(mask_phone)
df["MaskedDOB"] = df["DOB"].apply(mask_date)
df["MaskedSSN"] = df["SSN"].apply(mask_uniqueid)
df["MaskedSal"] = df["Sal"].apply(mask_sal)
# Dropping old columns
df.drop(['FirstName','Email','Phone','DOB','SSN', 'Sal'], axis=1, inplace=True)
# Renaming columns
df.rename(columns={'MaskedFirstName': 'FirstName'}, inplace=True)
df.rename(columns={'MaskedEmail': 'Email'}, inplace=True)
df.rename(columns={'MaskedPhone': 'Phone'}, inplace=True)
df.rename(columns={'MaskedDOB': 'DOB'}, inplace=True)
df.rename(columns={'MaskedSSN': 'SSN'}, inplace=True)
df.rename(columns={'MaskedSal': 'Sal'}, inplace=True)
# Repositioning columns of dataframe
df = df[hdr]
print('Masked DF: ')
print(df)
print('*'*120)
var1 = datetime.datetime.now().strftime("%Y-%m-%d_%H-%M-%S")
print('End Time: ' + str(var1))
except Exception as e:
x = str(e)
print('Error: ', x)
if __name__ == "__main__":
main()

view raw

playPII.py

hosted with ❤ by GitHub

Let us understand the key lines in details –

def mask_email(email):
    try:
        maskedEmail = charList.maskEmail(email)
        return maskedEmail
    except:
        return ''

def mask_phone(phone):
    try:
        maskedPhone = charList.maskPhone(phone)
        return maskedPhone
    except:
        return ''

def mask_name(flname):
    try:
        maskedFLName = charList.maskFLName(flname)
        return maskedFLName
    except:
        return ''

def mask_date(dt):
    try:
        maskedDate = charList.maskDate(dt)
        return maskedDate
    except:
        return ''

def mask_uniqueid(unqid):
    try:
        maskedUnqId = charList.maskSSN(unqid)
        return maskedUnqId
    except:
        return ''

def mask_sal(sal):
    try:
        maskedSal = charList.maskSal(sal)
        return maskedSal
    except:
        return ''

These functions take a value as input and attempt to mask it using the corresponding masking method from the charList module. If the masking is successful, the process will return a masked value per input; otherwise, the application will return an empty string.

More specifically, the functions are:

  • mask_email: masks the email address provided as input
  • mask_phone: masks the phone number provided as input
  • mask_name: masks the first and last name supplied as input
  • mask_date: masks the date provided as input
  • mask_uniqueid: masks the unique ID (e.g., Social Security Number) provided as input
  • mask_sal: masks the salary supplied as input

The functions use a try-except block to handle any exceptions that may arise when calling the corresponding masking method from the charList module. If the masking method raises an exception, the function will return an empty string to handle cases where the input value is invalid, or the masking method fails for another reason.

inputFile = CurrPath + FileName
df = p.read_csv(inputFile)
hdr = list(df.columns.values)


df["MaskedFirstName"] = df["FirstName"].apply(mask_name)
df["MaskedEmail"] = df["Email"].apply(mask_email)
df["MaskedPhone"] = df["Phone"].apply(mask_phone)
df["MaskedDOB"] = df["DOB"].apply(mask_date)
df["MaskedSSN"] = df["SSN"].apply(mask_uniqueid)
df["MaskedSal"] = df["Sal"].apply(mask_sal)

# Dropping old columns
df.drop(['FirstName','Email','Phone','DOB','SSN', 'Sal'], axis=1, inplace=True)

# Renaming columns
df.rename(columns={'MaskedFirstName': 'FirstName'}, inplace=True)
df.rename(columns={'MaskedEmail': 'Email'}, inplace=True)
df.rename(columns={'MaskedPhone': 'Phone'}, inplace=True)
df.rename(columns={'MaskedDOB': 'DOB'}, inplace=True)
df.rename(columns={'MaskedSSN': 'SSN'}, inplace=True)
df.rename(columns={'MaskedSal': 'Sal'}, inplace=True)
  1. The first line inputFile = CurrPath + FileName concatenates the current working directory path (CurrPath) with the name of a file (FileName) and assigns the resulting file path to a variable inputFile.
  2. The second line df = p.read_csv(inputFile) – reads the file located at inputFile into a Pandas DataFrame object called df.
  3. The following few lines apply certain functions (mask_name, mask_email, mask_phone, mask_date, mask_uniqueid, and mask_sal) to specific columns in the DataFrame to mask sensitive data. These functions likely perform some data masking or obfuscation on the input data.
  4. The following line df.drop([‘FirstName’,’Email’,’Phone’,’DOB’,’SSN’, ‘Sal’], axis=1, inplace=True) drops the original columns that we are supposed to mask (i.e., ‘FirstName’, ‘Email’, ‘Phone’, ‘DOB’, ‘SSN’, and ‘Sal’) from the DataFrame.
  5. The remaining lines rename the masked columns to their original names (i.e., ‘MaskedFirstName’ is renamed to ‘FirstName’, ‘MaskedEmail’ is renamed to ‘Email’, and so on).

Overall, this code reads in a file, masking specific sensitive columns, then outputting a new file with the masked data.

Now, let’s compare the output against the source data –

As you can see the blue highlighted columns are the masked column & you can compare the data pattern against the source.


So, finally, we’ve done it.

I know that this post is relatively bigger than my earlier post. But, I think, you can get all the details once you go through it.

You will get the complete codebase in the following GitHub link.

I’ll bring some more exciting topics in the coming days from the Python verse. Please share & subscribe to my post & let me know your feedback.

Till then, Happy Avenging! 🙂

Note: All the data & scenarios posted here are representational data & scenarios & available over the internet & for educational purposes only. Some of the images (except my photo) we’ve used are available over the net. We don’t claim ownership of these images. There is always room for improvement & especially in the prediction quality.

Building an Azure Function using Python (Crossover between Reality Stone & Time Stone in Python Verse)

Hi Guys!

Today, we’ll be discussing a preview features from Microsoft Azure. Building an Azure function using Python on it’s Linux/Ubuntu VM. Since this is a preview feature, we cannot implement this to production till now. However, my example definitely has more detailed steps & complete code guide compared to whatever available over the internet.

In this post, I will take one of my old posts & enhance it as per this post. Hence, I’ll post those modified scripts. However, I won’t discuss the logic in details as most of these scripts have cosmetic changes to cater to this requirement.

In this post, we’ll only show Ubuntu run & there won’t be Windows or MAC comparison.

Initial Environment Preparation:

  1. Set-up new virtual machine on Azure.
  2. Set-up Azure function environments on that server.

Set-up new virtual machine on Azure:

I’m not going into the details of how to create Ubuntu VM on Microsoft Azure. You can refer the steps in more information here.

After successful creation, the VM will look like this –

Azure VM - Ubuntu

Detailed information you can get after clicking this hyperlink over the name of the VM.

Azure-VM Basic Details

You have to open port 7071 for application testing from the local using postman.

You can get it from the network option under VM as follows –

Network-Configuration

Make sure that you are restricting these ports to specific network & not open to ALL traffic.

So, your VM is ready now.

To update Azure CLI, you need to use the following commands –

sudo apt-get update && sudo apt-get install –only-upgrade -y azure-cli

Set-up Azure function environments on that server:

To set-up the environment, you don’t have to go for Python installation as by default Ubuntu in Microsoft Azure comes up with desired Python version, i.e., Python3.6. However, to run the python application, you need to install the following app –

  1. Microsoft SDK. You will get the details from this link.
  2. Installing node-js. You will get the details from this link.
  3. You need to install a docker. However, as per Microsoft official version, this is not required. But, you can create a Docker container to distribute the python function in Azure application. I would say you can install this just in case if you want to continue with this approach. You will get the details over here. If you want to know details about the Docker. And, how you want to integrate python application. You can refer to this link.
  4. Your desired python packages. In this case, we’ll be modifying this post – “Encryption/Decryption, JSON, API, Flask Framework in Python (Crossover between Reality Stone & Time Stone in Python Verse).” We’ll be modifying a couple of lines only to cater to this functionality & deploying the same as an Azure function.
  5. Creating an Azure function template on Ubuntu. The essential detail you’ll get it from here. However, over there, it was not shown in detailed steps of python packages & how you can add all the dependencies to publish it in details. It was an excellent post to start-up your knowledge.

Let’s see these components status & very brief details –

Microsoft SDK:

To check the dot net version. You need to type the following commands in Ubuntu –

dotnet –info

And, the output will look like this –

DotNet-Version

Node-Js:

Following is the way to verify your node-js version & details –

node -v

npm -v

And, the output looks like this –

Node-Js

Docker:

Following is the way to test your docker version –

docker -v

And, the output will look like this –

Docker-Version

Python Packages:

Following are the python packages that we need to run & publish that in Azure cloud as an Azure function –

pip freeze | grep -v “pkg-resources” > requirements.txt

And, the output is –

Requirements

You must be wondered that why have I used this grep commands here. I’ve witnessed that on many occassion in Microsoft Azure’s Linux VM it produces one broken package called resource=0.0.0, which will terminate the deployment process. Hence, this is very crucial to eliminate those broken packages.

Now, we’re ready for our python scripts. But, before that, let’s see the directory structure over here –

Win_Vs_Ubuntu-Cloud

Creating an Azure Function Template on Ubuntu: 

Before we post our python scripts, we’ll create these following components, which is essential for our Python-based Azure function –

  • Creating a group:

              Creating a group either through Azure CLI or using a docker, you can proceed. The commands for Azure CLI is as follows –

az group create –name “rndWestUSGrp” –location westus

It is advisable to use double quotes for parameters value. Otherwise, you might land-up getting the following error – “Error: “resourceGroupName” should satisfy the constraint – “Pattern”: /^[-w._]+$/“.

I’m sure. You don’t want to face that again. And, here is the output –

CreateDeploymentGroup

Note that, here I haven’t used the double-quotes. But, to avoid any unforeseen issues – you should use double-quotes. You can refer the docker command from the above link, which I’ve shared earlier.

Now, you need to create one storage account where the metadata information of your function will be stored. You will create that as follows –

az storage account create –name cryptpy2019 –location westus –resource-group rndWestUSGrp –sku Standard_LRS

And, the output will look like this –

AccountCreate_1

Great. Now, we’ll create a virtual environment for Python3.6.

python3.6 -m venv .env
source .env/bin/activate

Python-VM

Now, we’ll create a local function project.

func init encPro

And, the output you will get is as follows –

Local-Function

Inside this directory, you’ll see the following files –

Local-Function-Details

You need to edit the host.json with these default lines –

{
 “version”: “2.0”,
 “extensionBundle”: {
                                       “id”: “Microsoft.Azure.Functions.ExtensionBundle”,
                                       “version”: “[1.*, 2.0.0)”
                                     }
}

And, the final content of these two files (excluding the requirements.txt) will look like this –

Configuration

Finally, we’ll create the template function by this following command –

func new

This will follow with steps finish it. You need to choose Python as your programing language. You need to choose an HTTP trigger template. Once you created that successfully, you’ll see the following files –

func_New

Note that, our initial function name is -> getVal.

By default, Azure will generate some default code inside the __init__.py. The details of those two files can be found here.

Since we’re ready with our environment setup. We can now discuss our Python scripts –

1. clsConfigServer.py (This script contains all the parameters of the server.)

###########################################
#### Written By: SATYAKI DE        ########
#### Written On: 10-Feb-2019       ########
####                               ########
#### Objective: Parameter File     ########
###########################################

import os
import platform as pl

# Checking with O/S system
os_det = pl.system()

class clsConfigServer(object):
    Curr_Path = os.path.dirname(os.path.realpath(__file__))

    if os_det == "Windows":
        config = {
            'FILE': 'acct_addr_20180112.csv',
            'SRC_FILE_PATH': Curr_Path + '\\' + 'src_file\\',
            'PROFILE_FILE_PATH': Curr_Path + '\\' + 'profile\\',
            'HOST_IP_ADDR': '0.0.0.0',
            'DEF_SALT': 'iooquzKtqLwUwXG3rModqj_fIl409vemWg9PekcKh2o=',
            'ACCT_NBR_SALT': 'iooquzKtqLwUwXG3rModqj_fIlpp1vemWg9PekcKh2o=',
            'NAME_SALT': 'iooquzKtqLwUwXG3rModqj_fIlpp1026Wg9PekcKh2o=',
            'PHONE_SALT': 'iooquzKtqLwUwXG3rMM0F5_fIlpp1026Wg9PekcKh2o=',
            'EMAIL_SALT': 'iooquzKtqLwU0653rMM0F5_fIlpp1026Wg9PekcKh2o='
        }
    else:
        config = {
            'FILE': 'acct_addr_20180112.csv',
            'SRC_FILE_PATH': Curr_Path + '/' + 'src_file/',
            'PROFILE_FILE_PATH': Curr_Path + '/' + 'profile/',
            'HOST_IP_ADDR': '0.0.0.0',
            'DEF_SALT': 'iooquzKtqLwUwXG3rModqj_fIl409vemWg9PekcKh2o=',
            'ACCT_NBR_SALT': 'iooquzKtqLwUwXG3rModqj_fIlpp1vemWg9PekcKh2o=',
            'NAME_SALT': 'iooquzKtqLwUwXG3rModqj_fIlpp1026Wg9PekcKh2o=',
            'PHONE_SALT': 'iooquzKtqLwUwXG3rMM0F5_fIlpp1026Wg9PekcKh2o=',
            'EMAIL_SALT': 'iooquzKtqLwU0653rMM0F5_fIlpp1026Wg9PekcKh2o='
        }

2. clsEnDec.py (This script is a lighter version of encryption & decryption of our previously discussed scenario. Hence, we won’t discuss in details. You can refer my earlier post to understand the logic of this script.)

###########################################
#### Written By: SATYAKI DE        ########
#### Written On: 25-Jan-2019       ########
#### Package Cryptography needs to ########
#### install in order to run this  ########
#### script.                       ########
####                               ########
#### Objective: This script will   ########
#### encrypt/decrypt based on the  ########
#### hidden supplied salt value.   ########
###########################################

from cryptography.fernet import Fernet
import logging

from getVal.clsConfigServer import clsConfigServer as csf

class clsEnDec(object):

    def __init__(self):
        # Calculating Key
        self.token = str(csf.config['DEF_SALT'])

    def encrypt_str(self, data, token):
        try:
            # Capturing the Salt Information
            t1 = self.token
            t2 = token

            if t2 == '':
                salt = t1
            else:
                salt = t2

            logging.info("Encrypting the value!")

            # Checking Individual Types inside the Dataframe
            cipher = Fernet(salt)
            encr_val = str(cipher.encrypt(bytes(data,'utf8'))).replace("b'","").replace("'","")

            strV1 = "Encrypted value:: " + str(encr_val)
            logging.info(strV1)

            return encr_val

        except Exception as e:
            x = str(e)
            print(x)
            encr_val = ''

            return encr_val

    def decrypt_str(self, data, token):
        try:
            # Capturing the Salt Information
            t1 = self.token
            t2 = token

            if t2 == '':
                salt = t1
            else:
                salt = t2

            logging.info("Decrypting the value!")

            # Checking Individual Types inside the Dataframe
            cipher = Fernet(salt)
            decr_val = str(cipher.decrypt(bytes(data,'utf8'))).replace("b'","").replace("'","")

            strV2 = "Decrypted value:: " + str(decr_val)
            logging.info(strV2)

            return decr_val

        except Exception as e:
            x = str(e)
            print(x)
            decr_val = ''

            return decr_val

3. clsFlask.py (This is the main server script that will the encrypt/decrypt class from our previous scenario. This script will capture the requested JSON from the client, who posted from the clients like another python script or third-party tools like Postman.)

###########################################
#### Written By: SATYAKI DE            ####
#### Written On: 25-Jan-2019           ####
#### Package Flask package needs to    ####
#### install in order to run this      ####
#### script.                           ####
####                                   ####
#### Objective: This script will       ####
#### encrypt/decrypt based on the      ####
#### supplied salt value. Also,        ####
#### this will capture the individual  ####
#### element & stored them into JSON   ####
#### variables using flask framework.  ####
###########################################

from getVal.clsConfigServer import clsConfigServer as csf
from getVal.clsEnDec import clsEnDecAuth

getVal = clsEnDec()

import logging

class clsFlask(object):
    def __init__(self):
        self.xtoken = str(csf.config['DEF_SALT'])

    def getEncryptProcess(self, dGroup, input_data, dTemplate):
        try:
            # It is sending default salt value
            xtoken = self.xtoken

            # Capturing the individual element
            dGroup = dGroup
            input_data = input_data
            dTemplate = dTemplate

            # This will check the mandatory json elements
            if ((dGroup != '') & (dTemplate != '')):

                # Based on the Group & Element it will fetch the salt
                # Based on the specific salt it will encrypt the data
                if ((dGroup == 'GrDet') & (dTemplate == 'subGrAcct_Nbr')):
                    xtoken = str(csf.config['ACCT_NBR_SALT'])

                    strV1 = "xtoken: " + str(xtoken)
                    logging.info(strV1)
                    strV2 = "Flask Input Data: " + str(input_data)
                    logging.info(strV2)

                    #x = cen.clsEnDecAuth()
                    ret_val = getVal.encrypt_str(input_data, xtoken)
                elif ((dGroup == 'GrDet') & (dTemplate == 'subGrName')):
                    xtoken = str(csf.config['NAME_SALT'])

                    strV1 = "xtoken: " + str(xtoken)
                    logging.info(strV1)
                    strV2 = "Flask Input Data: " + str(input_data)
                    logging.info(strV2)

                    #x = cen.clsEnDecAuth()
                    ret_val = getVal.encrypt_str(input_data, xtoken)
                elif ((dGroup == 'GrDet') & (dTemplate == 'subGrPhone')):
                    xtoken = str(csf.config['PHONE_SALT'])

                    strV1 = "xtoken: " + str(xtoken)
                    logging.info(strV1)
                    strV2 = "Flask Input Data: " + str(input_data)
                    logging.info(strV2)

                    #x = cen.clsEnDecAuth()
                    ret_val = getVal.encrypt_str(input_data, xtoken)
                elif ((dGroup == 'GrDet') & (dTemplate == 'subGrEmail')):
                    xtoken = str(csf.config['EMAIL_SALT'])

                    strV1 = "xtoken: " + str(xtoken)
                    logging.info(strV1)
                    strV2 = "Flask Input Data: " + str(input_data)
                    logging.info(strV2)

                    #x = cen.clsEnDecAuth()
                    ret_val = getVal.encrypt_str(input_data, xtoken)
                else:
                    ret_val = ''
            else:
                ret_val = ''

            # Return value
            return ret_val

        except Exception as e:
            ret_val = ''
            # Return the valid json Error Response
            return ret_val

    def getDecryptProcess(self, dGroup, input_data, dTemplate):
        try:
            xtoken = self.xtoken

            # Capturing the individual element
            dGroup = dGroup
            input_data = input_data
            dTemplate = dTemplate

            # This will check the mandatory json elements
            if ((dGroup != '') & (dTemplate != '')):

                # Based on the Group & Element it will fetch the salt
                # Based on the specific salt it will decrypt the data
                if ((dGroup == 'GrDet') & (dTemplate == 'subGrAcct_Nbr')):
                    xtoken = str(csf.config['ACCT_NBR_SALT'])

                    strV1 = "xtoken: " + str(xtoken)
                    logging.info(strV1)
                    strV2 = "Flask Input Data: " + str(input_data)
                    logging.info(strV2)

                    #x = cen.clsEnDecAuth()
                    ret_val = getVal.decrypt_str(input_data, xtoken)
                elif ((dGroup == 'GrDet') & (dTemplate == 'subGrName')):
                    xtoken = str(csf.config['NAME_SALT'])

                    strV1 = "xtoken: " + str(xtoken)
                    logging.info(strV1)
                    strV2 = "Flask Input Data: " + str(input_data)
                    logging.info(strV2)

                    #x = cen.clsEnDecAuth()
                    ret_val = getVal.decrypt_str(input_data, xtoken)
                elif ((dGroup == 'GrDet') & (dTemplate == 'subGrPhone')):
                    xtoken = str(csf.config['PHONE_SALT'])

                    strV1 = "xtoken: " + str(xtoken)
                    logging.info(strV1)
                    strV2 = "Flask Input Data: " + str(input_data)
                    logging.info(strV2)

                    #x = cen.clsEnDecAuth()
                    ret_val = getVal.decrypt_str(input_data, xtoken)
                elif ((dGroup == 'GrDet') & (dTemplate == 'subGrEmail')):
                    xtoken = str(csf.config['EMAIL_SALT'])

                    strV1 = "xtoken: " + str(xtoken)
                    logging.info(strV1)
                    strV2 = "Flask Input Data: " + str(input_data)
                    logging.info(strV2)

                    #x = cen.clsEnDecAuth()
                    ret_val = getVal.decrypt_str(input_data, xtoken)
                else:
                    ret_val = ''
            else:
                ret_val = ''

            # Return value
            return ret_val

        except Exception as e:
            ret_val = ''
            # Return the valid Error Response
            return ret_val

4. __init__.py (This autogenerated script contains the primary calling methods of encryption & decryption based on the element header & values after enhanced as per the functionality.)

###########################################
#### Written By: SATYAKI DE            ####
#### Written On: 08-Jun-2019           ####
#### Package Flask package needs to    ####
#### install in order to run this      ####
#### script.                           ####
####                                   ####
#### Objective: Main Calling scripts.  ####
#### This is an autogenrate scripts.   ####
#### However, to meet the functionality####
#### we've enhanced as per our logic.  ####
###########################################
__all__ = ['clsFlask']

import logging
import azure.functions as func
import json

from getVal.clsFlask import clsFlask

getVal = clsFlask()

def main(req: func.HttpRequest) -> func.HttpResponse:
    logging.info('Python Encryption function processed a request.')

    str_val = 'Input Payload:: ' + str(req.get_json())
    str_1 = str(req.get_json())

    logging.info(str_val)

    ret_val = {}
    DataIn = ''
    dGroup = ''
    dTemplate = ''
    flg = ''

    if (str_1 != ''):
        try:
            req_body = req.get_json()
            dGroup = req_body.get('dataGroup')

            try:
                DataIn = req_body.get('data')
                strV15 = 'If Part:: ' + str(DataIn)

                logging.info(strV15)

                if ((DataIn == '') | (DataIn == None)):
                    raise ValueError

                flg = 'Y'
            except ValueError:
                DataIn = req_body.get('edata')
                strV15 = 'Else Part:: ' + str(DataIn)
                logging.info(strV15)
                flg = 'N'
            except:
                DataIn = req_body.get('edata')
                strV15 = 'Else Part:: ' + str(DataIn)
                logging.info(strV15)
                flg = 'N'

            dTemplate = req_body.get('dataTemplate')

        except ValueError:
            pass

    strV5 = "Encrypt Decrypt Flag:: " + flg
    logging.info(strV5)

    if (flg == 'Y'):

        if ((DataIn != '') & ((dGroup != '') & (dTemplate != ''))):

            logging.info("Encryption Started!")
            ret_val = getVal.getEncryptProcess(dGroup, DataIn, dTemplate)
            strVal2 = 'Return Payload:: ' + str(ret_val)
            logging.info(strVal2)

            xval = json.dumps(ret_val)

            return func.HttpResponse(xval)
        else:
            return func.HttpResponse(
                 "Please pass a data in the request body",
                 status_code=400
            )
    else:

        if ((DataIn != '') & ((dGroup != '') & (dTemplate != ''))):

            logging.info("Decryption Started!")
            ret_val2 = getVal.getDecryptProcess(dGroup, DataIn, dTemplate)
            strVal3 = 'Return Payload:: ' + str(ret_val)
            logging.info(strVal3)

            xval1 = json.dumps(ret_val2)

            return func.HttpResponse(xval1)
        else:
            return func.HttpResponse(
                "Please pass a data in the request body",
                status_code=400
            )

In this script, based on the value of an flg variable, we’re calling our encryption or decryption methods. And, the value of the flg variable is set based on the following logic –

try:
    DataIn = req_body.get('data')
    strV15 = 'If Part:: ' + str(DataIn)

    logging.info(strV15)

    if ((DataIn == '') | (DataIn == None)):
        raise ValueError

    flg = 'Y'
except ValueError:
    DataIn = req_body.get('edata')
    strV15 = 'Else Part:: ' + str(DataIn)
    logging.info(strV15)
    flg = 'N'
except:
    DataIn = req_body.get('edata')
    strV15 = 'Else Part:: ' + str(DataIn)
    logging.info(strV15)
    flg = 'N'

So, if the application gets the “data” element then – it will consider the data needs to be encrypted; otherwise, it will go for decryption. And, based on that – it is setting the value.

Now, we’re ready to locally run our application –

func host start

And, the output will look like this –

StartingAzureFunction-Python
StartingAzureFunction-Python 2

Let’s test it from postman –

Encrypt:

Postman-Encrypt

Decrypt:

Postman-Decrypt

Great. Now, we’re ready to publish this application to Azure cloud.

As in our earlier steps, we’ve already built our storage account for the metadata. Please scroll to top to view that again. Now, using that information, we’ll make the function app with a more meaningful name –

az functionapp create –resource-group rndWestUSGrp –os-type Linux \
–consumption-plan-location westus –runtime python \
–name getEncryptDecrypt –storage-account cryptpy2019

CreatingFunctionPython

Let’s publish the function –

sudo func azure functionapp publish “getEncryptDecrypt” –build-native-deps

On many occassion, without the use of “–build-native-deps” might leads to failure. Hence, I’ve added that to avoid such scenarios.

Publishing-Function

Now, we need to test our first published complex Azure function with Python through postman –

Encrypt:

PubishedFuncPostmanEncrypt

Decrypt:

PubishedFuncPostmanDecrypt

Wonderful! So, it is working.

You can see the function under the Azure portal –

Deployed-Function

Let’s see some other important features of this function –

Monitor: You can monitor two ways. One is by clicking the monitor options you will get the individual requests level details & also get to see the log information over here –

Function-Monitor-Details-1

Clicking Application Insights will give you another level of detailed logs, which can be very useful for debugging. We’ll touch this at the end of this post with a very brief discussion.

Function-Monitor-Details-3.JPG

As you can see, clicking individual lines will show the details further.

Let’s quickly check the application insights –

Application-Insights-1

Application Insights will give you a SQL like an interface where you can get the log details of all your requests.

Application-Insights-2

You can expand the individual details for further information.

Application-Insights-3

You can change the parameter name & other details & click the run button to get all the log details for your debugging purpose.

So, finally, we’ve achieved our goal. This is relatively long posts. But, I’m sure this will help you to create your first python-based function on the Azure platform.

Hope, you will like this approach. Let me know your comment on the same.

I’ll bring some more exciting topic in the coming days from the Python verse.

Till then, Happy Avenging! 😀

Note: All the data posted here are representational data & available over the internet.

Ref Cursor In SQL

There are number occasions, which i personally met when many of my juniors are looking for solution of using ref-cursor in SQL based on some certain requirement and they want to use it in SQL that can be embed into some JAVA based applications. I’ve looked into that and able to produce one such useful case which can handy (Though i’ll prefer different approach than this.) when i require this kind of work.

satyaki>
satyaki>select * from v$version;

BANNER
----------------------------------------------------------------
Oracle Database 10g Enterprise Edition Release 10.2.0.1.0 - Prod
PL/SQL Release 10.2.0.1.0 - Production
CORE 10.2.0.1.0 Production
TNS for Linux: Version 10.2.0.1.0 - Production
NLSRTL Version 10.2.0.1.0 - Production

Elapsed: 00:00:00.00
satyaki>
satyaki>
satyaki>create table t_emp
2 as
3 select empno,
4 ename,
5 mgr,
6 sal
7 from emp
8 where 1=2;

Table created.

Elapsed: 00:00:00.05
satyaki>
satyaki>set lin 80
satyaki>
satyaki>desc t_emp;
Name Null? Type
----------------------------------------- -------- ----------------------
EMPNO NUMBER(4)
ENAME VARCHAR2(10)
MGR NUMBER(4)
SAL NUMBER(7,2)

satyaki>
satyaki>
satyaki>set lin 310
satyaki>
satyaki>select * from t_emp;

no rows selected

Elapsed: 00:00:00.00
satyaki>
satyaki>
satyaki>create or replace type etype as object
2 (
3 empno number,
4 ename varchar2(10),
5 mgr number,
6 sal number
7 );
8 /

Type created.

Elapsed: 00:00:01.03
satyaki>
satyaki>create or replace type t_etype as table of etype;
2 /

Type created.

Elapsed: 00:00:00.02
satyaki>
satyaki>create or replace function get_dept_emps(p_deptno in number)
2 return sys_refcursor
3 is
4 v_rc sys_refcursor;
5 begin
6 open v_rc for 'select empno, ename, mgr, sal from emp where deptno = :deptno' using p_deptno;
7 return v_rc;
8 end;
9 /

Function created.

Elapsed: 00:00:00.05
satyaki>
satyaki>
satyaki>create or replace function fetch_emps(deptno in number := null)
2 return t_etype
3 is
4 v_emptype t_etype := t_etype(); -- Declare a local table structure and initialize it
5 v_cnt number := 0;
6 v_rc sys_refcursor;
7 v_empno number;
8 v_ename varchar2(10);
9 v_mgr number;
10 v_sal number;
11 begin
12 v_rc := get_dept_emps(deptno);
13 loop
14 fetch v_rc into v_empno, v_ename, v_mgr, v_sal;
15 exit when v_rc%NOTFOUND;
16 v_emptype.extend;
17 v_cnt := v_cnt + 1;
18 v_emptype(v_cnt) := etype(v_empno, v_ename, v_mgr, v_sal);
19 end loop;
20 close v_rc;
21 return v_emptype;
22 end;
23 /

Function created.

Elapsed: 00:00:00.06
satyaki>
satyaki>
satyaki>select * from t_emp;

no rows selected

Elapsed: 00:00:00.00
satyaki>
satyaki>
satyaki>
satyaki>select * from t_emp;

no rows selected

Elapsed: 00:00:00.00
satyaki>
satyaki>
satyaki>insert into t_emp
2 select *
3 from table(fetch_emps(30));

4 rows created.

Elapsed: 00:00:00.02
satyaki>
satyaki>select * from t_emp;

EMPNO ENAME MGR SAL
---------- ---------- ---------- ----------
7654 MARTIN 7698 1815
7844 TURNER 7698 2178
7900 JAMES 7698 1379.4
7599 BILLY 7566 4500

Elapsed: 00:00:00.00
satyaki>
satyaki>commit;

Commit complete.

Elapsed: 00:00:00.00
satyaki>