Analyzing Language using IBM Watson using Python

Hi Guys,

Today, I’ll be discussing the following topic – “How to analyze text using IBM Watson implementing through Python.”

IBM has significantly improved in the field of Visual Image Analysis or Text language analysis using its IBM Watson cloud platform. In this particular topic, we’ll be exploring the natural languages only.

To access IBM API, we need to first create an IBM Cloud account from this site.

Let us quickly go through the steps to create the IBM Language Understanding service. Click the Catalog on top of your browser menu as shown in the below picture –

6. Creating an Instance for Watson

After that, click the AI option on your left-hand side of the panel marked in RED.

Click the Watson-Studio & later choose the plan. In our case, We’ll select the “Lite” option as IBM provided this platform for all the developers to explore their cloud for free.

7. Choosing AI
8. Choosing Plan

Clicking the create option will lead to a blank page of Watson Studio as shown below –

9. Choosing Watson Studio

And, now, we need to click the Get Started button to launch it. This will lead to Create Project page, which can be done using the following steps –

10. Create Project Initial Screen

Now, clicking the create a project will lead you to the next screen –

11. Create Project - Continue

You can choose either an empty project, or you can create it from a sample file. In this case, we’ll be selecting the first option & this will lead us to the below page –

12. Creating a Project

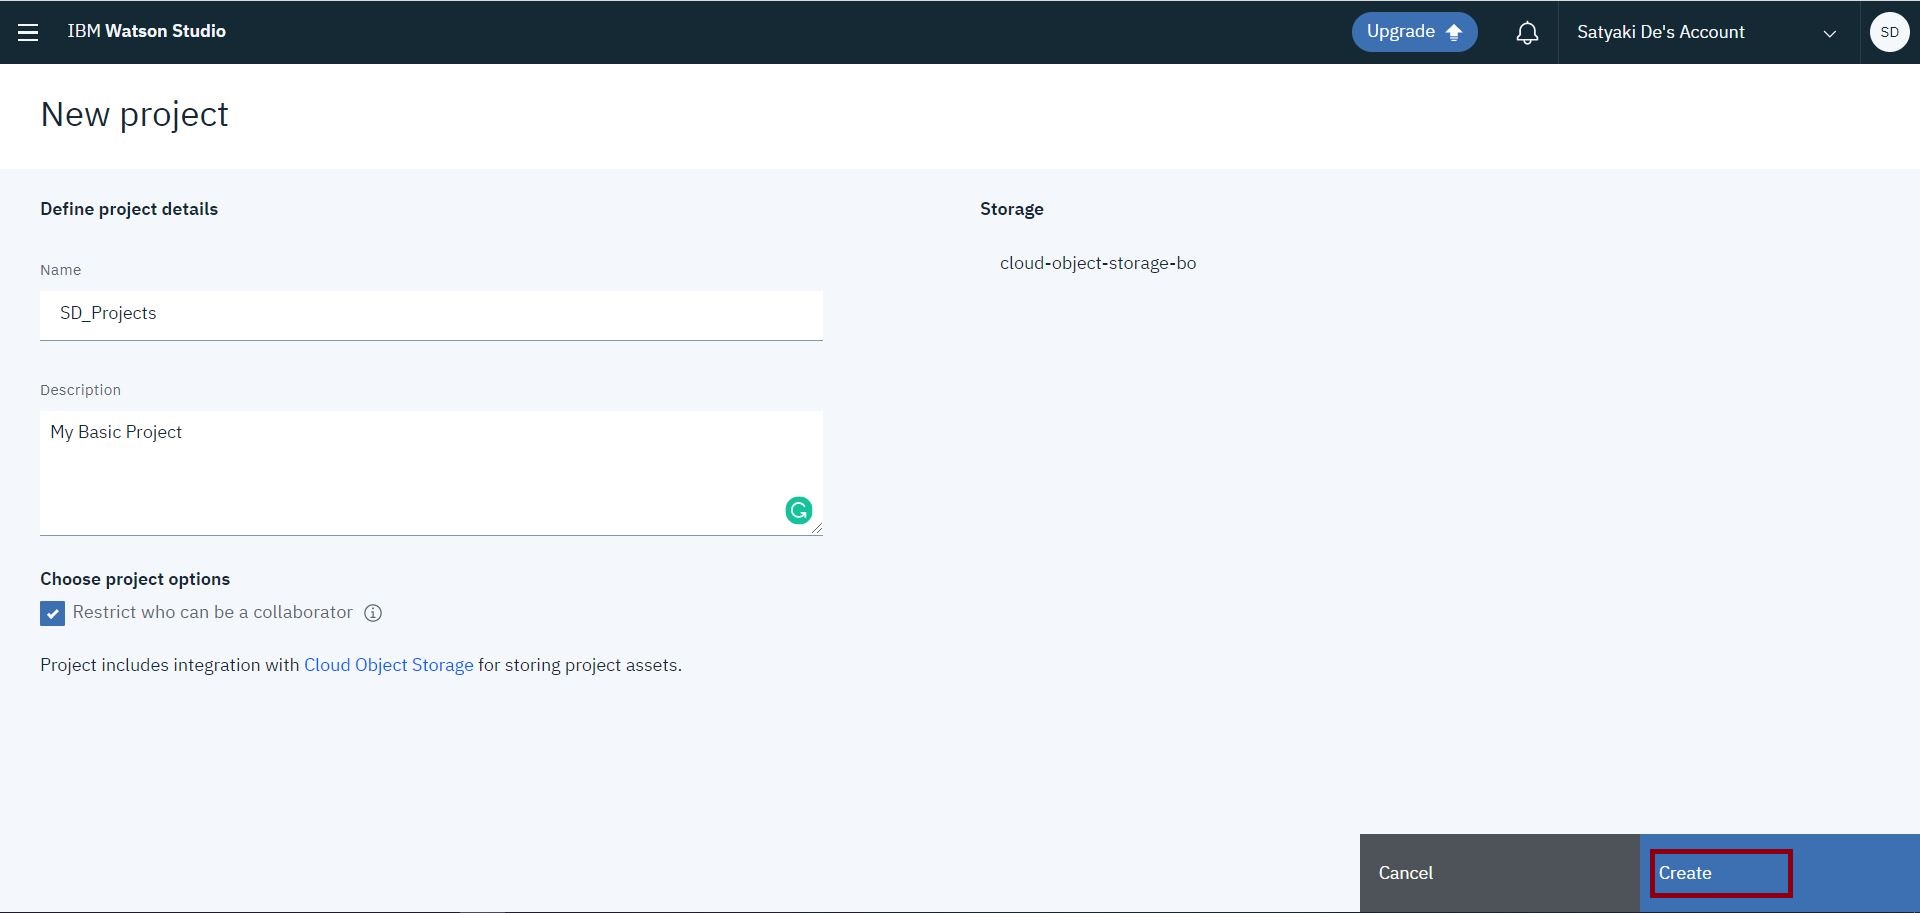
And, then you will click the “Create” option, which will lead you to the next screen –

13. Adding to project

Now, you need to click “Add to Project.” This will give you a variety of services that you want to explore/use from the list. If you want to create your own natural language classifier, which you can do that as follows –

14. Adding Natural Language Components from IBM Cloud

Once, you click it – you need to select the associate service –

15. Adding Associte Service - Sound

Here, you need to click the hyperlink, which prompts to the next screen –

16. Choosing Associate Service - Sound

You need to check the price for both the Visual & Natural Language Classifier. They are pretty expensive. The visual classifier has the Lite plan. However, it has limitations of output.

Clicking the “Create” will prompt to the next screen –

18. Selecting Region - Sound

After successful creation, you will be redirected to the following page –

19. Landing Page - Sound

Now, We’ll be adding our “Natural Language Understand” for our test –

29. Choosing Natural Language Understanding

This will prompt the next screen –

7. Choosing AI - Natural Language Understanding

Once, it is successful. You will see the service registered as shown below –

3. Watson Services - Sound

If you click the service marked in RED, it will lead you to another page, where you will get the API Key & Url. You need both of this information in Python application to access this API as shown below –

4. Watson API Details - Sound

Now, we’re ready with the necessary cloud set-up. After this, we need to install the Python package for IBM Cloud as shown below –

1. Installing_Packages

We’ve noticed that, recently, IBM has launched one upgraded package. Hence, we installed that one as well. I would recommend you to install this second package directly instead of the first one shown above –

2. Installing Latest IBM_Watson Package

Now, we’re done with our set-up.

Let’s see the directory structure –

31. Directory Structure

We’ll be discussing only the main calling script & class script. However, we’ll be posting the parameters without discussing it. And, we won’t discuss clsL.py as we’ve already discussed that in our previous post.

1. clsConfig.py (This script contains all the parameter details.)

##############################################
#### Written By: SATYAKI DE               ####
#### Written On: 04-Apr-2020              ####
####                                      ####
#### Objective: This script is a config   ####
#### file, contains all the keys for      ####
#### IBM Cloud API.   Application will    ####
#### process these information & perform  ####
#### various analysis on IBM Watson cloud.####
##############################################

import os
import platform as pl

class clsConfig(object):
    Curr_Path = os.path.dirname(os.path.realpath(__file__))

    os_det = pl.system()
    if os_det == "Windows":
        sep = '\\'
    else:
        sep = '/'

    config = {
        'APP_ID': 1,
        'SERVICE_URL': "https://api.eu-gb.natural-language-understanding.watson.cloud.ibm.com/instances/xxxxxxxxxxxxxxXXXXXXXXXXxxxxxxxxxxxxxxxx",
        'API_KEY': "Xxxxxxxxxxxxxkdkdfifd984djddkkdkdkdsSSdkdkdd",
        'API_TYPE': "application/json",
        'CACHE': "no-cache",
        'CON': "keep-alive",
        'ARCH_DIR': Curr_Path + sep + 'arch' + sep,
        'PROFILE_PATH': Curr_Path + sep + 'profile' + sep,
        'LOG_PATH': Curr_Path + sep + 'log' + sep,
        'REPORT_PATH': Curr_Path + sep + 'report',
        'SRC_PATH': Curr_Path + sep + 'Src_File' + sep,
        'APP_DESC_1': 'IBM Watson Language Understand!',
        'DEBUG_IND': 'N',
        'INIT_PATH': Curr_Path
    }

Note that you will be placing your API_KEY & URL here, as shown in the configuration file.

2. clsIBMWatson.py (This is the main script, which will invoke the IBM Watson API based on the input from the user & return 0 if successful.)

##############################################
#### Written By: SATYAKI DE               ####
#### Written On: 04-Apr-2020              ####
#### Modified On 04-Apr-2020              ####
####                                      ####
#### Objective: Main scripts to invoke    ####
#### IBM Watson Language Understand API.  ####
##############################################

import logging
from clsConfig import clsConfig as cf
import clsL as cl
import json
from ibm_watson import NaturalLanguageUnderstandingV1
from ibm_cloud_sdk_core.authenticators import IAMAuthenticator
from ibm_watson.natural_language_understanding_v1 import Features, EntitiesOptions, KeywordsOptions, SentimentOptions, CategoriesOptions, ConceptsOptions
from ibm_watson import ApiException

class clsIBMWatson:
    def __init__(self):
        self.api_key =  cf.config['API_KEY']
        self.service_url = cf.config['SERVICE_URL']

    def calculateExpressionFromUrl(self, inputUrl, inputVersion):
        try:
            api_key = self.api_key
            service_url = self.service_url
            print('-' * 60)
            print('Beginning of the IBM Watson for Input Url.')
            print('-' * 60)

            authenticator = IAMAuthenticator(api_key)

            # Authentication via service credentials provided in our config files
            service = NaturalLanguageUnderstandingV1(version=inputVersion, authenticator=authenticator)
            service.set_service_url(service_url)

            response = service.analyze(
                url=inputUrl,
                features=Features(entities=EntitiesOptions(),
                                  sentiment=SentimentOptions(),
                                  concepts=ConceptsOptions())).get_result()

            print(json.dumps(response, indent=2))

            return 0

        except ApiException as ex:
            print('-' * 60)
            print("Method failed for Url with status code " + str(ex.code) + ": " + ex.message)
            print('-' * 60)

            return 1

    def calculateExpressionFromText(self, inputText, inputVersion):
        try:
            api_key = self.api_key
            service_url = self.service_url
            print('-' * 60)
            print('Beginning of the IBM Watson for Input Url.')
            print('-' * 60)

            authenticator = IAMAuthenticator(api_key)

            # Authentication via service credentials provided in our config files
            service = NaturalLanguageUnderstandingV1(version=inputVersion, authenticator=authenticator)
            service.set_service_url(service_url)

            response = service.analyze(
                text=inputText,
                features=Features(entities=EntitiesOptions(),
                                  sentiment=SentimentOptions(),
                                  concepts=ConceptsOptions())).get_result()

            print(json.dumps(response, indent=2))

            return 0

        except ApiException as ex:
            print('-' * 60)
            print("Method failed for Url with status code " + str(ex.code) + ": " + ex.message)
            print('-' * 60)

            return 1

Some of the key lines from the above snippet –

authenticator = IAMAuthenticator(api_key)

# Authentication via service credentials provided in our config files
service = NaturalLanguageUnderstandingV1(version=inputVersion, authenticator=authenticator)
service.set_service_url(service_url)

By providing the API Key & Url, the application is initiating the service for Watson.

response = service.analyze(
    url=inputUrl,
    features=Features(entities=EntitiesOptions(),
                      sentiment=SentimentOptions(),
                      concepts=ConceptsOptions())).get_result()

Based on your type of input, it will bring the features of entities, sentiment & concepts here. Apart from that, you can additionally check the following features as well – Keywords & Categories.

3. callIBMWatsonAPI.py (This is the first calling script. Based on user choice, it will receive input either as Url or as the plain text & then analyze it.)

##############################################
#### Written By: SATYAKI DE               ####
#### Written On: 04-Apr-2020              ####
#### Modified On 04-Apr-2020              ####
####                                      ####
#### Objective: Main calling scripts.     ####
##############################################

from clsConfig import clsConfig as cf
import clsL as cl
import logging
import datetime
import clsIBMWatson as cw

# Disbling Warning
def warn(*args, **kwargs):
    pass

import warnings
warnings.warn = warn

# Lookup functions from
# Azure cloud SQL DB

var = datetime.datetime.now().strftime("%Y-%m-%d_%H-%M-%S")

def main():
    try:
        ret_1 = 0
        general_log_path = str(cf.config['LOG_PATH'])

        # Enabling Logging Info
        logging.basicConfig(filename=general_log_path + 'IBMWatson_NaturalLanguageAnalysis.log', level=logging.INFO)

        # Initiating Log Class
        l = cl.clsL()

        # Moving previous day log files to archive directory
        log_dir = cf.config['LOG_PATH']
        curr_ver =datetime.datetime.now().strftime("%Y-%m-%d")

        tmpR0 = "*" * 157

        logging.info(tmpR0)
        tmpR9 = 'Start Time: ' + str(var)
        logging.info(tmpR9)
        logging.info(tmpR0)

        print("Log Directory::", log_dir)
        tmpR1 = 'Log Directory::' + log_dir
        logging.info(tmpR1)

        print('Welcome to IBM Wantson Language Understanding Calling Program: ')
        print('-' * 60)
        print('Please Press 1 for Understand the language from Url.')
        print('Please Press 2 for Understand the language from your input-text.')
        input_choice = int(input('Please provide your choice:'))

        # Create the instance of the IBM Watson Class
        x2 = cw.clsIBMWatson()

        # Let's pass this to our map section
        if input_choice == 1:
            textUrl = str(input('Please provide the complete input url:'))
            ret_1 = x2.calculateExpressionFromUrl(textUrl, curr_ver)
        elif input_choice == 2:
            inputText = str(input('Please provide the input text:'))
            ret_1 = x2.calculateExpressionFromText(inputText, curr_ver)
        else:
            print('Invalid options!')

        if ret_1 == 0:
            print('Successful IBM Watson Language Understanding Generated!')
        else:
            print('Failed to generate IBM Watson Language Understanding!')

        print("-" * 60)
        print()

        print('Finding Analysis points..')
        print("*" * 157)
        logging.info('Finding Analysis points..')
        logging.info(tmpR0)


        tmpR10 = 'End Time: ' + str(var)
        logging.info(tmpR10)
        logging.info(tmpR0)

    except ValueError as e:
        print(str(e))
        print("Invalid option!")
        logging.info("Invalid option!")

    except Exception as e:
        print("Top level Error: args:{0}, message{1}".format(e.args, e.message))

if __name__ == "__main__":
    main()

This script is pretty straight forward as it is first creating an instance of the main class & then based on the user input, it is calling the respective functions here.

As of now, IBM Watson can work on a list of languages, which are available here.

If you want to start from scratch, please refer to the following link.

Please find the screenshot of our application run –

Case 1 (With Url): 

21. Win_Run_1_Url
23. Win_Run_3_Url

Case 2 (With Plain text):

25. Win_Run_1_InputText
26. Win_Run_2_InputText
27. Win_Run_3_InputText

Now, Don’t forget to delete all the services from your IBM Cloud.

32. Delete Service

As you can see, from the service, you need to delete all the services one-by-one as shown in the figure.

So, we’ve done it.

To explore my photography, you can visit the following link.

I’ll be posting another new post in the coming days. Till then, Happy Avenging! 😀

Note: All the data posted here are representational data & available over the internet & for educational purpose only.

Predicting health issues for Senior Citizens based on “Realtime Weather Data” in Python

Hi Guys,

Today, I’ll be presenting a different kind of post here. I’ll be trying to predict health issues for senior citizens based on “realtime weather data” by blending open-source population data using some mock risk factor calculation. At the end of the post, I’ll be plotting these numbers into some graphs for better understanding.

Let’s drive!

For this first, we need realtime weather data. To do that, we need to subscribe to the data from OpenWeather API. For that, you have to register as a developer & you’ll receive a similar email from them once they have approved –

1. Subscription To Open Weather

So, from the above picture, you can see that, you’ll be provided one API key & also offered a couple of useful API documentation. I would recommend exploring all the links before you try to use it.

You can also view your API key once you logged into their console. You can also create multiple API keys & the screen should look something like this –

2. Viewing Keys For security reasons, I’ll be hiding my own keys & the same should be applicable for you as well.

I would say many of these free APIs might have some issues. So, I would recommend you to start testing the open API through postman before you jump into the Python development. Here is the glimpse of my test through the postman –

3. Testing API

Once, I can see that the API is returning the result. I can work on it.

Apart from that, one needs to understand that these API might have limited use & also you need to know the consequences in terms of price & tier in case if you exceeded the limit. Here is the detail for this API –

5. Package Details - API

For our demo, I’ll be using the Free tire only.

Let’s look into our other source data. We got the top 10 city population-wise over there internet. Also, we have collected sample Senior Citizen percentage against sex ratio across those cities. We have masked these values on top of that as this is just for education purposes.

1. CityDetails.csv

Here is the glimpse of this file –

4. Source File

So, this file only contains the total population across the top 10 cities in the USA.

2. SeniorCitizen.csv

6. SeniorCitizen Data

This file contains the Sex ratio of Senior citizens across those top 10 cities by population.

Again, we are not going to discuss any script, which we’ve already discussed here.

Hence, we’re skipping clsL.py here.

1. clsConfig.py (This script contains all the parameters of the server.)

 1
 2
 3
 4
 5
 6
 7
 8
 9
10
11
12
13
14
15
16
17
18
19
20
21
22
23
24
25
26
27
28
29
30
31
32
33
34
35
36
37
38
39
40
41
42
43
44
45
46
##############################################
#### Written By: SATYAKI DE               ####
#### Written On: 19-Jan-2019              ####
####                                      ####
#### Objective: This script is a config   ####
#### file, contains all the keys for      ####
#### azure cosmos db. Application will    ####
#### process these information & perform  ####
#### various CRUD operation on Cosmos DB. ####
##############################################

import os
import platform as pl

class clsConfig(object):
    Curr_Path = os.path.dirname(os.path.realpath(__file__))

    os_det = pl.system()
    if os_det == "Windows":
        sep = '\\'
    else:
        sep = '/'

    config = {
        'APP_ID': 1,
        'URL': "http://api.openweathermap.org/data/2.5/weather",
        'API_HOST': "api.openweathermap.org",
        'API_KEY': "XXXXXXXXXXXXXXXXXXXXXX",
        'API_TYPE': "application/json",
        'CACHE': "no-cache",
        'CON': "keep-alive",
        'ARCH_DIR': Curr_Path + sep + 'arch' + sep,
        'PROFILE_PATH': Curr_Path + sep + 'profile' + sep,
        'LOG_PATH': Curr_Path + sep + 'log' + sep,
        'REPORT_PATH': Curr_Path + sep + 'report',
        'SRC_PATH': Curr_Path + sep + 'Src_File' + sep,
        'APP_DESC_1': 'Open Weather Forecast',
        'DEBUG_IND': 'N',
        'INIT_PATH': Curr_Path,
        'SRC_FILE': Curr_Path + sep + 'Src_File' + sep + 'CityDetails.csv',
        'SRC_FILE_1': Curr_Path + sep + 'Src_File' + sep + 'SeniorCitizen.csv',
        'SRC_FILE_INIT': 'CityDetails.csv',
        'COL_LIST': ['base', 'all', 'cod', 'lat', 'lon', 'dt', 'feels_like', 'humidity', 'pressure', 'temp', 'temp_max', 'temp_min', 'name', 'country', 'sunrise', 'sunset', 'type', 'timezone', 'visibility', 'weather', 'deg', 'gust', 'speed'],
        'COL_LIST_1': ['base', 'all', 'cod', 'lat', 'lon', 'dt', 'feels_like', 'humidity', 'pressure', 'temp', 'temp_max', 'temp_min', 'CityName', 'country', 'sunrise', 'sunset', 'type', 'timezone', 'visibility', 'deg', 'gust', 'speed', 'WeatherMain', 'WeatherDescription'],
        'COL_LIST_2': ['CityName', 'Population', 'State']
    }

2. clsWeather.py (This script contains the main logic to extract the realtime data from our subscribed weather API.)

 1
 2
 3
 4
 5
 6
 7
 8
 9
10
11
12
13
14
15
16
17
18
19
20
21
22
23
24
25
26
27
28
29
30
31
32
33
34
35
36
37
38
39
40
41
42
43
44
45
46
47
48
49
50
51
52
53
54
55
56
57
58
59
60
61
##############################################
#### Written By: SATYAKI DE               ####
#### Written On: 19-Jan-2020              ####
#### Modified On 19-Jan-2020              ####
####                                      ####
#### Objective: Main scripts to invoke    ####
#### Indian Railway API.                  ####
##############################################

import requests
import logging
import json
from clsConfig import clsConfig as cf

class clsWeather:
    def __init__(self):
        self.url = cf.config['URL']
        self.openmapapi_host = cf.config['API_HOST']
        self.openmapapi_key = cf.config['API_KEY']
        self.openmapapi_cache = cf.config['CACHE']
        self.openmapapi_con = cf.config['CON']
        self.type = cf.config['API_TYPE']

    def searchQry(self, rawQry):
        try:
            url = self.url
            openmapapi_host = self.openmapapi_host
            openmapapi_key = self.openmapapi_key
            openmapapi_cache = self.openmapapi_cache
            openmapapi_con = self.openmapapi_con
            type = self.type

            querystring = {"appid": openmapapi_key, "q": rawQry}

            print('Input JSON: ', str(querystring))

            headers = {
                'host': openmapapi_host,
                'content-type': type,
                'Cache-Control': openmapapi_cache,
                'Connection': openmapapi_con
            }

            response = requests.request("GET", url, headers=headers, params=querystring)

            ResJson  = response.text

            jdata = json.dumps(ResJson)
            ResJson = json.loads(jdata)

            return ResJson

        except Exception as e:
            ResJson = ''
            x = str(e)
            print(x)

            logging.info(x)
            ResJson = {'errorDetails': x}

            return ResJson

The key lines from this script –

querystring = {"appid": openmapapi_key, "q": rawQry}

print('Input JSON: ', str(querystring))

headers = {
    'host': openmapapi_host,
    'content-type': type,
    'Cache-Control': openmapapi_cache,
    'Connection': openmapapi_con
}

response = requests.request("GET", url, headers=headers, params=querystring)

ResJson  = response.text

In the above snippet, our application first preparing the payload & the parameters received from our param script. And then invoke the GET method to extract the real-time data in the form of JSON & finally sending the JSON payload to the primary calling function.

3. clsMap.py (This script contains the main logic to prepare the MAP using seaborn package & try to plot our custom made risk factor by blending the realtime data with our statistical data received over the internet.)

  1
  2
  3
  4
  5
  6
  7
  8
  9
 10
 11
 12
 13
 14
 15
 16
 17
 18
 19
 20
 21
 22
 23
 24
 25
 26
 27
 28
 29
 30
 31
 32
 33
 34
 35
 36
 37
 38
 39
 40
 41
 42
 43
 44
 45
 46
 47
 48
 49
 50
 51
 52
 53
 54
 55
 56
 57
 58
 59
 60
 61
 62
 63
 64
 65
 66
 67
 68
 69
 70
 71
 72
 73
 74
 75
 76
 77
 78
 79
 80
 81
 82
 83
 84
 85
 86
 87
 88
 89
 90
 91
 92
 93
 94
 95
 96
 97
 98
 99
100
101
102
103
104
105
106
107
108
109
110
111
112
113
114
115
116
117
118
119
##############################################
#### Written By: SATYAKI DE               ####
#### Written On: 19-Jan-2020              ####
#### Modified On 19-Jan-2020              ####
####                                      ####
#### Objective: Main scripts to invoke    ####
#### plot into the Map.                   ####
##############################################

import seaborn as sns
import logging
from clsConfig import clsConfig as cf
import pandas as p
import clsL as cl

# This library requires later
# to print the chart
import matplotlib.pyplot as plt

class clsMap:
    def __init__(self):
        self.src_file =  cf.config['SRC_FILE_1']

    def calculateRisk(self, row):
        try:
            # Let's assume some logic
            # 1. By default, 30% of Senior Citizen
            # prone to health Issue for each City
            # 2. Male Senior Citizen is 19% more prone
            # to illness than female.
            # 3. If humidity more than 70% or less
            # than 40% are 22% main cause of illness
            # 4. If feels like more than 280 or
            # less than 260 degree are 17% more prone
            # to illness.
            # Finally, this will be calculated per 1K
            # people around 10 blocks

            str_sex = str(row['Sex'])

            int_humidity = int(row['humidity'])
            int_feelsLike = int(row['feels_like'])
            int_population = int(str(row['Population']).replace(',',''))
            float_srcitizen = float(row['SeniorCitizen'])

            confidance_score = 0.0

            SeniorCitizenPopulation = (int_population * float_srcitizen)

            if str_sex == 'Male':
                confidance_score = (SeniorCitizenPopulation * 0.30 * 0.19) + confidance_score
            else:
                confidance_score = (SeniorCitizenPopulation * 0.30 * 0.11) + confidance_score

            if ((int_humidity > 70) | (int_humidity < 40)):
                confidance_score = confidance_score + (int_population * 0.30 * float_srcitizen) * 0.22

            if ((int_feelsLike > 280) | (int_feelsLike < 260)):
                confidance_score = confidance_score + (int_population * 0.30 * float_srcitizen) * 0.17

            final_score = round(round(confidance_score, 2) / (1000 * 10), 2)

            return final_score

        except Exception as e:
            x = str(e)

            return x

    def setMap(self, dfInput):
        try:
            resVal = 0
            df = p.DataFrame()
            debug_ind = 'Y'
            src_file =  self.src_file

            # Initiating Log Class
            l = cl.clsL()

            df = dfInput

            # Creating a subset of desired columns
            dfMod = df[['CityName', 'temp', 'Population', 'humidity', 'feels_like']]

            l.logr('5.dfSuppliment.csv', debug_ind, dfMod, 'log')

            # Fetching Senior Citizen Data
            df = p.read_csv(src_file, index_col=False)

            # Merging two frames
            dfMerge = p.merge(df, dfMod, on=['CityName'])

            l.logr('6.dfMerge.csv', debug_ind, dfMerge, 'log')

            # Getting RiskFactor quotient from our custom made logic
            dfMerge['RiskFactor'] = dfMerge.apply(lambda row: self.calculateRisk(row), axis=1)

            l.logr('7.dfRiskFactor.csv', debug_ind, dfMerge, 'log')

            # Generating Map plotss
            # sns.lmplot(x='RiskFactor', y='SeniorCitizen', data=dfMerge, hue='Sex')
            # sns.lmplot(x='RiskFactor', y='SeniorCitizen', data=dfMerge, hue='Sex', markers=['o','v'], scatter_kws={'s':25})
            sns.lmplot(x='RiskFactor', y='SeniorCitizen', data=dfMerge, col='Sex')

            # This is required when you are running
            # through normal Python & not through
            # Jupyter Notebook
            plt.show()

            return resVal

        except Exception as e:
            x = str(e)
            print(x)

            logging.info(x)
            resVal = x

            return resVal

Key lines from the above codebase –

# Creating a subset of desired columns
dfMod = df[['CityName', 'temp', 'Population', 'humidity', 'feels_like']]

l.logr('5.dfSuppliment.csv', debug_ind, dfMod, 'log')

# Fetching Senior Citizen Data
df = p.read_csv(src_file, index_col=False)

# Merging two frames
dfMerge = p.merge(df, dfMod, on=['CityName'])

l.logr('6.dfMerge.csv', debug_ind, dfMerge, 'log')

# Getting RiskFactor quotient from our custom made logic
dfMerge['RiskFactor'] = dfMerge.apply(lambda row: self.calculateRisk(row), axis=1)

l.logr('7.dfRiskFactor.csv', debug_ind, dfMerge, 'log')

Combining our Senior Citizen data with already processed data coming from our primary calling script. Also, here the application is calculating our custom logic to find out the risk factor figures. If you want to go through that, I’ve provided the logic to derive it. However, this is just a demo to find out similar figures. You should not rely on the logic that I’ve used (It is kind of my observation of life till now. :D).

The below lines are only required when you are running seaborn, not via Jupyter notebook.

plt.show()

4. callOpenMapWeatherAPI.py (This is the first calling script. This script also calls the realtime API & then blend the first file with it & pass the only relevant columns of data to our Map script to produce the graph.)

  1
  2
  3
  4
  5
  6
  7
  8
  9
 10
 11
 12
 13
 14
 15
 16
 17
 18
 19
 20
 21
 22
 23
 24
 25
 26
 27
 28
 29
 30
 31
 32
 33
 34
 35
 36
 37
 38
 39
 40
 41
 42
 43
 44
 45
 46
 47
 48
 49
 50
 51
 52
 53
 54
 55
 56
 57
 58
 59
 60
 61
 62
 63
 64
 65
 66
 67
 68
 69
 70
 71
 72
 73
 74
 75
 76
 77
 78
 79
 80
 81
 82
 83
 84
 85
 86
 87
 88
 89
 90
 91
 92
 93
 94
 95
 96
 97
 98
 99
100
101
102
103
104
105
106
107
108
109
110
111
112
113
114
115
116
117
118
119
120
121
122
123
124
125
126
127
128
129
130
131
132
133
134
135
136
137
138
139
140
141
142
143
144
145
146
147
148
149
150
151
152
153
154
155
156
157
158
159
160
161
162
163
164
165
166
167
168
169
170
171
172
173
174
175
176
177
178
179
180
181
182
183
184
185
186
187
188
189
190
191
192
193
194
195
196
197
198
199
200
201
202
203
204
205
206
207
208
209
210
211
212
213
214
215
216
217
218
219
220
221
222
223
224
225
226
227
228
229
230
231
##############################################
#### Written By: SATYAKI DE               ####
#### Written On: 19-Jan-2020              ####
#### Modified On 19-Jan-2020              ####
####                                      ####
#### Objective: Main calling scripts.     ####
##############################################

from clsConfig import clsConfig as cf
import pandas as p
import clsL as cl
import logging
import datetime
import json
import clsWeather as ct
import re
import numpy as np
import clsMap as cm

# Disbling Warning
def warn(*args, **kwargs):
    pass

import warnings
warnings.warn = warn

# Lookup functions from
# Azure cloud SQL DB

var = datetime.datetime.now().strftime("%Y-%m-%d_%H-%M-%S")

def getMainWeather(row):
    try:
        # Using regular expression to fetch time part only

        lkp_Columns = str(row['weather'])
        jpayload = str(lkp_Columns).replace("'", '"')

        #jpayload = json.dumps(lkp_Columns)
        payload = json.loads(jpayload)

        df_lkp = p.io.json.json_normalize(payload)
        df_lkp.columns = df_lkp.columns.map(lambda x: x.split(".")[-1])

        str_main_weather = str(df_lkp.iloc[0]['main'])

        return str_main_weather

    except Exception as e:
        x = str(e)
        str_main_weather = x

        return str_main_weather

def getMainDescription(row):
    try:
        # Using regular expression to fetch time part only

        lkp_Columns = str(row['weather'])
        jpayload = str(lkp_Columns).replace("'", '"')

        #jpayload = json.dumps(lkp_Columns)
        payload = json.loads(jpayload)

        df_lkp = p.io.json.json_normalize(payload)
        df_lkp.columns = df_lkp.columns.map(lambda x: x.split(".")[-1])

        str_description = str(df_lkp.iloc[0]['description'])

        return str_description

    except Exception as e:
        x = str(e)
        str_description = x

        return str_description

def main():
    try:
        dfSrc = p.DataFrame()
        df_ret = p.DataFrame()
        ret_2 = ''
        debug_ind = 'Y'

        general_log_path = str(cf.config['LOG_PATH'])

        # Enabling Logging Info
        logging.basicConfig(filename=general_log_path + 'consolidatedIR.log', level=logging.INFO)

        # Initiating Log Class
        l = cl.clsL()

        # Moving previous day log files to archive directory
        arch_dir = cf.config['ARCH_DIR']
        log_dir = cf.config['LOG_PATH']
        col_list = cf.config['COL_LIST']
        col_list_1 = cf.config['COL_LIST_1']
        col_list_2 = cf.config['COL_LIST_2']

        tmpR0 = "*" * 157

        logging.info(tmpR0)
        tmpR9 = 'Start Time: ' + str(var)
        logging.info(tmpR9)
        logging.info(tmpR0)

        print("Archive Directory:: ", arch_dir)
        print("Log Directory::", log_dir)
        tmpR1 = 'Log Directory::' + log_dir
        logging.info(tmpR1)

        df2 = p.DataFrame()

        src_file =  cf.config['SRC_FILE']

        # Fetching data from source file
        df = p.read_csv(src_file, index_col=False)

        # Creating a list of City Name from the source file
        city_list = df['CityName'].tolist()

        # Declaring an empty dictionary
        merge_dict = {}
        merge_dict['city'] = df2

        start_pos = 1
        src_file_name = '1.' + cf.config['SRC_FILE_INIT']

        for i in city_list:
            x1 = ct.clsWeather()
            ret_2 = x1.searchQry(i)

            # Capturing the JSON Payload
            res = json.loads(ret_2)

            # Converting dictionary to Pandas Dataframe
            # df_ret = p.read_json(ret_2, orient='records')

            df_ret = p.io.json.json_normalize(res)
            df_ret.columns = df_ret.columns.map(lambda x: x.split(".")[-1])

            # Removing any duplicate columns
            df_ret = df_ret.loc[:, ~df_ret.columns.duplicated()]

            # l.logr(str(start_pos) + '.1.' + src_file_name, debug_ind, df_ret, 'log')
            start_pos = start_pos + 1

            # If all the conversion successful
            # you won't get any gust column
            # from OpenMap response. Hence, we
            # need to add dummy reason column
            # to maintain the consistent structures

            if 'gust' not in df_ret.columns:
                df_ret = df_ret.assign(gust=999999)[['gust'] + df_ret.columns.tolist()]

            # Resetting the column orders as per JSON
            column_order = col_list
            df_mod_ret = df_ret.reindex(column_order, axis=1)

            if start_pos == 1:
                merge_dict['city'] = df_mod_ret
            else:
                d_frames = [merge_dict['city'], df_mod_ret]
                merge_dict['city'] = p.concat(d_frames)

            start_pos += 1

        for k, v in merge_dict.items():
            l.logr(src_file_name, debug_ind, merge_dict[k], 'log')

        # Now opening the temporary file
        temp_log_file = log_dir + src_file_name

        dfNew = p.read_csv(temp_log_file, index_col=False)

        # Extracting Complex columns
        dfNew['WeatherMain'] = dfNew.apply(lambda row: getMainWeather(row), axis=1)
        dfNew['WeatherDescription'] = dfNew.apply(lambda row: getMainDescription(row), axis=1)

        l.logr('2.dfNew.csv', debug_ind, dfNew, 'log')

        # Removing unwanted columns & Renaming key columns
        dfNew.drop(['weather'], axis=1, inplace=True)
        dfNew.rename(columns={'name': 'CityName'}, inplace=True)

        l.logr('3.dfNewMod.csv', debug_ind, dfNew, 'log')

        # Now joining with the main csv
        # to get the complete picture
        dfMain = p.merge(df, dfNew, on=['CityName'])

        l.logr('4.dfMain.csv', debug_ind, dfMain, 'log')

        # Let's extract only relevant columns
        dfSuppliment = dfMain[['CityName', 'Population', 'State', 'country', 'feels_like', 'humidity', 'pressure', 'temp', 'temp_max', 'temp_min', 'visibility', 'deg', 'gust', 'speed', 'WeatherMain', 'WeatherDescription']]

        l.logr('5.dfSuppliment.csv', debug_ind, dfSuppliment, 'log')

        # Let's pass this to our map section
        x2 = cm.clsMap()
        ret_3 = x2.setMap(dfSuppliment)

        if ret_3 == 0:
            print('Successful Map Generated!')
        else:
            print('Please check the log for further issue!')

        print("-" * 60)
        print()

        print('Finding Story points..')
        print("*" * 157)
        logging.info('Finding Story points..')
        logging.info(tmpR0)


        tmpR10 = 'End Time: ' + str(var)
        logging.info(tmpR10)
        logging.info(tmpR0)

    except ValueError as e:
        print(str(e))
        print("No relevant data to proceed!")
        logging.info("No relevant data to proceed!")

    except Exception as e:
        print("Top level Error: args:{0}, message{1}".format(e.args, e.message))

if __name__ == "__main__":
    main()

Key snippet from the above script –

# Capturing the JSON Payload
res = json.loads(ret_2)

# Converting dictionary to Pandas Dataframe
df_ret = p.io.json.json_normalize(res)
df_ret.columns = df_ret.columns.map(lambda x: x.split(".")[-1])

Once the application received the JSON response from the realtime API, the application is converting it to pandas dataframe.

# Removing any duplicate columns
df_ret = df_ret.loc[:, ~df_ret.columns.duplicated()]

Since this is a complex JSON response. The application might encounter duplicate columns, which might cause a problem later. Hence, our app is removing all these duplicate columns as they are not required for our cases.

if 'gust' not in df_ret.columns:
    df_ret = df_ret.assign(gust=999999)[['gust'] + df_ret.columns.tolist()]

There is a possibility that the application might not receive all the desired attributes from the realtime API. Hence, the above lines will check & add a dummy column named gust for those records in case if they are not present in the JSON response.

if start_pos == 1:
    merge_dict['city'] = df_mod_ret
else:
    d_frames = [merge_dict['city'], df_mod_ret]
    merge_dict['city'] = p.concat(d_frames)

These few lines required as our API has a limitation of responding with only one city at a time. Hence, in this case, we’re retrieving one town at a time & finally merge them into a single dataframe before creating a temporary source file for the next step.

At this moment our data should look like this –

16. Intermediate_Data_1

Let’s check the weather column. We need to extract the main & description for our dashboard, which will be coming in the next installment.

# Extracting Complex columns
dfNew['WeatherMain'] = dfNew.apply(lambda row: getMainWeather(row), axis=1)
dfNew['WeatherDescription'] = dfNew.apply(lambda row: getMainDescription(row), axis=1)

Hence, we’ve used the following two functions to extract these values & the critical snippet from one of the service is as follows –

lkp_Columns = str(row['weather'])
jpayload = str(lkp_Columns).replace("'", '"')
payload = json.loads(jpayload)

df_lkp = p.io.json.json_normalize(payload)
df_lkp.columns = df_lkp.columns.map(lambda x: x.split(".")[-1])

str_main_weather = str(df_lkp.iloc[0]['main'])

The above lines extracting the weather column & replacing the single quotes with the double quotes before the application is trying to convert that to JSON. Once it converted to JSON, the json_normalize will easily serialize it & create individual columns out of it. Once you have them captured inside the pandas dataframe, you can extract the unique values & store them & return them to your primary calling function.

# Let's pass this to our map section
x2 = cm.clsMap()
ret_3 = x2.setMap(dfSuppliment)

if ret_3 == 0:
    print('Successful Map Generated!')
else:
    print('Please check the log for further issue!')

In the above lines, the application will invoke the Map class to calculate the remaining logic & then plotting the data into the seaborn graph.

Let’s just briefly see the central directory structure –

10. RunWindow

Here is the log directory –

11. Log Directory

And, finally, the source directory should look something like this –

12. SourceDir

Now, let’s runt the application –

Following lines are essential –

sns.lmplot(x='RiskFactor', y='SeniorCitizen', data=dfMerge, hue='Sex')

This will project the plot like this –

13. AdditionalOption

Or,

sns.lmplot(x='RiskFactor', y='SeniorCitizen', data=dfMerge, hue='Sex', markers=['o','v'], scatter_kws={'s':25})

This will lead to the following figures –

14. Adding Markers

As you can see, here, using the marker of (‘o’/’v’) leads to two different symbols for the different gender.

Or,

sns.lmplot(x='RiskFactor', y='SeniorCitizen', data=dfMerge, col='Sex')

This will lead to –

15. Separate By Sex

So, in this case, the application has created two completely different sets for Sex.

So, finally, we’ve done it. 😀

In the next post, I’ll be doing some more improvisation on top of these data sets. Till then – Happy Avenging! 🙂

Note: All the data posted here are representational data & available over the internet & for educational purpose only.

Converting text to voice in Python

Hi Guys!

Today, we’ll be discussing one new post of converting text into a voice using some third-party APIs. This is particularly very useful in many such cases, where you can use this method to get more realistic communication.

There are many such providers, where you can get an almost realistic voice for both males & females. However, most of them are subscription-based. So, you have to be very careful about your budget & how to proceed.

For testing purposes, I’ll be using voice.org to simulate this.

Let’s look out the architecture of this process –

FlowS

As you can see, the user-initiated the application & provide some input in the form of plain text. Once the data is given, the app will send it to the third-party API for the process. Now, the Third-party API will verify the authentication & then it will check all the associate parameters before it starting to generate the audio response. After that, it will send the payload & that will be received by the calling python application. Here, it will be decoded & create the audio file & finally, that will be played at the invoking computer.

This third-party API has lots of limitations. However, they are giving you the platform to test your concept.

As of now, they support the following languages – English, Chinese, Catalan, French, Finnish, Dutch, Danish, German, Italian, Japanese, Korean, Polish, Norwegian, Portuguese, Russian, Spanish & Sweedish.

In our case, we’ll be checking with English.

To work with this, you need to have the following modules installed in python –

  • playsound
  • requests
  • base64

Let’s see the directory structure –

1. Directory

Again, we are not going to discuss any script, which we’ve already discussed here.

Hence, we’re skipping clsL.py here.

1. clsConfig.py (This script contains all the parameters of the server.)

##############################################
#### Written By: SATYAKI DE               ####
#### Written On: 12-Oct-2019              ####
####                                      ####
#### Objective: This script is a config   ####
#### file, contains all the keys for      ####
#### azure cosmos db. Application will    ####
#### process these information & perform  ####
#### various CRUD operation on Cosmos DB. ####
##############################################

import os
import platform as pl

class clsConfig(object):
    Curr_Path = os.path.dirname(os.path.realpath(__file__))

    os_det = pl.system()
    if os_det == "Windows":
        sep = '\\'
    else:
        sep = '/'

    config = {
        'APP_ID': 1,
        'url': "https://voicerss-text-to-speech.p.rapidapi.com/",
        'host': "voicerss-text-to-speech.p.rapidapi.com",
        'api_key': "xxxxxxxxxxxxxxxxxxxxxxxxxxxxxxxxxxxxx",
        'targetFile': "Bot_decode.mp3",
        'pitch_speed': "-6",
        'bot_language': "en-us",
        'audio_type': "mp3",
        'audio_freq': "22khz_8bit_stereo",
        'query_string_api': "hhhhhhhhhhhhhhhhhhhhhhhhhhhh",
        'b64_encoding': True,
        'APP_DESC_1': 'Text to voice conversion.',
        'DEBUG_IND': 'N',
        'INIT_PATH': Curr_Path,
        'LOG_PATH': Curr_Path + sep + 'log' + sep
    }

For security reasons, sensitive information masked with the dummy value.

‘api_key’: “xxxxxxxxxxxxxxxxxxxxxxxxxxxxxxxxxxxxx”,

‘query_string_api’: “hhhhhhhhhhhhhhhhhhhhhhhhhhhh”,

This two information is private to each subscriber. Hence, I’ve removed them & updated with some dummy values.

You have to fill-up with your subscribed information.

2. clsText2Voice.py (This script will convert the text data into an audio file using a GET API request from the third-party API & then play that using the web media player.)

###############################################
#### Written By: SATYAKI DE                ####
#### Written On: 27-Oct-2019               ####
#### Modified On 27-Oct-2019               ####
####                                       ####
#### Objective: Main class converting      ####
#### text to voice using third-party API.  ####
###############################################

from playsound import playsound
import requests
import base64
from clsConfig import clsConfig as cf

class clsText2Voice:
    def __init__(self):
        self.url = cf.config['url']
        self.api_key = cf.config['api_key']
        self.targetFile = cf.config['targetFile']
        self.pitch_speed = cf.config['pitch_speed']
        self.bot_language = cf.config['bot_language']
        self.audio_type = cf.config['audio_type']
        self.audio_freq = cf.config['audio_freq']
        self.b64_encoding = cf.config['b64_encoding']
        self.query_string_api = cf.config['query_string_api']
        self.host = cf.config['host']

    def getAudio(self, srcString):
        try:
            url = self.url
            api_key = self.api_key
            tarFile = self.targetFile
            pitch_speed = self.pitch_speed
            bot_language = self.bot_language
            audio_type = self.audio_type
            audio_freq = self.audio_freq
            b64_encoding = self.b64_encoding
            query_string_api = self.query_string_api
            host = self.host

            querystring = {
                "r": pitch_speed,
                "c": audio_type,
                "f": audio_freq,
                "src": srcString,
                "hl": bot_language,
                "key": query_string_api,
                "b64": b64_encoding
            }

            headers = {
                'x-rapidapi-host': host,
                'x-rapidapi-key': api_key
            }

            response = requests.request("GET", url, headers=headers, params=querystring)

            # Converting to MP3
            targetFile = tarFile
            mp3File_64_decode = base64.decodebytes(bytes(response.text, encoding="utf-8"))
            mp3File_result = open(targetFile, 'wb')

            # create a writable mp3File and write the decoding result
            mp3File_result.write(mp3File_64_decode)
            mp3File_result.close()

            playsound(targetFile)

            return 0
        except Exception as e:
            x = str(e)
            print('Error: ', x)

            return 1

Few crucial lines from the above script –

querystring = {
    "r": pitch_speed,
    "c": audio_type,
    "f": audio_freq,
    "src": srcString,
    "hl": bot_language,
    "key": query_string_api,
    "b64": b64_encoding
}

You can configure the voice of the audio by adjusting all the configurations. And, the text content will receive at srcString. So, whatever user will be typing that will be directly captured here & form the JSON payload accordingly.

response = requests.request("GET", url, headers=headers, params=querystring)

In this case, you will be receiving the audio file in the form of a base64 text file. Hence, you need to convert them back to the sound file by these following lines –

# Converting to MP3
targetFile = tarFile
mp3File_64_decode = base64.decodebytes(bytes(response.text, encoding="utf-8"))
mp3File_result = open(targetFile, 'wb')

# create a writable mp3File and write the decoding result
mp3File_result.write(mp3File_64_decode)
mp3File_result.close()

As you can see that, we’ve extracted the response.text & then we’ve decoded that to byte object to form the mp3 sound file at the receiving end.

Once we have our mp3 file ready, the following line simply plays the audio record.

playsound(targetFile)

Thus you can hear the actual voice.

3. callText2Voice.py (This is the main script that will invoke the text to voice API & then playback the audio once it gets the response from the third-party API.)

###############################################
#### Written By: SATYAKI DE                ####
#### Written On: 27-Oct-2019               ####
#### Modified On 27-Oct-2019               ####
####                                       ####
#### Objective: Main class converting      ####
#### text to voice using third-party API.  ####
###############################################

from clsConfig import clsConfig as cf
import clsL as cl
import logging
import datetime
import clsText2Voice as ct

# Disbling Warning
def warn(*args, **kwargs):
    pass

import warnings
warnings.warn = warn

var = datetime.datetime.now().strftime("%Y-%m-%d_%H-%M-%S")

def main():
    try:
        ret_2 = ''
        debug_ind = 'Y'

        general_log_path = str(cf.config['LOG_PATH'])

        # Enabling Logging Info
        logging.basicConfig(filename=general_log_path + 'consolidatedTwitter.log', level=logging.INFO)

        # Initiating Log Class
        l = cl.clsL()

        # Moving previous day log files to archive directory
        log_dir = cf.config['LOG_PATH']

        tmpR0 = "*" * 157

        logging.info(tmpR0)
        tmpR9 = 'Start Time: ' + str(var)
        logging.info(tmpR9)
        logging.info(tmpR0)

        print("Log Directory::", log_dir)
        tmpR1 = 'Log Directory::' + log_dir
        logging.info(tmpR1)

        # Query using parameters
        rawQry = str(input('Enter your string:'))

        x1 = ct.clsText2Voice()
        ret_2 = x1.getAudio(rawQry)

        if ret_2 == 0:
            print("Successfully converted from text to voice!")
            logging.info("Successfully converted from text to voice!")
            print("*" * 157)
            logging.info(tmpR0)
        else:
            print("Successfuly converted!")
            logging.info("Successfuly converted!")
            print("*" * 157)
            logging.info(tmpR0)

        print("*" * 157)
        logging.info(tmpR0)

        tmpR10 = 'End Time: ' + str(var)
        logging.info(tmpR10)
        logging.info(tmpR0)

    except ValueError:
        print("No relevant data to proceed!")
        logging.info("No relevant data to proceed!")

    except Exception as e:
        print("Top level Error: args:{0}, message{1}".format(e.args, e.message))

if __name__ == "__main__":
    main()

Essential lines from the above script –

# Query using parameters
rawQry = str(input('Enter your string:'))

x1 = ct.clsText2Voice()
ret_2 = x1.getAudio(rawQry)

As you can see, here the user will be passing the text content, which will be given to our class & then it will project the audio sound of that text.

Let’s see how it runs –

Input Text: Welcome to Satyaki De’s blog. This site mainly deals with the Python, SQL from different DBs & many useful areas from the leading cloud providers.

And, here is the run command under Windows OS looks like –

2. Windows_Run

And, please find the sample voice that it generates –

So, We’ve done it! 😀

Let us know your comment on this.

So, we’ll come out with another exciting post in the coming days!

N.B.: This is demonstrated for RnD/study purposes. All the data posted here are representational data & available over the internet.