So, here we come up with another crossover of Space Stone, Reality Stone & Mind Stone of Python-Verse. It is indeed exciting & I cannot wait to explore that part further. Today, in this post, we’ll see how one application can integrate all these key ingredients in Python to serve the purpose. Our key focus will be involving popular packages like Pandas, Numpy & Popular Encryption-Decryption techniques, which include some hidden files as well.
So, our objective here is to proceed with the encryption & decryption technique. But, there is a catch. We need to store some salt or tokenized value inside a hidden file. Our application will extract the salt value from it & then based on that it will perform Encrypt/Decrypt on the data.
Why do we need this approach?
The answer is simple. On many occasions, we don’t want to store our right credentials in configuration files. Also, we don’t want to keep our keys to open to other developers. There are many ways you can achieve this kind of security. Today, I’ll be showing a different approach to make the same.
Let’s explore.
As usual, I’ll provide the solution, which is tested in Windows & MAC & provide the script. Also, I’ll explain the critical lines of those scripts to understand it from a layman point of view. And, I won’t explain any script, which I’ve already explained in my earlier post. So, you have to refer my old post for that.
To encrypt & decrypt, we need the following files, which contains credentials in a csv. Please find the sample data –
Config_orig.csv

Please see the file, which will be hidden by the application process.

As you can see, this column contains the salt, which will be used in our Encryption/Decryption.
1. clsL.py (This script will create the csv files or any intermediate debug csv file after the corresponding process. Hence, the name comes into the picture.)
1 2 3 4 5 6 7 8 9 10 11 12 13 14 15 16 17 18 19 20 21 22 23 24 25 26 27 28 29 30 31 32 33 34 35 36 37 38 39 40 41 42 |
########################################### #### Written By: SATYAKI DE ######## #### Written On: 25-Jan-2019 ######## #### ######## #### Objective: Log File ######## ########################################### import pandas as p import platform as pl from clsParam import clsParam as cf class clsL(object): def __init__(self): self.path = cf.config['PATH'] def logr(self, Filename, Ind, df, subdir=None): try: x = p.DataFrame() x = df sd = subdir os_det = pl.system() if sd == None: if os_det == "Windows": fullFileName = self.path + '\\' + Filename else: fullFileName = self.path + '/' + Filename else: if os_det == "Windows": fullFileName = self.path + '\\' + sd + "\\" + Filename else: fullFileName = self.path + '/' + sd + "/" + Filename if Ind == 'Y': x.to_csv(fullFileName, index=False) return 0 except Exception as e: y = str(e) print(y) return 3 |
2. clsParam.py (This is the script that will be used as a parameter file & will be used in other python scripts.)
1 2 3 4 5 6 7 8 9 10 11 12 13 14 15 16 17 18 19 |
########################################### #### Written By: SATYAKI DE ######## #### Written On: 25-Jan-2019 ######## #### Objective: Parameter File ######## ########################################### import os import platform as pl class clsParam(object): config = { 'FILENAME' : 'test.amca', 'OSX_MOD_FILE_NM': '.test.amca', 'CURR_PATH': os.path.dirname(os.path.realpath(__file__)), 'NORMAL_FLAG': 32, 'HIDDEN_FLAG': 34, 'OS_DET': pl.system() } |
3. clsWinHide.py (This script contains the core logic of hiding/unhiding a file under Windows OS. Hence, the name comes into the picture.)
1 2 3 4 5 6 7 8 9 10 11 12 13 14 15 16 17 18 19 20 21 22 23 24 25 26 27 28 29 30 31 32 33 34 35 36 37 38 39 40 41 42 43 44 45 46 47 48 49 |
########################################### #### Written By: SATYAKI DE ###### #### Written On: 25-Jan-2019 ###### #### ###### #### This script will hide or Unhide ###### #### Files in Windows. ###### ########################################### import win32file import win32con from clsParam import clsParam as cp class clsWinHide(object): def __init__(self): self.path = cp.config['CURR_PATH'] self.FileName = cp.config['FILENAME'] self.normal_file_flag = cp.config['NORMAL_FLAG'] def doit(self): try: path = self.path FileName = self.FileName FileNameWithPath = path + '\\' + FileName flags = win32file.GetFileAttributesW(FileNameWithPath) win32file.SetFileAttributes(FileNameWithPath,win32con.FILE_ATTRIBUTE_HIDDEN | flags) return 0 except Exception as e: x = str(e) print(x) return 1 def undoit(self): try: path = self.path FileName = self.FileName normal_file_flag = self.normal_file_flag FileNameWithPath = path + '\\' + FileName win32file.SetFileAttributes(FileNameWithPath,win32con.FILE_ATTRIBUTE_NORMAL | int(normal_file_flag)) return 0 except Exception as e: x = str(e) print(x) return 1 |
Key lines that we would like to explore are as follows –
def doit()
flags = win32file.GetFileAttributesW(FileNameWithPath)
win32file.SetFileAttributes(FileNameWithPath,win32con.FILE_ATTRIBUTE_HIDDEN | flags)
The above two lines under doit() functions are changing the file attributes in Windows OS to the hidden mode by assigning the FILE_ATTRIBUTE_HIDDEN property.
def undoit()
normal_file_flag = self.normal_file_flag

FileNameWithPath = path + '\\' + FileName
win32file.SetFileAttributes(FileNameWithPath,win32con.FILE_ATTRIBUTE_NORMAL | int(normal_file_flag))
As the script suggested, the application is setting the file attribute of a hidden file to FILE_ATTRIBUTE_NORMAL & set the correct flag from parameters, which leads to the file appears as a normal windows file.
4. clsOSXHide.py (This script contains the core logic of hiding/unhiding a file under OSX, i.e., MAC OS. Hence, the name comes into the picture.)
1 2 3 4 5 6 7 8 9 10 11 12 13 14 15 16 17 18 19 20 21 22 23 24 25 26 27 28 29 30 31 32 33 34 35 36 37 38 39 40 41 42 43 44 45 46 47 48 49 |
########################################### #### Written By: SATYAKI DE ##### #### Written On: 25-Jan-2019 ##### #### ##### #### Objective: This script will hide ##### #### or Unhide the file in OSX. ##### ########################################### import os from clsParam import clsParam as cp class clsOSXHide(object): def __init__(self): self.path = cp.config['CURR_PATH'] self.FileName = cp.config['FILENAME'] self.OSX_Mod_FileName = cp.config['OSX_MOD_FILE_NM'] self.normal_file_flag = cp.config['NORMAL_FLAG'] def doit(self): try: path = self.path FileName = self.FileName FileNameWithPath = path + '/' + FileName os.rename(FileNameWithPath, os.path.join(os.path.dirname(FileNameWithPath),'.' + os.path.basename(FileNameWithPath))) return 0 except Exception as e: x = str(e) print(x) return 1 def undoit(self): try: path = self.path FileName = self.FileName OSX_Mod_FileName = self.OSX_Mod_FileName FileNameWithPath = path + '/' + FileName os.rename(OSX_Mod_FileName, FileNameWithPath) return 0 except Exception as e: x = str(e) print(x) return 1 |
The key lines that we’ll be exploring here are as follows –
def doit()
FileNameWithPath = path + '/' + FileName
os.rename(FileNameWithPath, os.path.join(os.path.dirname(FileNameWithPath),'.'
                                         + os.path.basename(FileNameWithPath)))
In MAC or Linux, any file starts with ‘.’ will be considered as a hidden file. Hence, we’re changing the file type by doing this manipulation.
def undoit()
OSX_Mod_FileName = self.OSX_Mod_FileName

FileNameWithPath = path + '/' + FileName
os.rename(OSX_Mod_FileName, FileNameWithPath)
In this case, our application simply renaming a file with its the original file to get the file as a normal file.
Let’s understand that in Linux or MAC, you have a lot of other ways to restrict any files as it has much more granular level access control. But, I thought, why not take a slightly different & fun way to achieve the same. After all, we’re building an Infinity War for Python verse. A little bit of fun will certainly make some sense. 🙂
5. clsProcess.py (This script will invoke any of the hide scripts, i.e. clsWinHide.py or clsOSXHide.py based on the OS platform. Hence, the name comes into the picture.)
1 2 3 4 5 6 7 8 9 10 11 12 13 14 15 16 17 18 19 20 21 22 23 24 25 26 27 28 29 30 31 32 33 34 35 36 37 38 39 40 41 42 43 44 45 46 47 48 49 50 51 52 53 54 55 56 57 58 59 60 61 62 63 64 65 66 67 |
########################################### #### Written By: SATYAKI DE ###### #### Written On: 25-Jan-2019 ###### #### ###### #### Objective: Based on the OS, this###### #### script calls the actual script. ###### ########################################### from clsParam import clsParam as cp plat_det = cp.config['OS_DET'] # Based on the platform # Application is loading subprocess # in order to avoid library missing # case against cross platform if plat_det == "Windows": import clsWinHide as win else: import clsOSXHide as osx # End of conditional class load class clsProcess(object): def __init__(self): self.os_det = plat_det def doit(self): try: os_det = self.os_det print("OS Info: ", os_det) if os_det == "Windows": win_doit = win.clsWinHide() ret_val = win_doit.doit() else: osx_doit = osx.clsOSXHide() ret_val = osx_doit.doit() return ret_val except Exception as e: x = str(e) print(x) return 1 def undoit(self): try: os_det = self.os_det print("OS Info: ", os_det) if os_det == "Windows": win_doit = win.clsWinHide() ret_val = win_doit.undoit() else: osx_doit = osx.clsOSXHide() ret_val = osx_doit.undoit() return ret_val except Exception as e: x = str(e) print(x) return 1 |
Key lines to explores are as follows –
from clsParam import clsParam as cp

plat_det = cp.config['OS_DET']

# Based on the platform
# Application is loading subprocess
# in order to avoid library missing
# case against cross platform

if plat_det == "Windows":
    import clsWinHide as win
else:
    import clsOSXHide as osx
This step is very essential to run the same python scripts in both the environments, e.g. in this case like MAC & Windows.
So, based on the platform details, which the application is getting from the clsParam class, it is loading the specific class to the application. And why it is so important.
Under Windows OS, this will work if you load both the class. But, under MAC, this will fail as the first program will try to load all the libraries & it may happen that the pywin32/pypiwin32 package might not available under MAC. Anyway, you are not even using that package. So, this conditional class loading is significant.
os_det = self.os_det
print("OS Info: ", os_det)

if os_det == "Windows":
    win_doit = win.clsWinHide()
    ret_val = win_doit.doit()
else:
    osx_doit = osx.clsOSXHide()
    ret_val = osx_doit.doit()
As you can see that, based on the OS, it is invoking the correct function of that corresponding class.
6. clsEnDec.py (This script will read the credentials from a csv file & then based on the salt captured from the hidden file, it will either encrypt or decrypt the content. Hence, the name comes into the picture.)
1 2 3 4 5 6 7 8 9 10 11 12 13 14 15 16 17 18 19 20 21 22 23 24 25 26 27 28 29 30 31 32 33 34 35 36 37 38 39 40 41 42 43 44 45 46 47 48 49 50 51 52 53 54 55 56 57 58 59 60 61 62 63 64 |
########################################### #### Written By: SATYAKI DE ######## #### Written On: 25-Jan-2019 ######## #### Package Cryptography needs to ######## #### install in order to run this ######## #### script. ######## #### ######## #### Objective: This script will ######## #### encrypt/decrypt based on the ######## #### hidden supplied salt value. ######## ########################################### import pandas as p from cryptography.fernet import Fernet class clsEnDec(object): def __init__(self, token): # Calculating Key self.token = token def encrypt_str(self): try: # Capturing the Salt Information salt = self.token # Fetching the content of lookup file df_orig = p.read_csv('Config_orig.csv', index_col=False) # Checking Individual Types inside the Dataframe cipher = Fernet(salt) df_orig['User'] = df_orig['User'].apply(lambda x1: cipher.encrypt(bytes(x1,'utf8'))) df_orig['Pwd'] = df_orig['Pwd'].apply(lambda x2: cipher.encrypt(bytes(x2,'utf8'))) # Writing to the File df_orig.to_csv('Encrypt_Config.csv', index=False) return 0 except Exception as e: x = str(e) print(x) return 1 def decrypt_str(self): try: # Capturing the Salt Information salt = self.token # Checking Individual Types inside the Dataframe cipher = Fernet(salt) # Fetching the Encrypted csv file df_orig = p.read_csv('Encrypt_Config.csv', index_col=False) df_orig['User'] = df_orig['User'].apply(lambda x1: str(cipher.decrypt(bytes(x1[2:-1],'utf8'))).replace("b'","").replace("'","")) df_orig['Pwd'] = df_orig['Pwd'].apply(lambda x2: str(cipher.decrypt(bytes(x2[2:-1],'utf8'))).replace("b'","").replace("'","")) # Writing to the file df_orig.to_csv('Decrypt_Config.csv', index=False) return 0 except Exception as e: x = str(e) print(x) return 1 |
Key lines from this script are as follows –
def encrypt_str()
# Checking Individual Types inside the Dataframe
cipher = Fernet(salt)

df_orig['User'] = df_orig['User'].apply(lambda x1: cipher.encrypt(bytes(x1,'utf8')))
df_orig['Pwd'] = df_orig['Pwd'].apply(lambda x2: cipher.encrypt(bytes(x2,'utf8')))
So, once you captured the salt from that hidden file, the application is capturing that value over here. And, based on that both the field will be encrypted. But, note that cryptography package is required for this. And, you need to pass bytes value to work this thing. Hence, we’ve used bytes() function over here.
def decrypt_str()
cipher = Fernet(salt)

# Fetching the Encrypted csv file
df_orig = p.read_csv('Encrypt_Config.csv', index_col=False)

df_orig['User'] = df_orig['User'].apply(lambda x1: str(cipher.decrypt(bytes(x1[2:-1],'utf8'))).replace("b'","").replace("'",""))
df_orig['Pwd'] = df_orig['Pwd'].apply(lambda x2: str(cipher.decrypt(bytes(x2[2:-1],'utf8'))).replace("b'","").replace("'",""))
Again, in this step, our application is extracting the salt & then it retrieves the encrypted values of corresponding fields & applies the decryption logic on top of it. Note that, since we need to pass bytes value to get it to work. Hence, your output will be appended with (b’xxxxx’). To strip that, we’ve used the replace() functions. You can use regular expression using pattern matching as well.
7. callEnDec.py (This script will create the split csv files or final merge file after the corresponding process. However, this can be used as normal verbose debug logging as well. Hence, the name comes into the picture.)
1 2 3 4 5 6 7 8 9 10 11 12 13 14 15 16 17 18 19 20 21 22 23 24 25 26 27 28 29 30 31 32 33 34 35 36 37 38 39 40 41 42 43 44 45 46 47 48 49 50 51 52 53 54 55 56 57 58 59 60 61 62 63 64 65 66 67 68 69 70 71 72 73 74 75 76 77 78 79 80 81 82 |
########################################### #### Written By: SATYAKI DE ##### #### Written On: 25-Jan-2019 ##### #### ##### #### Objective: Main calling function ##### ########################################### import clsEnDec as ed import clsProcess as h from clsParam import clsParam as cp import time as t import pandas as p def main(): print("") print("#" * 60) print("Calling (Encryption/Decryption) Package!!") print("#" * 60) print("") # Unhiding the file x = h.clsProcess() ret_val_unhide = x.undoit() if ret_val_unhide == 0: print("Successfully Unhide the file!") else: print("Unsuccessful to Unhide the file!") # To See the Unhide file t.sleep(10) print("*" * 60) print("Proceeding with Encryption...") print("*" * 60) # Getting Salt Value from the hidden files # by temporarily making it available FileName = cp.config['FILENAME'] df = p.read_csv(FileName, index_col=False) salt = str(df.iloc[0]['Token_Salt']) print("-" * 60) print("Salt: ", salt) print("-" * 60) # Calling the Encryption Method x = ed.clsEnDec(salt) ret_val = x.encrypt_str() if ret_val == 0: print("Encryption Successful!") else: print("Encryption Failure!") print("") print("*" * 60) print("Checking Decryption Now...") print("*" * 60) # Calling the Decryption Method ret_val1 = x.decrypt_str() if ret_val1 == 0: print("Decryption Successful!") else: print("Decryption Failure!") # Hiding the salt file x = h.clsProcess() ret_val_hide = x.doit() if ret_val_hide == 0: print("Successfully Hide the file!") else: print("Unsuccessful to Hide the file!") print("*" * 60) print("Operation Done!") print("*" * 60) if __name__ == '__main__': main() |
And, here comes the final calling methods.
The key lines that we would like to discuss –
# Getting Salt Value from the hidden files
# by temporarily making it available
FileName = cp.config['FILENAME']
df = p.read_csv(FileName, index_col=False)
salt = str(df.iloc[0]['Token_Salt'])
As I’ve shown that, we have our hidden files that contain only 1 row & 1 column. To extract the specific value we’ve used iloc with the row number as 0 along with the column name, i.e. Token_Salt.
Now, let’s see how it runs –
Windows (64 bit):

Mac (32 bit):
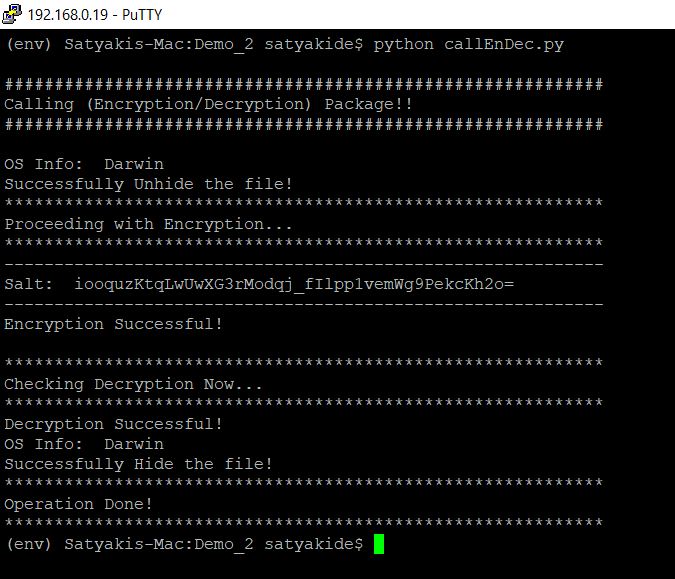
So, from the screenshot, we can see our desired output & you can calculate the aggregated value based on our sample provided in the previous screenshot.
Let’s check the Encrypted & Decrypted values –
Encrypted Values (Encrypt_Config.csv):

Decrypted Values (Decrypt_Config.csv):

So, finally, we’ve achieved our target.
I hope this will give you some more idea about more insights into the Python verse. Let me know – how do you think about this post.
Till then – Happy Avenging!
You must be logged in to post a comment.