This site mainly deals with various use cases demonstrated using Python, Data Science, Cloud basics, SQL Server, Oracle, Teradata along with SQL & their implementation. Expecting yours active participation & time. This blog can be access from your TP, Tablet & mobile also. Please provide your feedback.
This is a continuation of my previous post, which can be found here. This will be our last post of this series.
Let us recap the key takaways from our previous post –
Two cloud patterns show how MCP standardizes safe AI-to-system work. Azure “agent factory”: You ask in Teams; Azure AI Foundry dispatches a specialist agent (HR/Sales). The agent calls a specific MCP server (Functions/Logic Apps) for CRM, SharePoint, or SQL via API Management. Entra ID enforces access; Azure Monitor audits. AWS “composable serverless agents”: In Bedrock, domain agents (Financial/IT Ops) invoke Lambda-based MCP tools for DynamoDB, S3, or CloudWatch through API Gateway with IAM and optional VPC. In both, agents never hold credentials; tools map one-to-one to systems, improving security, clarity, scalability, and compliance.
In this post, we’ll discuss the GCP factory pattern.
Unified Workbench Pattern (GCP):
The GCP “unified workbench” pattern prioritizes a unified, data-centric platform for AI development, integrating seamlessly with Vertex AI and Google’s expertise in AI and data analytics. This approach is well-suited for AI-first companies and data-intensive organizations that want to build agents that leverage cutting-edge research tools.
Let’s explore the following diagram based on this –
Imagine Mia, a clinical operations lead, opens a simple app and asks: “Which clinics had the longest wait times this week? Give me a quick summary I can share.”
The app quietly sends Mia’s request to Vertex AI Agent Builder—think of it as the switchboard operator.
Vertex AI picks the Data Analysis agent (the “specialist” for questions like Mia’s).
That agent doesn’t go rummaging through databases. Instead, it uses a safe, preapproved tool—an MCP Server—to query BigQuery, where the data lives.
The tool fetches results and returns them to Mia—no passwords in the open, no risky shortcuts—just the answer, fast and safely.
Now meet Ravi, a developer who asks: “Show me the latest app metrics and confirm yesterday’s patch didn’t break the login table.”
The app routes Ravi’s request to Vertex AI.
Vertex AI chooses the Developer agent.
That agent calls a different tool—an MCP Server designed for Cloud SQL—to check the login table and run a safe query.
Results come back with guardrails intact. If the agent ever needs files, there’s also a Cloud Storage tool ready to fetch or store documents.
Let us understand how the underlying flow of activities took place –
User Interface:
Entry point: Vertex AI console or a custom app.
Sends a single request; no direct credentials or system access exposed to the user.
Orchestration: Vertex AI Agent Builder (MCP Host)
Routes the request to the most suitable agent:
Agent A (Data Analysis) for analytics/BI-style questions.
Agent B (Developer) for application/data-ops tasks.
Tooling via MCP Servers on Cloud Run
Each MCP Server is a purpose-built adapter with least-privilege access to exactly one service:
Server1 → BigQuery (analytics/warehouse) — used by Agent A in this diagram.
Server2 → Cloud Storage (GCS) (files/objects) — available when file I/O is needed.
Server3 → Cloud SQL (relational DB) — used by Agent B in this diagram.
Agents never hold database credentials; they request actions from the right tool.
Enterprise Systems
BigQuery, Cloud Storage, and Cloud SQL are the systems of record that the tools interact with.
Security, Networking, and Observability
GCP IAM: AuthN/AuthZ for Vertex AI and each MCP Server (fine-grained roles, least privilege).
GCP VPC: Private network paths for all Cloud Run MCP Servers (isolation, egress control).
Cloud Monitoring: Metrics, logs, and alerts across agents and tools (auditability, SLOs).
Return Path
Results flow back from the service → MCP Server → Agent → Vertex AI → UI.
Policies and logs track who requested what, when, and how.
Why does this design work?
One entry point for questions.
Clear accountability: specialists (agents) act within guardrails.
Built-in safety (IAM/VPC) and visibility (Monitoring) for trust.
Separation of concerns: agents decide what to do; tools (MCP Servers) decide how to do it.
Scalable: add a new tool (e.g., Pub/Sub or Vertex AI Feature Store) without changing the UI or agents.
Auditable & maintainable: each tool maps to one service with explicit IAM and VPC controls.
So, we’ve concluded the series with the above post. I hope you like it.
I’ll bring some more exciting topics in the coming days from the new advanced world of technology.
Till then, Happy Avenging! 🙂
Note: All the data & scenarios posted here are representative of data & scenarios available on the internet for educational purposes only. There is always room for improvement in this kind of model & the solution associated with it. I’ve shown the basic ways to achieve the same for educational purposes only.
Today, I will discuss our Virtual personal assistant (SJ) with a combination of AI-driven APIs, which is now operational in Python. We will use the three most potent APIs using OpenAI, Rev-AI & Pyttsx3. Why don’t we see the demo first?
Great! Let us understand we can leverage this by writing a tiny snippet using this new AI model.
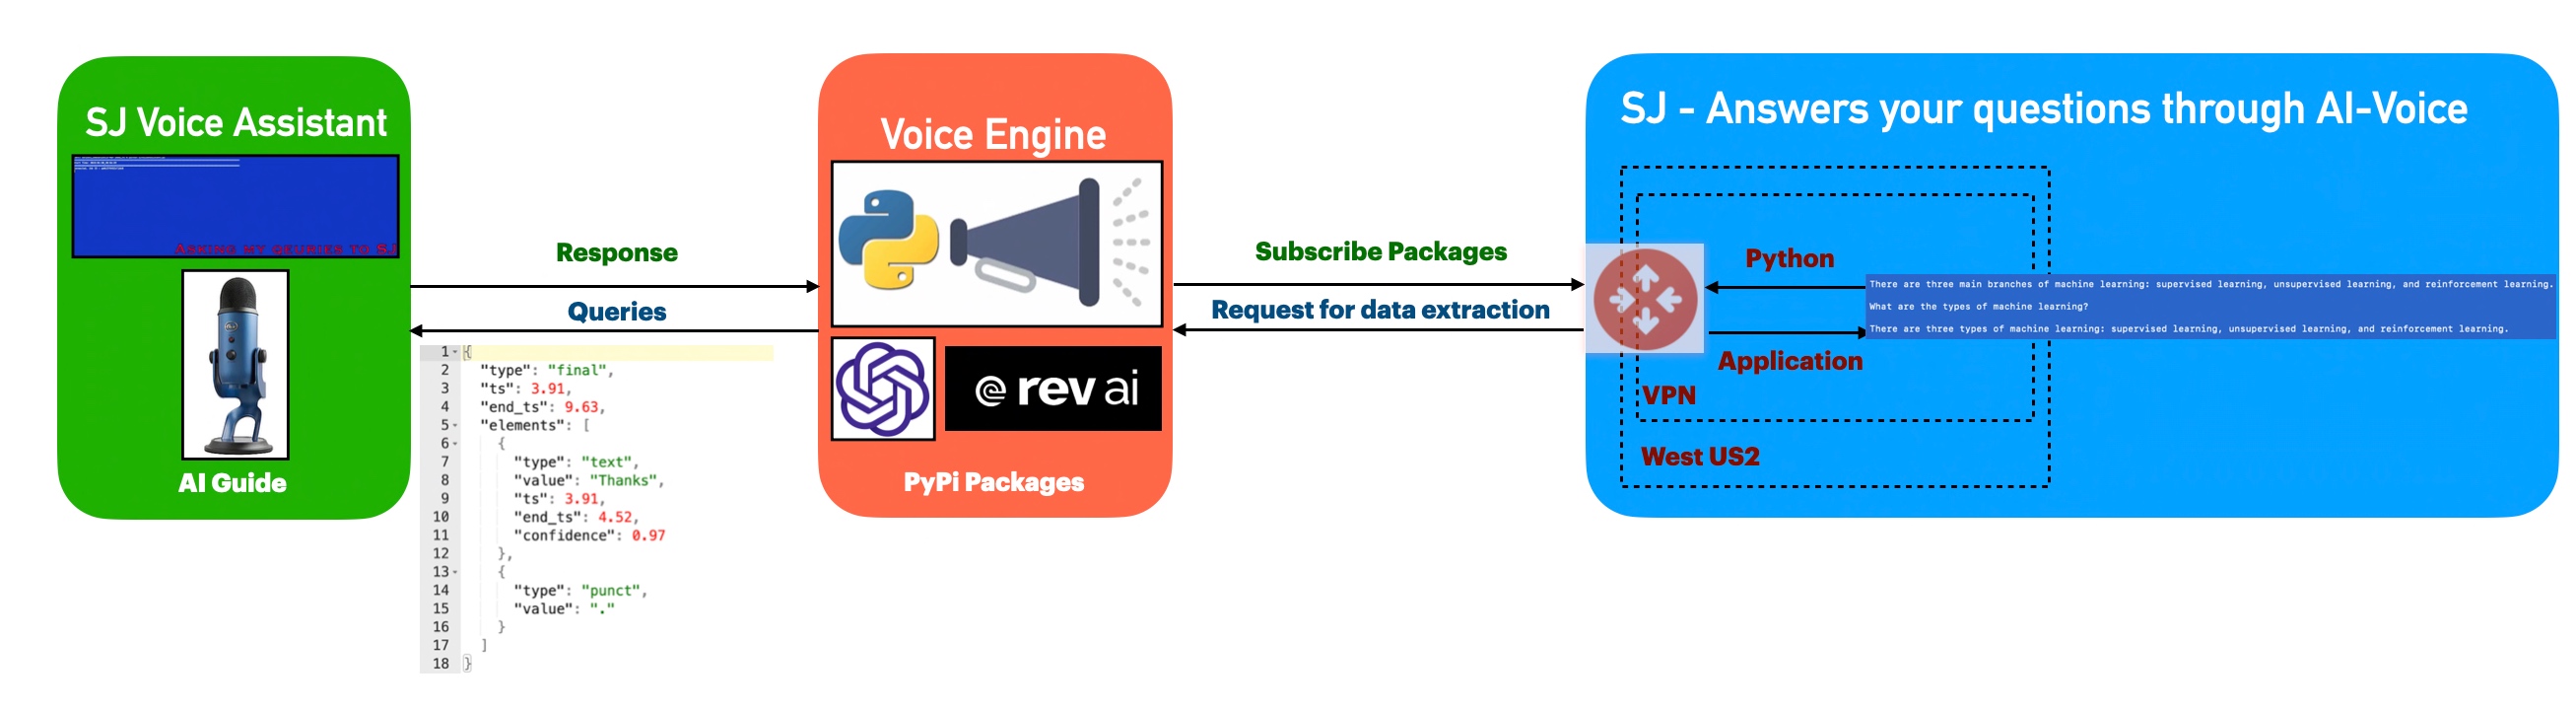
Architecture:
Let us understand the flow of events –
The application first invokes the API to capture the audio spoken through the audio device & then translate that into text, which is later parsed & shared as input by the openai for the response of the posted queries. Once, OpenAI shares the response, the python-based engine will take the response & using pyttsx3 to convert them to voice.
Python Packages:
Following are the python packages that are necessary to develop this brilliant use case –
Let us now understand the code. For this use case, we will only discuss three python scripts. However, we need more than these three. However, we have already discussed them in some of the early posts. Hence, we will skip them here.
clsConfigClient.py (Main configuration file)
This file contains hidden or bidirectional Unicode text that may be interpreted or compiled differently than what appears below. To review, open the file in an editor that reveals hidden Unicode characters. Learn more about bidirectional Unicode characters
Note that, all the API-key are not real. You need to generate your own key.
clsText2Voice.py (The python script that will convert text to voice)
This file contains hidden or bidirectional Unicode text that may be interpreted or compiled differently than what appears below. To review, open the file in an editor that reveals hidden Unicode characters. Learn more about bidirectional Unicode characters
The code is a function that generates speech audio from a given string using the Pyttsx3 library in Python. The function sets the speech rate and pitch using the “speedSpeech” and “speedPitch” properties of the calling object, initializes the Pyttsx3 engine, sets the speech rate and pitch on the engine, speaks the given string, and waits for the speech to finish. The function returns 0 after the speech is finished.
clsChatEngine.py (This python script will invoke the ChatGPT OpenAI class to initiate the response of the queries in python.)
This file contains hidden or bidirectional Unicode text that may be interpreted or compiled differently than what appears below. To review, open the file in an editor that reveals hidden Unicode characters. Learn more about bidirectional Unicode characters
The code is a function that uses OpenAI’s ChatGPT model to generate text based on a given prompt text. The function takes the text to be completed as input and uses an API key stored in the OPENAI_API_KEY property of the calling object to request OpenAI’s API. If the request is successful, the function returns the top completion generated by the model, as stored in the text field of the first item in the choices list of the API response.
The function includes error handling for IOError and Exception. If an IOError occurs, the function checks if the error number is errno.EPIPE and, if it is, returns without doing anything. If an Exception occurs, the function converts the error message to a string and prints it, then returns the string.
clsVoice2Text.py (This python script will invoke the Rev-AI class to initiate the transformation of audio into the text.)
This file contains hidden or bidirectional Unicode text that may be interpreted or compiled differently than what appears below. To review, open the file in an editor that reveals hidden Unicode characters. Learn more about bidirectional Unicode characters
The code is a python function called processVoice() that processes a user’s voice input using the Rev.AI API. The function takes in one argument, “var,” which is not used in the code.
Let us understand the code –
First, the function sets several variables, including the Rev.AI API access token, the sample rate, and the chunk size for the audio input.
Then, it creates a media configuration object for raw microphone input.
A RevAiStreamingClient object is created using the access token and the media configuration.
The code opens the microphone input using a statement and the microphone stream class.
Within the statement, the code starts the server connection and a thread that sends microphone audio to the server.
The code then iterates through the responses from the server, normalizing the JSON response and storing the values in a pandas data-frame.
If the “confidence” column exists in the data-frame, the code joins all the values to form the final text and raises an exception.
If there is an exception, the WebSocket connection is ended, and the final text is returned.
If there is any error, the WebSocket connection is also ended, and an empty string or the error message is returned.
clsMicrophoneStream.py (This python script invoke the rev_ai template to capture the chunk voice data & stream it to the service for text translation & return the response to app.)
This file contains hidden or bidirectional Unicode text that may be interpreted or compiled differently than what appears below. To review, open the file in an editor that reveals hidden Unicode characters. Learn more about bidirectional Unicode characters
This code is a part of a context manager class (clsMicrophoneStream) and implements the __enter__ method of the class. The method sets up a PyAudio object and opens an audio stream using the PyAudio object. The audio stream is configured to have the following properties:
Format: 16-bit integer (paInt16)
Channels: 1 (mono)
Rate: The rate specified in the instance of the ms.clsMicrophoneStream class.
Input: True, meaning the audio stream is an input stream, not an output stream.
Frames per buffer: The chunk specified in the instance of the ms.clsMicrophoneStream class.
Stream callback: The method self._fill_buffer will be called when the buffer needs more data.
The self.closed attribute is set to False to indicate that the stream is open. The method returns the instance of the class (self).
The exit method implements the “exit” behavior of a Python context manager. It is automatically called when the context manager is exited using the statement.
The method stops and closes the audio stream, sets the closed attribute to True, and places None in the buffer. The terminate method of the PyAudio interface is then called to release any resources used by the audio stream.
The _fill_buffer method is a callback function that runs asynchronously to continuously collect data from the audio stream and add it to the buffer.
The _fill_buffer method takes four arguments:
in_data: the raw audio data collected from the audio stream.
frame_count: the number of frames of audio data that was collected.
time_info: information about the timing of the audio data.
status_flags: flags that indicate the status of the audio stream.
The method adds the collected in_data to the buffer using the put method of the buffer object. It returns a tuple of None and pyaudio.paContinue to indicate that the audio stream should continue.
defgenerator(self):whilenotself.closed: ###################################################################### ### Useablockingget() toensurethere's at least one chunk of #### ### data,andstopiterationifthechunkisNone,indicatingthe #### ### endoftheaudiostream. #### ######################################################################chunk=self._buff.get()ifchunkis None:returndata= [chunk] ########################################################## ### Nowconsumewhateverotherdata's still buffered. #### ##########################################################while True:try:chunk=self._buff.get(block=False)ifchunkis None:returndata.append(chunk)exceptqueue.Empty:breakyieldb''.join(data)
The logic of the code “def generator(self):” is as follows:
The function generator is an infinite loop that runs until self.closed is True. Within the loop, it uses a blocking get() method of the buffer object (self._buff) to retrieve a chunk of audio data. If the retrieved chunk is None, it means the end of the audio stream has been reached, and the function returns.
If the retrieved chunk is not None, it appends it to the data list. The function then enters another inner loop that continues to retrieve chunks from the buffer using the non-blocking get() method until there are no more chunks left. Finally, the function yields the concatenated chunks of data as a single-byte string.
SJVoiceAssistant.py (Main calling python script)
This file contains hidden or bidirectional Unicode text that may be interpreted or compiled differently than what appears below. To review, open the file in an editor that reveals hidden Unicode characters. Learn more about bidirectional Unicode characters
defmain():try:spFlag=Truevar=datetime.datetime.now().strftime("%Y-%m-%d_%H-%M-%S")print('*'*120)print('Start Time: '+str(var))print('*'*120)exitComment='THANKS.'while True:try:finalText=''ifspFlag== True:finalText=x4.processVoice(var)else:passval=finalText.upper().strip()print('Main Return: ',val)print('Exit Call: ',exitComment)print('Length of Main Return: ',len(val))print('Length of Exit Call: ',len(exitComment))ifval== exitComment:breakeliffinalText=='':spFlag=Trueelse:print('spFlag::',spFlag)print('Inside: ',finalText)resVal=x2.findFromSJ(finalText)print('ChatGPT Response:: ')print(resVal)resAud=x3.getAudio(resVal)spFlag=FalseexceptExceptionas e:passvar1=datetime.datetime.now().strftime("%Y-%m-%d_%H-%M-%S")print('*'*120)print('End Time: '+str(var1))print('SJ Voice Assistant exited successfully!')print('*'*120)exceptExceptionas e:x=str(e)print('Error: ',x)
The code is a Python script that implements a voice-based chatbot (likely named “SJ Voice Assistant”). The code performs the following operations:
Initialize the string “exitComment” to “THANKS.” and set the “spFlag” to True.
Start an infinite loop until a specific condition breaks the loop.
In the loop, try to process the input voice with a function called “processVoice()” from an object “x4”. Store the result in “finalText.”
Convert “finalText” to upper case, remove leading/trailing whitespaces, and store it in “val.” Print “Main Return” and “Exit Call” with their length.
If “val” equals “exitComment,” break the loop. Suppose “finalText” is an empty string; set “spFlag” to True. Otherwise, perform further processing: a. Call the function “findFromSJ()” from an object “x2” with the input “finalText.” Store the result in “resVal.” b. Call the function “getAudio()” from an object “x3” with the input “resVal.” Store the result in “resAud.” Set “spFlag” to False.
If an exception occurs, catch it and pass (do nothing).
Finally the application will exit by displaying the following text – “SJ Voice Assistant exited successfully!”
If an exception occurs outside the loop, catch it and print the error message.
So, finally, we’ve done it.
I know that this post is relatively bigger than my earlier post. But, I think, you can get all the details once you go through it.
You will get the complete codebase in the following GitHub link.
I’ll bring some more exciting topics in the coming days from the Python verse. Please share & subscribe to my post & let me know your feedback.
Till then, Happy Avenging! 🙂
Note: All the data & scenarios posted here are representational data & scenarios & available over the internet & for educational purposes only. Some of the images (except my photo) we’ve used are available over the net. We don’t claim ownership of these images. There is always room for improvement & especially in the prediction quality.


You must be logged in to post a comment.