As we discover in our previous post about the Sarvam AI basic capabilities & a glimpse of code review. Today, we’ll finish the rest of the part & some of the matrices comparing against other popular LLMs.
Before that, you can refer to the previous post for a recap, which is available here.
Also, we’re providing the demo here –
Now, let us jump into the rest of the code –
Code:
clsSarvamAI.py (This script will capture the audio input in Indic languages & then provide an LLM response in the form of audio in Indic languages. In this post, we’ll discuss part of the code. In the next part, we’ll be discussing the next important methods. Note that we’re only going to discuss a few important functions here.)
def createWavFile(self, audio, output_filename="output.wav", target_sample_rate=16000):
      try:
          # Get the raw audio data as bytes
          audio_data = audio.get_raw_data()

          # Get the original sample rate
          original_sample_rate = audio.sample_rate

          # Open the output file in write mode
          with wave.open(output_filename, 'wb') as wf:
              # Set parameters: nchannels, sampwidth, framerate, nframes, comptype, compname
              wf.setnchannels(1)  # Assuming mono audio
              wf.setsampwidth(2)  # 16-bit audio (int16)
              wf.setframerate(original_sample_rate)

              # Write audio data in chunks
              chunk_size = 1024 * 10  # Chunk size (adjust based on memory constraints)
              for i in range(0, len(audio_data), chunk_size):
                  wf.writeframes(audio_data[i:i+chunk_size])

          # Log the current timestamp
          var = datetime.datetime.now().strftime("%Y-%m-%d_%H-%M-%S")
          print('Audio Time: ', str(var))

          return 0

      except Exception as e:
          print('Error: <Wav File Creation>: ', str(e))
          return 1
createWavFile:
Purpose:
This method saves recorded audio data into a WAV file format.
What it Does:
- Takes raw audio data and converts it into bytes.
- Gets the original sample rate of the audio.
- Opens a new WAV file in write mode.
- Sets the parameters for the audio file (like the number of channels, sample width, and frame rate).
- Writes the audio data into the file in small chunks to manage memory usage.
- Logs the current time to keep track of when the audio was saved.
- Returns 0 on success or 1 if there was an error.
The “createWavFile” method takes the recorded audio and saves it as a WAV file on your computer. It converts the audio into bytes and writes them into small file parts. If something goes wrong, it prints an error message.
def chunkBengaliResponse(self, text, max_length=500):
      try:
          chunks = []
          current_chunk = ""

          # Use regex to split on sentence-ending punctuation
          sentences = re.split(r'(।|\?|!)', text)

          for i in range(0, len(sentences), 2):
              sentence = sentences[i] + (sentences[i+1] if i+1 < len(sentences) else '')

              if len(current_chunk) + len(sentence) <= max_length:
                  current_chunk += sentence
              else:
                  if current_chunk:
                      chunks.append(current_chunk.strip())
                  current_chunk = sentence

          if current_chunk:
              chunks.append(current_chunk.strip())

          return chunks
      except Exception as e:
          x = str(e)
          print('Error: <<Chunking Bengali Response>>: ', x)

return ''chunkBengaliResponse:
Purpose:
This method breaks down a large piece of text (in Bengali) into smaller, manageable chunks.
What it Does:
- Initializes an empty list to store the chunks of text.
- It uses a regular expression to split the text based on punctuation marks like full stops (।), question marks (?), and exclamation points (!).
- Iterates through the split sentences to form chunks that do not exceed a specified maximum length (max_length).
- Adds each chunk to the list until the entire text is processed.
- Returns the list of chunks or an empty string if an error occurs.
The chunkBengaliResponse method takes a long Bengali text and splits it into smaller, easier-to-handle parts. It uses punctuation marks to determine where to split. If there’s a problem while splitting, it prints an error message.
def playWav(self, audio_data):
      try:
          # Create a wav file object from the audio data
          WavFile = wave.open(io.BytesIO(audio_data), 'rb')

          # Extract audio parameters
          channels = WavFile.getnchannels()
          sample_width = WavFile.getsampwidth()
          framerate = WavFile.getframerate()
          n_frames = WavFile.getnframes()

          # Read the audio data
          audio = WavFile.readframes(n_frames)
          WavFile.close()

          # Convert audio data to numpy array
          dtype_map = {1: np.int8, 2: np.int16, 3: np.int32, 4: np.int32}
          audio_np = np.frombuffer(audio, dtype=dtype_map[sample_width])

          # Reshape audio if stereo
          if channels == 2:
              audio_np = audio_np.reshape(-1, 2)

          # Play the audio
          sd.play(audio_np, framerate)
          sd.wait()

          return 0
      except Exception as e:
          x = str(e)
          print('Error: <<Playing the Wav>>: ', x)

          return 1
playWav:
Purpose:
This method plays audio data stored in a WAV file format.
What it Does:
- Reads the audio data from a WAV file object.
- Extracts parameters like the number of channels, sample width, and frame rate.
- Converts the audio data into a format that the sound device can process.
- If the audio is stereo (two channels), it reshapes the data for playback.
- Plays the audio through the speakers.
- Returns 0 on success or 1 if there was an error.
The playWav method takes audio data from a WAV file and plays it through your computer’s speakers. It reads the data and converts it into a format your speakers can understand. If there’s an issue playing the audio, it prints an error message.
  def audioPlayerWorker(self, queue):
      try:
          while True:
              var = datetime.datetime.now().strftime("%Y-%m-%d_%H-%M-%S")
              print('Response Audio Time: ', str(var))
              audio_bytes = queue.get()
              if audio_bytes is None:
                  break
              self.playWav(audio_bytes)
              queue.task_done()

          return 0
      except Exception as e:
          x = str(e)
          print('Error: <<Audio Player Worker>>: ', x)

          return 1
audioPlayerWorker:
Purpose:
This method continuously plays audio from a queue until there is no more audio to play.
What it Does:
- It enters an infinite loop to keep checking for audio data in the queue.
- Retrieves audio data from the queue and plays it using the “playWav”-method.
- Logs the current time each time an audio response is played.
- It breaks the loop if it encounters a None value, indicating no more audio to play.
- Returns 0 on success or 1 if there was an error.
The audioPlayerWorker method keeps checking a queue for new audio to play. It plays each piece of audio as it comes in and stops when there’s no more audio. If there’s an error during playback, it prints an error message.
  async def processChunk(self, chText, url_3, headers):
      try:
          sarvamAPIKey = self.sarvamAPIKey
          model_1 = self.model_1
          langCode_1 = self.langCode_1
          speakerName = self.speakerName

          print()
          print('Chunk Response: ')
          vText = chText.replace('*','').replace(':',' , ')
          print(vText)

          payload_3 = {
              "inputs": [vText],
              "target_language_code": langCode_1,
              "speaker": speakerName,
              "pitch": 0.15,
              "pace": 0.95,
              "loudness": 2.1,
              "speech_sample_rate": 16000,
              "enable_preprocessing": True,
              "model": model_1
          }
          response_3 = requests.request("POST", url_3, json=payload_3, headers=headers)
          audio_data = response_3.text
          data = json.loads(audio_data)
          byte_data = data['audios'][0]
          audio_bytes = base64.b64decode(byte_data)

          return audio_bytes
      except Exception as e:
          x = str(e)
          print('Error: <<Process Chunk>>: ', x)
          audio_bytes = base64.b64decode('')

          return audio_bytes
processChunk:
Purpose:
This asynchronous method processes a chunk of text to generate audio using an external API.
What it Does:
- Cleans up the text chunk by removing unwanted characters.
- Prepares a payload with the cleaned text and other parameters required for text-to-speech conversion.
- Sends a POST request to an external API to generate audio from the text.
- Decodes the audio data received from the API (in base64 format) into raw audio bytes.
- Returns the audio bytes or an empty byte string if there is an error.
The processChunk method takes a text, sends it to an external service to be converted into speech, and returns the audio data. If something goes wrong, it prints an error message.
  async def processAudio(self, audio):
      try:
          model_2 = self.model_2
          model_3 = self.model_3
          url_1 = self.url_1
          url_2 = self.url_2
          url_3 = self.url_3
          sarvamAPIKey = self.sarvamAPIKey
          audioFile = self.audioFile
          WavFile = self.WavFile
          langCode_1 = self.langCode_1
          langCode_2 = self.langCode_2
          speakerGender = self.speakerGender

          headers = {
              "api-subscription-key": sarvamAPIKey
          }

          audio_queue = Queue()
          data = {
              "model": model_2,
              "prompt": templateVal_1
          }
          files = {
              "file": (audioFile, open(WavFile, "rb"), "audio/wav")
          }

          response_1 = requests.post(url_1, headers=headers, data=data, files=files)
          tempDert = json.loads(response_1.text)
          regionalT = tempDert['transcript']
          langCd = tempDert['language_code']
          statusCd = response_1.status_code
          payload_2 = {
              "input": regionalT,
              "source_language_code": langCode_2,
              "target_language_code": langCode_1,
              "speaker_gender": speakerGender,
              "mode": "formal",
              "model": model_3,
              "enable_preprocessing": True
          }

          response_2 = requests.request("POST", url_2, json=payload_2, headers=headers)
          regionalT_2 = response_2.text
          data_ = json.loads(regionalT_2)
          regionalText = data_['translated_text']
          chunked_response = self.chunkBengaliResponse(regionalText)

          audio_thread = Thread(target=self.audioPlayerWorker, args=(audio_queue,))
          audio_thread.start()

          for chText in chunked_response:
              audio_bytes = await self.processChunk(chText, url_3, headers)
              audio_queue.put(audio_bytes)

          audio_queue.join()
          audio_queue.put(None)
          audio_thread.join()

          var = datetime.datetime.now().strftime("%Y-%m-%d_%H-%M-%S")
          print('Retrieval Time: ', str(var))

          return 0

      except Exception as e:
          x = str(e)
          print('Error: <<Processing Audio>>: ', x)

          return 1
processAudio:
Purpose:
This asynchronous method handles the complete audio processing workflow, including speech recognition, translation, and audio playback.
What it Does:
- Initializes various configurations and headers required for processing.
- Sends the recorded audio to an API to get the transcript and detected language.
- Translates the transcript into another language using another API.
- Splits the translated text into smaller chunks using the chunkBengaliResponse method.
- Starts an audio playback thread to play each processed audio chunk.
- Sends each text chunk to the processChunk method to convert to speech and adds the audio data to the queue for playback.
- Waits for all audio chunks to be processed and played before finishing.
- Logs the current time when the process is complete.
- Returns 0 on success or 1 if there was an error.
The “processAudio”-method takes recorded audio, recognizes what was said, translates it into another language, splits the translated text into parts, converts each part into speech, and plays it back. It uses different services to do this; if there’s a problem at any step, it prints an error message.
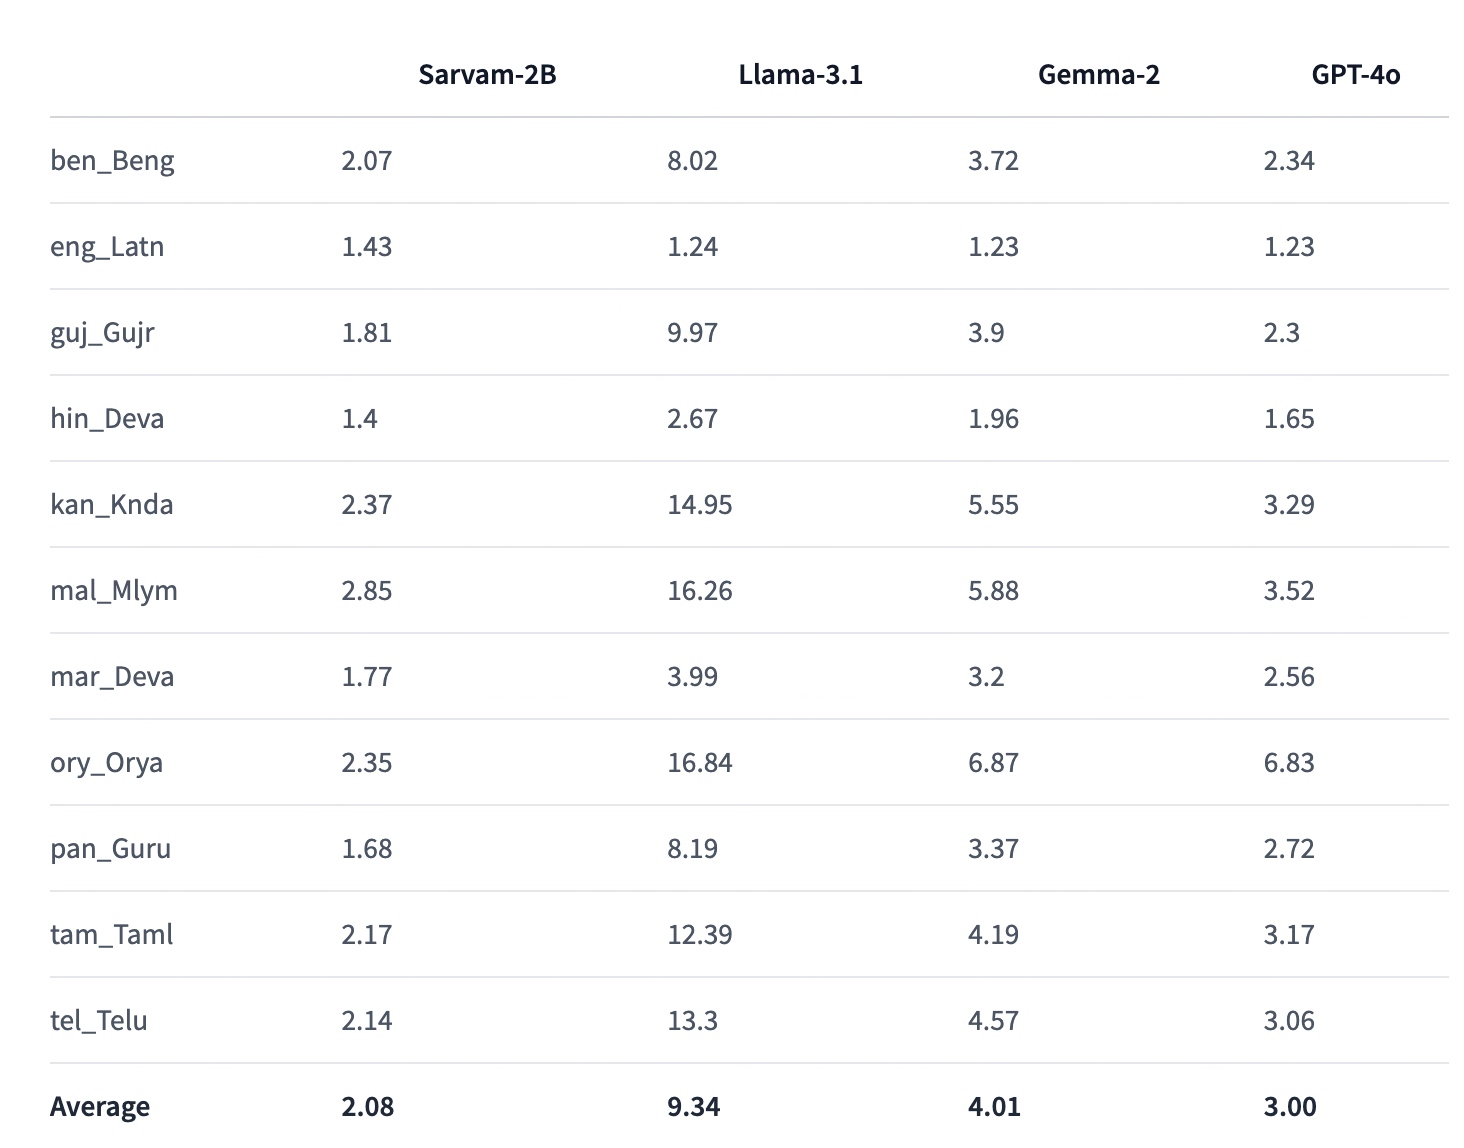
And, here is the performance stats (Captured from Sarvam AI website) –
So, finally, we’ve done it. You can view the complete code in this GitHub link.
I’ll bring some more exciting topics in the coming days from the Python verse.
Till then, Happy Avenging! 🙂
Note: All the data & scenarios posted here are representational data & scenarios & available over the internet & for educational purposes only. There is always room for improvement in this kind of model & the solution associated with it. I’ve shown the basic ways to achieve the same for educational purposes only.
Thanks for sharing this valuable info! I’m sure it will be a fantastic help to many people. Continue the good work!
The text discusses various methods in a Python script that handle audio processing, including capturing audio in Indic languages, chunking text in Bengali, playing WAV files, and processing audio using external APIs. The script involves converting audio to bytes, splitting text into manageable chunks, playing audio through speakers, and converting text to speech. Additionally, it details the complete audio processing workflow and provides some performance statistics. The script aims to demonstrate educational purposes and is available on GitHub for further inspection.
Wayne
Thanks for providing your feedback!