
Hi Guys!
Today, I’ll be demonstrating a primary way to improve the quality of old video using the Open-CV package. This post is the first of such a series of Open-CV that I’ll be posting in the coming years.
Let me tell you one thing – there are many brilliant papers on this, especially image enhancement with OpenCV, Pillow & many more valuable libraries. I’ll share some of the fascinating links later at the end of my blog.
What are we planning here?
We’ll de-noise the old video.
Slightly bright the video.
What kind of video should be the ideal candidate for this test?
Any video with more noise with low light will be an ideal candidate for this use case.
Why don’t we see the demo?
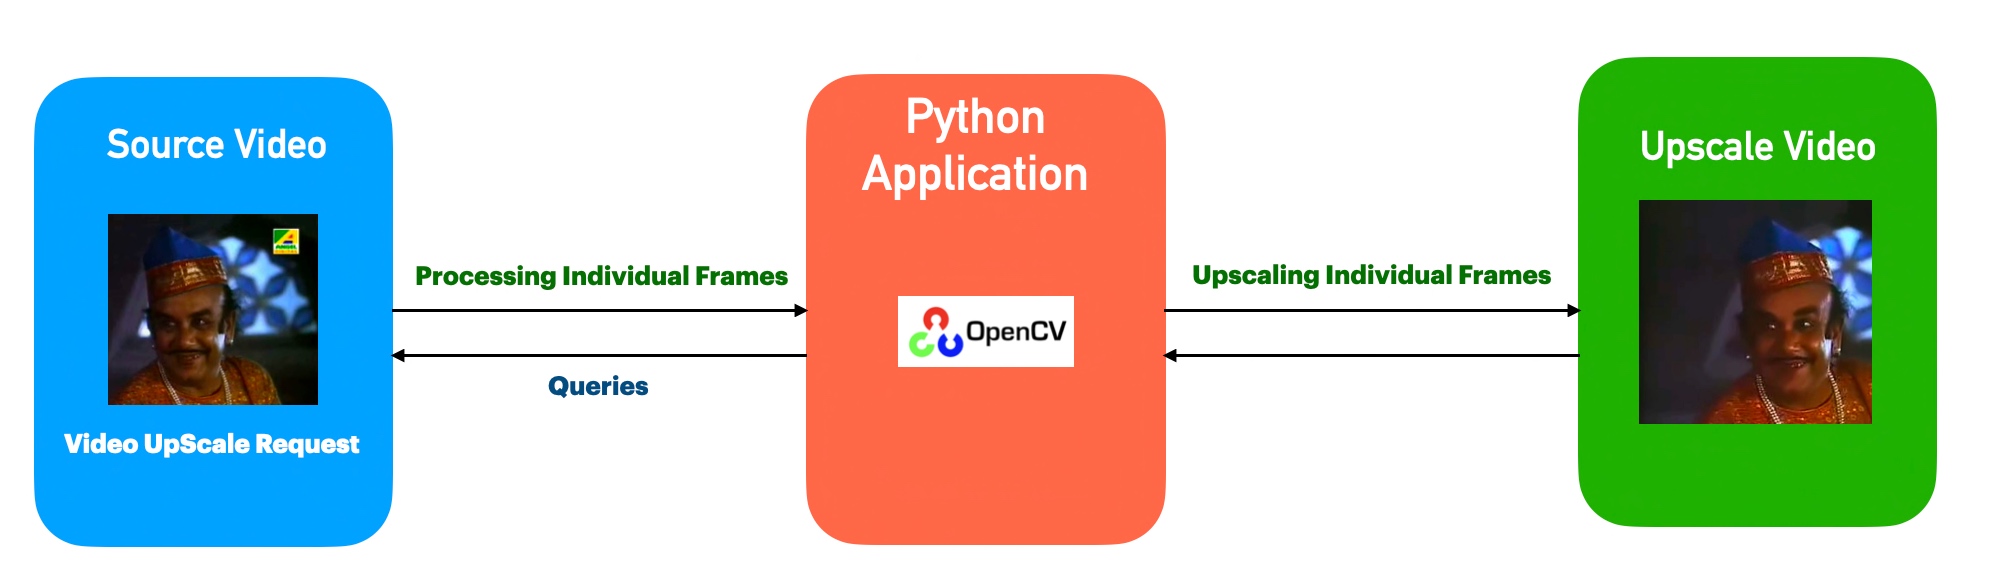
Architecture:
Let us find the basic architecture –
Code:
Let us explore the the key code base as follows –
- clsVideo2Frame.py (This will convert the supplied video into multiple frames. It will also extract the audio from the source file, which will later merge with the enhanced frames.)
This file contains hidden or bidirectional Unicode text that may be interpreted or compiled differently than what appears below. To review, open the file in an editor that reveals hidden Unicode characters.
Learn more about bidirectional Unicode characters
| ############################################## | |
| #### Updated By: SATYAKI DE #### | |
| #### Updated On: 12-Nov-2021 #### | |
| #### #### | |
| #### Objective: Consuming Streaming data #### | |
| #### from Ably channels & captured IoT #### | |
| #### events from the simulator & publish #### | |
| #### them in Kivy-I/OS App through #### | |
| #### measured KPIs. #### | |
| #### #### | |
| ############################################## | |
| import av | |
| import os | |
| import platform as pl | |
| import subprocess | |
| import sys | |
| from clsConfig import clsConfig as cf | |
| os_det = pl.system() | |
| if os_det == "Windows": | |
| sep = '\\' | |
| else: | |
| sep = '/' | |
| class clsVideo2Frame: | |
| def __init__(self): | |
| self.fileNm = str(cf.conf['FILE_NAME']) | |
| self.base_path = str(cf.conf['INIT_PATH']) | |
| def convert_video_to_audio_ffmpeg(self, video_file, output_ext="mp3"): | |
| try: | |
| """Converts video to audio directly using `ffmpeg` command | |
| with the help of subprocess module""" | |
| filename, ext = os.path.splitext(video_file) | |
| subprocess.call(["ffmpeg", "-y", "-i", video_file, f"{filename}.{output_ext}"], | |
| stdout=subprocess.DEVNULL, | |
| stderr=subprocess.STDOUT) | |
| return 0 | |
| except Exception as e: | |
| x = str(e) | |
| print('Error: ', x) | |
| return 1 | |
| def genFrame(self, dInd, var): | |
| try: | |
| base_path = self.base_path | |
| fileNm = self.fileNm | |
| path_to_src_video = base_path + sep + 'Source' + sep + fileNm + '.mp4' | |
| temp_path = base_path + sep + 'Temp' + sep | |
| print('Path: ', path_to_src_video) | |
| x = self.convert_video_to_audio_ffmpeg(path_to_src_video) | |
| if x == 0: | |
| print('Successfully Audio extracted from the source file!') | |
| else: | |
| print('Failed to extract the source audio!') | |
| container = av.open(path_to_src_video) | |
| for frame in container.decode(video=0): | |
| frame.to_image().save(temp_path + 'frame-%04d.jpg' % frame.index) | |
| print('Successfully Converted to Frames!') | |
| return 0 | |
| except Exception as e: | |
| x = str(e) | |
| print('Error: ', x) | |
| return 1 |
Let us understand some of the key snippet below –
    def convert_video_to_audio_ffmpeg(self, video_file, output_ext="mp3"):
        try:
            """Converts video to audio directly using `ffmpeg` command
            with the help of subprocess module"""
            filename, ext = os.path.splitext(video_file)
            subprocess.call(["ffmpeg", "-y", "-i", video_file, f"{filename}.{output_ext}"],
                            stdout=subprocess.DEVNULL,
                            stderr=subprocess.STDOUT)

            return 0
        except Exception as e:
            x = str(e)
            print('Error: ', x)

            return 1
In the above step, using the FFmpeg package python application is extracting the source audio & storing that into the source directory itself.
for frame in container.decode(video=0):
    frame.to_image().save(temp_path + 'frame-%04d.jpg' % frame.index)
From the above snippet, we can say that the application is splitting the videos into multiple frames & storing them into the temp directory, which will require later enhancement by another class.
2. clsFrameEnhance.py (This will enhance the frames as per your logic & upscale them with the parameters provided by you.)
This file contains hidden or bidirectional Unicode text that may be interpreted or compiled differently than what appears below. To review, open the file in an editor that reveals hidden Unicode characters.
Learn more about bidirectional Unicode characters
| ############################################## | |
| #### Updated By: SATYAKI DE #### | |
| #### Updated On: 12-Nov-2021 #### | |
| #### #### | |
| #### Objective: This python script will #### | |
| #### enhance the old existing frame by #### | |
| #### applying machine-learning algorithm #### | |
| #### to improve their quality one at a #### | |
| #### time. #### | |
| #### #### | |
| ############################################## | |
| import av | |
| import os | |
| import platform as pl | |
| import numpy as np | |
| import cv2 | |
| import glob | |
| from PIL import Image | |
| from numpy import asarray | |
| import numpy as np | |
| from clsConfig import clsConfig as cf | |
| import sys | |
| # Global Variable | |
| os_det = pl.system() | |
| if os_det == "Windows": | |
| sep = '\\' | |
| else: | |
| sep = '/' | |
| class clsFrameEnhance: | |
| def __init__(self): | |
| self.fileNm = str(cf.conf['FILE_NAME']) | |
| self.base_path = str(cf.conf['INIT_PATH']) | |
| def show(self, enhanced_path, fileNameOnly, buff): | |
| cv2.imwrite(enhanced_path + fileNameOnly, buff) | |
| def unsharp_mask(self, image, kernel_size=(3, 3), sigma=1.0, amount=2.0, threshold=2): | |
| """Return a sharpened version of the image, using an unsharp mask.""" | |
| blurred = cv2.GaussianBlur(image, kernel_size, sigma) | |
| sharpened = float(amount + 1) * image – float(amount) * blurred | |
| sharpened = np.maximum(sharpened, np.zeros(sharpened.shape)) | |
| sharpened = np.minimum(sharpened, 255 * np.ones(sharpened.shape)) | |
| sharpened = sharpened.round().astype(np.uint8) | |
| if threshold > 0: | |
| low_contrast_mask = np.absolute(image – blurred) < threshold | |
| np.copyto(sharpened, image, where=low_contrast_mask) | |
| return sharpened | |
| def doEnhance(self, dInd, var): | |
| try: | |
| base_path = self.base_path | |
| temp_path = base_path + sep + 'Temp' + sep | |
| enhanced_path = base_path + sep + 'Enhanced' + sep | |
| for filename in sorted(glob.glob(temp_path + '*.jpg')): | |
| print('Full File Name: ', str(filename)) | |
| img = cv2.imread(filename) | |
| if img is None: | |
| print('Failed to load image file:', filename) | |
| sys.exit(1) | |
| sharpened_image = self.unsharp_mask(img) | |
| img = np.asarray(sharpened_image) | |
| dst = cv2.fastNlMeansDenoising(img,None,7,7,21) | |
| Inten_matrix = np.ones(dst.shape, dtype='uint8')*20 | |
| bright_img = cv2.add(dst, Inten_matrix) | |
| head, tail = os.path.split(filename) | |
| self.show(enhanced_path, tail, bright_img) | |
| # Remove Files | |
| os.remove(filename) | |
| print('Successfully Enhanced the Frames!') | |
| return 0 | |
| except Exception as e: | |
| x = str(e) | |
| print('Error: ', x) | |
| return 1 |
Let us understand some of the key snippet below –
    def unsharp_mask(self, image, kernel_size=(3, 3), sigma=1.0, amount=2.0, threshold=2):
        """Return a sharpened version of the image, using an unsharp mask."""
        blurred = cv2.GaussianBlur(image, kernel_size, sigma)
        sharpened = float(amount + 1) * image - float(amount) * blurred
        sharpened = np.maximum(sharpened, np.zeros(sharpened.shape))
        sharpened = np.minimum(sharpened, 255 * np.ones(sharpened.shape))
        sharpened = sharpened.round().astype(np.uint8)
        if threshold > 0:
            low_contrast_mask = np.absolute(image - blurred) < threshold
            np.copyto(sharpened, image, where=low_contrast_mask)
        return sharpened
This will provide the sharpen version of the image. If you want to know more about this. Please refer the following link.
img = np.asarray(sharpened_image)

dst = cv2.fastNlMeansDenoising(img,None,7,7,21)

Inten_matrix = np.ones(dst.shape, dtype='uint8')*20
bright_img = cv2.add(dst, Inten_matrix)
As you can see, the image has further enhanced with the use of de-noise & the addition of brightest pixels using Inten_matrix.
3. clsFrame2Video.py (This will combine the frames along with the audio & produce the final video.)
This file contains hidden or bidirectional Unicode text that may be interpreted or compiled differently than what appears below. To review, open the file in an editor that reveals hidden Unicode characters.
Learn more about bidirectional Unicode characters
| ############################################### | |
| #### Updated By: SATYAKI DE #### | |
| #### Updated On: 17-Dec-2021 #### | |
| #### #### | |
| #### Objective: This script will convert #### | |
| #### enhanced frames to restored better #### | |
| #### quality videos & merge it with source #### | |
| #### audio. #### | |
| #### #### | |
| ############################################### | |
| import os | |
| import platform as pl | |
| import cv2 | |
| import numpy as np | |
| import glob | |
| import re | |
| import ffmpeg | |
| from clsConfig import clsConfig as cf | |
| import logging | |
| os_det = pl.system() | |
| if os_det == "Windows": | |
| sep = '\\' | |
| else: | |
| sep = '/' | |
| class clsFrame2Video: | |
| def __init__(self): | |
| self.fileNm = str(cf.conf['FILE_NAME']) | |
| self.base_path = str(cf.conf['INIT_PATH']) | |
| def convert2Vid(self, dInd, var): | |
| try: | |
| img_array = [] | |
| fileNm = self.fileNm | |
| base_path = self.base_path | |
| enhanced_path = base_path + sep + 'Enhanced' + sep | |
| target_path = base_path + sep + 'Target' + sep | |
| path_to_src_audio = base_path + sep + 'Source' + sep + fileNm + '.mp3' | |
| files = glob.glob(enhanced_path + '*.jpg') | |
| for filename in sorted(files, key=lambda x:float(re.findall("(-\d+)",x)[0].replace('-',''))): | |
| print('Processing… ', str(filename)) | |
| img = cv2.imread(filename) | |
| height, width, layers = img.shape | |
| size = (width,height) | |
| img_array.append(img) | |
| # Deleting Frames | |
| os.remove(filename) | |
| print('Successfully Removed Old Enhanced Frames!') | |
| out = cv2.VideoWriter(target_path + 'Temp.avi',cv2.VideoWriter_fourcc(*'DIVX'), 23, size) | |
| for i in range(len(img_array)): | |
| out.write(img_array[i]) | |
| out.release() | |
| print('Temporary File generated!') | |
| Temp_Target_File = str(target_path + 'Temp.avi') | |
| print('Temporary Video File Name: ', Temp_Target_File) | |
| print('Temporary Audio File Name: ', str(path_to_src_audio)) | |
| infile1 = ffmpeg.input(Temp_Target_File) | |
| infile2 = ffmpeg.input(path_to_src_audio) | |
| ffmpeg.concat(infile1, infile2, v=1, a=1).output(target_path + fileNm + '.mp4').run() | |
| # Deleting Frames | |
| os.remove(Temp_Target_File) | |
| print('Successfully Converted to Videos!') | |
| return 0 | |
| except Exception as e: | |
| x = str(e) | |
| print('Error: ', x) | |
| return 1 |
Let’s explore the key snippets –
files = glob.glob(enhanced_path + '*.jpg')

for filename in sorted(files, key=lambda x:float(re.findall("(-\d+)",x)[0].replace('-',''))):
    print('Processing... ', str(filename))
    img = cv2.imread(filename)
    height, width, layers = img.shape
    size = (width,height)
    img_array.append(img)

    # Deleting Frames
    os.remove(filename)

print('Successfully Removed Old Enhanced Frames!')
In the above snippet, the application first stitched frames together to form a temporary video without the audio.
Temp_Target_File = str(target_path + 'Temp.avi')
print('Temporary Video File Name: ', Temp_Target_File)
print('Temporary Audio File Name: ', str(path_to_src_audio))

infile1 = ffmpeg.input(Temp_Target_File)
infile2 = ffmpeg.input(path_to_src_audio)

ffmpeg.concat(infile1, infile2, v=1, a=1).output(target_path + fileNm + '.mp4').run()


out = cv2.VideoWriter(target_path + 'Temp.avi',cv2.VideoWriter_fourcc(*'DIVX'), 23, size)
Finally, merge the audio with the video to produce the final enriched video.
4. restoreOldVideo.py (This is the main application, which will invoke all the python class.)
This file contains hidden or bidirectional Unicode text that may be interpreted or compiled differently than what appears below. To review, open the file in an editor that reveals hidden Unicode characters.
Learn more about bidirectional Unicode characters
| ############################################### | |
| #### Written By: SATYAKI DE #### | |
| #### Written On: 17-Dec-2021 #### | |
| #### Modified On 17-Dec-2021 #### | |
| #### #### | |
| #### Objective: This python script will #### | |
| #### convert the old B&W video & restore #### | |
| #### them to relatively better quality. #### | |
| ############################################### | |
| # We keep the setup code in a different class as shown below. | |
| import clsVideo2Frame as vf | |
| import clsFrameEnhance as fe | |
| import clsFrame2Video as fv | |
| from clsConfig import clsConfig as cf | |
| import datetime | |
| import logging | |
| ############################################### | |
| ### Global Section ### | |
| ############################################### | |
| # Instantiating all the three classes | |
| x1 = vf.clsVideo2Frame() | |
| x2 = fe.clsFrameEnhance() | |
| x3 = fv.clsFrame2Video() | |
| ############################################### | |
| ### End of Global Section ### | |
| ############################################### | |
| def main(): | |
| try: | |
| # Other useful variables | |
| debugInd = 'Y' | |
| var = datetime.datetime.now().strftime("%Y-%m-%d_%H-%M-%S") | |
| var1 = datetime.datetime.now() | |
| print('Start Time: ', str(var)) | |
| # End of useful variables | |
| # Initiating Log Class | |
| general_log_path = str(cf.conf['LOG_PATH']) | |
| # Enabling Logging Info | |
| logging.basicConfig(filename=general_log_path + 'restoreVideo.log', level=logging.INFO) | |
| print('Started Transformation!') | |
| # Execute all the pass | |
| r1 = x1.genFrame(debugInd, var) | |
| r2 = x2.doEnhance(debugInd, var) | |
| r3 = x3.convert2Vid(debugInd, var) | |
| if ((r1 == 0) and (r2 == 0) and (r3 == 0)): | |
| print('Successfully File Enhanced!') | |
| else: | |
| print('Failed to enhance the source file!') | |
| var2 = datetime.datetime.now() | |
| c = var2 – var1 | |
| minutes = c.total_seconds() / 60 | |
| print('Total difference in minutes: ', str(minutes)) | |
| print('End Time: ', str(var1)) | |
| except Exception as e: | |
| x = str(e) | |
| print('Error: ', x) | |
| if __name__ == "__main__": | |
| main() |
Let us understand the final script –
x1 = vf.clsVideo2Frame()
x2 = fe.clsFrameEnhance()
x3 = fv.clsFrame2Video()
The above lines will instantiate the main python class.
# Execute all the pass
r1 = x1.genFrame(debugInd, var)
r2 = x2.doEnhance(debugInd, var)
r3 = x3.convert2Vid(debugInd, var)
Invoking all the functions with parameters to perform the video upscale.
So, we’ve done it.
You will get the complete codebase in the following Github link.
I’ll bring some more exciting topic in the coming days from the Python verse. Please share & subscribe my post & let me know your feedback.
Till then, Happy Avenging!
Note: All the data & scenario posted here are representational data & scenarios & available over the internet & for educational purpose only. Some of the images (except my photo) that we’ve used are available over the net. We don’t claim the ownership of these images. There is an always room for improvement & especially the quality of video. At this moment, the enhancement class working on a serial manner. You can implement threading or multiprocessing to make it more faster.
You must be logged in to post a comment.