Hi Guys,
Today, I’ll be using another exciting installment of Computer Vision. Today, our focus will be to get a sense of visual counting. Let me explain. This post will demonstrate how to count the number of stacked-up coins using computer vision. And, we’re going to add more coins to see the number changes.
Why don’t we see the demo first before jumping into the technical details?

Isn’t it exciting?
Architecture:
Let us understand the architecture –

From the above diagram, one can notice that as raw video feed captured from a specific location at a measured distance. The python-based intelligent application will read the numbers & project on top of the video feed for human validations.
Let me share one more perspective of how you can configure this experiment with another diagram that I prepared for this post.

From the above picture, one can see that a specific distance exists between the camera & the stacked coins as that will influence the single coin width.
You can see how that changed with the following pictures –


This entire test will depend upon many factors to consider to get effective results. I provided the basic demo. However, to make it robust & dynamic, one can dynamically diagnose the distance & individual coin width before starting this project. I felt that part should be machine learning to correctly predict the particular coin width depending upon the length & number of coins stacked. I leave it to you to explore that part.
Then how does the Aruco marker comes into the picture?
Let’s read it from the primary source side –
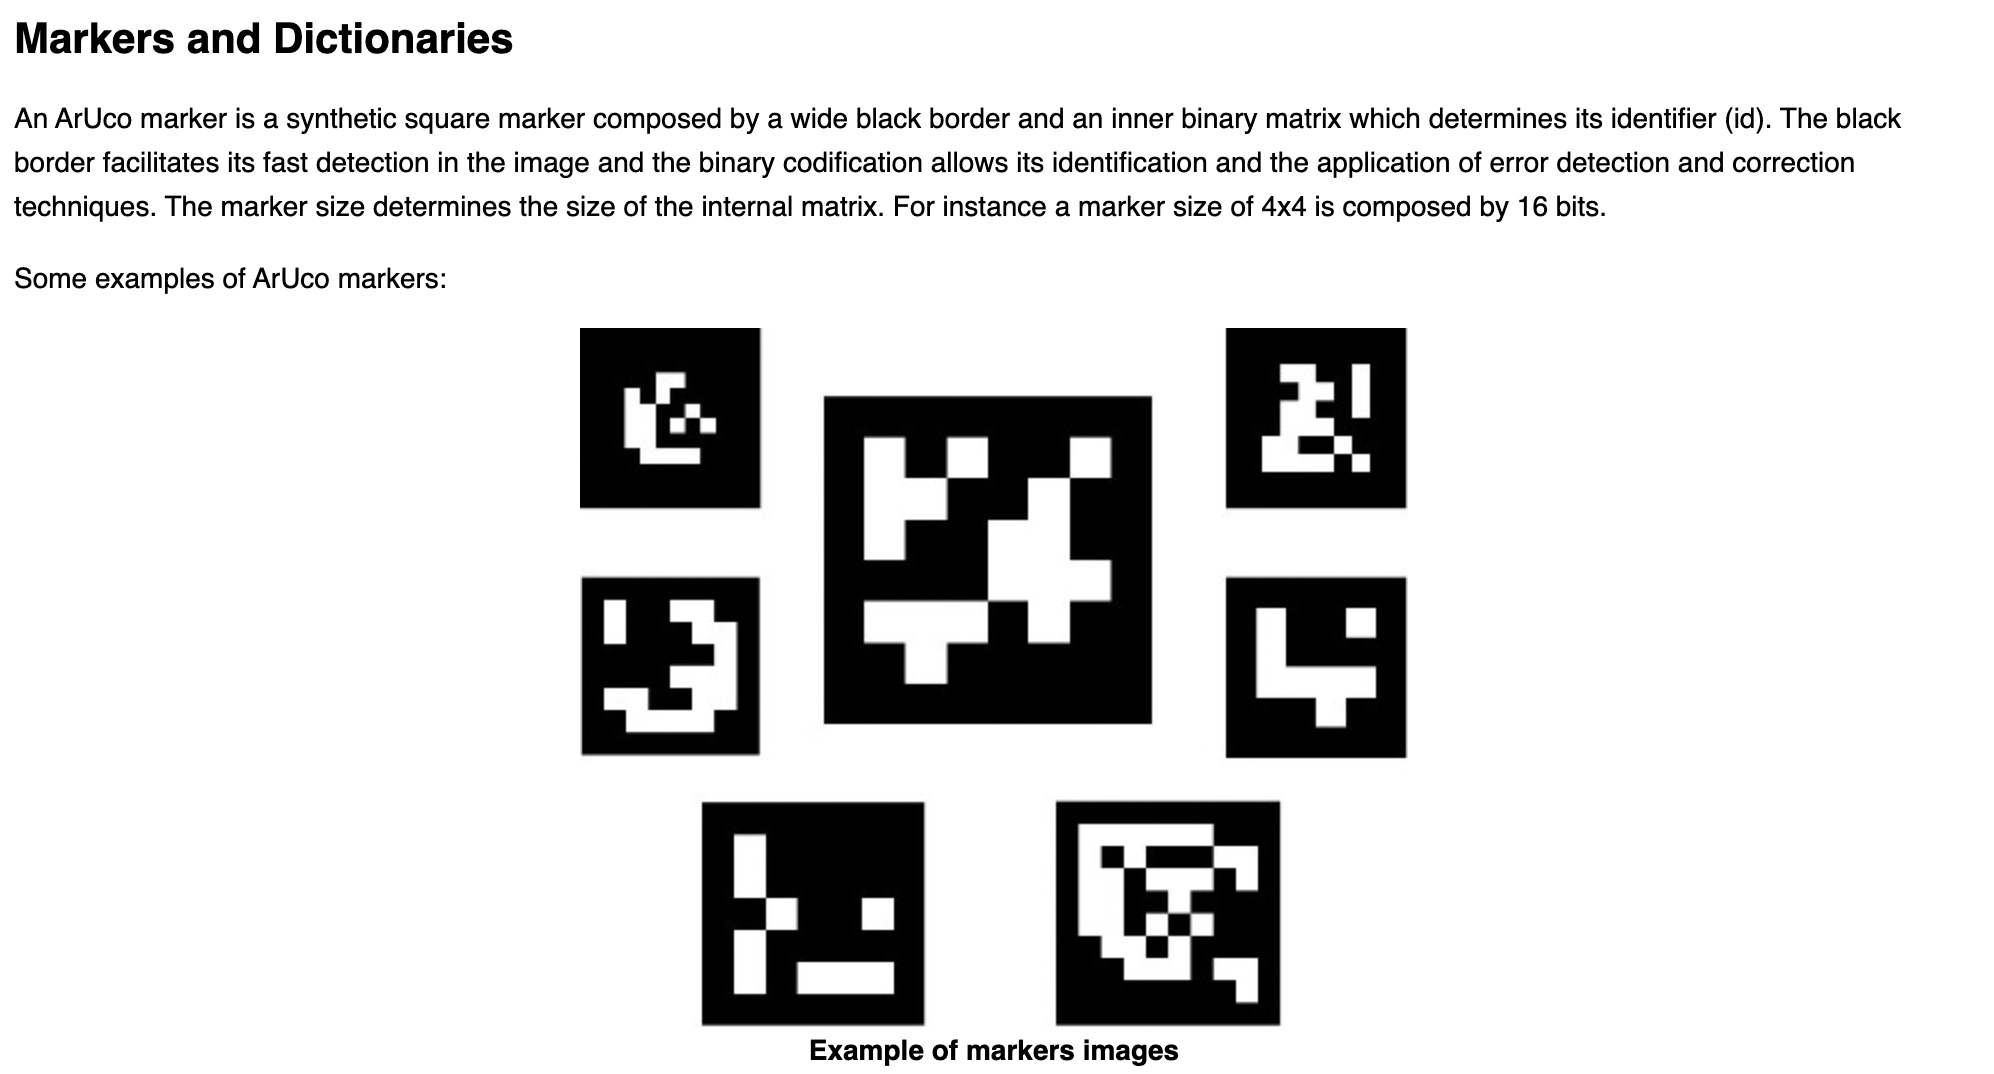
Please refer to the following link if you want to know more.
For our use case, we’ll be using the following aruco marker –

How will this help us? Because we know the width & height of it. And depending upon the placement & overall pixel area size, our application can then identify the pixel to centimeter ratio & which will enable us to predict any other objects’ height & width. Once we have that, the application will divide that by the calculated width we observed for each coin from this distance. And, then the application will be able to predict the actual counts in real-time.
How can you identify the individual width?
My easy process would be to put ten quarter dollars stacked up & then you will get the height from the Computer vision. You have to divide that height by 10 to get the individual width of the coin until you build the model to predict the correct width depending upon the distance.
CODE:
Let us understand the code now –
- clsConfig.py (Configuration file for the entire application.)
This file contains hidden or bidirectional Unicode text that may be interpreted or compiled differently than what appears below. To review, open the file in an editor that reveals hidden Unicode characters.
Learn more about bidirectional Unicode characters
| ################################################ | |
| #### Written By: SATYAKI DE #### | |
| #### Written On: 15-May-2020 #### | |
| #### Modified On: 28-Dec-2021 #### | |
| #### #### | |
| #### Objective: This script is a config #### | |
| #### file, contains all the keys for #### | |
| #### Machine-Learning & streaming dashboard.#### | |
| #### #### | |
| ################################################ | |
| import os | |
| import platform as pl | |
| class clsConfig(object): | |
| Curr_Path = os.path.dirname(os.path.realpath(__file__)) | |
| os_det = pl.system() | |
| if os_det == "Windows": | |
| sep = '\\' | |
| else: | |
| sep = '/' | |
| conf = { | |
| 'APP_ID': 1, | |
| 'ARCH_DIR': Curr_Path + sep + 'arch' + sep, | |
| 'PROFILE_PATH': Curr_Path + sep + 'profile' + sep, | |
| 'LOG_PATH': Curr_Path + sep + 'log' + sep, | |
| 'REPORT_PATH': Curr_Path + sep + 'report', | |
| 'FILE_NAME': Curr_Path + sep + 'Image' + sep + 'Orig.jpeg', | |
| 'SRC_PATH': Curr_Path + sep + 'data' + sep, | |
| 'APP_DESC_1': 'Old Video Enhancement!', | |
| 'DEBUG_IND': 'N', | |
| 'INIT_PATH': Curr_Path, | |
| 'SUBDIR': 'data', | |
| 'SEP': sep, | |
| 'COIN_DEF_HEIGHT':0.22, | |
| 'PIC_TO_CM_MAP': 15.24, | |
| 'CONTOUR_AREA': 2000 | |
| } |
'COIN_DEF_HEIGHT':0.22,
'PIC_TO_CM_MAP': 15.24,
'CONTOUR_AREA': 2000
The above entries are the important for us.
- PIC_TO_CM_MAP is the total length of the Aruco marker in centimeters involving all four sides.
- CONTOUR_AREA will change depending upon the minimum size you want to identify as part of the contour.
- COIN_DEF_HEIGHT needs to be revised as part of the previous steps explained.
- clsAutoDetector.py (This python script will detect the contour.)
This file contains hidden or bidirectional Unicode text that may be interpreted or compiled differently than what appears below. To review, open the file in an editor that reveals hidden Unicode characters.
Learn more about bidirectional Unicode characters
| ############################################### | |
| #### Written By: SATYAKI DE #### | |
| #### Written On: 17-Jan-2022 #### | |
| #### Modified On 20-Mar-2022 #### | |
| #### #### | |
| #### Objective: This python script will #### | |
| #### auto-detects the contours of an image #### | |
| #### using grayscale conversion & then #### | |
| #### share the contours details to the #### | |
| #### calling class. #### | |
| ############################################### | |
| import cv2 | |
| from clsConfig import clsConfig as cf | |
| class clsAutoDetector(): | |
| def __init__(self): | |
| self.cntArea = int(cf.conf['CONTOUR_AREA']) | |
| def detectObjects(self, frame): | |
| try: | |
| cntArea = self.cntArea | |
| # Convert Image to grayscale Image | |
| grayImage = cv2.cvtColor(frame, cv2.COLOR_BGR2GRAY) | |
| # Create a Mask with adaptive threshold | |
| maskImage = cv2.adaptiveThreshold(grayImage, 255, cv2.ADAPTIVE_THRESH_MEAN_C, cv2.THRESH_BINARY_INV, 19, 5) | |
| cv2.imshow("Masked-Image", maskImage) | |
| # Find contours | |
| conts, Oth = cv2.findContours(maskImage, cv2.RETR_EXTERNAL, cv2.CHAIN_APPROX_SIMPLE) | |
| objectsConts = [] | |
| for cnt in conts: | |
| area = cv2.contourArea(cnt) | |
| if area > cntArea: | |
| objectsConts.append(cnt) | |
| return objectsConts | |
| except Exception as e: | |
| x = str(e) | |
| print('Error: ', x) | |
| objectsConts = [] | |
| return objectsConts |
Key snippets from the above script are as follows –
# Find contours
conts, Oth = cv2.findContours(maskImage, cv2.RETR_EXTERNAL, cv2.CHAIN_APPROX_SIMPLE)

objectsConts = []

for cnt in conts:
    area = cv2.contourArea(cnt)
    if area > cntArea:
        objectsConts.append(cnt)
Depending upon the supplied contour area, this script will identify & mark the contour of every frame captured through WebCam.
- clsCountRealtime.py (This is the main class to calculate the number of stacked coins after reading using computer vision.)
This file contains hidden or bidirectional Unicode text that may be interpreted or compiled differently than what appears below. To review, open the file in an editor that reveals hidden Unicode characters.
Learn more about bidirectional Unicode characters
| ################################################## | |
| #### Written By: SATYAKI DE #### | |
| #### Written On: 17-Jan-2022 #### | |
| #### Modified On 20-Mar-2022 #### | |
| #### #### | |
| #### Objective: This python class will #### | |
| #### learn the number of coins stacks on #### | |
| #### top of another using computer vision #### | |
| #### with the help from Open-CV after #### | |
| #### manually recalibarting the initial #### | |
| #### data (Individual Coin Heights needs to #### | |
| #### adjust based on the distance of camera.) #### | |
| ################################################## | |
| import cv2 | |
| from clsAutoDetector import * | |
| import numpy as np | |
| import os | |
| import platform as pl | |
| # Custom Class | |
| from clsConfig import clsConfig as cf | |
| import clsL as cl | |
| # Initiating Log class | |
| l = cl.clsL() | |
| # Load Aruco detector | |
| arucoParams = cv2.aruco.DetectorParameters_create() | |
| arucoDict = cv2.aruco.Dictionary_get(cv2.aruco.DICT_5X5_50) | |
| # Load Object Detector | |
| detector = clsAutoDetector() | |
| class clsCountRealtime: | |
| def __init__(self): | |
| self.sep = str(cf.conf['SEP']) | |
| self.Curr_Path = str(cf.conf['INIT_PATH']) | |
| self.coinDefH = float(cf.conf['COIN_DEF_HEIGHT']) | |
| self.pics2cm = float(cf.conf['PIC_TO_CM_MAP']) | |
| def learnStats(self, debugInd, var): | |
| try: | |
| # Per Coin Default Size from the known distance_to_camera | |
| coinDefH = self.coinDefH | |
| pics2cm = self.pics2cm | |
| # Load Cap | |
| cap = cv2.VideoCapture(0) | |
| cap.set(cv2.CAP_PROP_FRAME_WIDTH, 1280) | |
| cap.set(cv2.CAP_PROP_FRAME_HEIGHT, 720) | |
| while True: | |
| success, img = cap.read() | |
| if success == False: | |
| break | |
| # Get Aruco marker | |
| imgCorners, a, b = cv2.aruco.detectMarkers(img, arucoDict, parameters=arucoParams) | |
| if imgCorners: | |
| # Draw polygon around the marker | |
| imgCornersInt = np.int0(imgCorners) | |
| cv2.polylines(img, imgCornersInt, True, (0, 255, 0), 5) | |
| # Aruco Perimeter | |
| arucoPerimeter = cv2.arcLength(imgCornersInt[0], True) | |
| # Pixel to cm ratio | |
| pixelCMRatio = arucoPerimeter / pics2cm | |
| contours = detector.detectObjects(img) | |
| # Draw objects boundaries | |
| for cnt in contours: | |
| # Get rect | |
| rect = cv2.boundingRect(cnt) | |
| (x, y, w, h) = rect | |
| print('*'*60) | |
| print('Width Pixel: ') | |
| print(str(w)) | |
| print('Height Pixel: ') | |
| print(str(h)) | |
| # Get Width and Height of the Objects by applying the Ratio pixel to cm | |
| objWidth = round(w / pixelCMRatio, 1) | |
| objHeight = round(h / pixelCMRatio, 1) | |
| cv2.rectangle(img, (x, y), (x + w, y + h), (255, 0, 0), 2) | |
| cv2.putText(img, "Width {} cm".format(objWidth), (int(x – 100), int(y – 20)), cv2.FONT_HERSHEY_PLAIN, 2, (100, 200, 0), 2) | |
| cv2.putText(img, "Height {} cm".format(objHeight), (int(x – 100), int(y + 15)), cv2.FONT_HERSHEY_PLAIN, 2, (100, 200, 0), 2) | |
| NoOfCoins = round(objHeight / coinDefH) | |
| cv2.putText(img, "No Of Coins: {}".format(NoOfCoins), (int(x – 100), int(y + 35)), cv2.FONT_HERSHEY_PLAIN, 2, (250, 0, 250), 2) | |
| print('Final Height: ') | |
| print(str(objHeight)) | |
| print('No Of Coins: ') | |
| print(str(NoOfCoins)) | |
| cv2.imshow("Image", img) | |
| if cv2.waitKey(1) & 0xFF == ord('q'): | |
| break | |
| cap.release() | |
| cv2.destroyAllWindows() | |
| return 0 | |
| except Exception as e: | |
| x = str(e) | |
| print('Error: ', x) | |
| return 1 |
Some of the key snippets from this script –
# Aruco Perimeter
arucoPerimeter = cv2.arcLength(imgCornersInt[0], True)

# Pixel to cm ratio
pixelCMRatio = arucoPerimeter / pics2cm
The above lines will extract the critical auroco perimeter & then the ratio between pixel against centimeters.
contours = detector.detectObjects(img)
The application detects the contours of each frame from the previous class, which will be used here.
# Draw objects boundaries
for cnt in contours:
    # Get rect
    rect = cv2.boundingRect(cnt)
    (x, y, w, h) = rect
In this step, the application will draw the object contours & also capture the center points, along with the height & width of the identified objects.
# Get Width and Height of the Objects by applying the Ratio pixel to cm
objWidth = round(w / pixelCMRatio, 1)
objHeight = round(h / pixelCMRatio, 1)
Finally, identify the width & height of the contoured object in centimeters.
cv2.putText(img, "Width {} cm".format(objWidth), (int(x - 100), int(y - 20)), cv2.FONT_HERSHEY_PLAIN, 2, (100, 200, 0), 2)
cv2.putText(img, "Height {} cm".format(objHeight), (int(x - 100), int(y + 15)), cv2.FONT_HERSHEY_PLAIN, 2, (100, 200, 0), 2)

NoOfCoins = round(objHeight / coinDefH)

cv2.putText(img, "No Of Coins: {}".format(NoOfCoins), (int(x - 100), int(y + 35)), cv2.FONT_HERSHEY_PLAIN, 2, (250, 0, 250), 2)
It displays both the height, width & total number of coins on top of the live video.
if cv2.waitKey(1) & 0xFF == ord('q'):
    break
The above line will help the developer exit from the visual application by pressing the escape or ‘q’ key in Macbook.
- visualDataRead.py (Main calling function.)
This file contains hidden or bidirectional Unicode text that may be interpreted or compiled differently than what appears below. To review, open the file in an editor that reveals hidden Unicode characters.
Learn more about bidirectional Unicode characters
| ############################################### | |
| #### Written By: SATYAKI DE #### | |
| #### Written On: 17-Jan-2022 #### | |
| #### Modified On 20-Mar-2022 #### | |
| #### #### | |
| #### Objective: This is the main calling #### | |
| #### python script that will invoke the #### | |
| #### clsCountRealtime class to initiate #### | |
| #### the model to read the real-time #### | |
| #### stckaed-up coins & share the actual #### | |
| #### numbers on top of the video feed. #### | |
| ############################################### | |
| # We keep the setup code in a different class as shown below. | |
| import clsCountRealtime as ar | |
| from clsConfig import clsConfig as cf | |
| import datetime | |
| import logging | |
| ############################################### | |
| ### Global Section ### | |
| ############################################### | |
| # Instantiating all the three classes | |
| x1 = ar.clsCountRealtime() | |
| ############################################### | |
| ### End of Global Section ### | |
| ############################################### | |
| def main(): | |
| try: | |
| # Other useful variables | |
| debugInd = 'Y' | |
| var = datetime.datetime.now().strftime("%Y-%m-%d_%H-%M-%S") | |
| var1 = datetime.datetime.now() | |
| print('Start Time: ', str(var)) | |
| # End of useful variables | |
| # Initiating Log Class | |
| general_log_path = str(cf.conf['LOG_PATH']) | |
| # Enabling Logging Info | |
| logging.basicConfig(filename=general_log_path + 'restoreVideo.log', level=logging.INFO) | |
| print('Started Capturing Real-Time Coin Counts!') | |
| # Execute all the pass | |
| r1 = x1.learnStats(debugInd, var) | |
| if (r1 == 0): | |
| print('Successfully counts number of stcaked coins!') | |
| else: | |
| print('Failed to counts number of stcaked coins!') | |
| var2 = datetime.datetime.now() | |
| c = var2 – var1 | |
| minutes = c.total_seconds() / 60 | |
| print('Total difference in minutes: ', str(minutes)) | |
| print('End Time: ', str(var1)) | |
| except Exception as e: | |
| x = str(e) | |
| print('Error: ', x) | |
| if __name__ == "__main__": | |
| main() |
And, the key snippet from the above script –
x1 = ar.clsCountRealtime()
The application instantiates the main class.
# Execute all the pass
r1 = x1.learnStats(debugInd, var)

if (r1 == 0):
    print('Successfully counts number of stcaked coins!')
else:
    print('Failed to counts number of stcaked coins!')
The above code invokes the learnStats function to calculate the count of stacked coins.
FOLDER STRUCTURE:

So, we’ve done it.
You will get the complete codebase in the following Github link.
I’ll bring some more exciting topic in the coming days from the Python verse. Please share & subscribe my post & let me know your feedback.
Till then, Happy Avenging! 😀
Note: All the data & scenario posted here are representational data & scenarios & available over the internet & for educational purpose only. Some of the images (except my photo) that we’ve used are available over the net. We don’t claim the ownership of these images. There is an always room for improvement & especially the prediction quality.