
This week we’re going to extend one of our earlier posts & trying to read an entire text from streaming using computer vision. If you want to view the previous post, please click the following link.
But, before we proceed, why don’t we view the demo first?
Architecture:
Let us understand the architecture flow –

The above diagram shows that the application, which uses the Open-CV, analyzes individual frames from the source & extracts the complete text within the video & displays it on top of the target screen besides prints the same in the console.
Python Packages:
pip install imutils==0.5.4
pip install matplotlib==3.5.2
pip install numpy==1.21.6
pip install opencv-contrib-python==4.6.0.66
pip install opencv-contrib-python-headless==4.6.0.66
pip install opencv-python==4.6.0.66
pip install opencv-python-headless==4.6.0.66
pip install pandas==1.3.5
pip install Pillow==9.1.1
pip install pytesseract==0.3.9
pip install python-dateutil==2.8.2
CODE:
Let us now understand the code. For this use case, we will only discuss three python scripts. However, we need more than these three. However, we have already discussed them in some of the early posts. Hence, we will skip them here.
- clsReadingTextFromStream.py (This is the main class of python script that will extract the text from the WebCAM streaming in real-time.)
This file contains hidden or bidirectional Unicode text that may be interpreted or compiled differently than what appears below. To review, open the file in an editor that reveals hidden Unicode characters.
Learn more about bidirectional Unicode characters
| ################################################## | |
| #### Written By: SATYAKI DE #### | |
| #### Written On: 22-Jul-2022 #### | |
| #### Modified On 25-Jul-2022 #### | |
| #### #### | |
| #### Objective: This is the main class of #### | |
| #### python script that will invoke the #### | |
| #### extraction of texts from a WebCAM. #### | |
| #### #### | |
| ################################################## | |
| # Importing necessary packages | |
| from clsConfig import clsConfig as cf | |
| from imutils.object_detection import non_max_suppression | |
| import numpy as np | |
| import pytesseract | |
| import imutils | |
| import time | |
| import cv2 | |
| import time | |
| ############################################### | |
| ### Global Section ### | |
| ############################################### | |
| # Two output layer names for the text detector model | |
| lNames = cf.conf['LAYER_DET'] | |
| # Tesseract OCR text param values | |
| strVal = "-l " + str(cf.conf['LANG']) + " –oem " + str(cf.conf['OEM_VAL']) + " –psm " + str(cf.conf['PSM_VAL']) + "" | |
| config = (strVal) | |
| ############################################### | |
| ### End of Global Section ### | |
| ############################################### | |
| class clsReadingTextFromStream: | |
| def __init__(self): | |
| self.sep = str(cf.conf['SEP']) | |
| self.Curr_Path = str(cf.conf['INIT_PATH']) | |
| self.CacheL = int(cf.conf['CACHE_LIM']) | |
| self.modelPath = str(cf.conf['MODEL_PATH']) + str(cf.conf['MODEL_FILE_NAME']) | |
| self.minConf = float(cf.conf['MIN_CONFIDENCE']) | |
| self.wt = int(cf.conf['WIDTH']) | |
| self.ht = int(cf.conf['HEIGHT']) | |
| self.pad = float(cf.conf['PADDING']) | |
| self.title = str(cf.conf['TITLE']) | |
| self.Otitle = str(cf.conf['ORIG_TITLE']) | |
| self.drawTag = cf.conf['DRAW_TAG'] | |
| self.aRange = int(cf.conf['ASCII_RANGE']) | |
| self.sParam = cf.conf['SUBTRACT_PARAM'] | |
| def findBoundBox(self, boxes, res, rW, rH, orig, origW, origH, pad): | |
| try: | |
| # Loop over the bounding boxes | |
| for (spX, spY, epX, epY) in boxes: | |
| # Scale the bounding box coordinates based on the respective | |
| # ratios | |
| spX = int(spX * rW) | |
| spY = int(spY * rH) | |
| epX = int(epX * rW) | |
| epY = int(epY * rH) | |
| # To obtain a better OCR of the text we can potentially | |
| # apply a bit of padding surrounding the bounding box. | |
| # And, computing the deltas in both the x and y directions | |
| dX = int((epX – spX) * pad) | |
| dY = int((epY – spY) * pad) | |
| # Apply padding to each side of the bounding box, respectively | |
| spX = max(0, spX – dX) | |
| spY = max(0, spY – dY) | |
| epX = min(origW, epX + (dX * 2)) | |
| epY = min(origH, epY + (dY * 2)) | |
| # Extract the actual padded ROI | |
| roi = orig[spY:epY, spX:epX] | |
| # Choose the proper OCR Config | |
| text = pytesseract.image_to_string(roi, config=config) | |
| # Add the bounding box coordinates and OCR'd text to the list | |
| # of results | |
| res.append(((spX, spY, epX, epY), text)) | |
| # Sort the results bounding box coordinates from top to bottom | |
| res = sorted(res, key=lambda r:r[0][1]) | |
| return res | |
| except Exception as e: | |
| x = str(e) | |
| print(x) | |
| return res | |
| def predictText(self, imgScore, imgGeo): | |
| try: | |
| minConf = self.minConf | |
| # Initializing the bounding box rectangles & confidence score by | |
| # extracting the rows & columns from the imgScore volume. | |
| (numRows, numCols) = imgScore.shape[2:4] | |
| rects = [] | |
| confScore = [] | |
| for y in range(0, numRows): | |
| # Extract the imgScore probabilities to derive potential | |
| # bounding box coordinates that surround text | |
| imgScoreData = imgScore[0, 0, y] | |
| xVal0 = imgGeo[0, 0, y] | |
| xVal1 = imgGeo[0, 1, y] | |
| xVal2 = imgGeo[0, 2, y] | |
| xVal3 = imgGeo[0, 3, y] | |
| anglesData = imgGeo[0, 4, y] | |
| for x in range(0, numCols): | |
| # If our score does not have sufficient probability, | |
| # ignore it | |
| if imgScoreData[x] < minConf: | |
| continue | |
| # Compute the offset factor as our resulting feature | |
| # maps will be 4x smaller than the input frame | |
| (offX, offY) = (x * 4.0, y * 4.0) | |
| # Extract the rotation angle for the prediction and | |
| # then compute the sin and cosine | |
| angle = anglesData[x] | |
| cos = np.cos(angle) | |
| sin = np.sin(angle) | |
| # Derive the width and height of the bounding box from | |
| # imgGeo | |
| h = xVal0[x] + xVal2[x] | |
| w = xVal1[x] + xVal3[x] | |
| # Compute both the starting and ending (x, y)-coordinates | |
| # for the text prediction bounding box | |
| epX = int(offX + (cos * xVal1[x]) + (sin * xVal2[x])) | |
| epY = int(offY – (sin * xVal1[x]) + (cos * xVal2[x])) | |
| spX = int(epX – w) | |
| spY = int(epY – h) | |
| # Adding bounding box coordinates and probability score | |
| # to the respective lists | |
| rects.append((spX, spY, epX, epY)) | |
| confScore.append(imgScoreData[x]) | |
| # return a tuple of the bounding boxes and associated confScore | |
| return (rects, confScore) | |
| except Exception as e: | |
| x = str(e) | |
| print(x) | |
| rects = [] | |
| confScore = [] | |
| return (rects, confScore) | |
| def processStream(self, debugInd, var): | |
| try: | |
| sep = self.sep | |
| Curr_Path = self.Curr_Path | |
| CacheL = self.CacheL | |
| modelPath = self.modelPath | |
| minConf = self.minConf | |
| wt = self.wt | |
| ht = self.ht | |
| pad = self.pad | |
| title = self.title | |
| Otitle = self.Otitle | |
| drawTag = self.drawTag | |
| aRange = self.aRange | |
| sParam = self.sParam | |
| val = 0 | |
| # Initialize the video stream and allow the camera sensor to warm up | |
| print("[INFO] Starting video stream…") | |
| cap = cv2.VideoCapture(0) | |
| # Loading the pre-trained text detector | |
| print("[INFO] Loading Text Detector…") | |
| net = cv2.dnn.readNet(modelPath) | |
| # Loop over the frames from the video stream | |
| while True: | |
| try: | |
| # Grab the frame from our video stream and resize it | |
| success, frame = cap.read() | |
| orig = frame.copy() | |
| (origH, origW) = frame.shape[:2] | |
| # Setting new width and height and then determine the ratio in change | |
| # for both the width and height | |
| (newW, newH) = (wt, ht) | |
| rW = origW / float(newW) | |
| rH = origH / float(newH) | |
| # Resize the frame and grab the new frame dimensions | |
| frame = cv2.resize(frame, (newW, newH)) | |
| (H, W) = frame.shape[:2] | |
| # Construct a blob from the frame and then perform a forward pass of | |
| # the model to obtain the two output layer sets | |
| blob = cv2.dnn.blobFromImage(frame, 1.0, (W, H), sParam, swapRB=True, crop=False) | |
| net.setInput(blob) | |
| (confScore, imgGeo) = net.forward(lNames) | |
| # Decode the predictions, then apply non-maxima suppression to | |
| # suppress weak, overlapping bounding boxes | |
| (rects, confidences) = self.predictText(confScore, imgGeo) | |
| boxes = non_max_suppression(np.array(rects), probs=confidences) | |
| # Initialize the list of results | |
| res = [] | |
| # Getting BoundingBox boundaries | |
| res = self.findBoundBox(boxes, res, rW, rH, orig, origW, origH, pad) | |
| for ((spX, spY, epX, epY), text) in res: | |
| # Display the text OCR by using Tesseract APIs | |
| print("Reading Text::") | |
| print("=" *60) | |
| print(text) | |
| print("=" *60) | |
| # Removing the non-ASCII text so it can draw the text on the frame | |
| # using OpenCV, then draw the text and a bounding box surrounding | |
| # the text region of the input frame | |
| text = "".join([c if ord(c) < aRange else "" for c in text]).strip() | |
| output = orig.copy() | |
| cv2.rectangle(output, (spX, spY), (epX, epY), drawTag, 2) | |
| cv2.putText(output, text, (spX, spY – 20), cv2.FONT_HERSHEY_SIMPLEX, 1.2, drawTag, 3) | |
| # Show the output frame | |
| cv2.imshow(title, output) | |
| #cv2.imshow(Otitle, frame) | |
| # If the `q` key was pressed, break from the loop | |
| if cv2.waitKey(1) == ord('q'): | |
| break | |
| val = 0 | |
| except Exception as e: | |
| x = str(e) | |
| print(x) | |
| val = 1 | |
| # Performing cleanup at the end | |
| cap.release() | |
| cv2.destroyAllWindows() | |
| return val | |
| except Exception as e: | |
| x = str(e) | |
| print('Error:', x) | |
| return 1 |
Please find the key snippet from the above script –
# Two output layer names for the text detector model

lNames = cf.conf['LAYER_DET']

# Tesseract OCR text param values

strVal = "-l " + str(cf.conf['LANG']) + " --oem " + str(cf.conf['OEM_VAL']) + " --psm " + str(cf.conf['PSM_VAL']) + ""
config = (strVal)
The first line contains the two output layers’ names for the text detector model. Among them, the first one indicates the outcome possibilities & the second one use to derive the bounding box coordinates of the predicted text.
The second line contains various options for the tesseract APIs. You need to understand the opportunities in detail to make them work. These are the essential options for our use case –
- Language – The intended language, for example, English, Spanish, Hindi, Bengali, etc.
- OEM flag – In this case, the application will use 4 to indicate LSTM neural net model for OCR.
- OEM Value – In this case, the selected value is 7, indicating that the application treats the ROI as a single line of text.
For more details, please refer to the config file.
print("[INFO] Loading Text Detector...")
net = cv2.dnn.readNet(modelPath)
The above lines bring the already created model & load it to memory for evaluation.
# Setting new width and height and then determine the ratio in change
# for both the width and height
(newW, newH) = (wt, ht)
rW = origW / float(newW)
rH = origH / float(newH)

# Resize the frame and grab the new frame dimensions
frame = cv2.resize(frame, (newW, newH))
(H, W) = frame.shape[:2]

# Construct a blob from the frame and then perform a forward pass of
# the model to obtain the two output layer sets
blob = cv2.dnn.blobFromImage(frame, 1.0, (W, H), sParam, swapRB=True, crop=False)
net.setInput(blob)
(confScore, imgGeo) = net.forward(lNames)

# Decode the predictions, then apply non-maxima suppression to
# suppress weak, overlapping bounding boxes
(rects, confidences) = self.predictText(confScore, imgGeo)
boxes = non_max_suppression(np.array(rects), probs=confidences)
The above lines are more of preparing individual frames to get the bounding box by resizing the height & width followed by a forward pass of the model to obtain two output layer sets. And then apply the non-maxima suppression to remove the weak, overlapping bounding box by interpreting the prediction. In short, this will identify the potential text region & put the bounding box surrounding it.
# Initialize the list of results
res = []

# Getting BoundingBox boundaries
res = self.findBoundBox(boxes, res, rW, rH, orig, origW, origH, pad)
The above function will create the bounding box surrounding the predicted text regions. Also, we will capture the expected text inside the result variable.
for (spX, spY, epX, epY) in boxes:
  # Scale the bounding box coordinates based on the respective
  # ratios
  spX = int(spX * rW)
  spY = int(spY * rH)
  epX = int(epX * rW)
  epY = int(epY * rH)

  # To obtain a better OCR of the text we can potentially
  # apply a bit of padding surrounding the bounding box.
  # And, computing the deltas in both the x and y directions
  dX = int((epX - spX) * pad)
  dY = int((epY - spY) * pad)

  # Apply padding to each side of the bounding box, respectively
  spX = max(0, spX - dX)
  spY = max(0, spY - dY)
  epX = min(origW, epX + (dX * 2))
  epY = min(origH, epY + (dY * 2))

  # Extract the actual padded ROI
  roi = orig[spY:epY, spX:epX]
Now, the application will scale the bounding boxes based on the previously computed ratio for actual text recognition. In this process, the application also padded the bounding boxes & then extracted the padded region of interest.
# Choose the proper OCR Config
text = pytesseract.image_to_string(roi, config=config)

# Add the bounding box coordinates and OCR'd text to the list
# of results
res.append(((spX, spY, epX, epY), text))
Using OCR options, the application extracts the text within the video frame & adds that to the res list.
# Sort the results bounding box coordinates from top to bottom
res = sorted(res, key=lambda r:r[0][1])
It then sends a sorted output to the primary calling functions.
for ((spX, spY, epX, epY), text) in res:
  # Display the text OCR by using Tesseract APIs
  print("Reading Text::")
  print("=" *60)
  print(text)
  print("=" *60)

  # Removing the non-ASCII text so it can draw the text on the frame
  # using OpenCV, then draw the text and a bounding box surrounding
  # the text region of the input frame
  text = "".join([c if ord(c) < aRange else "" for c in text]).strip()
  output = orig.copy()

  cv2.rectangle(output, (spX, spY), (epX, epY), drawTag, 2)
  cv2.putText(output, text, (spX, spY - 20), cv2.FONT_HERSHEY_SIMPLEX, 1.2, drawTag, 3)

  # Show the output frame
  cv2.imshow(title, output)
Finally, it fetches the potential text region along with the text & then prints on top of the source video. Also, it removed some non-printable characters during this time to avoid any cryptic texts.
- readingVideo.py (Main calling script.)
This file contains hidden or bidirectional Unicode text that may be interpreted or compiled differently than what appears below. To review, open the file in an editor that reveals hidden Unicode characters.
Learn more about bidirectional Unicode characters
| ##################################################### | |
| #### Written By: SATYAKI DE #### | |
| #### Written On: 22-Jul-2022 #### | |
| #### Modified On 25-Jul-2022 #### | |
| #### #### | |
| #### Objective: This is the main calling #### | |
| #### python script that will invoke the #### | |
| #### clsReadingTextFromStream class to initiate #### | |
| #### the reading capability in real-time #### | |
| #### & display text via Web-CAM. #### | |
| ##################################################### | |
| # We keep the setup code in a different class as shown below. | |
| import clsReadingTextFromStream as rtfs | |
| from clsConfig import clsConfig as cf | |
| import datetime | |
| import logging | |
| ############################################### | |
| ### Global Section ### | |
| ############################################### | |
| # Instantiating all the main class | |
| x1 = rtfs.clsReadingTextFromStream() | |
| ############################################### | |
| ### End of Global Section ### | |
| ############################################### | |
| def main(): | |
| try: | |
| # Other useful variables | |
| debugInd = 'Y' | |
| var = datetime.datetime.now().strftime("%Y-%m-%d_%H-%M-%S") | |
| var1 = datetime.datetime.now() | |
| print('Start Time: ', str(var)) | |
| # End of useful variables | |
| # Initiating Log Class | |
| general_log_path = str(cf.conf['LOG_PATH']) | |
| # Enabling Logging Info | |
| logging.basicConfig(filename=general_log_path + 'readingTextFromVideo.log', level=logging.INFO) | |
| print('Started reading text from videos!') | |
| # Execute all the pass | |
| r1 = x1.processStream(debugInd, var) | |
| if (r1 == 0): | |
| print('Successfully read text from the Live Stream!') | |
| else: | |
| print('Failed to read text from the Live Stream!') | |
| var2 = datetime.datetime.now() | |
| c = var2 – var1 | |
| minutes = c.total_seconds() / 60 | |
| print('Total difference in minutes: ', str(minutes)) | |
| print('End Time: ', str(var1)) | |
| except Exception as e: | |
| x = str(e) | |
| print('Error: ', x) | |
| if __name__ == "__main__": | |
| main() |
Please find the key snippet –
# Instantiating all the main class

x1 = rtfs.clsReadingTextFromStream()

# Execute all the pass
r1 = x1.processStream(debugInd, var)

if (r1 == 0):
    print('Successfully read text from the Live Stream!')
else:
    print('Failed to read text from the Live Stream!')
The above lines instantiate the main calling class & then invoke the function to get the desired extracted text from the live streaming video if that is successful.
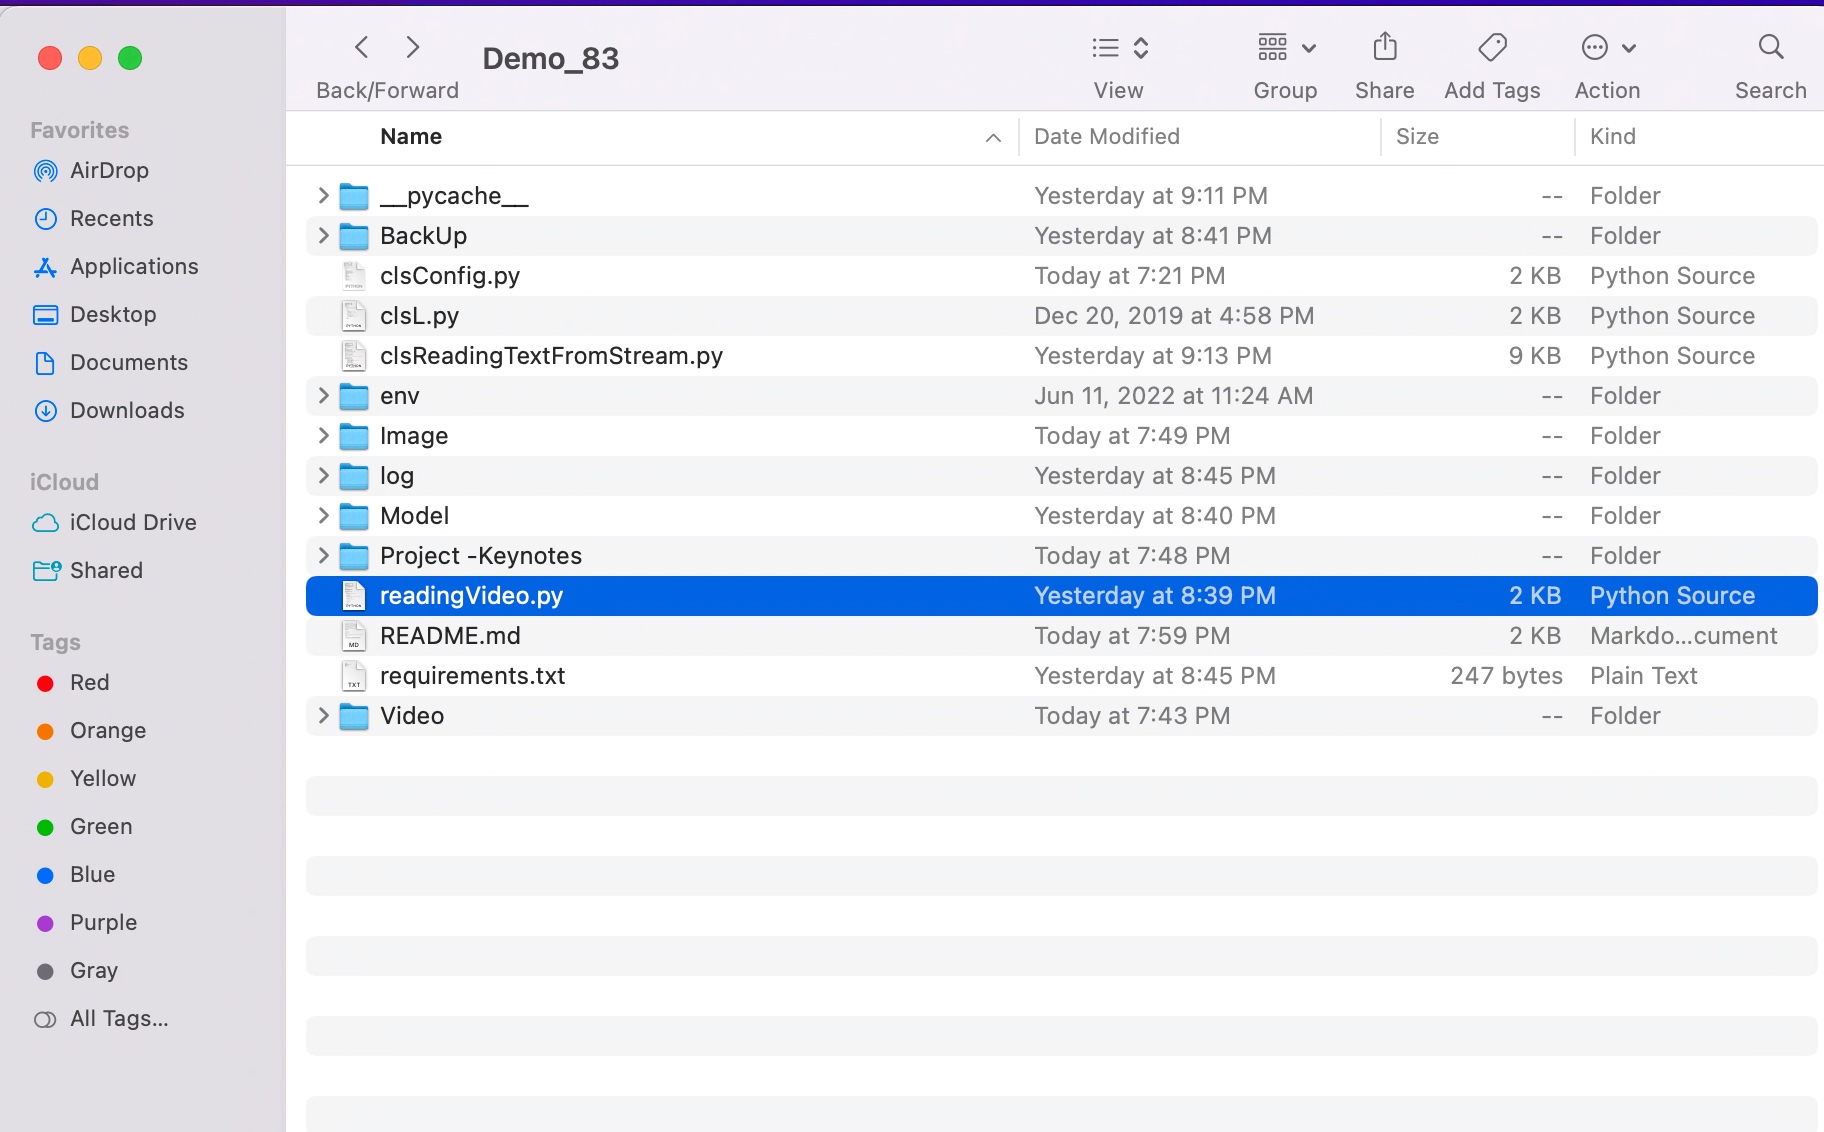
FOLDER STRUCTURE:
Here is the folder structure that contains all the files & directories in MAC O/S –
You will get the complete codebase in the following Github link.
Unfortunately, I cannot upload the model due to it’s size. I will share on the need basis.
I’ll bring some more exciting topic in the coming days from the Python verse. Please share & subscribe my post & let me know your feedback.
Till then, Happy Avenging! 🙂
Note: All the data & scenario posted here are representational data & scenarios & available over the internet & for educational purpose only. Some of the images (except my photo) that we’ve used are available over the net. We don’t claim the ownership of these images. There is an always room for improvement & especially the prediction quality.


You must be logged in to post a comment.