
Today, I’ll be sharing the fourth & final installment of the Colibri LLM framework with a bit of custom twists to get a stunning result at the end of this post.
In case, if you want read the previous posts from this series, then do visit the following links –
ANYTHING NOT LIKE YOUR OTHER LLM STACK – PART 1
ANYTHING NOT LIKE YOUR OTHER LLM STACK – PART 2
ANYTHING NOT LIKE YOUR OTHER LLM STACK – PART 3
The primary goal of this post is to optimize overall LLM response performance by finding the right balance between hardware capabilities and the optimization techniques offered by the Colibri framework. The objective is to achieve the best possible performance when running large language models (LLMs) locally, without relying on massive AI infrastructure or expensive cloud-based premium models.
But, before that let us watch the demo first.
Great! Based on the tests conducted across the use cases shown above, we observed significant differences in the total time required to generate a complete LLM response. The following summarizes the performance of each configuration using the same prompt and a response length of approximately 400 words:
- Option 1 – Direct Execution Using the Colibri Framework (Command Line): Running the Colibri framework directly from the command line took between 16 and 22 minutes to generate the complete response.
- Option 2 – Colibri Framework With a Wrapper Layer (Custom Web UI): Using a custom web interface with a wrapper layer built around the Colibri framework reduced the total response time to under 32 minutes for the same prompt.
- Option 3 – Colibri Framework With a Wrapper Layer and Multi-Node Architecture (Custom Web UI):Integrating the wrapper layer with the Colibri framework in a multi-node configuration further reduced the total response time to 3 – 4 minutes or less, representing a substantial performance improvement over the previous configurations.
Key Takeaway: The multi-node configuration delivered the most significant performance improvement, reducing response generation time from over 16 to 22 minutes to 3 – 4 minutes or less. This demonstrates the potential of combining hardware resources with software optimization to make local LLM inference considerably faster, without relying on expensive cloud-based infrastructure.
Now, let’s explore how we achieved what initially seemed impossible. Before diving into the technical details, it is important to understand the core principles behind this solution. The key lies in a combination of software and hardware optimizations, along with efficient data transfer and communication between components. Each of these elements plays a critical role in achieving the performance improvements demonstrated above.
ARCHITECTURE:

For this setup, I used a Satechi CubeDock Thunderbolt 5 docking station equipped with a Samsung 9100 PRO 2 TB NVMe SSD as an external high-speed storage solution, rather than upgrading the internal storage of my MacBook Pro M4 Max. This external SSD stores two different LLMs configured to run using the Colibri framework.
Since the MacBook Pro can directly access this high-speed SSD, I used SMB (Server Message Block) network sharing to make the model files accessible to both Mac minis. Each Mac mini mounts the shared storage over the network, allowing all three machines to access the centrally stored models without maintaining separate copies on their internal SSDs.
This approach helps overcome the individual storage limitations of the Mac minis while enabling a more flexible, multi-node architecture. However, shared storage does not increase the available RAM on each machine; memory utilization must still be managed according to each node’s hardware capabilities.
An important aspect of this architecture is that each LLM and computing node has a specific responsibility, while the MacBook Pro M4 Max serves as the primary or master node, coordinating the overall workflow and distributing tasks across the available resources.
Now, I’ll share the hardware details, which I bought it from Amazon & Quill (This is not a paid promotion for any of the products).
- Samsung 9100 PRO – 2 TB
- Satechi CubeDock Thunderbolt 5 Universal Docking Station with SSD Enclosure, Silver (ST-DT5CES-US)
I’ve been using my Mac minis and MacBook Pro for quite some time, so I decided to put these existing machines to better use by combining them into a multi-node computing cluster.
You can adopt a similar approach using your existing computers, provided they meet the hardware and software requirements of your setup. The machines do not necessarily need identical specifications, as different nodes can contribute based on their individual capabilities.
The key takeaway? Don’t be too quick to discard your older computers! With the right configuration and optimization, they can still serve a valuable purpose in modern AI workloads. Unless you’re upgrading or trading them in as part of a worthwhile deal, consider how you might repurpose them. You never know when those additional computing resources might come in handy.
MODEL-DRIVEN ARCHITECTURE:
In this section, I’ll explain how each computing node can run a specific LLM based on its available memory and hardware capabilities, with each model assigned a particular task. By distributing these tasks across multiple nodes and executing them in parallel, we can significantly reduce the overall processing time and improve the efficiency of the entire system.
The goal is to demonstrate how this multi-node architecture can deliver competitive LLM response performance, potentially approaching that of commercial, cloud-based LLM services for certain workloads, while making the most of existing hardware resources and minimizing infrastructure costs.
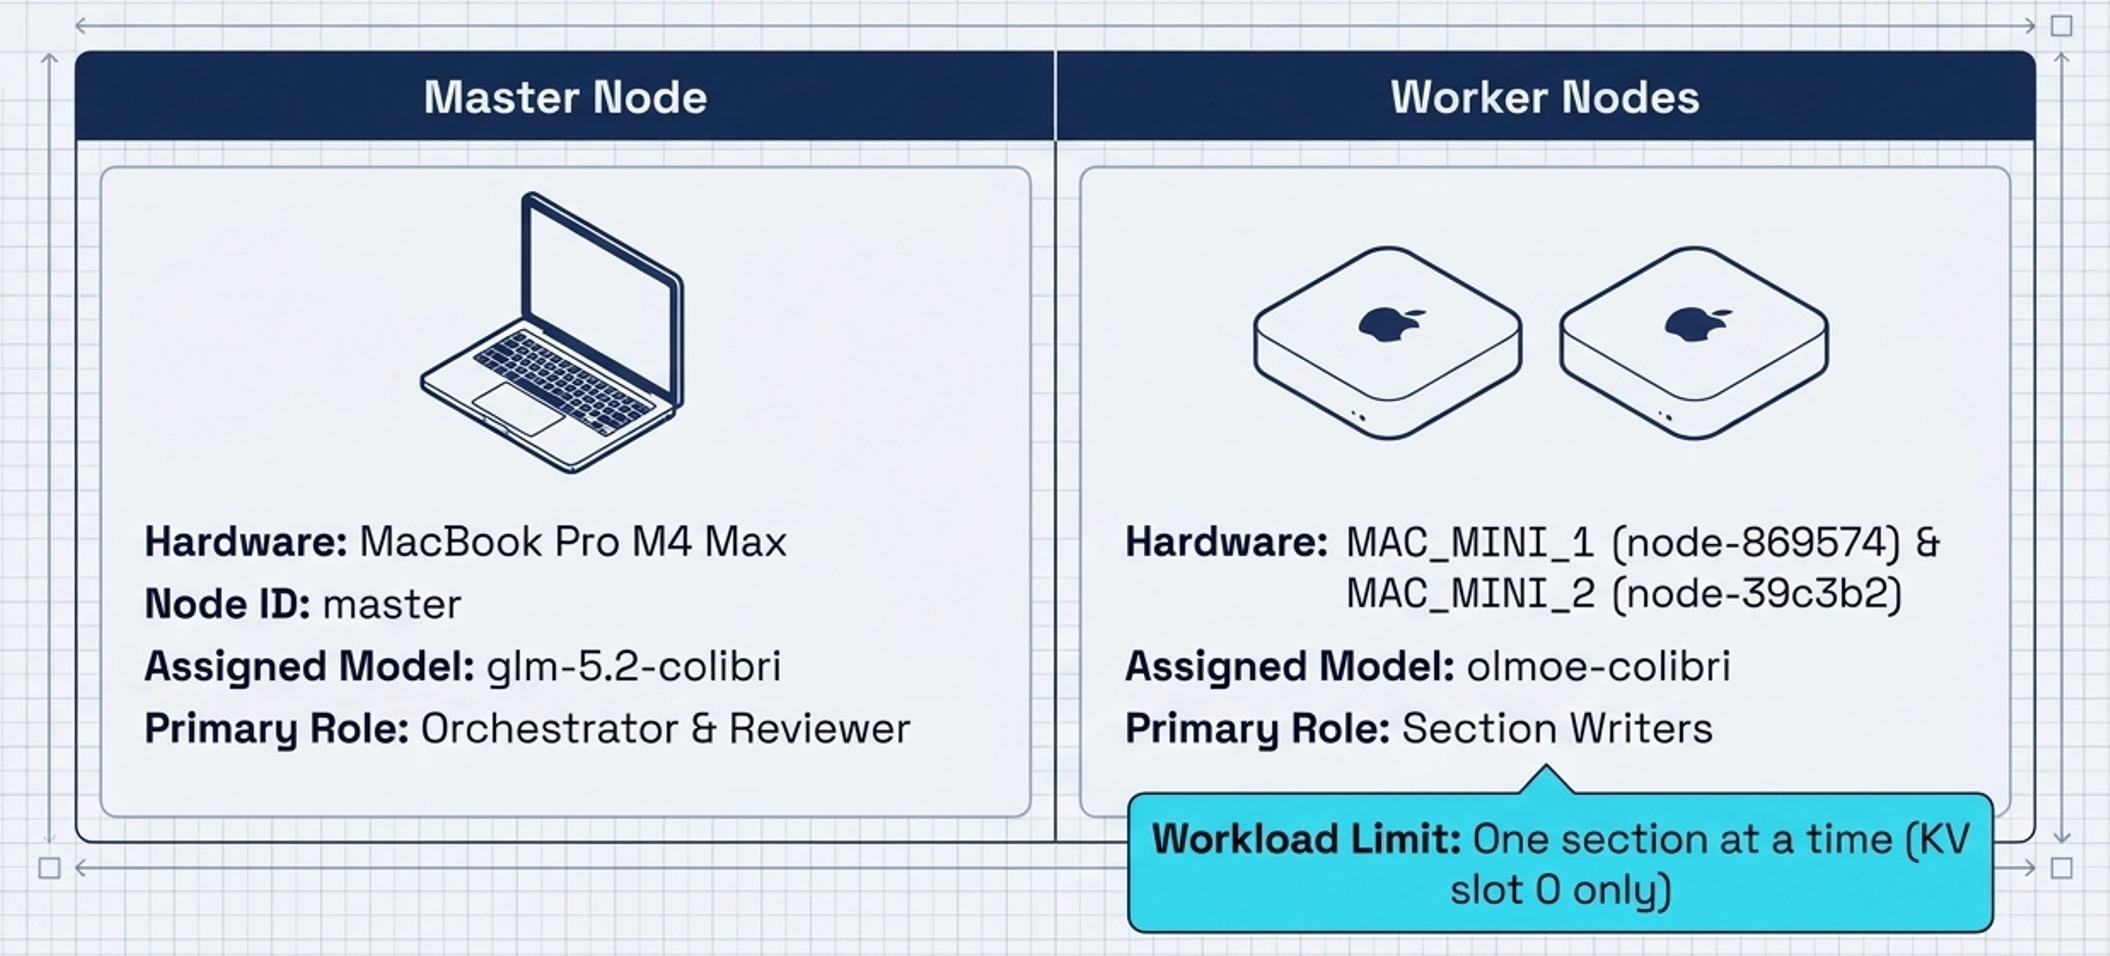
As you can see that, the Mini’s will share the caches, whereas the Master node won’t as they belongs to complete two different kinds of model families.
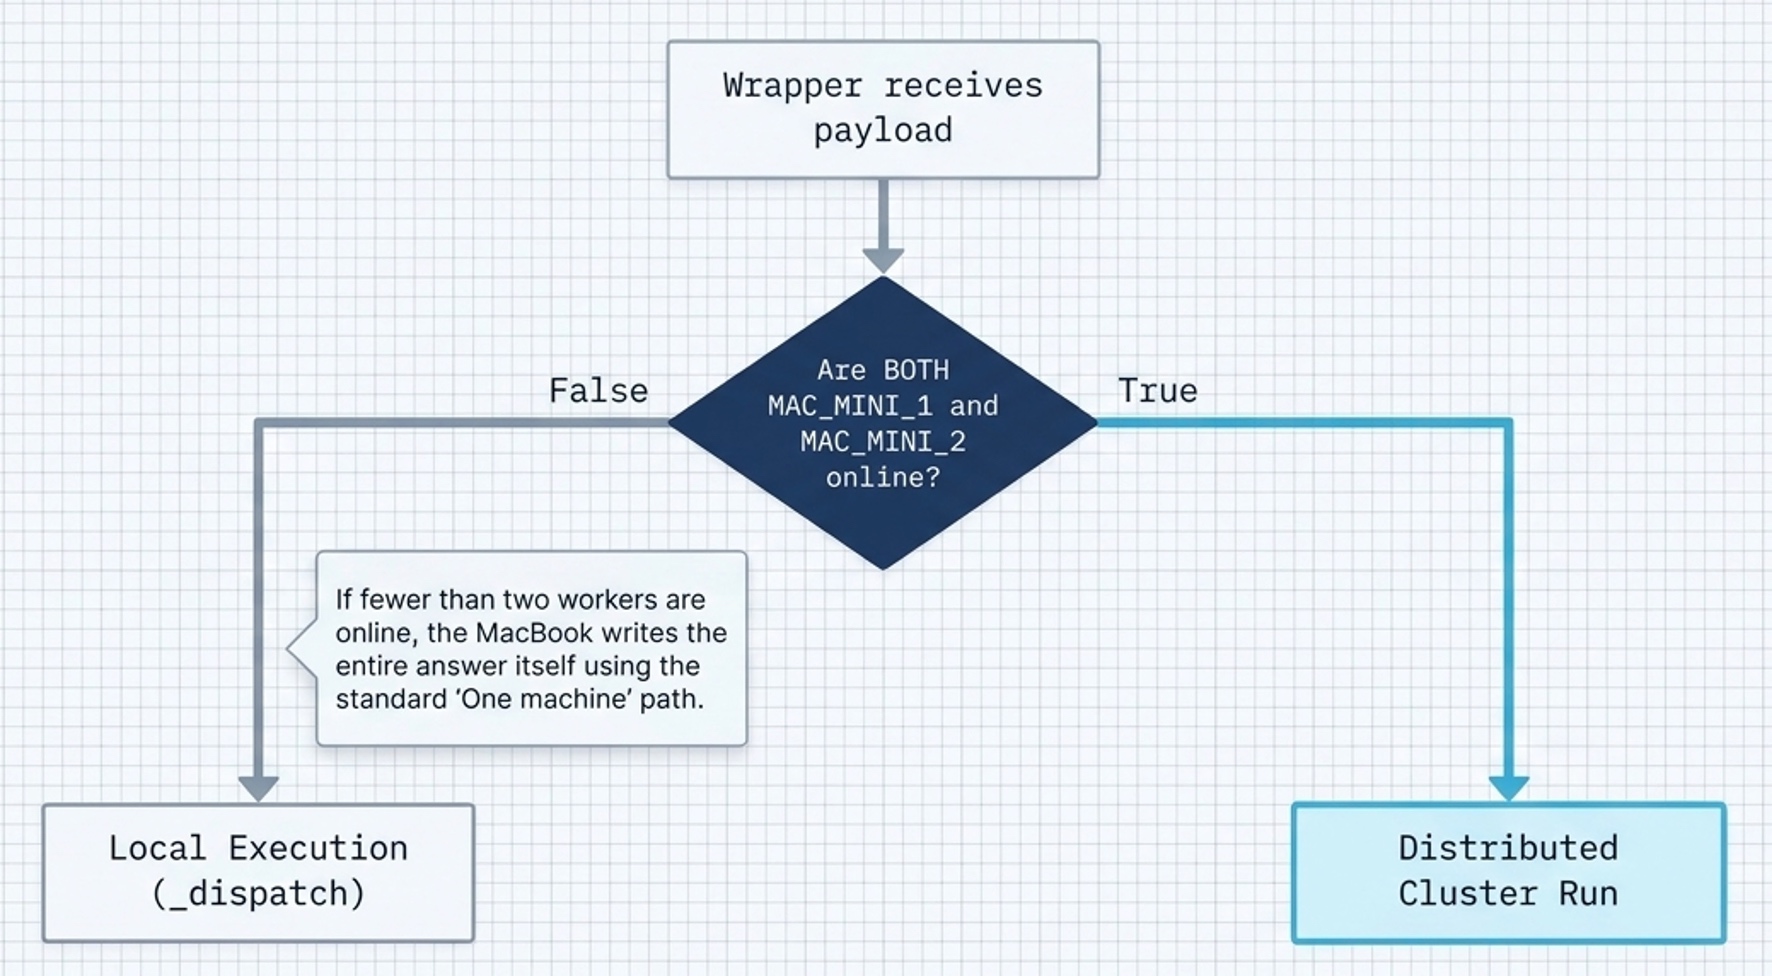
Until or unless the Mac Mini’s are available the entire process will take place in the master node only.
Now, the sequence of activities that happened as follows ->

As soon as you submit the prompt the following sequence of activities will take place –
- The master node (MacBook Pro M4 Max) first analyzes the submitted request and breaks it down into high-level sections based on the topic and its context.
- Task Distribution: Once the sections are defined, the master node shares each section’s specific context and instructions with the assigned Mac mini node.
- Parallel Processing: Each Mac mini processes one request at a time. With two Mac minis operating simultaneously, the system can handle up to two concurrent requests, allowing both nodes to independently generate relevant content for their assigned sections.
- Task Queue and Monitoring: While both nodes are busy processing their current assignments, the remaining sections stay in a queue. The Web UI displays the status of each section, making it easy to identify which tasks are being processed and which are waiting for an available node.
- Automatic Task Execution: As soon as a Mac mini completes its assigned section, it automatically picks up the next task from its queue. Using the context and instructions provided by the master node, it generates the content for that section. This process continues until all assigned sections are completed.
- By distributing independent tasks across multiple computing nodes, this architecture enables parallel content generation, efficient resource utilization, and reduced overall response time compared with processing every section sequentially on a single node.

- As soon as a child node (Mac mini) completes its assigned section, the master node (MacBook Pro M4 Max) begins the first phase of content review. During this phase, the master node checks for incomplete sentences or unfinished paragraphs. If any are identified, it analyzes the surrounding context and attempts to complete them while preserving the original meaning and flow.
- Phase 1 – Section-Level Review: The master node reviews each completed section individually, identifying and correcting incomplete sentences or paragraphs to ensure the content is clear, coherent, and contextually relevant.
- Phase 2 – Final Content Review and Refinement: Once all child nodes have completed their assigned sections and the first review phase is finished, the master node performs a second review of the entire response. During this phase, it identifies and removes duplicate statements, repetitive phrases, and redundant information across sections. It may also add important details or missing points that the child nodes did not include in their initial responses.
- This two-phase review process helps improve the consistency, completeness, and overall quality of the final response while taking advantage of parallel content generation across multiple computing nodes.
The below image will explain the above-points clearly –
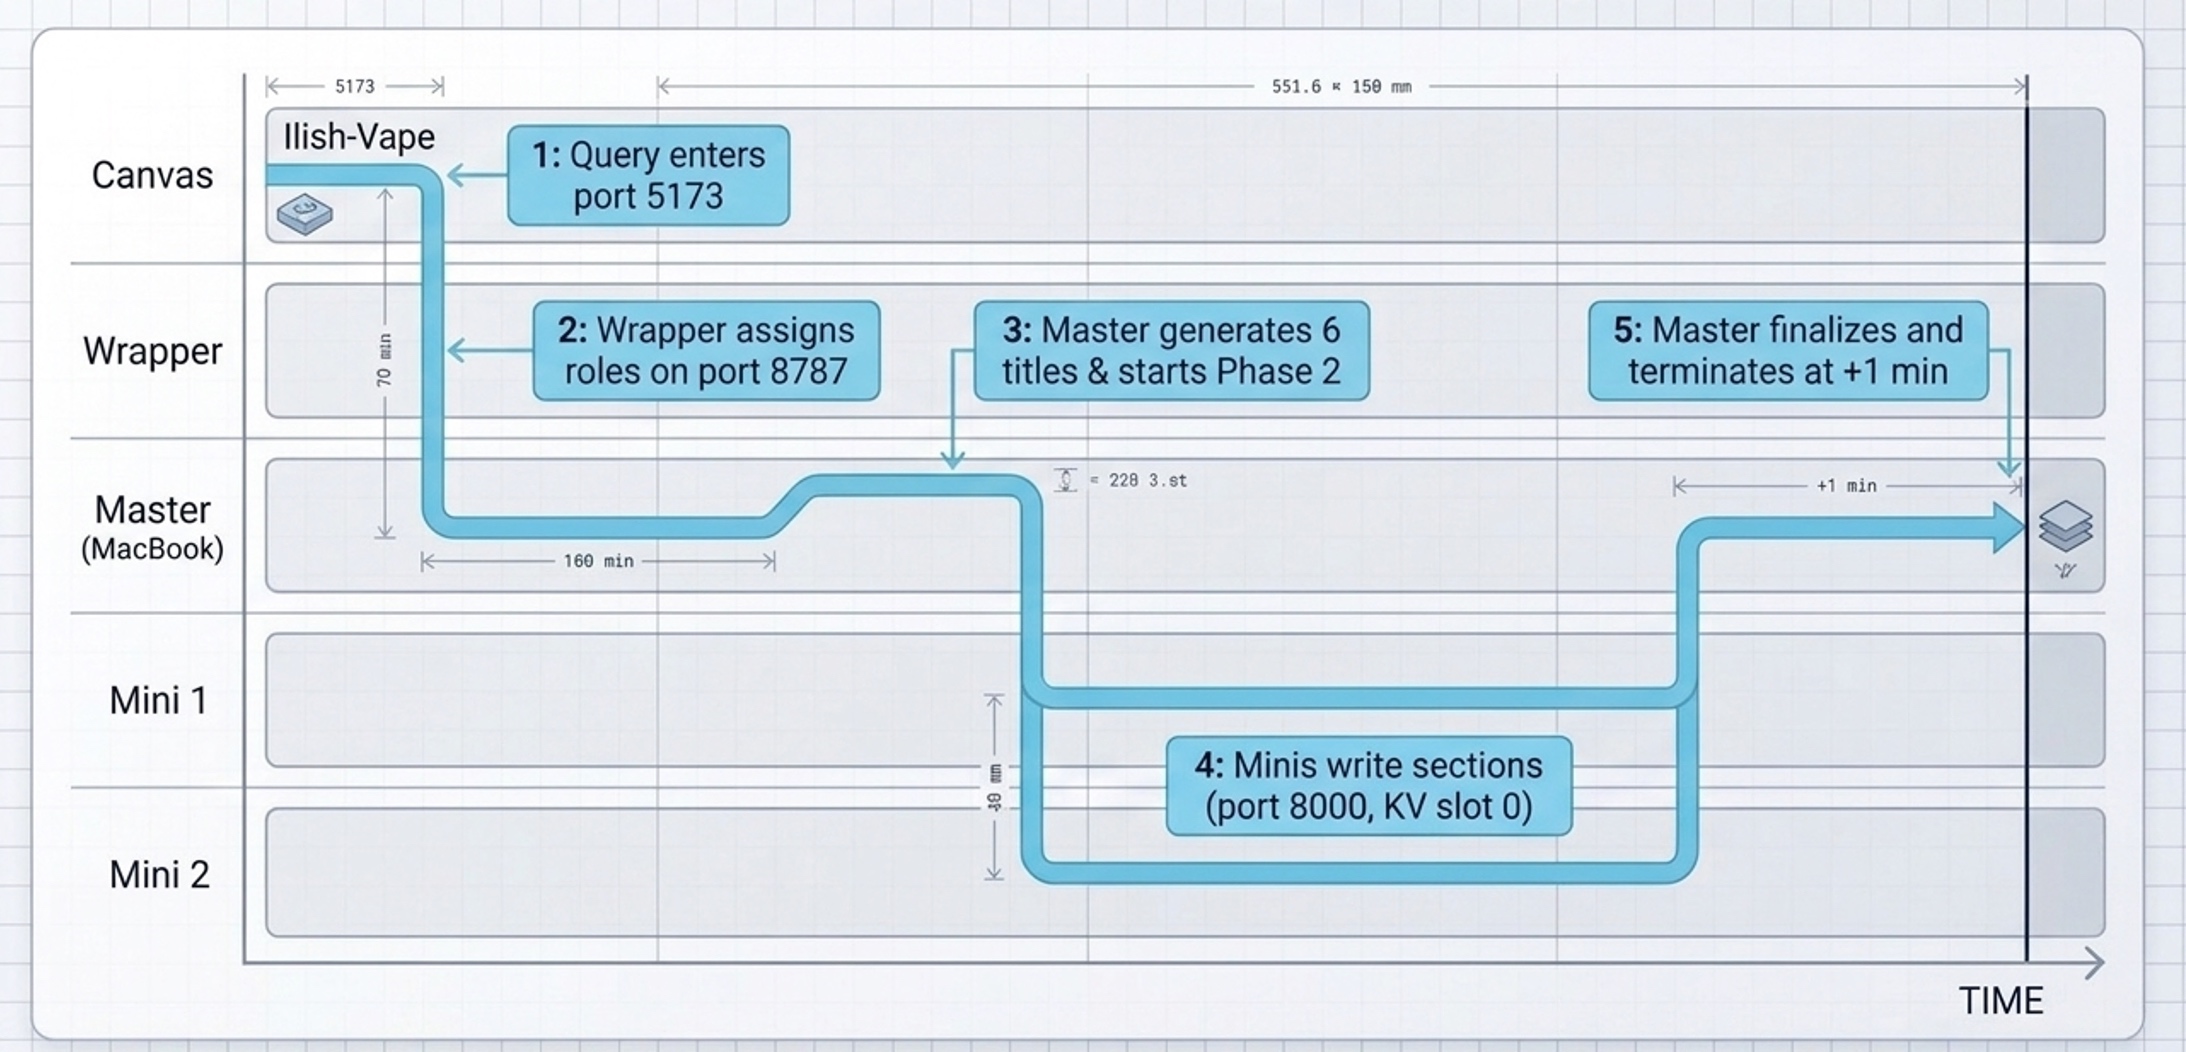
In the above, we’re showing the example of the following prompt -> “How to prepare Ilish-vape food in Bengali-Indian style?”
Hope this will give you clarity that you are looking for.
SETTING-UP YOUR INFRA:
All the nodes will be connected by Thunderbolt 5 to get faster network communication.
And, here is the way all the nodes are connected ->
Satechi CubeDock (Samsung 2 TB SSD) -> MacBook Pro -> Mac Mini 1 -> Mac Mini 2
So, both the Mini’s are also diretly connected with the MacBook Pro as well.
Verify SMB is running on the MacBook Pro
networksetup -getinfo "Thunderbolt Bridge"Verify the IP address & then execute the following –
sudo lsof -nP -iTCP:445 -sTCP:LISTENThis checks whether the SMB service is listening for connections.
sudo launchctl print system/com.apple.smbdNow, test the following in the Mini’s –
Configuring the SMB Drive:
nc -vz -G 5 192.168.100.X 445X – represent your actual IP address (All the IP Address mentioned here are dummy in nature).
Then test the IP Address –
ping -c 20 192.168.100.YRemember, here the IP Address that is mentioned is the MacBook Pro’s IP Address i.e. Master node.
Mount the SSD from Finder
Using Command + K, you need to browse through the specific drive & navigate to the specific folder to mount it in the respective node.
smb://192.168.100.YVerify the SMB Drive from the terminal
mount | grep smbfs
ls /VolumesIt will show the newly mounted drive from the terminal as well.
The following is directory structure of the repo for the wrapper Layer that is hosted via the designed UI –
CollibriWrapper/
├── .cursor/
│   ├── hooks.json
│   ├── hooks/inbuilt-memory-capture.sh
│   └── rules/inbuilt-memory.mdc
├── .gitignore
├── .vscode/settings.json
├── config/nodes.json
├── docs/
│   ├── API.md
│   └── NODES_METHODS_AND_ALGORITHMS.md
├── backend/
│   ├── requirements.txt
│   ├── app/
│   │   ├── __init__.py
│   │   ├── capabilities.py
│   │   ├── colibri.py
│   │   ├── config.py
│   │   ├── discover.py
│   │   ├── hoststats.py
│   │   ├── main.py
│   │   ├── orchestrator.py
│   │   ├── planner.py
│   │   ├── scheduler.py
│   │   └── volumes.py
│   └── tests/
│       ├── __init__.py
│       ├── test_capabilities.py
│       ├── test_cluster_schedule.py
│       ├── test_discover.py
│       └── test_planner.py
├── frontend/
│   ├── index.html
│   ├── package.json
│   ├── package-lock.json
│   ├── tsconfig.json
│   ├── vite.config.ts
│   └── src/
│       ├── App.tsx
│       ├── main.tsx
│       ├── styles.css
│       └── types.ts
├── scripts/
│   ├── colibri-volume.sh
│   ├── lib/libomp.dylib
│   ├── restart-from-ui.sh
│   ├── stack-common.sh
│   ├── start.sh
│   ├── start-wrapper.sh
│   ├── stop.sh
│   ├── worker-host.py
│   ├── worker-start.sh
│   └── worker-stop.sh
└── data/
    ├── run/
    │   ├── canvas.log
    │   ├── colibri.log
    │   ├── colibri.volume
    │   ├── memory.log
    │   ├── memory-node.pid
    │   └── wrapper.log
    └── sessions/
        ├── 114af16ca1514055b309408288d8432a.json
└── 686e1efe04f94ca293aac47e0f75ba5c.jsonSTART THE WRAPPER-LAYER:
Start The Master Node:
We’ll be browsing through the right path (In our case) ->
cd /Volumes/TD_BLACK/StartUp/CollibriWrapper/scripts

# Start the Master Node
./start.shStop The Master Node:
# To Stop the Master Node
./stop.shStart the Worker Node:
./worker-start.shStop the Worker Node:
./worker-stop.shSo, we’ve done it. 🙂
I hope you all like this effort & let me know your feedback. I’ll be back with another topic. Until then, Happy Avenging!
Note: All the data & scenarios posted here are representative of data & scenarios available on the internet for educational purposes only. There is always room for improvement in this kind of model & the solution associated with it. This article is for educational purposes only. The techniques described should only be used for authorized security testing and research. Unauthorized access to computer systems is illegal and unethical & not encouraged.
You must be logged in to post a comment.