This site mainly deals with various use cases demonstrated using Python, Data Science, Cloud basics, SQL Server, Oracle, Teradata along with SQL & their implementation. Expecting yours active participation & time. This blog can be access from your TP, Tablet & mobile also. Please provide your feedback.
This is a continuation of my previous post, which can be found here.
Let us recap the key takaways from our previous post –
Enterprise AI, utilizing the Model Context Protocol (MCP), leverages an open standard that enables AI systems to securely and consistently access enterprise data and tools. MCP replaces brittle “N×M” integrations between models and systems with a standardized client–server pattern: an MCP host (e.g., IDE or chatbot) runs an MCP client that communicates with lightweight MCP servers, which wrap external systems via JSON-RPC. Servers expose three assets—Resources (data), Tools (actions), and Prompts (templates)—behind permissions, access control, and auditability. This design enables real-time context, reduces hallucinations, supports model- and cloud-agnostic interoperability, and accelerates “build once, integrate everywhere” deployment. A typical flow (e.g., retrieving a customer’s latest order) encompasses intent parsing, authorized tool invocation, query translation/execution, and the return of a normalized JSON result to the model for natural-language delivery. Performance introduces modest overhead (RPC hops, JSON (de)serialization, network transit) and scale considerations (request volume, significant results, context-window pressure). Mitigations include in-memory/semantic caching, optimized SQL with indexing, pagination, and filtering, connection pooling, and horizontal scaling with load balancing. In practice, small latency costs are often outweighed by the benefits of higher accuracy, stronger governance, and a decoupled, scalable architecture.
How does MCP compare with other AI integration approaches?
Compared to other approaches, the Model Context Protocol (MCP) offers a uniquely standardized and secure framework for AI-tool integration, shifting from brittle, custom-coded connections to a universal plug-and-play model. It is not a replacement for underlying systems, such as APIs or databases, but instead acts as an intelligent, secure abstraction layer designed explicitly for AI agents.
MCP vs. Custom API integrations:
This approach was the traditional method for AI integration before standards like MCP emerged.
Custom API integrations (traditional): Each AI application requires a custom-built connector for every external system it needs to access, leading to an N x M integration problem (the number of connectors grows exponentially with the number of models and systems). This approach is resource-intensive, challenging to maintain, and prone to breaking when underlying APIs change.
MCP: The standardized protocol eliminates the N x M problem by creating a universal interface. Tool creators build a single MCP server for their system, and any MCP-compatible AI agent can instantly access it. This process decouples the AI model from the underlying implementation details, drastically reducing integration and maintenance costs.
For more detailed information, please refer to the following link.
MCP vs. Retrieval-Augmented Generation (RAG):
RAG is a technique that retrieves static documents to augment an LLM’s knowledge, while MCP focuses on live interactions. They are complementary, not competing.
RAG:
Focus: Retrieving and summarizing static, unstructured data, such as documents, manuals, or knowledge bases.
Best for: Providing background knowledge and general information, as in a policy lookup tool or customer service bot.
Data type: Unstructured, static knowledge.
MCP:
Focus: Accessing and acting on real-time, structured, and dynamic data from databases, APIs, and business systems.
Best for: Agentic use cases involving real-world actions, like pulling live sales reports from a CRM or creating a ticket in a project management tool.
Data type: Structured, real-time, and dynamic data.
MCP vs. LLM plugins and extensions:
Before MCP, platforms like OpenAI offered proprietary plugin systems to extend LLM capabilities.
LLM plugins:
Proprietary: Tied to a specific AI vendor (e.g., OpenAI).
Limited: Rely on the vendor’s API function-calling mechanism, which focuses on call formatting but not standardized execution.
Centralized: Managed by the AI vendor, creating a risk of vendor lock-in.
MCP:
Open standard: Based on a public, interoperable protocol (JSON-RPC 2.0), making it model-agnostic and usable across different platforms.
Infrastructure layer: Provides a standardized infrastructure for agents to discover and use any compliant tool, regardless of the underlying LLM.
Decentralized: Promotes a flexible ecosystem and reduces the risk of vendor lock-in.
How enterprise AI with MCP has opened up a specific Architecture pattern for Azure, AWS & GCP?
Microsoft Azure:
The “agent factory” pattern: Azure focuses on providing managed services for building and orchestrating AI agents, tightly integrated with its enterprise security and governance features. The MCP architecture is a core component of the Azure AI Foundry, serving as a secure, managed “agent factory.”
Azure architecture pattern with MCP:
AI orchestration layer: The Azure AI Agent Service, within Azure AI Foundry, acts as the central host and orchestrator. It provides the control plane for creating, deploying, and managing multiple specialized agents, and it natively supports the MCP standard.
AI model layer: Agents in the Foundry can be powered by various models, including those from Azure OpenAI Service, commercial models from partners, or open-source models.
MCP server and tool layer: MCP servers are deployed using serverless functions, such as Azure Functions or Azure Logic Apps, to wrap existing enterprise systems. These servers expose tools for interacting with enterprise data sources like SharePoint, Azure AI Search, and Azure Blob Storage.
Data and security layer: Data is secured using Microsoft Entra ID (formerly Azure AD) for authentication and access control, with robust security policies enforced via Azure API Management. Access to data sources, such as databases and storage, is managed securely through private networks and Managed Identity.
Amazon Web Services (AWS):
The “composable serverless agent” pattern: AWS emphasizes a modular, composable, and serverless approach, leveraging its extensive portfolio of services to build sophisticated, flexible, and scalable AI solutions. The MCP architecture here aligns with the principle of creating lightweight, event-driven services that AI agents can orchestrate.
AWS architecture pattern with MCP:
The AI orchestration layer, which includesAmazon Bedrock Agents or custom agent frameworks deployed via AWS Fargate or Lambda, acts as the MCP hosts. Bedrock Agents provide built-in orchestration, while custom agents offer greater flexibility and customization options.
AI model layer: The models are sourced from Amazon Bedrock, which provides a wide selection of foundation models.
MCP server and tool layer: MCP servers are deployed as serverless AWS Lambda functions. AWS offers pre-built MCP servers for many of its services, including the AWS Serverless MCP Server for managing serverless applications and the AWS Lambda Tool MCP Server for invoking existing Lambda functions as tools.
Data and security layer: Access is tightly controlled using AWS Identity and Access Management (IAM) roles and policies, with fine-grained permissions for each MCP server. Private data sources like databases (Amazon DynamoDB) and storage (Amazon S3) are accessed securely within a Virtual Private Cloud (VPC).
Google Cloud Platform (GCP):
The “unified workbench” pattern: GCP focuses on providing a unified, open, and data-centric platform for AI development. The MCP architecture on GCP integrates natively with the Vertex AI platform, treating MCP servers as first-class tools that can be dynamically discovered and used within a single workbench.
GCP architecture pattern with MCP:
AI orchestration layer: The Vertex AI Agent Builder serves as the central environment for building and managing conversational AI and other agents. It orchestrates workflows and manages tool invocation for agents.
AI model layer: Agents use foundation models available through the Vertex AI Model Garden or the Gemini API.
MCP server and tool layer: MCP servers are deployed as containerized microservices on Cloud Run or managed by services like App Engine. These servers contain tools that interact with GCP services, such as BigQuery, Cloud Storage, and Cloud SQL. GCP offers pre-built MCP server implementations, such as the GCP MCP Toolbox, for integration with its databases.
Data and security layer:Vertex AI Vector Search and other data sources are encapsulated within the MCP server tools to provide contextual information. Access to these services is managed by Identity and Access Management (IAM) and secured through virtual private clouds. The MCP server can leverage Vertex AI Context Caching for improved performance.
Note that all the native technology is referred to in each respective cloud. Hence, some of the better technologies can be used in place of the tool mentioned here. This is more of a concept-level comparison rather than industry-wise implementation approaches.
We’ll go ahead and conclude this post here & continue discussing on a further deep dive in the next post.
Till then, Happy Avenging! 🙂
Note: All the data & scenarios posted here are representational data & scenarios & available over the internet & for educational purposes only. There is always room for improvement in this kind of model & the solution associated with it. I’ve shown the basic ways to achieve the same for educational purposes only.
As a continuation of the previous post, I would like to continue my discussion about the implementation of MCP protocols among agents. But before that, I want to add the quick demo one more time to recap our objectives.
Let us recap the process flow –
Also, understand the groupings of scripts by each group as posted in the previous post –
Great! Now, we’ll continue with the main discussion.
CODE:
clsYouTubeVideoProcessor.py (This class processes the transcripts from YouTube. It may also translate them into English for non-native speakers.)
defextract_youtube_id(youtube_url):"""Extract YouTube video ID from URL""" youtube_id_match = re.search(r'(?:v=|\/)([0-9A-Za-z_-]{11}).*', youtube_url)if youtube_id_match:return youtube_id_match.group(1)returnNonedefget_youtube_transcript(youtube_url):"""Get transcript from YouTube video""" video_id =extract_youtube_id(youtube_url)ifnot video_id:return{"error":"Invalid YouTube URL or ID"}try: transcript_list = YouTubeTranscriptApi.list_transcripts(video_id)# First try to get manual transcriptstry: transcript = transcript_list.find_manually_created_transcript(["en"]) transcript_data = transcript.fetch()print(f"Debug - Manual transcript format: {type(transcript_data)}")if transcript_data andlen(transcript_data)>0:print(f"Debug - First item type: {type(transcript_data[0])}")print(f"Debug - First item sample: {transcript_data[0]}")return{"text": transcript_data,"language":"en","auto_generated":False}exceptExceptionas e:print(f"Debug - No manual transcript: {str(e)}")# If no manual English transcript, try any available transcripttry: available_transcripts =list(transcript_list)if available_transcripts: transcript = available_transcripts[0]print(f"Debug - Using transcript in language: {transcript.language_code}") transcript_data = transcript.fetch()print(f"Debug - Auto transcript format: {type(transcript_data)}")if transcript_data andlen(transcript_data)>0:print(f"Debug - First item type: {type(transcript_data[0])}")print(f"Debug - First item sample: {transcript_data[0]}")return{"text": transcript_data,"language": transcript.language_code,"auto_generated": transcript.is_generated}else:return{"error":"No transcripts available for this video"}exceptExceptionas e:return{"error":f"Error getting transcript: {str(e)}"}exceptExceptionas e:return{"error":f"Error getting transcript list: {str(e)}"}# ----------------------------------------------------------------------------------# YouTube Video Processor# ----------------------------------------------------------------------------------classclsYouTubeVideoProcessor:"""Process YouTube videos using the agent system"""def__init__(self,documentation_agent,translation_agent,research_agent):self.documentation_agent = documentation_agentself.translation_agent = translation_agentself.research_agent = research_agentdefprocess_youtube_video(self,youtube_url):"""Process a YouTube video"""print(f"Processing YouTube video: {youtube_url}")# Extract transcript transcript_result =get_youtube_transcript(youtube_url)if"error"in transcript_result:return{"error": transcript_result["error"]}# Start a new conversation conversation_id =self.documentation_agent.start_processing()# Process transcript segments transcript_data = transcript_result["text"] transcript_language = transcript_result["language"]print(f"Debug - Type of transcript_data: {type(transcript_data)}")# For each segment, detect language and translate if needed processed_segments =[]try:# Make sure transcript_data is a list of dictionaries with text and start fieldsifisinstance(transcript_data,list):for idx, segment inenumerate(transcript_data):print(f"Debug - Processing segment {idx}, type: {type(segment)}")# Extract text properly based on the typeifisinstance(segment,dict)and"text"in segment: text = segment["text"] start = segment.get("start",0)else:# Try to access attributes for non-dict typestry: text = segment.text start =getattr(segment,"start",0)exceptAttributeError:# If all else fails, convert to string text =str(segment) start = idx *5# Arbitrary timestampprint(f"Debug - Extracted text: {text[:30]}...")# Create a standardized segment std_segment ={"text": text,"start": start}# Process through translation agent translation_result =self.translation_agent.process_text(text, conversation_id)# Update segment with translation information segment_with_translation ={**std_segment,"translation_info": translation_result}# Use translated text for documentationif"final_text"in translation_result and translation_result["final_text"]!= text: std_segment["processed_text"]= translation_result["final_text"]else: std_segment["processed_text"]= text processed_segments.append(segment_with_translation)else:# If transcript_data is not a list, treat it as a single text blockprint(f"Debug - Transcript is not a list, treating as single text") text =str(transcript_data) std_segment ={"text": text,"start":0} translation_result =self.translation_agent.process_text(text, conversation_id) segment_with_translation ={**std_segment,"translation_info": translation_result}if"final_text"in translation_result and translation_result["final_text"]!= text: std_segment["processed_text"]= translation_result["final_text"]else: std_segment["processed_text"]= text processed_segments.append(segment_with_translation)exceptExceptionas e:print(f"Debug - Error processing transcript: {str(e)}")return{"error":f"Error processing transcript: {str(e)}"}# Process the transcript with the documentation agent documentation_result =self.documentation_agent.process_transcript( processed_segments, conversation_id)return{"youtube_url": youtube_url,"transcript_language": transcript_language,"processed_segments": processed_segments,"documentation": documentation_result,"conversation_id": conversation_id}
Let us understand this step-by-step:
Part 1: Getting the YouTube Transcript
defextract_youtube_id(youtube_url): ...
This extracts the unique video ID from any YouTube link.
defget_youtube_transcript(youtube_url): ...
This gets the actual spoken content of the video.
It tries to get a manual transcript first (created by humans).
If not available, it falls back to an auto-generated version (created by YouTube’s AI).
If nothing is found, it gives back an error message like: “Transcript not available.”
Part 2: Processing the Video with Agents
classclsYouTubeVideoProcessor: ...
This is like the control center that tells each intelligent agent what to do with the transcript. Here are the detailed steps:
1. Start the Process
defprocess_youtube_video(self,youtube_url): ...
The system starts with a YouTube video link.
It prints a message like: “Processing YouTube video: [link]”
2. Extract the Transcript
The system runs the get_youtube_transcript() function.
If it fails, it returns an error (e.g., invalid link or no subtitles available).
3. Start a “Conversation”
The documentation agent begins a new session, tracked by a unique conversation ID.
Think of this like opening a new folder in a shared team workspace to store everything related to this video.
4. Go Through Each Segment of the Transcript
The spoken text is often broken into small parts (segments), like subtitles.
For each part:
It checks the text.
It finds out the time that part was spoken.
It sends it to the translation agent to clean up or translate the text.
5. Translate (if needed)
If the translation agent finds a better or translated version, it replaces the original.
Otherwise, it keeps the original.
6. Prepare for Documentation
After translation, the segment is passed to the documentation agent.
This agent might:
Summarize the content,
Highlight important terms,
Structure it into a readable format.
7. Return the Final Result
The system gives back a structured package with:
The video link
The original language
The transcript in parts (processed and translated)
A documentation summary
The conversation ID (for tracking or further updates)
clsDocumentationAgent.py (This is the main class that will be part of the document agents.)
classclsDocumentationAgent:"""Documentation Agent built with LangChain"""def__init__(self,agent_id:str,broker: clsMCPBroker):self.agent_id = agent_idself.broker = brokerself.broker.register_agent(agent_id)# Initialize LangChain componentsself.llm =ChatOpenAI(model="gpt-4-0125-preview",temperature=0.1,api_key=OPENAI_API_KEY)# Create toolsself.tools =[clsSendMessageTool(sender_id=self.agent_id,broker=self.broker)]# Set up LLM with toolsself.llm_with_tools =self.llm.bind(tools=[tool.tool_config for tool inself.tools])# Setup memoryself.memory =ConversationBufferMemory(memory_key="chat_history",return_messages=True)# Create promptself.prompt = ChatPromptTemplate.from_messages([("system","""You are a Documentation Agent for YouTube video transcripts. Your responsibilities include: 1. Process YouTube video transcripts 2. Identify key points, topics, and main ideas 3. Organize content into a coherent and structured format 4. Create concise summaries 5. Request research information when necessary When you need additional context or research, send a request to the Research Agent. Always maintain a professional tone and ensure your documentation is clear and organized."""),MessagesPlaceholder(variable_name="chat_history"),("human","{input}"),MessagesPlaceholder(variable_name="agent_scratchpad"),])# Create agentself.agent =({"input":lambdax: x["input"],"chat_history":lambdax:self.memory.load_memory_variables({})["chat_history"],"agent_scratchpad":lambdax:format_to_openai_tool_messages(x["intermediate_steps"]),}|self.prompt|self.llm_with_tools|OpenAIToolsAgentOutputParser())# Create agent executorself.agent_executor =AgentExecutor(agent=self.agent,tools=self.tools,verbose=True,memory=self.memory)# Video dataself.current_conversation_id =Noneself.video_notes ={}self.key_points =[]self.transcript_segments =[]defstart_processing(self)->str:"""Start processing a new video"""self.current_conversation_id =str(uuid.uuid4())self.video_notes ={}self.key_points =[]self.transcript_segments =[]returnself.current_conversation_iddefprocess_transcript(self,transcript_segments,conversation_id=None):"""Process a YouTube transcript"""ifnot conversation_id: conversation_id =self.start_processing()self.current_conversation_id = conversation_id# Store transcript segmentsself.transcript_segments = transcript_segments# Process segments processed_segments =[]for segment in transcript_segments: processed_result =self.process_segment(segment) processed_segments.append(processed_result)# Generate summary summary =self.generate_summary()return{"processed_segments": processed_segments,"summary": summary,"conversation_id": conversation_id}defprocess_segment(self,segment):"""Process individual transcript segment""" text = segment.get("text","") start = segment.get("start",0)# Use LangChain agent to process the segment result =self.agent_executor.invoke({"input":f"Process this video transcript segment at timestamp {start}s: {text}. If research is needed, send a request to the research_agent."})# Update video notes timestamp = startself.video_notes[timestamp]={"text": text,"analysis": result["output"]}return{"timestamp": timestamp,"text": text,"analysis": result["output"]}defhandle_mcp_message(self,message: clsMCPMessage)-> Optional[clsMCPMessage]:"""Handle an incoming MCP message"""if message.message_type =="research_response":# Process research information received from Research Agent research_info = message.content.get("text","") result =self.agent_executor.invoke({"input":f"Incorporate this research information into video analysis: {research_info}"})# Send acknowledgment back to Research Agent response =clsMCPMessage(sender=self.agent_id,receiver=message.sender,message_type="acknowledgment",content={"text":"Research information incorporated into video analysis."},reply_to=message.id,conversation_id=message.conversation_id)self.broker.publish(response)return responseelif message.message_type =="translation_response":# Process translation response from Translation Agent translation_result = message.content# Process the translated textif"final_text"in translation_result: text = translation_result["final_text"] original_text = translation_result.get("original_text","") language_info = translation_result.get("language",{}) result =self.agent_executor.invoke({"input":f"Process this translated text: {text}\nOriginal language: {language_info.get('language','unknown')}\nOriginal text: {original_text}"})# Update notes with translation informationfor timestamp, note inself.video_notes.items():if note["text"]== original_text: note["translated_text"]= text note["language"]= language_infobreakreturnNonereturnNonedefrun(self):"""Run the agent to listen for MCP messages"""print(f"Documentation Agent {self.agent_id} is running...")whileTrue: message =self.broker.get_message(self.agent_id,timeout=1)if message:self.handle_mcp_message(message) time.sleep(0.1)defgenerate_summary(self)->str:"""Generate a summary of the video"""ifnotself.video_notes:return"No video data available to summarize." all_notes ="\n".join([f"{ts}: {note['text']}"for ts, note inself.video_notes.items()]) result =self.agent_executor.invoke({"input":f"Generate a concise summary of this YouTube video, including key points and topics:\n{all_notes}"})return result["output"]
Let us understand the key methods in a step-by-step manner:
The Documentation Agent is like a smart assistant that watches a YouTube video, takes notes, pulls out important ideas, and creates a summary — almost like a professional note-taker trained to help educators, researchers, and content creators. It works with a team of other assistants, like a Translator Agent and a Research Agent, and they all talk to each other through a messaging system.
1. Starting to Work on a New Video
defstart_processing(self)->str
When a new video is being processed:
A new project ID is created.
Old notes and transcripts are cleared to start fresh.
2. Processing the Whole Transcript
defprocess_transcript(...)
This is where the assistant:
Takes in the full transcript (what was said in the video).
Breaks it into small parts (like subtitles).
Sends each part to the smart brain for analysis.
Collects the results.
Finally, a summary of all the main ideas is created.
3. Processing One Transcript Segment at a Time
defprocess_segment(self,segment)
For each chunk of the video:
The assistant reads the text and timestamp.
It asks GPT-4 to analyze it and suggest important insights.
It saves that insight along with the original text and timestamp.
4. Handling Incoming Messages from Other Agents
defhandle_mcp_message(self,message)
The assistant can also receive messages from teammates (other agents):
If the message is from the Research Agent:
It reads new information and adds it to its notes.
It replies with a thank-you message to say it got the research.
If the message is from the Translation Agent:
It takes the translated version of a transcript.
Updates its notes to reflect the translated text and its language.
This is like a team of assistants emailing back and forth to make sure the notes are complete and accurate.
5. Summarizing the Whole Video
defgenerate_summary(self)
After going through all the transcript parts, the agent asks GPT-4 to create a short, clean summary — identifying:
Main ideas
Key talking points
Structure of the content
The final result is clear, professional, and usable in learning materials or documentation.
clsResearchAgent.py (This is the main class that implements the research agent.)
classclsResearchAgent:"""Research Agent built with AutoGen"""def__init__(self,agent_id:str,broker: clsMCPBroker):self.agent_id = agent_idself.broker = brokerself.broker.register_agent(agent_id)# Configure AutoGen directly with API keyifnot OPENAI_API_KEY:print("Warning: OPENAI_API_KEY not set for ResearchAgent")# Create config list directly instead of loading from file config_list =[{"model":"gpt-4-0125-preview","api_key": OPENAI_API_KEY}]# Create AutoGen assistant for researchself.assistant =AssistantAgent(name="research_assistant",system_message="""You are a Research Agent for YouTube videos. Your responsibilities include: 1. Research topics mentioned in the video 2. Find relevant information, facts, references, or context 3. Provide concise, accurate information to support the documentation 4. Focus on delivering high-quality, relevant information Respond directly to research requests with clear, factual information.""",llm_config={"config_list": config_list,"temperature":0.1})# Create user proxy to handle message passingself.user_proxy =UserProxyAgent(name="research_manager",human_input_mode="NEVER",code_execution_config={"work_dir":"coding","use_docker":False},default_auto_reply="Working on the research request...")# Current conversation trackingself.current_requests ={}defhandle_mcp_message(self,message: clsMCPMessage)-> Optional[clsMCPMessage]:"""Handle an incoming MCP message"""if message.message_type =="request":# Process research request from Documentation Agent request_text = message.content.get("text","")# Use AutoGen to process the research requestdefresearch_task():self.user_proxy.initiate_chat(self.assistant,message=f"Research request for YouTube video content: {request_text}. Provide concise, factual information.")# Return last assistant messagereturnself.assistant.chat_messages[self.user_proxy.name][-1]["content"]# Execute research task research_result =research_task()# Send research results back to Documentation Agent response =clsMCPMessage(sender=self.agent_id,receiver=message.sender,message_type="research_response",content={"text": research_result},reply_to=message.id,conversation_id=message.conversation_id)self.broker.publish(response)return responsereturnNonedefrun(self):"""Run the agent to listen for MCP messages"""print(f"Research Agent {self.agent_id} is running...")whileTrue: message =self.broker.get_message(self.agent_id,timeout=1)if message:self.handle_mcp_message(message) time.sleep(0.1)
Let us understand the key methods in detail.
1. Receiving and Responding to Research Requests
defhandle_mcp_message(self,message)
When the Research Agent gets a message (like a question or request for info), it:
Reads the message to see what needs to be researched.
Asks GPT-4 to find helpful, accurate info about that topic.
Sends the answer back to whoever asked the question (usually the Documentation Agent).
clsTranslationAgent.py (This is the main class that represents the translation agent)
classclsTranslationAgent:"""Agent for language detection and translation"""def__init__(self,agent_id:str,broker: clsMCPBroker):self.agent_id = agent_idself.broker = brokerself.broker.register_agent(agent_id)# Initialize language detectorself.language_detector =clsLanguageDetector()# Initialize translation serviceself.translation_service =clsTranslationService()defprocess_text(self,text,conversation_id=None):"""Process text: detect language and translate if needed, handling mixed language content"""ifnot conversation_id: conversation_id =str(uuid.uuid4())# Detect language with support for mixed language content language_info =self.language_detector.detect(text)# Decide if translation is needed needs_translation =True# Pure English content doesn't need translationif language_info["language_code"]=="en-IN"or language_info["language_code"]=="unknown": needs_translation =False# For mixed language, check if it's primarily Englishif language_info.get("is_mixed",False)and language_info.get("languages",[]): english_langs =[ lang for lang in language_info.get("languages",[])if lang["language_code"]=="en-IN"or lang["language_code"].startswith("en-")]# If the highest confidence language is English and > 60% confident, don't translateif english_langs and english_langs[0].get("confidence",0)>0.6: needs_translation =Falseif needs_translation:# Translate using the appropriate service based on language detection translation_result =self.translation_service.translate(text, language_info)return{"original_text": text,"language": language_info,"translation": translation_result,"final_text": translation_result.get("translated_text", text),"conversation_id": conversation_id}else:# Already English or unknown language, return as isreturn{"original_text": text,"language": language_info,"translation":{"provider":"none"},"final_text": text,"conversation_id": conversation_id}defhandle_mcp_message(self,message: clsMCPMessage)-> Optional[clsMCPMessage]:"""Handle an incoming MCP message"""if message.message_type =="translation_request":# Process translation request from Documentation Agent text = message.content.get("text","")# Process the text result =self.process_text(text, message.conversation_id)# Send translation results back to requester response =clsMCPMessage(sender=self.agent_id,receiver=message.sender,message_type="translation_response",content=result,reply_to=message.id,conversation_id=message.conversation_id)self.broker.publish(response)return responsereturnNonedefrun(self):"""Run the agent to listen for MCP messages"""print(f"Translation Agent {self.agent_id} is running...")whileTrue: message =self.broker.get_message(self.agent_id,timeout=1)if message:self.handle_mcp_message(message) time.sleep(0.1)
Let us understand the key methods in step-by-step manner:
1. Understanding and Translating Text:
defprocess_text(...)
This is the core job of the agent. Here’s what it does with any piece of text:
Step 1: Detect the Language
It tries to figure out the language of the input text.
It can handle cases where more than one language is mixed together, which is common in casual speech or subtitles.
Step 2: Decide Whether to Translate
If the text is clearly in English, or it’s unclear what the language is, it decides not to translate.
If the text is mostly in another language or has less than 60% confidence in being English, it will translate it into English.
Step 3: Translate (if needed)
If translation is required, it uses the translation service to do the job.
Then it packages all the information: the original text, detected language, the translated version, and a unique conversation ID.
Step 4: Return the Results
If no translation is needed, it returns the original text and a note saying “no translation was applied.”
2. Receiving Messages and Responding
defhandle_mcp_message(...)
The agent listens for messages from other agents. When someone asks it to translate something:
It takes the text from the message.
Runs it through the process_text function (as explained above).
Sends the translated (or original) result to the person who asked.
clsTranslationService.py (This is the actual work process of translation by the agent)
classclsTranslationService:"""Translation service using multiple providers with support for mixed languages"""def__init__(self):# Initialize Sarvam AI clientself.sarvam_api_key = SARVAM_API_KEYself.sarvam_url ="https://api.sarvam.ai/translate"# Initialize Google Cloud Translation client using simple HTTP requestsself.google_api_key = GOOGLE_API_KEYself.google_translate_url ="https://translation.googleapis.com/language/translate/v2"deftranslate_with_sarvam(self,text,source_lang,target_lang="en-IN"):"""Translate text using Sarvam AI (for Indian languages)"""ifnotself.sarvam_api_key:return{"error":"Sarvam API key not set"} headers ={"Content-Type":"application/json","api-subscription-key":self.sarvam_api_key} payload ={"input": text,"source_language_code": source_lang,"target_language_code": target_lang,"speaker_gender":"Female","mode":"formal","model":"mayura:v1"}try: response = requests.post(self.sarvam_url,headers=headers,json=payload)if response.status_code ==200:return{"translated_text": response.json().get("translated_text",""),"provider":"sarvam"}else:return{"error":f"Sarvam API error: {response.text}","provider":"sarvam"}exceptExceptionas e:return{"error":f"Error calling Sarvam API: {str(e)}","provider":"sarvam"}deftranslate_with_google(self,text,target_lang="en"):"""Translate text using Google Cloud Translation API with direct HTTP request"""ifnotself.google_api_key:return{"error":"Google API key not set"}try:# Using the translation API v2 with API key params ={"key":self.google_api_key,"q": text,"target": target_lang} response = requests.post(self.google_translate_url,params=params)if response.status_code ==200: data = response.json() translation = data.get("data",{}).get("translations",[{}])[0]return{"translated_text": translation.get("translatedText",""),"detected_source_language": translation.get("detectedSourceLanguage",""),"provider":"google"}else:return{"error":f"Google API error: {response.text}","provider":"google"}exceptExceptionas e:return{"error":f"Error calling Google Translation API: {str(e)}","provider":"google"}deftranslate(self,text,language_info):"""Translate text to English based on language detection info"""# If already English or unknown language, return as isif language_info["language_code"]=="en-IN"or language_info["language_code"]=="unknown":return{"translated_text": text,"provider":"none"}# Handle mixed language contentif language_info.get("is_mixed",False)and language_info.get("languages",[]):# Strategy for mixed language: # 1. If one of the languages is English, don't translate the entire text, as it might distort English portions# 2. If no English but contains Indian languages, use Sarvam as it handles code-mixing better# 3. Otherwise, use Google Translate for the primary detected language has_english =False has_indian =Falsefor lang in language_info.get("languages",[]):if lang["language_code"]=="en-IN"or lang["language_code"].startswith("en-"): has_english =Trueif lang.get("is_indian",False): has_indian =Trueif has_english:# Contains English - use Google for full text as it handles code-mixing wellreturnself.translate_with_google(text)elif has_indian:# Contains Indian languages - use Sarvam# Use the highest confidence Indian language as source indian_langs =[lang for lang in language_info.get("languages",[])if lang.get("is_indian",False)]if indian_langs:# Sort by confidence indian_langs.sort(key=lambdax: x.get("confidence",0),reverse=True) source_lang = indian_langs[0]["language_code"]returnself.translate_with_sarvam(text, source_lang)else:# Fallback to primary languageif language_info["is_indian"]:returnself.translate_with_sarvam(text, language_info["language_code"])else:returnself.translate_with_google(text)else:# No English, no Indian languages - use Google for primary languagereturnself.translate_with_google(text)else:# Not mixed language - use standard approachif language_info["is_indian"]:# Use Sarvam AI for Indian languagesreturnself.translate_with_sarvam(text, language_info["language_code"])else:# Use Google for other languagesreturnself.translate_with_google(text)
This Translation Service is like a smart translator that knows how to:
Detect what language the text is written in,
Choose the best translation provider depending on the language (especially for Indian languages),
And then translate the text into English.
It supports mixed-language content (such as Hindi-English in one sentence) and uses either Google Translate or Sarvam AI, a translation service designed for Indian languages.
Now, let us understand the key methods in a step-by-step manner:
1. Translating Using Google Translate
deftranslate_with_google(...)
This function uses Google Translate:
It sends the text, asks for English as the target language, and gets a translation back.
It also detects the source language automatically.
If successful, it returns the translated text and the detected original language.
If there’s an error, it returns a message saying what went wrong.
Best For: Non-Indian languages (like Spanish, French, Chinese) and content that is not mixed with English.
2. Main Translation Logic
deftranslate(self,text,language_info)
This is the decision-maker. Here’s how it works:
Case 1: No Translation Needed
If the text is already in English or the language is unknown, it simply returns the original text.
Case 2: Mixed Language (e.g., Hindi + English)
If the text contains more than one language:
✅ If one part is English → use Google Translate (it’s good with mixed languages).
✅ If it includes Indian languages only → use Sarvam AI (better at handling Indian content).
✅ If it’s neither English nor Indian → use Google Translate.
The service checks how confident it is about each language in the mix and chooses the most likely one to translate from.
Case 3: Single Language
If the text is only in one language:
✅ If it’s an Indian language (like Bengali, Tamil, or Marathi), use Sarvam AI.
✅ If it’s any other language, use Google Translate.
So, we’ve done it.
I’ve included the complete working solutions for you in the GitHub Link.
We’ll cover the detailed performance testing, Optimized configurations & many other useful details in our next post.
Till then, Happy Avenging! 🙂
Note: All the data & scenarios posted here are representational data & scenarios & available over the internet & for educational purposes only. There is always room for improvement in this kind of model & the solution associated with it. I’ve shown the basic ways to achieve the same for educational purposes only.
As we discover in our previous post about the Sarvam AI basic capabilities & a glimpse of code review. Today, we’ll finish the rest of the part & some of the matrices comparing against other popular LLMs.
Before that, you can refer to the previous post for a recap, which is available here.
Also, we’re providing the demo here –
Now, let us jump into the rest of the code –
Code:
clsSarvamAI.py (This script will capture the audio input in Indic languages & then provide an LLM response in the form of audio in Indic languages. In this post, we’ll discuss part of the code. In the next part, we’ll be discussing the next important methods. Note that we’re only going to discuss a few important functions here.)
This method saves recorded audio data into a WAV file format.
What it Does:
Takes raw audio data and converts it into bytes.
Gets the original sample rate of the audio.
Opens a new WAV file in write mode.
Sets the parameters for the audio file (like the number of channels, sample width, and frame rate).
Writes the audio data into the file in small chunks to manage memory usage.
Logs the current time to keep track of when the audio was saved.
Returns 0 on success or 1 if there was an error.
The “createWavFile” method takes the recorded audio and saves it as a WAV file on your computer. It converts the audio into bytes and writes them into small file parts. If something goes wrong, it prints an error message.
This method breaks down a large piece of text (in Bengali) into smaller, manageable chunks.
What it Does:
Initializes an empty list to store the chunks of text.
It uses a regular expression to split the text based on punctuation marks like full stops (।), question marks (?), and exclamation points (!).
Iterates through the split sentences to form chunks that do not exceed a specified maximum length (max_length).
Adds each chunk to the list until the entire text is processed.
Returns the list of chunks or an empty string if an error occurs.
The chunkBengaliResponse method takes a long Bengali text and splits it into smaller, easier-to-handle parts. It uses punctuation marks to determine where to split. If there’s a problem while splitting, it prints an error message.
This method plays audio data stored in a WAV file format.
What it Does:
Reads the audio data from a WAV file object.
Extracts parameters like the number of channels, sample width, and frame rate.
Converts the audio data into a format that the sound device can process.
If the audio is stereo (two channels), it reshapes the data for playback.
Plays the audio through the speakers.
Returns 0 on success or 1 if there was an error.
The playWav method takes audio data from a WAV file and plays it through your computer’s speakers. It reads the data and converts it into a format your speakers can understand. If there’s an issue playing the audio, it prints an error message.
This method continuously plays audio from a queue until there is no more audio to play.
What it Does:
It enters an infinite loop to keep checking for audio data in the queue.
Retrieves audio data from the queue and plays it using the “playWav”-method.
Logs the current time each time an audio response is played.
It breaks the loop if it encounters a None value, indicating no more audio to play.
Returns 0 on success or 1 if there was an error.
The audioPlayerWorker method keeps checking a queue for new audio to play. It plays each piece of audio as it comes in and stops when there’s no more audio. If there’s an error during playback, it prints an error message.
This asynchronous method processes a chunk of text to generate audio using an external API.
What it Does:
Cleans up the text chunk by removing unwanted characters.
Prepares a payload with the cleaned text and other parameters required for text-to-speech conversion.
Sends a POST request to an external API to generate audio from the text.
Decodes the audio data received from the API (in base64 format) into raw audio bytes.
Returns the audio bytes or an empty byte string if there is an error.
The processChunk method takes a text, sends it to an external service to be converted into speech, and returns the audio data. If something goes wrong, it prints an error message.
This asynchronous method handles the complete audio processing workflow, including speech recognition, translation, and audio playback.
What it Does:
Initializes various configurations and headers required for processing.
Sends the recorded audio to an API to get the transcript and detected language.
Translates the transcript into another language using another API.
Splits the translated text into smaller chunks using the chunkBengaliResponse method.
Starts an audio playback thread to play each processed audio chunk.
Sends each text chunk to the processChunk method to convert to speech and adds the audio data to the queue for playback.
Waits for all audio chunks to be processed and played before finishing.
Logs the current time when the process is complete.
Returns 0 on success or 1 if there was an error.
The “processAudio”-method takes recorded audio, recognizes what was said, translates it into another language, splits the translated text into parts, converts each part into speech, and plays it back. It uses different services to do this; if there’s a problem at any step, it prints an error message.
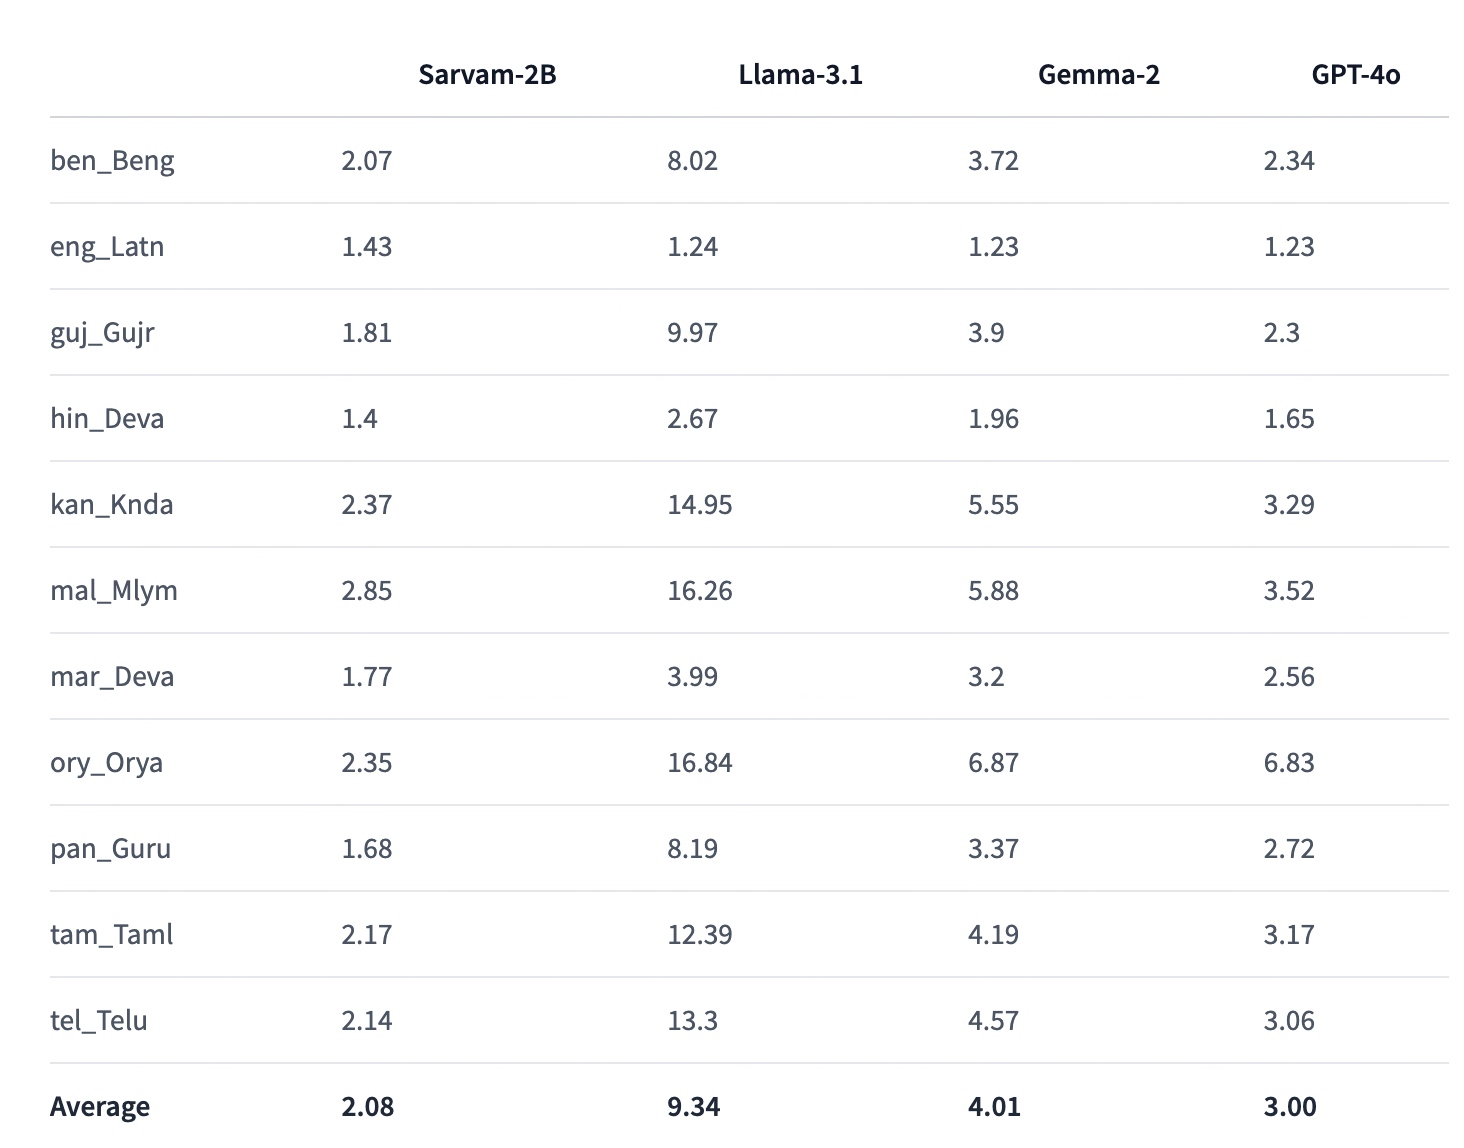
And, here is the performance stats (Captured from Sarvam AI website) –
So, finally, we’ve done it. You can view the complete code in this GitHub link.
I’ll bring some more exciting topics in the coming days from the Python verse.
Till then, Happy Avenging! 🙂
Note: All the data & scenarios posted here are representational data & scenarios & available over the internet & for educational purposes only. There is always room for improvement in this kind of model & the solution associated with it. I’ve shown the basic ways to achieve the same for educational purposes only.
In the rapidly evolving landscape of artificial intelligence, Sarvam AI has emerged as a pioneering force in developing language technologies for Indian languages. This article series aims to provide an in-depth look at Sarvam AI’s Indic APIs, exploring their features, performance, and potential impact on the Indian tech ecosystem.
This LLM aims to bridge the language divide in India’s digital landscape by providing powerful, accessible AI tools for Indic languages.
The importance of Indic language processing:
India has 22 official languages and hundreds of dialects, presenting a unique challenge for technology adoption and digital inclusion. Even though all the government work happens in both the official language along with English language.
Developers can fine-tune the models for specific domains or use cases, improving accuracy for specialized applications.
Supported languages and use cases:
As of 2024, Sarvam AI’s Indic APIs support the following languages:
Hindi
Bengali
Tamil
Telugu
Marathi
Gujarati
Kannada
Malayalam
Punjabi
Odia
Before delving into the details, I strongly recommend taking a look at the demo.
Isn’t this exciting? Let us understand the flow of events in the following diagram –
The application interacts with Sarvam AI’s API. After interpreting the initial audio inputs from the computer, it uses Sarvam AI’s API to get the answer based on the selected Indic language, Bengali.
clsSarvamAI.py (This script will capture the audio input in Indic languages & then provide an LLM response in the form of audio in Indic languages. In this post, we’ll discuss part of the code. In the next part, we’ll be discussing the next important methods. Note that we’re only going to discuss a few important functions here.)
definitializeMicrophone(self):try:forindex,nameinenumerate(sr.Microphone.list_microphone_names()):print(f"Microphone with name \"{name}\" found (device_index={index})")returnsr.Microphone()exceptExceptionas e:x=str(e)print('Error: <<Initiating Microphone>>: ',x)return''defrealTimeTranslation(self):try:WavFile=self.WavFilerecognizer=sr.Recognizer()try:microphone=self.initializeMicrophone()exceptExceptionas e:print(f"Error initializing microphone: {e}")returnwithmicrophoneas source:print("Adjusting for ambient noise. Please wait...")recognizer.adjust_for_ambient_noise(source,duration=5)print("Microphone initialized. Start speaking...")try:while True:try:print("Listening...")audio=recognizer.listen(source,timeout=5,phrase_time_limit=5)print("Audio captured. Recognizing...") #var=datetime.datetime.now().strftime("%Y-%m-%d_%H-%M-%S") #print('Before Audio Time: ',str(var))self.createWavFile(audio,WavFile)try:text=recognizer.recognize_google(audio,language="bn-BD") # Bengalilanguagecodesentences=text.split('।') # Bengalifullstopprint('Sentences: ')print(sentences)print('*'*120)ifnot text:print("No speech detected. Please try again.")continueifstr(text).lower() =='টাটা':raiseBreakOuterLoop("Based on User Choice!")asyncio.run(self.processAudio(audio))exceptsr.UnknownValueError:print("Google Speech Recognition could not understand audio")exceptsr.RequestErroras e:print(f"Could not request results from Google Speech Recognition service; {e}")exceptsr.WaitTimeoutError:print("No speech detected within the timeout period. Listening again...")except BreakOuterLoop:raiseexceptExceptionas e:print(f"An unexpected error occurred: {e}")time.sleep(1) # ShortpausebeforenextiterationexceptBreakOuterLoopas e:print(f"Exited : {e}") # Removingthetemporaryaudiofilethatwasgeneratedatthebeginingos.remove(WavFile)return0exceptExceptionas e:x=str(e)print('Error: <<Real-time Translation>>: ',x)return1
initializeMicrophone:
Purpose:
This method is responsible for setting up and initializing the microphone for audio input.
What it Does:
It attempts to list all available microphones connected to the system.
It prints the microphone’s name and corresponding device index (a unique identifier) for each microphone.
If successful, it returns a microphone object (sr.Microphone()), which can be used later to capture audio.
If this process encounters an error (e.g., no microphones being found or an internal error), it catches the exception, prints an error message, and returns an empty string (“).
The “initializeMicrophone” Method finds all microphones connected to the computer and prints their names. If it finds a microphone, it prepares to use it for recording. If something goes wrong, it tells you what went wrong and stops the process.
realTimeTranslation:
Purpose: This Method uses the microphone to handle real-time speech translation from a user. It captures spoken audio, converts it into text, and processes it further.
What it Does:
Initializes a recognizer object (sr.Recognizer()) for speech recognition.
Call initializeMicrophone to set up the microphone. If initialization fails, an error message is printed, and the process is stopped.
Once the microphone is set up successfully, it adjusts for ambient noise to enhance accuracy.
Enters a loop to continuously listen for audio input from the user:
It waits for the user to speak and captures the audio.
Converts the captured audio to text using Google’s Speech Recognition service, specifying Bengali as the language.
If text is successfully captured and recognized:
Splits the text into sentences using the Bengali full-stop character.
Prints the sentences.
It checks if the text is a specific word (“টাটা”), and if so, it raises an exception to stop the loop (indicating that the user wants to exit).
Otherwise, it processes the audio asynchronously with processAudio.
If no speech is detected or an error occurs, it prints the relevant message and continues listening.
If the user decides to exit or if an error occurs, it breaks out of the loop, deletes any temporary audio files created, and returns a status code (0 for success, 1 for failure).
The “realTimeTranslation” method continuously listens to the microphone for the user to speak. It captures what is said and tries to understand it using Google’s service, specifically for the Bengali language. It then splits what was said into sentences and prints them out. If the user says “টাটা” (which means “goodbye” in Bengali), it stops listening and exits. If it cannot understand the user or if there is a problem, it will let the user know and try again. It will print an error and stop the process if something goes wrong.
Let’s wait for the next part & enjoy this part.
Note: All the data & scenarios posted here are representational data & scenarios & available over the internet & for educational purposes only. There is always room for improvement in this kind of model & the solution associated with it. I’ve shown the basic ways to achieve the same for educational purposes only.


You must be logged in to post a comment.