Building solutions using LLM AutoGen in Python – Part 3

Before we dive into the details of this post, let us provide the previous two links that precede it.

Building solutions using LLM AutoGen in Python – Part 1

Building solutions using LLM AutoGen in Python – Part 2

For, reference, we’ll share the demo before deep dive into the actual follow-up analysis in the below section –


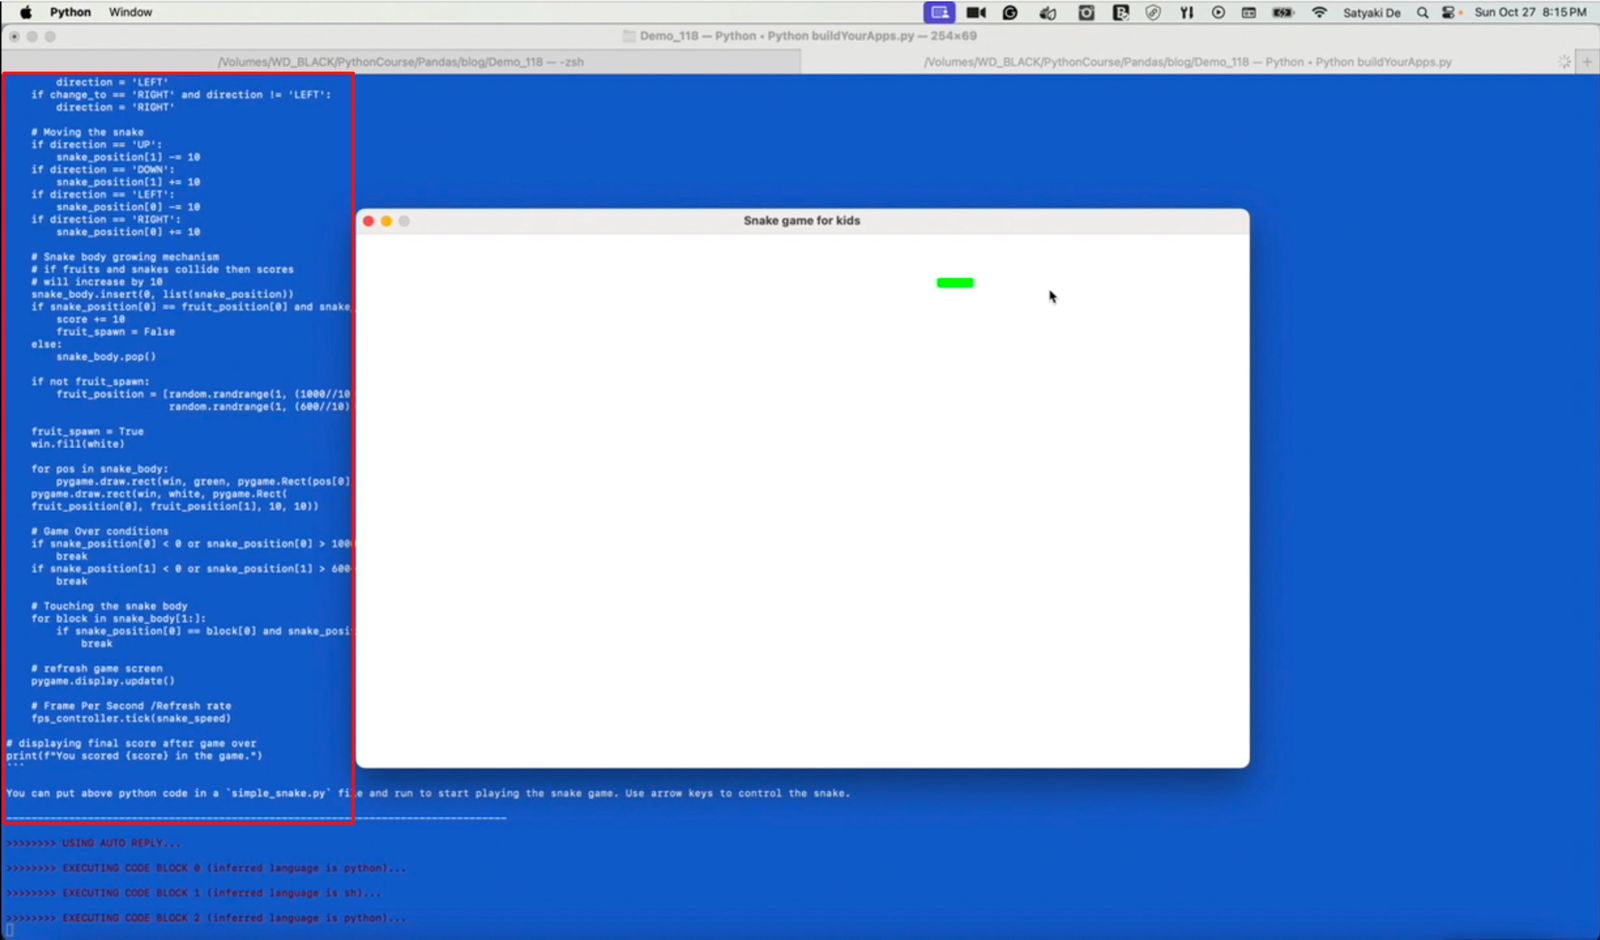
In this post, we will understand the initial code generated & then the revised code to compare them for a better understanding of the impact of revised prompts.

But, before that let us broadly understand the communication types between the agents.

  • Agents InvolvedAgent1Agent2
  • Flow:
    • Agent1 sends a request directly to Agent2.
    • Agent2 processes the request and sends the response back to Agent1.
  • Use Case: Simple query-response interactions without intermediaries.
  • Agents InvolvedUserAgentMediatorSpecialistAgent1SpecialistAgent2
  • Flow:
    • UserAgent sends input to Mediator.
    • Mediator delegates tasks to SpecialistAgent1 and SpecialistAgent2.
    • Specialists process tasks and return results to Mediator.
    • Mediator consolidates results and sends them back to UserAgent.
  • Agents InvolvedBroadcasterAgentAAgentBAgentC
  • Flow:
    • Broadcaster sends a message to multiple agents simultaneously.
    • Agents that find the message relevant (AgentAAgentC) acknowledge or respond.
  • Use Case: System-wide notifications or alerts.
  • Agents InvolvedSupervisorWorker1Worker2
  • Flow:
    • Supervisor assigns tasks to Worker1 and Worker2.
    • Workers execute tasks and report progress back to Supervisor.
  • Use Case: Task delegation in structured organizations.
  • Agents InvolvedPublisherSubscriber1Topic
  • Flow:
    • Publisher publishes an event or message to a Topic.
    • Subscriber1, who is subscribed to the Topic, receives the event.
  • Use Case: Decoupled systems where publishers and subscribers do not need direct knowledge of each other.
  • Agents InvolvedTriggerEventReactiveAgentNextStep
  • Flow:
    • An event occurs (TriggerEvent).
    • ReactiveAgent detects the event and acts.
    • The action leads to the NextStep in the process.
  • Use Case: Systems that need to respond to asynchronous events or changes in the environment.

Since, we now understand the basic communication types. Let us understand the AutoGen generated first code & the last code (That satisfies our need) –

# filename: simple_snake.py (Generated by AutoGen)

import pygame
import time
import random
 
snake_speed = 15
 
# Window color
white = pygame.Color(255, 255, 255)
 
# Snake color
green = pygame.Color(0, 255, 0)
 
snake_position = [100, 50]
 
# defining first 4 blocks 
# of snake body
snake_body = [ [100, 50], 
               [90, 50],
               [80, 50],
               [70, 50]
            ]
# fruit position
fruit_position = [random.randrange(1, (1000//10)) * 10, 
                  random.randrange(1, (600//10)) * 10]
fruit_spawn = True
 
direction = 'RIGHT'
change_to = direction
 
score = 0
 
# Initialising pygame
pygame.init()
 
# Initialise game window
win = pygame.display.set_mode((1000, 600))
pygame.display.set_caption("Snake game for kids")
 
# FPS (frames per second) controller
fps_controller = pygame.time.Clock()
 
  
while True:
    # handling key events
    for event in pygame.event.get():
        if event.type == pygame.KEYDOWN:
            if event.key == pygame.K_UP:
                change_to = 'UP'
            if event.key == pygame.K_DOWN:
                change_to = 'DOWN'
            if event.key == pygame.K_LEFT:
                change_to = 'LEFT'
            if event.key == pygame.K_RIGHT:
                change_to = 'RIGHT'

    # If two keys pressed simultaneously
    # we don't want snake to move into two
    # directions simultaneously
    if change_to == 'UP' and direction != 'DOWN':
        direction = 'UP'
    if change_to == 'DOWN' and direction != 'UP':
        direction = 'DOWN'
    if change_to == 'LEFT' and direction != 'RIGHT':
        direction = 'LEFT'
    if change_to == 'RIGHT' and direction != 'LEFT':
        direction = 'RIGHT'
 
    # Moving the snake
    if direction == 'UP':
        snake_position[1] -= 10
    if direction == 'DOWN':
        snake_position[1] += 10
    if direction == 'LEFT':
        snake_position[0] -= 10
    if direction == 'RIGHT':
        snake_position[0] += 10
 
    # Snake body growing mechanism
    # if fruits and snakes collide then scores
    # will increase by 10
    snake_body.insert(0, list(snake_position))
    if snake_position[0] == fruit_position[0] and snake_position[1] == fruit_position[1]:
        score += 10
        fruit_spawn = False
    else:
        snake_body.pop()
         
    if not fruit_spawn:
        fruit_position = [random.randrange(1, (1000//10)) * 10, 
                          random.randrange(1, (600//10)) * 10]
         
    fruit_spawn = True
    win.fill(white)
    
    for pos in snake_body:
        pygame.draw.rect(win, green, pygame.Rect(pos[0], pos[1], 10, 10))
    pygame.draw.rect(win, white, pygame.Rect(
    fruit_position[0], fruit_position[1], 10, 10))
 
    # Game Over conditions
    if snake_position[0] < 0 or snake_position[0] > 1000-10:
        break
    if snake_position[1] < 0 or snake_position[1] > 600-10:
        break
 
    # Touching the snake body
    for block in snake_body[1:]:
        if snake_position[0] == block[0] and snake_position[1] == block[1]:
            break
    
    # refresh game screen
    pygame.display.update()

    # Frame Per Second /Refresh rate
    fps_controller.tick(snake_speed)

# displaying final score after game over
print(f"You scored {score} in the game.")

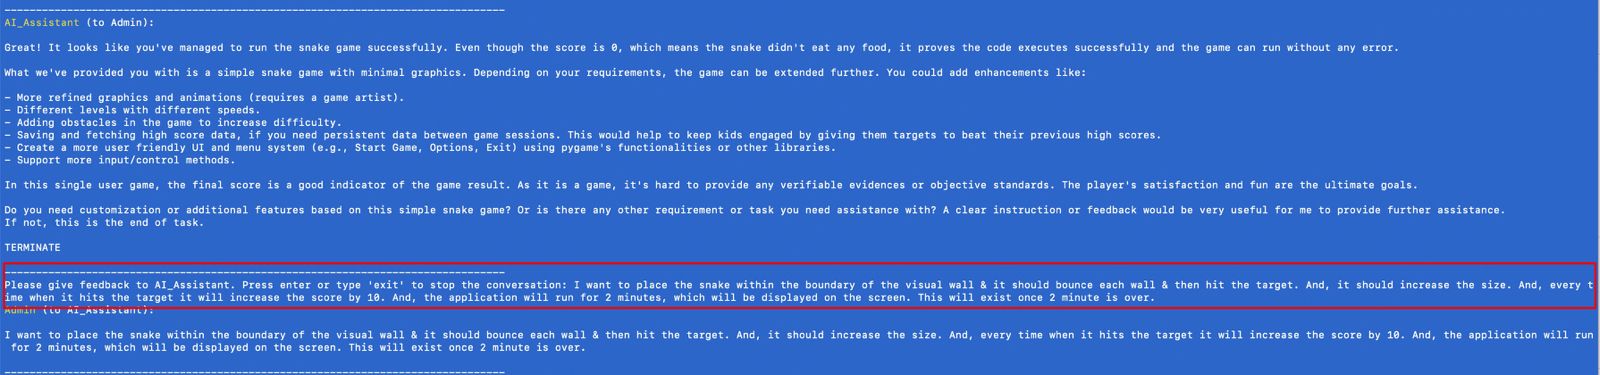
Now, let us remember the prompt refinement that we’ve done (We’ve already posted that in our last post as well) –

I want to place the snake within the boundary of the visual wall & it should bounce each wall & then hit the target. And, it should increase the size. And, every time when it hits the target it will increase the score by 10. And, the application will run for 2 minutes, which will be displayed on the screen. This will exit once 2 minute is over.
# filename: simple_snake.py (Generated by AutoGen)

import pygame
import time
import random
import math

pygame.init()

white = (255, 255, 255)
yellow = (255, 255, 102)
green = (0, 255, 0)
red = (255, 0, 0)
black = (0, 0, 0)
blue = (0, 0, 255)

dis_width = 800
dis_height = 600

dis = pygame.display.set_mode((dis_width, dis_height))
pygame.display.set_caption('Snake Game')

clock = pygame.time.Clock()
snake_block = 10
snake_speed = 30
font_style = pygame.font.SysFont(None, 50)
score_font = pygame.font.SysFont(None, 35)

def our_snake(snake_block, snake_List):
    for x in snake_List:
        pygame.draw.rect(dis, green, [x[0], x[1], snake_block, snake_block])

def message(msg,color):
    mesg = font_style.render(msg, True, color)
    dis.blit(mesg, [dis_width / 3, dis_height / 3])

def gameLoop():  # creating a function
    game_over = False
    game_close = False

    # snake starting coordinates
    x1 = dis_width / 2
    y1 = dis_height / 2

    # snake initial movement direction
    x1_change = 0
    y1_change = 0

    # initialize snake length and list of coordinates
    snake_List = []
    Length_of_snake = 1

    # random starting point for the food
    foodx = round(random.randrange(0, dis_width - snake_block) / 10.0) * 10.0
    foody = round(random.randrange(0, dis_height - snake_block) / 10.0) * 10.0

    # initialize score
    score = 0

    # store starting time
    start_time = time.time()

    while not game_over:

        # Remaining time
        elapsed_time = time.time() - start_time
        remaining_time = 120 - elapsed_time  # 2 minutes game
        if remaining_time <= 0:
            game_over = True

        # event handling loop
        for event in pygame.event.get():
            if event.type == pygame.QUIT:
                game_over = True  # when closing window
            if event.type == pygame.MOUSEBUTTONUP:
                # get mouse click coordinates
                pos = pygame.mouse.get_pos()

                # calculate new direction vector from snake to click position
                x1_change = pos[0] - x1
                y1_change = pos[1] - y1

                # normalize direction vector
                norm = math.sqrt(x1_change ** 2 + y1_change ** 2)
                if norm != 0:
                    x1_change /= norm
                    y1_change /= norm

                # multiply direction vector by step size
                x1_change *= snake_block
                y1_change *= snake_block

        x1 += x1_change
        y1 += y1_change
        dis.fill(white)
        pygame.draw.rect(dis, red, [foodx, foody, snake_block, snake_block])
        pygame.draw.rect(dis, green, [x1, y1, snake_block, snake_block])
        snake_Head = []
        snake_Head.append(x1)
        snake_Head.append(y1)
        snake_List.append(snake_Head)
        if len(snake_List) > Length_of_snake:
            del snake_List[0]

        our_snake(snake_block, snake_List)

        # Bounces the snake back if it hits the edge
        if x1 < 0 or x1 > dis_width:
            x1_change *= -1
        if y1 < 0 or y1 > dis_height:
            y1_change *= -1

        # Display score
        value = score_font.render("Your Score: " + str(score), True, black)
        dis.blit(value, [0, 0])

        # Display remaining time
        time_value = score_font.render("Remaining Time: " + str(int(remaining_time)), True, blue)
        dis.blit(time_value, [0, 30])

        pygame.display.update()

        # Increase score and length of snake when snake gets the food
        if abs(x1 - foodx) < snake_block and abs(y1 - foody) < snake_block:
            foodx = round(random.randrange(0, dis_width - snake_block) / 10.0) * 10.0
            foody = round(random.randrange(0, dis_height - snake_block) / 10.0) * 10.0
            Length_of_snake += 1
            score += 10

        # Snake movement speed
        clock.tick(snake_speed)

    pygame.quit()
    quit()

gameLoop()

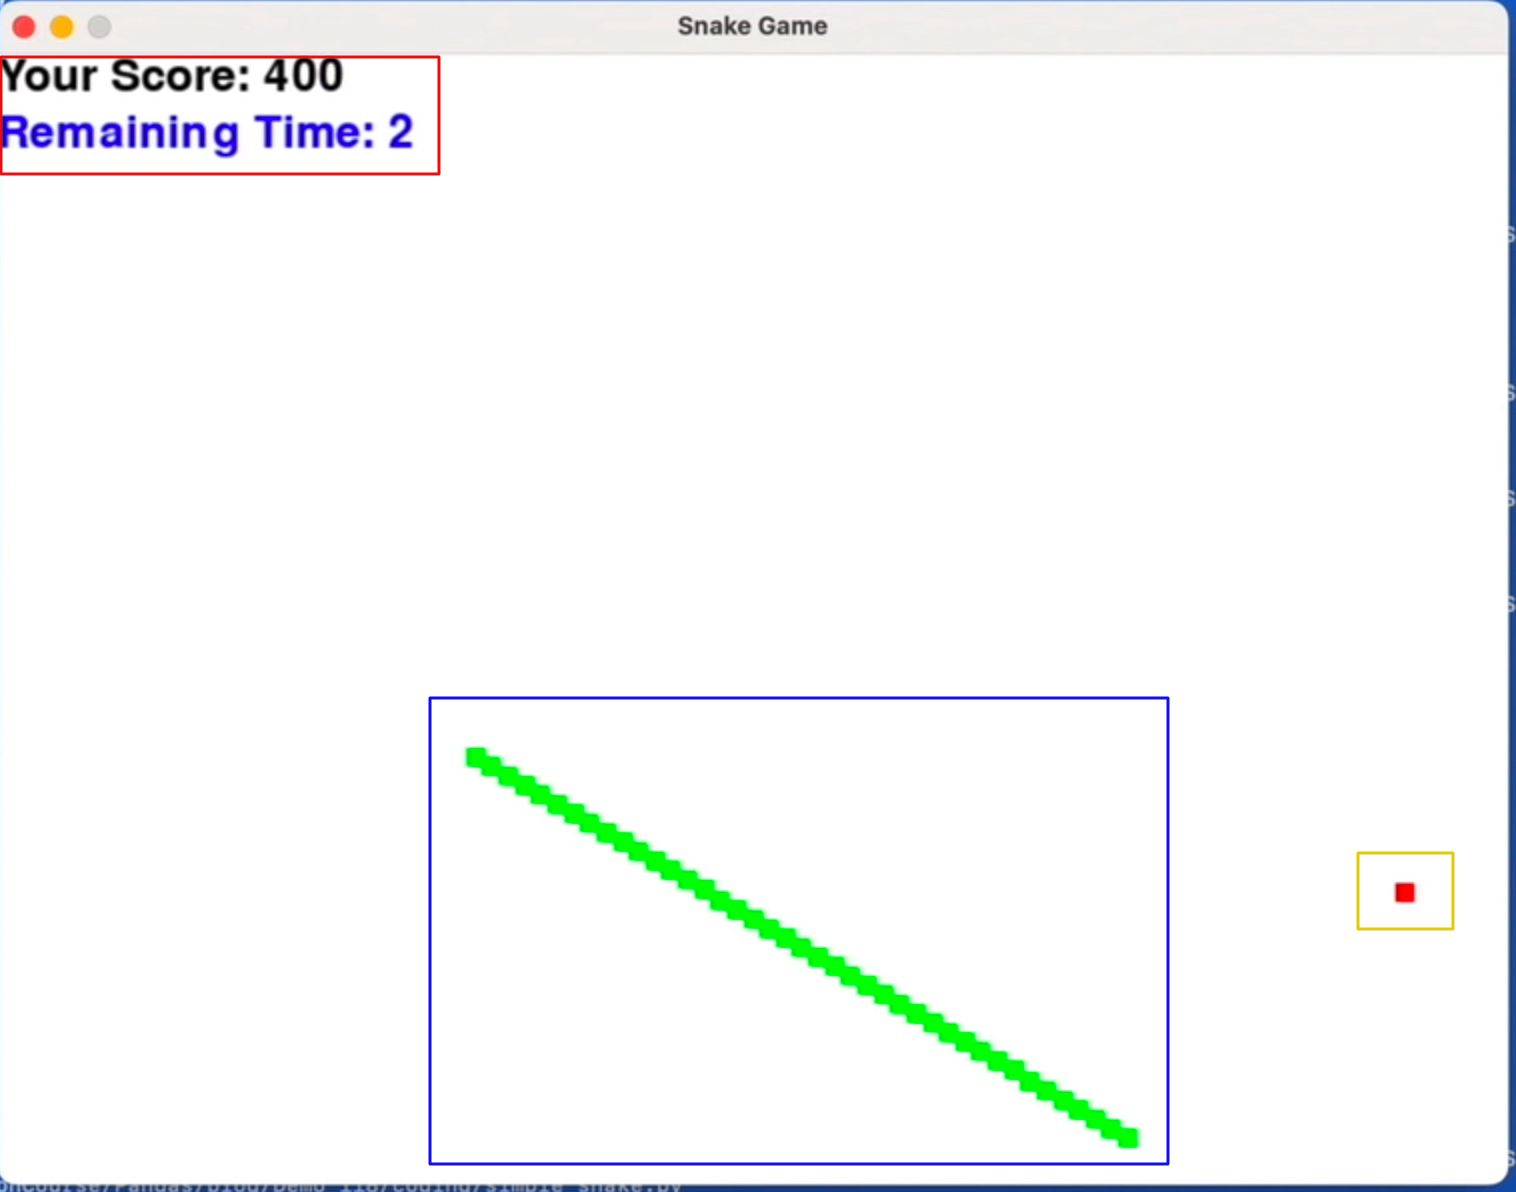
Now, let us understand the difference here –

The first program is a snake game controlled by arrow keys that end if the Snake hits a wall or itself. The second game uses mouse clicks for control, bounces off walls instead of ending, includes a 2-minute timer, and displays the remaining time.

So, we’ve done it. 🙂

You can find the detailed code in the following Github link.


I’ll bring some more exciting topics in the coming days from the Python verse.

Till then, Happy Avenging! 🙂

Building solutions using LLM AutoGen in Python – Part 2

Let us understand the rest of the post as a continuation of the previous post. But before that, please refer to the previous post.

But before that, I’m adding the demo here at the beginning one more time.


For continuation, I have posted the process flow, which we discussed in the earlier post.


We’ll analyze the prompt engineering in today’s post.

But, before that, let us understand the flow of process by the agents & how they work together as one team –

But, for more clarity let’s understand the roles of individual agents that you want to define –

The first prompt is relatively simple, as it asks to build a simple user interface for the Game of Snake (Which we used to play a lot using our first Nokia mobile phones).

And, it didn’t exactly build what we were anticipating at first glance. And, it came out with something like this –

Even though it creates the Snake marked with Green objects on top of the white screen, it lacks many things. For example, the Snake briefly leaves the visual box and appears from the opposite side once it reaches a wall. It doesn’t have a target to hit, a score to show, or a timer to control the play hours per session per person, i.e., 2 minutes at once.

However, AutoGen will give you an option to further refine your goals with the following prompt. And, developers have the option to provide their best feedback based on the previous demo, which is as follows –

I want to place the snake within the boundary of the visual wall & it should bounce each wall & then hit the target. And, it should increase the size. And, every time when it hits the target it will increase the score by 10. And, the application will run for 2 minutes, which will be displayed on the screen. This will exit once 2 minute is over.

And, the output of this change is per our expectations, which is shown below –


We’ll further analyze the prompt engineering & the final generated code in the next post.

Building the optimized Indic Language bot by using the Python-based Sarvam AI LLMs – Part 2

As we discover in our previous post about the Sarvam AI basic capabilities & a glimpse of code review. Today, we’ll finish the rest of the part & some of the matrices comparing against other popular LLMs.

Before that, you can refer to the previous post for a recap, which is available here.

Also, we’re providing the demo here –


Now, let us jump into the rest of the code –

clsSarvamAI.py (This script will capture the audio input in Indic languages & then provide an LLM response in the form of audio in Indic languages. In this post, we’ll discuss part of the code. In the next part, we’ll be discussing the next important methods. Note that we’re only going to discuss a few important functions here.)

def createWavFile(self, audio, output_filename="output.wav", target_sample_rate=16000):
      try:
          # Get the raw audio data as bytes
          audio_data = audio.get_raw_data()

          # Get the original sample rate
          original_sample_rate = audio.sample_rate

          # Open the output file in write mode
          with wave.open(output_filename, 'wb') as wf:
              # Set parameters: nchannels, sampwidth, framerate, nframes, comptype, compname
              wf.setnchannels(1)  # Assuming mono audio
              wf.setsampwidth(2)  # 16-bit audio (int16)
              wf.setframerate(original_sample_rate)

              # Write audio data in chunks
              chunk_size = 1024 * 10  # Chunk size (adjust based on memory constraints)
              for i in range(0, len(audio_data), chunk_size):
                  wf.writeframes(audio_data[i:i+chunk_size])

          # Log the current timestamp
          var = datetime.datetime.now().strftime("%Y-%m-%d_%H-%M-%S")
          print('Audio Time: ', str(var))

          return 0

      except Exception as e:
          print('Error: <Wav File Creation>: ', str(e))
          return 1

Purpose:

This method saves recorded audio data into a WAV file format.

What it Does:

  • Takes raw audio data and converts it into bytes.
  • Gets the original sample rate of the audio.
  • Opens a new WAV file in write mode.
  • Sets the parameters for the audio file (like the number of channels, sample width, and frame rate).
  • Writes the audio data into the file in small chunks to manage memory usage.
  • Logs the current time to keep track of when the audio was saved.
  • Returns 0 on success or 1 if there was an error.

The “createWavFile” method takes the recorded audio and saves it as a WAV file on your computer. It converts the audio into bytes and writes them into small file parts. If something goes wrong, it prints an error message.


def chunkBengaliResponse(self, text, max_length=500):
      try:
          chunks = []
          current_chunk = ""

          # Use regex to split on sentence-ending punctuation
          sentences = re.split(r'(।|\?|!)', text)

          for i in range(0, len(sentences), 2):
              sentence = sentences[i] + (sentences[i+1] if i+1 < len(sentences) else '')

              if len(current_chunk) + len(sentence) <= max_length:
                  current_chunk += sentence
              else:
                  if current_chunk:
                      chunks.append(current_chunk.strip())
                  current_chunk = sentence

          if current_chunk:
              chunks.append(current_chunk.strip())

          return chunks
      except Exception as e:
          x = str(e)
          print('Error: <<Chunking Bengali Response>>: ', x)

          return ''

Purpose:

This method breaks down a large piece of text (in Bengali) into smaller, manageable chunks.

What it Does:

  • Initializes an empty list to store the chunks of text.
  • It uses a regular expression to split the text based on punctuation marks like full stops (।), question marks (?), and exclamation points (!).
  • Iterates through the split sentences to form chunks that do not exceed a specified maximum length (max_length).
  • Adds each chunk to the list until the entire text is processed.
  • Returns the list of chunks or an empty string if an error occurs.

The chunkBengaliResponse method takes a long Bengali text and splits it into smaller, easier-to-handle parts. It uses punctuation marks to determine where to split. If there’s a problem while splitting, it prints an error message.


def playWav(self, audio_data):
      try:
          # Create a wav file object from the audio data
          WavFile = wave.open(io.BytesIO(audio_data), 'rb')

          # Extract audio parameters
          channels = WavFile.getnchannels()
          sample_width = WavFile.getsampwidth()
          framerate = WavFile.getframerate()
          n_frames = WavFile.getnframes()

          # Read the audio data
          audio = WavFile.readframes(n_frames)
          WavFile.close()

          # Convert audio data to numpy array
          dtype_map = {1: np.int8, 2: np.int16, 3: np.int32, 4: np.int32}
          audio_np = np.frombuffer(audio, dtype=dtype_map[sample_width])

          # Reshape audio if stereo
          if channels == 2:
              audio_np = audio_np.reshape(-1, 2)

          # Play the audio
          sd.play(audio_np, framerate)
          sd.wait()

          return 0
      except Exception as e:
          x = str(e)
          print('Error: <<Playing the Wav>>: ', x)

          return 1

Purpose:

This method plays audio data stored in a WAV file format.

What it Does:

  • Reads the audio data from a WAV file object.
  • Extracts parameters like the number of channels, sample width, and frame rate.
  • Converts the audio data into a format that the sound device can process.
  • If the audio is stereo (two channels), it reshapes the data for playback.
  • Plays the audio through the speakers.
  • Returns 0 on success or 1 if there was an error.

The playWav method takes audio data from a WAV file and plays it through your computer’s speakers. It reads the data and converts it into a format your speakers can understand. If there’s an issue playing the audio, it prints an error message.


  def audioPlayerWorker(self, queue):
      try:
          while True:
              var = datetime.datetime.now().strftime("%Y-%m-%d_%H-%M-%S")
              print('Response Audio Time: ', str(var))
              audio_bytes = queue.get()
              if audio_bytes is None:
                  break
              self.playWav(audio_bytes)
              queue.task_done()

          return 0
      except Exception as e:
          x = str(e)
          print('Error: <<Audio Player Worker>>: ', x)

          return 1

Purpose:

This method continuously plays audio from a queue until there is no more audio to play.

What it Does:

  • It enters an infinite loop to keep checking for audio data in the queue.
  • Retrieves audio data from the queue and plays it using the “playWav”-method.
  • Logs the current time each time an audio response is played.
  • It breaks the loop if it encounters a None value, indicating no more audio to play.
  • Returns 0 on success or 1 if there was an error.

The audioPlayerWorker method keeps checking a queue for new audio to play. It plays each piece of audio as it comes in and stops when there’s no more audio. If there’s an error during playback, it prints an error message.


  async def processChunk(self, chText, url_3, headers):
      try:
          sarvamAPIKey = self.sarvamAPIKey
          model_1 = self.model_1
          langCode_1 = self.langCode_1
          speakerName = self.speakerName

          print()
          print('Chunk Response: ')
          vText = chText.replace('*','').replace(':',' , ')
          print(vText)

          payload_3 = {
              "inputs": [vText],
              "target_language_code": langCode_1,
              "speaker": speakerName,
              "pitch": 0.15,
              "pace": 0.95,
              "loudness": 2.1,
              "speech_sample_rate": 16000,
              "enable_preprocessing": True,
              "model": model_1
          }
          response_3 = requests.request("POST", url_3, json=payload_3, headers=headers)
          audio_data = response_3.text
          data = json.loads(audio_data)
          byte_data = data['audios'][0]
          audio_bytes = base64.b64decode(byte_data)

          return audio_bytes
      except Exception as e:
          x = str(e)
          print('Error: <<Process Chunk>>: ', x)
          audio_bytes = base64.b64decode('')

          return audio_bytes

Purpose:

This asynchronous method processes a chunk of text to generate audio using an external API.

What it Does:

  • Cleans up the text chunk by removing unwanted characters.
  • Prepares a payload with the cleaned text and other parameters required for text-to-speech conversion.
  • Sends a POST request to an external API to generate audio from the text.
  • Decodes the audio data received from the API (in base64 format) into raw audio bytes.
  • Returns the audio bytes or an empty byte string if there is an error.

The processChunk method takes a text, sends it to an external service to be converted into speech, and returns the audio data. If something goes wrong, it prints an error message.


  async def processAudio(self, audio):
      try:
          model_2 = self.model_2
          model_3 = self.model_3
          url_1 = self.url_1
          url_2 = self.url_2
          url_3 = self.url_3
          sarvamAPIKey = self.sarvamAPIKey
          audioFile = self.audioFile
          WavFile = self.WavFile
          langCode_1 = self.langCode_1
          langCode_2 = self.langCode_2
          speakerGender = self.speakerGender

          headers = {
              "api-subscription-key": sarvamAPIKey
          }

          audio_queue = Queue()
          data = {
              "model": model_2,
              "prompt": templateVal_1
          }
          files = {
              "file": (audioFile, open(WavFile, "rb"), "audio/wav")
          }

          response_1 = requests.post(url_1, headers=headers, data=data, files=files)
          tempDert = json.loads(response_1.text)
          regionalT = tempDert['transcript']
          langCd = tempDert['language_code']
          statusCd = response_1.status_code
          payload_2 = {
              "input": regionalT,
              "source_language_code": langCode_2,
              "target_language_code": langCode_1,
              "speaker_gender": speakerGender,
              "mode": "formal",
              "model": model_3,
              "enable_preprocessing": True
          }

          response_2 = requests.request("POST", url_2, json=payload_2, headers=headers)
          regionalT_2 = response_2.text
          data_ = json.loads(regionalT_2)
          regionalText = data_['translated_text']
          chunked_response = self.chunkBengaliResponse(regionalText)

          audio_thread = Thread(target=self.audioPlayerWorker, args=(audio_queue,))
          audio_thread.start()

          for chText in chunked_response:
              audio_bytes = await self.processChunk(chText, url_3, headers)
              audio_queue.put(audio_bytes)

          audio_queue.join()
          audio_queue.put(None)
          audio_thread.join()

          var = datetime.datetime.now().strftime("%Y-%m-%d_%H-%M-%S")
          print('Retrieval Time: ', str(var))

          return 0

      except Exception as e:
          x = str(e)
          print('Error: <<Processing Audio>>: ', x)

          return 1

Purpose:

This asynchronous method handles the complete audio processing workflow, including speech recognition, translation, and audio playback.

What it Does:

  • Initializes various configurations and headers required for processing.
  • Sends the recorded audio to an API to get the transcript and detected language.
  • Translates the transcript into another language using another API.
  • Splits the translated text into smaller chunks using the chunkBengaliResponse method.
  • Starts an audio playback thread to play each processed audio chunk.
  • Sends each text chunk to the processChunk method to convert to speech and adds the audio data to the queue for playback.
  • Waits for all audio chunks to be processed and played before finishing.
  • Logs the current time when the process is complete.
  • Returns 0 on success or 1 if there was an error.

The “processAudio”-method takes recorded audio, recognizes what was said, translates it into another language, splits the translated text into parts, converts each part into speech, and plays it back. It uses different services to do this; if there’s a problem at any step, it prints an error message.

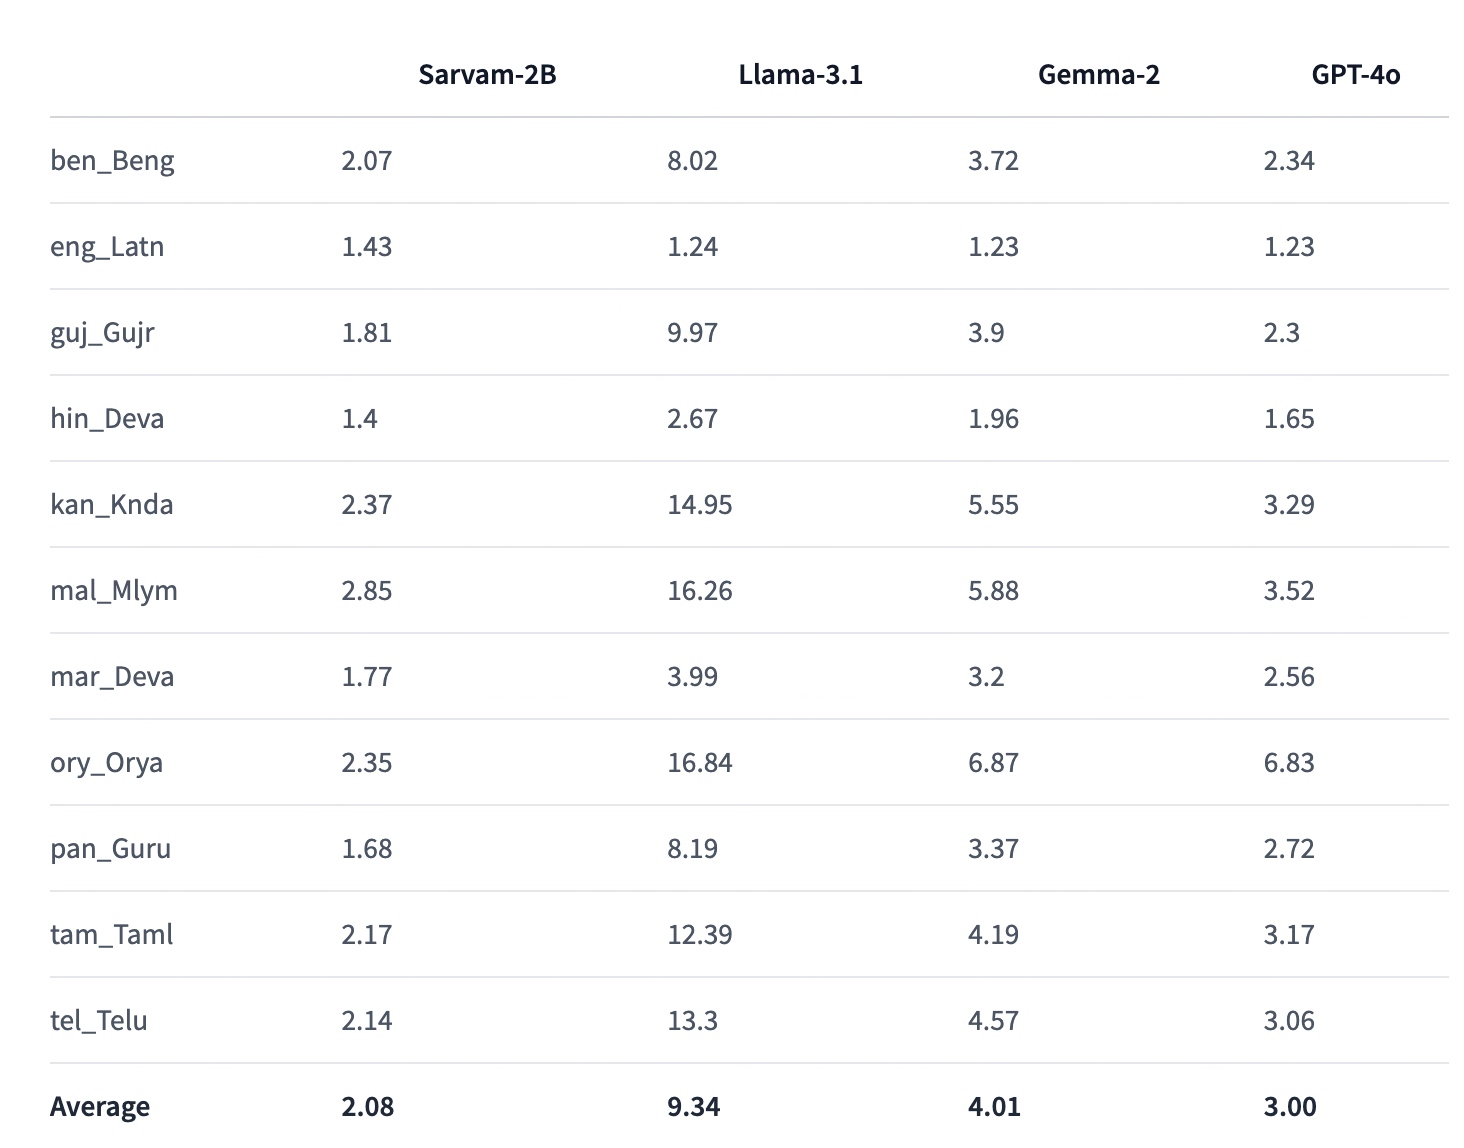
And, here is the performance stats (Captured from Sarvam AI website) –


So, finally, we’ve done it. You can view the complete code in this GitHub link.

I’ll bring some more exciting topics in the coming days from the Python verse.

Till then, Happy Avenging! 🙂

Building the optimized Indic Language bot by using the Python-based Sarvam AI LLMs – Part 1

In the rapidly evolving landscape of artificial intelligence, Sarvam AI has emerged as a pioneering force in developing language technologies for Indian languages. This article series aims to provide an in-depth look at Sarvam AI’s Indic APIs, exploring their features, performance, and potential impact on the Indian tech ecosystem.

This LLM aims to bridge the language divide in India’s digital landscape by providing powerful, accessible AI tools for Indic languages.

India has 22 official languages and hundreds of dialects, presenting a unique challenge for technology adoption and digital inclusion. Even though all the government work happens in both the official language along with English language.

Developers can fine-tune the models for specific domains or use cases, improving accuracy for specialized applications.

As of 2024, Sarvam AI’s Indic APIs support the following languages:

  • Hindi
  • Bengali
  • Tamil
  • Telugu
  • Marathi
  • Gujarati
  • Kannada
  • Malayalam
  • Punjabi
  • Odia

Before delving into the details, I strongly recommend taking a look at the demo.

Isn’t this exciting? Let us understand the flow of events in the following diagram –

The application interacts with Sarvam AI’s API. After interpreting the initial audio inputs from the computer, it uses Sarvam AI’s API to get the answer based on the selected Indic language, Bengali.

pip install SpeechRecognition==3.10.4
pip install pydub==0.25.1
pip install sounddevice==0.5.0
pip install numpy==1.26.4
pip install soundfile==0.12.1

clsSarvamAI.py (This script will capture the audio input in Indic languages & then provide an LLM response in the form of audio in Indic languages. In this post, we’ll discuss part of the code. In the next part, we’ll be discussing the next important methods. Note that we’re only going to discuss a few important functions here.)

def initializeMicrophone(self):
      try:
          for index, name in enumerate(sr.Microphone.list_microphone_names()):
              print(f"Microphone with name \"{name}\" found (device_index={index})")
          return sr.Microphone()
      except Exception as e:
          x = str(e)
          print('Error: <<Initiating Microphone>>: ', x)

          return ''

  def realTimeTranslation(self):
      try:
          WavFile = self.WavFile
          recognizer = sr.Recognizer()
          try:
              microphone = self.initializeMicrophone()
          except Exception as e:
              print(f"Error initializing microphone: {e}")
              return

          with microphone as source:
              print("Adjusting for ambient noise. Please wait...")
              recognizer.adjust_for_ambient_noise(source, duration=5)
              print("Microphone initialized. Start speaking...")

              try:
                  while True:
                      try:
                          print("Listening...")
                          audio = recognizer.listen(source, timeout=5, phrase_time_limit=5)
                          print("Audio captured. Recognizing...")

                          #var = datetime.datetime.now().strftime("%Y-%m-%d_%H-%M-%S")
                          #print('Before Audio Time: ', str(var))

                          self.createWavFile(audio, WavFile)

                          try:
                              text = recognizer.recognize_google(audio, language="bn-BD")  # Bengali language code
                              sentences = text.split('')  # Bengali full stop

                              print('Sentences: ')
                              print(sentences)
                              print('*'*120)

                              if not text:
                                  print("No speech detected. Please try again.")
                                  continue

                              if str(text).lower() == 'টাটা':
                                  raise BreakOuterLoop("Based on User Choice!")

                              asyncio.run(self.processAudio(audio))

                          except sr.UnknownValueError:
                              print("Google Speech Recognition could not understand audio")
                          except sr.RequestError as e:
                              print(f"Could not request results from Google Speech Recognition service; {e}")

                      except sr.WaitTimeoutError:
                          print("No speech detected within the timeout period. Listening again...")
                      except BreakOuterLoop:
                          raise
                      except Exception as e:
                          print(f"An unexpected error occurred: {e}")

                      time.sleep(1)  # Short pause before next iteration

              except BreakOuterLoop as e:
                  print(f"Exited : {e}")

          # Removing the temporary audio file that was generated at the begining
          os.remove(WavFile)

          return 0
      except Exception as e:
          x = str(e)
          print('Error: <<Real-time Translation>>: ', x)

          return 1

Purpose:

This method is responsible for setting up and initializing the microphone for audio input.

What it Does:

  • It attempts to list all available microphones connected to the system.
  • It prints the microphone’s name and corresponding device index (a unique identifier) for each microphone.
  • If successful, it returns a microphone object (sr.Microphone()), which can be used later to capture audio.
  • If this process encounters an error (e.g., no microphones being found or an internal error), it catches the exception, prints an error message, and returns an empty string (“).

The “initializeMicrophone” Method finds all microphones connected to the computer and prints their names. If it finds a microphone, it prepares to use it for recording. If something goes wrong, it tells you what went wrong and stops the process.

Purpose:
This Method uses the microphone to handle real-time speech translation from a user. It captures spoken audio, converts it into text, and processes it further.

What it Does:

  • Initializes a recognizer object (sr.Recognizer()) for speech recognition.
  • Call initializeMicrophone to set up the microphone. If initialization fails, an error message is printed, and the process is stopped.
  • Once the microphone is set up successfully, it adjusts for ambient noise to enhance accuracy.
  • Enters a loop to continuously listen for audio input from the user:
    • It waits for the user to speak and captures the audio.
    • Converts the captured audio to text using Google’s Speech Recognition service, specifying Bengali as the language.
    • If text is successfully captured and recognized:
      • Splits the text into sentences using the Bengali full-stop character.
      • Prints the sentences.
      • It checks if the text is a specific word (“টাটা”), and if so, it raises an exception to stop the loop (indicating that the user wants to exit).
      • Otherwise, it processes the audio asynchronously with processAudio.
    • If no speech is detected or an error occurs, it prints the relevant message and continues listening.
  • If the user decides to exit or if an error occurs, it breaks out of the loop, deletes any temporary audio files created, and returns a status code (0 for success, 1 for failure).


The “realTimeTranslation” method continuously listens to the microphone for the user to speak. It captures what is said and tries to understand it using Google’s service, specifically for the Bengali language. It then splits what was said into sentences and prints them out. If the user says “টাটা” (which means “goodbye” in Bengali), it stops listening and exits. If it cannot understand the user or if there is a problem, it will let the user know and try again. It will print an error and stop the process if something goes wrong.


Let’s wait for the next part & enjoy this part.

Building Process Flow diagram based on Python-based LLMs

I’ve been looking to create a process flow diagram using Open AI LLM. And, I think this easy hack will help to generate process flow easily without spending significant time developing it.

Before delving into the details, I strongly recommend taking a look at the demo. It’s a great way to get a comprehensive understanding of Gen AI and its capabilities in coordination with Matplotlib.

Demo

Let us understand the generic flow of events in the following diagram –

As one can see the Python-based application will get the relevant steps from the Open AI LLM models & then parse them with the help of matplotlib APIs & finally be able to generate a flow-chart depicted in the right-side box.

Let us understand the sample packages that are required for this task.

pip install matplotlib==3.9.1
pip install networkx==3.3
pip install numpy==2.0.0
pip install openai==1.35.13
pip install pandas==2.2.2
pip install pillow==10.4.0
    def summarizeToFourWords(self, sentence):
        try:
            modelName = self.modelName
            content_3 = templateVal_4
            content_4 = f"" + templateVal_5 + str(sentence)

            response = client.chat.completions.create(
                model=modelName,
                messages=[
                    {"role": "system", "content": content_3},
                    {"role": "user", "content": content_4}
                ],
                n=1,
                temperature=0.1,
            )

            summary = response.choices[0].message.content.strip().split('\n')

            # If summary is a list, join it into a string
            if isinstance(summary, list):
                summary = ' '.join(summary)

            summary = ' '.join(summary.replace('.', '').split()[:4])

            return summary

        except Exception as e:
            return f"Error: {str(e)}"

This function translates the input task that was assigned through the command prompt & then translates that into a more meaningful 4-word picture name, that will represent the output of the process flow generated by matplotlib with the help from OpenAI.

For example, let us understand the following input queries –

As per the above function, the application will create a meaningful file name, which represents the above task as follows –

def generateFlowchart(self, srcDesc, debugInd, varVa):
        try:
            modelName = self.modelName
            ouputPath = self.ouputPath

            content_1 = templateVal_1
            content_2 = templateVal_2 + " " + srcDesc + ". " + templateVal_3

            # Use OpenAI to generate flowchart steps
            response = client.chat.completions.create(
                model=modelName,
                messages=[
                    {"role": "system", "content": content_1},
                    {"role": "user", "content": content_2}
                ],
                temperature=0.7,
            )

            steps = response.choices[0].message.content.strip().split('\n')

            # Create a new directed graph
            G = nx.DiGraph()

            # Add nodes and edges based on the generated steps
            for i, step in enumerate(steps):
                step_parts = step.split(': ', 1)
                if len(step_parts) == 2:
                    step_number, step_description = step_parts
                    G.add_node(i, description=step_description)
                    if i > 0:
                        G.add_edge(i-1, i)

            # Calculate layout
            num_nodes = len(G.nodes())
            rows = math.ceil(math.sqrt(num_nodes))
            cols = math.ceil(num_nodes / rows)

            # Calculate figure size
            fig_width = max(12, cols * 4)
            fig_height = max(8, rows * 3)

            # Create the plot
            fig, ax = plt.subplots(figsize=(fig_width, fig_height))

            # Generate a list of soft, pleasing colors
            colors = plt.cm.Pastel1(np.linspace(0, 1, num_nodes))

            # Calculate positions for nodes
            pos = {}
            for i in range(num_nodes):
                row = i // cols
                col = i % cols
                x = col / (cols - 1) if cols > 1 else 0.5
                y = 1 - (row / (rows - 1) if rows > 1 else 0.5)
                pos[i] = (x, y)

            # Draw arrows
            for edge in G.edges():
                start = pos[edge[0]]
                end = pos[edge[1]]
                ax.arrow(start[0], start[1], end[0]-start[0], end[1]-start[1],
                         head_width=0.03, head_length=0.05, fc='gray', ec='gray', linewidth=2)

            # Draw nodes and labels
            for i, (node, (x, y)) in enumerate(pos.items()):
                srcDesc = G.nodes[node]['description']
                wrapped_text = '\n'.join(wrap(srcDesc, width=15))

                circle = Circle((x, y), radius=0.08, fill=True, facecolor=colors[i], edgecolor='black', zorder=2)
                ax.add_patch(circle)

                ax.text(x, y, wrapped_text, ha='center', va='center', wrap=True, fontsize=8, zorder=3)

                if i == 0:
                    ax.text(x, y+0.11, "Start", ha='center', va='bottom', fontweight='bold')
                elif i == num_nodes - 1:
                    ax.text(x, y-0.11, "End", ha='center', va='top', fontweight='bold')

            # Set plot limits and remove axes
            ax.set_xlim(-0.1, 1.1)
            ax.set_ylim(-0.1, 1.1)
            ax.axis('off')

            # Getting the Short Description of the Image
            resDesc = self.summarizeToFourWords(srcDesc)

            plt.title(f"Flowchart: {resDesc}")
            plt.tight_layout()

            var = datetime.now().strftime("%Y-%m-%d_%H-%M-%S")

            filename = f"flowchart_{resDesc.replace(' ', '_')}_{var}.png"
            print('Filename:')
            print(filename)
            plt.savefig(ouputPath+filename, format='png', dpi=300, bbox_inches='tight')
            plt.close()
            print(f"Flowchart generated as '{filename}'")

            return 0

        except Exception as e:
            x = str(e)
            print(x)

            logging.info(x)

            return 1

This code defines a function called “generateFlowchart” that creates a visual flowchart based on a given description. Here’s what it does:

  • It uses an AI model to generate steps for the flowchart based on the input description.
  • It creates a graph structure to represent these steps and their connections.
  • The function then sets up a plot to visualize this graph as a flowchart.
  • It arranges the steps in a grid layout, with each step represented by a colored circle.
  • The steps are connected by arrows to show the flow of the process.
  • The first step is labeled “Start” and the last step is labeled “End”.
  • The function adds a title to the flowchart based on a summary of the input description.
  • Finally, it saves the flowchart as an image file with a unique name based on the description and current date/time.
  • If any errors occur during this process, the function logs the error and returns a failure code.
import clsGenFlowLLM as gfl

from clsConfigClient import clsConfigClient as cf

import datetime
import logging

def main():
    try:
        # Other useful variables
        debugInd = 'Y'

        var = datetime.datetime.now().strftime("%Y-%m-%d_%H-%M-%S")
        print('Start Time: ', str(var))

        # Initiating Log Class
        general_log_path = str(cf.conf['LOG_PATH'])

        # Enabling Logging Info
        logging.basicConfig(filename=general_log_path + 'genFLDLog.log', level=logging.INFO)

        print('Started predicting best bodyline deliveries from the Cricket Streaming!')

        # Passing source data csv file
        x1 = gfl.clsGenFlowLLM()

        while True:
            desc = input("Enter the subject to generate the flow diagram (or 'quit' to exit): ")

            var1 = datetime.datetime.now()

            if desc.lower() == 'quit':
                break

            # Execute all the pass
            r1 = x1.generateFlowchart(desc, debugInd, var1)

            if (r1 == 0):
                print('Successfully generated Flow Diagram based on the content!')
            else:
                print('Failed to generate Flow Diagram!')

            r1 = 0

            var2 = datetime.datetime.now()

            c = var2 - var1
            minutes = c.total_seconds() / 60
            print('Total difference in minutes: ', str(minutes))

        var3 = datetime.datetime.now().strftime("%Y-%m-%d_%H-%M-%S")

        print('End Time: ', str(var3))

    except Exception as e:
        x = str(e)
        print('Error: ', x)

if __name__ == "__main__":
    main()

The above code will instantiate the class & then invoke the function based on the input command task & receive the response.


So, we’ve done it. For more information, you can visit the following link.

I’ll bring some more exciting topics in the coming days from the Python verse.

Till then, Happy Avenging! 🙂

Building & deploying a RAG architecture rapidly using Langflow & Python

I’ve been looking for a solution that can help deploy any RAG solution involving Python faster. It would be more effective if an available UI helped deliver the solution faster. And, here comes the solution that does exactly what I needed – “LangFlow.”

Before delving into the details, I strongly recommend taking a look at the demo. It’s a great way to get a comprehensive understanding of LangFlow and its capabilities in deploying RAG architecture rapidly.

Demo

This describes the entire architecture; hence, I’ll share the architecture components I used to build the solution.

To know more about RAG-Architecture, please refer to the following link.

As we all know, we can parse the data from the source website URL (in this case, I’m referring to my photography website to extract the text of one of my blogs) and then embed it into the newly created Astra DB & new collection, where I will be storing the vector embeddings.

As you can see from the above diagram, the flow that I configured within 5 minutes and the full functionality of writing a complete solution (underlying Python application) within no time that extracts chunks, converts them into embeddings, and finally stores them inside the Astra DB.

Now, let us understand the next phase, where, based on the ask from a chatbot, I need to convert that question into Vector DB & then find the similarity search to bring the relevant vectors as shown below –

You need to configure this entire flow by dragging the necessary widgets from the left-side panel as marked in the Blue-Box shown below –

For this specific use case, we’ve created an instance of Astra DB & then created an empty vector collection. Also, we need to ensure that we generate the API-Key & and provide the right roles assigned with the token. After successfully creating the token, you need to copy the endpoint, token & collection details & paste them into the desired fields of the Astra-DB components inside the LangFlow. Think of it as a framework where one needs to provide all the necessary information to build & run the entire flow successfully.

Following are some of the important snapshots from the Astra-DB –

Step – 1

Step – 2

Once you run the vector DB population, this will insert extracted text & then convert it into vectors, which will show in the following screenshot –

You can see the sample vectors along with the text chunks inside the Astra DB data explorer as shown below –

Some of the critical components are highlighted in the Blue-box which is important for us to monitor the vector embeddings.

Now, here is how you can modify the current Python code of any available widgets or build your own widget by using the custom widget.

The first step is to click the code button highlighted in the Red-box as shown below –

The next step is when you click that button, which will open the detailed Python code representing the entire widget build & its functionality. This button is the place where you can add, modify, or keep it as it is depending upon your need, which will shown below –

Once one builds the entire solution, you must click the final compile button (shown in the red box), which will eventually compile all the individual widgets. However, you can build the compile button for the individual widgets as soon as you make the solution. So you can pinpoint any potential problems at that very step.

Let us understand one sample code of a widget. In this case, we will take vector embedding insertion into the Astra DB. Let us see the code –

from typing import List, Optional, Union
from langchain_astradb import AstraDBVectorStore
from langchain_astradb.utils.astradb import SetupMode

from langflow.custom import CustomComponent
from langflow.field_typing import Embeddings, VectorStore
from langflow.schema import Record
from langchain_core.retrievers import BaseRetriever


class AstraDBVectorStoreComponent(CustomComponent):
    display_name = "Astra DB"
    description = "Builds or loads an Astra DB Vector Store."
    icon = "AstraDB"
    field_order = ["token", "api_endpoint", "collection_name", "inputs", "embedding"]

    def build_config(self):
        return {
            "inputs": {
                "display_name": "Inputs",
                "info": "Optional list of records to be processed and stored in the vector store.",
            },
            "embedding": {"display_name": "Embedding", "info": "Embedding to use"},
            "collection_name": {
                "display_name": "Collection Name",
                "info": "The name of the collection within Astra DB where the vectors will be stored.",
            },
            "token": {
                "display_name": "Token",
                "info": "Authentication token for accessing Astra DB.",
                "password": True,
            },
            "api_endpoint": {
                "display_name": "API Endpoint",
                "info": "API endpoint URL for the Astra DB service.",
            },
            "namespace": {
                "display_name": "Namespace",
                "info": "Optional namespace within Astra DB to use for the collection.",
                "advanced": True,
            },
            "metric": {
                "display_name": "Metric",
                "info": "Optional distance metric for vector comparisons in the vector store.",
                "advanced": True,
            },
            "batch_size": {
                "display_name": "Batch Size",
                "info": "Optional number of records to process in a single batch.",
                "advanced": True,
            },
            "bulk_insert_batch_concurrency": {
                "display_name": "Bulk Insert Batch Concurrency",
                "info": "Optional concurrency level for bulk insert operations.",
                "advanced": True,
            },
            "bulk_insert_overwrite_concurrency": {
                "display_name": "Bulk Insert Overwrite Concurrency",
                "info": "Optional concurrency level for bulk insert operations that overwrite existing records.",
                "advanced": True,
            },
            "bulk_delete_concurrency": {
                "display_name": "Bulk Delete Concurrency",
                "info": "Optional concurrency level for bulk delete operations.",
                "advanced": True,
            },
            "setup_mode": {
                "display_name": "Setup Mode",
                "info": "Configuration mode for setting up the vector store, with options likeSync,Async, orOff”.",
                "options": ["Sync", "Async", "Off"],
                "advanced": True,
            },
            "pre_delete_collection": {
                "display_name": "Pre Delete Collection",
                "info": "Boolean flag to determine whether to delete the collection before creating a new one.",
                "advanced": True,
            },
            "metadata_indexing_include": {
                "display_name": "Metadata Indexing Include",
                "info": "Optional list of metadata fields to include in the indexing.",
                "advanced": True,
            },
            "metadata_indexing_exclude": {
                "display_name": "Metadata Indexing Exclude",
                "info": "Optional list of metadata fields to exclude from the indexing.",
                "advanced": True,
            },
            "collection_indexing_policy": {
                "display_name": "Collection Indexing Policy",
                "info": "Optional dictionary defining the indexing policy for the collection.",
                "advanced": True,
            },
        }

    def build(
        self,
        embedding: Embeddings,
        token: str,
        api_endpoint: str,
        collection_name: str,
        inputs: Optional[List[Record]] = None,
        namespace: Optional[str] = None,
        metric: Optional[str] = None,
        batch_size: Optional[int] = None,
        bulk_insert_batch_concurrency: Optional[int] = None,
        bulk_insert_overwrite_concurrency: Optional[int] = None,
        bulk_delete_concurrency: Optional[int] = None,
        setup_mode: str = "Sync",
        pre_delete_collection: bool = False,
        metadata_indexing_include: Optional[List[str]] = None,
        metadata_indexing_exclude: Optional[List[str]] = None,
        collection_indexing_policy: Optional[dict] = None,
    ) -> Union[VectorStore, BaseRetriever]:
        try:
            setup_mode_value = SetupMode[setup_mode.upper()]
        except KeyError:
            raise ValueError(f"Invalid setup mode: {setup_mode}")
        if inputs:
            documents = [_input.to_lc_document() for _input in inputs]

            vector_store = AstraDBVectorStore.from_documents(
                documents=documents,
                embedding=embedding,
                collection_name=collection_name,
                token=token,
                api_endpoint=api_endpoint,
                namespace=namespace,
                metric=metric,
                batch_size=batch_size,
                bulk_insert_batch_concurrency=bulk_insert_batch_concurrency,
                bulk_insert_overwrite_concurrency=bulk_insert_overwrite_concurrency,
                bulk_delete_concurrency=bulk_delete_concurrency,
                setup_mode=setup_mode_value,
                pre_delete_collection=pre_delete_collection,
                metadata_indexing_include=metadata_indexing_include,
                metadata_indexing_exclude=metadata_indexing_exclude,
                collection_indexing_policy=collection_indexing_policy,
            )
        else:
            vector_store = AstraDBVectorStore(
                embedding=embedding,
                collection_name=collection_name,
                token=token,
                api_endpoint=api_endpoint,
                namespace=namespace,
                metric=metric,
                batch_size=batch_size,
                bulk_insert_batch_concurrency=bulk_insert_batch_concurrency,
                bulk_insert_overwrite_concurrency=bulk_insert_overwrite_concurrency,
                bulk_delete_concurrency=bulk_delete_concurrency,
                setup_mode=setup_mode_value,
                pre_delete_collection=pre_delete_collection,
                metadata_indexing_include=metadata_indexing_include,
                metadata_indexing_exclude=metadata_indexing_exclude,
                collection_indexing_policy=collection_indexing_policy,
            )

        return vector_store

Method: build_config:

  • This method defines the configuration options for the component.
  • Each configuration option includes a display_name and info, which provides details about the option.
  • Some options are marked as advanced, indicating they are optional and more complex.

Method: build:

  • This method is used to create an instance of the Astra DB Vector Store.
  • It takes several parameters, including embedding, token, api_endpoint, collection_name, and various optional parameters.
  • It converts the setup_mode string to an enum value.
  • If inputs are provided, they are converted to a format suitable for storing in the vector store.
  • Depending on whether inputs are provided, a new vector store from documents can be created, or an empty vector store can be initialized with the given configurations.
  • Finally, it returns the created vector store instance.

And, here is the the screenshot of your run –

And, this is the last steps to run the Integrated Chatbot as shown below –

As one can see the left side highlighted shows the reference text & chunks & the right side actual response.


So, we’ve done it. And, you know the fun fact. I did this entire workflow within 35 minutes alone. 😛

I’ll bring some more exciting topics in the coming days from the Python verse.

To learn more about LangFlow, please click here.

To learn about Astra DB, you need to click the following link.

To learn about my blog & photography, you can click the following url.

Till then, Happy Avenging!  🙂

Building a real-time Gen AI Improvement Matrices (GAIIM) using Python, UpTrain, Open AI & React

How does the RAG work better for various enterprise-level Gen AI use cases? What needs to be there to make the LLM model work more efficiently & able to check the response & validate their response, including the bias, hallucination & many more?

This is my post (after a slight GAP), which will capture and discuss some of the burning issues that many AI architects are trying to explore. In this post, I’ve considered a newly formed AI start-up from India, which developed an open-source framework that can easily evaluate all the challenges that one is facing with their LLMs & easily integrate with your existing models for better understanding including its limitations. You will get plenty of insights about it.

But, before we dig deep, why not see the demo first –

Isn’t it exciting? Let’s deep dive into the flow of events.


Let’s explore the broad-level architecture/flow –

Let us understand the steps of the above architecture. First, our Python application needs to trigger and enable the API, which will interact with the Open AI and UpTrain AI to fetch all the LLM KPIs based on the input from the React app named “Evaluation.”

Once the response is received from UpTrain AI, the Python application then organizes the results in a better readable manner without changing the core details coming out from their APIs & then shares that back with the react interface.

Let’s examine the react app’s sample inputs to better understand the input that will be passed to the Python-based API solution, which is wrapper capability to call multiple APIs from the UpTrain & then accumulate them under one response by parsing the data & reorganizing the data with the help of Open AI & sharing that back.

Highlighted in RED are some of the critical inputs you need to provide to get most of the KPIs. And, here are the sample text inputs for your reference –

Q. Enter input question.
A. What are the four largest moons of Jupiter?
Q. Enter the context document.
A. Jupiter, the largest planet in our solar system, boasts a fascinating array of moons. Among these, the four largest are collectively known as the Galilean moons, named after the renowned astronomer Galileo Galilei, who first observed them in 1610. These four moons, Io, Europa, Ganymede, and Callisto, hold significant scientific interest due to their unique characteristics and diverse geological features.
Q. Enter LLM response.
A. The four largest moons of Jupiter, known as the Galilean moons, are Io, Europa, Ganymede, and Marshmello.
Q. Enter the persona response.
A. strict and methodical teacher
Q. Enter the guideline.
A. Response shouldn’t contain any specific numbers
Q. Enter the ground truth.
A. The Jupiter is the largest & gaseous planet in the solar system.
Q. Choose the evaluation method.
A. llm

Once you fill in the App should look like this –

Once you fill in, the app should look like the below screenshot –


Let us understand the sample packages that are required for this task.

pip install Flask==3.0.3
pip install Flask-Cors==4.0.0
pip install numpy==1.26.4
pip install openai==1.17.0
pip install pandas==2.2.2
pip install uptrain==0.6.13

Note that, we’re not going to discuss the entire script here. Only those parts are relevant. However, you can get the complete scripts in the GitHub repository.

def askFeluda(context, question):
    try:
        # Combine the context and the question into a single prompt.
        prompt_text = f"{context}\n\n Question: {question}\n Answer:"

        # Retrieve conversation history from the session or database
        conversation_history = []

        # Add the new message to the conversation history
        conversation_history.append(prompt_text)

        # Call OpenAI API with the updated conversation
        response = client.with_options(max_retries=0).chat.completions.create(
            messages=[
                {
                    "role": "user",
                    "content": prompt_text,
                }
            ],
            model=cf.conf['MODEL_NAME'],
            max_tokens=150,  # You can adjust this based on how long you expect the response to be
            temperature=0.3,  # Adjust for creativity. Lower values make responses more focused and deterministic
            top_p=1,
            frequency_penalty=0,
            presence_penalty=0
        )

        # Extract the content from the first choice's message
        chat_response = response.choices[0].message.content

        # Print the generated response text
        return chat_response.strip()
    except Exception as e:
        return f"An error occurred: {str(e)}"

This function will ask the supplied questions with contexts or it will supply the UpTrain results to summarize the JSON into more easily readable plain texts. For our test, we’ve used “gpt-3.5-turbo”.

def evalContextRelevance(question, context, resFeluda, personaResponse):
    try:
        data = [{
            'question': question,
            'context': context,
            'response': resFeluda
        }]

        results = eval_llm.evaluate(
            data=data,
            checks=[Evals.CONTEXT_RELEVANCE, Evals.FACTUAL_ACCURACY, Evals.RESPONSE_COMPLETENESS, Evals.RESPONSE_RELEVANCE, CritiqueTone(llm_persona=personaResponse), Evals.CRITIQUE_LANGUAGE, Evals.VALID_RESPONSE, Evals.RESPONSE_CONCISENESS]
        )

        return results
    except Exception as e:
        x = str(e)

        return x

The above methods initiate the model from UpTrain to get all the stats, which will be helpful for your LLM response. In this post, we’ve captured the following KPIs –

- Context Relevance Explanation
- Factual Accuracy Explanation
- Guideline Adherence Explanation
- Response Completeness Explanation
- Response Fluency Explanation
- Response Relevance Explanation
- Response Tonality Explanation
# Function to extract and print all the keys and their values
def extractPrintedData(data):
    for entry in data:
        print("Parsed Data:")
        for key, value in entry.items():


            if key == 'score_context_relevance':
                s_1_key_val = value
            elif key == 'explanation_context_relevance':
                cleaned_value = preprocessParseData(value)
                print(f"{key}: {cleaned_value}\n")
                s_1_val = cleaned_value
            elif key == 'score_factual_accuracy':
                s_2_key_val = value
            elif key == 'explanation_factual_accuracy':
                cleaned_value = preprocessParseData(value)
                print(f"{key}: {cleaned_value}\n")
                s_2_val = cleaned_value
            elif key == 'score_response_completeness':
                s_3_key_val = value
            elif key == 'explanation_response_completeness':
                cleaned_value = preprocessParseData(value)
                print(f"{key}: {cleaned_value}\n")
                s_3_val = cleaned_value
            elif key == 'score_response_relevance':
                s_4_key_val = value
            elif key == 'explanation_response_relevance':
                cleaned_value = preprocessParseData(value)
                print(f"{key}: {cleaned_value}\n")
                s_4_val = cleaned_value
            elif key == 'score_critique_tone':
                s_5_key_val = value
            elif key == 'explanation_critique_tone':
                cleaned_value = preprocessParseData(value)
                print(f"{key}: {cleaned_value}\n")
                s_5_val = cleaned_value
            elif key == 'score_fluency':
                s_6_key_val = value
            elif key == 'explanation_fluency':
                cleaned_value = preprocessParseData(value)
                print(f"{key}: {cleaned_value}\n")
                s_6_val = cleaned_value
            elif key == 'score_valid_response':
                s_7_key_val = value
            elif key == 'score_response_conciseness':
                s_8_key_val = value
            elif key == 'explanation_response_conciseness':
                print('Raw Value: ', value)
                cleaned_value = preprocessParseData(value)
                print(f"{key}: {cleaned_value}\n")
                s_8_val = cleaned_value

    print('$'*200)

    results = {
        "Factual_Accuracy_Score": s_2_key_val,
        "Factual_Accuracy_Explanation": s_2_val,
        "Context_Relevance_Score": s_1_key_val,
        "Context_Relevance_Explanation": s_1_val,
        "Response_Completeness_Score": s_3_key_val,
        "Response_Completeness_Explanation": s_3_val,
        "Response_Relevance_Score": s_4_key_val,
        "Response_Relevance_Explanation": s_4_val,
        "Response_Fluency_Score": s_6_key_val,
        "Response_Fluency_Explanation": s_6_val,
        "Response_Tonality_Score": s_5_key_val,
        "Response_Tonality_Explanation": s_5_val,
        "Guideline_Adherence_Score": s_8_key_val,
        "Guideline_Adherence_Explanation": s_8_val,
        "Response_Match_Score": s_7_key_val
        # Add other evaluations similarly
    }

    return results

The above method parsed the initial data from UpTrain before sending it to OpenAI for a better summary without changing any text returned by it.

@app.route('/evaluate', methods=['POST'])
def evaluate():
    data = request.json

    if not data:
        return {jsonify({'error': 'No data provided'}), 400}

    # Extracting input data for processing (just an example of logging received data)
    question = data.get('question', '')
    context = data.get('context', '')
    llmResponse = ''
    personaResponse = data.get('personaResponse', '')
    guideline = data.get('guideline', '')
    groundTruth = data.get('groundTruth', '')
    evaluationMethod = data.get('evaluationMethod', '')

    print('question:')
    print(question)

    llmResponse = askFeluda(context, question)
    print('='*200)
    print('Response from Feluda::')
    print(llmResponse)
    print('='*200)

    # Getting Context LLM
    cLLM = evalContextRelevance(question, context, llmResponse, personaResponse)

    print('&'*200)
    print('cLLM:')
    print(cLLM)
    print(type(cLLM))
    print('&'*200)

    results = extractPrintedData(cLLM)

    print('JSON::')
    print(results)

    resJson = jsonify(results)

    return resJson

The above function is the main method, which first receives all the input parameters from the react app & then invokes one-by-one functions to get the LLM response, and LLM performance & finally summarizes them before sending it to react-app.

For any other scripts, please refer to the above-mentioned GitHub link.


Let us see some of the screenshots of the test run –


So, we’ve done it.

I’ll bring some more exciting topics in the coming days from the Python verse.

Till then, Happy Avenging! 🙂

Enabling & Exploring Stable Defussion – Part 1

This new solution will evaluate the power of Stable Defussion, which is created solutions as we progress & refine our prompt from scratch by using Stable Defussion & Python. This post opens new opportunities for IT companies & business start-ups looking to deliver solutions & have better performance compared to the paid version of Stable Defussion AI’s API performance. This project is for the advanced Python, Stable Defussion for data Science Newbies & AI evangelists.

In a series of posts, I’ll explain and focus on the Stable Defussion API and custom solution using the Python-based SDK of Stable Defussion.

But, before that, let us view the video that it generates from the prompt by using the third-party API:

Prompt to Video

And, let us understand the prompt that we supplied to create the above video –

Isn’t it exciting?

However, I want to stress this point: the video generated by the Stable Defusion (Stability AI) API was able to partially apply the animation effect. Even though the animation applies to the cloud, It doesn’t apply the animation to the wave. But, I must admit, the quality of the video is quite good.


Let us understand the code and how we run the solution, and then we can try to understand its performance along with the other solutions later in the subsequent series.

As you know, we’re exploring the code base of the third-party API, which will actually execute a series of API calls that create a video out of the prompt.

Let us understand some of the important snippet –

class clsStabilityAIAPI:
    def __init__(self, STABLE_DIFF_API_KEY, OUT_DIR_PATH, FILE_NM, VID_FILE_NM):
        self.STABLE_DIFF_API_KEY = STABLE_DIFF_API_KEY
        self.OUT_DIR_PATH = OUT_DIR_PATH
        self.FILE_NM = FILE_NM
        self.VID_FILE_NM = VID_FILE_NM

    def delFile(self, fileName):
        try:
            # Deleting the intermediate image
            os.remove(fileName)

            return 0 
        except Exception as e:
            x = str(e)
            print('Error: ', x)

            return 1

    def generateText2Image(self, inputDescription):
        try:
            STABLE_DIFF_API_KEY = self.STABLE_DIFF_API_KEY
            fullFileName = self.OUT_DIR_PATH + self.FILE_NM
            
            if STABLE_DIFF_API_KEY is None:
                raise Exception("Missing Stability API key.")
            
            response = requests.post(f"{api_host}/v1/generation/{engine_id}/text-to-image",
                                    headers={
                                        "Content-Type": "application/json",
                                        "Accept": "application/json",
                                        "Authorization": f"Bearer {STABLE_DIFF_API_KEY}"
                                        },
                                        json={
                                            "text_prompts": [{"text": inputDescription}],
                                            "cfg_scale": 7,
                                            "height": 1024,
                                            "width": 576,
                                            "samples": 1,
                                            "steps": 30,
                                            },)
            
            if response.status_code != 200:
                raise Exception("Non-200 response: " + str(response.text))
            
            data = response.json()

            for i, image in enumerate(data["artifacts"]):
                with open(fullFileName, "wb") as f:
                    f.write(base64.b64decode(image["base64"]))      
            
            return fullFileName

        except Exception as e:
            x = str(e)
            print('Error: ', x)

            return 'N/A'

    def image2VideoPassOne(self, imgNameWithPath):
        try:
            STABLE_DIFF_API_KEY = self.STABLE_DIFF_API_KEY

            response = requests.post(f"https://api.stability.ai/v2beta/image-to-video",
                                    headers={"authorization": f"Bearer {STABLE_DIFF_API_KEY}"},
                                    files={"image": open(imgNameWithPath, "rb")},
                                    data={"seed": 0,"cfg_scale": 1.8,"motion_bucket_id": 127},
                                    )
            
            print('First Pass Response:')
            print(str(response.text))
            
            genID = response.json().get('id')

            return genID 
        except Exception as e:
            x = str(e)
            print('Error: ', x)

            return 'N/A'

    def image2VideoPassTwo(self, genId):
        try:
            generation_id = genId
            STABLE_DIFF_API_KEY = self.STABLE_DIFF_API_KEY
            fullVideoFileName = self.OUT_DIR_PATH + self.VID_FILE_NM

            response = requests.request("GET", f"https://api.stability.ai/v2beta/image-to-video/result/{generation_id}",
                                        headers={
                                            'accept': "video/*",  # Use 'application/json' to receive base64 encoded JSON
                                            'authorization': f"Bearer {STABLE_DIFF_API_KEY}"
                                            },) 
            
            print('Retrieve Status Code: ', str(response.status_code))
            
            if response.status_code == 202:
                print("Generation in-progress, try again in 10 seconds.")

                return 5
            elif response.status_code == 200:
                print("Generation complete!")
                with open(fullVideoFileName, 'wb') as file:
                    file.write(response.content)

                print("Successfully Retrieved the video file!")

                return 0
            else:
                raise Exception(str(response.json()))
            
        except Exception as e:
            x = str(e)
            print('Error: ', x)

            return 1

Now, let us understand the code –

This function is called when an object of the class is created. It initializes four properties:

  • STABLE_DIFF_API_KEY: the API key for Stability AI services.
  • OUT_DIR_PATH: the folder path to save files.
  • FILE_NM: the name of the generated image file.
  • VID_FILE_NM: the name of the generated video file.

This function deletes a file specified by fileName.

  • If successful, it returns 0.
  • If an error occurs, it logs the error and returns 1.

This function generates an image based on a text description:

  • Sends a request to the Stability AI text-to-image endpoint using the API key.
  • Saves the resulting image to a file.
  • Returns the file’s path on success or 'N/A' if an error occurs.

This function uploads an image to create a video in its first phase:

  • Sends the image to Stability AI’s image-to-video endpoint.
  • Logs the response and extracts the id (generation ID) for the next phase.
  • Returns the id if successful or 'N/A' on failure.

This function retrieves the video created in the second phase using the genId:

  • Checks the video generation status from the Stability AI endpoint.
  • If complete, saves the video file and returns 0.
  • If still processing, returns 5.
  • Logs and returns 1 for any errors.

As you can see, the code is pretty simple to understand & we’ve taken all the necessary actions in case of any unforeseen network issues or even if the video is not ready after our job submission in the following lines of the main calling script (generateText2VideoAPI.py) –

waitTime = 10
time.sleep(waitTime)

# Failed case retry
retries = 1
success = False

try:
    while not success:
        try:
            z = r1.image2VideoPassTwo(gID)
        except Exception as e:
            success = False

        if z == 0:
            success = True
        else:
            wait = retries * 2 * 15
            str_R1 = "retries Fail! Waiting " + str(wait) + " seconds and retrying!"

            print(str_R1)

            time.sleep(wait)
            retries += 1

        # Checking maximum retries
        if retries >= maxRetryNo:
            success = True
            raise  Exception
except:
    print()

And, let us see how the run looks like –

Let us understand the CPU utilization –

As you can see, CPU utilization is minimal since most tasks are at the API end.


So, we’ve done it. 🙂

Please find the next series on this topic below:

Enabling & Exploring Stable Defussion – Part 2

Enabling & Exploring Stable Defussion – Part 3

Please let me know your feedback after reviewing all the posts! 🙂

Building solutions using LLM AutoGen in Python – Part 1

Today, I’ll be publishing a series of posts on LLM agents and how they can help you improve your delivery capabilities for various tasks.

Also, we’re providing the demo here –

Isn’t it exciting?


The application will interact with the AutoGen agents, use underlying Open AI APIs to follow the instructions, generate the steps, and then follow that path to generate the desired code. Finally, it will execute the generated scripts if the first outcome of the demo satisfies users.


Let us understand some of the key snippets –

# Create the assistant agent
assistant = autogen.AssistantAgent(
    name="AI_Assistant",
    llm_config={
        "config_list": config_list,
    }
)

Purpose: This line creates an AI assistant agent named “AI_Assistant”.

Function: It uses a language model configuration provided in config_list to define how the assistant behaves.

Role: The assistant serves as the primary agent who will coordinate with other agents to solve problems.

user_proxy = autogen.UserProxyAgent(
    name="Admin",
    system_message=templateVal_1,
    human_input_mode="TERMINATE",
    max_consecutive_auto_reply=10,
    is_termination_msg=lambda x: x.get("content", "").rstrip().endswith("TERMINATE"),
    code_execution_config={
        "work_dir": WORK_DIR,
        "use_docker": False,
    },
)

Purpose: This code creates a user proxy agent named “Admin”.

Function:

  • System Message: Uses templateVal_1 as its initial message to set the context.
  • Human Input Mode: Set to "TERMINATE", meaning it will keep interacting until a termination condition is met.
  • Auto-Reply Limit: Can automatically reply up to 10 times without human intervention.
  • Termination Condition: A message is considered a termination message if it ends with the word “TERMINATE”.
  • Code Execution: Configured to execute code in the directory specified by WORK_DIR without using Docker.

Role: Acts as an intermediary between the user and the assistant, handling interactions and managing the conversation flow.

engineer = autogen.AssistantAgent(
    name="Engineer",
    llm_config={
        "config_list": config_list,
    },
    system_message=templateVal_2,
)

Purpose: Creates an assistant agent named “Engineer”.

Function: Uses templateVal_2 as its system message to define its expertise in engineering matters.

Role: Specializes in technical and engineering aspects of the problem.

game_designer = autogen.AssistantAgent(
    name="GameDesigner",
    llm_config={
        "config_list": config_list,
    },
    system_message=templateVal_3,
)

Purpose: Creates an assistant agent named “GameDesigner”.

Function: Uses templateVal_3 to set its focus on game design.

Role: Provides insights and solutions related to game design aspects.

planner = autogen.AssistantAgent(
    name="Planer",
    llm_config={
        "config_list": config_list,
    },
    system_message=templateVal_4,
)

Purpose: Creates an assistant agent named “Planer” (likely intended to be “Planner”).

Function: Uses templateVal_4 to define its role in planning.

Role: Responsible for organizing and planning tasks to solve the problem.

critic = autogen.AssistantAgent(
    name="Critic",
    llm_config={
        "config_list": config_list,
    },
    system_message=templateVal_5,
)

Purpose: Creates an assistant agent named “Critic”.

Function: Uses templateVal_5 to set its function as a critic.

Role: Provide feedback, critique solutions, and help improve the overall response.

logging.basicConfig(level=logging.ERROR)
logger = logging.getLogger(__name__)

Purpose: Configures the logging system.

Function: Sets the logging level to only capture error messages to avoid cluttering the output.

Role: Helps in debugging by capturing and displaying error messages.

def buildAndPlay(self, inputPrompt):
    try:
        user_proxy.initiate_chat(
            assistant,
            message=f"We need to solve the following problem: {inputPrompt}. "
                    "Please coordinate with the admin, engineer, game_designer, planner and critic to provide a comprehensive solution. "
        )

        return 0
    except Exception as e:
        x = str(e)
        print('Error: <<Real-time Translation>>: ', x)

        return 1

Purpose: Defines a method to initiate the problem-solving process.

Function:

  • Parameters: Takes inputPrompt, which is the problem to be solved.
  • Action:
    • Calls user_proxy.initiate_chat() to start a conversation between the user proxy agent and the assistant agent.
    • Sends a message requesting coordination among all agents to provide a comprehensive solution to the problem.
  • Error Handling: If an exception occurs, it prints an error message and returns 1.

Role: Initiates collaboration among all agents to solve the provided problem.

Agents Setup: Multiple agents with specialized roles are created.
Initiating Conversation: The buildAndPlay method starts a conversation, asking agents to collaborate.
Problem Solving: Agents communicate and coordinate to provide a comprehensive solution to the input problem.
Error Handling: The system captures and logs any errors that occur during execution.


We’ll continue to discuss this topic in the upcoming post.

I’ll bring some more exciting topics in the coming days from the Python verse.

Till then, Happy Avenging! 🙂

Demystifying Modern Data Technologies: Insights from the Global PowerBI Summit

In an engaging session at the Global PowerBI Summit, we and our co-host delved into the evolving landscape of data technologies. Our discussion aimed to illuminate the distinctions and applications of several pivotal technologies in the data sphere, ranging from Lakehouse vs. Storage Account to the nuanced differences between Fabric Pipeline and Data Pipeline and the critical comparisons of Notebooks vs. Databricks, including their performance metrics. Furthermore, we explored the realm of model experimentation and Azure ML, shedding light on their performance benchmarks.

  • Enhanced File Previews and Transformations: The Lakehouse paradigm revolutionizes how we preview and transform files into SQL tables, offering a seamless data manipulation experience.
  • Robust Data Governance: It introduces native indexing for data lineage, PII scans, and discovery, thus laying a solid foundation for data governance.
  • Optimized Performance for Reporting: With direct lake mode, Lakehouse significantly improves performance for Power BI Reporting, catering to the needs of data analysts and business intelligence professionals.
  • Functional Restrictions: Despite its strengths, Lakehouse falls short in providing a native file download feature, demands manual refresh for new file visibility, and has limited support for file formats outside of Delta and Parquet.
  • Lakehouse distinguishes itself by being user-friendly and efficient in data uploading, albeit with slower previews. Its distinction from a Storage Account lies in these unique functionalities and user experience.
  • Ease of Data Transformation: It introduces a low-code, no-code approach with the Power Query Editor, enriching the data transformation process.
  • Advanced Monitoring Capabilities: The ability to monitor pipelines and trace lineage enhances the management and integration of fabric artifacts.
  • Artifact and Trigger Limitations: A notable drawback is the isolated nature of each pipeline artifact and the limitation to a single scheduled trigger type per pipeline.
  • Our analysis reveals that while both platforms share a user-friendly interface reminiscent of Azure’s, navigating between pipelines in Fabric requires additional steps. However, both platforms demonstrate rapid execution capabilities, with Azure slightly leading due to its unified pipeline management.
  • Comprehensive Support and Integration: Notably, Notebooks excel in providing native support for various programming and visualization packages, coupled with a direct connection to Lakehouse.
  • Collaborative Features and Efficiency: The platform encourages collaboration through real-time co-editing and optimizes resource usage by stopping clusters when not in use.
  • Cluster and Resource Management: External management of clusters and the absence of a shared folder or user notebooks present challenges in collaborative environments.
  • Our discussion highlighted that Notebooks offers a superior user interface and connectivity options despite Databricks’ having certain advantages in data processing speeds.

Our performance analysis underscored Fabric Notebooks’ superiority in handling large datasets and running machine learning models more efficiently than Databricks, especially highlighting Lakehouse’s faster cluster initiation times and data storage efficiencies.

  • Seamless Integration and Configuration: Fabric’s integration with Lakehouse and direct pipeline connections streamline the data science workflow.
  • Graphical Interface and Focus: Fabric’s lack of a graphical interface contrasts with Azure ML’s user-friendly studio, indicating Fabric’s analytics and BI focus against Azure ML’s comprehensive experiment capabilities.
  • Our comparative performance review revealed that Fabric excels in dataset loading and model execution speeds, offering significant advantages over Azure ML.

Our Global PowerBI Summit session aimed to demystify the complexities of modern data technologies, providing attendees with clear, actionable insights. Our collaborative presentation underscored the importance of understanding each technology’s strengths and limitations, empowering data professionals to make informed decisions in their projects. The dynamic interplay between these technologies illustrates the vibrant and evolving nature of the data landscape, promising exciting possibilities for innovation and efficiency in data management and analysis.

These stats were taken during the early release of the product. However, there is a continuous improvement of this product. Hence, we need to revisit this after a period of some time.