This site mainly deals with various use cases demonstrated using Python, Data Science, Cloud basics, SQL Server, Oracle, Teradata along with SQL & their implementation. Expecting yours active participation & time. This blog can be access from your TP, Tablet & mobile also. Please provide your feedback.
This is a continuation of my previous post, which can be found here. This will be our last post of this series.
Let us recap the key takaways from our previous post –
Two cloud patterns show how MCP standardizes safe AI-to-system work. Azure “agent factory”: You ask in Teams; Azure AI Foundry dispatches a specialist agent (HR/Sales). The agent calls a specific MCP server (Functions/Logic Apps) for CRM, SharePoint, or SQL via API Management. Entra ID enforces access; Azure Monitor audits. AWS “composable serverless agents”: In Bedrock, domain agents (Financial/IT Ops) invoke Lambda-based MCP tools for DynamoDB, S3, or CloudWatch through API Gateway with IAM and optional VPC. In both, agents never hold credentials; tools map one-to-one to systems, improving security, clarity, scalability, and compliance.
In this post, we’ll discuss the GCP factory pattern.
Unified Workbench Pattern (GCP):
The GCP “unified workbench” pattern prioritizes a unified, data-centric platform for AI development, integrating seamlessly with Vertex AI and Google’s expertise in AI and data analytics. This approach is well-suited for AI-first companies and data-intensive organizations that want to build agents that leverage cutting-edge research tools.
Let’s explore the following diagram based on this –
Imagine Mia, a clinical operations lead, opens a simple app and asks: “Which clinics had the longest wait times this week? Give me a quick summary I can share.”
The app quietly sends Mia’s request to Vertex AI Agent Builder—think of it as the switchboard operator.
Vertex AI picks the Data Analysis agent (the “specialist” for questions like Mia’s).
That agent doesn’t go rummaging through databases. Instead, it uses a safe, preapproved tool—an MCP Server—to query BigQuery, where the data lives.
The tool fetches results and returns them to Mia—no passwords in the open, no risky shortcuts—just the answer, fast and safely.
Now meet Ravi, a developer who asks: “Show me the latest app metrics and confirm yesterday’s patch didn’t break the login table.”
The app routes Ravi’s request to Vertex AI.
Vertex AI chooses the Developer agent.
That agent calls a different tool—an MCP Server designed for Cloud SQL—to check the login table and run a safe query.
Results come back with guardrails intact. If the agent ever needs files, there’s also a Cloud Storage tool ready to fetch or store documents.
Let us understand how the underlying flow of activities took place –
User Interface:
Entry point: Vertex AI console or a custom app.
Sends a single request; no direct credentials or system access exposed to the user.
Orchestration: Vertex AI Agent Builder (MCP Host)
Routes the request to the most suitable agent:
Agent A (Data Analysis) for analytics/BI-style questions.
Agent B (Developer) for application/data-ops tasks.
Tooling via MCP Servers on Cloud Run
Each MCP Server is a purpose-built adapter with least-privilege access to exactly one service:
Server1 → BigQuery (analytics/warehouse) — used by Agent A in this diagram.
Server2 → Cloud Storage (GCS) (files/objects) — available when file I/O is needed.
Server3 → Cloud SQL (relational DB) — used by Agent B in this diagram.
Agents never hold database credentials; they request actions from the right tool.
Enterprise Systems
BigQuery, Cloud Storage, and Cloud SQL are the systems of record that the tools interact with.
Security, Networking, and Observability
GCP IAM: AuthN/AuthZ for Vertex AI and each MCP Server (fine-grained roles, least privilege).
GCP VPC: Private network paths for all Cloud Run MCP Servers (isolation, egress control).
Cloud Monitoring: Metrics, logs, and alerts across agents and tools (auditability, SLOs).
Return Path
Results flow back from the service → MCP Server → Agent → Vertex AI → UI.
Policies and logs track who requested what, when, and how.
Why does this design work?
One entry point for questions.
Clear accountability: specialists (agents) act within guardrails.
Built-in safety (IAM/VPC) and visibility (Monitoring) for trust.
Separation of concerns: agents decide what to do; tools (MCP Servers) decide how to do it.
Scalable: add a new tool (e.g., Pub/Sub or Vertex AI Feature Store) without changing the UI or agents.
Auditable & maintainable: each tool maps to one service with explicit IAM and VPC controls.
So, we’ve concluded the series with the above post. I hope you like it.
I’ll bring some more exciting topics in the coming days from the new advanced world of technology.
Till then, Happy Avenging! 🙂
Note: All the data & scenarios posted here are representative of data & scenarios available on the internet for educational purposes only. There is always room for improvement in this kind of model & the solution associated with it. I’ve shown the basic ways to achieve the same for educational purposes only.
This is a continuation of my previous post, which can be found here.
Let us recap the key takaways from our previous post –
The Model Context Protocol (MCP) standardizes how AI agents use tools and data. Instead of fragile, custom connectors (N×M problem), teams build one MCP server per system; any MCP-compatible agent can use it, reducing cost and breakage. Unlike RAG, which retrieves static, unstructured documents for context, MCP enables live, structured, and actionable operations (e.g., query databases, create tickets). Compared with proprietary plugins, MCP is open, model-agnostic (JSON-RPC 2.0), and minimizes vendor lock-in. Cloud patterns: Azure “agent factory,” AWS “serverless agents,” and GCP “unified workbench”—each hosting agents with MCP servers securely fronting enterprise services.
Today, we’ll try to understand some of the popular pattern from the world of cloud & we’ll explore them in this post & the next post.
Agent Factory Pattern (Azure):
The Azure “agent factory” pattern leverages the Azure AI Foundry to serve as a secure, managed hub for creating and orchestrating multiple specialized AI agents. This pattern emphasizes enterprise-grade security, governance, and seamless integration with the Microsoft ecosystem, making it ideal for organizations that use Microsoft products extensively.
Let’s explore the following diagram based on this –
Imagine you ask a question in Microsoft Teams—“Show me the latest HR policy” or “What is our current sales pipeline?” Your message is sent to Azure AI Foundry, which acts as an expert dispatcher. Foundry chooses a specialist AI agent—for example, an HR agent for policies or a Sales agent for the pipeline.
That agent does not rummage through your systems directly. Instead, it uses a safe, preapproved tool (an “MCP Server”) that knows how to talk to one system—such as Dynamics 365/CRM, SharePoint, or an Azure SQL database. The tool gets the information, sends it back to the agent, who then explains the answer clearly to you in Teams.
Throughout the process, three guardrails keep everything safe and reliable:
Microsoft Entra ID checks identity and permissions.
Azure API Management (APIM) is the controlled front door for all tool calls.
Azure Monitor watches performance and creates an audit trail.
Let us now understand the technical events that is going on underlying this request –
Control plane: Azure AI Foundry (MCP Host) orchestrates intent, tool selection, and multi-agent flows.
Execution plane: Agents invoke MCP Servers (Azure Functions/Logic Apps) via APIM; each server encapsulates a single domain integration (CRM, SharePoint, SQL).
Data plane:
MCP Server (CRM) ↔ Dynamics 365/CRM
MCP Server (SharePoint) ↔ SharePoint
MCP Server (SQL) ↔ Azure SQL Database
Identity & access:Entra ID issues tokens and enforces least-privilege access; Foundry, APIM, and MCP Servers validate tokens.
Observability:Azure Monitor for metrics, logs, distributed traces, and auditability across agents and tool calls.
Traffic pattern in diagram:
User → Foundry → Agent (Sales/HR).
Agent —tool call→ MCP Server (CRM/SharePoint/SQL).
MCP Server → Target system; response returns along the same path.
Note: The SQL MCP Server is shown connected to Azure SQL; agents can call it in the same fashion as CRM/SharePoint when a use case requires relational data.
Why does this design work?
Safety by design: Agents never directly touch back-end systems; MCP Servers mediate access with APIM and Entra ID.
Clarity & maintainability: Each tool maps to one system; changes are localized and testable.
Scalability: Add new agents or systems by introducing another MCP Server behind APIM.
Auditability: Every action is observable in Azure Monitor for compliance and troubleshooting.
AWS MCP Architecture:
The AWS “composable serverless agent” pattern focuses on building lightweight, modular, and event-driven AI agents using Bedrock and serverless technologies. It prioritizes customization, scalability, and leveraging AWS’s deep service portfolio, making it a strong choice for enterprises that value flexibility and granular control.
A manager opens a familiar app (the Bedrock console or a simple web app) and types, “Show me last quarter’s approved purchase requests.” The request goes to Amazon Bedrock Agents, which acts like an intelligent dispatcher. It chooses the Financial Agent—a specialist in finance tasks. That agent uses a safe, pre-approved tool to fetch data from the company’s DynamoDB records. Moments later, the manager sees a clear summary, without ever touching databases or credentials.
Actors & guardrails. UI (Bedrock console or custom app) → Amazon Bedrock Agents (MCP host/orchestrator) → Domain Agents (Financial, IT Ops) → MCP Servers on AWS Lambda (one tool per AWS service) → Enterprise Services (DynamoDB, S3, CloudWatch). Access is governed by IAM (least-privilege roles, agent→tool→service), ingress/policy by API Gateway (front door to each Lambda tool), and network isolation by VPC where required.
Agent–tool mappings:
Agent A (Financial) → Lambda MCP (DynamoDB)
Agent B (IT Ops) → Lambda MCP (CloudWatch)
Optional: Lambda MCP (S3) for file/object operations
End-to-end sequence:
UI → Bedrock Agents: User submits a prompt.
Agent selection: Bedrock dispatches to the appropriate domain agent (Financial or IT Ops).
Tool invocation: The agent calls the required Lambda MCP Server via API Gateway.
Authorization: The tool executes only permitted actions under its IAM role (least privilege).
Safer by default: Agents never handle raw credentials; tools enforce least privilege with IAM.
Clear boundaries: Each tool maps to one service, making audits and changes simpler.
Scalable & maintainable:Lambda and API Gateway scale on demand; adding a new tool (e.g., a Cost Explorer tool) does not require changing the UI or existing agents.
Faster delivery: Specialists (agents) focus on logic; tools handle system specifics.
In the next post, we’ll conclude the final thread on this topic.
Till then, Happy Avenging! 🙂
Note: All the data & scenarios posted here are representational data & scenarios & available over the internet & for educational purposes only. There is always room for improvement in this kind of model & the solution associated with it. I’ve shown the basic ways to achieve the same for educational purposes only.
This is a continuation of my previous post, which can be found here.
Let us recap the key takaways from our previous post –
Enterprise AI, utilizing the Model Context Protocol (MCP), leverages an open standard that enables AI systems to securely and consistently access enterprise data and tools. MCP replaces brittle “N×M” integrations between models and systems with a standardized client–server pattern: an MCP host (e.g., IDE or chatbot) runs an MCP client that communicates with lightweight MCP servers, which wrap external systems via JSON-RPC. Servers expose three assets—Resources (data), Tools (actions), and Prompts (templates)—behind permissions, access control, and auditability. This design enables real-time context, reduces hallucinations, supports model- and cloud-agnostic interoperability, and accelerates “build once, integrate everywhere” deployment. A typical flow (e.g., retrieving a customer’s latest order) encompasses intent parsing, authorized tool invocation, query translation/execution, and the return of a normalized JSON result to the model for natural-language delivery. Performance introduces modest overhead (RPC hops, JSON (de)serialization, network transit) and scale considerations (request volume, significant results, context-window pressure). Mitigations include in-memory/semantic caching, optimized SQL with indexing, pagination, and filtering, connection pooling, and horizontal scaling with load balancing. In practice, small latency costs are often outweighed by the benefits of higher accuracy, stronger governance, and a decoupled, scalable architecture.
How does MCP compare with other AI integration approaches?
Compared to other approaches, the Model Context Protocol (MCP) offers a uniquely standardized and secure framework for AI-tool integration, shifting from brittle, custom-coded connections to a universal plug-and-play model. It is not a replacement for underlying systems, such as APIs or databases, but instead acts as an intelligent, secure abstraction layer designed explicitly for AI agents.
MCP vs. Custom API integrations:
This approach was the traditional method for AI integration before standards like MCP emerged.
Custom API integrations (traditional): Each AI application requires a custom-built connector for every external system it needs to access, leading to an N x M integration problem (the number of connectors grows exponentially with the number of models and systems). This approach is resource-intensive, challenging to maintain, and prone to breaking when underlying APIs change.
MCP: The standardized protocol eliminates the N x M problem by creating a universal interface. Tool creators build a single MCP server for their system, and any MCP-compatible AI agent can instantly access it. This process decouples the AI model from the underlying implementation details, drastically reducing integration and maintenance costs.
For more detailed information, please refer to the following link.
MCP vs. Retrieval-Augmented Generation (RAG):
RAG is a technique that retrieves static documents to augment an LLM’s knowledge, while MCP focuses on live interactions. They are complementary, not competing.
RAG:
Focus: Retrieving and summarizing static, unstructured data, such as documents, manuals, or knowledge bases.
Best for: Providing background knowledge and general information, as in a policy lookup tool or customer service bot.
Data type: Unstructured, static knowledge.
MCP:
Focus: Accessing and acting on real-time, structured, and dynamic data from databases, APIs, and business systems.
Best for: Agentic use cases involving real-world actions, like pulling live sales reports from a CRM or creating a ticket in a project management tool.
Data type: Structured, real-time, and dynamic data.
MCP vs. LLM plugins and extensions:
Before MCP, platforms like OpenAI offered proprietary plugin systems to extend LLM capabilities.
LLM plugins:
Proprietary: Tied to a specific AI vendor (e.g., OpenAI).
Limited: Rely on the vendor’s API function-calling mechanism, which focuses on call formatting but not standardized execution.
Centralized: Managed by the AI vendor, creating a risk of vendor lock-in.
MCP:
Open standard: Based on a public, interoperable protocol (JSON-RPC 2.0), making it model-agnostic and usable across different platforms.
Infrastructure layer: Provides a standardized infrastructure for agents to discover and use any compliant tool, regardless of the underlying LLM.
Decentralized: Promotes a flexible ecosystem and reduces the risk of vendor lock-in.
How enterprise AI with MCP has opened up a specific Architecture pattern for Azure, AWS & GCP?
Microsoft Azure:
The “agent factory” pattern: Azure focuses on providing managed services for building and orchestrating AI agents, tightly integrated with its enterprise security and governance features. The MCP architecture is a core component of the Azure AI Foundry, serving as a secure, managed “agent factory.”
Azure architecture pattern with MCP:
AI orchestration layer: The Azure AI Agent Service, within Azure AI Foundry, acts as the central host and orchestrator. It provides the control plane for creating, deploying, and managing multiple specialized agents, and it natively supports the MCP standard.
AI model layer: Agents in the Foundry can be powered by various models, including those from Azure OpenAI Service, commercial models from partners, or open-source models.
MCP server and tool layer: MCP servers are deployed using serverless functions, such as Azure Functions or Azure Logic Apps, to wrap existing enterprise systems. These servers expose tools for interacting with enterprise data sources like SharePoint, Azure AI Search, and Azure Blob Storage.
Data and security layer: Data is secured using Microsoft Entra ID (formerly Azure AD) for authentication and access control, with robust security policies enforced via Azure API Management. Access to data sources, such as databases and storage, is managed securely through private networks and Managed Identity.
Amazon Web Services (AWS):
The “composable serverless agent” pattern: AWS emphasizes a modular, composable, and serverless approach, leveraging its extensive portfolio of services to build sophisticated, flexible, and scalable AI solutions. The MCP architecture here aligns with the principle of creating lightweight, event-driven services that AI agents can orchestrate.
AWS architecture pattern with MCP:
The AI orchestration layer, which includesAmazon Bedrock Agents or custom agent frameworks deployed via AWS Fargate or Lambda, acts as the MCP hosts. Bedrock Agents provide built-in orchestration, while custom agents offer greater flexibility and customization options.
AI model layer: The models are sourced from Amazon Bedrock, which provides a wide selection of foundation models.
MCP server and tool layer: MCP servers are deployed as serverless AWS Lambda functions. AWS offers pre-built MCP servers for many of its services, including the AWS Serverless MCP Server for managing serverless applications and the AWS Lambda Tool MCP Server for invoking existing Lambda functions as tools.
Data and security layer: Access is tightly controlled using AWS Identity and Access Management (IAM) roles and policies, with fine-grained permissions for each MCP server. Private data sources like databases (Amazon DynamoDB) and storage (Amazon S3) are accessed securely within a Virtual Private Cloud (VPC).
Google Cloud Platform (GCP):
The “unified workbench” pattern: GCP focuses on providing a unified, open, and data-centric platform for AI development. The MCP architecture on GCP integrates natively with the Vertex AI platform, treating MCP servers as first-class tools that can be dynamically discovered and used within a single workbench.
GCP architecture pattern with MCP:
AI orchestration layer: The Vertex AI Agent Builder serves as the central environment for building and managing conversational AI and other agents. It orchestrates workflows and manages tool invocation for agents.
AI model layer: Agents use foundation models available through the Vertex AI Model Garden or the Gemini API.
MCP server and tool layer: MCP servers are deployed as containerized microservices on Cloud Run or managed by services like App Engine. These servers contain tools that interact with GCP services, such as BigQuery, Cloud Storage, and Cloud SQL. GCP offers pre-built MCP server implementations, such as the GCP MCP Toolbox, for integration with its databases.
Data and security layer:Vertex AI Vector Search and other data sources are encapsulated within the MCP server tools to provide contextual information. Access to these services is managed by Identity and Access Management (IAM) and secured through virtual private clouds. The MCP server can leverage Vertex AI Context Caching for improved performance.
Note that all the native technology is referred to in each respective cloud. Hence, some of the better technologies can be used in place of the tool mentioned here. This is more of a concept-level comparison rather than industry-wise implementation approaches.
We’ll go ahead and conclude this post here & continue discussing on a further deep dive in the next post.
Till then, Happy Avenging! 🙂
Note: All the data & scenarios posted here are representational data & scenarios & available over the internet & for educational purposes only. There is always room for improvement in this kind of model & the solution associated with it. I’ve shown the basic ways to achieve the same for educational purposes only.
This is a continuation of my previous post, which can be found here.
Let us recap the key takaways from our previous post –
Agentic AI refers to autonomous systems that pursue goals with minimal supervision by planning, reasoning about next steps, utilizing tools, and maintaining context across sessions. Core capabilities include goal-directed autonomy, interaction with tools and environments (e.g., APIs, databases, devices), multi-step planning and reasoning under uncertainty, persistence, and choiceful decision-making.
Architecturally, three modules coordinate intelligent behavior: Sensing (perception pipelines that acquire multimodal data, extract salient patterns, and recognize entities/events); Observation/Deliberation (objective setting, strategy formation, and option evaluation relative to resources and constraints); and Action (execution via software interfaces, communications, or physical actuation to deliver outcomes). These functions are enabled by machine learning, deep learning, computer vision, natural language processing, planning/decision-making, uncertainty reasoning, and simulation/modeling.
At enterprise scale, open standards align autonomy with governance: the Model Context Protocol (MCP) grants an agent secure, principled access to enterprise tools and data (vertical integration), while Agent-to-Agent (A2A) enables specialized agents to coordinate, delegate, and exchange information (horizontal collaboration). Together, MCP and A2A help organizations transition from isolated pilots to scalable programs, delivering end-to-end automation, faster integration, enhanced security and auditability, vendor-neutral interoperability, and adaptive problem-solving that responds to real-time context.
Great! Let’s dive into this topic now.
Enterprise AI with MCP refers to the application of the Model Context Protocol (MCP), an open standard, to enable AI systems to securely and consistently access external enterprise data and applications.
The problem MCP solves in enterprise AI:
Before MCP, enterprise AI integration was characterized by a “many-to-many” or “N x M” problem. Companies had to build custom, fragile, and costly integrations between each AI model and every proprietary data source, which was not scalable. These limitations left AI agents with limited, outdated, or siloed information, restricting their potential impact. MCP addresses this by offering a standardized architecture for AI and data systems to communicate with each other.
How does MCP work?
The MCP framework uses a client-server architecture to enable communication between AI models and external tools and data sources.
MCP Host: The AI-powered application or environment, such as an AI-enhanced IDE or a generative AI chatbot like Anthropic’s Claude or OpenAI’s ChatGPT, where the user interacts.
MCP Client: A component within the host application that manages the connection to MCP servers.
MCP Server: A lightweight service that wraps around an external system (e.g., a CRM, database, or API) and exposes its capabilities to the AI client in a standardized format, typically using JSON-RPC 2.0.
An MCP server provides AI clients with three key resources:
Resources: Structured or unstructured data that an AI can access, such as files, documents, or database records.
Tools: The functionality to perform specific actions within an external system, like running a database query or sending an email.
Prompts: Pre-defined text templates or workflows to help guide the AI’s actions.
Benefits of MCP for enterprise AI:
Standardized integration: Developers can build integrations against a single, open standard, which dramatically reduces the complexity and time required to deploy and scale AI initiatives.
Enhanced security and governance: MCP incorporates native support for security and compliance measures. It provides permission models, access control, and auditing capabilities to ensure AI systems only access data and tools within specified boundaries.
Real-time contextual awareness: By connecting AI agents to live enterprise data sources, MCP ensures they have access to the most current and relevant information, which reduces hallucinations and improves the accuracy of AI outputs.
Greater interoperability: MCP is model-agnostic & can be used with a variety of AI models (e.g., Anthropic’s Claude or OpenAI’s models) and across different cloud environments. This approach helps enterprises avoid vendor lock-in.
Accelerated development: The “build once, integrate everywhere” approach enables internal teams to focus on innovation instead of writing custom connectors for every system.
Flow of activities:
Let us understand one sample case & the flow of activities.
A customer support agent uses an AI assistant to get information about a customer’s recent orders. The AI assistant utilizes an MCP-compliant client to communicate with an MCP server, which is connected to the company’s PostgreSQL database.
The interaction flow:
1. User request: The support agent asks the AI assistant, “What was the most recent order placed by Priyanka Chopra Jonas?”
2. AI model processes intent: The AI assistant, running on an MCP host, analyzes the natural language query. It recognizes that to answer this question, it needs to perform a database query. It then identifies the appropriate tool from the MCP server’s capabilities.
3. Client initiates tool call: The AI assistant’s MCP client sends a JSON-RPC request to the MCP server connected to the PostgreSQL database. The request specifies the tool to be used, such as get_customer_orders, and includes the necessary parameters:
5. Database returns data: The PostgreSQL database executes the query and returns the requested data to the MCP server.
6. Server formats the response: The MCP server receives the raw database output and formats it into a standardized JSON response that the MCP client can understand.
7. Client returns data to the model: The MCP client receives the JSON response and passes it back to the AI assistant’s language model.
8. AI model generates final response: The language model incorporates this real-time data into its response and presents it to the user in a natural, conversational format.
“Priyanka Chopra Jonas’s most recent order was placed on August 25, 2025, with an order ID of 98765, for a total of $11025.50.”
What are the performance implications of using MCP for database access?
Using the Model Context Protocol (MCP) for database access introduces a layer of abstraction that affects performance in several ways. While it adds some latency and processing overhead, strategic implementation can mitigate these effects. For AI applications, the benefits often outweigh the costs, particularly in terms of improved accuracy, security, and scalability.
Sources of performance implications::
Added latency and processing overhead:
The MCP architecture introduces extra communication steps between the AI agent and the database, each adding a small amount of latency.
RPC overhead: The JSON-RPC call from the AI’s client to the MCP server adds a small processing and network delay. This is an out-of-process request, as opposed to a simple local function call.
JSON serialization: Request and response data must be serialized and deserialized into JSON format, which requires processing time.
Network transit: For remote MCP servers, the data must travel over the network, adding latency. However, for a local or on-premise setup, this is minimal. The physical location of the MCP server relative to the AI model and the database is a significant factor.
Scalability and resource consumption:
The performance impact scales with the complexity and volume of the AI agent’s interactions.
High request volume: A single AI agent working on a complex task might issue dozens of parallel database queries. In high-traffic scenarios, managing numerous simultaneous connections can strain system resources and require robust infrastructure.
Excessive data retrieval: A significant performance risk is an AI agent retrieving a massive dataset in a single query. This process can consume a large number of tokens, fill the AI’s context window, and cause bottlenecks at the database and client levels.
Context window usage: Tool definitions and the results of tool calls consume space in the AI’s context window. If a large number of tools are in use, this can limit the AI’s “working memory,” resulting in slower and less effective reasoning.
Optimizations for high performance::
Caching:
Caching is a crucial strategy for mitigating the performance overhead of MCP.
In-memory caching: The MCP server can cache results from frequent or expensive database queries in memory (e.g., using Redis or Memcached). This approach enables repeat requests to be served almost instantly without requiring a database hit.
Semantic caching: Advanced techniques can cache the results of previous queries and serve them for semantically similar future requests, reducing token consumption and improving speed for conversational applications.
Efficient queries and resource management:
Designing the MCP server and its database interactions for efficiency is critical.
Optimized SQL: The MCP server should generate optimized SQL queries. Database indexes should be utilized effectively to expedite lookups and minimize load.
Pagination and filtering: To prevent a single query from overwhelming the system, the MCP server should implement pagination. The AI agent can be prompted to use filtering parameters to retrieve only the necessary data.
Connection pooling: This technique reuses existing database connections instead of opening a new one for each request, thereby reducing latency and database load.
Load balancing and scaling:
For large-scale enterprise deployments, scaling is essential for maintaining performance.
Multiple servers: The workload can be distributed across various MCP servers. One server could handle read requests, and another could handle writes.
Load balancing: A reverse proxy or other load-balancing solution can distribute incoming traffic across MCP server instances. Autoscaling can dynamically add or remove servers in response to demand.
The performance trade-off in perspective:
For AI-driven tasks, a slight increase in latency for database access is often a worthwhile trade-off for significant gains.
Improved accuracy: Accessing real-time, high-quality data through MCP leads to more accurate and relevant AI responses, reducing “hallucinations”.
Scalable ecosystem: The standardization of MCP reduces development overhead and allows for a more modular, scalable ecosystem, which saves significant engineering resources compared to building custom integrations.
Decoupled architecture: The MCP server decouples the AI model from the database, allowing each to be optimized and scaled independently.
We’ll go ahead and conclude this post here & continue discussing on a further deep dive in the next post.
Till then, Happy Avenging! 🙂
Note: All the data & scenarios posted here are representational data & scenarios & available over the internet & for educational purposes only. There is always room for improvement in this kind of model & the solution associated with it. I’ve shown the basic ways to achieve the same for educational purposes only.
Today, we won’t be discussing any solutions. Today, we’ll be discussing the Agentic AI & its implementation in the Enterprise landscape in a series of upcoming posts.
So, hang tight! We’re about to launch a new venture as part of our knowledge drive.
What is Agentic AI?
Agentic AI refers to artificial intelligence systems that can act autonomously to achieve goals, making decisions and taking actions without constant human oversight. Unlike traditional AI, which responds to prompts, agentic AI can plan, reason about next steps, utilize tools, and work toward objectives over extended periods of time.
Key characteristics of agentic AI include:
Autonomy and Goal-Directed Behavior: These systems can pursue objectives independently, breaking down complex tasks into smaller steps and executing them sequentially.
Tool Use and Environment Interaction: Agentic AI can interact with external systems, APIs, databases, and software tools to gather information and perform actions in the real world.
Planning and Reasoning: They can develop multi-step strategies, adapt their approach based on feedback, and reason through problems to find solutions.
Persistence: Unlike single-interaction AI, agentic systems can maintain context and continue working on tasks across multiple interactions or sessions.
Decision Making: They can evaluate options, weigh trade-offs, and make choices about how to proceed when faced with uncertainty.
Foundational Elements of Agentic AI Architectures:
Agentic AI systems have several interconnected components that work together to enable intelligent behaviour. Each element plays a crucial role in the overall functioning of the AI system, and they must interact seamlessly to achieve desired outcomes. Let’s explore each of these components in more detail.
Sensing:
The sensing module serves as the AI’s eyes and ears, enabling it to understand its surroundings and make informed decisions. Think of it as the system that helps the AI “see” and “hear” the world around it, much like how humans use their senses.
Gathering Information: The system collects data from multiple sources, including cameras for visual information, microphones for audio, sensors for physical touch, and digital systems for data. This step provides the AI with a comprehensive understanding of what’s happening.
Making Sense of Data: Raw information from sensors can be messy and overwhelming. This component processes the data to identify the essential patterns and details that actually matter for making informed decisions.
Recognizing What’s Important: Utilizing advanced techniques such as computer vision (for images), natural language processing (for text and speech), and machine learning (for data patterns), the system identifies and understands objects, people, events, and situations within the environment.
This sensing capability enables AI systems to transition from merely following pre-programmed instructions to genuinely understanding their environment and making informed decisions based on real-world conditions. It’s the difference between a basic automated system and an intelligent agent that can adapt to changing situations.
Observation:
The observation module serves as the AI’s decision-making center, where it sets objectives, develops strategies, and selects the most effective actions to take. This step is where the AI transforms what it perceives into purposeful action, much like humans think through problems and devise plans.
Setting Clear Objectives: The system establishes specific goals and desired outcomes, giving the AI a clear sense of direction and purpose. This approach helps ensure all actions are working toward meaningful results rather than random activity.
Strategic Planning: Using information about its own capabilities and the current situation, the AI creates step-by-step plans to reach its goals. It considers potential obstacles, available resources, and different approaches to find the most effective path forward.
Intelligent Decision-Making: When faced with multiple options, the system evaluates each choice against the current circumstances, established goals, and potential outcomes. It then selects the action most likely to move the AI closer to achieving its objectives.
This observation capability is what transforms an AI from a simple tool that follows commands into an intelligent system that can work independently toward business goals. It enables the AI to handle complex, multi-step tasks and adapt its approach when conditions change, making it valuable for a wide range of applications, from customer service to project management.
Action:
The action module serves as the AI’s hands and voice, turning decisions into real-world results. This step is where the AI actually puts its thinking and planning into action, carrying out tasks that make a tangible difference in the environment.
Control Systems: The system utilizes various tools to interact with the world, including motors for physical movement, speakers for communication, network connections for digital tasks, and software interfaces for system operation. These serve as the AI’s means of reaching out and making adjustments.
Task Implementation: Once the cognitive module determines the action to take, this component executes the actual task. Whether it’s sending an email, moving a robotic arm, updating a database, or scheduling a meeting, this module handles the execution from start to finish.
This action capability is what makes AI systems truly useful in business environments. Without it, an AI could analyze data and make significant decisions, but it couldn’t help solve problems or complete tasks. The action module bridges the gap between artificial intelligence and real-world impact, enabling AI to automate processes, respond to customers, manage systems, and deliver measurable business value.
Technology that is primarily involved in the Agentic AI is as follows –
1. Machine Learning
2. Deep Learning
3. Computer Vision
4. Natural Language Processing (NLP)
5. Planning and Decision-Making
6. Uncertainty and Reasoning
7. Simulation and Modeling
Agentic AI at Scale: MCP + A2A:
In an enterprise setting, agentic AI systems utilize the Model Context Protocol (MCP) and the Agent-to-Agent (A2A) protocol as complementary, open standards to achieve autonomous, coordinated, and secure workflows. An MCP-enabled agent gains the ability to access and manipulate enterprise tools and data. At the same time, A2A allows a network of these agents to collaborate on complex tasks by delegating and exchanging information.
This combined approach allows enterprises to move from isolated AI experiments to strategic, scalable, and secure AI programs.
How do the protocols work together in an enterprise?
Protocol
Function in Agentic AI
Focus
Example use case
Model Context Protocol (MCP)
Equips a single AI agent with the tools and data it needs to perform a specific job.
Vertical integration: connecting agents to enterprise systems like databases, CRMs, and APIs.
A sales agent uses MCP to query the company CRM for a client’s recent purchase history.
Agent-to-Agent (A2A)
Enables multiple specialized agents to communicate, delegate tasks, and collaborate on a larger, multi-step goal.
Horizontal collaboration: allowing agents from different domains to work together seamlessly.
An orchestrating agent uses A2A to delegate parts of a complex workflow to specialized HR, IT, and sales agents.
Advantages for the enterprise:
End-to-end automation: Agents can handle tasks from start to finish, including complex, multi-step workflows, autonomously.
Greater agility and speed: Enterprise-wide adoption of these protocols reduces the cost and complexity of integrating AI, accelerating deployment timelines for new applications.
Enhanced security and governance: Enterprise AI platforms built on these open standards incorporate robust security policies, centralized access controls, and comprehensive audit trails.
Vendor neutrality and interoperability: As open standards, MCP and A2A allow AI agents to work together seamlessly, regardless of the underlying vendor or platform.
Adaptive problem-solving: Agents can dynamically adjust their strategies and collaborate based on real-time data and contextual changes, leading to more resilient and efficient systems.
We will discuss this topic further in our upcoming posts.
Till then, Happy Avenging! 🙂
Note: All the data & scenarios posted here are representational data & scenarios & available over the internet & for educational purposes only. There is always room for improvement in this kind of model & the solution associated with it. I’ve shown the basic ways to achieve the same for educational purposes only.
As a continuation of the previous post, I would like to continue my discussion about the implementation of MCP protocols among agents. But before that, I want to add the quick demo one more time to recap our objectives.
Let us recap the process flow –
Also, understand the groupings of scripts by each group as posted in the previous post –
Great! Now, we’ll continue with the main discussion.
CODE:
clsYouTubeVideoProcessor.py (This class processes the transcripts from YouTube. It may also translate them into English for non-native speakers.)
defextract_youtube_id(youtube_url):"""Extract YouTube video ID from URL""" youtube_id_match = re.search(r'(?:v=|\/)([0-9A-Za-z_-]{11}).*', youtube_url)if youtube_id_match:return youtube_id_match.group(1)returnNonedefget_youtube_transcript(youtube_url):"""Get transcript from YouTube video""" video_id =extract_youtube_id(youtube_url)ifnot video_id:return{"error":"Invalid YouTube URL or ID"}try: transcript_list = YouTubeTranscriptApi.list_transcripts(video_id)# First try to get manual transcriptstry: transcript = transcript_list.find_manually_created_transcript(["en"]) transcript_data = transcript.fetch()print(f"Debug - Manual transcript format: {type(transcript_data)}")if transcript_data andlen(transcript_data)>0:print(f"Debug - First item type: {type(transcript_data[0])}")print(f"Debug - First item sample: {transcript_data[0]}")return{"text": transcript_data,"language":"en","auto_generated":False}exceptExceptionas e:print(f"Debug - No manual transcript: {str(e)}")# If no manual English transcript, try any available transcripttry: available_transcripts =list(transcript_list)if available_transcripts: transcript = available_transcripts[0]print(f"Debug - Using transcript in language: {transcript.language_code}") transcript_data = transcript.fetch()print(f"Debug - Auto transcript format: {type(transcript_data)}")if transcript_data andlen(transcript_data)>0:print(f"Debug - First item type: {type(transcript_data[0])}")print(f"Debug - First item sample: {transcript_data[0]}")return{"text": transcript_data,"language": transcript.language_code,"auto_generated": transcript.is_generated}else:return{"error":"No transcripts available for this video"}exceptExceptionas e:return{"error":f"Error getting transcript: {str(e)}"}exceptExceptionas e:return{"error":f"Error getting transcript list: {str(e)}"}# ----------------------------------------------------------------------------------# YouTube Video Processor# ----------------------------------------------------------------------------------classclsYouTubeVideoProcessor:"""Process YouTube videos using the agent system"""def__init__(self,documentation_agent,translation_agent,research_agent):self.documentation_agent = documentation_agentself.translation_agent = translation_agentself.research_agent = research_agentdefprocess_youtube_video(self,youtube_url):"""Process a YouTube video"""print(f"Processing YouTube video: {youtube_url}")# Extract transcript transcript_result =get_youtube_transcript(youtube_url)if"error"in transcript_result:return{"error": transcript_result["error"]}# Start a new conversation conversation_id =self.documentation_agent.start_processing()# Process transcript segments transcript_data = transcript_result["text"] transcript_language = transcript_result["language"]print(f"Debug - Type of transcript_data: {type(transcript_data)}")# For each segment, detect language and translate if needed processed_segments =[]try:# Make sure transcript_data is a list of dictionaries with text and start fieldsifisinstance(transcript_data,list):for idx, segment inenumerate(transcript_data):print(f"Debug - Processing segment {idx}, type: {type(segment)}")# Extract text properly based on the typeifisinstance(segment,dict)and"text"in segment: text = segment["text"] start = segment.get("start",0)else:# Try to access attributes for non-dict typestry: text = segment.text start =getattr(segment,"start",0)exceptAttributeError:# If all else fails, convert to string text =str(segment) start = idx *5# Arbitrary timestampprint(f"Debug - Extracted text: {text[:30]}...")# Create a standardized segment std_segment ={"text": text,"start": start}# Process through translation agent translation_result =self.translation_agent.process_text(text, conversation_id)# Update segment with translation information segment_with_translation ={**std_segment,"translation_info": translation_result}# Use translated text for documentationif"final_text"in translation_result and translation_result["final_text"]!= text: std_segment["processed_text"]= translation_result["final_text"]else: std_segment["processed_text"]= text processed_segments.append(segment_with_translation)else:# If transcript_data is not a list, treat it as a single text blockprint(f"Debug - Transcript is not a list, treating as single text") text =str(transcript_data) std_segment ={"text": text,"start":0} translation_result =self.translation_agent.process_text(text, conversation_id) segment_with_translation ={**std_segment,"translation_info": translation_result}if"final_text"in translation_result and translation_result["final_text"]!= text: std_segment["processed_text"]= translation_result["final_text"]else: std_segment["processed_text"]= text processed_segments.append(segment_with_translation)exceptExceptionas e:print(f"Debug - Error processing transcript: {str(e)}")return{"error":f"Error processing transcript: {str(e)}"}# Process the transcript with the documentation agent documentation_result =self.documentation_agent.process_transcript( processed_segments, conversation_id)return{"youtube_url": youtube_url,"transcript_language": transcript_language,"processed_segments": processed_segments,"documentation": documentation_result,"conversation_id": conversation_id}
Let us understand this step-by-step:
Part 1: Getting the YouTube Transcript
defextract_youtube_id(youtube_url): ...
This extracts the unique video ID from any YouTube link.
defget_youtube_transcript(youtube_url): ...
This gets the actual spoken content of the video.
It tries to get a manual transcript first (created by humans).
If not available, it falls back to an auto-generated version (created by YouTube’s AI).
If nothing is found, it gives back an error message like: “Transcript not available.”
Part 2: Processing the Video with Agents
classclsYouTubeVideoProcessor: ...
This is like the control center that tells each intelligent agent what to do with the transcript. Here are the detailed steps:
1. Start the Process
defprocess_youtube_video(self,youtube_url): ...
The system starts with a YouTube video link.
It prints a message like: “Processing YouTube video: [link]”
2. Extract the Transcript
The system runs the get_youtube_transcript() function.
If it fails, it returns an error (e.g., invalid link or no subtitles available).
3. Start a “Conversation”
The documentation agent begins a new session, tracked by a unique conversation ID.
Think of this like opening a new folder in a shared team workspace to store everything related to this video.
4. Go Through Each Segment of the Transcript
The spoken text is often broken into small parts (segments), like subtitles.
For each part:
It checks the text.
It finds out the time that part was spoken.
It sends it to the translation agent to clean up or translate the text.
5. Translate (if needed)
If the translation agent finds a better or translated version, it replaces the original.
Otherwise, it keeps the original.
6. Prepare for Documentation
After translation, the segment is passed to the documentation agent.
This agent might:
Summarize the content,
Highlight important terms,
Structure it into a readable format.
7. Return the Final Result
The system gives back a structured package with:
The video link
The original language
The transcript in parts (processed and translated)
A documentation summary
The conversation ID (for tracking or further updates)
clsDocumentationAgent.py (This is the main class that will be part of the document agents.)
classclsDocumentationAgent:"""Documentation Agent built with LangChain"""def__init__(self,agent_id:str,broker: clsMCPBroker):self.agent_id = agent_idself.broker = brokerself.broker.register_agent(agent_id)# Initialize LangChain componentsself.llm =ChatOpenAI(model="gpt-4-0125-preview",temperature=0.1,api_key=OPENAI_API_KEY)# Create toolsself.tools =[clsSendMessageTool(sender_id=self.agent_id,broker=self.broker)]# Set up LLM with toolsself.llm_with_tools =self.llm.bind(tools=[tool.tool_config for tool inself.tools])# Setup memoryself.memory =ConversationBufferMemory(memory_key="chat_history",return_messages=True)# Create promptself.prompt = ChatPromptTemplate.from_messages([("system","""You are a Documentation Agent for YouTube video transcripts. Your responsibilities include: 1. Process YouTube video transcripts 2. Identify key points, topics, and main ideas 3. Organize content into a coherent and structured format 4. Create concise summaries 5. Request research information when necessary When you need additional context or research, send a request to the Research Agent. Always maintain a professional tone and ensure your documentation is clear and organized."""),MessagesPlaceholder(variable_name="chat_history"),("human","{input}"),MessagesPlaceholder(variable_name="agent_scratchpad"),])# Create agentself.agent =({"input":lambdax: x["input"],"chat_history":lambdax:self.memory.load_memory_variables({})["chat_history"],"agent_scratchpad":lambdax:format_to_openai_tool_messages(x["intermediate_steps"]),}|self.prompt|self.llm_with_tools|OpenAIToolsAgentOutputParser())# Create agent executorself.agent_executor =AgentExecutor(agent=self.agent,tools=self.tools,verbose=True,memory=self.memory)# Video dataself.current_conversation_id =Noneself.video_notes ={}self.key_points =[]self.transcript_segments =[]defstart_processing(self)->str:"""Start processing a new video"""self.current_conversation_id =str(uuid.uuid4())self.video_notes ={}self.key_points =[]self.transcript_segments =[]returnself.current_conversation_iddefprocess_transcript(self,transcript_segments,conversation_id=None):"""Process a YouTube transcript"""ifnot conversation_id: conversation_id =self.start_processing()self.current_conversation_id = conversation_id# Store transcript segmentsself.transcript_segments = transcript_segments# Process segments processed_segments =[]for segment in transcript_segments: processed_result =self.process_segment(segment) processed_segments.append(processed_result)# Generate summary summary =self.generate_summary()return{"processed_segments": processed_segments,"summary": summary,"conversation_id": conversation_id}defprocess_segment(self,segment):"""Process individual transcript segment""" text = segment.get("text","") start = segment.get("start",0)# Use LangChain agent to process the segment result =self.agent_executor.invoke({"input":f"Process this video transcript segment at timestamp {start}s: {text}. If research is needed, send a request to the research_agent."})# Update video notes timestamp = startself.video_notes[timestamp]={"text": text,"analysis": result["output"]}return{"timestamp": timestamp,"text": text,"analysis": result["output"]}defhandle_mcp_message(self,message: clsMCPMessage)-> Optional[clsMCPMessage]:"""Handle an incoming MCP message"""if message.message_type =="research_response":# Process research information received from Research Agent research_info = message.content.get("text","") result =self.agent_executor.invoke({"input":f"Incorporate this research information into video analysis: {research_info}"})# Send acknowledgment back to Research Agent response =clsMCPMessage(sender=self.agent_id,receiver=message.sender,message_type="acknowledgment",content={"text":"Research information incorporated into video analysis."},reply_to=message.id,conversation_id=message.conversation_id)self.broker.publish(response)return responseelif message.message_type =="translation_response":# Process translation response from Translation Agent translation_result = message.content# Process the translated textif"final_text"in translation_result: text = translation_result["final_text"] original_text = translation_result.get("original_text","") language_info = translation_result.get("language",{}) result =self.agent_executor.invoke({"input":f"Process this translated text: {text}\nOriginal language: {language_info.get('language','unknown')}\nOriginal text: {original_text}"})# Update notes with translation informationfor timestamp, note inself.video_notes.items():if note["text"]== original_text: note["translated_text"]= text note["language"]= language_infobreakreturnNonereturnNonedefrun(self):"""Run the agent to listen for MCP messages"""print(f"Documentation Agent {self.agent_id} is running...")whileTrue: message =self.broker.get_message(self.agent_id,timeout=1)if message:self.handle_mcp_message(message) time.sleep(0.1)defgenerate_summary(self)->str:"""Generate a summary of the video"""ifnotself.video_notes:return"No video data available to summarize." all_notes ="\n".join([f"{ts}: {note['text']}"for ts, note inself.video_notes.items()]) result =self.agent_executor.invoke({"input":f"Generate a concise summary of this YouTube video, including key points and topics:\n{all_notes}"})return result["output"]
Let us understand the key methods in a step-by-step manner:
The Documentation Agent is like a smart assistant that watches a YouTube video, takes notes, pulls out important ideas, and creates a summary — almost like a professional note-taker trained to help educators, researchers, and content creators. It works with a team of other assistants, like a Translator Agent and a Research Agent, and they all talk to each other through a messaging system.
1. Starting to Work on a New Video
defstart_processing(self)->str
When a new video is being processed:
A new project ID is created.
Old notes and transcripts are cleared to start fresh.
2. Processing the Whole Transcript
defprocess_transcript(...)
This is where the assistant:
Takes in the full transcript (what was said in the video).
Breaks it into small parts (like subtitles).
Sends each part to the smart brain for analysis.
Collects the results.
Finally, a summary of all the main ideas is created.
3. Processing One Transcript Segment at a Time
defprocess_segment(self,segment)
For each chunk of the video:
The assistant reads the text and timestamp.
It asks GPT-4 to analyze it and suggest important insights.
It saves that insight along with the original text and timestamp.
4. Handling Incoming Messages from Other Agents
defhandle_mcp_message(self,message)
The assistant can also receive messages from teammates (other agents):
If the message is from the Research Agent:
It reads new information and adds it to its notes.
It replies with a thank-you message to say it got the research.
If the message is from the Translation Agent:
It takes the translated version of a transcript.
Updates its notes to reflect the translated text and its language.
This is like a team of assistants emailing back and forth to make sure the notes are complete and accurate.
5. Summarizing the Whole Video
defgenerate_summary(self)
After going through all the transcript parts, the agent asks GPT-4 to create a short, clean summary — identifying:
Main ideas
Key talking points
Structure of the content
The final result is clear, professional, and usable in learning materials or documentation.
clsResearchAgent.py (This is the main class that implements the research agent.)
classclsResearchAgent:"""Research Agent built with AutoGen"""def__init__(self,agent_id:str,broker: clsMCPBroker):self.agent_id = agent_idself.broker = brokerself.broker.register_agent(agent_id)# Configure AutoGen directly with API keyifnot OPENAI_API_KEY:print("Warning: OPENAI_API_KEY not set for ResearchAgent")# Create config list directly instead of loading from file config_list =[{"model":"gpt-4-0125-preview","api_key": OPENAI_API_KEY}]# Create AutoGen assistant for researchself.assistant =AssistantAgent(name="research_assistant",system_message="""You are a Research Agent for YouTube videos. Your responsibilities include: 1. Research topics mentioned in the video 2. Find relevant information, facts, references, or context 3. Provide concise, accurate information to support the documentation 4. Focus on delivering high-quality, relevant information Respond directly to research requests with clear, factual information.""",llm_config={"config_list": config_list,"temperature":0.1})# Create user proxy to handle message passingself.user_proxy =UserProxyAgent(name="research_manager",human_input_mode="NEVER",code_execution_config={"work_dir":"coding","use_docker":False},default_auto_reply="Working on the research request...")# Current conversation trackingself.current_requests ={}defhandle_mcp_message(self,message: clsMCPMessage)-> Optional[clsMCPMessage]:"""Handle an incoming MCP message"""if message.message_type =="request":# Process research request from Documentation Agent request_text = message.content.get("text","")# Use AutoGen to process the research requestdefresearch_task():self.user_proxy.initiate_chat(self.assistant,message=f"Research request for YouTube video content: {request_text}. Provide concise, factual information.")# Return last assistant messagereturnself.assistant.chat_messages[self.user_proxy.name][-1]["content"]# Execute research task research_result =research_task()# Send research results back to Documentation Agent response =clsMCPMessage(sender=self.agent_id,receiver=message.sender,message_type="research_response",content={"text": research_result},reply_to=message.id,conversation_id=message.conversation_id)self.broker.publish(response)return responsereturnNonedefrun(self):"""Run the agent to listen for MCP messages"""print(f"Research Agent {self.agent_id} is running...")whileTrue: message =self.broker.get_message(self.agent_id,timeout=1)if message:self.handle_mcp_message(message) time.sleep(0.1)
Let us understand the key methods in detail.
1. Receiving and Responding to Research Requests
defhandle_mcp_message(self,message)
When the Research Agent gets a message (like a question or request for info), it:
Reads the message to see what needs to be researched.
Asks GPT-4 to find helpful, accurate info about that topic.
Sends the answer back to whoever asked the question (usually the Documentation Agent).
clsTranslationAgent.py (This is the main class that represents the translation agent)
classclsTranslationAgent:"""Agent for language detection and translation"""def__init__(self,agent_id:str,broker: clsMCPBroker):self.agent_id = agent_idself.broker = brokerself.broker.register_agent(agent_id)# Initialize language detectorself.language_detector =clsLanguageDetector()# Initialize translation serviceself.translation_service =clsTranslationService()defprocess_text(self,text,conversation_id=None):"""Process text: detect language and translate if needed, handling mixed language content"""ifnot conversation_id: conversation_id =str(uuid.uuid4())# Detect language with support for mixed language content language_info =self.language_detector.detect(text)# Decide if translation is needed needs_translation =True# Pure English content doesn't need translationif language_info["language_code"]=="en-IN"or language_info["language_code"]=="unknown": needs_translation =False# For mixed language, check if it's primarily Englishif language_info.get("is_mixed",False)and language_info.get("languages",[]): english_langs =[ lang for lang in language_info.get("languages",[])if lang["language_code"]=="en-IN"or lang["language_code"].startswith("en-")]# If the highest confidence language is English and > 60% confident, don't translateif english_langs and english_langs[0].get("confidence",0)>0.6: needs_translation =Falseif needs_translation:# Translate using the appropriate service based on language detection translation_result =self.translation_service.translate(text, language_info)return{"original_text": text,"language": language_info,"translation": translation_result,"final_text": translation_result.get("translated_text", text),"conversation_id": conversation_id}else:# Already English or unknown language, return as isreturn{"original_text": text,"language": language_info,"translation":{"provider":"none"},"final_text": text,"conversation_id": conversation_id}defhandle_mcp_message(self,message: clsMCPMessage)-> Optional[clsMCPMessage]:"""Handle an incoming MCP message"""if message.message_type =="translation_request":# Process translation request from Documentation Agent text = message.content.get("text","")# Process the text result =self.process_text(text, message.conversation_id)# Send translation results back to requester response =clsMCPMessage(sender=self.agent_id,receiver=message.sender,message_type="translation_response",content=result,reply_to=message.id,conversation_id=message.conversation_id)self.broker.publish(response)return responsereturnNonedefrun(self):"""Run the agent to listen for MCP messages"""print(f"Translation Agent {self.agent_id} is running...")whileTrue: message =self.broker.get_message(self.agent_id,timeout=1)if message:self.handle_mcp_message(message) time.sleep(0.1)
Let us understand the key methods in step-by-step manner:
1. Understanding and Translating Text:
defprocess_text(...)
This is the core job of the agent. Here’s what it does with any piece of text:
Step 1: Detect the Language
It tries to figure out the language of the input text.
It can handle cases where more than one language is mixed together, which is common in casual speech or subtitles.
Step 2: Decide Whether to Translate
If the text is clearly in English, or it’s unclear what the language is, it decides not to translate.
If the text is mostly in another language or has less than 60% confidence in being English, it will translate it into English.
Step 3: Translate (if needed)
If translation is required, it uses the translation service to do the job.
Then it packages all the information: the original text, detected language, the translated version, and a unique conversation ID.
Step 4: Return the Results
If no translation is needed, it returns the original text and a note saying “no translation was applied.”
2. Receiving Messages and Responding
defhandle_mcp_message(...)
The agent listens for messages from other agents. When someone asks it to translate something:
It takes the text from the message.
Runs it through the process_text function (as explained above).
Sends the translated (or original) result to the person who asked.
clsTranslationService.py (This is the actual work process of translation by the agent)
classclsTranslationService:"""Translation service using multiple providers with support for mixed languages"""def__init__(self):# Initialize Sarvam AI clientself.sarvam_api_key = SARVAM_API_KEYself.sarvam_url ="https://api.sarvam.ai/translate"# Initialize Google Cloud Translation client using simple HTTP requestsself.google_api_key = GOOGLE_API_KEYself.google_translate_url ="https://translation.googleapis.com/language/translate/v2"deftranslate_with_sarvam(self,text,source_lang,target_lang="en-IN"):"""Translate text using Sarvam AI (for Indian languages)"""ifnotself.sarvam_api_key:return{"error":"Sarvam API key not set"} headers ={"Content-Type":"application/json","api-subscription-key":self.sarvam_api_key} payload ={"input": text,"source_language_code": source_lang,"target_language_code": target_lang,"speaker_gender":"Female","mode":"formal","model":"mayura:v1"}try: response = requests.post(self.sarvam_url,headers=headers,json=payload)if response.status_code ==200:return{"translated_text": response.json().get("translated_text",""),"provider":"sarvam"}else:return{"error":f"Sarvam API error: {response.text}","provider":"sarvam"}exceptExceptionas e:return{"error":f"Error calling Sarvam API: {str(e)}","provider":"sarvam"}deftranslate_with_google(self,text,target_lang="en"):"""Translate text using Google Cloud Translation API with direct HTTP request"""ifnotself.google_api_key:return{"error":"Google API key not set"}try:# Using the translation API v2 with API key params ={"key":self.google_api_key,"q": text,"target": target_lang} response = requests.post(self.google_translate_url,params=params)if response.status_code ==200: data = response.json() translation = data.get("data",{}).get("translations",[{}])[0]return{"translated_text": translation.get("translatedText",""),"detected_source_language": translation.get("detectedSourceLanguage",""),"provider":"google"}else:return{"error":f"Google API error: {response.text}","provider":"google"}exceptExceptionas e:return{"error":f"Error calling Google Translation API: {str(e)}","provider":"google"}deftranslate(self,text,language_info):"""Translate text to English based on language detection info"""# If already English or unknown language, return as isif language_info["language_code"]=="en-IN"or language_info["language_code"]=="unknown":return{"translated_text": text,"provider":"none"}# Handle mixed language contentif language_info.get("is_mixed",False)and language_info.get("languages",[]):# Strategy for mixed language: # 1. If one of the languages is English, don't translate the entire text, as it might distort English portions# 2. If no English but contains Indian languages, use Sarvam as it handles code-mixing better# 3. Otherwise, use Google Translate for the primary detected language has_english =False has_indian =Falsefor lang in language_info.get("languages",[]):if lang["language_code"]=="en-IN"or lang["language_code"].startswith("en-"): has_english =Trueif lang.get("is_indian",False): has_indian =Trueif has_english:# Contains English - use Google for full text as it handles code-mixing wellreturnself.translate_with_google(text)elif has_indian:# Contains Indian languages - use Sarvam# Use the highest confidence Indian language as source indian_langs =[lang for lang in language_info.get("languages",[])if lang.get("is_indian",False)]if indian_langs:# Sort by confidence indian_langs.sort(key=lambdax: x.get("confidence",0),reverse=True) source_lang = indian_langs[0]["language_code"]returnself.translate_with_sarvam(text, source_lang)else:# Fallback to primary languageif language_info["is_indian"]:returnself.translate_with_sarvam(text, language_info["language_code"])else:returnself.translate_with_google(text)else:# No English, no Indian languages - use Google for primary languagereturnself.translate_with_google(text)else:# Not mixed language - use standard approachif language_info["is_indian"]:# Use Sarvam AI for Indian languagesreturnself.translate_with_sarvam(text, language_info["language_code"])else:# Use Google for other languagesreturnself.translate_with_google(text)
This Translation Service is like a smart translator that knows how to:
Detect what language the text is written in,
Choose the best translation provider depending on the language (especially for Indian languages),
And then translate the text into English.
It supports mixed-language content (such as Hindi-English in one sentence) and uses either Google Translate or Sarvam AI, a translation service designed for Indian languages.
Now, let us understand the key methods in a step-by-step manner:
1. Translating Using Google Translate
deftranslate_with_google(...)
This function uses Google Translate:
It sends the text, asks for English as the target language, and gets a translation back.
It also detects the source language automatically.
If successful, it returns the translated text and the detected original language.
If there’s an error, it returns a message saying what went wrong.
Best For: Non-Indian languages (like Spanish, French, Chinese) and content that is not mixed with English.
2. Main Translation Logic
deftranslate(self,text,language_info)
This is the decision-maker. Here’s how it works:
Case 1: No Translation Needed
If the text is already in English or the language is unknown, it simply returns the original text.
Case 2: Mixed Language (e.g., Hindi + English)
If the text contains more than one language:
✅ If one part is English → use Google Translate (it’s good with mixed languages).
✅ If it includes Indian languages only → use Sarvam AI (better at handling Indian content).
✅ If it’s neither English nor Indian → use Google Translate.
The service checks how confident it is about each language in the mix and chooses the most likely one to translate from.
Case 3: Single Language
If the text is only in one language:
✅ If it’s an Indian language (like Bengali, Tamil, or Marathi), use Sarvam AI.
✅ If it’s any other language, use Google Translate.
So, we’ve done it.
I’ve included the complete working solutions for you in the GitHub Link.
We’ll cover the detailed performance testing, Optimized configurations & many other useful details in our next post.
Till then, Happy Avenging! 🙂
Note: All the data & scenarios posted here are representational data & scenarios & available over the internet & for educational purposes only. There is always room for improvement in this kind of model & the solution associated with it. I’ve shown the basic ways to achieve the same for educational purposes only.
Starts by clearing GPU memory and running garbage collection.
Loads the init_image, resizes it to 1024×1024 pixels, and converts it to RGB format.
Iteratively applies the pipeline to transform the image:
Uses the prompt and specified parameters like strength, guidance_scale, and num_inference_steps.
Stores the resulting frames in a list.
Interpolates between consecutive frames to create smooth transitions:
Uses linear blending for smooth animation across a specified duration and frame rate (24 fps for 10 segments).
Returns the final list of generated frames or an empty list if an error occurs.
Always clears memory after execution.
3. genVideo(prompt, inputImage, targetVideo, fps)
This is the main function for creating a video from an image and text prompt:
Logs the start of the animation generation process.
Calls generate_frames() with the given pipeline, inputImage, and prompt to create frames.
Saves the generated frames as a video using the imageio library, setting the specified frame rate (fps).
Logs a success message and returns 0 if the process is successful.
On error, logs the issue and returns 1.
Now, let us understand the performance. But, before that let us explore the device on which we’ve performed these stress test that involves GPU & CPUs as well.
And, here is the performance stats –
From the above snapshot, we can clearly communicate that the GPU is 100% utilized. However, the CPU has shown a significant % of availability.
As you can see, the first pass converts the input prompt to intermediate images within 1 min 30 sec. However, the second pass constitutes multiple hops (11 hops) on an avg 22 seconds. Overall, the application will finish in 5 minutes 36 seconds for a 10-second video clip.
So, we’ve done it.
You can find the detailed code at the GitHub link.
I’ll bring some more exciting topics in the coming days from the Python verse.
Till then, Happy Avenging! 🙂
Note: All the data & scenarios posted here are representational data & scenarios & available over the internet & for educational purposes only. There is always room for improvement in this kind of model & the solution associated with it. I’ve shown the basic ways to achieve the same for educational purposes only.
For, reference, we’ll share the demo before deep dive into the actual follow-up analysis in the below section –
In this post, we will understand the initial code generated & then the revised code to compare them for a better understanding of the impact of revised prompts.
But, before that let us broadly understand the communication types between the agents.
Direct Communication:
Agents Involved: Agent1, Agent2
Flow:
Agent1 sends a request directly to Agent2.
Agent2 processes the request and sends the response back to Agent1.
Use Case: Simple query-response interactions without intermediaries.
Use Case: Systems that need to respond to asynchronous events or changes in the environment.
Since, we now understand the basic communication types. Let us understand the AutoGen generated first code & the last code (That satisfies our need) –
# filename: simple_snake.py (Generated by AutoGen)import pygameimport timeimport randomsnake_speed =15# Window colorwhite = pygame.Color(255,255,255)# Snake colorgreen = pygame.Color(0,255,0)snake_position =[100,50]# defining first 4 blocks # of snake bodysnake_body =[[100,50],[90,50],[80,50],[70,50]]# fruit positionfruit_position =[random.randrange(1,(1000//10))*10, random.randrange(1,(600//10))*10]fruit_spawn =Truedirection ='RIGHT'change_to = directionscore =0# Initialising pygamepygame.init()# Initialise game windowwin = pygame.display.set_mode((1000,600))pygame.display.set_caption("Snake game for kids")# FPS (frames per second) controllerfps_controller = pygame.time.Clock()whileTrue:# handling key eventsfor event in pygame.event.get():if event.type == pygame.KEYDOWN:if event.key == pygame.K_UP: change_to ='UP'if event.key == pygame.K_DOWN: change_to ='DOWN'if event.key == pygame.K_LEFT: change_to ='LEFT'if event.key == pygame.K_RIGHT: change_to ='RIGHT'# If two keys pressed simultaneously# we don't want snake to move into two# directions simultaneouslyif change_to =='UP'and direction !='DOWN': direction ='UP'if change_to =='DOWN'and direction !='UP': direction ='DOWN'if change_to =='LEFT'and direction !='RIGHT': direction ='LEFT'if change_to =='RIGHT'and direction !='LEFT': direction ='RIGHT'# Moving the snakeif direction =='UP': snake_position[1]-=10if direction =='DOWN': snake_position[1]+=10if direction =='LEFT': snake_position[0]-=10if direction =='RIGHT': snake_position[0]+=10# Snake body growing mechanism# if fruits and snakes collide then scores# will increase by 10 snake_body.insert(0,list(snake_position))if snake_position[0]== fruit_position[0]and snake_position[1]== fruit_position[1]: score +=10 fruit_spawn =Falseelse: snake_body.pop()ifnot fruit_spawn: fruit_position =[random.randrange(1,(1000//10))*10, random.randrange(1,(600//10))*10] fruit_spawn =True win.fill(white)for pos in snake_body: pygame.draw.rect(win, green, pygame.Rect(pos[0], pos[1],10,10)) pygame.draw.rect(win, white, pygame.Rect( fruit_position[0], fruit_position[1],10,10))# Game Over conditionsif snake_position[0]<0or snake_position[0]>1000-10:breakif snake_position[1]<0or snake_position[1]>600-10:break# Touching the snake bodyfor block in snake_body[1:]:if snake_position[0]== block[0]and snake_position[1]== block[1]:break# refresh game screen pygame.display.update()# Frame Per Second /Refresh rate fps_controller.tick(snake_speed)# displaying final score after game overprint(f"You scored {score} in the game.")
Now, let us remember the prompt refinement that we’ve done (We’ve already posted that in our last post as well) –
I want to place the snake within the boundary of the visual wall & it should bounce each wall & then hit the target. And, it should increase the size. And, every time when it hits the target it will increase the score by 10. And, the application will run for 2 minutes, which will be displayed on the screen. This will exit once 2 minute is over.
# filename: simple_snake.py (Generated by AutoGen)import pygameimport timeimport randomimport mathpygame.init()white =(255,255,255)yellow =(255,255,102)green =(0,255,0)red =(255,0,0)black =(0,0,0)blue =(0,0,255)dis_width =800dis_height =600dis = pygame.display.set_mode((dis_width, dis_height))pygame.display.set_caption('Snake Game')clock = pygame.time.Clock()snake_block =10snake_speed =30font_style = pygame.font.SysFont(None,50)score_font = pygame.font.SysFont(None,35)defour_snake(snake_block,snake_List):for x in snake_List: pygame.draw.rect(dis, green,[x[0], x[1], snake_block, snake_block])defmessage(msg,color): mesg = font_style.render(msg,True, color) dis.blit(mesg,[dis_width /3, dis_height /3])defgameLoop():# creating a function game_over =False game_close =False# snake starting coordinates x1 = dis_width /2 y1 = dis_height /2# snake initial movement direction x1_change =0 y1_change =0# initialize snake length and list of coordinates snake_List =[] Length_of_snake =1# random starting point for the food foodx =round(random.randrange(0, dis_width - snake_block)/10.0)*10.0 foody =round(random.randrange(0, dis_height - snake_block)/10.0)*10.0# initialize score score =0# store starting time start_time = time.time()whilenot game_over:# Remaining time elapsed_time = time.time()- start_time remaining_time =120- elapsed_time # 2 minutes gameif remaining_time <=0: game_over =True# event handling loopfor event in pygame.event.get():if event.type == pygame.QUIT: game_over =True# when closing windowif event.type == pygame.MOUSEBUTTONUP:# get mouse click coordinates pos = pygame.mouse.get_pos()# calculate new direction vector from snake to click position x1_change = pos[0]- x1 y1_change = pos[1]- y1# normalize direction vector norm = math.sqrt(x1_change **2+ y1_change **2)if norm !=0: x1_change /= norm y1_change /= norm# multiply direction vector by step size x1_change *= snake_block y1_change *= snake_block x1 += x1_change y1 += y1_change dis.fill(white) pygame.draw.rect(dis, red,[foodx, foody, snake_block, snake_block]) pygame.draw.rect(dis, green,[x1, y1, snake_block, snake_block]) snake_Head =[] snake_Head.append(x1) snake_Head.append(y1) snake_List.append(snake_Head)iflen(snake_List)> Length_of_snake:del snake_List[0]our_snake(snake_block, snake_List)# Bounces the snake back if it hits the edgeif x1 <0or x1 > dis_width: x1_change *=-1if y1 <0or y1 > dis_height: y1_change *=-1# Display score value = score_font.render("Your Score: "+str(score),True, black) dis.blit(value,[0,0])# Display remaining time time_value = score_font.render("Remaining Time: "+str(int(remaining_time)),True, blue) dis.blit(time_value,[0,30]) pygame.display.update()# Increase score and length of snake when snake gets the foodifabs(x1 - foodx)< snake_block andabs(y1 - foody)< snake_block: foodx =round(random.randrange(0, dis_width - snake_block)/10.0)*10.0 foody =round(random.randrange(0, dis_height - snake_block)/10.0)*10.0 Length_of_snake +=1 score +=10# Snake movement speed clock.tick(snake_speed) pygame.quit()quit()gameLoop()
Now, let us understand the difference here –
The first program is a snake game controlled by arrow keys that end if the Snake hits a wall or itself. The second game uses mouse clicks for control, bounces off walls instead of ending, includes a 2-minute timer, and displays the remaining time.
So, we’ve done it. 🙂
You can find the detailed code in the following Github link.
I’ll bring some more exciting topics in the coming days from the Python verse.
Till then, Happy Avenging! 🙂
Note: All the data & scenarios posted here are representational data & scenarios & available over the internet & for educational purposes only. There is always room for improvement in this kind of model & the solution associated with it. I’ve shown the basic ways to achieve the same for educational purposes only.
As we discover in our previous post about the Sarvam AI basic capabilities & a glimpse of code review. Today, we’ll finish the rest of the part & some of the matrices comparing against other popular LLMs.
Before that, you can refer to the previous post for a recap, which is available here.
Also, we’re providing the demo here –
Now, let us jump into the rest of the code –
Code:
clsSarvamAI.py (This script will capture the audio input in Indic languages & then provide an LLM response in the form of audio in Indic languages. In this post, we’ll discuss part of the code. In the next part, we’ll be discussing the next important methods. Note that we’re only going to discuss a few important functions here.)
This method saves recorded audio data into a WAV file format.
What it Does:
Takes raw audio data and converts it into bytes.
Gets the original sample rate of the audio.
Opens a new WAV file in write mode.
Sets the parameters for the audio file (like the number of channels, sample width, and frame rate).
Writes the audio data into the file in small chunks to manage memory usage.
Logs the current time to keep track of when the audio was saved.
Returns 0 on success or 1 if there was an error.
The “createWavFile” method takes the recorded audio and saves it as a WAV file on your computer. It converts the audio into bytes and writes them into small file parts. If something goes wrong, it prints an error message.
This method breaks down a large piece of text (in Bengali) into smaller, manageable chunks.
What it Does:
Initializes an empty list to store the chunks of text.
It uses a regular expression to split the text based on punctuation marks like full stops (।), question marks (?), and exclamation points (!).
Iterates through the split sentences to form chunks that do not exceed a specified maximum length (max_length).
Adds each chunk to the list until the entire text is processed.
Returns the list of chunks or an empty string if an error occurs.
The chunkBengaliResponse method takes a long Bengali text and splits it into smaller, easier-to-handle parts. It uses punctuation marks to determine where to split. If there’s a problem while splitting, it prints an error message.
This method plays audio data stored in a WAV file format.
What it Does:
Reads the audio data from a WAV file object.
Extracts parameters like the number of channels, sample width, and frame rate.
Converts the audio data into a format that the sound device can process.
If the audio is stereo (two channels), it reshapes the data for playback.
Plays the audio through the speakers.
Returns 0 on success or 1 if there was an error.
The playWav method takes audio data from a WAV file and plays it through your computer’s speakers. It reads the data and converts it into a format your speakers can understand. If there’s an issue playing the audio, it prints an error message.
This method continuously plays audio from a queue until there is no more audio to play.
What it Does:
It enters an infinite loop to keep checking for audio data in the queue.
Retrieves audio data from the queue and plays it using the “playWav”-method.
Logs the current time each time an audio response is played.
It breaks the loop if it encounters a None value, indicating no more audio to play.
Returns 0 on success or 1 if there was an error.
The audioPlayerWorker method keeps checking a queue for new audio to play. It plays each piece of audio as it comes in and stops when there’s no more audio. If there’s an error during playback, it prints an error message.
This asynchronous method processes a chunk of text to generate audio using an external API.
What it Does:
Cleans up the text chunk by removing unwanted characters.
Prepares a payload with the cleaned text and other parameters required for text-to-speech conversion.
Sends a POST request to an external API to generate audio from the text.
Decodes the audio data received from the API (in base64 format) into raw audio bytes.
Returns the audio bytes or an empty byte string if there is an error.
The processChunk method takes a text, sends it to an external service to be converted into speech, and returns the audio data. If something goes wrong, it prints an error message.
This asynchronous method handles the complete audio processing workflow, including speech recognition, translation, and audio playback.
What it Does:
Initializes various configurations and headers required for processing.
Sends the recorded audio to an API to get the transcript and detected language.
Translates the transcript into another language using another API.
Splits the translated text into smaller chunks using the chunkBengaliResponse method.
Starts an audio playback thread to play each processed audio chunk.
Sends each text chunk to the processChunk method to convert to speech and adds the audio data to the queue for playback.
Waits for all audio chunks to be processed and played before finishing.
Logs the current time when the process is complete.
Returns 0 on success or 1 if there was an error.
The “processAudio”-method takes recorded audio, recognizes what was said, translates it into another language, splits the translated text into parts, converts each part into speech, and plays it back. It uses different services to do this; if there’s a problem at any step, it prints an error message.
And, here is the performance stats (Captured from Sarvam AI website) –
So, finally, we’ve done it. You can view the complete code in this GitHub link.
I’ll bring some more exciting topics in the coming days from the Python verse.
Till then, Happy Avenging! 🙂
Note: All the data & scenarios posted here are representational data & scenarios & available over the internet & for educational purposes only. There is always room for improvement in this kind of model & the solution associated with it. I’ve shown the basic ways to achieve the same for educational purposes only.
In the rapidly evolving landscape of artificial intelligence, Sarvam AI has emerged as a pioneering force in developing language technologies for Indian languages. This article series aims to provide an in-depth look at Sarvam AI’s Indic APIs, exploring their features, performance, and potential impact on the Indian tech ecosystem.
This LLM aims to bridge the language divide in India’s digital landscape by providing powerful, accessible AI tools for Indic languages.
The importance of Indic language processing:
India has 22 official languages and hundreds of dialects, presenting a unique challenge for technology adoption and digital inclusion. Even though all the government work happens in both the official language along with English language.
Developers can fine-tune the models for specific domains or use cases, improving accuracy for specialized applications.
Supported languages and use cases:
As of 2024, Sarvam AI’s Indic APIs support the following languages:
Hindi
Bengali
Tamil
Telugu
Marathi
Gujarati
Kannada
Malayalam
Punjabi
Odia
Before delving into the details, I strongly recommend taking a look at the demo.
Isn’t this exciting? Let us understand the flow of events in the following diagram –
The application interacts with Sarvam AI’s API. After interpreting the initial audio inputs from the computer, it uses Sarvam AI’s API to get the answer based on the selected Indic language, Bengali.
clsSarvamAI.py (This script will capture the audio input in Indic languages & then provide an LLM response in the form of audio in Indic languages. In this post, we’ll discuss part of the code. In the next part, we’ll be discussing the next important methods. Note that we’re only going to discuss a few important functions here.)
definitializeMicrophone(self):try:forindex,nameinenumerate(sr.Microphone.list_microphone_names()):print(f"Microphone with name \"{name}\" found (device_index={index})")returnsr.Microphone()exceptExceptionas e:x=str(e)print('Error: <<Initiating Microphone>>: ',x)return''defrealTimeTranslation(self):try:WavFile=self.WavFilerecognizer=sr.Recognizer()try:microphone=self.initializeMicrophone()exceptExceptionas e:print(f"Error initializing microphone: {e}")returnwithmicrophoneas source:print("Adjusting for ambient noise. Please wait...")recognizer.adjust_for_ambient_noise(source,duration=5)print("Microphone initialized. Start speaking...")try:while True:try:print("Listening...")audio=recognizer.listen(source,timeout=5,phrase_time_limit=5)print("Audio captured. Recognizing...") #var=datetime.datetime.now().strftime("%Y-%m-%d_%H-%M-%S") #print('Before Audio Time: ',str(var))self.createWavFile(audio,WavFile)try:text=recognizer.recognize_google(audio,language="bn-BD") # Bengalilanguagecodesentences=text.split('।') # Bengalifullstopprint('Sentences: ')print(sentences)print('*'*120)ifnot text:print("No speech detected. Please try again.")continueifstr(text).lower() =='টাটা':raiseBreakOuterLoop("Based on User Choice!")asyncio.run(self.processAudio(audio))exceptsr.UnknownValueError:print("Google Speech Recognition could not understand audio")exceptsr.RequestErroras e:print(f"Could not request results from Google Speech Recognition service; {e}")exceptsr.WaitTimeoutError:print("No speech detected within the timeout period. Listening again...")except BreakOuterLoop:raiseexceptExceptionas e:print(f"An unexpected error occurred: {e}")time.sleep(1) # ShortpausebeforenextiterationexceptBreakOuterLoopas e:print(f"Exited : {e}") # Removingthetemporaryaudiofilethatwasgeneratedatthebeginingos.remove(WavFile)return0exceptExceptionas e:x=str(e)print('Error: <<Real-time Translation>>: ',x)return1
initializeMicrophone:
Purpose:
This method is responsible for setting up and initializing the microphone for audio input.
What it Does:
It attempts to list all available microphones connected to the system.
It prints the microphone’s name and corresponding device index (a unique identifier) for each microphone.
If successful, it returns a microphone object (sr.Microphone()), which can be used later to capture audio.
If this process encounters an error (e.g., no microphones being found or an internal error), it catches the exception, prints an error message, and returns an empty string (“).
The “initializeMicrophone” Method finds all microphones connected to the computer and prints their names. If it finds a microphone, it prepares to use it for recording. If something goes wrong, it tells you what went wrong and stops the process.
realTimeTranslation:
Purpose: This Method uses the microphone to handle real-time speech translation from a user. It captures spoken audio, converts it into text, and processes it further.
What it Does:
Initializes a recognizer object (sr.Recognizer()) for speech recognition.
Call initializeMicrophone to set up the microphone. If initialization fails, an error message is printed, and the process is stopped.
Once the microphone is set up successfully, it adjusts for ambient noise to enhance accuracy.
Enters a loop to continuously listen for audio input from the user:
It waits for the user to speak and captures the audio.
Converts the captured audio to text using Google’s Speech Recognition service, specifying Bengali as the language.
If text is successfully captured and recognized:
Splits the text into sentences using the Bengali full-stop character.
Prints the sentences.
It checks if the text is a specific word (“টাটা”), and if so, it raises an exception to stop the loop (indicating that the user wants to exit).
Otherwise, it processes the audio asynchronously with processAudio.
If no speech is detected or an error occurs, it prints the relevant message and continues listening.
If the user decides to exit or if an error occurs, it breaks out of the loop, deletes any temporary audio files created, and returns a status code (0 for success, 1 for failure).
The “realTimeTranslation” method continuously listens to the microphone for the user to speak. It captures what is said and tries to understand it using Google’s service, specifically for the Bengali language. It then splits what was said into sentences and prints them out. If the user says “টাটা” (which means “goodbye” in Bengali), it stops listening and exits. If it cannot understand the user or if there is a problem, it will let the user know and try again. It will print an error and stop the process if something goes wrong.
Let’s wait for the next part & enjoy this part.
Note: All the data & scenarios posted here are representational data & scenarios & available over the internet & for educational purposes only. There is always room for improvement in this kind of model & the solution associated with it. I’ve shown the basic ways to achieve the same for educational purposes only.


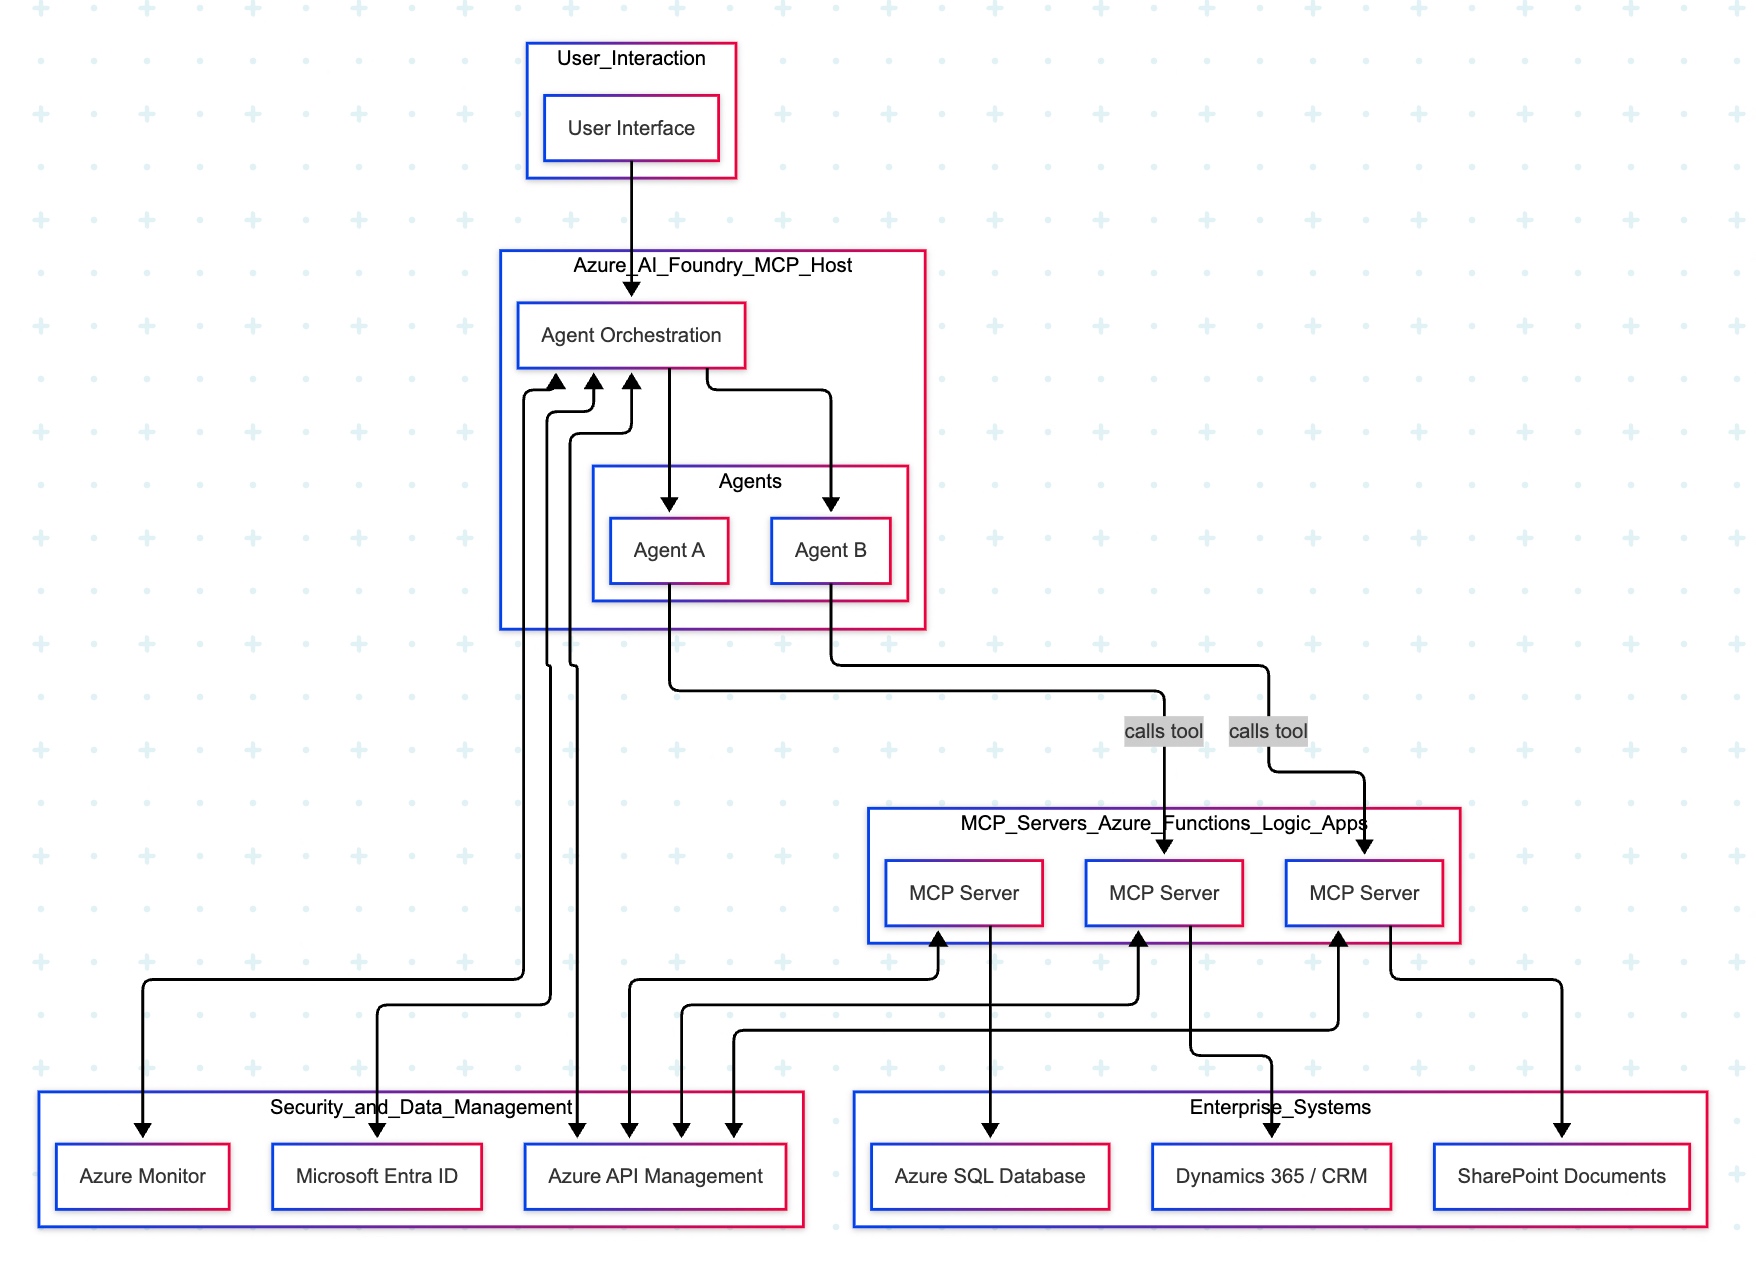
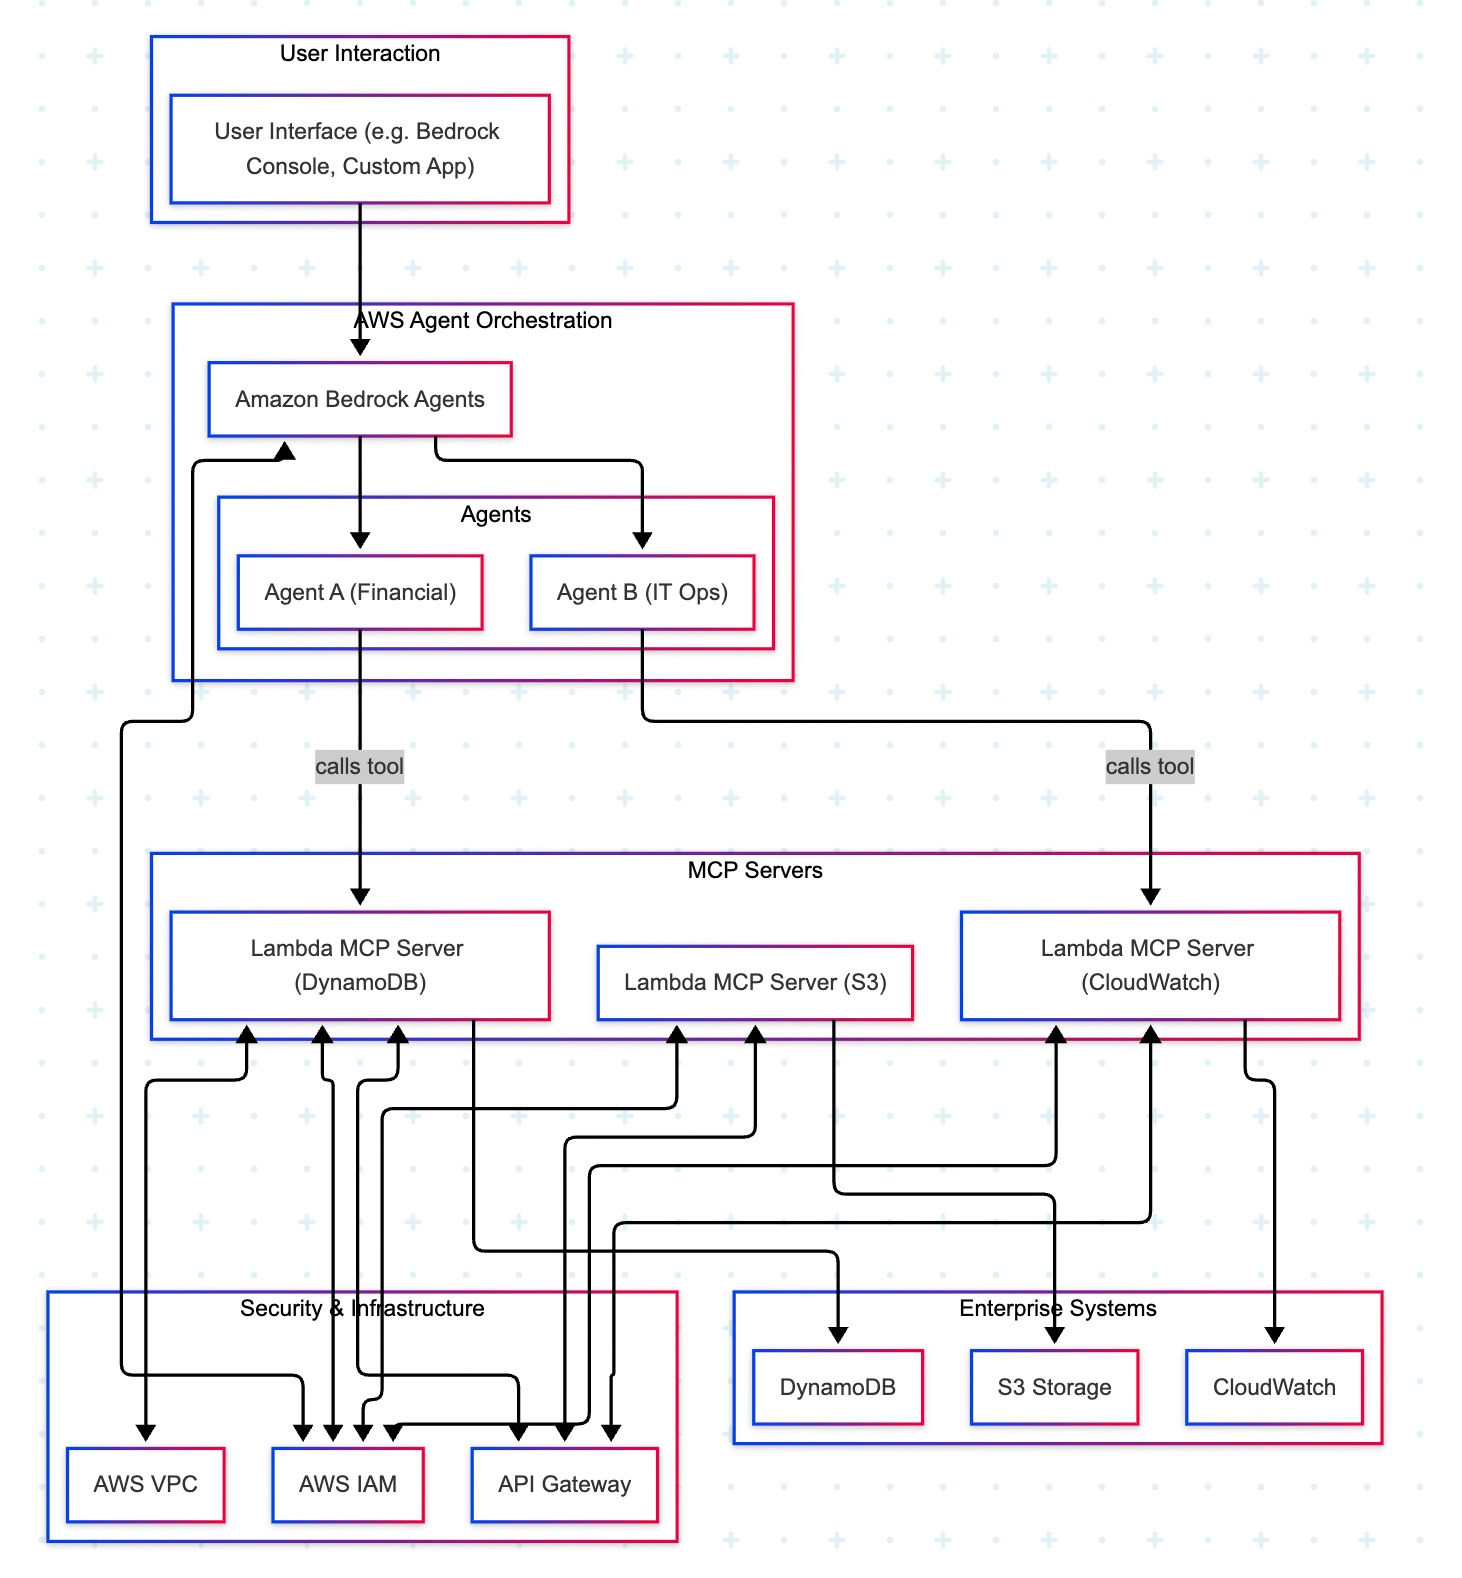


You must be logged in to post a comment.