This site mainly deals with various use cases demonstrated using Python, Data Science, Cloud basics, SQL Server, Oracle, Teradata along with SQL & their implementation. Expecting yours active participation & time. This blog can be access from your TP, Tablet & mobile also. Please provide your feedback.
Today, I’ll be using another exciting installment of Computer Vision. Today, our focus will be to get a sense of visual counting. Let me explain. This post will demonstrate how to count the number of stacked-up coins using computer vision. And, we’re going to add more coins to see the number changes.
Why don’t we see the demo first before jumping into the technical details?
Demo
Isn’t it exciting?
Architecture:
Let us understand the architecture –
From the above diagram, one can notice that as raw video feed captured from a specific location at a measured distance. The python-based intelligent application will read the numbers & project on top of the video feed for human validations.
Let me share one more perspective of how you can configure this experiment with another diagram that I prepared for this post.
Setup Process
From the above picture, one can see that a specific distance exists between the camera & the stacked coins as that will influence the single coin width.
You can see how that changed with the following pictures –
This entire test will depend upon many factors to consider to get effective results. I provided the basic demo. However, to make it robust & dynamic, one can dynamically diagnose the distance & individual coin width before starting this project. I felt that part should be machine learning to correctly predict the particular coin width depending upon the length & number of coins stacked. I leave it to you to explore that part.
Then how does the Aruco marker comes into the picture?
Let’s read it from the primary source side –
From: Source
Please refer to the following link if you want to know more.
For our use case, we’ll be using the following aruco marker –
Marker
How will this help us? Because we know the width & height of it. And depending upon the placement & overall pixel area size, our application can then identify the pixel to centimeter ratio & which will enable us to predict any other objects’ height & width. Once we have that, the application will divide that by the calculated width we observed for each coin from this distance. And, then the application will be able to predict the actual counts in real-time.
How can you identify the individual width?
My easy process would be to put ten quarter dollars stacked up & then you will get the height from the Computer vision. You have to divide that height by 10 to get the individual width of the coin until you build the model to predict the correct width depending upon the distance.
CODE:
Let us understand the code now –
clsConfig.py (Configuration file for the entire application.)
This file contains hidden or bidirectional Unicode text that may be interpreted or compiled differently than what appears below. To review, open the file in an editor that reveals hidden Unicode characters. Learn more about bidirectional Unicode characters
PIC_TO_CM_MAP is the total length of the Aruco marker in centimeters involving all four sides.
CONTOUR_AREA will change depending upon the minimum size you want to identify as part of the contour.
COIN_DEF_HEIGHT needs to be revised as part of the previous steps explained.
clsAutoDetector.py (This python script will detect the contour.)
This file contains hidden or bidirectional Unicode text that may be interpreted or compiled differently than what appears below. To review, open the file in an editor that reveals hidden Unicode characters. Learn more about bidirectional Unicode characters
Key snippets from the above script are as follows –
# Find contours
conts, Oth = cv2.findContours(maskImage, cv2.RETR_EXTERNAL, cv2.CHAIN_APPROX_SIMPLE)

objectsConts = []

for cnt in conts:
    area = cv2.contourArea(cnt)
    if area > cntArea:
        objectsConts.append(cnt)
Depending upon the supplied contour area, this script will identify & mark the contour of every frame captured through WebCam.
clsCountRealtime.py (This is the main class to calculate the number of stacked coins after reading using computer vision.)
This file contains hidden or bidirectional Unicode text that may be interpreted or compiled differently than what appears below. To review, open the file in an editor that reveals hidden Unicode characters. Learn more about bidirectional Unicode characters
It displays both the height, width & total number of coins on top of the live video.
if cv2.waitKey(1) & 0xFF == ord('q'):
    break
The above line will help the developer exit from the visual application by pressing the escape or ‘q’ key in Macbook.
visualDataRead.py (Main calling function.)
This file contains hidden or bidirectional Unicode text that may be interpreted or compiled differently than what appears below. To review, open the file in an editor that reveals hidden Unicode characters. Learn more about bidirectional Unicode characters
# Execute all the pass
r1 = x1.learnStats(debugInd, var)

if (r1 == 0):
    print('Successfully counts number of stcaked coins!')
else:
    print('Failed to counts number of stcaked coins!')
The above code invokes the learnStats function to calculate the count of stacked coins.
FOLDER STRUCTURE:
Folder Details
So, we’ve done it.
You will get the complete codebase in the following Github link.
I’ll bring some more exciting topic in the coming days from the Python verse. Please share & subscribe my post & let me know your feedback.
Till then, Happy Avenging! 😀
Note: All the data & scenario posted here are representational data & scenarios & available over the internet & for educational purpose only. Some of the images (except my photo) that we’ve used are available over the net. We don’t claim the ownership of these images. There is an always room for improvement & especially the prediction quality.
Today, I’ll be sharing one of the most exciting posts I’ve ever shared. This post is rare as you cannot find the most relevant working solution easily over the net.
So, what are we talking about here? We’re going to build a Python-based iOS App using the Kivy framework. You get plenty of videos & documents on this as well. However, nowhere you’ll find the capability that I’m about to disclose. We’ll consume live IoT streaming data from a dummy application & then plot them in a MatplotLib dashboard inside the mobile App. And that’s where this post is seriously different from the rest of the available white papers.
But, before we dig into more details, let us see a quick demo of our iOS App.
Demo:
Demo
Isn’t it exciting? Great! Now, let’s dig into the details.
Let’s understand the architecture as to how we want to proceed with the solution here.
Architecture:
Broad-level design
The above diagram shows that the Kive-based iOS application that will consume streaming data from the Ably queue. The initial dummy IoT application will push the real-time events to the same Ably queue.
So, now we understand the architecture. Fantastic!
Let’s deep dive into the code that we specifically built for this use case.
Code:
IoTDataGen.py (Publishing Streaming data to Ably channels & captured IoT events from the simulator & publish them in Dashboard through measured KPIs.)
This file contains hidden or bidirectional Unicode text that may be interpreted or compiled differently than what appears below. To review, open the file in an editor that reveals hidden Unicode characters. Learn more about bidirectional Unicode characters
In the above snippet, we’re forming the payload dynamically & then calling the “pushEvents” to push all the random generated IoT mock-events to the Ably queue.
2. custom.kv (Publishing Streaming data to Ably channels & captured IoT events from the simulator & publish them in Dashboard through measured KPIs.)
This file contains hidden or bidirectional Unicode text that may be interpreted or compiled differently than what appears below. To review, open the file in an editor that reveals hidden Unicode characters. Learn more about bidirectional Unicode characters
To understand this, one needs to learn how to prepare a Kivy design layout using the KV-language. You can develop the same using native-python code as well. However, I wanted to explore this language & not to mention that this is the preferred way of doing a front-end GUI design in Kivy.
Like any graphical interface, one needs to understand the layouts & the widgets that you are planning to use or build. For that, please go through the following critical documentation link on Kivy Layouts. Please go through this if you are doing this for the first time.
To pinpoint the conversation, I would like to present the documentation segment from the official site in the given picture –
Official Kivy-refernce
Since we’ve used our custom buttons & top bars, the most convenient GUI layouts will be FloatLayout for our use case. By using that layout, we can conveniently position our widgets at any random place as per our needs. At the same time, one can use nested layouts by combining different types of arrangements under another.
Some of the key lines from the above scripting files will be –
Screen:
  name: "background_1"
  Image:
      source: "Background/Background_1.png"
      allow_stretch: True
      keep_ratio: True
      size_hint_y: None
      size_hint_x: None
      width: self.parent.width
      height: self.parent.width/self.image_ratio
      FloatLayout:
          orientation: 'vertical'
          Label:
              text: "This is an application, which will consume the live streaming data inside a Kivy-based IOS-App by using Matplotlib to capture the KPIs."
              text_size: self.width + 350, None
              height: self.texture_size[1]
              halign: "left"
              valign: "bottom"
              pos_hint: {'center_x':2.9,'center_y':6.5}
          Image:
              id: homesc
              pos_hint: {'right':6, 'top':5.4}
              size_hint: None, None
              size: 560, 485
              source: "Background/FP.jpeg"
Let us understand what we discussed here & try to map that with the image.
Part of GUI defined in KV file
From the above image now, you can understand how we placed the label & image into our custom positions to create a lean & clean interface.
Let us understand the custom buttons mapped in our Apps.
So, these are custom buttons. We placed them into specific positions & sizes by mentioning the appropriate size & position coordinates & then assigned the button methods (on_press & on_release).
However, these button methods will be present inside the main python script, which we’ll discuss after this segment.
3. main.py (Consuming Streaming data from Ably channels & captured IoT events from the simulator & publish them in Kivy-based iOS App through measured KPIs.)
This file contains hidden or bidirectional Unicode text that may be interpreted or compiled differently than what appears below. To review, open the file in an editor that reveals hidden Unicode characters. Learn more about bidirectional Unicode characters
We’ve taken one of the button events & captured how the application will behave once someone clicks the Start button & how it will bring all the corresponding elements of a static page. It also explained the transition type between screens.
The above crucial line shows how we capture the live calculation & assign them into matplotlib plots & finally assign that figure canvas of matplotlib to a box widget as per our size & display the change content whenever it invokes this method.
Rests of the functions are pretty self-explanatory. So, I’m not going to discuss them.
Run:
Let’s run the app & see the output –
STEP – 1
Triggering the mock IoT App
STEP – 2
Triggering the iOS App
STEP – 3
Mobile Screen Shots
So, we’ve done it.
You will get the complete codebase in the following Github link.
I’ll bring some more exciting topic in the coming days from the Python verse. Please share & subscribe my post & let me know your feedback.
Till then, Happy Avenging!
Note: All the data & scenario posted here are representational data & scenarios & available over the internet & for educational purpose only. Some of the images (except my photo) that we’ve used are available over the net. We don’t claim the ownership of these images. There is an always room for improvement & especially all the GUI components size & position that will be dynamic in nature by defining self.width along with some constant values.
Today, I’ll share one of the important posts on predicting data using facebook’s relatively new machine-learning-based API. I find this API is interesting as to how it can build & anticipate the outcome.
We’ll be using one of the most acceptable API-based sources for Covid-19 & I’ll be sharing the link over here.
We’ll be using the prophet-API developed by Facebook to predict the data. You will get the details from this link.
Architecture
Now, let’s explore the architecture shared above.
As you can see that the application will consume the data from the third-party API named “about-corona,” & the python application will clean & transform the data. The application will send the clean data to the Facebook API (prophet) built on the machine-learning algorithm. This API is another effective time-series analysis platform given to the data scientist community.
Once the application receives the predicted model, it will visualize them using plotly & matplotlib.
I would request you to please check the demo of this application just for your reference.
Demo Run
We’ll do a time series analysis. Let us understand the basic concept of time series.
Time series is a series of data points indexed (or listed or graphed) in time order.
Therefore, the data organized by relatively deterministic timestamps and potentially compared with random sample data contain additional information that we can leverage for our business use case to make a better decision.
To use the prophet API, one needs to use & transform their data cleaner & should contain two fields (ds & y).
Let’s check one such use case since our source has plenty of good data points to decide. We’ve daily data of newly infected covid patients based on countries, as shown below –
Covid Cases
And, our clean class will transform the data into two fields –
Transformed Data
Once we fit the data into the prophet model, it will generate some additional columns, which will be used for prediction as shown below –
Generated data from prophet-api
And, a sample prediction based on a similar kind of data would be identical to this –
Sample Prediction
Let us understand what packages we need to install to prepare this application –
Installing Dependency Packages – IInstalling Dependency Packages – II
1. clsConfig.py ( This native Python script contains the configuration entries. )
This file contains hidden or bidirectional Unicode text that may be interpreted or compiled differently than what appears below. To review, open the file in an editor that reveals hidden Unicode characters. Learn more about bidirectional Unicode characters
We’re not going to discuss anything specific to this script.
2. clsL.py ( This native Python script logs the application. )
This file contains hidden or bidirectional Unicode text that may be interpreted or compiled differently than what appears below. To review, open the file in an editor that reveals hidden Unicode characters. Learn more about bidirectional Unicode characters
Based on the operating system, the log class will capture potential information under the “log” directory in the form of csv for later reference purposes.
3. clsForecast.py ( This native Python script will clean & transform the data. )
This file contains hidden or bidirectional Unicode text that may be interpreted or compiled differently than what appears below. To review, open the file in an editor that reveals hidden Unicode characters. Learn more about bidirectional Unicode characters
Let’s explore the critical snippet out of this script –
df_Comm = dfWork[[tms, fnc]]
Now, the application will extract only the relevant columns to proceed.
df_Comm.columns = ['ds', 'y']
It is now assigning specific column names, which is a requirement for prophet API.
4. clsCovidAPI.py ( This native Python script will call the Covid-19 API. )
This file contains hidden or bidirectional Unicode text that may be interpreted or compiled differently than what appears below. To review, open the file in an editor that reveals hidden Unicode characters. Learn more about bidirectional Unicode characters
The application will extract the elements & normalize the JSON & convert that to a pandas dataframe & also added one dummy column, which will use for the later purpose to merge the data from another set.
Now, the application will take the nested element & normalize that as per granular level. Also, it added the dummy column to join both of these data together.
The application will Merge both the data sets to get the complete denormalized data for our use cases.
# Merging with the previous Country Code data
if cnt == 0:
    df_M = df_fin
else:
    d_frames = [df_M, df_fin]
    df_M = p.concat(d_frames)
This entire deserializing execution happens per country. Hence, the above snippet will create an individual sub-group based on the country & later does union to all the sets.
If any calls to source API fails, the application will retrigger after waiting for a specific time until it reaches its maximum capacity.
5. callPredictCovidAnalysis.py ( This native Python script is the main one to predict the Covid. )
This file contains hidden or bidirectional Unicode text that may be interpreted or compiled differently than what appears below. To review, open the file in an editor that reveals hidden Unicode characters. Learn more about bidirectional Unicode characters
The application is extracting the full country name based on ISO country code.
# Lowercase the column names
iDF.columns = [c.lower() for c in iDF.columns]
# Determine which is Y axis
y_col = [c for c in iDF.columns if c.startswith('y')][0]
# Determine which is X axis
x_col = [c for c in iDF.columns if c.startswith('ds')][0]

# Data Conversion
iDF['y'] = iDF[y_col].astype('float')
iDF['ds'] = iDF[x_col].astype('datetime64[ns]')
The above script will convert all the column names in lower letters & then convert & cast them with the appropriate data type.
# Forecast calculations
# Decreasing the changepoint_prior_scale to 0.001 to make the trend less flexible
m = Prophet(n_changepoints=20, yearly_seasonality=True, changepoint_prior_scale=0.001)
m.fit(iDF)

forecastDF = m.make_future_dataframe(periods=365)

forecastDF = m.predict(forecastDF)

l.logr('15.forecastDF_' + var + '_' + countryCD + '.csv', debug_ind, forecastDF, 'log')

df_M = forecastDF[['ds', 'yhat', 'yhat_lower', 'yhat_upper']]

l.logr('16.df_M_' + var + '_' + countryCD + '.csv', debug_ind, df_M, 'log')
The above snippet will use the machine-learning driven prophet-API, where the application will fit the model & then predict based on the existing data for a year. Also, we’ve identified the number of changepoints. By default, the prophet-API adds 25 changepoints to the initial 80% of the data set that trend is less flexible.
Prophet allows you to adjust the trend in case there is an overfit or underfit. changepoint_prior_scale helps adjust the strength of the movement & decreasing the changepoint_prior_scale to 0.001 to make it less flexible.
The application is fetching & creating the country-specific dataframe.
for i in countryList:
    try:
        cntryIndiv = i.strip()

        print('Country Porcessing: ' + str(cntryIndiv))

        # Creating dataframe for each country
        # Germany Main DataFrame
        dfCountry = countrySpecificDF(df, cntryIndiv)
        l.logr(str(cnt) + '.df_' + cntryIndiv + '_' + var1 + '.csv', DInd, dfCountry, 'log')

        # Let's pass this to our map section
        retDFGenNC = x2.forecastNewConfirmed(dfCountry, DInd, var1)

        statVal = str(NC)

        a1 = plot_picture(retDFGenNC, DInd, var1, cntryIndiv, statVal)

        retDFGenNC_D = x2.forecastNewDead(dfCountry, DInd, var1)

        statVal = str(ND)

        a2 = plot_picture(retDFGenNC_D, DInd, var1, cntryIndiv, statVal)

        cntryFullName = countryDet(cntryIndiv)

        if (a1 + a2) == 0:
            oprMsg = cntryFullName + ' ' + SM
            print(oprMsg)
        else:
            oprMsg = cntryFullName + ' ' + FM
            print(oprMsg)

        # Resetting the dataframe value for the next iteration
        dfCountry = p.DataFrame()
        cntryIndiv = ''
        oprMsg = ''
        cntryFullName = ''
        a1 = 0
        a2 = 0
        statVal = ''

        cnt += 1
    except Exception as e:
        x = str(e)
        print(x)
The above snippet will call the function to predict the data & then predict the visual representation based on plotting the data points.
Let us run the application –
Application Run
And, it will generate the visual representation as follows –
Application Run – Continue
And, here is the folder structure –
Directory Structure
Let’s explore the comparison study & try to find out the outcome –
Option – 1
Option – 2
Option – 3
Option -4
Let us analyze from the above visual data-point.
Conclusion:
Let’s explore the comparison study & try to find out the outcome –
India may see a rise of new covid cases & it might cross the mark 400,000 during June 2022 & would be the highest among the countries that we’ve considered here including India, Indonesia, Germany, US, UK, Canada & Brazil. The second worst affected country might be the US during the same period. The third affected country will be Indonesia during the same period.
Canada will be the least affected country during June 2022. The figure should be within 12,000.
However, death case wise India is not only the leading country. The US, India & Brazil will see almost 4000 or slightly over the 4000 marks.
So, we’ve done it.
You will get the complete codebase in the following Github link.
I’ll bring some more exciting topic in the coming days from the Python verse.
Till then, Happy Avenging! 😀
Note: All the data & scenario posted here are representational data & scenarios & available over the internet & for educational purpose only.
One more thing you need to understand is that this prediction based on limited data points. The actual event may happen differently. Ideally, countries are taking a cue from this kind of analysis & are initiating appropriate measures to avoid the high-curve. And, that is one of the main objective of time series analysis.
There is always a room for improvement of this kind of models & the solution associated with it. I’ve shown the basic ways to achieve the same for the education purpose only.
It’s time to share another installment of fun & exciting posts from the world of Python-verse.
Today, We’ll be leveraging the Twilio voice API to send custom messages through phone calls directly. This service is beneficial on many occasions, including alerting the customer of potential payment reminders to pending product delivery calls to warehouse managers.
Dependent Packages:
Let us explore what packages we need for this –
Dependent Package Installation
The commands for your reference –
pip install twilio
pip install pandas
Also, you need to subscribe/register in Twilio. I’ve already shown you what to do about that. You can refer to my old post to know more about it. However, you need to reserve one phone number from which you will be calling your customers.
Buying phone numbers
As you can see, I’ve reserved one phone number to demonstrate this use case.
Let us explore the key codebase –
clsVoiceAPI.py (Main class invoking the voice API)
This file contains hidden or bidirectional Unicode text that may be interpreted or compiled differently than what appears below. To review, open the file in an editor that reveals hidden Unicode characters. Learn more about bidirectional Unicode characters
We’re invoking the Twilio API in the above block by giving both the calling & Callee numbers. And, we’re receiving the desired messages from our primary calling program, which the IVR will spell while calling to the customers.
2. callTwilioVoice.py (Main calling script)
This file contains hidden or bidirectional Unicode text that may be interpreted or compiled differently than what appears below. To review, open the file in an editor that reveals hidden Unicode characters. Learn more about bidirectional Unicode characters
        # Create the instance of the Twilio Voice API Class
        x1 = ca.clsVoiceAPI()

        # Let's pass this to our map section
        resSID = x1.sendCall(voiceCallText)
As you can see, we’re first instantiating the class & then calling the method from it by providing the appropriate messages that will eventually deliver to our customer. You can configure dynamic content & pass it to this class.
Let us explore the directory structure –
Directory Structures
Let us see how it runs –
Running Applications
You need to make sure that you are checking your balance of your Twilio account diligently.
Checking Balance
And, here is the sneak peak of how it looks like in an video –
Actual execution
For more information on IVR, please check the following link.
Today, I’m going to discuss a potential use case, where on many occasions, different teams need almost similar kinds of data through API. However, they are not identical. Creating a fresh API/Microservice after following-up with many processes will take significant time.
What if we can create an API in such a way so that we can get the response dynamically without needing to make another one. In this post, we’ll be demonstrating a similar approach.
I’ll be using open-source Covid-API, which will be useful for several posts starting from this one.
Let’s take two cases. One, where one service might need to access all the elements, there might be another, where some other service requires specific details.
Let’s explore the code base first –
init.py ( This native Python-based azure-function that will consume streaming data & dynamic API response. )
###########################################
#### Written By: SATYAKI DE            ####
#### Written On: 06-Feb-2021           ####
#### Package Flask package needs to    ####
#### install in order to run this      ####
#### script.                           ####
####                                   ####
#### Objective: Main Calling scripts.  ####
####                                   ####
#### However, to meet the functionality####
#### we've enhanced as per our logic.  ####
###########################################

import logging
import json
import requests
import os
import pandas as p
import numpy as np

import azure.functions as func


def main(req: func.HttpRequest) -> func.HttpResponse:
    logging.info('Dynamic-Covid-Status HTTP trigger function processed a request.')

    try:

        # Application Variable
        url = os.environ['URL']
        appType = os.environ['appType']
        conType = os.environ['conType']

        # API-Configuration
        payload={}
        headers = {
            "Connection": conType,
            "Content-Type": appType
        }

        # Validating input parameters
        typeSel = req.params.get('typeSel')
        if not typeSel:
            try:
                req_body = req.get_json()
            except ValueError:
                pass
            else:
                typeSel = req_body.get('typeSel')

        typeVal = req.params.get('typeVal')
        if not typeVal:
            try:
                req_body = req.get_json()
            except ValueError:
                pass
            else:
                typeVal = req_body.get('typeVal')

        # Printing Key-Element Values
        str1 = 'typeSel: ' + str(typeSel)
        logging.info(str1)

        str2 = 'typeVal: ' + str(typeVal)
        logging.info(str2)

        # End of API-Inputs

        # Getting Covid data from the REST-API
        response = requests.request("GET", url, headers=headers, data=payload)
        ResJson  = response.text

        if typeSel == '*':
            if typeVal != '':
                # Converting it to Json
                jdata = json.loads(ResJson)

                df_ret = p.io.json.json_normalize(jdata)
                df_ret.columns = df_ret.columns.map(lambda x: x.split(".")[-1])

                rJson = df_ret.to_json(orient ='records')

                return func.HttpResponse(rJson, status_code=200)
            else:
                x_stat = 'Failed'
                x_msg = 'Important information is missing for all values!'

                rJson = {
                    "status": x_stat,
                    "details": x_msg
                }

                xval = json.dumps(rJson)
                return func.HttpResponse(xval, status_code=200)
        elif typeSel == 'Cols':
            if typeVal != '':
                # Converting it to Json
                jdata = json.loads(ResJson)

                df_ret = p.io.json.json_normalize(jdata)
                df_ret.columns = df_ret.columns.map(lambda x: x.split(".")[-1])

                # Fetching for the selected columns
                # Extracting the columns from the list
                lstHead = []

                listX = typeVal.split (",")

                for i in listX:
                    lstHead.append(str(i).strip())

                str3 = 'Main List: ' + str(lstHead)
                logging.info(str3)

                slice_df = df_ret[np.intersect1d(df_ret.columns, lstHead)]
                rJson = slice_df.to_json(orient ='records')

                return func.HttpResponse(rJson, status_code=200)
            else:
                x_stat = 'Failed'
                x_msg = 'Important information is missing for selected values!'

                rJson = {
                    "status": x_stat,
                    "details": x_msg
                }

                xval = json.dumps(rJson)
                return func.HttpResponse(xval, status_code=200)
        else:
            x_stat = 'Failed'
            x_msg = 'Important information is missing for typeSel!'

            rJson = {
                "status": x_stat,
                "details": x_msg
            }

            xval = json.dumps(rJson)
            return func.HttpResponse(xval, status_code=200)
    except Exception as e:
        x_msg = str(e)
        x_stat = 'Failed'

        rJson = {
                    "status": x_stat,
                    "details": x_msg
                }

        xval = json.dumps(rJson)
        return func.HttpResponse(xval, status_code=200)
In the above lines, we’re converting the response & organizing it to a pandas dataframe before converting the response to JSON.
# Fetching for the selected columns
# Extracting the columns from the list
lstHead = []

listX = typeVal.split (",")

for i in listX:
    lstHead.append(str(i).strip())

str3 = 'Main List: ' + str(lstHead)
logging.info(str3)

#slice_df = df_ret[df_ret.columns.intersection(lstHead)]
slice_df = df_ret[np.intersect1d(df_ret.columns, lstHead)]
For the second case, the above additional logic will play a significant part. Based on the supplied input in the typeVal attribute, this time, the new response will display accordingly.
Let’s see how it looks –
Azure function in Visual Studio Code
<p value="<amp-fit-text layout="fixed-height" min-font-size="6" max-font-size="72" height="80">Let's test it using Postman -Let’s test it using Postman –
Case 1 (For all the columns):
For all elements
And, the formatted output is as follows –
Formatted output for all elements
Case 2 (For selected columns):
For selected elements
<p value="<amp-fit-text layout="fixed-height" min-font-size="6" max-font-size="72" height="80">And, the formatted output is as follows -And, the formatted output is as follows –
Formatted output ofSelected element case
You can find the code in the Github using the following link.
So, finally, we have done it.
I’ll bring some more exciting topic in the coming days from the Python verse.
Till then, Happy Avenging! 😀
Note: All the data & scenario posted here are representational data & scenarios & available over the internet & for educational purpose only.
Today, I’ll be referring to two of my old posts & enhance one of them to create a basic online check-in app by integrating with Python. The best thing is – “All the components that will be in use already built using native Python code.”
And, probably, this will be the perfect tribute to growing Python fan-followers, who make this thing a reality.
We’ll be using the following API, which I shared in my previous post.
However, note that – to create any API environment better, one needs to use event-hub-based design & publish & consume events from there, instead of directly calling one microservice/API from another.
We need to use the following packages –
pip install briefcase
pip install requests
Apart from it you need to use JSON library as well.
The following steps are required to create this online check-in application –
STEP -1:
mkdir online_checkin

cd online_checkin
STEP -2:
python3 -m venv env

source env/bin/activate
STEP -3:
You need to install the desired packages mentioned above.
It should look something like –
Setting-up the environment
STEP -4:
Now, we have to execute the following command to initiate the project –
briefcase new
This will prompt to fill-up a set of inputs to configure the project as shown in the below screenshot –
Creation of a Mobile-App ProjectCreation of Mobile-App Project – Continuation
To check whether all the settings correctly captured or not, one can issue the following command –
briefcase dev
<p value="<amp-fit-text layout="fixed-height" min-font-size="6" max-font-size="72" height="80">If all the settings are correct, then a blank canvas iOS app will launch using the native Python code, which should look -If all the settings are correct, then a blank canvas iOS app will launch using the native Python code, which should look –
<p value="<amp-fit-text layout="fixed-height" min-font-size="6" max-font-size="72" height="80">
Empty iOS App launch
The above command will generate a series of directories & template python scripts.
Now, we are going to modify the app.py generated as part of the initial project creation.
app.py ( This iOS app will invoke online check-in API to receive the inputs & confirm the status based on the inputs selected by the passengers. )
################################################
####                                        ####
#### Written By: SATYAKI DE                 ####
#### Written On: 24-Nov-2020                ####
#### Briefcase, Toga, json, requests needs  ####
#### to install to run this package.        ####
####                                        ####
#### Objective: This script will create a   ####
#### native I/OS App using native Python.   ####
####                                        ####
################################################

"""
Calling Azure Microservice from Native Mobile App
"""
import toga
from toga.style import Pack
from toga.style.pack import COLUMN, ROW
import requests
import json

class online_checkin(toga.App):

    def startup(self):
        """
        Construct and show the Toga application.

        Usually, you would add your application to a main content box.
        We then create a main window (with a name matching the app), and
        show the main window.
        """
        main_box = toga.Box(style=Pack(direction=COLUMN))

        # Adding Individual Layout details
        name_label = toga.Label("Full Name", style=Pack(padding=(0, 5)))
        self.name_input = toga.TextInput(style=Pack(flex=1))

        name_box = toga.Box(style=Pack(direction=ROW, padding=5))
        name_box.add(name_label)
        name_box.add(self.name_input)

        mobile_label = toga.Label("Mobile", style=Pack(padding=(0, 5)))
        self.mobile_input = toga.TextInput(style=Pack(flex=1))

        mobile_box = toga.Box(style=Pack(direction=ROW, padding=5))
        mobile_box.add(mobile_label)
        mobile_box.add(self.mobile_input)

        email_label = toga.Label("Email", style=Pack(padding=(0, 5)))
        self.email_input = toga.TextInput(style=Pack(flex=1))

        email_box = toga.Box(style=Pack(direction=ROW, padding=5))
        email_box.add(email_label)
        email_box.add(self.email_input)

        source_label = toga.Label("Source Airport", style=Pack(padding=(0, 5)))
        self.source_input = toga.TextInput(style=Pack(flex=1))

        source_box = toga.Box(style=Pack(direction=ROW, padding=5))
        source_box.add(source_label)
        source_box.add(self.source_input)

        destination_label = toga.Label("Destination Airport", style=Pack(padding=(0, 5)))
        self.destination_input = toga.TextInput(style=Pack(flex=1))

        destination_box = toga.Box(style=Pack(direction=ROW, padding=5))
        destination_box.add(destination_label)
        destination_box.add(self.destination_input)

        boardingclass_label = toga.Label("Boarding Class", style=Pack(padding=(0, 5)))
        self.boardingclass_input = toga.TextInput(style=Pack(flex=1))

        boardingclass_box = toga.Box(style=Pack(direction=ROW, padding=5))
        boardingclass_box.add(boardingclass_label)
        boardingclass_box.add(self.boardingclass_input)

        preferredSeatNo_label = toga.Label("Preferred Seat", style=Pack(padding=(0, 5)))
        self.preferredSeatNo_input = toga.TextInput(style=Pack(flex=1))

        preferredSeatNo_box = toga.Box(style=Pack(direction=ROW, padding=5))
        preferredSeatNo_box.add(preferredSeatNo_label)
        preferredSeatNo_box.add(self.preferredSeatNo_input)

        mealBreakfast_label = toga.Label("Breakfast Choice", style=Pack(padding=(0, 5)))
        self.mealBreakfast_input = toga.TextInput(style=Pack(flex=1))

        mealBreakfast_box = toga.Box(style=Pack(direction=ROW, padding=5))
        mealBreakfast_box.add(mealBreakfast_label)
        mealBreakfast_box.add(self.mealBreakfast_input)

        mealLunch_label = toga.Label("Lunch Choice", style=Pack(padding=(0, 5)))
        self.mealLunch_input = toga.TextInput(style=Pack(flex=1))

        mealLunch_box = toga.Box(style=Pack(direction=ROW, padding=5))
        mealLunch_box.add(mealLunch_label)
        mealLunch_box.add(self.mealLunch_input)

        mealDinner_label = toga.Label("Dinner Choice", style=Pack(padding=(0, 5)))
        self.mealDinner_input = toga.TextInput(style=Pack(flex=1))

        mealDinner_box = toga.Box(style=Pack(direction=ROW, padding=5))
        mealDinner_box.add(mealDinner_label)
        mealDinner_box.add(self.mealDinner_input)

        passPort_label = toga.Label("Passport Details", style=Pack(padding=(0, 5)))
        self.passPort_input = toga.TextInput(style=Pack(flex=1))

        passPort_box = toga.Box(style=Pack(direction=ROW, padding=5))
        passPort_box.add(passPort_label)
        passPort_box.add(self.passPort_input)

        localAddress_label = toga.Label("Local Address", style=Pack(padding=(0, 5)))
        self.localAddress_input = toga.TextInput(style=Pack(flex=1))

        localAddress_box = toga.Box(style=Pack(direction=ROW, padding=5))
        localAddress_box.add(localAddress_label)
        localAddress_box.add(self.localAddress_input)

        bookingNo_label = toga.Label("Confirmed Booking No", style=Pack(padding=(0, 5)))
        self.bookingNo_input = toga.TextInput(style=Pack(flex=1))

        bookingNo_box = toga.Box(style=Pack(direction=ROW, padding=5))
        bookingNo_box.add(bookingNo_label)
        bookingNo_box.add(self.bookingNo_input)

        # End Of Layout details

        boardingStatus_box_label = toga.Label("Boarding Status", style=Pack(padding=(0, 5)))
        self.boardingStatus_box_input = toga.MultilineTextInput(readonly=True, style=Pack(flex=1))
        boardingStatus_box = toga.Box(style=Pack(direction=ROW, padding=5))
        boardingStatus_box.add(boardingStatus_box_label)
        boardingStatus_box.add(self.boardingStatus_box_input)

        button = toga.Button("On-Board Now", on_press=self.onBoarding, style=Pack(padding=5))

        # Adding all the visual layout in the main frame

        main_box.add(name_box)
        main_box.add(mobile_box)
        main_box.add(email_box)
        main_box.add(source_box)
        main_box.add(destination_box)
        main_box.add(boardingclass_box)
        main_box.add(preferredSeatNo_box)
        main_box.add(mealBreakfast_box)
        main_box.add(mealLunch_box)
        main_box.add(mealDinner_box)
        main_box.add(passPort_box)
        main_box.add(localAddress_box)
        main_box.add(bookingNo_box)
        main_box.add(button)
        main_box.add(boardingStatus_box)

        # End Of Main Frame

        self.main_window = toga.MainWindow(title=self.formal_name)
        self.main_window.content = main_box
        self.main_window.show()

    def onBoarding(self, widget):

        BASE_URL = "https://xxxxxxxxxx.yyyyyyyy.net/api/getOnBoarding"
        openmapapi_cache = "no-cache"
        openmapapi_con = "keep-alive"
        type = "application/json"

        querystring = { "sourceLeg":  self.source_input.value, "destinationLeg":  self.destination_input.value,
                        "boardingClass":  self.boardingclass_input.value, "preferredSeatNo":  self.preferredSeatNo_input.value,
                        "travelPassport":  self.passPort_input.value , "bookingNo":  self.bookingNo_input.value,
                        "travelerEmail":  self.email_input.value, "travelerMobile": self.mobile_input.value,
                        "mealBreakFast":  self.mealBreakfast_input.value , "mealLunch":  self.mealLunch_input.value,
                        "mealDinner":  self.mealDinner_input.value, "localAddress":  self.localAddress_input.value }

        payload = json.dumps(querystring)

        print('Input Payload: ')
        print(payload)

        headers = {
            'content-type': type,
            'Cache-Control': openmapapi_cache,
            'Connection': openmapapi_con
        }

        response = requests.request("POST", BASE_URL, headers=headers, data=payload)
        ResJson = response.text

        #jdata = json.dumps(ResJson)
        resp = json.loads(ResJson)

        print('Response JSON:')
        print(resp)

        details = resp["description"].strip()
        status = str(resp["status"]).strip()
        sourceAirport = str(resp["sourceLeg"]).strip()
        destinationAirport = str(resp["destinationLeg"]).strip()
        boardingClass = str(resp["boardingClass"]).strip()
        confirmedSeat = str(resp["confirmedSeatNo"]).strip()

        try:
            self.boardingStatus_box_input.value = f'Please find the update on your itenary -> Source - {sourceAirport} to Destination - {destinationAirport} - ' \
                                                  f'Boarding Class - {boardingClass} - Confirmed Seat - {confirmedSeat} and ' \
                                                  f'the summary is as follows  - {details} - Status - {status}'
        except ValueError:
            self.boardingStatus_box_input.value = "Some technical issue occured. We are working on it."

def main():
    return online_checkin()
From the above snippet, the program is building the input textbox on the iOS frame for the user input. This is more of a designing point of view. Other languages have sophisticated UI, which can generate similar kind of codes in the background. Unfortunately, Python still needs to grow in that aspect. However, if you think about the journey – it has progressed a lot.
        # Adding all the visual layout in the main frame

        main_box.add(name_box)
The above line finally stitches the widgets into the visual panel of the iOS app.
The above code first designs the button on the app & then it is tied with the “onBoarding” methods, which will invoke the API that we’ve already developed.
The above few lines framing an input JSON for our API & then invoke it & finally receive & parse the JSON to display the appropriate message on the iOS app.
The following image will show you the directory structure & also how the code should look. This will help you to map & understand the overall project.
Project Details
Let’s test our API –
Testing API through Postman
Now, we’re ready to test our iOS app.
You need to run the application locally as shown in the below image –
Running local iOS app using Native Python
As you can see that it is successfully able to fetch the API response & then parse it & populate the Boarding Status box marked in “Blue“.
Let us create the package for distribution by using the following command –
briefcase create
This will prompt a series of standard execution as shown below –
Building the package
Finally, you need to execute the following command to build the app –
briefcase build
Building the executed platform on the target OS
To find out whether your application ran successfully or not, one can use the following command –
briefcase run
This time it will run the application from this package & not from you local.
Now, the following commands help you to create & upload the package to iOS App Store.
briefcase create iOS

briefcase build iOS
You can refer the following official-site fore more information on creating the iOS package using briefcase.
Also, I find this is extremely useful for troubleshooting any issues here in this link.
So, finally, we have done it.
You will get the entire codebase from the following Github link.
I’ll bring some more exciting topic in the coming days from the Python verse.
Till then, Happy Avenging! 😀
Note:All the data & scenario posted here are representational data & scenarios & available over the internet & for educational purpose only.
Today, We will be discussing some of the better use-cases where we want to implement better solutions, which helps our entire Microservice/API integration painless.
As we drive towards more & more real-time applications such as mobile apps, IoT, and bots, we are engaging more microservice/API components in our technology stack. Moreover, We have witnessed that on many occasions, a full grown microservice environment leads to many unforeseen scenarios, which was not predicted or captured correctly.
To understand how a mesh-API architecture looks like, let us take one sample example for our case. Furthermore, what kind of problem we might face & how we can address.
Let us consider Airline online check-in as an example here.
There are following components are taking place irrespective of any airline ->
Filling-up primary information such as First Name, Last Name, Address, Contact details, Passport & Booking No.
We will have to choose a seat.
We will need to provide the input for a meal (However, this is optional as the domestic flight may or may not have this based on the distance & budget)
Finally, generations of Boarding-Pass.
If we decoupled our application here, we could create four inter-connected microservices to cater to our requirements. And this is shown in the given diagram –
Normal Microservice operations
From the above diagram, we can see that customer invokes a couple of related but independent services to finish the process of generating a Boarding-Pass. As per the diagram, initial requests reach the main Onboarding API & that results in cascading service calls & their successful response. In a developer’s term, this one we call it a “Happy Scenario!”
Nevertheless, developers do not always get this kind of rosy scenario. Sometimes, we encountered a scenario like this –
Cascading failure in microservice framework
Suppose we see an issue with our Boarding-pass generation service, which may encounter some network or any fatal issue, which leads to a chain of failure to its parent services. Moreover, the result will be disastrous.
How can we handle such scenarios? There are a few guidelines that we can explore.
Time-Out trigger while calling any service/s
Building Asynchronous service
Implementation of Circuit-Breaker
We can also use the standard workflow management or custom build workflow manager to improve that further (We will discuss this later in this blog).
We understood that our parent service should not wait for a longer time, where there is a significant delay from the child service. Otherwise, it will have a cascading effect & bring down the entire array of services and it.
However, the use of Circuit-Breaker is an advanced & better way to handle such scenarios. To keep this post small, We are not going to share all the codebase here. We will examine mainly two base codes.
Please find the current directory structure –
Current directory structure
Let us consider implementing without the Circuit-Breaker. We have created the following functions & a custom Python library deployed for this demo. However, We will not discuss anything in this library today. We will release it in PyPi & share the post the update & detail functionality here later. This library is a Python-based lightweight workflow manager, which will continuously monitor any failed service & when connected – it will trigger it when connected.
Use of Python-based Workflow Manager
From the above diagram, we can see that if we force “time-out” while calling our services, we can use this lightweight framework later whenever that service wake-up or establish a connection.
Please find the WhatsApp delivery through our microservice framework using this lightweight workflow framework.
Sending WhatsApp message using Python-based Workflow Manager
We have used Visual studio code editor for this entire development of azure functions. And, the screen should look something like this –
Development Editor
We’ll discuss one the following two services –
getSeatSelection
getBoardingPass
We will also discuss the first script twice – one is with the standard time-out approach & another with the circuit-breaker.
getSeatSelection( This Microservice receives the inputs from its parent microservice & confirm the preferred seat-no selected by the passengers. )
##############################################
#### Written By: SATYAKI DE               ####
#### Written On: 05-Oct-2020              ####
#### Modified On 05-Oct-2020              ####
####                                      ####
#### Objective: Scripts to choose the     ####
#### seat for the passenger.              ####
##############################################

import logging
import json
import time
import os
import ssl
import requests

import azure.functions as func

def callService(inputJson, urlPost, retryNo, eventFlag, maxRetryNo, maxTimeOut):
    # Invoking getBoardingPass API
    try:
        # Bypassing SSL Authentication
        try:
            _create_unverified_https_context = ssl._create_unverified_context
        except AttributeError:
            # Legacy python that doesn't verify HTTPS certificates by default
            pass
        else:
            # Handle target enviornment that doesn't support HTTPS verification
            ssl._create_default_https_context = _create_unverified_https_context

        # Providing the url bearer token
        url = urlPost

        json_data = inputJson
        headers = {'content-type': "application/json", 'cache-control': "no-cache"}

        # Failed case retry
        retries = retryNo
        success = False

        return_description = 'N/A'
        statusVal = 'Failed'

        try:
            while not success:
                try:
                    # Getting response from web service
                    try:
                        strCheckMsg = 'Sending Payload - ' + str(retries)
                        logging.info(strCheckMsg)

                        response = requests.request("POST", url, data=json_data, headers=headers, verify=False, timeout=maxTimeOut)

                        resp_dict = json.loads(response.text)

                        statusVal = resp_dict['status']
                        return_description = resp_dict['description']

                        logging.info(statusVal)

                    except Exception as e:
                        x = str(e)
                        logging.info(x)
                        success = False

                    if (eventFlag == 'Boarding-Pass'):
                        str_R = "Boarding-Pass Json Response:: " + str(response.text)
                    else:
                        str_R = "Invalid flag options "

                    logging.info((str_R))

                    if len(response.text) > 80:
                        if str(response.status_code)[:1] == '2':
                            success = True
                        else:
                            wait = retries * 2
                            str_R1 = "retries Fail! Waiting " + str(wait) + " seconds and retrying!"
                            logging.info(str_R1)
                            time.sleep(wait)
                            retries += 1

                        # Checking maximum retries
                        if retries >= maxRetryNo:
                            success = True
                            raise  Exception
                    else:
                        if str(response.status_code)[:1] == '2':
                            success = True
                        else:
                            # Checking maximum entries
                            if retries >= maxRetryNo:
                                success = True
                                raise  Exception

                            retries += 1
                except:
                    strVal = 'Retrying - ' + str(retries)
                    logging.info(strVal)
                    # Checking maximum entries
                    if retries >= maxRetryNo:
                        success = True
                        raise  Exception

                    retries += 1

            selection_flag = 'Y'

            # Forming return JSON
            jsonRet = {
                "eventFlag": eventFlag,
                "status":statusVal,
                "description":return_description,
                "computeFlag":selection_flag
            }

            xval = json.dumps(jsonRet)

            return xval

        except (ConnectionError, TimeoutError, InterruptedError) as e:
            str_R8 = "Response from Server: " + str(response)
            logging.info(str_R8)

            str_R9 = "Sending payload to Webservice!"
            logging.info(str_R9)
            selection_flag = 'N'

            # Forming return JSON
            jsonRet = {
                "eventFlag": eventFlag,
                "status":"Lost",
                "description":"Timed-Out or Connection Error or any I/O issue preventing the process. We're working on this!",
                "computeFlag":selection_flag
            }

            xval = json.dumps(jsonRet)

            return xval

        except ValueError as e:
            x = str(e)
            logging.info(x)

            selection_flag = 'N'

            # Forming return JSON
            jsonRet = {
                "eventFlag": eventFlag,
                "status":"Failed",
                "description":"Please check the internal parameters compatibility with it's data-type!",
                "computeFlag":selection_flag
            }

            xval = json.dumps(jsonRet)

            return xval

        except Exception as e:
            x = str(e)
            logging.info(x)

            selection_flag = 'N'

            # Forming return JSON
            jsonRet = {
                "eventFlag": eventFlag,
                "status":"Accepted",
                "description":"Maximum rerties to the Boarding-Pass service is now reached. We're working offline to get that for you. Please rerty after 4 hours in case if you haven't received it or you can directly call customer care number!",
                "computeFlag":selection_flag
            }

            xval = json.dumps(jsonRet)

            return xval


    except Exception as e:
        x = str(e)
        logging.info(x)

        selection_flag = 'N'

        # Forming return JSON
        jsonRet = {
            "eventFlag": eventFlag,
            "status":"Failed",
            "description":"DevOps Engineer is looking into this. Please try after some time!",
            "computeFlag":selection_flag
        }

        xval = json.dumps(jsonRet)

        return xval

def main(req: func.HttpRequest) -> func.HttpResponse:
    logging.info('Invoking Seat-Selection generation service.')

    # Getting System Variable from local settings file
    strVal = 'Parameter Recieved :' + os.environ['maxRetry']

    logging.info(strVal)

    # Capturing parameters from local settings
    max_retries = int(os.environ['maxRetry'])
    c_url = os.environ['cUrlBP']

    # Printing input Payload
    str_val = 'Input Payload:: ' + str(req.get_json())
    logging.info(str_val)

    strMainCheck = str(req.get_json())

    # variable
    x_status = 'Success'

    if (strMainCheck != ''):

        # Capturing individual elements

        sourceLeg = req.params.get('sourceLeg')
        destinationLeg = req.params.get('destinationLeg')
        boardingClass = req.params.get('boardingClass')
        preferredSeatNo = req.params.get('preferredSeatNo')
        travelPassport = req.params.get('travelPassport')
        bookingNo = req.params.get('bookingNo')
        travelerEmail = req.params.get('travelerEmail')
        travelerMobile = req.params.get('travelerMobile')

        # Checking Individual Elements

        if not sourceLeg:
            try:
                req_body = req.get_json()
            except ValueError:
                pass
            else:
                sourceLeg = req_body.get('sourceLeg')

        if not destinationLeg:
            try:
                req_body = req.get_json()
            except ValueError:
                pass
            else:
                destinationLeg = req_body.get('destinationLeg')

        if not boardingClass:
            try:
                req_body = req.get_json()
            except ValueError:
                pass
            else:
                boardingClass = req_body.get('boardingClass')

        if not preferredSeatNo:
            try:
                req_body = req.get_json()
            except ValueError:
                pass
            else:
                preferredSeatNo = req_body.get('preferredSeatNo')

        if not travelPassport:
            try:
                req_body = req.get_json()
            except ValueError:
                pass
            else:
                travelPassport = req_body.get('travelPassport')

        if not bookingNo:
            try:
                req_body = req.get_json()
            except ValueError:
                pass
            else:
                bookingNo = req_body.get('bookingNo')

        if not travelerEmail:
            try:
                req_body = req.get_json()
            except ValueError:
                pass
            else:
                travelerEmail = req_body.get('travelerEmail')

        if not travelerMobile:
            try:
                req_body = req.get_json()
            except ValueError:
                pass
            else:
                travelerMobile = req_body.get('travelerMobile')


        if (
            (sourceLeg != '') & (destinationLeg != '') & (boardingClass != '') &
            (preferredSeatNo != '') & (travelPassport != '') & (bookingNo != '') &
            ((travelerEmail != '') | (travelerMobile != ''))
            ):

            x_description = "Seat-Selection Successfully Processed!"

            # Preparing Payload for boarding-pass
            json_str_boarding = {
                "sourceLeg": sourceLeg,
                "destinationLeg": destinationLeg,
                "boardingClass": boardingClass,
                "confirmedSeatNo": preferredSeatNo,
                "travelPassport": travelPassport,
                "bookingNo": bookingNo,
                "travelerEmail": travelerEmail,
                "travelerMobile": travelerMobile
                        }

            jsonBoardingInput = json.dumps(json_str_boarding)

            eventFlag = 'Boarding-Pass'
            retryNoBase = 1
            maxTimeOut = 2.5

            # Invoking getBoardingPass API
            microCallsBP = callService(jsonBoardingInput, c_url, retryNoBase, eventFlag, max_retries, maxTimeOut)

            # Extracting seat_selection_flag
            resp_dict = json.loads(microCallsBP)
            x_status = resp_dict['status']
            x_description = resp_dict['description']

            # Capturing description value based on the logic
            logging.info(x_description)

            # Formatting return Payload
            json_str = {
                "description": x_description,
                "status": x_status,
                "sourceLeg": sourceLeg,
                "destinationLeg": destinationLeg,
                "boardingClass": boardingClass,
                "confirmedSeatNo": preferredSeatNo,
                "travelPassport": travelPassport,
                "bookingNo": bookingNo,
                "travelerEmail": travelerEmail,
                "travelerMobile": travelerMobile
                        }

            xval = json.dumps(json_str)

            return func.HttpResponse(xval, status_code=200)
        else:
            json_str = {
                "description": "Missing mandatory Email or Phone Number!",
                "status": "Failed",
                "sourceLeg": sourceLeg,
                "destinationLeg": destinationLeg,
                "boardingClass": boardingClass,
                "confirmedSeatNo": preferredSeatNo,
                "travelPassport": travelPassport,
                "bookingNo": bookingNo,
                "travelerEmail": travelerEmail,
                "travelerMobile": travelerMobile
            }

            xval = json.dumps(json_str)
            return func.HttpResponse(xval,status_code=200)
    else:
        json_str = {
            "description": "Missing entire payload!",
            "status": "Failed",
            "sourceLeg": "N/A",
            "destinationLeg": "N/A",
            "boardingClass": "N/A",
            "confirmedSeatNo": "N/A",
            "travelPassport": "N/A",
            "bookingNo": "N/A",
            "travelerEmail": "N/A",
            "travelerMobile": "N/A"
        }

        xval = json.dumps(json_str)
        return func.HttpResponse(xval,status_code=200)
There are a few key snippets that we would like to discuss here.
# Getting response from web service
try:
    strCheckMsg = 'Sending Payload - ' + str(retries)
    logging.info(strCheckMsg)

    response = requests.request("POST", url, data=json_data, headers=headers, verify=False, timeout=maxTimeOut)

    resp_dict = json.loads(response.text)

    statusVal = resp_dict['status']
    return_description = resp_dict['description']

    logging.info(statusVal)

except Exception as e:
    x = str(e)
    logging.info(x)
    success = False
From the above snippet, we can see that we are using time-out based on our understanding of response time or the max SLA agreed upon for that particular service.
If we get the response, we are capturing the status as well as the description from its child service & capturing it in our log, which will look something like this –
Azure Monitor of Seat-Selection service
2. getBoardingPass ( This Microservice receives the input from its parent service & confirm the autogenerated boarding pass shared with their WhatsApp number.)
We tried to create a random wait time, which will produce a sudden network latency or mimicking potential network/time-out/connection issues. Also, we want to finish this thread to avoid any unwanted WhatsApp message trigger via Twilio-API.
And, when we want to test the parent Seat-Selection service through postman, it will show the following response –
Seat-Selection Microservice response
We must have noticed that since the boarding pass also captured the seat details; hence, we are addressing them together here.
For successful execution, we can see a similar message –
Seat-Selection service success status
However, if we want to handle this better, we can use “Circuit-Breaker.”
Let us understand what this is. Since our childhood, we all know that when there is an electricity fluctuation happens frequently, to prevent all the electrical appliances, we deploy this small device that will disconnect the power between our house’s primary grid with all the appliances at our home. It will prevent these devices from getting exposed.
The same concept has been implemented for Microservice architecture as well.
For Normal operation without any issue
The above diagram shows that using a circuit breaker will continue all its previous parent services in everyday activities without any issues.
Basic concept of the Circuit Breaker in Microservice
The above diagram shows that it will stop all the parent services if the child service is not responding based on the threshold count.
Circuit breaker with partially allow case
The above diagram shows that once there is a “STOP” event captured. It will wait for a few seconds before it will allow a few services to test whether the impacted service is ready to consume further requests or not. This way, it can control the threading bottleneck.
The next diagram will give us the distinct state of a “Circuit Breaker.”
States of a Circuit Breaker
The above diagram shows that using a circuit breaker will prevent all its previous parent services. It will maintain a threshold of failures & successful data points. It will allow services to invoke the impacted service either entirely, partially, or even completely block it depending on the situation.
Let us revise the code & review it together –
3. getSeatSelection ( This Microservice receives the inputs from its parent microservice & confirm the preferred seat-no selected by the passengers – using Circuit-Breaker. )
##############################################
#### Written By: SATYAKI DE               ####
#### Written On: 05-Oct-2020              ####
#### Modified On 05-Oct-2020              ####
####                                      ####
#### Objective: Scripts to choose the     ####
#### seat for the passenger.              ####
##############################################

import logging
import json
import time
import os
import ssl
import requests

import azure.functions as func

from circuitbreaker import CircuitBreaker

class BoardingPassCircuitBreaker(CircuitBreaker):
    FAILURE_THRESHOLD = 10
    RECOVERY_TIMEOUT = 60
    EXPECTED_EXCEPTION = TimeoutError

@BoardingPassCircuitBreaker()
def callService(inputJson, urlPost, retryNo, eventFlag, maxRetryNo, maxTimeOut):
    # Invoking getBoardingPass API
    try:
        # Bypassing SSL Authentication
        try:
            _create_unverified_https_context = ssl._create_unverified_context
        except AttributeError:
            # Legacy python that doesn't verify HTTPS certificates by default
            pass
        else:
            # Handle target enviornment that doesn't support HTTPS verification
            ssl._create_default_https_context = _create_unverified_https_context

        # Providing the url bearer token
        url = urlPost

        json_data = inputJson
        headers = {'content-type': "application/json", 'cache-control': "no-cache"}

        # Failed case retry
        retries = retryNo
        success = False

        return_description = 'N/A'
        statusVal = 'Failed'

        try:
            while not success:
                try:
                    # Getting response from web service
                    try:
                        strCheckMsg = 'Sending Payload - ' + str(retries)
                        logging.info(strCheckMsg)

                        response = requests.request("POST", url, data=json_data, headers=headers, verify=False, timeout=maxTimeOut)

                        resp_dict = json.loads(response.text)

                        statusVal = resp_dict['status']
                        return_description = resp_dict['description']

                        logging.info(statusVal)

                    except Exception as e:
                        x = str(e)
                        logging.info(x)
                        success = False

                    if (eventFlag == 'Boarding-Pass'):
                        str_R = "Boarding-Pass Json Response:: " + str(response.text)
                    else:
                        str_R = "Invalid flag options "

                    logging.info((str_R))

                    if len(response.text) > 80:
                        if str(response.status_code)[:1] == '2':
                            success = True
                        else:
                            wait = retries * 2
                            str_R1 = "retries Fail! Waiting " + str(wait) + " seconds and retrying!"
                            logging.info(str_R1)
                            time.sleep(wait)
                            retries += 1

                        # Checking maximum retries
                        if retries >= maxRetryNo:
                            success = True
                            raise  Exception
                    else:
                        if str(response.status_code)[:1] == '2':
                            success = True
                        else:
                            # Checking maximum entries
                            if retries >= maxRetryNo:
                                success = True
                                raise  Exception

                            retries += 1
                except:
                    strVal = 'Retrying - ' + str(retries)
                    logging.info(strVal)
                    # Checking maximum entries
                    if retries >= maxRetryNo:
                        success = True
                        raise  Exception

                    retries += 1

            selection_flag = 'Y'

            # Forming return JSON
            jsonRet = {
                "eventFlag": eventFlag,
                "status":statusVal,
                "description":return_description,
                "computeFlag":selection_flag
            }

            xval = json.dumps(jsonRet)

            return xval

        except (ConnectionError, TimeoutError, InterruptedError) as e:
            str_R8 = "Response from Server: " + str(response)
            logging.info(str_R8)

            str_R9 = "Sending payload to Webservice!"
            logging.info(str_R9)
            selection_flag = 'N'

            # Forming return JSON
            jsonRet = {
                "eventFlag": eventFlag,
                "status":"Lost",
                "description":"Timed-Out or Connection Error or any I/O issue preventing the process. We're working on this!",
                "computeFlag":selection_flag
            }

            xval = json.dumps(jsonRet)

            return xval

        except ValueError as e:
            x = str(e)
            logging.info(x)

            selection_flag = 'N'

            # Forming return JSON
            jsonRet = {
                "eventFlag": eventFlag,
                "status":"Failed",
                "description":"Please check the internal parameters compatibility with it's data-type!",
                "computeFlag":selection_flag
            }

            xval = json.dumps(jsonRet)

            return xval

        except Exception as e:
            x = str(e)
            logging.info(x)

            selection_flag = 'N'

            # Forming return JSON
            jsonRet = {
                "eventFlag": eventFlag,
                "status":"Accepted",
                "description":"Maximum rerties to the Boarding-Pass service is now reached. We're working offline to get that for you. Please rerty after 4 hours in case if you haven't received it or you can directly call customer care number!",
                "computeFlag":selection_flag
            }

            xval = json.dumps(jsonRet)

            return xval


    except Exception as e:
        x = str(e)
        logging.info(x)

        selection_flag = 'N'

        # Forming return JSON
        jsonRet = {
            "eventFlag": eventFlag,
            "status":"Failed",
            "description":"DevOps Engineer is looking into this. Please try after some time!",
            "computeFlag":selection_flag
        }

        xval = json.dumps(jsonRet)

        return xval

def main(req: func.HttpRequest) -> func.HttpResponse:
    logging.info('Invoking Seat-Selection generation service.')

    # Getting System Variable from local settings file
    strVal = 'Parameter Recieved :' + os.environ['maxRetry']

    logging.info(strVal)

    # Capturing parameters from local settings
    max_retries = int(os.environ['maxRetry'])
    c_url = os.environ['cUrlBP']

    # Printing input Payload
    str_val = 'Input Payload:: ' + str(req.get_json())
    logging.info(str_val)

    strMainCheck = str(req.get_json())

    # variable
    x_status = 'Success'

    if (strMainCheck != ''):

        # Capturing individual elements

        sourceLeg = req.params.get('sourceLeg')
        destinationLeg = req.params.get('destinationLeg')
        boardingClass = req.params.get('boardingClass')
        preferredSeatNo = req.params.get('preferredSeatNo')
        travelPassport = req.params.get('travelPassport')
        bookingNo = req.params.get('bookingNo')
        travelerEmail = req.params.get('travelerEmail')
        travelerMobile = req.params.get('travelerMobile')

        # Checking Individual Elements

        if not sourceLeg:
            try:
                req_body = req.get_json()
            except ValueError:
                pass
            else:
                sourceLeg = req_body.get('sourceLeg')

        if not destinationLeg:
            try:
                req_body = req.get_json()
            except ValueError:
                pass
            else:
                destinationLeg = req_body.get('destinationLeg')

        if not boardingClass:
            try:
                req_body = req.get_json()
            except ValueError:
                pass
            else:
                boardingClass = req_body.get('boardingClass')

        if not preferredSeatNo:
            try:
                req_body = req.get_json()
            except ValueError:
                pass
            else:
                preferredSeatNo = req_body.get('preferredSeatNo')

        if not travelPassport:
            try:
                req_body = req.get_json()
            except ValueError:
                pass
            else:
                travelPassport = req_body.get('travelPassport')

        if not bookingNo:
            try:
                req_body = req.get_json()
            except ValueError:
                pass
            else:
                bookingNo = req_body.get('bookingNo')

        if not travelerEmail:
            try:
                req_body = req.get_json()
            except ValueError:
                pass
            else:
                travelerEmail = req_body.get('travelerEmail')

        if not travelerMobile:
            try:
                req_body = req.get_json()
            except ValueError:
                pass
            else:
                travelerMobile = req_body.get('travelerMobile')


        if (
            (sourceLeg != '') & (destinationLeg != '') & (boardingClass != '') &
            (preferredSeatNo != '') & (travelPassport != '') & (bookingNo != '') &
            ((travelerEmail != '') | (travelerMobile != ''))
            ):

            x_description = "Seat-Selection Successfully Processed!"

            # Preparing Payload for boarding-pass
            json_str_boarding = {
                "sourceLeg": sourceLeg,
                "destinationLeg": destinationLeg,
                "boardingClass": boardingClass,
                "confirmedSeatNo": preferredSeatNo,
                "travelPassport": travelPassport,
                "bookingNo": bookingNo,
                "travelerEmail": travelerEmail,
                "travelerMobile": travelerMobile
                        }

            jsonBoardingInput = json.dumps(json_str_boarding)

            eventFlag = 'Boarding-Pass'
            retryNoBase = 1
            maxTimeOut = 2.5

            # Invoking getBoardingPass API
            microCallsBP = callService(jsonBoardingInput, c_url, retryNoBase, eventFlag, max_retries, maxTimeOut)

            # Extracting seat_selection_flag
            resp_dict = json.loads(microCallsBP)
            x_status = resp_dict['status']
            x_description = resp_dict['description']

            # Capturing description value based on the logic
            logging.info(x_description)

            # Formatting return Payload
            json_str = {
                "description": x_description,
                "status": x_status,
                "sourceLeg": sourceLeg,
                "destinationLeg": destinationLeg,
                "boardingClass": boardingClass,
                "confirmedSeatNo": preferredSeatNo,
                "travelPassport": travelPassport,
                "bookingNo": bookingNo,
                "travelerEmail": travelerEmail,
                "travelerMobile": travelerMobile
                        }

            xval = json.dumps(json_str)

            return func.HttpResponse(xval, status_code=200)
        else:
            json_str = {
                "description": "Missing mandatory Email or Phone Number!",
                "status": "Failed",
                "sourceLeg": sourceLeg,
                "destinationLeg": destinationLeg,
                "boardingClass": boardingClass,
                "confirmedSeatNo": preferredSeatNo,
                "travelPassport": travelPassport,
                "bookingNo": bookingNo,
                "travelerEmail": travelerEmail,
                "travelerMobile": travelerMobile
            }

            xval = json.dumps(json_str)
            return func.HttpResponse(xval,status_code=200)
    else:
        json_str = {
            "description": "Missing entire payload!",
            "status": "Failed",
            "sourceLeg": "N/A",
            "destinationLeg": "N/A",
            "boardingClass": "N/A",
            "confirmedSeatNo": "N/A",
            "travelPassport": "N/A",
            "bookingNo": "N/A",
            "travelerEmail": "N/A",
            "travelerMobile": "N/A"
        }

        xval = json.dumps(json_str)
        return func.HttpResponse(xval,status_code=200)
Let us review the key snippets –
from circuitbreaker import CircuitBreaker

class BoardingPassCircuitBreaker(CircuitBreaker):
    FAILURE_THRESHOLD = 10
    RECOVERY_TIMEOUT = 60
    EXPECTED_EXCEPTION = TimeoutError

@BoardingPassCircuitBreaker()
def callService(inputJson, urlPost, retryNo, eventFlag, maxRetryNo, maxTimeOut):
    # Invoking getBoardingPass API
    try:
	    <Code>

            # Forming return JSON
            jsonRet = {
                "eventFlag": eventFlag,
                "status":statusVal,
                "description":return_description,
                "computeFlag":selection_flag
            }

            xval = json.dumps(jsonRet)

            return xval


    except Exception as e:
        x = str(e)
        logging.info(x)

        selection_flag = 'N'

        # Forming return JSON
        jsonRet = {
            "eventFlag": eventFlag,
            "status":"Failed",
            "description":"DevOps Engineer is looking into this. Please try after some time!",
            "computeFlag":selection_flag
        }

        xval = json.dumps(jsonRet)

        return xval
We have put the microservice call into a function & then mark it as a circuit-breaker method. Also, we have enforced some custom settings in our main circuit-breaker class as well.
Moreover, here are some of our main API sample outputs, i.e., “getOnBoarding,” depending on the child-services’ availability.
Please click the above image gallery to see all the combinations of responses.
Finally, here is the WhatsApp message if that call successful. We have used Twilio API to exchange the text.
Boarding Pass delivery to Passenger WhatsApp No
Please find the dependent package from requirements.txt ->
Today, I’ll explain a relatively new GUI framework with which you can create native mobile applications across all the different platforms. Note that this framework is still in the preview phase on many fronts. And you also can contribute here in many ways.
Let’s jump into making a chat application using this. It is relatively easy to build.
You need to install the following framework –
pip install beeware==0.3.0.dev3
As I’ve told you that this package is in the preview stage. So, you need to wait for few more days to get this package available for production use.
However, the following diagram presented in Pycon explains that all –
Let’s jump into our objective.
To create the project, the following are steps that need to perform –
Functions that you need to use –
briefcase new
This will lead to several options that you need to fill as shown in the next couple of slides –
Note that, this one I’ve created in the Windows environment. So, you need to provide all these details before creating the app.
This will create a template of code as shown below –
"""Chat with my friends"""importtogafromtoga.styleimport Pack
fromtoga.style.packimport COLUMN, ROW
classSDApp(toga.App):
defstartup(self):
""" Construct and show the Toga application. Usually, you would add your application to a main content box. We then create a main window (with a name matching the app), and show the main window. """
main_box = toga.Box()
self.main_window = toga.MainWindow(title=self.formal_name)
self.main_window.content = main_box
self.main_window.show()
defmain():
return SDApp()
And, you can run this template to see the default template output by using the following command –
briefcase dev
Now, I want to take this & add some lines of codes to create a chat-based application in MAC & see how it behaves.
But, before that, the directory structure will look like this –
As you can see, SDChat is my application name. And, based on that, the following directories.
And, inside the final SDChat directory, the following files are created –
__init__.py
__main__.py
app.py
Let’s take this & modify it for MAC. To do that, we need to change app.py script & layout our all the essential GUI ingredients.
Note that I’m not going to discuss the custom bot that I created. Only, I’ll be referring to it.
1. app.py (This script contains all the GUI details & it will invoke the custom bot.)
################################################## Written By: SATYAKI DE ######## Written On: 17-Feb-2020 ######## Modified On 17-Feb-2020 ######## ######## Objective: Main calling scripts. ##################################################"""This is a Chat Application with custom made bot"""importtogafromtoga.styleimport Pack
fromtoga.style.packimport COLUMN, ROW
# My Custom Built BotfromSDChatbotsimport clsTalk2Bot as e
#-- NewclassSDChat(toga.App):
defstartup(self):
""" Construct and show the Toga application. Usually, you would add your application to a main content box. We then create a main window (with a name matching the app), and show the main window. """self.chat = toga.DetailedList(data=[], style=Pack(flex=1))
self.chat.data.append(icon = toga.Icon('resources/brutus.png'), title='SDChat', subtitle='Hi! How are you doing today?')
self.text_input = toga.TextInput(style=Pack(flex=1))
#send_button = toga.Button('Send')
send_button = toga.Button(
    'Send',
    on_press=self.greet,
    style=Pack(padding_right=5)
)
input_box = toga.Box(
children=[self.text_input, send_button],
style=Pack(direction=ROW, alignment='center', padding=5)
)
main_box = toga.Box(children=[self.chat, input_box], style=Pack(direction=COLUMN))
# main_box.add(send_button)self.main_window = toga.MainWindow(title=self.formal_name)
self.main_window.content = main_box
self.main_window.show()
defgreet(self, widget):
print('Value: ', self.text_input.value)
input_text =self.text_input.value
self.chat.data.append(icon=toga.Icon('resources/user.png'), title='You', subtitle = input_text)
# Chatbot
y = e.clsTalk2Bot()
ret_val = y.TalkNow(input_text)
self.chat.data.append(icon=toga.Icon('resources/brutus.png'), title='SDChat', subtitle=ret_val)
self.text_input.value =''self.chat.scroll_to_bottom()
defmain():
return SDChat()
Let’s discuss a couple of essential lines from the above snippet –
self.chat = toga.DetailedList(data=[], style=Pack(flex=1))self.chat.data.append(icon = toga.Icon('resources/brutus.png'), title='SDChat', subtitle='Hi! How are you doing today?')
This is the main display box, where you can see all the chat details. And, also, by default, it will prompt the initial conversion starter.
Here is the button that you are creating. As you can see, almost all the places I’ve provided the “Style,” which is key to your object alignment inside your mobile app.
As you can see, here, our application will capture the user input & based on that, our program will pass the input text to our chatbot. Also, you can see once that communication & response achieved, the input box will be cleared & the control will move down to the end of the chat screen. This is required. Otherwise, the user won’t be able to view the latest communication.
So, as you can see that, this extremely easy to create & you can enhance it as per your need.
For more information on this framework, please go through the following link ->


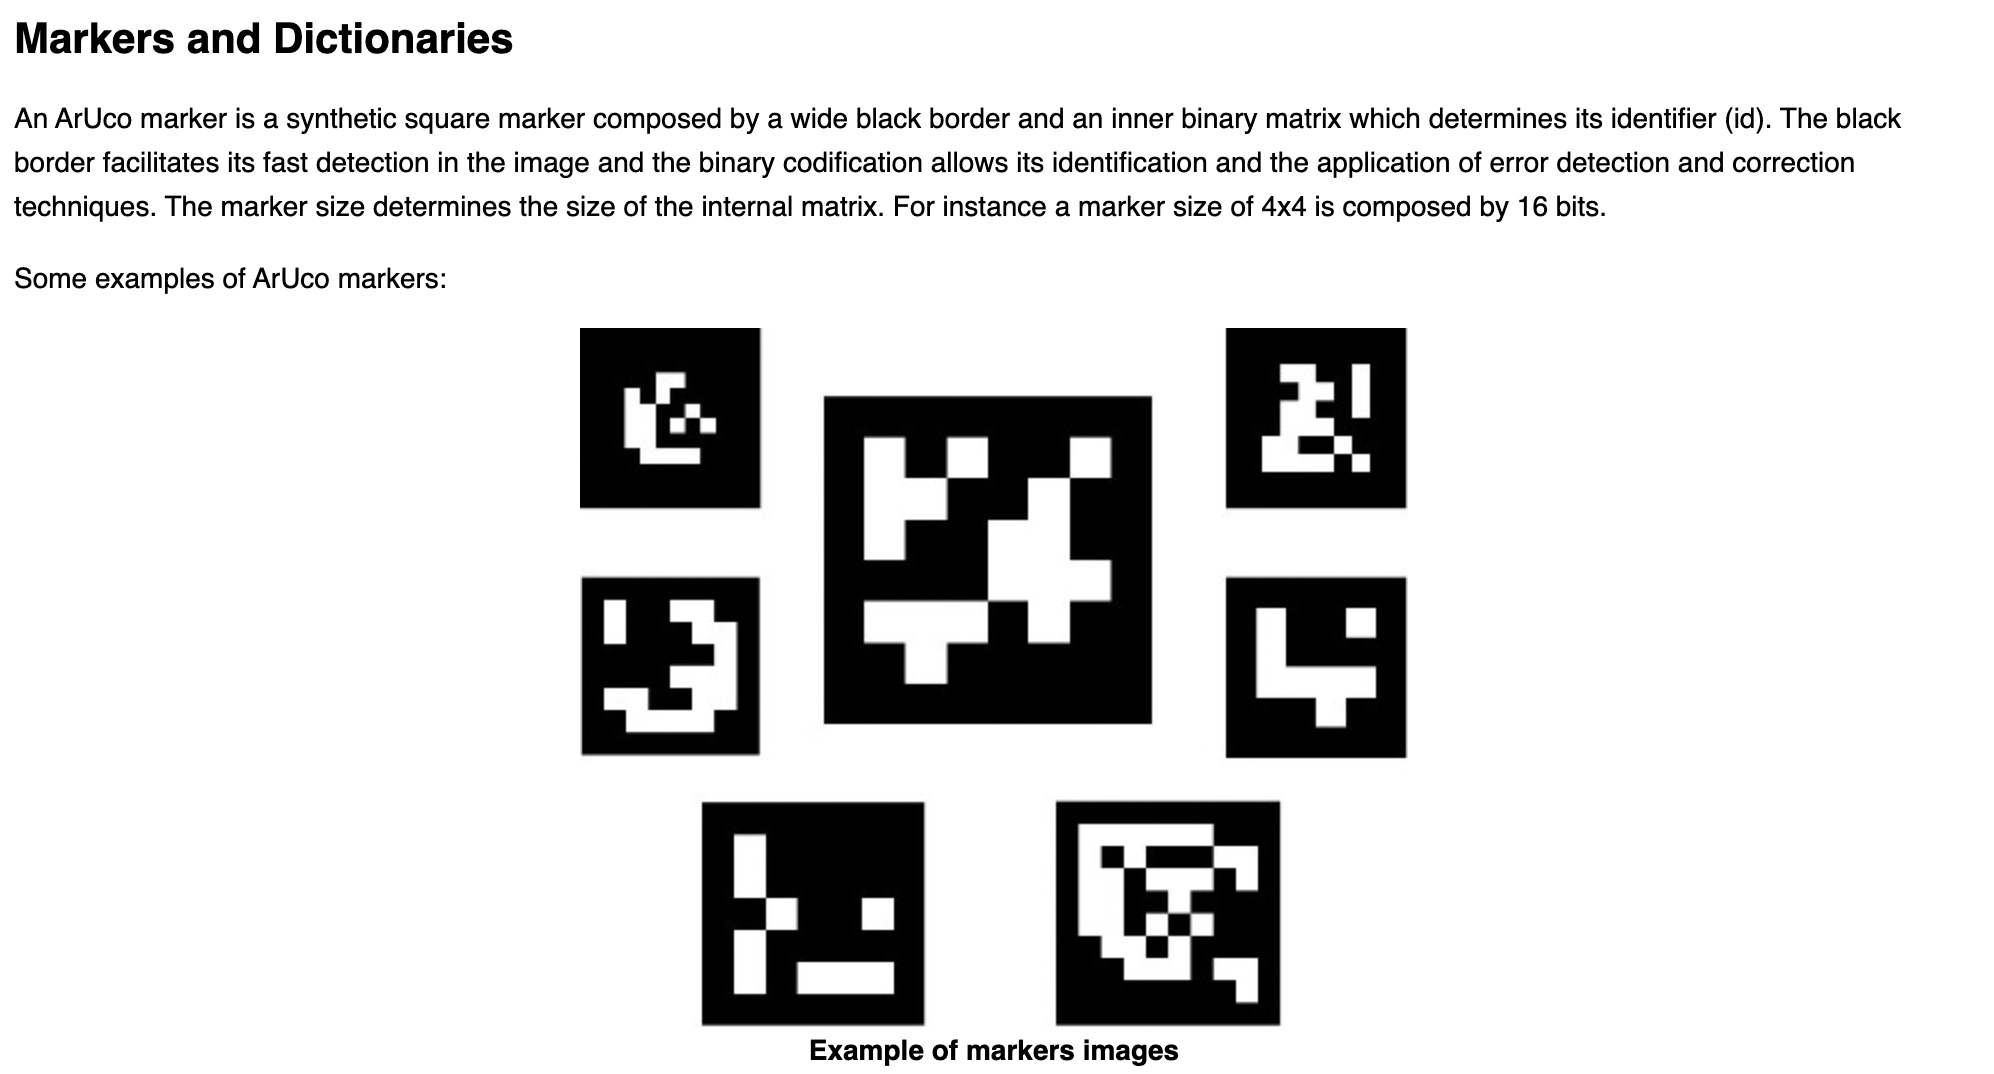


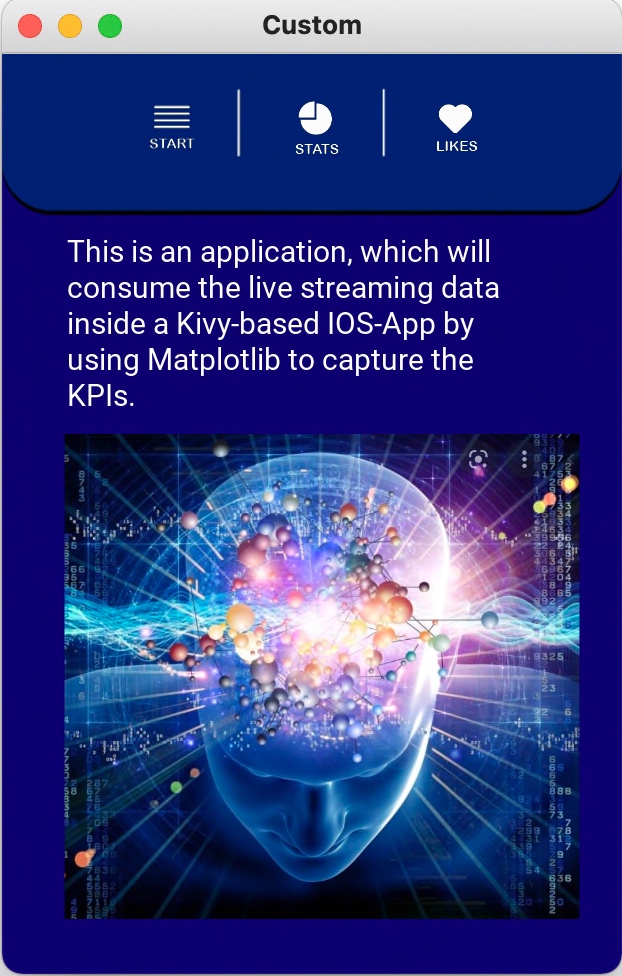

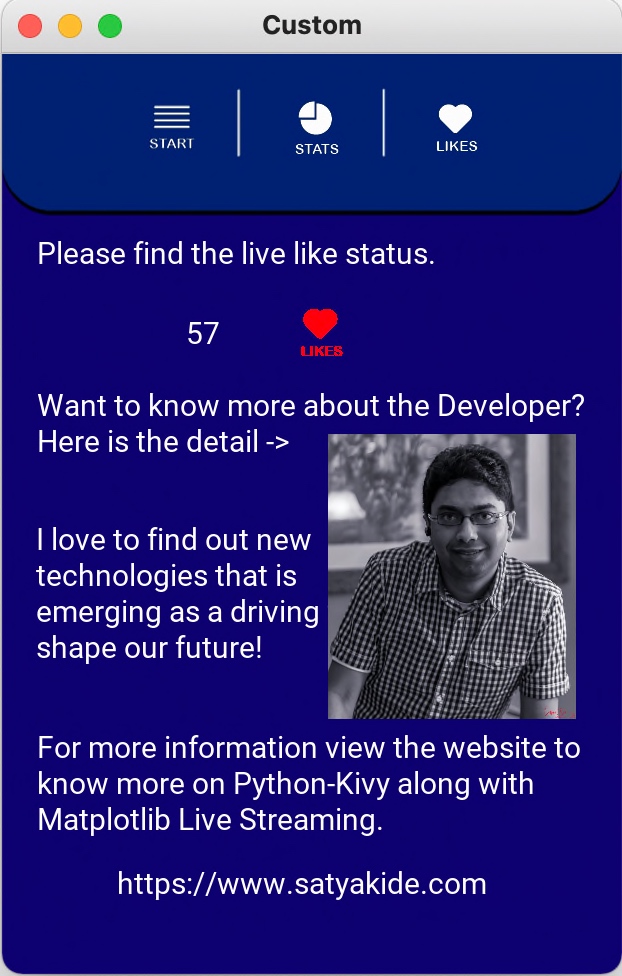

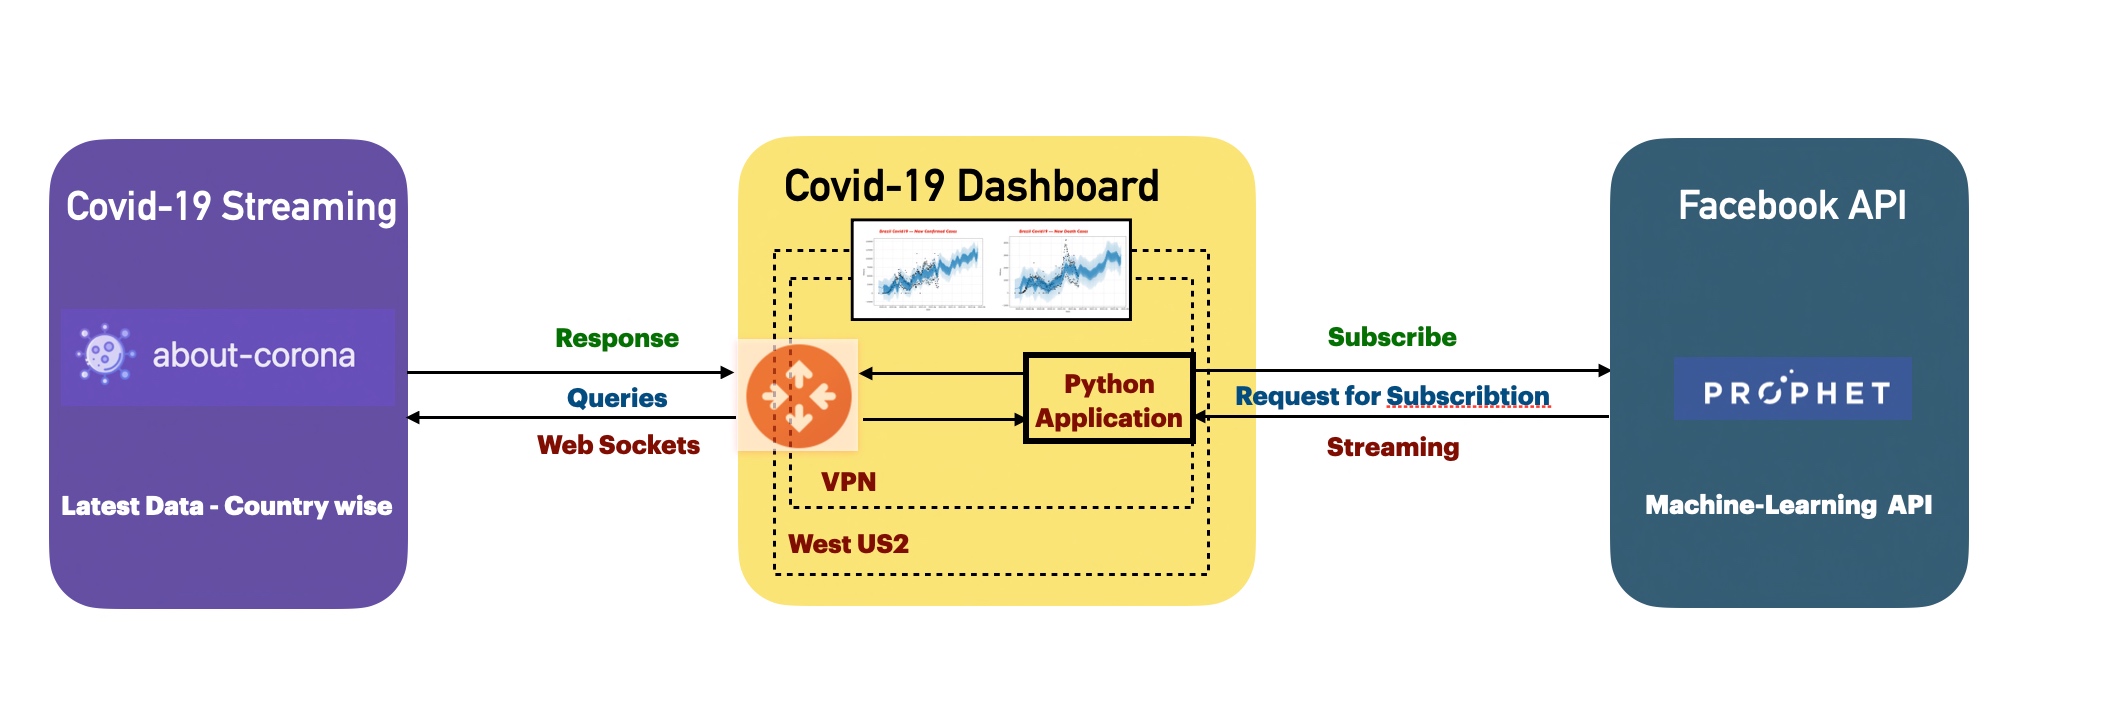
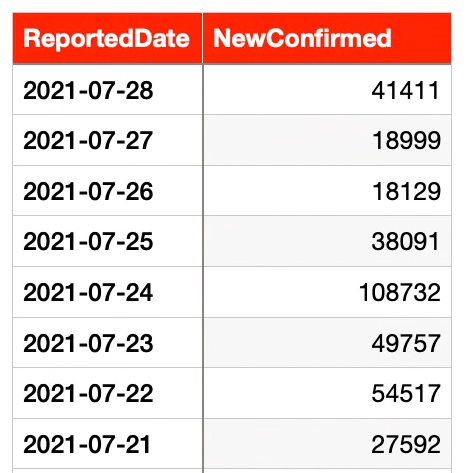
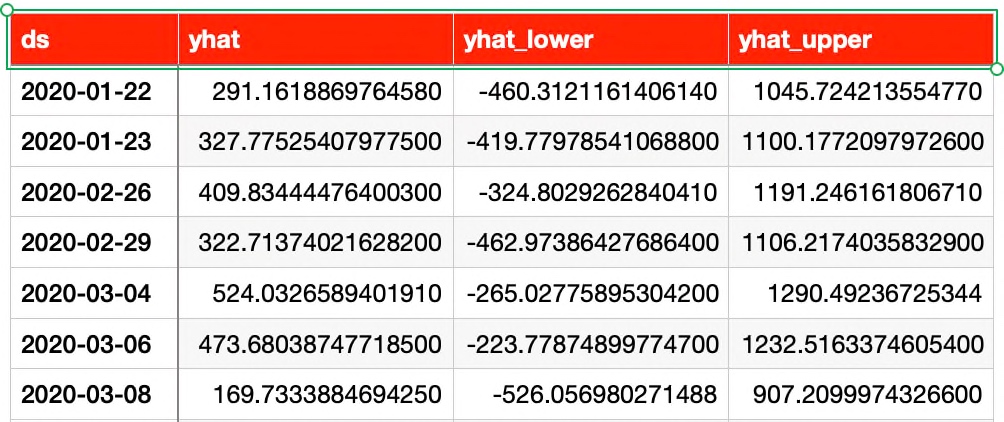


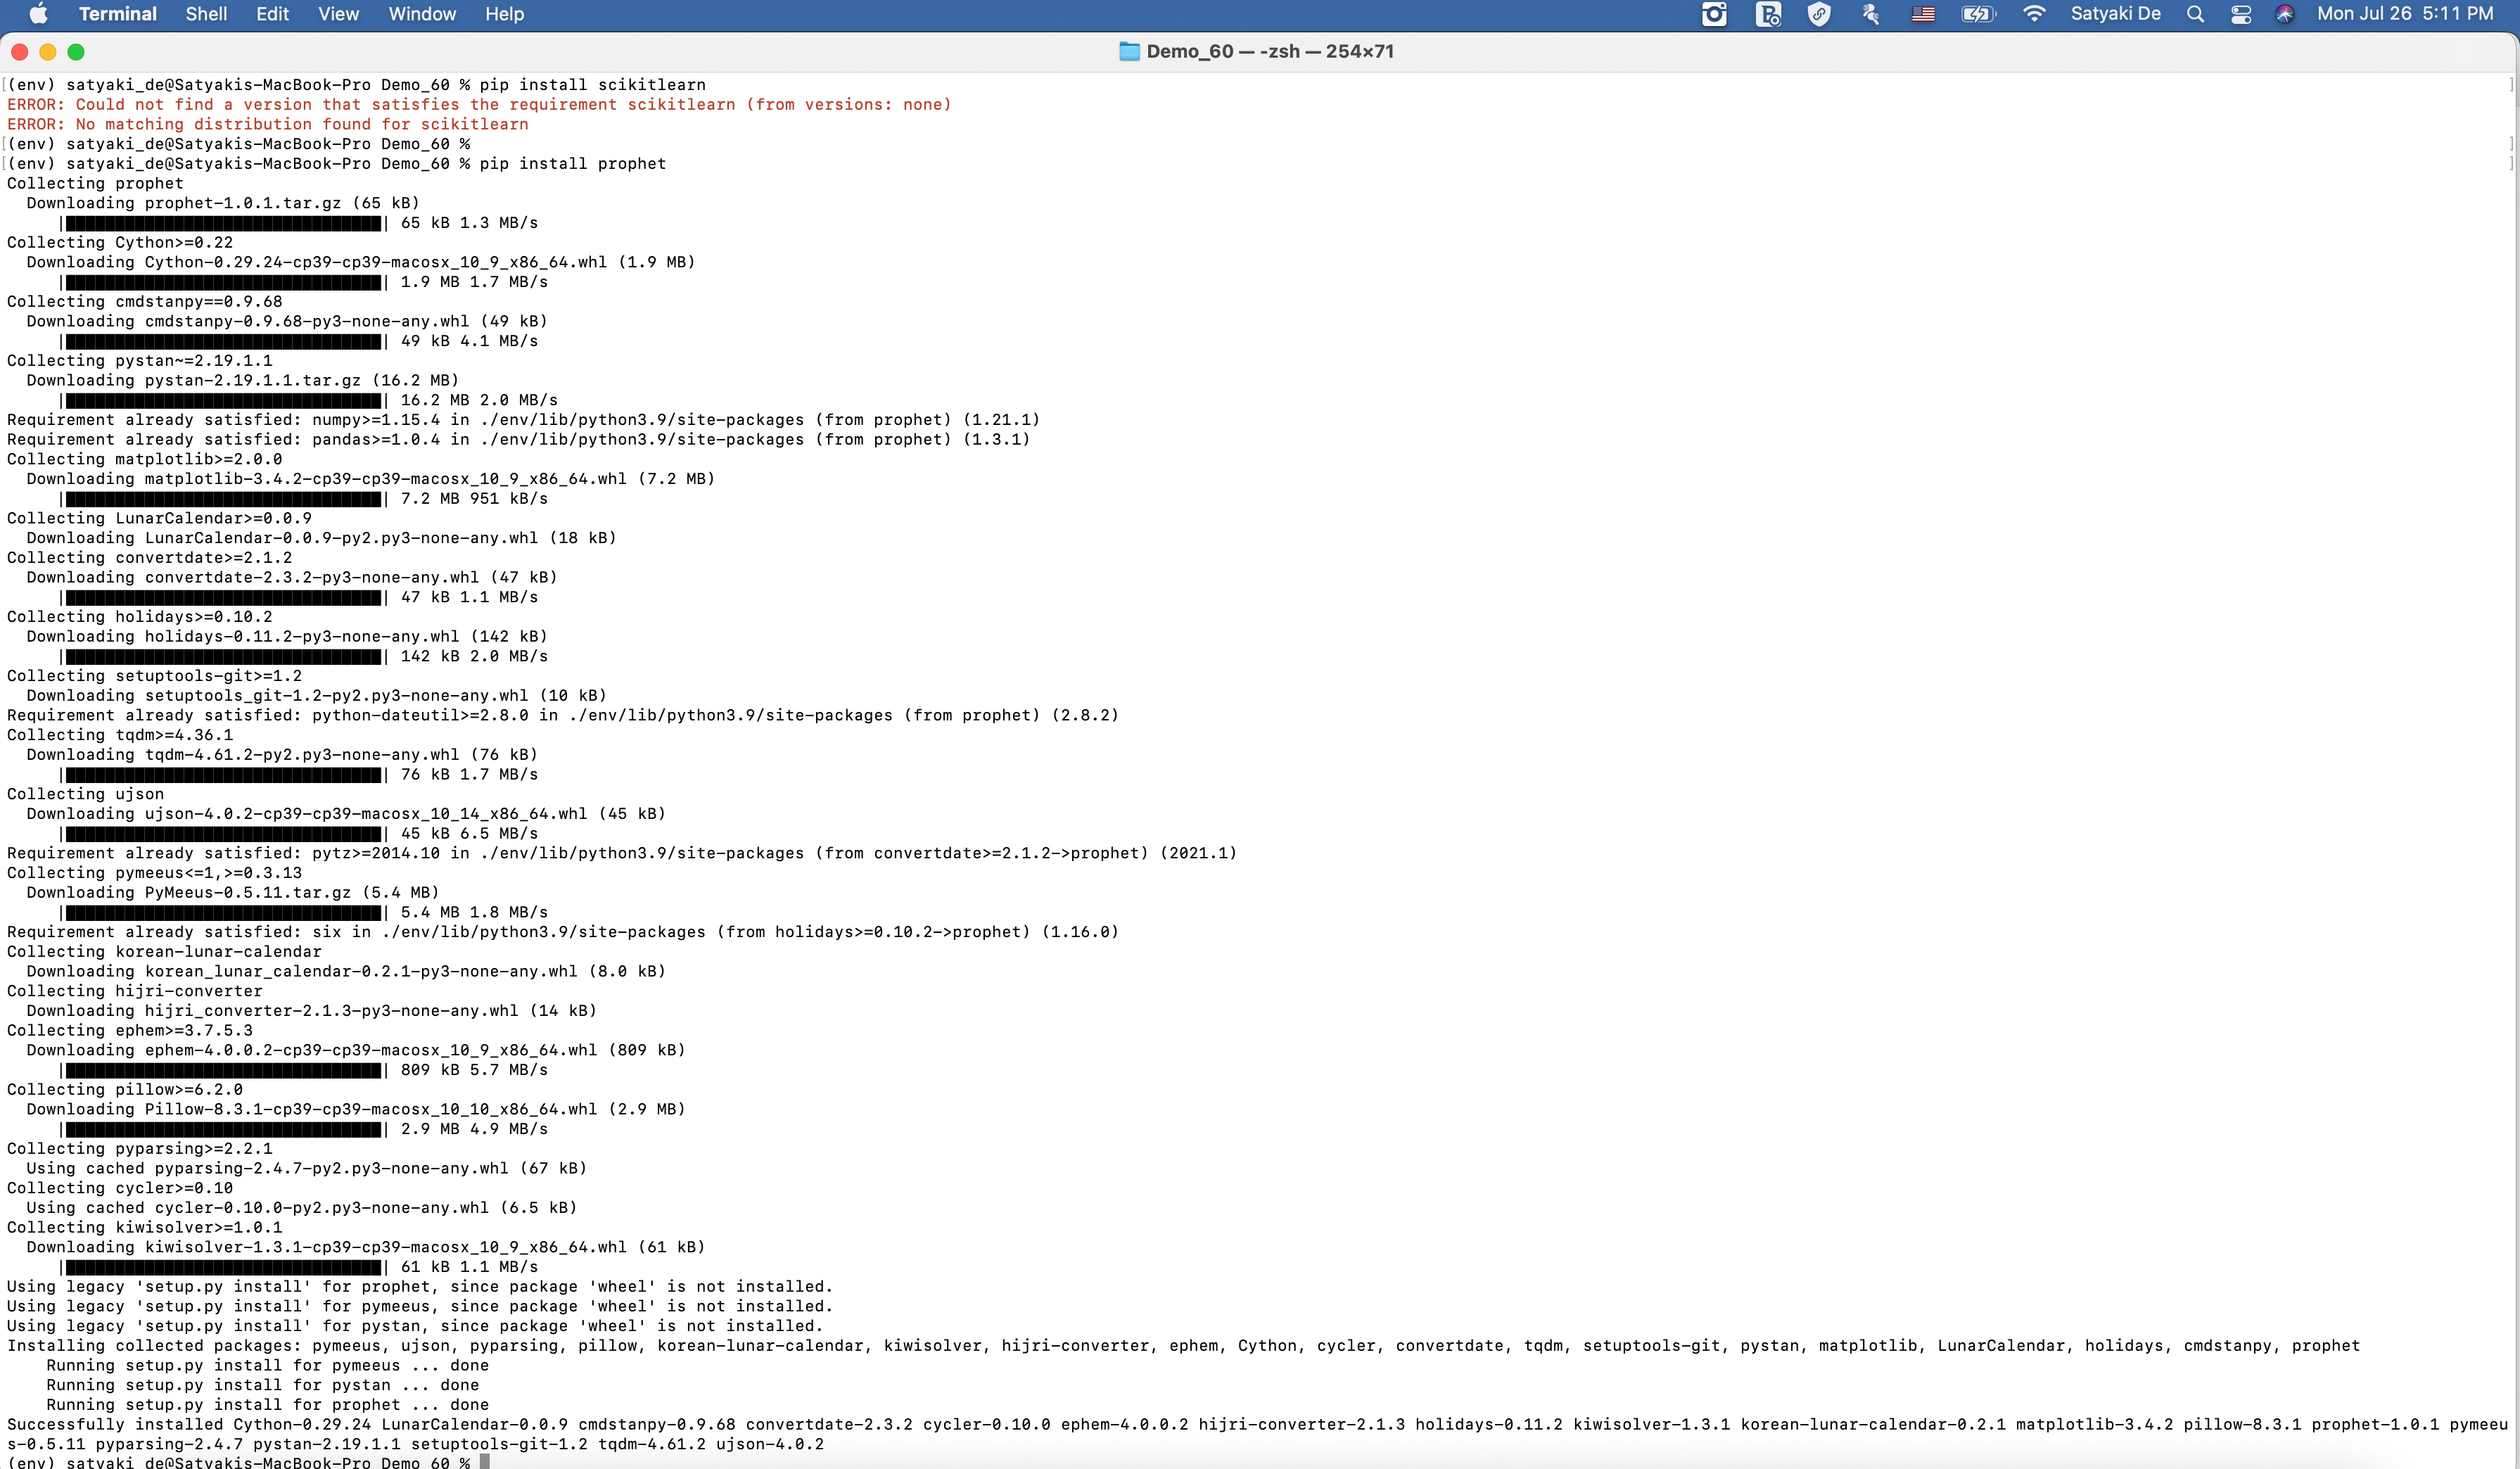
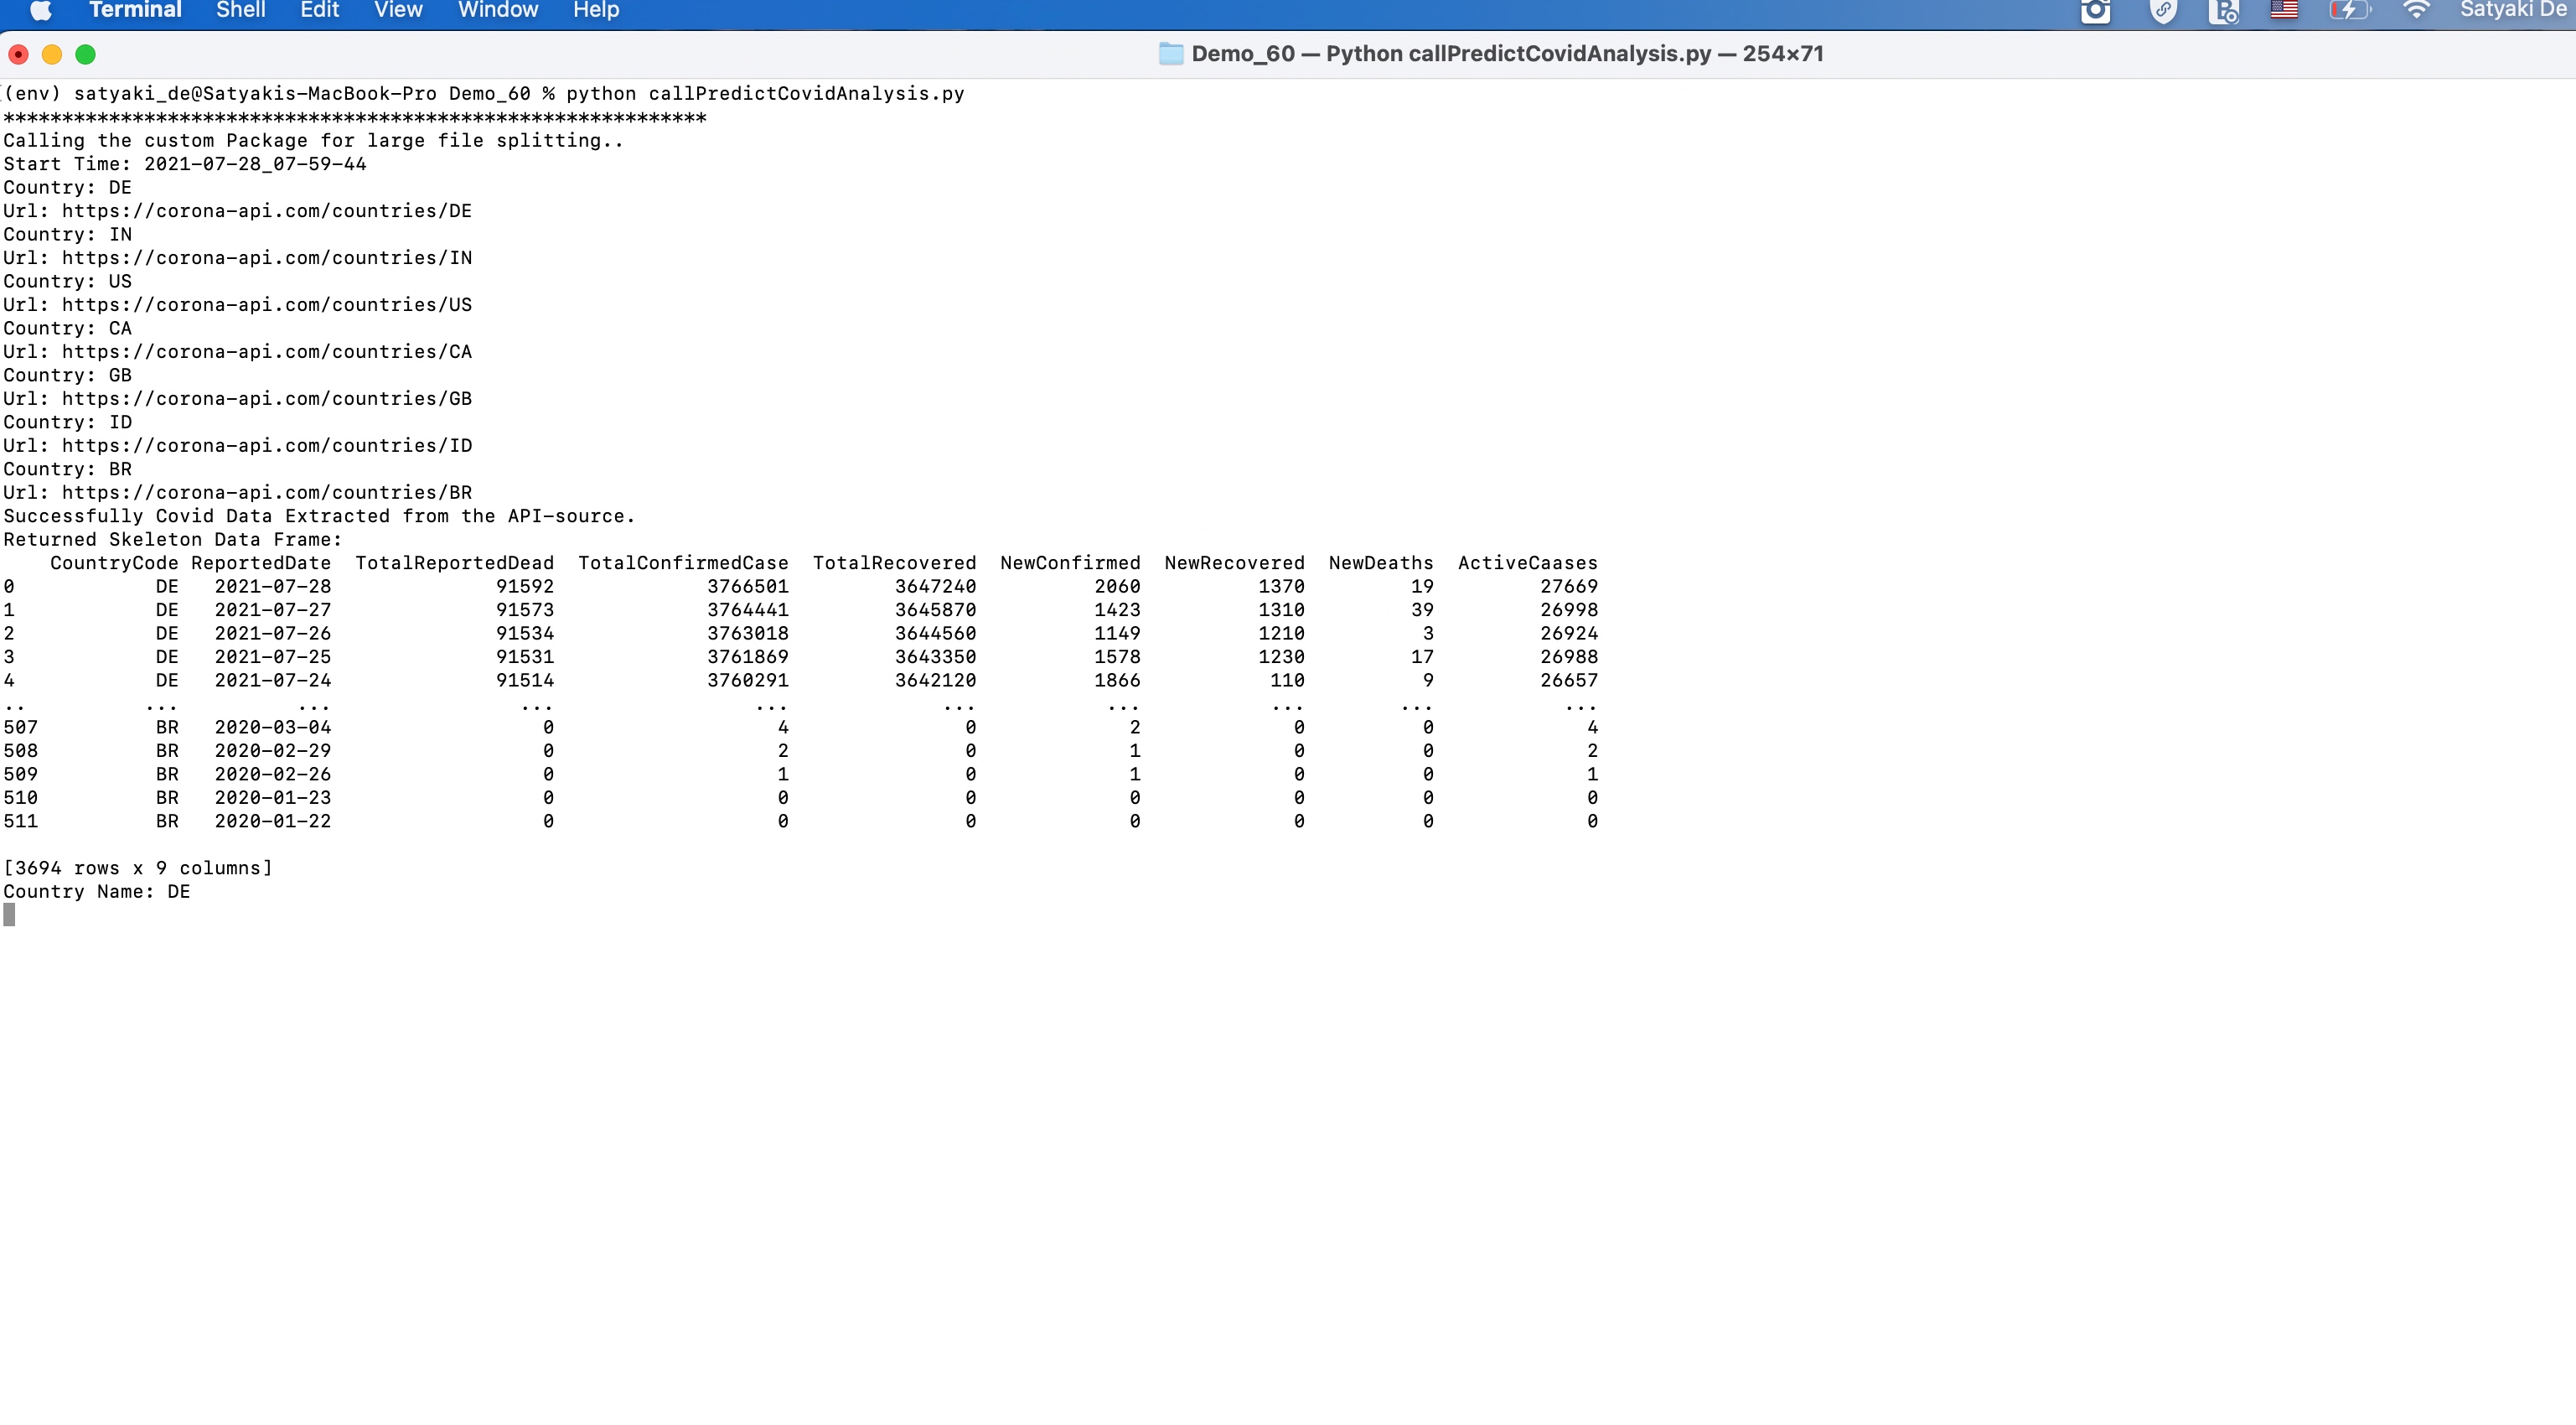

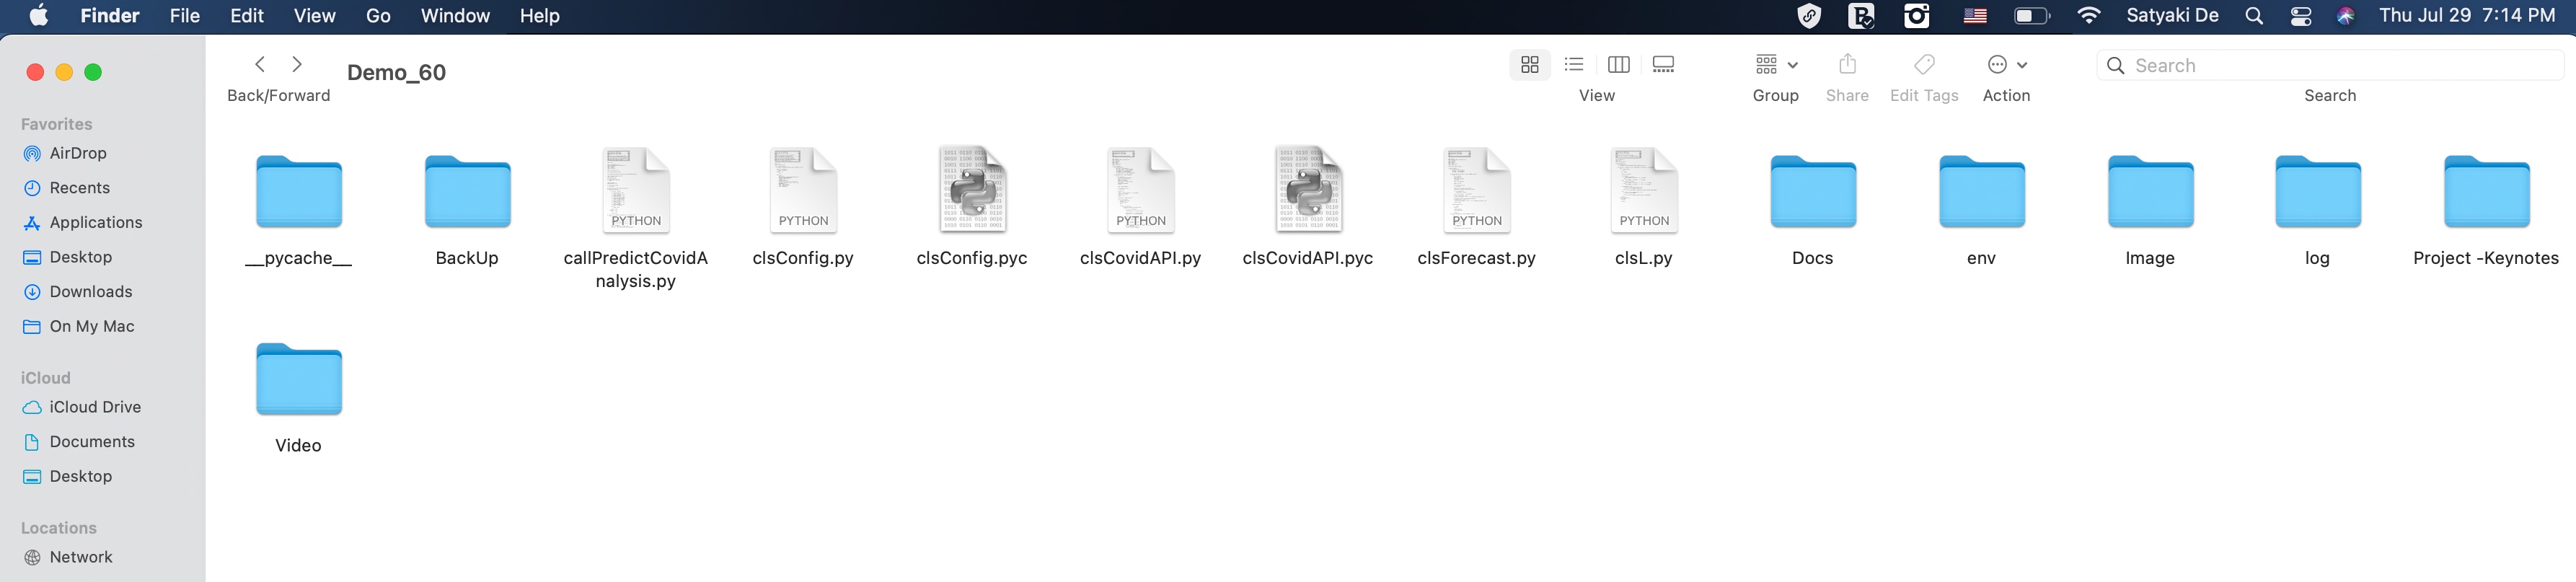


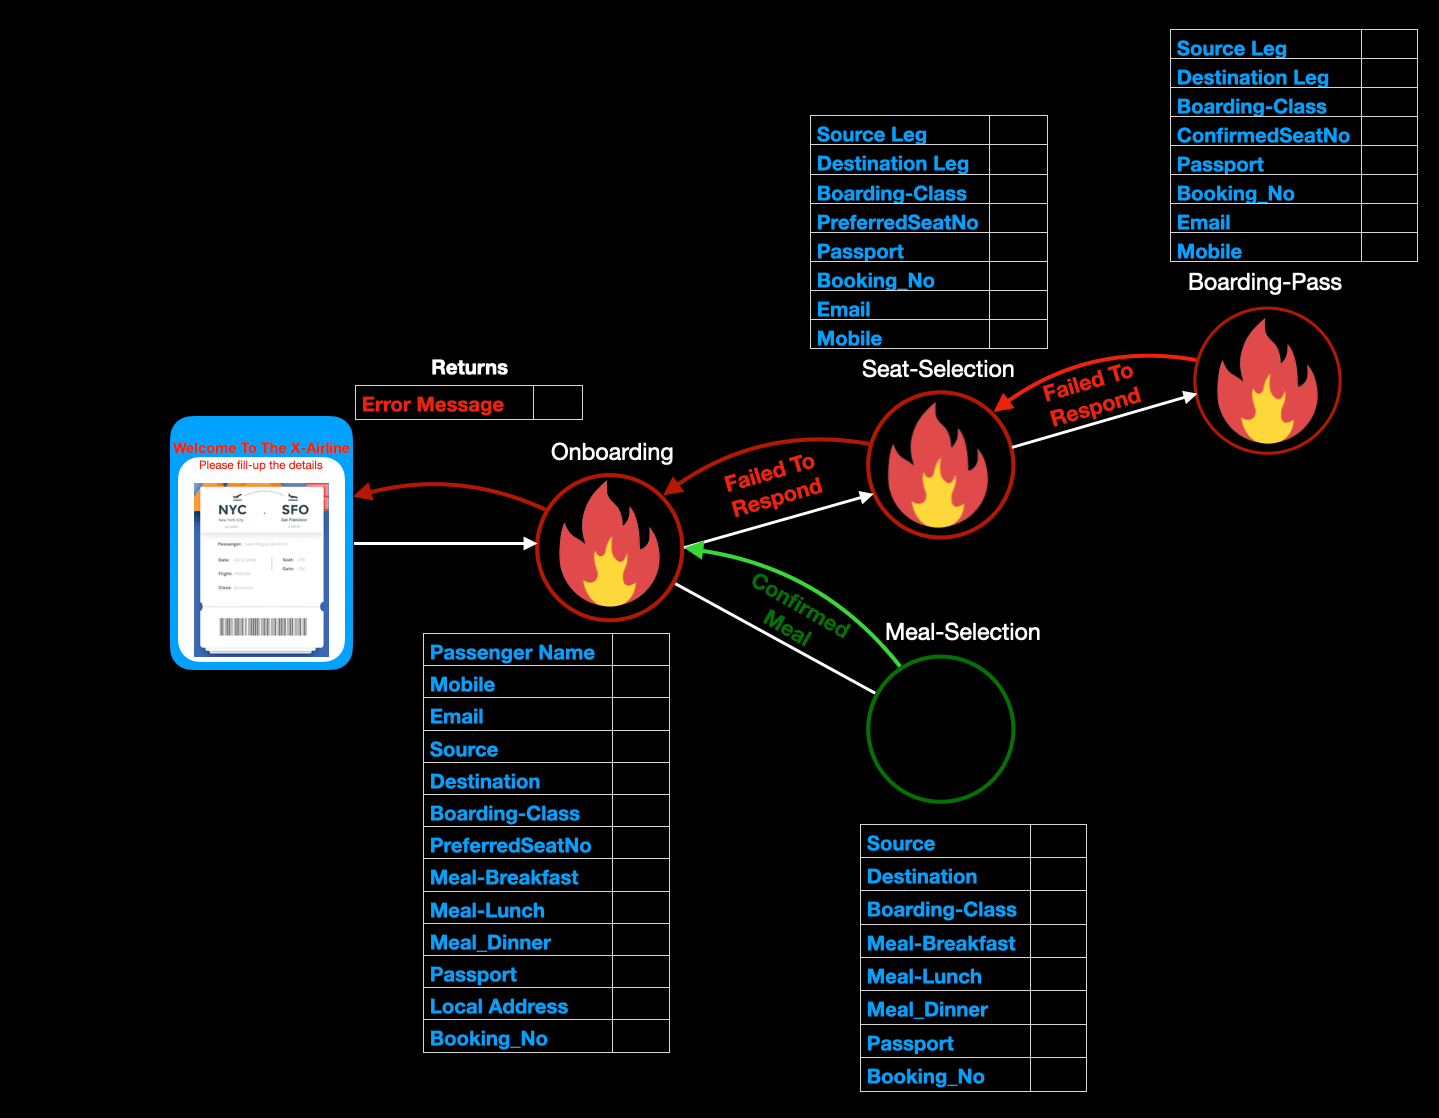


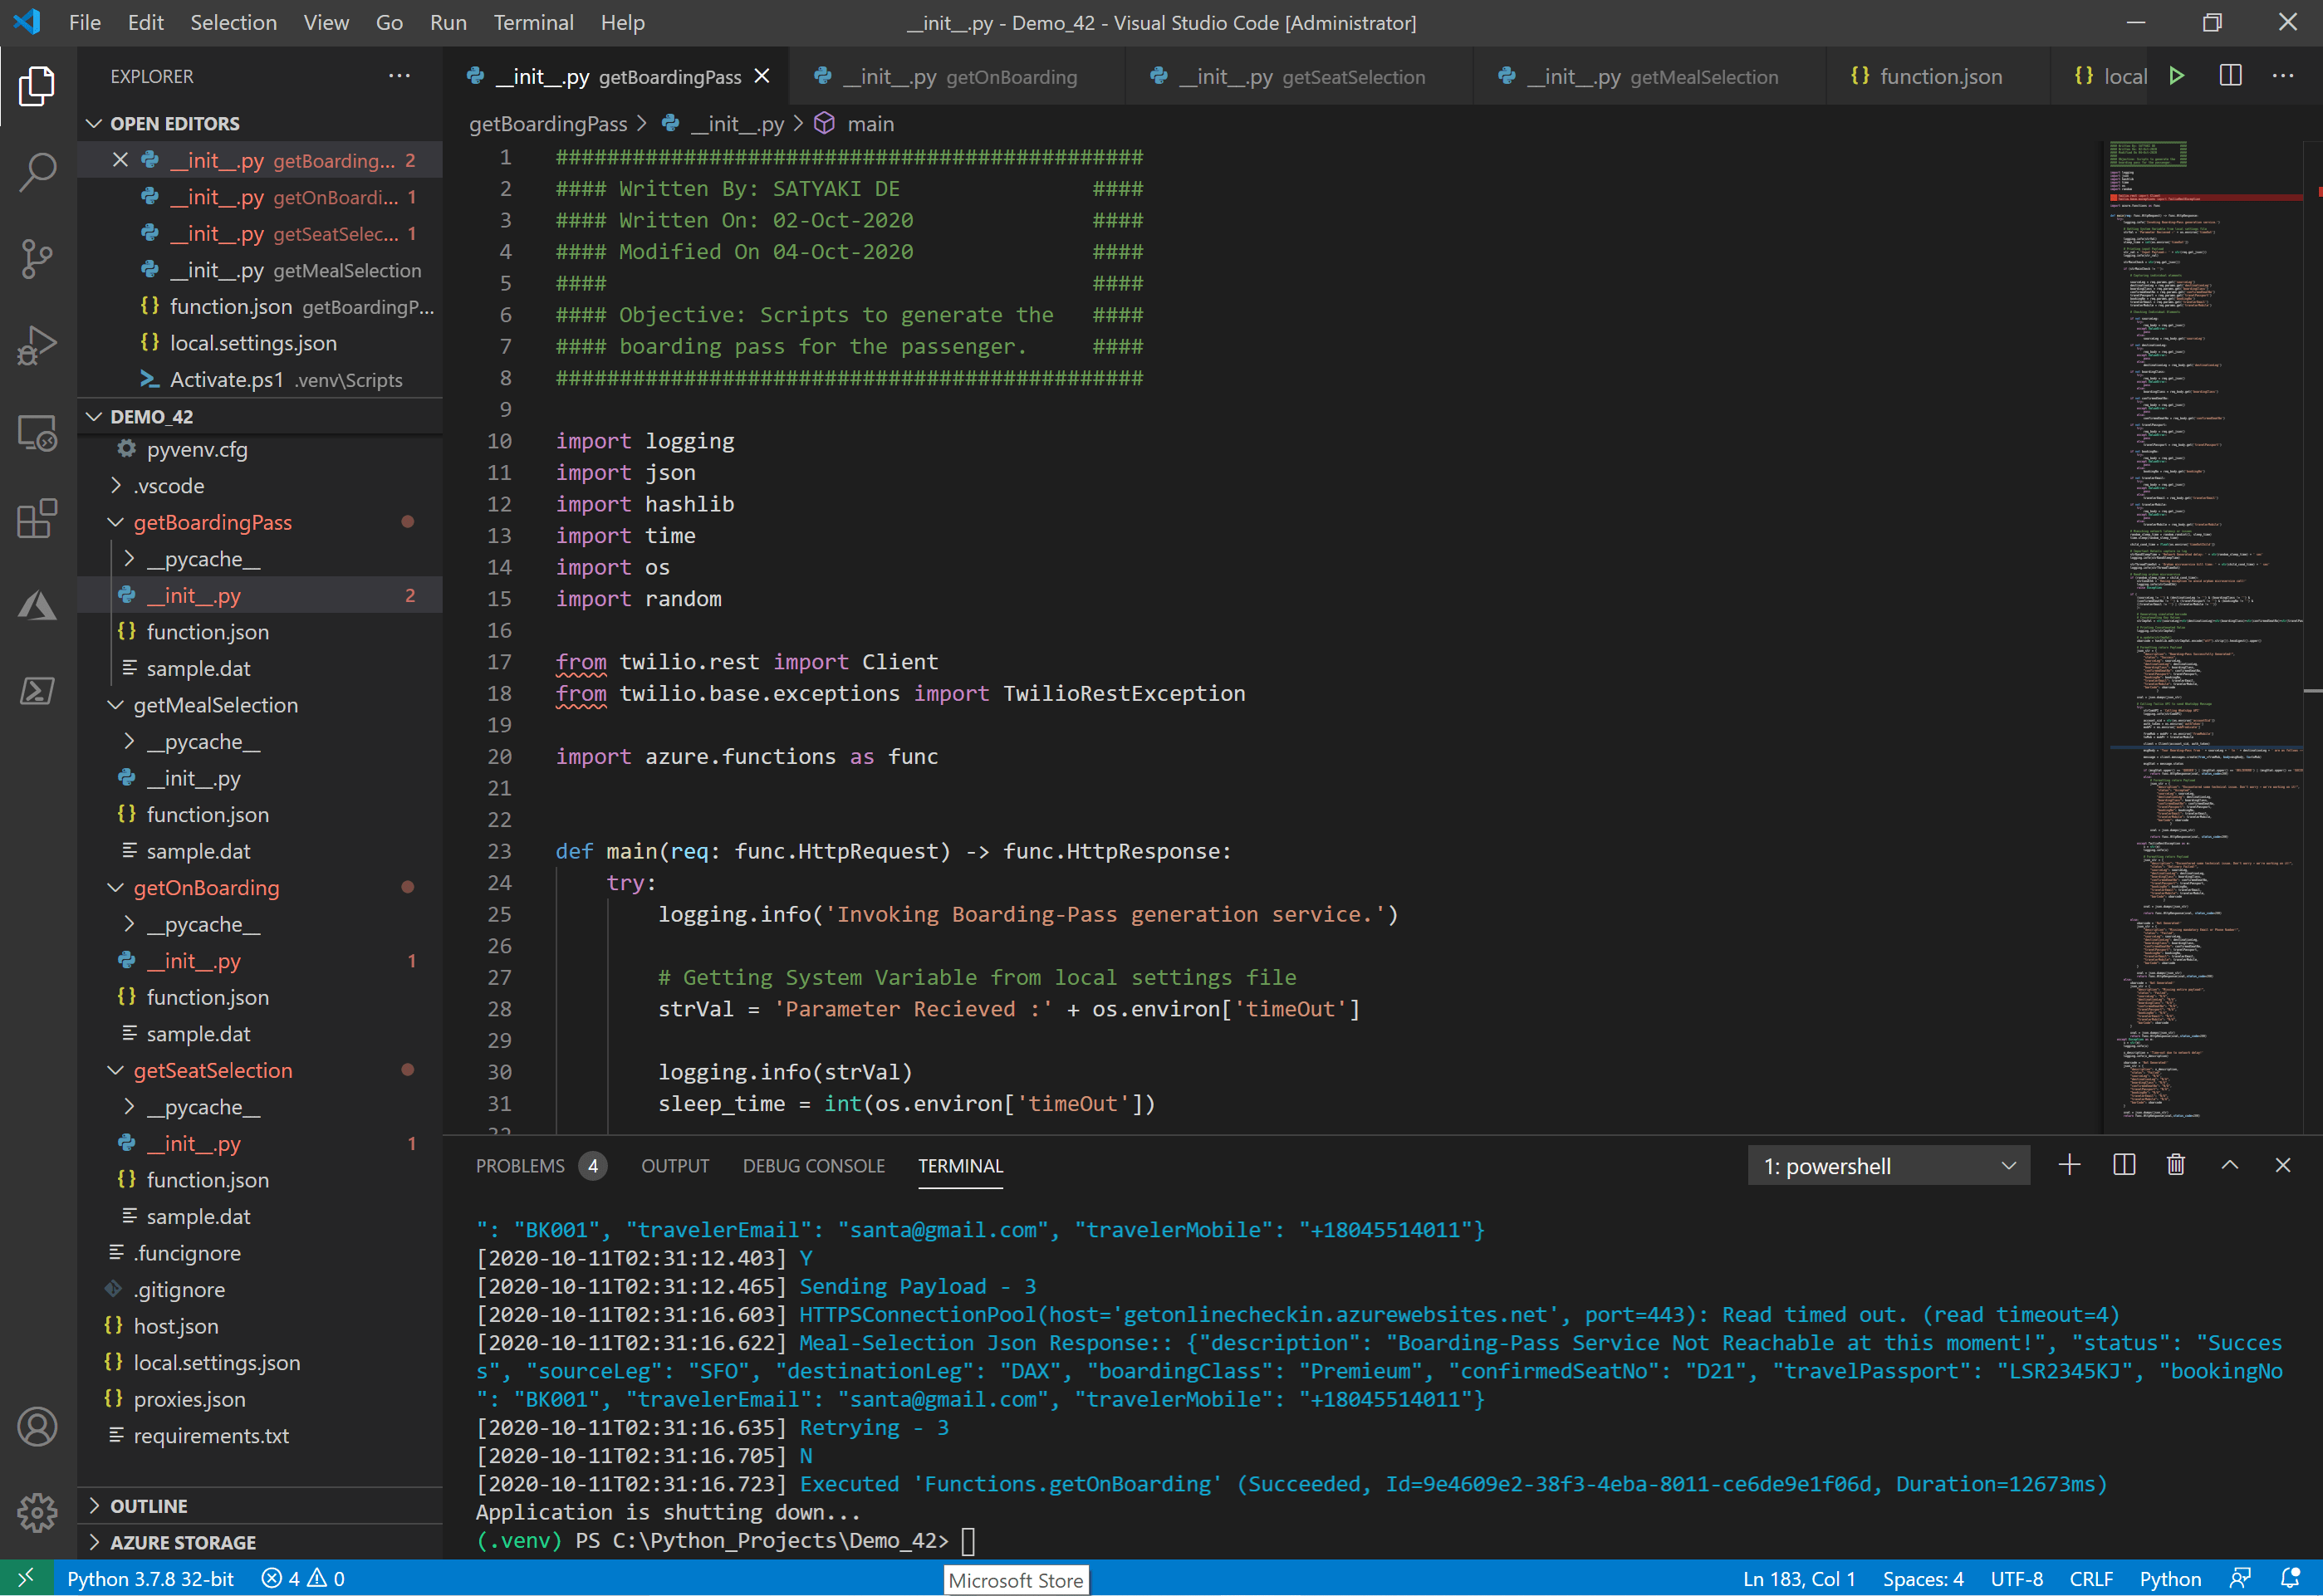


You must be logged in to post a comment.