
As a continuation of the previous post, I would like to continue my discussion about the implementation of MCP protocols among agents. But before that, I want to add the quick demo one more time to recap our objectives.
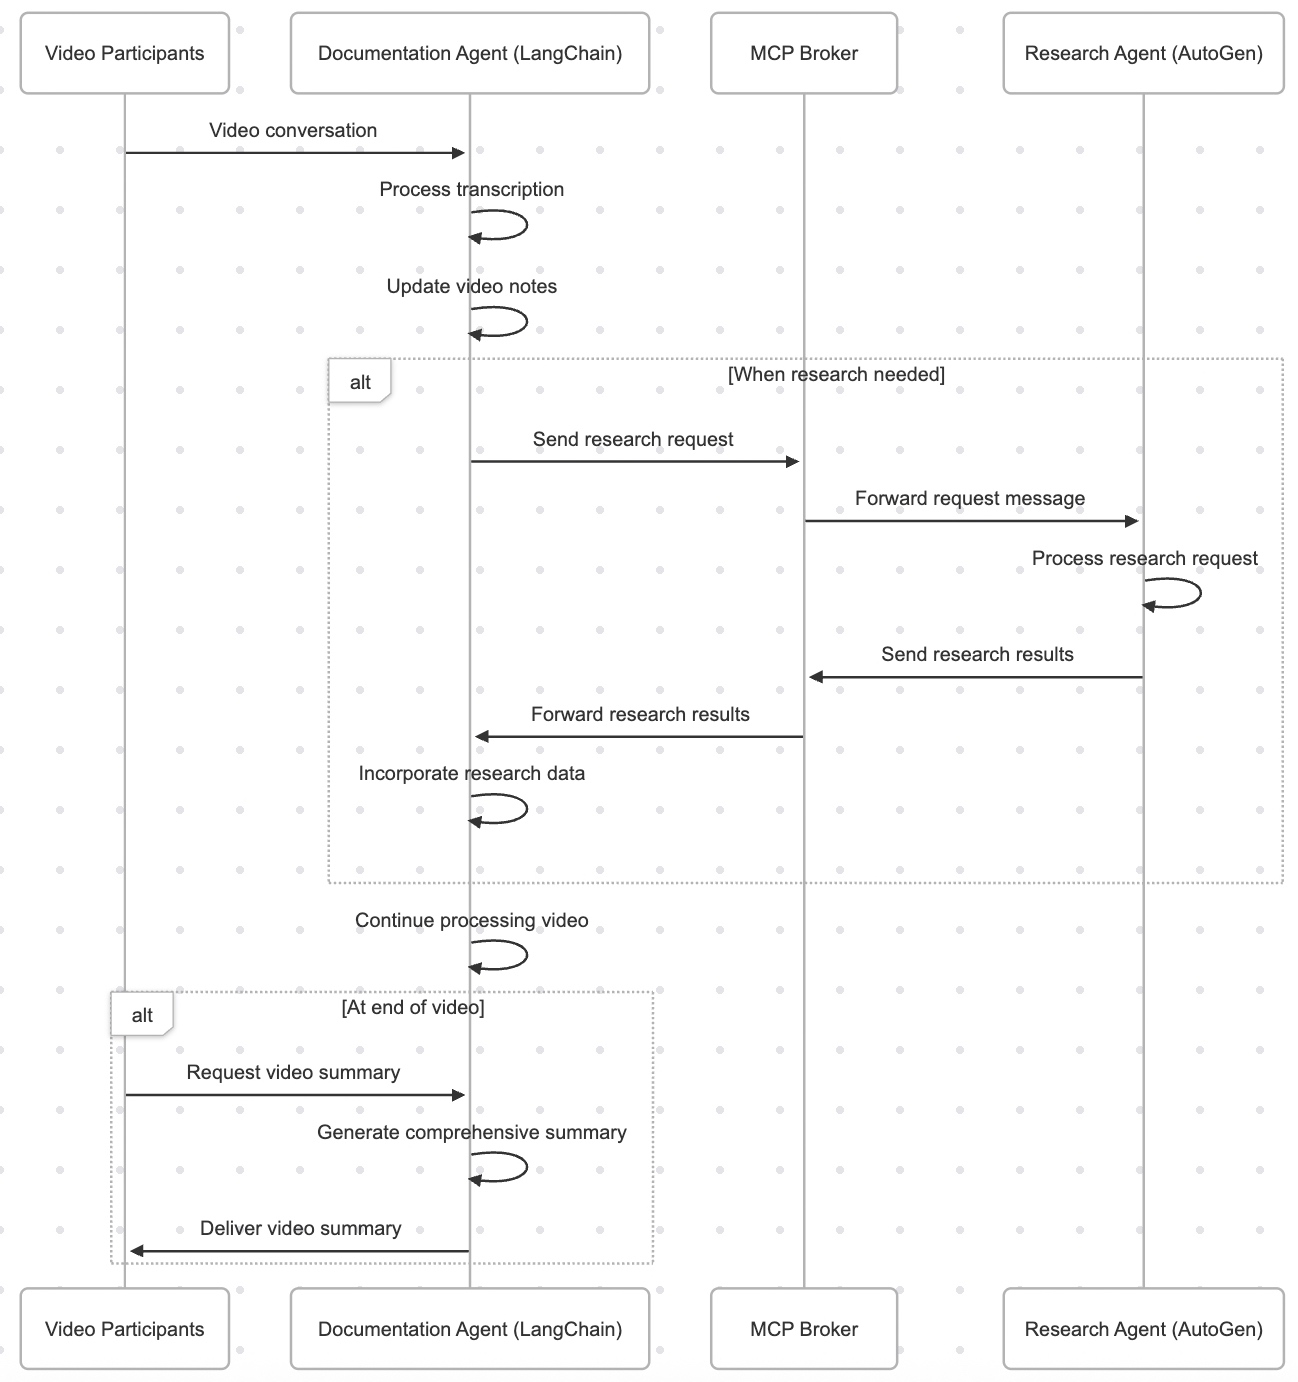
Let us recap the process flow –

Also, understand the groupings of scripts by each group as posted in the previous post –
Message-Chaining Protocol (MCP) Implementation:

    clsMCPMessage.py
    clsMCPBroker.py

YouTube Transcript Extraction:

    clsYouTubeVideoProcessor.py

Language Detection:

    clsLanguageDetector.py

Translation Services & Agents:

    clsTranslationAgent.py
    clsTranslationService.py

Documentation Agent:

    clsDocumentationAgent.py

Research Agent:

    clsDocumentationAgent.py
Great! Now, we’ll continue with the main discussion.
CODE:
- clsYouTubeVideoProcessor.py (This class processes the transcripts from YouTube. It may also translate them into English for non-native speakers.)
def extract_youtube_id(youtube_url):
    """Extract YouTube video ID from URL"""
    youtube_id_match = re.search(r'(?:v=|\/)([0-9A-Za-z_-]{11}).*', youtube_url)
    if youtube_id_match:
        return youtube_id_match.group(1)
    return None

def get_youtube_transcript(youtube_url):
    """Get transcript from YouTube video"""
    video_id = extract_youtube_id(youtube_url)
    if not video_id:
        return {"error": "Invalid YouTube URL or ID"}

    try:
        transcript_list = YouTubeTranscriptApi.list_transcripts(video_id)

        # First try to get manual transcripts
        try:
            transcript = transcript_list.find_manually_created_transcript(["en"])
            transcript_data = transcript.fetch()
            print(f"Debug - Manual transcript format: {type(transcript_data)}")
            if transcript_data and len(transcript_data) > 0:
                print(f"Debug - First item type: {type(transcript_data[0])}")
                print(f"Debug - First item sample: {transcript_data[0]}")
            return {"text": transcript_data, "language": "en", "auto_generated": False}
        except Exception as e:
            print(f"Debug - No manual transcript: {str(e)}")
            # If no manual English transcript, try any available transcript
            try:
                available_transcripts = list(transcript_list)
                if available_transcripts:
                    transcript = available_transcripts[0]
                    print(f"Debug - Using transcript in language: {transcript.language_code}")
                    transcript_data = transcript.fetch()
                    print(f"Debug - Auto transcript format: {type(transcript_data)}")
                    if transcript_data and len(transcript_data) > 0:
                        print(f"Debug - First item type: {type(transcript_data[0])}")
                        print(f"Debug - First item sample: {transcript_data[0]}")
                    return {
                        "text": transcript_data,
                        "language": transcript.language_code,
                        "auto_generated": transcript.is_generated
                    }
                else:
                    return {"error": "No transcripts available for this video"}
            except Exception as e:
                return {"error": f"Error getting transcript: {str(e)}"}
    except Exception as e:
        return {"error": f"Error getting transcript list: {str(e)}"}

# ----------------------------------------------------------------------------------
# YouTube Video Processor
# ----------------------------------------------------------------------------------

class clsYouTubeVideoProcessor:
    """Process YouTube videos using the agent system"""

    def __init__(self, documentation_agent, translation_agent, research_agent):
        self.documentation_agent = documentation_agent
        self.translation_agent = translation_agent
        self.research_agent = research_agent

    def process_youtube_video(self, youtube_url):
        """Process a YouTube video"""
        print(f"Processing YouTube video: {youtube_url}")

        # Extract transcript
        transcript_result = get_youtube_transcript(youtube_url)

        if "error" in transcript_result:
            return {"error": transcript_result["error"]}

        # Start a new conversation
        conversation_id = self.documentation_agent.start_processing()

        # Process transcript segments
        transcript_data = transcript_result["text"]
        transcript_language = transcript_result["language"]

        print(f"Debug - Type of transcript_data: {type(transcript_data)}")

        # For each segment, detect language and translate if needed
        processed_segments = []

        try:
            # Make sure transcript_data is a list of dictionaries with text and start fields
            if isinstance(transcript_data, list):
                for idx, segment in enumerate(transcript_data):
                    print(f"Debug - Processing segment {idx}, type: {type(segment)}")

                    # Extract text properly based on the type
                    if isinstance(segment, dict) and "text" in segment:
                        text = segment["text"]
                        start = segment.get("start", 0)
                    else:
                        # Try to access attributes for non-dict types
                        try:
                            text = segment.text
                            start = getattr(segment, "start", 0)
                        except AttributeError:
                            # If all else fails, convert to string
                            text = str(segment)
                            start = idx * 5  # Arbitrary timestamp

                    print(f"Debug - Extracted text: {text[:30]}...")

                    # Create a standardized segment
                    std_segment = {
                        "text": text,
                        "start": start
                    }

                    # Process through translation agent
                    translation_result = self.translation_agent.process_text(text, conversation_id)

                    # Update segment with translation information
                    segment_with_translation = {
                        **std_segment,
                        "translation_info": translation_result
                    }

                    # Use translated text for documentation
                    if "final_text" in translation_result and translation_result["final_text"] != text:
                        std_segment["processed_text"] = translation_result["final_text"]
                    else:
                        std_segment["processed_text"] = text

                    processed_segments.append(segment_with_translation)
            else:
                # If transcript_data is not a list, treat it as a single text block
                print(f"Debug - Transcript is not a list, treating as single text")
                text = str(transcript_data)
                std_segment = {
                    "text": text,
                    "start": 0
                }

                translation_result = self.translation_agent.process_text(text, conversation_id)
                segment_with_translation = {
                    **std_segment,
                    "translation_info": translation_result
                }

                if "final_text" in translation_result and translation_result["final_text"] != text:
                    std_segment["processed_text"] = translation_result["final_text"]
                else:
                    std_segment["processed_text"] = text

                processed_segments.append(segment_with_translation)

        except Exception as e:
            print(f"Debug - Error processing transcript: {str(e)}")
            return {"error": f"Error processing transcript: {str(e)}"}

        # Process the transcript with the documentation agent
        documentation_result = self.documentation_agent.process_transcript(
            processed_segments,
            conversation_id
        )

        return {
            "youtube_url": youtube_url,
            "transcript_language": transcript_language,
            "processed_segments": processed_segments,
            "documentation": documentation_result,
            "conversation_id": conversation_id
        }
Let us understand this step-by-step:
Part 1: Getting the YouTube Transcript
def extract_youtube_id(youtube_url):
    ...
This extracts the unique video ID from any YouTube link.
def get_youtube_transcript(youtube_url):
    ...
- This gets the actual spoken content of the video.
- It tries to get a manual transcript first (created by humans).
- If not available, it falls back to an auto-generated version (created by YouTube’s AI).
- If nothing is found, it gives back an error message like: “Transcript not available.”
Part 2: Processing the Video with Agents
class clsYouTubeVideoProcessor:
    ...
This is like the control center that tells each intelligent agent what to do with the transcript. Here are the detailed steps:
1. Start the Process
def process_youtube_video(self, youtube_url):
    ...
- The system starts with a YouTube video link.
- It prints a message like: “Processing YouTube video: [link]”
2. Extract the Transcript
- The system runs the
get_youtube_transcript()function. - If it fails, it returns an error (e.g., invalid link or no subtitles available).
3. Start a “Conversation”
- The documentation agent begins a new session, tracked by a unique conversation ID.
- Think of this like opening a new folder in a shared team workspace to store everything related to this video.
4. Go Through Each Segment of the Transcript
- The spoken text is often broken into small parts (segments), like subtitles.
- For each part:
- It checks the text.
- It finds out the time that part was spoken.
- It sends it to the translation agent to clean up or translate the text.
5. Translate (if needed)
- If the translation agent finds a better or translated version, it replaces the original.
- Otherwise, it keeps the original.
6. Prepare for Documentation
- After translation, the segment is passed to the documentation agent.
- This agent might:
- Summarize the content,
- Highlight important terms,
- Structure it into a readable format.
7. Return the Final Result
The system gives back a structured package with:
- The video link
- The original language
- The transcript in parts (processed and translated)
- A documentation summary
- The conversation ID (for tracking or further updates)
- clsDocumentationAgent.py (This is the main class that will be part of the document agents.)
class clsDocumentationAgent:
    """Documentation Agent built with LangChain"""

    def __init__(self, agent_id: str, broker: clsMCPBroker):
        self.agent_id = agent_id
        self.broker = broker
        self.broker.register_agent(agent_id)

        # Initialize LangChain components
        self.llm = ChatOpenAI(
            model="gpt-4-0125-preview",
            temperature=0.1,
            api_key=OPENAI_API_KEY
        )

        # Create tools
        self.tools = [
            clsSendMessageTool(sender_id=self.agent_id, broker=self.broker)
        ]

        # Set up LLM with tools
        self.llm_with_tools = self.llm.bind(
            tools=[tool.tool_config for tool in self.tools]
        )

        # Setup memory
        self.memory = ConversationBufferMemory(
            memory_key="chat_history",
            return_messages=True
        )

        # Create prompt
        self.prompt = ChatPromptTemplate.from_messages([
            ("system", """You are a Documentation Agent for YouTube video transcripts. Your responsibilities include:
                1. Process YouTube video transcripts
                2. Identify key points, topics, and main ideas
                3. Organize content into a coherent and structured format
                4. Create concise summaries
                5. Request research information when necessary

                When you need additional context or research, send a request to the Research Agent.
                Always maintain a professional tone and ensure your documentation is clear and organized.
            """),
            MessagesPlaceholder(variable_name="chat_history"),
            ("human", "{input}"),
            MessagesPlaceholder(variable_name="agent_scratchpad"),
        ])

        # Create agent
        self.agent = (
            {
                "input": lambda x: x["input"],
                "chat_history": lambda x: self.memory.load_memory_variables({})["chat_history"],
                "agent_scratchpad": lambda x: format_to_openai_tool_messages(x["intermediate_steps"]),
            }
            | self.prompt
            | self.llm_with_tools
            | OpenAIToolsAgentOutputParser()
        )

        # Create agent executor
        self.agent_executor = AgentExecutor(
            agent=self.agent,
            tools=self.tools,
            verbose=True,
            memory=self.memory
        )

        # Video data
        self.current_conversation_id = None
        self.video_notes = {}
        self.key_points = []
        self.transcript_segments = []

    def start_processing(self) -> str:
        """Start processing a new video"""
        self.current_conversation_id = str(uuid.uuid4())
        self.video_notes = {}
        self.key_points = []
        self.transcript_segments = []

        return self.current_conversation_id

    def process_transcript(self, transcript_segments, conversation_id=None):
        """Process a YouTube transcript"""
        if not conversation_id:
            conversation_id = self.start_processing()
        self.current_conversation_id = conversation_id

        # Store transcript segments
        self.transcript_segments = transcript_segments

        # Process segments
        processed_segments = []
        for segment in transcript_segments:
            processed_result = self.process_segment(segment)
            processed_segments.append(processed_result)

        # Generate summary
        summary = self.generate_summary()

        return {
            "processed_segments": processed_segments,
            "summary": summary,
            "conversation_id": conversation_id
        }

    def process_segment(self, segment):
        """Process individual transcript segment"""
        text = segment.get("text", "")
        start = segment.get("start", 0)

        # Use LangChain agent to process the segment
        result = self.agent_executor.invoke({
            "input": f"Process this video transcript segment at timestamp {start}s: {text}. If research is needed, send a request to the research_agent."
        })

        # Update video notes
        timestamp = start
        self.video_notes[timestamp] = {
            "text": text,
            "analysis": result["output"]
        }

        return {
            "timestamp": timestamp,
            "text": text,
            "analysis": result["output"]
        }

    def handle_mcp_message(self, message: clsMCPMessage) -> Optional[clsMCPMessage]:
        """Handle an incoming MCP message"""
        if message.message_type == "research_response":
            # Process research information received from Research Agent
            research_info = message.content.get("text", "")

            result = self.agent_executor.invoke({
                "input": f"Incorporate this research information into video analysis: {research_info}"
            })

            # Send acknowledgment back to Research Agent
            response = clsMCPMessage(
                sender=self.agent_id,
                receiver=message.sender,
                message_type="acknowledgment",
                content={"text": "Research information incorporated into video analysis."},
                reply_to=message.id,
                conversation_id=message.conversation_id
            )

            self.broker.publish(response)
            return response

        elif message.message_type == "translation_response":
            # Process translation response from Translation Agent
            translation_result = message.content

            # Process the translated text
            if "final_text" in translation_result:
                text = translation_result["final_text"]
                original_text = translation_result.get("original_text", "")
                language_info = translation_result.get("language", {})

                result = self.agent_executor.invoke({
                    "input": f"Process this translated text: {text}\nOriginal language: {language_info.get('language', 'unknown')}\nOriginal text: {original_text}"
                })

                # Update notes with translation information
                for timestamp, note in self.video_notes.items():
                    if note["text"] == original_text:
                        note["translated_text"] = text
                        note["language"] = language_info
                        break

            return None

        return None

    def run(self):
        """Run the agent to listen for MCP messages"""
        print(f"Documentation Agent {self.agent_id} is running...")
        while True:
            message = self.broker.get_message(self.agent_id, timeout=1)
            if message:
                self.handle_mcp_message(message)
            time.sleep(0.1)

    def generate_summary(self) -> str:
        """Generate a summary of the video"""
        if not self.video_notes:
            return "No video data available to summarize."

        all_notes = "\n".join([f"{ts}: {note['text']}" for ts, note in self.video_notes.items()])

        result = self.agent_executor.invoke({
            "input": f"Generate a concise summary of this YouTube video, including key points and topics:\n{all_notes}"
        })

        return result["output"]
Let us understand the key methods in a step-by-step manner:
The Documentation Agent is like a smart assistant that watches a YouTube video, takes notes, pulls out important ideas, and creates a summary — almost like a professional note-taker trained to help educators, researchers, and content creators. It works with a team of other assistants, like a Translator Agent and a Research Agent, and they all talk to each other through a messaging system.
1. Starting to Work on a New Video
def start_processing(self) -> str
When a new video is being processed:
- A new project ID is created.
- Old notes and transcripts are cleared to start fresh.
2. Processing the Whole Transcript
def process_transcript(...)
This is where the assistant:
- Takes in the full transcript (what was said in the video).
- Breaks it into small parts (like subtitles).
- Sends each part to the smart brain for analysis.
- Collects the results.
- Finally, a summary of all the main ideas is created.
3. Processing One Transcript Segment at a Time
def process_segment(self, segment)
For each chunk of the video:
- The assistant reads the text and timestamp.
- It asks GPT-4 to analyze it and suggest important insights.
- It saves that insight along with the original text and timestamp.
4. Handling Incoming Messages from Other Agents
def handle_mcp_message(self, message)
The assistant can also receive messages from teammates (other agents):
If the message is from the Research Agent:
- It reads new information and adds it to its notes.
- It replies with a thank-you message to say it got the research.
If the message is from the Translation Agent:
- It takes the translated version of a transcript.
- Updates its notes to reflect the translated text and its language.
This is like a team of assistants emailing back and forth to make sure the notes are complete and accurate.
5. Summarizing the Whole Video
def generate_summary(self)
After going through all the transcript parts, the agent asks GPT-4 to create a short, clean summary — identifying:
- Main ideas
- Key talking points
- Structure of the content
The final result is clear, professional, and usable in learning materials or documentation.
- clsResearchAgent.py (This is the main class that implements the research agent.)
class clsResearchAgent:
    """Research Agent built with AutoGen"""

    def __init__(self, agent_id: str, broker: clsMCPBroker):
        self.agent_id = agent_id
        self.broker = broker
        self.broker.register_agent(agent_id)

        # Configure AutoGen directly with API key
        if not OPENAI_API_KEY:
            print("Warning: OPENAI_API_KEY not set for ResearchAgent")

        # Create config list directly instead of loading from file
        config_list = [
            {
                "model": "gpt-4-0125-preview",
                "api_key": OPENAI_API_KEY
            }
        ]
        # Create AutoGen assistant for research
        self.assistant = AssistantAgent(
            name="research_assistant",
            system_message="""You are a Research Agent for YouTube videos. Your responsibilities include:
                1. Research topics mentioned in the video
                2. Find relevant information, facts, references, or context
                3. Provide concise, accurate information to support the documentation
                4. Focus on delivering high-quality, relevant information

                Respond directly to research requests with clear, factual information.
            """,
            llm_config={"config_list": config_list, "temperature": 0.1}
        )

        # Create user proxy to handle message passing
        self.user_proxy = UserProxyAgent(
            name="research_manager",
            human_input_mode="NEVER",
            code_execution_config={"work_dir": "coding", "use_docker": False},
            default_auto_reply="Working on the research request..."
        )

        # Current conversation tracking
        self.current_requests = {}

    def handle_mcp_message(self, message: clsMCPMessage) -> Optional[clsMCPMessage]:
        """Handle an incoming MCP message"""
        if message.message_type == "request":
            # Process research request from Documentation Agent
            request_text = message.content.get("text", "")

            # Use AutoGen to process the research request
            def research_task():
                self.user_proxy.initiate_chat(
                    self.assistant,
                    message=f"Research request for YouTube video content: {request_text}. Provide concise, factual information."
                )
                # Return last assistant message
                return self.assistant.chat_messages[self.user_proxy.name][-1]["content"]

            # Execute research task
            research_result = research_task()

            # Send research results back to Documentation Agent
            response = clsMCPMessage(
                sender=self.agent_id,
                receiver=message.sender,
                message_type="research_response",
                content={"text": research_result},
                reply_to=message.id,
                conversation_id=message.conversation_id
            )

            self.broker.publish(response)
            return response

        return None

    def run(self):
        """Run the agent to listen for MCP messages"""
        print(f"Research Agent {self.agent_id} is running...")
        while True:
            message = self.broker.get_message(self.agent_id, timeout=1)
            if message:
                self.handle_mcp_message(message)
            time.sleep(0.1)
Let us understand the key methods in detail.
1. Receiving and Responding to Research Requests
def handle_mcp_message(self, message)
When the Research Agent gets a message (like a question or request for info), it:
- Reads the message to see what needs to be researched.
- Asks GPT-4 to find helpful, accurate info about that topic.
- Sends the answer back to whoever asked the question (usually the Documentation Agent).
- clsTranslationAgent.py (This is the main class that represents the translation agent)
class clsTranslationAgent:
    """Agent for language detection and translation"""

    def __init__(self, agent_id: str, broker: clsMCPBroker):
        self.agent_id = agent_id
        self.broker = broker
        self.broker.register_agent(agent_id)

        # Initialize language detector
        self.language_detector = clsLanguageDetector()

        # Initialize translation service
        self.translation_service = clsTranslationService()

    def process_text(self, text, conversation_id=None):
        """Process text: detect language and translate if needed, handling mixed language content"""
        if not conversation_id:
            conversation_id = str(uuid.uuid4())

        # Detect language with support for mixed language content
        language_info = self.language_detector.detect(text)

        # Decide if translation is needed
        needs_translation = True

        # Pure English content doesn't need translation
        if language_info["language_code"] == "en-IN" or language_info["language_code"] == "unknown":
            needs_translation = False

        # For mixed language, check if it's primarily English
        if language_info.get("is_mixed", False) and language_info.get("languages", []):
            english_langs = [
                lang for lang in language_info.get("languages", [])
                if lang["language_code"] == "en-IN" or lang["language_code"].startswith("en-")
            ]

            # If the highest confidence language is English and > 60% confident, don't translate
            if english_langs and english_langs[0].get("confidence", 0) > 0.6:
                needs_translation = False

        if needs_translation:
            # Translate using the appropriate service based on language detection
            translation_result = self.translation_service.translate(text, language_info)

            return {
                "original_text": text,
                "language": language_info,
                "translation": translation_result,
                "final_text": translation_result.get("translated_text", text),
                "conversation_id": conversation_id
            }
        else:
            # Already English or unknown language, return as is
            return {
                "original_text": text,
                "language": language_info,
                "translation": {"provider": "none"},
                "final_text": text,
                "conversation_id": conversation_id
            }

    def handle_mcp_message(self, message: clsMCPMessage) -> Optional[clsMCPMessage]:
        """Handle an incoming MCP message"""
        if message.message_type == "translation_request":
            # Process translation request from Documentation Agent
            text = message.content.get("text", "")

            # Process the text
            result = self.process_text(text, message.conversation_id)

            # Send translation results back to requester
            response = clsMCPMessage(
                sender=self.agent_id,
                receiver=message.sender,
                message_type="translation_response",
                content=result,
                reply_to=message.id,
                conversation_id=message.conversation_id
            )

            self.broker.publish(response)
            return response

        return None

    def run(self):
        """Run the agent to listen for MCP messages"""
        print(f"Translation Agent {self.agent_id} is running...")
        while True:
            message = self.broker.get_message(self.agent_id, timeout=1)
            if message:
                self.handle_mcp_message(message)
            time.sleep(0.1)
Let us understand the key methods in step-by-step manner:
1. Understanding and Translating Text:
def process_text(...)
This is the core job of the agent. Here’s what it does with any piece of text:
Step 1: Detect the Language
- It tries to figure out the language of the input text.
- It can handle cases where more than one language is mixed together, which is common in casual speech or subtitles.
Step 2: Decide Whether to Translate
- If the text is clearly in English, or it’s unclear what the language is, it decides not to translate.
- If the text is mostly in another language or has less than 60% confidence in being English, it will translate it into English.
Step 3: Translate (if needed)
- If translation is required, it uses the translation service to do the job.
- Then it packages all the information: the original text, detected language, the translated version, and a unique conversation ID.
Step 4: Return the Results
- If no translation is needed, it returns the original text and a note saying “no translation was applied.”
2. Receiving Messages and Responding
def handle_mcp_message(...)
The agent listens for messages from other agents. When someone asks it to translate something:
- It takes the text from the message.
- Runs it through the
process_textfunction (as explained above). - Sends the translated (or original) result to the person who asked.
- clsTranslationService.py (This is the actual work process of translation by the agent)
class clsTranslationService:
    """Translation service using multiple providers with support for mixed languages"""

    def __init__(self):
        # Initialize Sarvam AI client
        self.sarvam_api_key = SARVAM_API_KEY
        self.sarvam_url = "https://api.sarvam.ai/translate"

        # Initialize Google Cloud Translation client using simple HTTP requests
        self.google_api_key = GOOGLE_API_KEY
        self.google_translate_url = "https://translation.googleapis.com/language/translate/v2"

    def translate_with_sarvam(self, text, source_lang, target_lang="en-IN"):
        """Translate text using Sarvam AI (for Indian languages)"""
        if not self.sarvam_api_key:
            return {"error": "Sarvam API key not set"}

        headers = {
            "Content-Type": "application/json",
            "api-subscription-key": self.sarvam_api_key
        }

        payload = {
            "input": text,
            "source_language_code": source_lang,
            "target_language_code": target_lang,
            "speaker_gender": "Female",
            "mode": "formal",
            "model": "mayura:v1"
        }

        try:
            response = requests.post(self.sarvam_url, headers=headers, json=payload)
            if response.status_code == 200:
                return {"translated_text": response.json().get("translated_text", ""), "provider": "sarvam"}
            else:
                return {"error": f"Sarvam API error: {response.text}", "provider": "sarvam"}
        except Exception as e:
            return {"error": f"Error calling Sarvam API: {str(e)}", "provider": "sarvam"}

    def translate_with_google(self, text, target_lang="en"):
        """Translate text using Google Cloud Translation API with direct HTTP request"""
        if not self.google_api_key:
            return {"error": "Google API key not set"}

        try:
            # Using the translation API v2 with API key
            params = {
                "key": self.google_api_key,
                "q": text,
                "target": target_lang
            }

            response = requests.post(self.google_translate_url, params=params)
            if response.status_code == 200:
                data = response.json()
                translation = data.get("data", {}).get("translations", [{}])[0]
                return {
                    "translated_text": translation.get("translatedText", ""),
                    "detected_source_language": translation.get("detectedSourceLanguage", ""),
                    "provider": "google"
                }
            else:
                return {"error": f"Google API error: {response.text}", "provider": "google"}
        except Exception as e:
            return {"error": f"Error calling Google Translation API: {str(e)}", "provider": "google"}

    def translate(self, text, language_info):
        """Translate text to English based on language detection info"""
        # If already English or unknown language, return as is
        if language_info["language_code"] == "en-IN" or language_info["language_code"] == "unknown":
            return {"translated_text": text, "provider": "none"}

        # Handle mixed language content
        if language_info.get("is_mixed", False) and language_info.get("languages", []):
            # Strategy for mixed language:
            # 1. If one of the languages is English, don't translate the entire text, as it might distort English portions
            # 2. If no English but contains Indian languages, use Sarvam as it handles code-mixing better
            # 3. Otherwise, use Google Translate for the primary detected language

            has_english = False
            has_indian = False

            for lang in language_info.get("languages", []):
                if lang["language_code"] == "en-IN" or lang["language_code"].startswith("en-"):
                    has_english = True
                if lang.get("is_indian", False):
                    has_indian = True

            if has_english:
                # Contains English - use Google for full text as it handles code-mixing well
                return self.translate_with_google(text)
            elif has_indian:
                # Contains Indian languages - use Sarvam
                # Use the highest confidence Indian language as source
                indian_langs = [lang for lang in language_info.get("languages", []) if lang.get("is_indian", False)]
                if indian_langs:
                    # Sort by confidence
                    indian_langs.sort(key=lambda x: x.get("confidence", 0), reverse=True)
                    source_lang = indian_langs[0]["language_code"]
                    return self.translate_with_sarvam(text, source_lang)
                else:
                    # Fallback to primary language
                    if language_info["is_indian"]:
                        return self.translate_with_sarvam(text, language_info["language_code"])
                    else:
                        return self.translate_with_google(text)
            else:
                # No English, no Indian languages - use Google for primary language
                return self.translate_with_google(text)
        else:
            # Not mixed language - use standard approach
            if language_info["is_indian"]:
                # Use Sarvam AI for Indian languages
                return self.translate_with_sarvam(text, language_info["language_code"])
            else:
                # Use Google for other languages
                return self.translate_with_google(text)
This Translation Service is like a smart translator that knows how to:
- Detect what language the text is written in,
- Choose the best translation provider depending on the language (especially for Indian languages),
- And then translate the text into English.
It supports mixed-language content (such as Hindi-English in one sentence) and uses either Google Translate or Sarvam AI, a translation service designed for Indian languages.
Now, let us understand the key methods in a step-by-step manner:
1. Translating Using Google Translate
def translate_with_google(...)
This function uses Google Translate:
- It sends the text, asks for English as the target language, and gets a translation back.
- It also detects the source language automatically.
- If successful, it returns the translated text and the detected original language.
- If there’s an error, it returns a message saying what went wrong.
Best For: Non-Indian languages (like Spanish, French, Chinese) and content that is not mixed with English.
2. Main Translation Logic
def translate(self, text, language_info)
This is the decision-maker. Here’s how it works:
Case 1: No Translation Needed
If the text is already in English or the language is unknown, it simply returns the original text.
Case 2: Mixed Language (e.g., Hindi + English)
If the text contains more than one language:
- ✅ If one part is English → use Google Translate (it’s good with mixed languages).
- ✅ If it includes Indian languages only → use Sarvam AI (better at handling Indian content).
- ✅ If it’s neither English nor Indian → use Google Translate.
The service checks how confident it is about each language in the mix and chooses the most likely one to translate from.
Case 3: Single Language
If the text is only in one language:
- ✅ If it’s an Indian language (like Bengali, Tamil, or Marathi), use Sarvam AI.
- ✅ If it’s any other language, use Google Translate.
So, we’ve done it.
I’ve included the complete working solutions for you in the GitHub Link.
We’ll cover the detailed performance testing, Optimized configurations & many other useful details in our next post.
Till then, Happy Avenging! 🙂
Note: All the data & scenarios posted here are representational data & scenarios & available over the internet & for educational purposes only. There is always room for improvement in this kind of model & the solution associated with it. I’ve shown the basic ways to achieve the same for educational purposes only.


You must be logged in to post a comment.