Agentic AI in the Enterprise: Strategy, Architecture, and Implementation – Part 1

Today, we won’t be discussing any solutions. Today, we’ll be discussing the Agentic AI & its implementation in the Enterprise landscape in a series of upcoming posts.

So, hang tight! We’re about to launch a new venture as part of our knowledge drive.

Agentic AI refers to artificial intelligence systems that can act autonomously to achieve goals, making decisions and taking actions without constant human oversight. Unlike traditional AI, which responds to prompts, agentic AI can plan, reason about next steps, utilize tools, and work toward objectives over extended periods of time.

Key characteristics of agentic AI include:

  • Autonomy and Goal-Directed Behavior: These systems can pursue objectives independently, breaking down complex tasks into smaller steps and executing them sequentially.
  • Tool Use and Environment Interaction: Agentic AI can interact with external systems, APIs, databases, and software tools to gather information and perform actions in the real world.
  • Planning and Reasoning: They can develop multi-step strategies, adapt their approach based on feedback, and reason through problems to find solutions.
  • Persistence: Unlike single-interaction AI, agentic systems can maintain context and continue working on tasks across multiple interactions or sessions.
  • Decision Making: They can evaluate options, weigh trade-offs, and make choices about how to proceed when faced with uncertainty.

Agentic AI systems have several interconnected components that work together to enable intelligent behaviour. Each element plays a crucial role in the overall functioning of the AI system, and they must interact seamlessly to achieve desired outcomes. Let’s explore each of these components in more detail.

The sensing module serves as the AI’s eyes and ears, enabling it to understand its surroundings and make informed decisions. Think of it as the system that helps the AI “see” and “hear” the world around it, much like how humans use their senses.

  • Gathering Information: The system collects data from multiple sources, including cameras for visual information, microphones for audio, sensors for physical touch, and digital systems for data. This step provides the AI with a comprehensive understanding of what’s happening.
  • Making Sense of Data: Raw information from sensors can be messy and overwhelming. This component processes the data to identify the essential patterns and details that actually matter for making informed decisions.
  • Recognizing What’s Important: Utilizing advanced techniques such as computer vision (for images), natural language processing (for text and speech), and machine learning (for data patterns), the system identifies and understands objects, people, events, and situations within the environment.

This sensing capability enables AI systems to transition from merely following pre-programmed instructions to genuinely understanding their environment and making informed decisions based on real-world conditions. It’s the difference between a basic automated system and an intelligent agent that can adapt to changing situations.

The observation module serves as the AI’s decision-making center, where it sets objectives, develops strategies, and selects the most effective actions to take. This step is where the AI transforms what it perceives into purposeful action, much like humans think through problems and devise plans.

  • Setting Clear Objectives: The system establishes specific goals and desired outcomes, giving the AI a clear sense of direction and purpose. This approach helps ensure all actions are working toward meaningful results rather than random activity.
  • Strategic Planning: Using information about its own capabilities and the current situation, the AI creates step-by-step plans to reach its goals. It considers potential obstacles, available resources, and different approaches to find the most effective path forward.
  • Intelligent Decision-Making: When faced with multiple options, the system evaluates each choice against the current circumstances, established goals, and potential outcomes. It then selects the action most likely to move the AI closer to achieving its objectives.

This observation capability is what transforms an AI from a simple tool that follows commands into an intelligent system that can work independently toward business goals. It enables the AI to handle complex, multi-step tasks and adapt its approach when conditions change, making it valuable for a wide range of applications, from customer service to project management.

The action module serves as the AI’s hands and voice, turning decisions into real-world results. This step is where the AI actually puts its thinking and planning into action, carrying out tasks that make a tangible difference in the environment.

  • Control Systems: The system utilizes various tools to interact with the world, including motors for physical movement, speakers for communication, network connections for digital tasks, and software interfaces for system operation. These serve as the AI’s means of reaching out and making adjustments.
  • Task Implementation: Once the cognitive module determines the action to take, this component executes the actual task. Whether it’s sending an email, moving a robotic arm, updating a database, or scheduling a meeting, this module handles the execution from start to finish.

This action capability is what makes AI systems truly useful in business environments. Without it, an AI could analyze data and make significant decisions, but it couldn’t help solve problems or complete tasks. The action module bridges the gap between artificial intelligence and real-world impact, enabling AI to automate processes, respond to customers, manage systems, and deliver measurable business value.

Technology that is primarily involved in the Agentic AI is as follows –

1. Machine Learning
2. Deep Learning
3. Computer Vision
4. Natural Language Processing (NLP)
5. Planning and Decision-Making
6. Uncertainty and Reasoning
7. Simulation and Modeling

In an enterprise setting, agentic AI systems utilize the Model Context Protocol (MCP) and the Agent-to-Agent (A2A) protocol as complementary, open standards to achieve autonomous, coordinated, and secure workflows. An MCP-enabled agent gains the ability to access and manipulate enterprise tools and data. At the same time, A2A allows a network of these agents to collaborate on complex tasks by delegating and exchanging information.

This combined approach allows enterprises to move from isolated AI experiments to strategic, scalable, and secure AI programs.

ProtocolFunction in Agentic AIFocusExample use case
Model Context Protocol (MCP)Equips a single AI agent with the tools and data it needs to perform a specific job.Vertical integration: connecting agents to enterprise systems like databases, CRMs, and APIs.A sales agent uses MCP to query the company CRM for a client’s recent purchase history.
Agent-to-Agent (A2A)Enables multiple specialized agents to communicate, delegate tasks, and collaborate on a larger, multi-step goal.Horizontal collaboration: allowing agents from different domains to work together seamlessly.An orchestrating agent uses A2A to delegate parts of a complex workflow to specialized HR, IT, and sales agents.
  • End-to-end automation: Agents can handle tasks from start to finish, including complex, multi-step workflows, autonomously.
  • Greater agility and speed: Enterprise-wide adoption of these protocols reduces the cost and complexity of integrating AI, accelerating deployment timelines for new applications.
  • Enhanced security and governance: Enterprise AI platforms built on these open standards incorporate robust security policies, centralized access controls, and comprehensive audit trails.
  • Vendor neutrality and interoperability: As open standards, MCP and A2A allow AI agents to work together seamlessly, regardless of the underlying vendor or platform.
  • Adaptive problem-solving: Agents can dynamically adjust their strategies and collaborate based on real-time data and contextual changes, leading to more resilient and efficient systems.

We will discuss this topic further in our upcoming posts.

Till then, Happy Avenging! 🙂

Building & deploying a RAG architecture rapidly using Langflow & Python

I’ve been looking for a solution that can help deploy any RAG solution involving Python faster. It would be more effective if an available UI helped deliver the solution faster. And, here comes the solution that does exactly what I needed – “LangFlow.”

Before delving into the details, I strongly recommend taking a look at the demo. It’s a great way to get a comprehensive understanding of LangFlow and its capabilities in deploying RAG architecture rapidly.

Demo

This describes the entire architecture; hence, I’ll share the architecture components I used to build the solution.

To know more about RAG-Architecture, please refer to the following link.

As we all know, we can parse the data from the source website URL (in this case, I’m referring to my photography website to extract the text of one of my blogs) and then embed it into the newly created Astra DB & new collection, where I will be storing the vector embeddings.

As you can see from the above diagram, the flow that I configured within 5 minutes and the full functionality of writing a complete solution (underlying Python application) within no time that extracts chunks, converts them into embeddings, and finally stores them inside the Astra DB.

Now, let us understand the next phase, where, based on the ask from a chatbot, I need to convert that question into Vector DB & then find the similarity search to bring the relevant vectors as shown below –

You need to configure this entire flow by dragging the necessary widgets from the left-side panel as marked in the Blue-Box shown below –

For this specific use case, we’ve created an instance of Astra DB & then created an empty vector collection. Also, we need to ensure that we generate the API-Key & and provide the right roles assigned with the token. After successfully creating the token, you need to copy the endpoint, token & collection details & paste them into the desired fields of the Astra-DB components inside the LangFlow. Think of it as a framework where one needs to provide all the necessary information to build & run the entire flow successfully.

Following are some of the important snapshots from the Astra-DB –

Step – 1

Step – 2

Once you run the vector DB population, this will insert extracted text & then convert it into vectors, which will show in the following screenshot –

You can see the sample vectors along with the text chunks inside the Astra DB data explorer as shown below –

Some of the critical components are highlighted in the Blue-box which is important for us to monitor the vector embeddings.

Now, here is how you can modify the current Python code of any available widgets or build your own widget by using the custom widget.

The first step is to click the code button highlighted in the Red-box as shown below –

The next step is when you click that button, which will open the detailed Python code representing the entire widget build & its functionality. This button is the place where you can add, modify, or keep it as it is depending upon your need, which will shown below –

Once one builds the entire solution, you must click the final compile button (shown in the red box), which will eventually compile all the individual widgets. However, you can build the compile button for the individual widgets as soon as you make the solution. So you can pinpoint any potential problems at that very step.

Let us understand one sample code of a widget. In this case, we will take vector embedding insertion into the Astra DB. Let us see the code –

from typing import List, Optional, Union
from langchain_astradb import AstraDBVectorStore
from langchain_astradb.utils.astradb import SetupMode

from langflow.custom import CustomComponent
from langflow.field_typing import Embeddings, VectorStore
from langflow.schema import Record
from langchain_core.retrievers import BaseRetriever


class AstraDBVectorStoreComponent(CustomComponent):
    display_name = "Astra DB"
    description = "Builds or loads an Astra DB Vector Store."
    icon = "AstraDB"
    field_order = ["token", "api_endpoint", "collection_name", "inputs", "embedding"]

    def build_config(self):
        return {
            "inputs": {
                "display_name": "Inputs",
                "info": "Optional list of records to be processed and stored in the vector store.",
            },
            "embedding": {"display_name": "Embedding", "info": "Embedding to use"},
            "collection_name": {
                "display_name": "Collection Name",
                "info": "The name of the collection within Astra DB where the vectors will be stored.",
            },
            "token": {
                "display_name": "Token",
                "info": "Authentication token for accessing Astra DB.",
                "password": True,
            },
            "api_endpoint": {
                "display_name": "API Endpoint",
                "info": "API endpoint URL for the Astra DB service.",
            },
            "namespace": {
                "display_name": "Namespace",
                "info": "Optional namespace within Astra DB to use for the collection.",
                "advanced": True,
            },
            "metric": {
                "display_name": "Metric",
                "info": "Optional distance metric for vector comparisons in the vector store.",
                "advanced": True,
            },
            "batch_size": {
                "display_name": "Batch Size",
                "info": "Optional number of records to process in a single batch.",
                "advanced": True,
            },
            "bulk_insert_batch_concurrency": {
                "display_name": "Bulk Insert Batch Concurrency",
                "info": "Optional concurrency level for bulk insert operations.",
                "advanced": True,
            },
            "bulk_insert_overwrite_concurrency": {
                "display_name": "Bulk Insert Overwrite Concurrency",
                "info": "Optional concurrency level for bulk insert operations that overwrite existing records.",
                "advanced": True,
            },
            "bulk_delete_concurrency": {
                "display_name": "Bulk Delete Concurrency",
                "info": "Optional concurrency level for bulk delete operations.",
                "advanced": True,
            },
            "setup_mode": {
                "display_name": "Setup Mode",
                "info": "Configuration mode for setting up the vector store, with options like “Sync”, “Async”, or “Off”.",
                "options": ["Sync", "Async", "Off"],
                "advanced": True,
            },
            "pre_delete_collection": {
                "display_name": "Pre Delete Collection",
                "info": "Boolean flag to determine whether to delete the collection before creating a new one.",
                "advanced": True,
            },
            "metadata_indexing_include": {
                "display_name": "Metadata Indexing Include",
                "info": "Optional list of metadata fields to include in the indexing.",
                "advanced": True,
            },
            "metadata_indexing_exclude": {
                "display_name": "Metadata Indexing Exclude",
                "info": "Optional list of metadata fields to exclude from the indexing.",
                "advanced": True,
            },
            "collection_indexing_policy": {
                "display_name": "Collection Indexing Policy",
                "info": "Optional dictionary defining the indexing policy for the collection.",
                "advanced": True,
            },
        }

    def build(
        self,
        embedding: Embeddings,
        token: str,
        api_endpoint: str,
        collection_name: str,
        inputs: Optional[List[Record]] = None,
        namespace: Optional[str] = None,
        metric: Optional[str] = None,
        batch_size: Optional[int] = None,
        bulk_insert_batch_concurrency: Optional[int] = None,
        bulk_insert_overwrite_concurrency: Optional[int] = None,
        bulk_delete_concurrency: Optional[int] = None,
        setup_mode: str = "Sync",
        pre_delete_collection: bool = False,
        metadata_indexing_include: Optional[List[str]] = None,
        metadata_indexing_exclude: Optional[List[str]] = None,
        collection_indexing_policy: Optional[dict] = None,
    ) -> Union[VectorStore, BaseRetriever]:
        try:
            setup_mode_value = SetupMode[setup_mode.upper()]
        except KeyError:
            raise ValueError(f"Invalid setup mode: {setup_mode}")
        if inputs:
            documents = [_input.to_lc_document() for _input in inputs]

            vector_store = AstraDBVectorStore.from_documents(
                documents=documents,
                embedding=embedding,
                collection_name=collection_name,
                token=token,
                api_endpoint=api_endpoint,
                namespace=namespace,
                metric=metric,
                batch_size=batch_size,
                bulk_insert_batch_concurrency=bulk_insert_batch_concurrency,
                bulk_insert_overwrite_concurrency=bulk_insert_overwrite_concurrency,
                bulk_delete_concurrency=bulk_delete_concurrency,
                setup_mode=setup_mode_value,
                pre_delete_collection=pre_delete_collection,
                metadata_indexing_include=metadata_indexing_include,
                metadata_indexing_exclude=metadata_indexing_exclude,
                collection_indexing_policy=collection_indexing_policy,
            )
        else:
            vector_store = AstraDBVectorStore(
                embedding=embedding,
                collection_name=collection_name,
                token=token,
                api_endpoint=api_endpoint,
                namespace=namespace,
                metric=metric,
                batch_size=batch_size,
                bulk_insert_batch_concurrency=bulk_insert_batch_concurrency,
                bulk_insert_overwrite_concurrency=bulk_insert_overwrite_concurrency,
                bulk_delete_concurrency=bulk_delete_concurrency,
                setup_mode=setup_mode_value,
                pre_delete_collection=pre_delete_collection,
                metadata_indexing_include=metadata_indexing_include,
                metadata_indexing_exclude=metadata_indexing_exclude,
                collection_indexing_policy=collection_indexing_policy,
            )

        return vector_store

Method: build_config:

  • This method defines the configuration options for the component.
  • Each configuration option includes a display_name and info, which provides details about the option.
  • Some options are marked as advanced, indicating they are optional and more complex.

Method: build:

  • This method is used to create an instance of the Astra DB Vector Store.
  • It takes several parameters, including embedding, token, api_endpoint, collection_name, and various optional parameters.
  • It converts the setup_mode string to an enum value.
  • If inputs are provided, they are converted to a format suitable for storing in the vector store.
  • Depending on whether inputs are provided, a new vector store from documents can be created, or an empty vector store can be initialized with the given configurations.
  • Finally, it returns the created vector store instance.

And, here is the the screenshot of your run –

And, this is the last steps to run the Integrated Chatbot as shown below –

As one can see the left side highlighted shows the reference text & chunks & the right side actual response.


So, we’ve done it. And, you know the fun fact. I did this entire workflow within 35 minutes alone. 😛

I’ll bring some more exciting topics in the coming days from the Python verse.

To learn more about LangFlow, please click here.

To learn about Astra DB, you need to click the following link.

To learn about my blog & photography, you can click the following url.

Till then, Happy Avenging!  🙂

Validating source data against RAG-response using Open AI, GloVe, FAISS using Python

Today, I’ll be presenting another exciting capability of architecture in the world of LLMs, where you need to answer one crucial point & that is how valid the response generated by these LLMs is against your data. This response is critical when discussing business growth & need to take the right action at the right time.

Why not view the demo before going through it?

Demo

Isn’t it exciting? Great! Let us understand this in detail.

The first dotted box (extreme-left) represents the area that talks about the data ingestion from different sources, including third-party PDFs. It is expected that organizations should have ready-to-digest data sources. Examples: Data Lake, Data Mart, One Lake, or any other equivalent platforms. Those PDFs will provide additional insights beyond the conventional advanced analytics.

You need to have some kind of OCR solution that will extract all the relevant information in the form of text from the documents. 

The next important part is how you define the chunking & embedding of data chunks into Vector DB. Chunking & indexing strategies, along with the overlapping chain, play a crucial importance in tying that segregated piece of context into a single context that will be fed into the source for your preferred LLMs.

This system employs a vector similarity search to browse through unstructured information and concurrently accesses the database to retrieve the context, ensuring that the responses are not only comprehensive but also anchored in validated knowledge.

This approach is particularly vital for addressing multi-hop questions, where a single query can be broken down into multiple sub-questions and may require information from numerous documents to generate an accurate answer.


pip install openai==0.27.8
pip install pandas==2.0.3
pip install tensorflow==2.11.1
pip install faiss-cpu==1.7.4
pip install gensim==4.3.2

Let us understand the key class & snippets.

  • clsFeedVectorDB.py (This is the main class that will invoke the Faiss framework to contextualize the docs inside the vector DB with the source file name to validate the answer from Gen AI using Globe.6B embedding models.)

Let us understand some of the key snippets from the above script (Full scripts will be available in the GitHub Repo) –

# Sample function to convert text to a vector
def text2Vector(self, text):
    # Encode the text using the tokenizer
    words = [word for word in text.lower().split() if word in self.model]

    # If no words in the model, return a zero vector
    if not words:
        return np.zeros(self.model.vector_size)

    # Compute the average of the word vectors
    vector = np.mean([self.model[word] for word in words], axis=0)
    return vector.reshape(1, -1)

This code is for a function called “text2Vector” that takes some text as input and converts it into a numerical vector. Let me break it down step by step:

  • It starts by taking some text as input, and this text is expected to be a sentence or a piece of text.
  • The text is then split into individual words, and each word is converted to lowercase.
  • It checks if each word is present in a pre-trained language model (probably a word embedding model like Word2Vec or GloVe). If a word is not in the model, it’s ignored.
  • If none of the words from the input text are found in the model, the function returns a vector filled with zeros. This vector has the same size as the word vectors in the model.
  • If there are words from the input text in the model, the function calculates the average vector of these words. It does this by taking the word vectors for each word found in the model and computing their mean (average). This results in a single vector that represents the input text.
  • Finally, the function reshapes this vector into a 2D array with one row and as many columns as there are elements in the vector. The reason for this reshaping is often related to compatibility with other parts of the code or libraries used in the project.

So, in simple terms, this function takes a piece of text, looks up the word vectors for the words in that text, and calculates the average of those vectors to create a single numerical representation of the text. If none of the words are found in the model, it returns a vector of zeros.

    def genData(self):
        try:
            basePath = self.basePath
            modelFileName = self.modelFileName
            vectorDBPath = self.vectorDBPath
            vectorDBFileName = self.vectorDBFileName

            # Create a FAISS index
            dimension = int(cf.conf['NO_OF_MODEL_DIM'])  # Assuming 100-dimensional vectors 
            index = faiss.IndexFlatL2(dimension)

            print('*' * 240)
            print('Vector Index Your Data for Retrieval:')
            print('*' * 240)

            FullVectorDBname = vectorDBPath + vectorDBFileName
            indexFile = str(vectorDBPath) + str(vectorDBFileName) + '.index'

            print('File: ', str(indexFile))

            data = {}
            # List all files in the specified directory
            files = os.listdir(basePath)

            # Filter out files that are not text files
            text_files = [file for file in files if file.endswith('.txt')]

            # Read each text file
            for file in text_files:
                file_path = os.path.join(basePath, file)
                print('*' * 240)
                print('Processing File:')
                print(str(file_path))
                try:
                    # Attempt to open with utf-8 encoding
                    with open(file_path, 'r', encoding='utf-8') as file:
                        for line_number, line in enumerate(file, start=1):
                            # Assume each line is a separate document
                            vector = self.text2Vector(line)
                            vector = vector.reshape(-1)
                            index_id = index.ntotal

                            index.add(np.array([vector]))  # Adding the vector to the index
                            data[index_id] = {'text': line, 'line_number': line_number, 'file_name': file_path}  # Storing the line and file name
                except UnicodeDecodeError:
                    # If utf-8 fails, try a different encoding
                    try:
                        with open(file_path, 'r', encoding='ISO-8859-1') as file:
                            for line_number, line in enumerate(file, start=1):
                                # Assume each line is a separate document
                                vector = self.text2Vector(line)
                                vector = vector.reshape(-1)
                                index_id = index.ntotal
                                index.add(np.array([vector]))  # Adding the vector to the index
                                data[index_id] = {'text': line, 'line_number': line_number, 'file_name': file_path}  # Storing the line and file name
                    except Exception as e:
                        print(f"Could not read file {file}: {e}")
                        continue

                print('*' * 240)

            # Save the data dictionary using pickle
            dataCache = vectorDBPath + modelFileName
            with open(dataCache, 'wb') as f:
                pickle.dump(data, f)

            # Save the index and data for later use
            faiss.write_index(index, indexFile)

            print('*' * 240)

            return 0

        except Exception as e:
            x = str(e)
            print('Error: ', x)

            return 1
  • This code defines a function called genData, and its purpose is to prepare and store data for later retrieval using a FAISS index. Let’s break down what it does step by step:
  • It starts by assigning several variables, such as basePath, modelFileName, vectorDBPath, and vectorDBFileName. These variables likely contain file paths and configuration settings.
  • It creates a FAISS index with a specified dimension (assuming 100-dimensional vectors in this case) using faiss.IndexFlatL2. FAISS is a library for efficient similarity search and clustering of high-dimensional data.
  • It prints the file name and lines where the index will be stored. It initializes an empty dictionary called data to store information about the processed text data.
  • It lists all the files in a directory specified by basePath. It filters out only the files that have a “.txt” extension as text files.
  • It then reads each of these text files one by one. For each file:
  1. It attempts to open the file with UTF-8 encoding.
    • It reads the file line by line.
    • For each line, it calls a function text2Vector to convert the text into a numerical vector representation. This vector is added to the FAISS index.
    • It also stores some information about the line, such as the line number and the file name, in the data dictionary.
    • If there is an issue with UTF-8 encoding, it tries to open the file with a different encoding, “ISO-8859-1”. The same process of reading and storing data continues.
  • If there are any exceptions (errors) during this process, it prints an error message but continues processing other files.
  • Once all the files are processed, it saves the data dictionary using the pickle library to a file specified by dataCache.
  • It also saves the FAISS index to a file specified by indexFile.
  • Finally, it returns 0 if the process completes successfully or 1 if there was an error during execution.

In summary, this function reads text files, converts their contents into numerical vectors, and builds a FAISS index for efficient similarity search. It also saves the processed data and the index for later use. If there are any issues during the process, it prints error messages but continues processing other files.

  • clsRAGOpenAI.py (This is the main class that will invoke the RAG class, which will get the contexts with references including source files, line numbers, and source texts. This will help the customer to validate the source against the OpenAI response to understand & control the data bias & other potential critical issues.)

Let us understand some of the key snippets from the above script (Full scripts will be available in the GitHub Repo) –

def ragAnswerWithHaystackAndGPT3(self, queryVector, k, question):
    modelName = self.modelName
    maxToken = self.maxToken
    temp = self.temp

    # Assuming getTopKContexts is a method that returns the top K contexts
    contexts = self.getTopKContexts(queryVector, k)
    messages = []

    # Add contexts as system messages
    for file_name, line_number, text in contexts:
        messages.append({"role": "system", "content": f"Document: {file_name} \nLine Number: {line_number} \nContent: {text}"})

    prompt = self.generateOpenaiPrompt(queryVector, k)
    prompt = prompt + "Question: " + str(question) + ". \n Answer based on the above documents."

    # Add user question
    messages.append({"role": "user", "content": prompt})

    # Create chat completion
    completion = client.chat.completions.create(
    model=modelName,
    messages=messages,
    temperature = temp,
    max_tokens = maxToken
    )

    # Assuming the last message in the response is the answer
    last_response = completion.choices[0].message.content
    source_refernces = ['FileName: ' + str(context[0]) + ' - Line Numbers: ' + str(context[1]) + ' - Source Text (Reference): ' + str(context[2]) for context in contexts]

    return last_response, source_refernces
  • This code defines a function called ragAnswerWithHaystackAndGPT3. Its purpose is to use a combination of the Haystack search method and OpenAI’s GPT-3 model to generate an answer to a user’s question. Let’s break down what it does step by step:
  • It starts by assigning several variables, such as modelName, maxToken, and temp. These variables likely contain model-specific information and settings for GPT-3.
  • It calls a method getTopKContexts to retrieve the top K contexts (which are likely documents or pieces of text) related to the user’s query. These contexts are stored in the contexts variable.
  • It initializes an empty list called messages to store messages that will be used in the conversation with the GPT-3 model.
  • It iterates through each context and adds them as system messages to the messages list. These system messages provide information about the documents or sources being used in the conversation.
  • It creates a prompt that combines the query, retrieved contexts, and the user’s question. This prompt is then added as a user message to the messages list. It effectively sets up the conversation for GPT-3, where the user’s question is followed by context.
  • It makes a request to the GPT-3 model using the client.chat.completions.create method, passing in the model name, the constructed messages, and other settings such as temperature and maximum tokens.
  • After receiving a response from GPT-3, it assumes that the last message in the response contains the answer generated by the model.
  • It also constructs source_references, which is a list of references to the documents or sources used in generating the answer. This information includes the file name, line numbers, and source text for each context.
  • Finally, it returns the generated answer (last_response) and the source references to the caller.

In summary, this function takes a user’s query, retrieves relevant contexts or documents, sets up a conversation with GPT-3 that includes the query and contexts, and then uses GPT-3 to generate an answer. It also provides references to the sources used in generating the answer.

    def getTopKContexts(self, queryVector, k):
        try:
            distances, indices = index.search(queryVector, k)
            resDict = [(data[i]['file_name'], data[i]['line_number'], data[i]['text']) for i in indices[0]]
            return resDict
        except Exception as e:
            x = str(e)
            print('Error: ', x)

            return x

This code defines a function called getTopKContexts. Its purpose is to retrieve the top K relevant contexts or pieces of information from a pre-built index based on a query vector. Here’s a breakdown of what it does:

  1. It takes two parameters as input: queryVector, which is a numerical vector representing a query, and k, which specifies how many relevant contexts to retrieve.
  2. Inside a try-except block, it attempts the following steps:
    • It uses the index.search method to find the top K closest contexts to the given queryVector. This method returns two arrays: distances (measuring how similar the contexts are to the query) and indices (indicating the positions of the closest contexts in the data).
    • It creates a list called “resDict", which contains tuples for each of the top K contexts. Each tuple contains three pieces of information: the file name (file_name), the line number (line_number), and the text content (text) of the context. These details are extracted from a data dictionary.
  3. If the process completes successfully, it returns the list of top K contexts (resDict) to the caller.
  4. If there’s an exception (an error) during this process, it captures the error message as a string (x), prints the error message, and then returns the error message itself.

In summary, this function takes a query vector and finds the K most relevant contexts or pieces of information based on their similarity to the query. It returns these contexts as a list of tuples containing file names, line numbers, and text content. If there’s an error, it prints an error message and returns the error message string.

def generateOpenaiPrompt(self, queryVector, k):
    contexts = self.getTopKContexts(queryVector, k)
    template = ct.templateVal_1
    prompt = template
    for file_name, line_number, text in contexts:
        prompt += f"Document: {file_name}\n Line Number: {line_number} \n Content: {text}\n\n"
    return prompt

This code defines a function called generateOpenaiPrompt. Its purpose is to create a prompt or a piece of text that combines a template with information from the top K relevant contexts retrieved earlier. Let’s break down what it does:

  1. It starts by calling the getTopKContexts function to obtain the top K relevant contexts based on a given queryVector.
  2. It initializes a variable called template with a predefined template value (likely defined elsewhere in the code).
  3. It sets the prompt variable to the initial template.
  4. Then, it enters a loop where it iterates through each of the relevant contexts retrieved earlier (contexts are typically documents or text snippets).
  5. For each context, it appends information to the prompt. Specifically, it adds lines to the prompt that include:
    • The document’s file name (Document: [file_name]).
    • The line number within the document (Line Number: [line_number]).
    • The content of the context itself (Content: [text]).
  6. It adds some extra spacing (newlines) between each context to ensure readability.
  7. Finally, it returns the complete – prompt, which is a combination of the template and information from the relevant contexts.

In summary, this function takes a query vector, retrieves relevant contexts, and creates a prompt by combining a template with information from these contexts. This prompt can then be used as input for an AI model or system, likely for generating responses or answers based on the provided context.

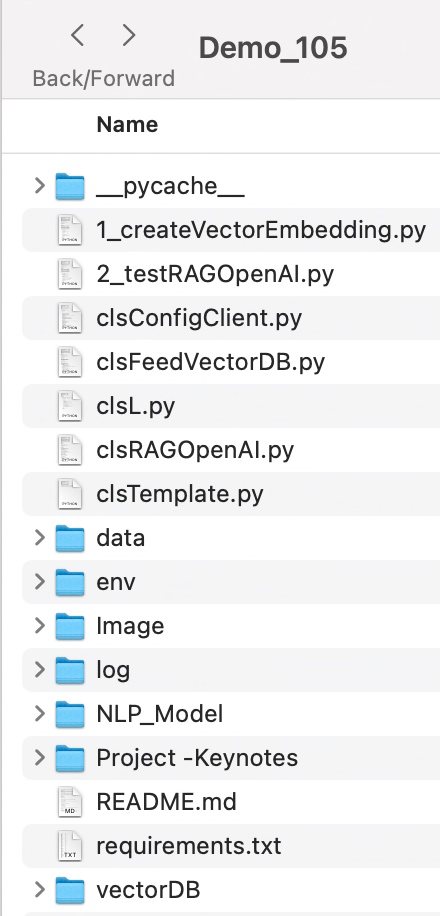
Let us understand the directory structure of this entire application –


To learn more about this package, please visit the following GitHub link.

So, finally, we’ve done it. I know that this post is relatively smaller than my earlier post. But, I think, you can get a good hack to improve some of your long-running jobs by applying this trick.

I’ll bring some more exciting topics in the coming days from the Python verse. Please share & subscribe to my post & let me know your feedback.

Till then, Happy Avenging! 🙂

Performance improvement of Python application programming

Hello guys,

Today, I’ll be demonstrating a short but significant topic. There are widespread facts that, on many occasions, Python is relatively slower than other strongly typed programming languages like C++, Java, or even the latest version of PHP.

I found a relatively old post with a comparison shown between Python and the other popular languages. You can find the details at this link.

However, I haven’t verified the outcome. So, I can’t comment on the final statistics provided on that link.

My purpose is to find cases where I can take certain tricks to improve performance drastically.

One preferable option would be the use of Cython. That involves the middle ground between C & Python & brings the best out of both worlds.

The other option would be the use of GPU for vector computations. That would drastically increase the processing power. Today, we’ll be exploring this option.

Let’s find out what we need to prepare our environment before we try out on this.

Step – 1 (Installing dependent packages):

pip install pyopencl
pip install plaidml-keras

So, we will be taking advantage of the Keras package to use our GPU. And, the screen should look like this –

Installation Process of Python-based Packages

Once we’ve installed the packages, we’ll configure the package showing on the next screen.

Configuration of Packages

For our case, we need to install pandas as we’ll be using numpy, which comes default with it.

Installation of supplemental packages

Let’s explore our standard snippet to test this use case.

Case 1 (Normal computational code in Python):

##############################################
#### Written By: SATYAKI DE               ####
#### Written On: 18-Jan-2020              ####
####                                      ####
#### Objective: Main calling scripts for  ####
#### normal execution.                    ####
##############################################

import numpy as np
from timeit import default_timer as timer

def pow(a, b, c):
    for i in range(a.size):
         c[i] = a[i] ** b[i]

def main():
    vec_size = 100000000

    a = b = np.array(np.random.sample(vec_size), dtype=np.float32)
    c = np.zeros(vec_size, dtype=np.float32)

    start = timer()
    pow(a, b, c)
    duration = timer() - start

    print(duration)

if __name__ == '__main__':
    main()

Case 2 (GPU-based computational code in Python):

#################################################
#### Written By: SATYAKI DE                  ####
#### Written On: 18-Jan-2020                 ####
####                                         ####
#### Objective: Main calling scripts for     ####
#### use of GPU to speed-up the performance. ####
#################################################

import numpy as np
from timeit import default_timer as timer

# Adding GPU Instance
from os import environ
environ["KERAS_BACKEND"] = "plaidml.keras.backend"

def pow(a, b):
    return a ** b

def main():
    vec_size = 100000000

    a = b = np.array(np.random.sample(vec_size), dtype=np.float32)
    c = np.zeros(vec_size, dtype=np.float32)

    start = timer()
    c = pow(a, b)
    duration = timer() - start

    print(duration)

if __name__ == '__main__':
    main()

And, here comes the output for your comparisons –

Case 1 Vs Case 2:

Performance Comparisons

As you can see, there is a significant improvement that we can achieve using this. However, it has limited scope. Not everywhere you get the benefits. Until or unless Python decides to work on the performance side, you better need to explore either of the two options that I’ve discussed here (I didn’t mention a lot on Cython here. Maybe some other day.).

To get the codebase you can refer the following Github link.


So, finally, we have done it.

I’ll bring some more exciting topic in the coming days from the Python verse.

Till then, Happy Avenging! 😀

Note: All the data & scenario posted here are representational data & scenarios & available over the internet & for educational purpose only.