Real-time video summary assistance App – Part 1

Today, we’ll discuss another topic in our two-part series. We will understand the importance of the MCP protocol for communicating between agents.

This will be an in-depth highly technical as well as depicting using easy-to-understand visuals.

But, before that, let us understand the demo first.

Isn’t it exciting?


Let us first understand in easy language about the MCP protocol.

MCP (Multi-Agent Communication Protocol) is a custom message exchange system that facilitates structured and scalable communication among multiple AI agents operating within an application. These agents collaborate asynchronously or in real-time to complete complex tasks by sharing results, context, and commands through a common messaging layer.

How MCP Protocol Helps:

FeatureBenefit
Agent-Oriented ArchitectureEach agent handles a focused task, improving modularity and scalability.
Event-Driven Message PassingAgents communicate based on triggers, not polling—leading to faster and efficient responses.
Structured Communication FormatAll messages follow a standard format (e.g., JSON) with metadata for sender, recipient, type, and payload.
State PreservationAgents maintain context across messages using memory (e.g., ConversationBufferMemory) to ensure coherence.

How It Works (Step-by-Step):

  • 📥 User uploads or streams a video.
  • 🧑‍💻 MCP Protocol triggers the Transcription Agent to start converting audio into text.
  • 🌐 Translation Agent receives this text (if a different language is needed).
  • 🧾 Summarization Agent receives the translated or original transcript and generates a concise summary.
  • 📚 Research Agent checks for references or terminology used in the video.
  • 📄 Documentation Agent compiles the output into a structured report.
  • 🔁 All communication between agents flows through MCP, ensuring consistent message delivery and coordination.

Now, let us understand the solution that we intend to implement for our solutions:

This app provides live summarization and contextual insights from videos such as webinars, interviews, or YouTube recordings using multiple cooperating AI agents. These agents may include:

  • Transcription Agent: Converts spoken words to text.
  • Translation Agent: Translates text to different languages (if needed).
  • Summarization Agent: Generates concise summaries.
  • Research Agent: Finds background or supplementary data related to the discussion.
  • Documentation Agent: Converts outputs into structured reports or learning materials.
We need to understand one more thing before deep diving into the code. Part of your conversation may be mixed, like part Hindi & part English. So, in that case, it will break the sentences into chunks & then convert all of them into the same language. Hence, the following rules are applied while translating the sentences –


Now, we will go through the basic frame of the system & try to understand how it fits all the principles that we discussed above for this particular solution mapped against the specific technology –

  1. Documentation Agent built with the LangChain framework
  2. Research Agent built with the AutoGen framework
  3. MCP Broker for seamless communication between agents

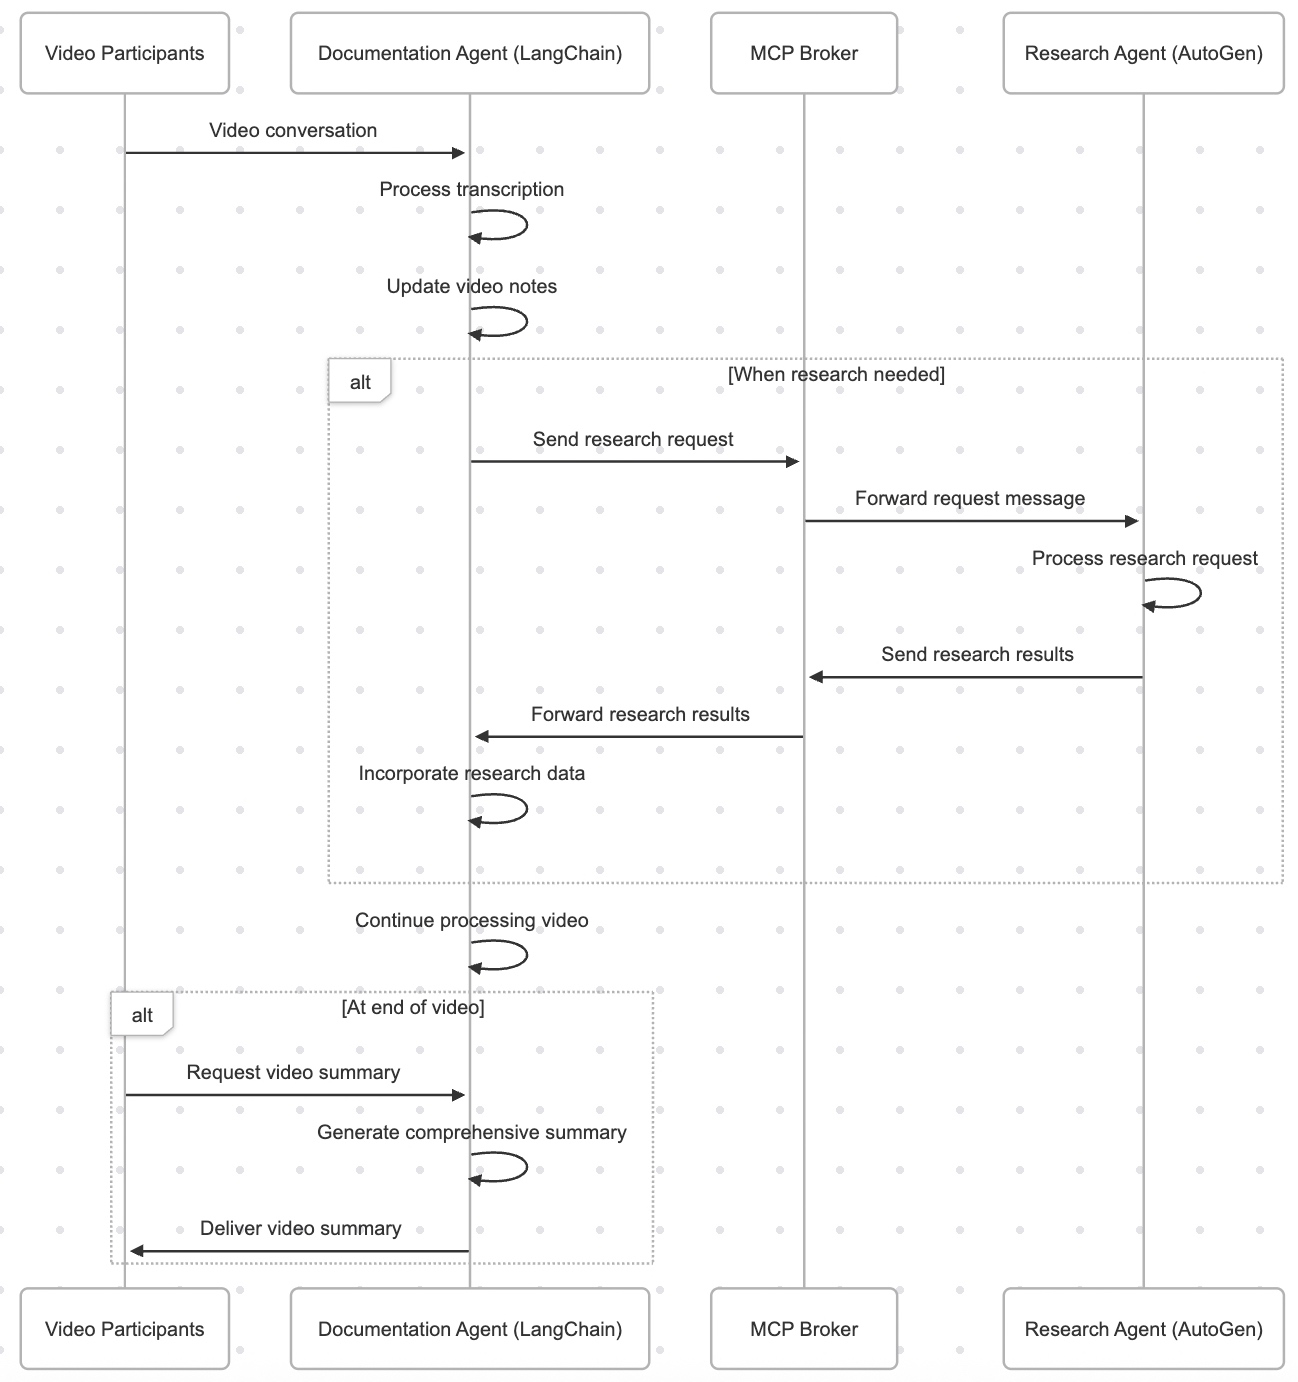
Let us understand from the given picture the flow of the process that our app is trying to implement –


Great! So, now, we’ll focus on some of the key Python scripts & go through their key features.

But, before that, we share the group of scripts that belong to specific tasks.

  • clsMCPMessage.py
  • clsMCPBroker.py
  • clsYouTubeVideoProcessor.py
  • clsLanguageDetector.py
  • clsTranslationAgent.py
  • clsTranslationService.py
  • clsDocumentationAgent.py
  • clsResearchAgent.py

Now, we’ll review some of the script in this post, along with the next post, as a continuation from this post.

class clsMCPMessage(BaseModel):
    """Message format for MCP protocol"""
    id: str = Field(default_factory=lambda: str(uuid.uuid4()))
    timestamp: float = Field(default_factory=time.time)
    sender: str
    receiver: str
    message_type: str  # "request", "response", "notification"
    content: Dict[str, Any]
    reply_to: Optional[str] = None
    conversation_id: str
    metadata: Dict[str, Any] = {}
    
class clsMCPBroker:
    """Message broker for MCP protocol communication between agents"""
    
    def __init__(self):
        self.message_queues: Dict[str, queue.Queue] = {}
        self.subscribers: Dict[str, List[str]] = {}
        self.conversation_history: Dict[str, List[clsMCPMessage]] = {}
    
    def register_agent(self, agent_id: str) -> None:
        """Register an agent with the broker"""
        if agent_id not in self.message_queues:
            self.message_queues[agent_id] = queue.Queue()
            self.subscribers[agent_id] = []
    
    def subscribe(self, subscriber_id: str, publisher_id: str) -> None:
        """Subscribe an agent to messages from another agent"""
        if publisher_id in self.subscribers:
            if subscriber_id not in self.subscribers[publisher_id]:
                self.subscribers[publisher_id].append(subscriber_id)
    
    def publish(self, message: clsMCPMessage) -> None:
        """Publish a message to its intended receiver"""
        # Store in conversation history
        if message.conversation_id not in self.conversation_history:
            self.conversation_history[message.conversation_id] = []
        self.conversation_history[message.conversation_id].append(message)
        
        # Deliver to direct receiver
        if message.receiver in self.message_queues:
            self.message_queues[message.receiver].put(message)
        
        # Deliver to subscribers of the sender
        for subscriber in self.subscribers.get(message.sender, []):
            if subscriber != message.receiver:  # Avoid duplicates
                self.message_queues[subscriber].put(message)
    
    def get_message(self, agent_id: str, timeout: Optional[float] = None) -> Optional[clsMCPMessage]:
        """Get a message for the specified agent"""
        try:
            return self.message_queues[agent_id].get(timeout=timeout)
        except (queue.Empty, KeyError):
            return None
    
    def get_conversation_history(self, conversation_id: str) -> List[clsMCPMessage]:
        """Get the history of a conversation"""
        return self.conversation_history.get(conversation_id, [])

Imagine a system where different virtual agents (like robots or apps) need to talk to each other. To do that, they send messages back and forth—kind of like emails or text messages. This code is responsible for:

  • Making sure those messages are properly written (like filling out all parts of a form).
  • Making sure messages are delivered to the right people.
  • Keeping a record of conversations so you can go back and review what was said.

This part (clsMCPMessage) is like a template or a form that every message needs to follow. Each message has:

  • ID: A unique number so every message is different (like a serial number).
  • Time Sent: When the message was created.
  • Sender & Receiver: Who sent the message and who is supposed to receive it.
  • Type of Message: Is it a request, a response, or just a notification?
  • Content: The actual information or question the message is about.
  • Reply To: If this message is answering another one, this tells which one.
  • Conversation ID: So we know which group of messages belongs to the same conversation.
  • Extra Info (Metadata): Any other small details that might help explain the message.

This (clsMCPBroker) is the system (or “post office”) that makes sure messages get to where they’re supposed to go. Here’s what it does:

1. Registering an Agent

  • Think of this like signing up a new user in the system.
  • Each agent gets their own personal mailbox (called a “message queue”) so others can send them messages.

2. Subscribing to Another Agent

  • If Agent A wants to receive copies of messages from Agent B, they can “subscribe” to B.
  • This is like signing up for B’s newsletter—whenever B sends something, A gets a copy.

3. Sending a Message

  • When someone sends a message:
    • It is saved into a conversation history (like keeping emails in your inbox).
    • It is delivered to the main person it was meant for.
    • And, if anyone subscribed to the sender, they get a copy too—unless they’re already the main receiver (to avoid sending duplicates).

4. Receiving Messages

  • Each agent can check their personal mailbox to see if they got any new messages.
  • If there are no messages, they’ll either wait for some time or move on.

5. Viewing Past Conversations

  • You can look up all messages that were part of a specific conversation.
  • This is helpful for remembering what was said earlier.

In systems where many different smart tools or services need to work together and communicate, this kind of communication system makes sure everything is:

  • Organized
  • Delivered correctly
  • Easy to trace back when needed

So, in this post, we’ll finish it here. We’ll cover the rest of the post in the next post.

I’ll bring some more exciting topics in the coming days from the Python verse.

Till then, Happy Avenging!  🙂

Creating a local LLM Cluster Server using Apple Silicon GPU

Today, we’re going to discuss creating a local LLM server and then utilizing it to execute various popular LLM models. We will club the local Apple GPUs together via a new framework that binds all the available Apple Silicon devices into one big LLM server. This enables people to run many large models, which was otherwise not possible due to the lack of GPUs.

This is certainly a new way; One can create virtual computation layers by adding nodes to the resource pool, increasing the computation capacity.

Why not witness a small demo to energize ourselves –

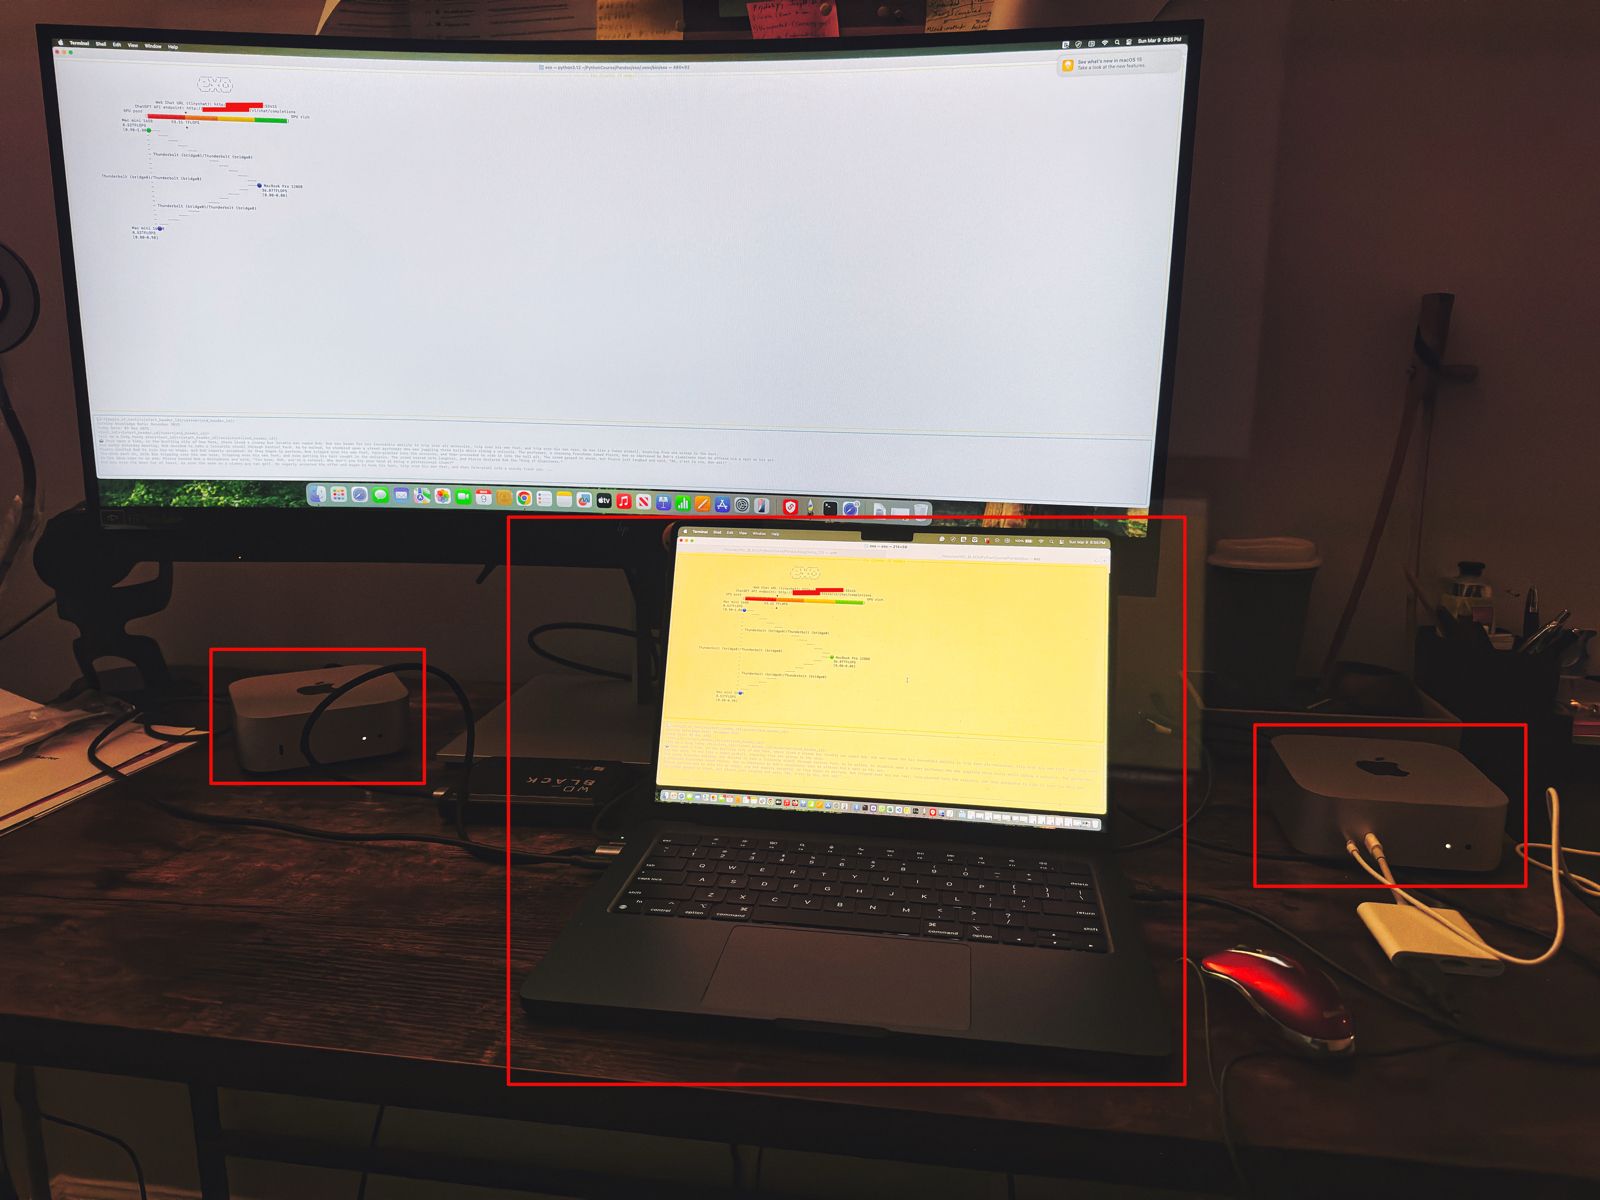
Let us understand the scenario. I’ve one Mac Book Pro M4 & 2 Mac Mini Pro M4 (Base models). So, I want to add them & expose them as a cluster as follows –

As you can see, I’ve connected my MacBook Pro with both the Mac Mini using high-speed thunderbolt cables for better data transmissions. And, I’ll be using an open-source framework called “Exo” to create it.

Also, you can see that my total computing capacity is 53.11 TFlops, which is slightly more than the last category.

“Exo” is an open-source framework that helps you merge all your available devices into a large cluster of available resources. This extracts all the computing juice needed to handle complex tasks, including the big LLMs, which require very expensive GPU-based servers.

For more information on “Exo”, please refer to the following link.

In our previous diagram, we can see that the framework also offers endpoints.

  • One option is a local ChatGPT interface, where any question you ask will receive a response from models by combining all available computing power.
  • The other endpoint offers users a choice of any standard LLM API endpoint, which helps them integrate it into their solutions.

Let us see, how the devices are connected together –


To proceed with this, you need to have at least Python 3.12, Anaconda or Miniconda & Xcode installed in all of your machines. Also, you need to install some Apple-specific MLX packages or libraries to get the best performance.

Depending on your choice, you need to use the following link to download Anaconda or Miniconda.

You can download the following link to download the Python 3.12. However, I’ve used Python 3.13 on some machines & some machines, I’ve used Python 3.12. And it worked without any problem.

Sometimes, after installing Anaconda or Miniconda, the environment may not implicitly be activated after successful installation. In that case, you may need to use the following commands in the terminal -> source ~/.bash_profile

To verify, whether the conda has been successfully installed & activated, you need to type the following command –

(base) satyaki_de@Satyakis-MacBook-Pro-Max Pandas % conda --version
conda 24.11.3
(base) satyaki_de@Satyakis-MacBook-Pro-Max Pandas % 

Once you verify it. Now, we need to install the following supplemental packages in all the machines as –

satyaki_de@Satyakis-MacBook-Pro-Max Pandas % 
satyaki_de@Satyakis-MacBook-Pro-Max Pandas % conda install anaconda::m4
Channels:
 - defaults
 - anaconda
Platform: osx-arm64
Collecting package metadata (repodata.json): done
Solving environment: done

## Package Plan ##

  environment location: /opt/anaconda3

  added / updated specs:
    - anaconda::m4


The following packages will be downloaded:

    package                    |            build
    ---------------------------|-----------------
    m4-1.4.18                  |       h1230e6a_1         202 KB  anaconda
    ------------------------------------------------------------
                                           Total:         202 KB

The following NEW packages will be INSTALLED:

  m4                 anaconda/osx-arm64::m4-1.4.18-h1230e6a_1 


Proceed ([y]/n)? y


Downloading and Extracting Packages:
                                                                                                                                                                                                                      
Preparing transaction: done
Verifying transaction: done
Executing transaction: done

Also, you can use this package to install in your machines –

(base) satyakidemini2@Satyakis-Mac-mini-2 exo % 
(base) satyakidemini2@Satyakis-Mac-mini-2 exo % pip install mlx
Collecting mlx
  Downloading mlx-0.23.2-cp312-cp312-macosx_14_0_arm64.whl.metadata (5.3 kB)
Downloading mlx-0.23.2-cp312-cp312-macosx_14_0_arm64.whl (27.6 MB)
   ━━━━━━━━━━━━━━━━━━━━━━━━━━━━━━━━━━━━━━━━ 27.6/27.6 MB 8.8 MB/s eta 0:00:00
Installing collected packages: mlx
Successfully installed mlx-0.23.2
(base) satyakidemini2@Satyakis-Mac-mini-2 exo % 

Till now, we’ve installed all the important packages. Now, we need to setup the final “eco” framework in all the machines like our previous steps.

Now, we’ll first clone the “eco” framework by the following commands –

(base) satyaki_de@Satyakis-MacBook-Pro-Max Pandas % 
(base) satyaki_de@Satyakis-MacBook-Pro-Max Pandas % git clone https://github.com/exo-explore/exo.git
Cloning into 'exo'...
remote: Enumerating objects: 9736, done.
remote: Counting objects: 100% (411/411), done.
remote: Compressing objects: 100% (148/148), done.
remote: Total 9736 (delta 333), reused 263 (delta 263), pack-reused 9325 (from 3)
Receiving objects: 100% (9736/9736), 12.18 MiB | 8.41 MiB/s, done.
Resolving deltas: 100% (5917/5917), done.
Updating files: 100% (178/178), done.
Filtering content: 100% (9/9), 3.16 MiB | 2.45 MiB/s, done.
(base) satyaki_de@Satyakis-MacBook-Pro-Max Pandas % 

And, the content of the “Exo” folder should look like this –

total 28672
drwx------  1 satyaki_de  staff  1048576 Mar  9 17:06 docs
-rwx------  1 satyaki_de  staff     1337 Mar  9 17:06 configure_mlx.sh
-rwx------  1 satyaki_de  staff    11107 Mar  9 17:06 README.md
-rwx------  1 satyaki_de  staff    35150 Mar  9 17:06 LICENSE
drwx------  1 satyaki_de  staff  1048576 Mar  9 17:06 examples
drwx------  1 satyaki_de  staff  1048576 Mar  9 17:06 exo
drwx------  1 satyaki_de  staff  1048576 Mar  9 17:06 extra
drwx------  1 satyaki_de  staff  1048576 Mar  9 17:06 scripts
-rwx------  1 satyaki_de  staff      390 Mar  9 17:06 install.sh
-rwx------  1 satyaki_de  staff      792 Mar  9 17:06 format.py
drwx------  1 satyaki_de  staff  1048576 Mar  9 17:06 test
-rwx------  1 satyaki_de  staff     2476 Mar  9 17:06 setup.py
drwx------  1 satyaki_de  staff  1048576 Mar  9 17:10 build
drwx------  1 satyaki_de  staff  1048576 Mar  9 17:17 exo.egg-info

Similar commands need to fire to other devices. Here, I’m showing one Mac-Mini examples –

(base) satyakidemini2@Satyakis-Mac-mini-2 Pandas % 
(base) satyakidemini2@Satyakis-Mac-mini-2 Pandas % git clone https://github.com/exo-explore/exo.git
Cloning into 'exo'...
remote: Enumerating objects: 9736, done.
remote: Counting objects: 100% (424/424), done.
remote: Compressing objects: 100% (146/146), done.
remote: Total 9736 (delta 345), reused 278 (delta 278), pack-reused 9312 (from 4)
Receiving objects: 100% (9736/9736), 12.18 MiB | 6.37 MiB/s, done.
Resolving deltas: 100% (5920/5920), done.
(base) satyakidemini2@Satyakis-Mac-mini-2 Pandas % 

After that, I’ll execute the following sets of commands to install the framework –

(base) satyaki_de@Satyakis-MacBook-Pro-Max Pandas % cd exo
(base) satyaki_de@Satyakis-MacBook-Pro-Max exo % 
(base) satyaki_de@Satyakis-MacBook-Pro-Max exo % conda create --name exo1 python=3.13
WARNING: A conda environment already exists at '/opt/anaconda3/envs/exo1'

Remove existing environment?
This will remove ALL directories contained within this specified prefix directory, including any other conda environments.

 (y/[n])? y

Channels:
 - defaults
Platform: osx-arm64
Collecting package metadata (repodata.json): done
Solving environment: done

## Package Plan ##

  environment location: /opt/anaconda3/envs/exo1

  added / updated specs:
    - python=3.13


The following NEW packages will be INSTALLED:

  bzip2              pkgs/main/osx-arm64::bzip2-1.0.8-h80987f9_6 
  ca-certificates    pkgs/main/osx-arm64::ca-certificates-2025.2.25-hca03da5_0 
  expat              pkgs/main/osx-arm64::expat-2.6.4-h313beb8_0 
  libcxx             pkgs/main/osx-arm64::libcxx-14.0.6-h848a8c0_0 
  libffi             pkgs/main/osx-arm64::libffi-3.4.4-hca03da5_1 
  libmpdec           pkgs/main/osx-arm64::libmpdec-4.0.0-h80987f9_0 
  ncurses            pkgs/main/osx-arm64::ncurses-6.4-h313beb8_0 
  openssl            pkgs/main/osx-arm64::openssl-3.0.16-h02f6b3c_0 
  pip                pkgs/main/osx-arm64::pip-25.0-py313hca03da5_0 
  python             pkgs/main/osx-arm64::python-3.13.2-h4862095_100_cp313 
  python_abi         pkgs/main/osx-arm64::python_abi-3.13-0_cp313 
  readline           pkgs/main/osx-arm64::readline-8.2-h1a28f6b_0 
  setuptools         pkgs/main/osx-arm64::setuptools-75.8.0-py313hca03da5_0 
  sqlite             pkgs/main/osx-arm64::sqlite-3.45.3-h80987f9_0 
  tk                 pkgs/main/osx-arm64::tk-8.6.14-h6ba3021_0 
  tzdata             pkgs/main/noarch::tzdata-2025a-h04d1e81_0 
  wheel              pkgs/main/osx-arm64::wheel-0.45.1-py313hca03da5_0 
  xz                 pkgs/main/osx-arm64::xz-5.6.4-h80987f9_1 
  zlib               pkgs/main/osx-arm64::zlib-1.2.13-h18a0788_1 


Proceed ([y]/n)? y


Downloading and Extracting Packages:

Preparing transaction: done
Verifying transaction: done
Executing transaction: done
#
# To activate this environment, use
#
#     $ conda activate exo1
#
# To deactivate an active environment, use
#
#     $ conda deactivate

(base) satyaki_de@Satyakis-MacBook-Pro-Max exo % conda activate exo1
(exo1) satyaki_de@Satyakis-MacBook-Pro-Max exo % 
(exo1) satyaki_de@Satyakis-MacBook-Pro-Max exo % ls -lrt
total 24576
drwx------  1 satyaki_de  staff  1048576 Mar  9 17:06 docs
-rwx------  1 satyaki_de  staff     1337 Mar  9 17:06 configure_mlx.sh
-rwx------  1 satyaki_de  staff    11107 Mar  9 17:06 README.md
-rwx------  1 satyaki_de  staff    35150 Mar  9 17:06 LICENSE
drwx------  1 satyaki_de  staff  1048576 Mar  9 17:06 examples
drwx------  1 satyaki_de  staff  1048576 Mar  9 17:06 exo
drwx------  1 satyaki_de  staff  1048576 Mar  9 17:06 extra
drwx------  1 satyaki_de  staff  1048576 Mar  9 17:06 scripts
-rwx------  1 satyaki_de  staff      390 Mar  9 17:06 install.sh
-rwx------  1 satyaki_de  staff      792 Mar  9 17:06 format.py
drwx------  1 satyaki_de  staff  1048576 Mar  9 17:06 test
-rwx------  1 satyaki_de  staff     2476 Mar  9 17:06 setup.py
(exo1) satyaki_de@Satyakis-MacBook-Pro-Max exo % 
(exo1) satyaki_de@Satyakis-MacBook-Pro-Max exo % pip install .
Processing /Volumes/WD_BLACK/PythonCourse/Pandas/exo
  Preparing metadata (setup.py) ... done
Collecting tinygrad@ git+https://github.com/tinygrad/tinygrad.git@ec120ce6b9ce8e4ff4b5692566a683ef240e8bc8 (from exo==0.0.1)
  Cloning https://github.com/tinygrad/tinygrad.git (to revision ec120ce6b9ce8e4ff4b5692566a683ef240e8bc8) to /private/var/folders/26/dj11b57559b8r8rl6ztdpc840000gn/T/pip-install-q18fzk3r/tinygrad_7917114c483a4d9c83c795b69dbeb5c7
  Running command git clone --filter=blob:none --quiet https://github.com/tinygrad/tinygrad.git /private/var/folders/26/dj11b57559b8r8rl6ztdpc840000gn/T/pip-install-q18fzk3r/tinygrad_7917114c483a4d9c83c795b69dbeb5c7
  Running command git rev-parse -q --verify 'sha^ec120ce6b9ce8e4ff4b5692566a683ef240e8bc8'
  Running command git fetch -q https://github.com/tinygrad/tinygrad.git ec120ce6b9ce8e4ff4b5692566a683ef240e8bc8
  Running command git checkout -q ec120ce6b9ce8e4ff4b5692566a683ef240e8bc8
  Resolved https://github.com/tinygrad/tinygrad.git to commit ec120ce6b9ce8e4ff4b5692566a683ef240e8bc8
  Preparing metadata (setup.py) ... done
Collecting aiohttp==3.10.11 (from exo==0.0.1)
.
.
(Installed many more dependant packages)
.
.
Downloading propcache-0.3.0-cp313-cp313-macosx_11_0_arm64.whl (44 kB)
Building wheels for collected packages: exo, nuitka, numpy, uuid, tinygrad
  Building wheel for exo (setup.py) ... done
  Created wheel for exo: filename=exo-0.0.1-py3-none-any.whl size=901357 sha256=5665297f8ea09d06670c9dea91e40270acc4a3cf99a560bf8d268abb236050f7
  Stored in directory: /private/var/folders/26/dj118r8rl6ztdpc840000gn/T/pip-ephem-wheel-cache-0k8zloo3/wheels/b6/91/fb/c1c7d8ca90cf16b9cd8203c11bb512614bee7f6d34
  Building wheel for nuitka (pyproject.toml) ... done
  Created wheel for nuitka: filename=nuitka-2.5.1-cp313-cp313-macosx_11_0_arm64.whl size=3432720 sha256=ae5a280a1684fde98c334516ee8a99f9f0acb6fc2f625643b7f9c5c0887c2998
  Stored in directory: /Users/satyaki_de/Library/Caches/pip/wheels/f6/c9/53/9e37c6fb34c27e892e8357aaead46da610f82117ab2825
  Building wheel for numpy (pyproject.toml) ... done
  Created wheel for numpy: filename=numpy-2.0.0-cp313-cp313-macosx_15_0_arm64.whl size=4920701 sha256=f030b0aa51ec6628f708fab0af14ff765a46d210df89aa66dd8d9482e59b5
  Stored in directory: /Users/satyaki_de/Library/Caches/pip/wheels/e0/d3/66/30d07c18e56ac85e8d3ceaf22f093a09bae124a472b85d1
  Building wheel for uuid (setup.py) ... done
  Created wheel for uuid: filename=uuid-1.30-py3-none-any.whl size=6504 sha256=885103a90d1dc92d9a75707fc353f4154597d232f2599a636de1bc6d1c83d
  Stored in directory: /Users/satyaki_de/Library/Caches/pip/wheels/cc/9d/72/13ff6a181eacfdbd6d761a4ee7c5c9f92034a9dc8a1b3c
  Building wheel for tinygrad (setup.py) ... done
  Created wheel for tinygrad: filename=tinygrad-0.10.0-py3-none-any.whl size=1333964 sha256=1f08c5ce55aa3c87668675beb80810d609955a81b99d416459d2489b36a
  Stored in directory: /Users/satyaki_de/Library/Caches/pip/wheels/c7/bd/02/bd91c1303002619dad23f70f4c1f1c15d0c24c60b043e
Successfully built exo nuitka numpy uuid tinygrad
Installing collected packages: uuid, sentencepiece, nvidia-ml-py, zstandard, uvloop, urllib3, typing-extensions, tqdm, tinygrad, scapy, safetensors, regex, pyyaml, pygments, psutil, protobuf, propcache, prometheus-client, pillow, packaging, ordered-set, numpy, multidict, mlx, mdurl, MarkupSafe, idna, grpcio, fsspec, frozenlist, filelock, charset-normalizer, certifi, attrs, annotated-types, aiohappyeyeballs, aiofiles, yarl, requests, pydantic-core, opencv-python, nuitka, markdown-it-py, Jinja2, grpcio-tools, aiosignal, rich, pydantic, huggingface-hub, aiohttp, tokenizers, aiohttp_cors, transformers, mlx-lm, exo
Successfully installed Jinja2-3.1.4 MarkupSafe-3.0.2 aiofiles-24.1.0 aiohappyeyeballs-2.5.0 aiohttp-3.10.11 aiohttp_cors-0.7.0 aiosignal-1.3.2 annotated-types-0.7.0 attrs-25.1.0 certifi-2025.1.31 charset-normalizer-3.4.1 exo-0.0.1 filelock-3.17.0 frozenlist-1.5.0 fsspec-2025.3.0 grpcio-1.67.0 grpcio-tools-1.67.0 huggingface-hub-0.29.2 idna-3.10 markdown-it-py-3.0.0 mdurl-0.1.2 mlx-0.22.0 mlx-lm-0.21.1 multidict-6.1.0 nuitka-2.5.1 numpy-2.0.0 nvidia-ml-py-12.560.30 opencv-python-4.10.0.84 ordered-set-4.1.0 packaging-24.2 pillow-10.4.0 prometheus-client-0.20.0 propcache-0.3.0 protobuf-5.28.1 psutil-6.0.0 pydantic-2.9.2 pydantic-core-2.23.4 pygments-2.19.1 pyyaml-6.0.2 regex-2024.11.6 requests-2.32.3 rich-13.7.1 safetensors-0.5.3 scapy-2.6.1 sentencepiece-0.2.0 tinygrad-0.10.0 tokenizers-0.20.3 tqdm-4.66.4 transformers-4.46.3 typing-extensions-4.12.2 urllib3-2.3.0 uuid-1.30 uvloop-0.21.0 yarl-1.18.3 zstandard-0.23.0
(exo1) satyaki_de@Satyakis-MacBook-Pro-Max exo % 

And, you need to perform the same process in other available devices as well.

Now, we’re ready to proceed with the final command –

(.venv) (exo1) satyaki_de@Satyakis-MacBook-Pro-Max exo % exo
/opt/anaconda3/envs/exo1/lib/python3.13/site-packages/google/protobuf/runtime_version.py:112: UserWarning: Protobuf gencode version 5.27.2 is older than the runtime version 5.28.1 at node_service.proto. Please avoid checked-in Protobuf gencode that can be obsolete.
  warnings.warn(
None of PyTorch, TensorFlow >= 2.0, or Flax have been found. Models won't be available and only tokenizers, configuration and file/data utilities can be used.
Selected inference engine: None

  _____  _____  
 / _ \ \/ / _ \ 
|  __/>  < (_) |
 \___/_/\_\___/ 
    
Detected system: Apple Silicon Mac
Inference engine name after selection: mlx
Using inference engine: MLXDynamicShardInferenceEngine with shard downloader: SingletonShardDownloader
[60771, 54631, 54661]
Chat interface started:
 - http://127.0.0.1:52415
 - http://XXX.XXX.XX.XX:52415
 - http://XXX.XXX.XXX.XX:52415
 - http://XXX.XXX.XXX.XXX:52415
ChatGPT API endpoint served at:
 - http://127.0.0.1:52415/v1/chat/completions
 - http://XXX.XXX.X.XX:52415/v1/chat/completions
 - http://XXX.XXX.XXX.XX:52415/v1/chat/completions
 - http://XXX.XXX.XXX.XXX:52415/v1/chat/completions
has_read=True, has_write=True
╭────────────────────────────────────────────────────────────────────────────────────────────── Exo Cluster (2 nodes) ───────────────────────────────────────────────────────────────────────────────────────────────╮
Received exit signal SIGTERM...
Thank you for using exo.

  _____  _____  
 / _ \ \/ / _ \ 
|  __/>  < (_) |
 \___/_/\_\___/ 
    

Note that I’ve masked the IP addresses for security reasons.


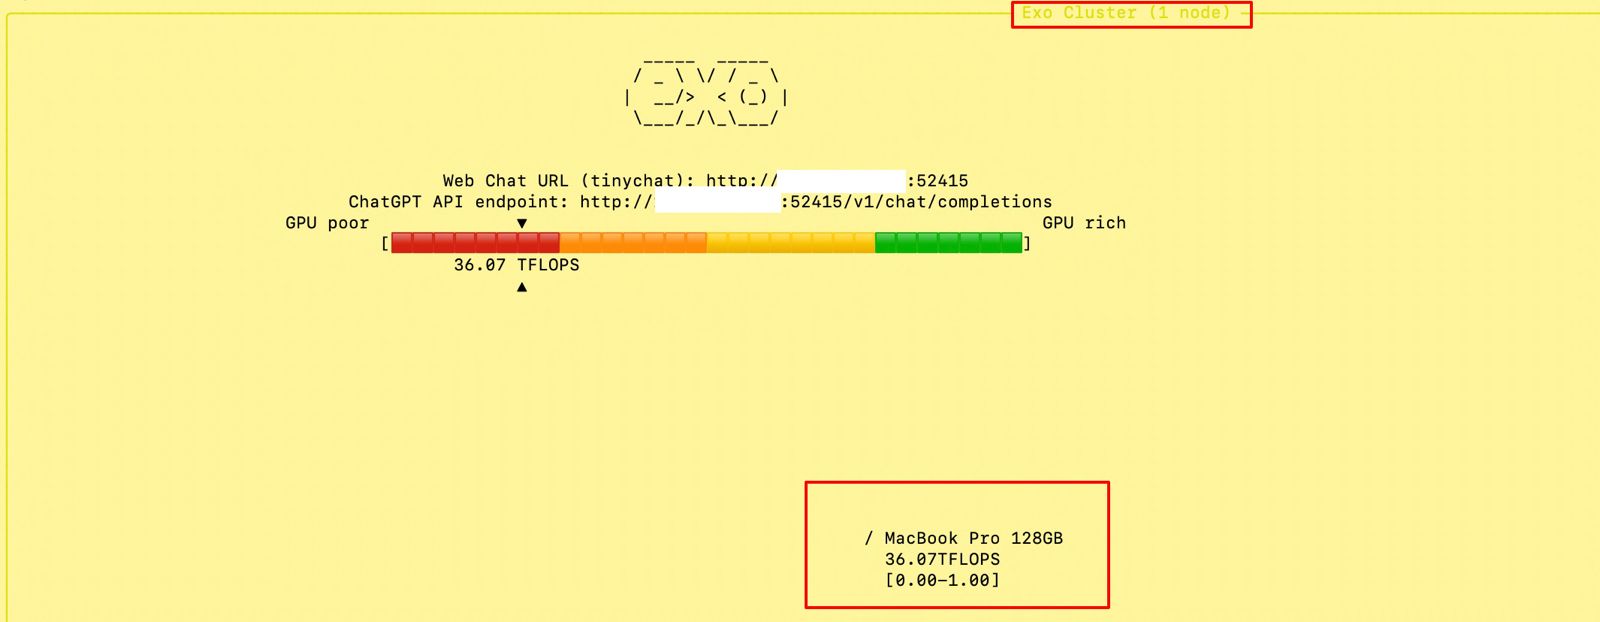
At the beginning, if we trigger the main MacBook Pro Max, the “Exo” screen should looks like this –

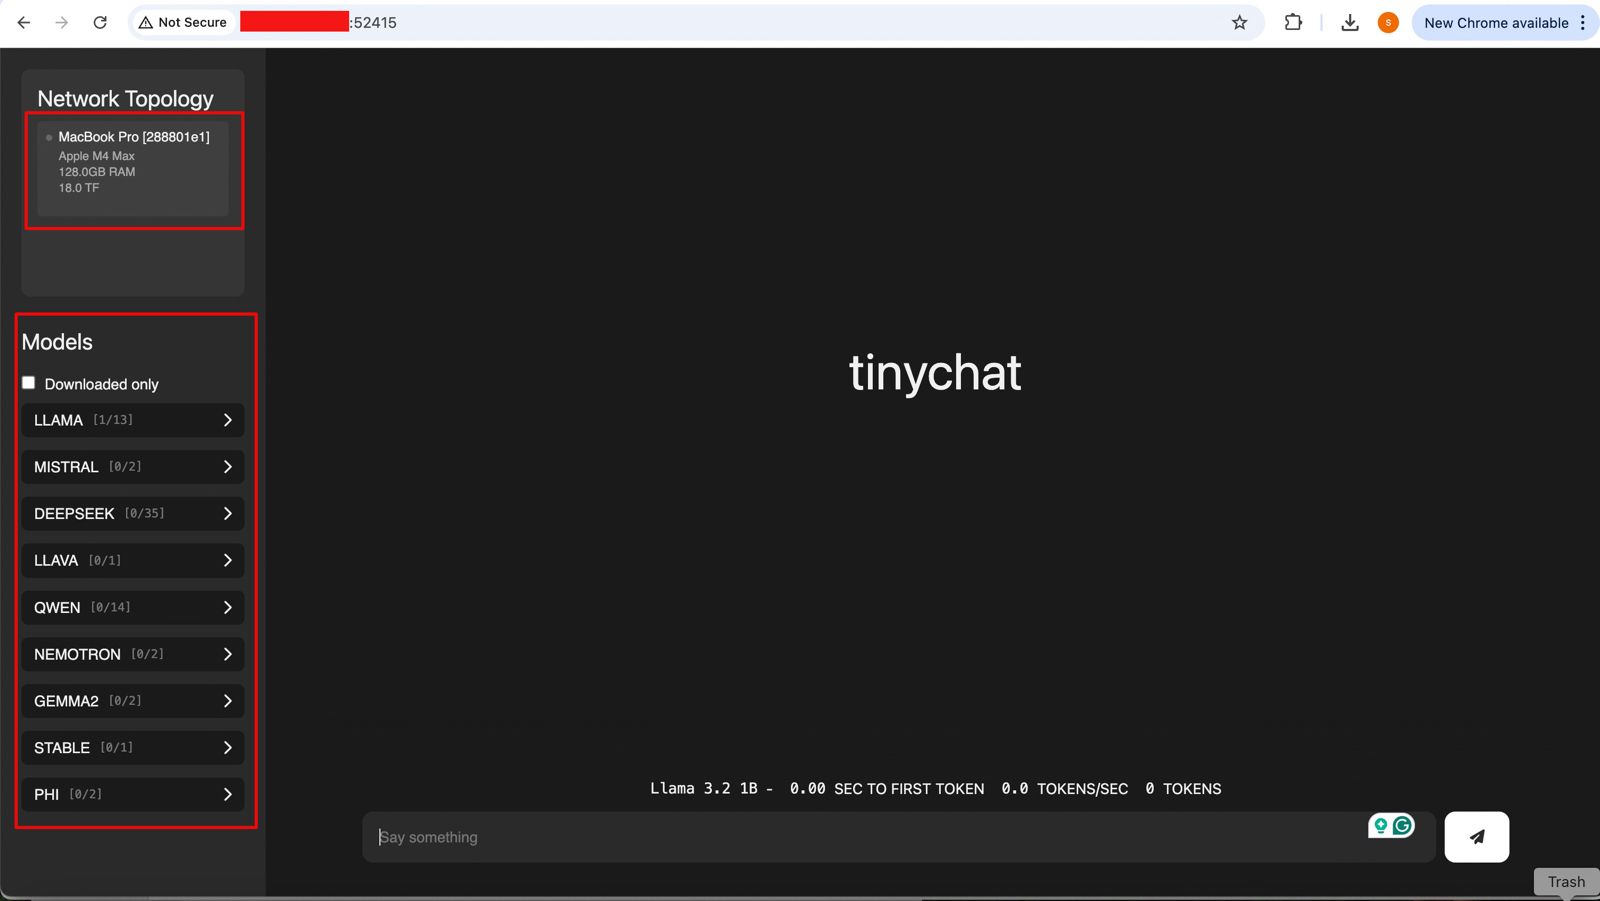
And if you open the URL, you will see the following ChatGPT-like interface –

Connecting without the Thunderbolt bridge with the relevant port or a hub may cause performance degradation. Hence, how you connect will play a major role in the success of this intention. However, this is certainly a great idea to proceed with.


So, we’ve done it.

We’ll cover the detailed performance testing, Optimized configurations & many other useful details in our next post.

Till then, Happy Avenging! 🙂

Demystifying Modern Data Technologies: Insights from the Global PowerBI Summit

In an engaging session at the Global PowerBI Summit, we and our co-host delved into the evolving landscape of data technologies. Our discussion aimed to illuminate the distinctions and applications of several pivotal technologies in the data sphere, ranging from Lakehouse vs. Storage Account to the nuanced differences between Fabric Pipeline and Data Pipeline and the critical comparisons of Notebooks vs. Databricks, including their performance metrics. Furthermore, we explored the realm of model experimentation and Azure ML, shedding light on their performance benchmarks.

  • Enhanced File Previews and Transformations: The Lakehouse paradigm revolutionizes how we preview and transform files into SQL tables, offering a seamless data manipulation experience.
  • Robust Data Governance: It introduces native indexing for data lineage, PII scans, and discovery, thus laying a solid foundation for data governance.
  • Optimized Performance for Reporting: With direct lake mode, Lakehouse significantly improves performance for Power BI Reporting, catering to the needs of data analysts and business intelligence professionals.
  • Functional Restrictions: Despite its strengths, Lakehouse falls short in providing a native file download feature, demands manual refresh for new file visibility, and has limited support for file formats outside of Delta and Parquet.
  • Lakehouse distinguishes itself by being user-friendly and efficient in data uploading, albeit with slower previews. Its distinction from a Storage Account lies in these unique functionalities and user experience.
  • Ease of Data Transformation: It introduces a low-code, no-code approach with the Power Query Editor, enriching the data transformation process.
  • Advanced Monitoring Capabilities: The ability to monitor pipelines and trace lineage enhances the management and integration of fabric artifacts.
  • Artifact and Trigger Limitations: A notable drawback is the isolated nature of each pipeline artifact and the limitation to a single scheduled trigger type per pipeline.
  • Our analysis reveals that while both platforms share a user-friendly interface reminiscent of Azure’s, navigating between pipelines in Fabric requires additional steps. However, both platforms demonstrate rapid execution capabilities, with Azure slightly leading due to its unified pipeline management.
  • Comprehensive Support and Integration: Notably, Notebooks excel in providing native support for various programming and visualization packages, coupled with a direct connection to Lakehouse.
  • Collaborative Features and Efficiency: The platform encourages collaboration through real-time co-editing and optimizes resource usage by stopping clusters when not in use.
  • Cluster and Resource Management: External management of clusters and the absence of a shared folder or user notebooks present challenges in collaborative environments.
  • Our discussion highlighted that Notebooks offers a superior user interface and connectivity options despite Databricks’ having certain advantages in data processing speeds.

Our performance analysis underscored Fabric Notebooks’ superiority in handling large datasets and running machine learning models more efficiently than Databricks, especially highlighting Lakehouse’s faster cluster initiation times and data storage efficiencies.

  • Seamless Integration and Configuration: Fabric’s integration with Lakehouse and direct pipeline connections streamline the data science workflow.
  • Graphical Interface and Focus: Fabric’s lack of a graphical interface contrasts with Azure ML’s user-friendly studio, indicating Fabric’s analytics and BI focus against Azure ML’s comprehensive experiment capabilities.
  • Our comparative performance review revealed that Fabric excels in dataset loading and model execution speeds, offering significant advantages over Azure ML.

Our Global PowerBI Summit session aimed to demystify the complexities of modern data technologies, providing attendees with clear, actionable insights. Our collaborative presentation underscored the importance of understanding each technology’s strengths and limitations, empowering data professionals to make informed decisions in their projects. The dynamic interplay between these technologies illustrates the vibrant and evolving nature of the data landscape, promising exciting possibilities for innovation and efficiency in data management and analysis.

These stats were taken during the early release of the product. However, there is a continuous improvement of this product. Hence, we need to revisit this after a period of some time.

Building a real-time streamlit app by consuming events from Ably channels

I’ll bring an exciting streamlit app that will reflect the real-time dashboard by consuming all the events from the Ably channel.

One more time, I’ll be utilizing my IoT emulator that will feed the real-time events based on the user inputs to the Ably channel, which will be subscribed to by the Streamlit-based app.

However, I would like to share the run before we dig deep into this.


Demo

Isn’t this exciting? How we can use our custom-built IoT emulator & capture real-time events to Ably Queue, then transform those raw events into more meaningful KPIs? Let’s deep dive then.

Let’s explore the broad-level architecture/flow –

As you can see, the green box is a demo IoT application that generates events & pushes them into the Ably Queue. At the same time, the streamlit-based Dashboard app consumes the events & transforms them into more meaningful metrics.

Let us understand the sample packages that are required for this task.

pip install ably==2.0.3
pip install numpy==1.26.3
pip install pandas==2.2.0
pip install plotly==5.19.0
pip install requests==2.31.0
pip install streamlit==1.30.0
pip install streamlit-autorefresh==1.0.1
pip install streamlit-echarts==0.4.0

Since this is an extension to our previous post, we’re not going to discuss other scripts, which we’ve already discussed over there. Instead, we will talk about the enhanced scripts & the new scripts that are required for this use case.

1. app.py (This script will consume real-time streaming data coming out from a hosted API source using another popular third-party service named Ably. Ably mimics the pub sub-streaming concept, which might be extremely useful for any start-up. This will then translate into many meaningful KPIs in a streamlit-based dashboard app.)

Note that, we’re not going to discuss the entire script here. Only those parts are relevant. However, you can get the complete scripts in the GitHub repository.

def createHumidityGauge(humidity_value):
    fig = go.Figure(go.Indicator(
        mode = "gauge+number",
        value = humidity_value,
        domain = {'x': [0, 1], 'y': [0, 1]},
        title = {'text': "Humidity", 'font': {'size': 24}},
        gauge = {
            'axis': {'range': [None, 100], 'tickwidth': 1, 'tickcolor': "darkblue"},
            'bar': {'color': "darkblue"},
            'bgcolor': "white",
            'borderwidth': 2,
            'bordercolor': "gray",
            'steps': [
                {'range': [0, 50], 'color': 'cyan'},
                {'range': [50, 100], 'color': 'royalblue'}],
            'threshold': {
                'line': {'color': "red", 'width': 4},
                'thickness': 0.75,
                'value': humidity_value}
        }
    ))

    fig.update_layout(height=220, paper_bgcolor = "white", font = {'color': "darkblue", 'family': "Arial"}, margin=dict(t=0, l=5, r=5, b=0))

    return fig

The above function creates a customized humidity gauge that visually represents a given humidity value, making it easy to read and understand at a glance.

This code defines a function “createHumidityGauge“ that creates a visual gauge (like a meter) to display a humidity value. Here’s a simple breakdown of what it does:

  1. Function Definition: It starts by defining a function named createHumidityGauge that takes one parameter, humidity_value, which is the humidity level you want to display on the gauge.
  2. Creating the Gauge: Inside the function, it creates a figure using Plotly (a plotting library) with a specific type of chart called an Indicator. This Indicator is set to display in “gauge+number” mode, meaning it shows both a gauge visual and the numeric value of the humidity.
  3. Setting Gauge Properties:
    • The value is set to the humidity_value parameter, so the gauge shows this humidity level.
    • The domain sets the position of the gauge on the plot, which is set to fill the available space ([0, 1] for both x and y axes).
    • The title is set to “Humidity” with a font size of 24, labeling the gauge.
    • The gauge section defines the appearance and behavior of the gauge, including:
      • An axis that goes from 0 to 100 (assuming humidity is measured as a percentage from 0% to 100%).
      • The color and style of the gauge’s bar and background.
      • Colored steps indicating different ranges of humidity (cyan for 0-50% and royal blue for 50-100%).
      • A threshold line that appears at the value of the humidity, marked in red to stand out.
  4. Finalizing the Gauge Appearance: The function then updates the layout of the figure to set its height, background color, font style, and margins to make sure the gauge looks nice and is visible.
  5. Returning the Figure: Finally, the function returns the fig object, which is the fully configured gauge, ready to be displayed.

Other similar functions will repeat the same steps.

def createTemperatureLineChart(data):
    # Assuming 'data' is a DataFrame with a 'Timestamp' index and a 'Temperature' column
    fig = px.line(data, x=data.index, y='Temperature', title='Temperature Vs Time')
    fig.update_layout(height=270)  # Specify the desired height here
    return fig

The above function takes a set of temperature data indexed by timestamp and creates a line chart that visually represents how the temperature changes over time.

This code defines a function “createTemperatureLineChart” that creates a line chart to display temperature data over time. Here’s a simple summary of what it does:

  1. Function Definition: It starts with defining a function named “createTemperatureLineChart“ that takes one parameter, data, which is expected to be a DataFrame (a type of data structure used in pandas, a Python data analysis library). This data frame should have a ‘Timestamp’ as its index (meaning each row represents a different point in time) and a ‘Temperature’ column containing temperature values.
  2. Creating the Line Chart: The function uses Plotly Express (a plotting library) to create a line chart with the following characteristics:
    • The x-axis represents time, taken from the DataFrame’s index (‘Timestamp’).
    • The y-axis represents temperature, taken from the ‘Temperature’ column in the DataFrame.
    • The chart is titled ‘Temperature Vs Time’, clearly indicating what the chart represents.
  3. Customizing the Chart: It then updates the layout of the chart to set a specific height (270 pixels) for the chart, making it easier to view.
  4. Returning the Chart: Finally, the function returns the fig object, which is the fully prepared line chart, ready to be displayed.

Similar functions will repeat for other KPIs.

    st.sidebar.header("KPIs")
    selected_kpis = st.sidebar.multiselect(
        "Select KPIs", options=["Temperature", "Humidity", "Pressure"], default=["Temperature"]
    )

The above code will create a sidebar with drop-down lists, which will show the KPIs (“Temperature”, “Humidity”, “Pressure”).

# Split the layout into columns for KPIs and graphs
    gauge_col, kpi_col, graph_col = st.columns(3)

    # Auto-refresh setup
    st_autorefresh(interval=7000, key='data_refresh')

    # Fetching real-time data
    data = getData(var1, DInd)

    st.markdown(
        """
        <style>
        .stEcharts { margin-bottom: -50px; }  /* Class might differ, inspect the HTML to find the correct class name */
        </style>
        """,
        unsafe_allow_html=True
    )

    # Display gauges at the top of the page
    gauges = st.container()

    with gauges:
        col1, col2, col3 = st.columns(3)
        with col1:
            humidity_value = round(data['Humidity'].iloc[-1], 2)
            humidity_gauge_fig = createHumidityGauge(humidity_value)
            st.plotly_chart(humidity_gauge_fig, use_container_width=True)

        with col2:
            temp_value = round(data['Temperature'].iloc[-1], 2)
            temp_gauge_fig = createTempGauge(temp_value)
            st.plotly_chart(temp_gauge_fig, use_container_width=True)

        with col3:
            pressure_value = round(data['Pressure'].iloc[-1], 2)
            pressure_gauge_fig = createPressureGauge(pressure_value)
            st.plotly_chart(pressure_gauge_fig, use_container_width=True)


    # Next row for actual readings and charts side-by-side
    readings_charts = st.container()


    # Display KPIs and their trends
    with readings_charts:
        readings_col, graph_col = st.columns([1, 2])

        with readings_col:
            st.subheader("Latest Readings")
            if "Temperature" in selected_kpis:
                st.metric("Temperature", f"{temp_value:.2f}%")

            if "Humidity" in selected_kpis:
                st.metric("Humidity", f"{humidity_value:.2f}%")

            if "Pressure" in selected_kpis:
                st.metric("Pressure", f"{pressure_value:.2f}%")


        # Graph placeholders for each KPI
        with graph_col:
            if "Temperature" in selected_kpis:
                temperature_fig = createTemperatureLineChart(data.set_index("Timestamp"))

                # Display the Plotly chart in Streamlit with specified dimensions
                st.plotly_chart(temperature_fig, use_container_width=True)

            if "Humidity" in selected_kpis:
                humidity_fig = createHumidityLineChart(data.set_index("Timestamp"))

                # Display the Plotly chart in Streamlit with specified dimensions
                st.plotly_chart(humidity_fig, use_container_width=True)

            if "Pressure" in selected_kpis:
                pressure_fig = createPressureLineChart(data.set_index("Timestamp"))

                # Display the Plotly chart in Streamlit with specified dimensions
                st.plotly_chart(pressure_fig, use_container_width=True)
  1. The code begins by splitting the Streamlit web page layout into three columns to separately display Key Performance Indicators (KPIs), gauges, and graphs.
  2. It sets up an auto-refresh feature with a 7-second interval, ensuring the data displayed is regularly updated without manual refreshes.
  3. Real-time data is fetched using a function called getData, which takes unspecified parameters var1 and DInd.
  4. A CSS style is injected into the Streamlit page to adjust the margin of Echarts elements, which may be used to improve the visual layout of the page.
  5. A container for gauges is created at the top of the page, with three columns inside it dedicated to displaying humidity, temperature, and pressure gauges.
  6. Each gauge (humidity, temperature, and pressure) is created by rounding the last value from the fetched data to two decimal places and then visualized using respective functions that create Plotly gauge charts.
  7. Below the gauges, another container is set up for displaying the latest readings and their corresponding graphs in a side-by-side layout, using two columns.
  8. The left column under “Latest Readings” displays the latest values for selected KPIs (temperature, humidity, pressure) as metrics.
  9. In the right column, for each selected KPI, a line chart is created using data with timestamps as indices and displayed using Plotly charts, allowing for a visual trend analysis.
  10. This structured approach enables a dynamic and interactive dashboard within Streamlit, offering real-time insights into temperature, humidity, and pressure with both numeric metrics and graphical trends, optimized for regular data refreshes and user interactivity.

Let us understand some of the important screenshots of this application –


So, we’ve done it.

I’ll bring some more exciting topics in the coming days from the Python verse.

Till then, Happy Avenging! 🙂

Validating source data against RAG-response using Open AI, GloVe, FAISS using Python

Today, I’ll be presenting another exciting capability of architecture in the world of LLMs, where you need to answer one crucial point & that is how valid the response generated by these LLMs is against your data. This response is critical when discussing business growth & need to take the right action at the right time.

Why not view the demo before going through it?

Demo

Isn’t it exciting? Great! Let us understand this in detail.

The first dotted box (extreme-left) represents the area that talks about the data ingestion from different sources, including third-party PDFs. It is expected that organizations should have ready-to-digest data sources. Examples: Data Lake, Data Mart, One Lake, or any other equivalent platforms. Those PDFs will provide additional insights beyond the conventional advanced analytics.

You need to have some kind of OCR solution that will extract all the relevant information in the form of text from the documents. 

The next important part is how you define the chunking & embedding of data chunks into Vector DB. Chunking & indexing strategies, along with the overlapping chain, play a crucial importance in tying that segregated piece of context into a single context that will be fed into the source for your preferred LLMs.

This system employs a vector similarity search to browse through unstructured information and concurrently accesses the database to retrieve the context, ensuring that the responses are not only comprehensive but also anchored in validated knowledge.

This approach is particularly vital for addressing multi-hop questions, where a single query can be broken down into multiple sub-questions and may require information from numerous documents to generate an accurate answer.


pip install openai==0.27.8
pip install pandas==2.0.3
pip install tensorflow==2.11.1
pip install faiss-cpu==1.7.4
pip install gensim==4.3.2

Let us understand the key class & snippets.

  • clsFeedVectorDB.py (This is the main class that will invoke the Faiss framework to contextualize the docs inside the vector DB with the source file name to validate the answer from Gen AI using Globe.6B embedding models.)

Let us understand some of the key snippets from the above script (Full scripts will be available in the GitHub Repo) –

# Sample function to convert text to a vector
def text2Vector(self, text):
    # Encode the text using the tokenizer
    words = [word for word in text.lower().split() if word in self.model]

    # If no words in the model, return a zero vector
    if not words:
        return np.zeros(self.model.vector_size)

    # Compute the average of the word vectors
    vector = np.mean([self.model[word] for word in words], axis=0)
    return vector.reshape(1, -1)

This code is for a function called “text2Vector” that takes some text as input and converts it into a numerical vector. Let me break it down step by step:

  • It starts by taking some text as input, and this text is expected to be a sentence or a piece of text.
  • The text is then split into individual words, and each word is converted to lowercase.
  • It checks if each word is present in a pre-trained language model (probably a word embedding model like Word2Vec or GloVe). If a word is not in the model, it’s ignored.
  • If none of the words from the input text are found in the model, the function returns a vector filled with zeros. This vector has the same size as the word vectors in the model.
  • If there are words from the input text in the model, the function calculates the average vector of these words. It does this by taking the word vectors for each word found in the model and computing their mean (average). This results in a single vector that represents the input text.
  • Finally, the function reshapes this vector into a 2D array with one row and as many columns as there are elements in the vector. The reason for this reshaping is often related to compatibility with other parts of the code or libraries used in the project.

So, in simple terms, this function takes a piece of text, looks up the word vectors for the words in that text, and calculates the average of those vectors to create a single numerical representation of the text. If none of the words are found in the model, it returns a vector of zeros.

    def genData(self):
        try:
            basePath = self.basePath
            modelFileName = self.modelFileName
            vectorDBPath = self.vectorDBPath
            vectorDBFileName = self.vectorDBFileName

            # Create a FAISS index
            dimension = int(cf.conf['NO_OF_MODEL_DIM'])  # Assuming 100-dimensional vectors 
            index = faiss.IndexFlatL2(dimension)

            print('*' * 240)
            print('Vector Index Your Data for Retrieval:')
            print('*' * 240)

            FullVectorDBname = vectorDBPath + vectorDBFileName
            indexFile = str(vectorDBPath) + str(vectorDBFileName) + '.index'

            print('File: ', str(indexFile))

            data = {}
            # List all files in the specified directory
            files = os.listdir(basePath)

            # Filter out files that are not text files
            text_files = [file for file in files if file.endswith('.txt')]

            # Read each text file
            for file in text_files:
                file_path = os.path.join(basePath, file)
                print('*' * 240)
                print('Processing File:')
                print(str(file_path))
                try:
                    # Attempt to open with utf-8 encoding
                    with open(file_path, 'r', encoding='utf-8') as file:
                        for line_number, line in enumerate(file, start=1):
                            # Assume each line is a separate document
                            vector = self.text2Vector(line)
                            vector = vector.reshape(-1)
                            index_id = index.ntotal

                            index.add(np.array([vector]))  # Adding the vector to the index
                            data[index_id] = {'text': line, 'line_number': line_number, 'file_name': file_path}  # Storing the line and file name
                except UnicodeDecodeError:
                    # If utf-8 fails, try a different encoding
                    try:
                        with open(file_path, 'r', encoding='ISO-8859-1') as file:
                            for line_number, line in enumerate(file, start=1):
                                # Assume each line is a separate document
                                vector = self.text2Vector(line)
                                vector = vector.reshape(-1)
                                index_id = index.ntotal
                                index.add(np.array([vector]))  # Adding the vector to the index
                                data[index_id] = {'text': line, 'line_number': line_number, 'file_name': file_path}  # Storing the line and file name
                    except Exception as e:
                        print(f"Could not read file {file}: {e}")
                        continue

                print('*' * 240)

            # Save the data dictionary using pickle
            dataCache = vectorDBPath + modelFileName
            with open(dataCache, 'wb') as f:
                pickle.dump(data, f)

            # Save the index and data for later use
            faiss.write_index(index, indexFile)

            print('*' * 240)

            return 0

        except Exception as e:
            x = str(e)
            print('Error: ', x)

            return 1
  • This code defines a function called genData, and its purpose is to prepare and store data for later retrieval using a FAISS index. Let’s break down what it does step by step:
  • It starts by assigning several variables, such as basePath, modelFileName, vectorDBPath, and vectorDBFileName. These variables likely contain file paths and configuration settings.
  • It creates a FAISS index with a specified dimension (assuming 100-dimensional vectors in this case) using faiss.IndexFlatL2. FAISS is a library for efficient similarity search and clustering of high-dimensional data.
  • It prints the file name and lines where the index will be stored. It initializes an empty dictionary called data to store information about the processed text data.
  • It lists all the files in a directory specified by basePath. It filters out only the files that have a “.txt” extension as text files.
  • It then reads each of these text files one by one. For each file:
  1. It attempts to open the file with UTF-8 encoding.
    • It reads the file line by line.
    • For each line, it calls a function text2Vector to convert the text into a numerical vector representation. This vector is added to the FAISS index.
    • It also stores some information about the line, such as the line number and the file name, in the data dictionary.
    • If there is an issue with UTF-8 encoding, it tries to open the file with a different encoding, “ISO-8859-1”. The same process of reading and storing data continues.
  • If there are any exceptions (errors) during this process, it prints an error message but continues processing other files.
  • Once all the files are processed, it saves the data dictionary using the pickle library to a file specified by dataCache.
  • It also saves the FAISS index to a file specified by indexFile.
  • Finally, it returns 0 if the process completes successfully or 1 if there was an error during execution.

In summary, this function reads text files, converts their contents into numerical vectors, and builds a FAISS index for efficient similarity search. It also saves the processed data and the index for later use. If there are any issues during the process, it prints error messages but continues processing other files.

  • clsRAGOpenAI.py (This is the main class that will invoke the RAG class, which will get the contexts with references including source files, line numbers, and source texts. This will help the customer to validate the source against the OpenAI response to understand & control the data bias & other potential critical issues.)

Let us understand some of the key snippets from the above script (Full scripts will be available in the GitHub Repo) –

def ragAnswerWithHaystackAndGPT3(self, queryVector, k, question):
    modelName = self.modelName
    maxToken = self.maxToken
    temp = self.temp

    # Assuming getTopKContexts is a method that returns the top K contexts
    contexts = self.getTopKContexts(queryVector, k)
    messages = []

    # Add contexts as system messages
    for file_name, line_number, text in contexts:
        messages.append({"role": "system", "content": f"Document: {file_name} \nLine Number: {line_number} \nContent: {text}"})

    prompt = self.generateOpenaiPrompt(queryVector, k)
    prompt = prompt + "Question: " + str(question) + ". \n Answer based on the above documents."

    # Add user question
    messages.append({"role": "user", "content": prompt})

    # Create chat completion
    completion = client.chat.completions.create(
    model=modelName,
    messages=messages,
    temperature = temp,
    max_tokens = maxToken
    )

    # Assuming the last message in the response is the answer
    last_response = completion.choices[0].message.content
    source_refernces = ['FileName: ' + str(context[0]) + ' - Line Numbers: ' + str(context[1]) + ' - Source Text (Reference): ' + str(context[2]) for context in contexts]

    return last_response, source_refernces
  • This code defines a function called ragAnswerWithHaystackAndGPT3. Its purpose is to use a combination of the Haystack search method and OpenAI’s GPT-3 model to generate an answer to a user’s question. Let’s break down what it does step by step:
  • It starts by assigning several variables, such as modelName, maxToken, and temp. These variables likely contain model-specific information and settings for GPT-3.
  • It calls a method getTopKContexts to retrieve the top K contexts (which are likely documents or pieces of text) related to the user’s query. These contexts are stored in the contexts variable.
  • It initializes an empty list called messages to store messages that will be used in the conversation with the GPT-3 model.
  • It iterates through each context and adds them as system messages to the messages list. These system messages provide information about the documents or sources being used in the conversation.
  • It creates a prompt that combines the query, retrieved contexts, and the user’s question. This prompt is then added as a user message to the messages list. It effectively sets up the conversation for GPT-3, where the user’s question is followed by context.
  • It makes a request to the GPT-3 model using the client.chat.completions.create method, passing in the model name, the constructed messages, and other settings such as temperature and maximum tokens.
  • After receiving a response from GPT-3, it assumes that the last message in the response contains the answer generated by the model.
  • It also constructs source_references, which is a list of references to the documents or sources used in generating the answer. This information includes the file name, line numbers, and source text for each context.
  • Finally, it returns the generated answer (last_response) and the source references to the caller.

In summary, this function takes a user’s query, retrieves relevant contexts or documents, sets up a conversation with GPT-3 that includes the query and contexts, and then uses GPT-3 to generate an answer. It also provides references to the sources used in generating the answer.

    def getTopKContexts(self, queryVector, k):
        try:
            distances, indices = index.search(queryVector, k)
            resDict = [(data[i]['file_name'], data[i]['line_number'], data[i]['text']) for i in indices[0]]
            return resDict
        except Exception as e:
            x = str(e)
            print('Error: ', x)

            return x

This code defines a function called getTopKContexts. Its purpose is to retrieve the top K relevant contexts or pieces of information from a pre-built index based on a query vector. Here’s a breakdown of what it does:

  1. It takes two parameters as input: queryVector, which is a numerical vector representing a query, and k, which specifies how many relevant contexts to retrieve.
  2. Inside a try-except block, it attempts the following steps:
    • It uses the index.search method to find the top K closest contexts to the given queryVector. This method returns two arrays: distances (measuring how similar the contexts are to the query) and indices (indicating the positions of the closest contexts in the data).
    • It creates a list called “resDict", which contains tuples for each of the top K contexts. Each tuple contains three pieces of information: the file name (file_name), the line number (line_number), and the text content (text) of the context. These details are extracted from a data dictionary.
  3. If the process completes successfully, it returns the list of top K contexts (resDict) to the caller.
  4. If there’s an exception (an error) during this process, it captures the error message as a string (x), prints the error message, and then returns the error message itself.

In summary, this function takes a query vector and finds the K most relevant contexts or pieces of information based on their similarity to the query. It returns these contexts as a list of tuples containing file names, line numbers, and text content. If there’s an error, it prints an error message and returns the error message string.

def generateOpenaiPrompt(self, queryVector, k):
    contexts = self.getTopKContexts(queryVector, k)
    template = ct.templateVal_1
    prompt = template
    for file_name, line_number, text in contexts:
        prompt += f"Document: {file_name}\n Line Number: {line_number} \n Content: {text}\n\n"
    return prompt

This code defines a function called generateOpenaiPrompt. Its purpose is to create a prompt or a piece of text that combines a template with information from the top K relevant contexts retrieved earlier. Let’s break down what it does:

  1. It starts by calling the getTopKContexts function to obtain the top K relevant contexts based on a given queryVector.
  2. It initializes a variable called template with a predefined template value (likely defined elsewhere in the code).
  3. It sets the prompt variable to the initial template.
  4. Then, it enters a loop where it iterates through each of the relevant contexts retrieved earlier (contexts are typically documents or text snippets).
  5. For each context, it appends information to the prompt. Specifically, it adds lines to the prompt that include:
    • The document’s file name (Document: [file_name]).
    • The line number within the document (Line Number: [line_number]).
    • The content of the context itself (Content: [text]).
  6. It adds some extra spacing (newlines) between each context to ensure readability.
  7. Finally, it returns the complete – prompt, which is a combination of the template and information from the relevant contexts.

In summary, this function takes a query vector, retrieves relevant contexts, and creates a prompt by combining a template with information from these contexts. This prompt can then be used as input for an AI model or system, likely for generating responses or answers based on the provided context.

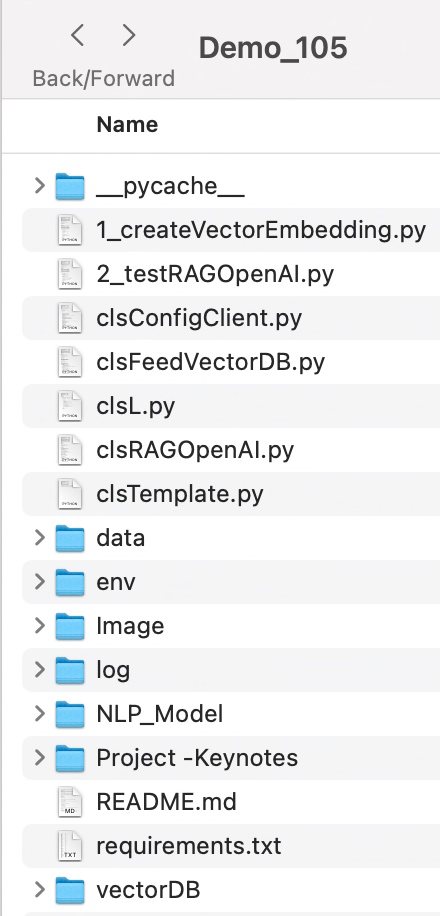
Let us understand the directory structure of this entire application –


To learn more about this package, please visit the following GitHub link.

So, finally, we’ve done it. I know that this post is relatively smaller than my earlier post. But, I think, you can get a good hack to improve some of your long-running jobs by applying this trick.

I’ll bring some more exciting topics in the coming days from the Python verse. Please share & subscribe to my post & let me know your feedback.

Till then, Happy Avenging! 🙂

Exploring the new Polars library in Python

Today, I will present some valid Python packages where you can explore most of the complex SQLs by using this new package named “Polars,” which can be extremely handy on many occasions.

This post will be short posts where I’ll prepare something new on LLMs for the upcoming posts for the next month.

Why not view the demo before going through it?


Demo
pip install polars
pip install pandas

Let us understand the key class & snippets.

  • clsConfigClient.py (Key entries that will be discussed later)
################################################
#### Written By: SATYAKI DE                 ####
#### Written On:  15-May-2020               ####
#### Modified On: 28-Oct-2023               ####
####                                        ####
#### Objective: This script is a config     ####
#### file, contains all the keys for        ####
#### personal OpenAI-based MAC-shortcuts    ####
#### enable bot.                            ####
####                                        ####
################################################

import os
import platform as pl

class clsConfigClient(object):
    Curr_Path = os.path.dirname(os.path.realpath(__file__))

    os_det = pl.system()
    if os_det == "Windows":
        sep = '\\'
    else:
        sep = '/'

    conf = {
        'APP_ID': 1,
        'ARCH_DIR': Curr_Path + sep + 'arch' + sep,
        'LOG_PATH': Curr_Path + sep + 'log' + sep,
        'DATA_PATH': Curr_Path + sep + 'data' + sep,
        'TEMP_PATH': Curr_Path + sep + 'temp' + sep,
        'OUTPUT_DIR': 'model',
        'APP_DESC_1': 'Polars Demo!',
        'DEBUG_IND': 'Y',
        'INIT_PATH': Curr_Path,
        'TITLE': "Polars Demo!",
        'PATH' : Curr_Path,
        'OUT_DIR': 'data',
        'MERGED_FILE': 'mergedFile.csv',
        'ACCT_FILE': 'AccountAddress.csv',
        'ORDER_FILE': 'Orders.csv',
        'CUSTOMER_FILE': 'CustomerDetails.csv',
        'STATE_CITY_WISE_REPORT_FILE': 'StateCityWiseReport.csv'
    }
  • clsSQL.py (Main class file that contains how to use the SQL)
#####################################################
#### Written By: SATYAKI DE                      ####
#### Written On: 27-May-2023                     ####
#### Modified On 28-Oct-2023                     ####
####                                             ####
#### Objective: This is the main calling         ####
#### python class that will invoke the           ####
#### Polar class, which will enable SQL          ####
#### capabilitites.                              ####
####                                             ####
#####################################################

import polars as pl
import os
from clsConfigClient import clsConfigClient as cf
import pandas as p

###############################################
###           Global Section                ###
###############################################

# Disbling Warning
def warn(*args, **kwargs):
    pass

import warnings
warnings.warn = warn

###############################################
###    End of Global Section                ###
###############################################

class clsSQL:
    def __init__(self):
        self.acctFile = cf.conf['ACCT_FILE']
        self.orderFile = cf.conf['ORDER_FILE']
        self.stateWiseReport = cf.conf['STATE_CITY_WISE_REPORT_FILE']
        self.custFile = cf.conf['CUSTOMER_FILE']
        self.dataPath = cf.conf['DATA_PATH']

    def execSQL(self):
        try:
            dataPath = self.dataPath
            acctFile = self.acctFile
            orderFile = self.orderFile
            stateWiseReport = self.stateWiseReport
            custFile = self.custFile

            fullAcctFile = dataPath + acctFile
            fullOrderFile = dataPath + orderFile
            fullStateWiseReportFile = dataPath + stateWiseReport
            fullCustomerFile = dataPath + custFile

            ctx = pl.SQLContext(accountMaster = pl.scan_csv(fullAcctFile),
            orderMaster = pl.scan_csv(fullOrderFile),
            stateMaster = pl.scan_csv(fullStateWiseReportFile))

            querySQL = """
            SELECT orderMaster.order_id,
            orderMaster.total,
            stateMaster.state,
            accountMaster.Acct_Nbr,
            accountMaster.Name,
            accountMaster.Email,
            accountMaster.user_id,
            COUNT(*) TotalCount
            FROM orderMaster
            JOIN stateMaster USING (city)
            JOIN accountMaster USING (user_id)
            ORDER BY stateMaster.state
            """

            res = ctx.execute(querySQL, eager=True)
            res_Pandas = res.to_pandas()

            print('Result:')
            print(res_Pandas)
            print(type(res_Pandas))

            ctx_1 = pl.SQLContext(customerMaster = pl.scan_csv(fullCustomerFile),
            tempMaster=pl.from_pandas(res_Pandas))

            querySQL_1 = """
            SELECT tempMaster.order_id,
            tempMaster.total,
            tempMaster.state,
            tempMaster.Acct_Nbr,
            tempMaster.Name,
            tempMaster.Email,
            tempMaster.TotalCount,
            tempMaster.user_id,
            COUNT(*) OVER(PARTITION BY tempMaster.state ORDER BY tempMaster.state, tempMaster.Acct_Nbr) StateWiseCount,
            MAX(tempMaster.Acct_Nbr) OVER(PARTITION BY tempMaster.state ORDER BY tempMaster.state, tempMaster.Acct_Nbr) MaxAccountByState,
            MIN(tempMaster.Acct_Nbr) OVER(PARTITION BY tempMaster.state ORDER BY tempMaster.state, tempMaster.Acct_Nbr) MinAccountByState,
            CASE WHEN tempMaster.total < 70 THEN 'SILVER' ELSE 'GOLD' END CategoryStat,
            SUM(customerMaster.Balance) OVER(PARTITION BY tempMaster.state) SumBalance
            FROM tempMaster
            JOIN customerMaster USING (user_id)
            ORDER BY tempMaster.state
            """

            res_1 = ctx_1.execute(querySQL_1, eager=True)

            finDF = res_1.to_pandas()

            print('Result 2:')
            print(finDF)

            return 0
        except Exception as e:
            discussedTopic = []
            x = str(e)
            print('Error: ', x)

            return 1

If we go through some of the key lines, we will understand how this entire package works.

But, before that, let us understand the source data –

Let us understand the steps –

  1. Join orderMaster, stateMaster & accountMaster and fetch the selected attributes. Store this in a temporary data frame named tempMaster.
  2. Join tempMaster & customerMaster and fetch the relevant attributes with some more aggregation, which is required for the business KPIs.
ctx = pl.SQLContext(accountMaster = pl.scan_csv(fullAcctFile),
orderMaster = pl.scan_csv(fullOrderFile),
stateMaster = pl.scan_csv(fullStateWiseReportFile))

The above method will create three temporary tables by reading the source files – AccountAddress.csv, Orders.csv & StateCityWiseReport.csv.

And, let us understand the supported SQLs –

SELECT  orderMaster.order_id,
        orderMaster.total,
        stateMaster.state,
        accountMaster.Acct_Nbr,
        accountMaster.Name,
        accountMaster.Email,
        accountMaster.user_id,
        COUNT(*) TotalCount
FROM orderMaster
JOIN stateMaster USING (city)
JOIN accountMaster USING (user_id)
ORDER BY stateMaster.state

In this step, we’re going to store the output of the above query into a temporary view named – tempMaster data frame.

Since this is a polar data frame, we’re converting it to the pandas data frame.

res_Pandas = res.to_pandas()

Finally, let us understand the next part –

ctx_1 = pl.SQLContext(customerMaster = pl.scan_csv(fullCustomerFile),
tempMaster=pl.from_pandas(res_Pandas))

In the above section, one source is getting populated from the CSV file, whereas the other source is feeding from a pandas data frame populated in the previous step.

Now, let us understand the SQL supported by this package, which is impressive –

SELECT  tempMaster.order_id,
        tempMaster.total,
        tempMaster.state,
        tempMaster.Acct_Nbr,
        tempMaster.Name,
        tempMaster.Email,
        tempMaster.TotalCount,
        tempMaster.user_id,
        COUNT(*) OVER(PARTITION BY tempMaster.state ORDER BY tempMaster.state, tempMaster.Acct_Nbr) StateWiseCount,
        MAX(tempMaster.Acct_Nbr) OVER(PARTITION BY tempMaster.state ORDER BY tempMaster.state, tempMaster.Acct_Nbr) MaxAccountByState,
        MIN(tempMaster.Acct_Nbr) OVER(PARTITION BY tempMaster.state ORDER BY tempMaster.state, tempMaster.Acct_Nbr) MinAccountByState,
        CASE WHEN tempMaster.total < 70 THEN 'SILVER' ELSE 'GOLD' END CategoryStat,
        SUM(customerMaster.Balance) OVER(PARTITION BY tempMaster.state) SumBalance
FROM tempMaster
JOIN customerMaster USING (user_id)
ORDER BY tempMaster.state

As you can see it has the capability of all the advanced analytics SQL using partitions, and CASE statements.

The only problem with COUNT(*) with the partition is not working as expected. Not sure, whether that is related to any version issues or not.

COUNT(*) OVER(PARTITION BY tempMaster.state ORDER BY tempMaster.state, tempMaster.Acct_Nbr) StateWiseCount

I’m trying to get more information on this. Except for this statement, everything works perfectly.

  • 1_testSQL.py (Main class file that contains how to use the SQL)
#########################################################
#### Written By: SATYAKI DE                          ####
#### Written On: 27-Jun-2023                         ####
#### Modified On 28-Oct-2023                         ####
####                                                 ####
#### Objective: This is the main class that invokes  ####
#### advanced analytic SQL in python.                ####
####                                                 ####
#########################################################

from clsConfigClient import clsConfigClient as cf
import clsL as log
import clsSQL as ccl

from datetime import datetime, timedelta

# Disbling Warning
def warn(*args, **kwargs):
    pass

import warnings
warnings.warn = warn

###############################################
###           Global Section                ###
###############################################

#Initiating Logging Instances
clog = log.clsL()
cl = ccl.clsSQL()

var = datetime.now().strftime(".%H.%M.%S")

documents = []

###############################################
###    End of Global Section                ###
###############################################
def main():
    try:
        var = datetime.now().strftime("%Y-%m-%d_%H-%M-%S")
        print('*'*120)
        print('Start Time: ' + str(var))
        print('*'*120)

        r1 = cl.execSQL()

        if r1 == 0:
            print()
            print('Successfully SQL-enabled!')
        else:
            print()
            print('Failed to senable SQL!')

        print('*'*120)
        var1 = datetime.now().strftime("%Y-%m-%d_%H-%M-%S")
        print('End Time: ' + str(var1))

    except Exception as e:
        x = str(e)
        print('Error: ', x)

if __name__ == '__main__':
    main()

As this is extremely easy to understand & self-explanatory.

To learn more about this package, please visit the following link.


So, finally, we’ve done it. I know that this post is relatively smaller than my earlier post. But, I think, you can get a good hack to improve some of your long-running jobs by applying this trick.

I’ll bring some more exciting topics in the coming days from the Python verse. Please share & subscribe to my post & let me know your feedback.

Till then, Happy Avenging!  🙂

RAG implementation of LLMs by using Python, Haystack & React (Part – 2)

Today, we’ll share the second installment of the RAG implementation. If you are new here, please visit the previous post for full context.

In this post, we’ll be discussing the Haystack framework more. Again, before discussing the main context, I want to present the demo here.

Demo

Let us look at the flow diagram as it captures the sequence of events that unfold as part of the process, where today, we’ll pay our primary attention.

As you can see today, we’ll discuss the red dotted line, which contextualizes the source data into the Vector DBs.

Let us understand the flow of events here –

  1. The main Python application will consume the nested JSON by invoking the museum API in multiple threads.
  2. The application will clean the nested data & extract the relevant attributes after flattening the JSON.
  3. It will create the unstructured text-based context, which is later fed to the Vector DB framework.

pip install farm-haystack==1.19.0
pip install Flask==2.2.5
pip install Flask-Cors==4.0.0
pip install Flask-JWT-Extended==4.5.2
pip install Flask-Session==0.5.0
pip install openai==0.27.8
pip install pandas==2.0.3
pip install tensorflow==2.11.1

We’re using the Metropolitan Museum API to feed the data to our Vector DB. For more information, please visit the following link. And this is free to use & moreover, we’re using it for education scenarios.


We’ll discuss the tokenization part highlighted in a red dotted line from the above picture.

We’ll discuss the scripts in the diagram as part of the flow mentioned above.

  • clsExtractJSON.py (This is the main class that will extract the content from the museum API using parallel calls.)
def genData(self):
    try:
        base_url = self.base_url
        header_token = self.header_token
        basePath = self.basePath
        outputPath = self.outputPath
        mergedFile = self.mergedFile
        subdir = self.subdir
        Ind = self.Ind
        var_1 = datetime.now().strftime("%H.%M.%S")


        devVal = list()
        objVal = list()

        # Main Details
        headers = {'Cookie':header_token}
        payload={}

        url = base_url + '/departments'

        date_ranges = self.generateFirstDayOfLastTenYears()

        # Getting all the departments
        try:
            print('Department URL:')
            print(str(url))

            response = requests.request("GET", url, headers=headers, data=payload)
            parsed_data = json.loads(response.text)

            print('Department JSON:')
            print(str(parsed_data))

            # Extract the "departmentId" values into a Python list
            for dept_det in parsed_data['departments']:
                for info in dept_det:
                    if info == 'departmentId':
                        devVal.append(dept_det[info])

        except Exception as e:
            x = str(e)
            print('Error: ', x)
            devVal = list()

        # List to hold thread objects
        threads = []

        # Calling the Data using threads
        for dep in devVal:
            t = threading.Thread(target=self.getDataThread, args=(dep, base_url, headers, payload, date_ranges, objVal, subdir, Ind,))
            threads.append(t)
            t.start()

        # Wait for all threads to complete
        for t in threads:
            t.join()

        res = self.mergeCsvFilesInDirectory(basePath, outputPath, mergedFile)

        if res == 0:
            print('Successful!')
        else:
            print('Failure!')

        return 0

    except Exception as e:
        x = str(e)
        print('Error: ', x)

        return 1

The above code translates into the following steps –

  1. The above method first calls the generateFirstDayOfLastTenYears() plan to populate records for every department after getting all the unique departments by calling another API.
  2. Then, it will call the getDataThread() methods to fetch all the relevant APIs simultaneously to reduce the overall wait time & create individual smaller files.
  3. Finally, the application will invoke the mergeCsvFilesInDirectory() method to merge all the chunk files into one extensive historical data.
def generateFirstDayOfLastTenYears(self):
    yearRange = self.yearRange
    date_format = "%Y-%m-%d"
    current_year = datetime.now().year

    date_ranges = []
    for year in range(current_year - yearRange, current_year + 1):
        first_day_of_year_full = datetime(year, 1, 1)
        first_day_of_year = first_day_of_year_full.strftime(date_format)
        date_ranges.append(first_day_of_year)

    return date_ranges

The first method will generate the first day of each year for the last ten years, including the current year.

def getDataThread(self, dep, base_url, headers, payload, date_ranges, objVal, subdir, Ind):
    try:
        cnt = 0
        cnt_x = 1
        var_1 = datetime.now().strftime("%H.%M.%S")

        for x_start_date in date_ranges:
            try:
                urlM = base_url + '/objects?metadataDate=' + str(x_start_date) + '&departmentIds=' + str(dep)

                print('Nested URL:')
                print(str(urlM))

                response_obj = requests.request("GET", urlM, headers=headers, data=payload)
                objectDets = json.loads(response_obj.text)

                for obj_det in objectDets['objectIDs']:
                    objVal.append(obj_det)

                for objId in objVal:
                    urlS = base_url + '/objects/' + str(objId)

                    print('Final URL:')
                    print(str(urlS))

                    response_det = requests.request("GET", urlS, headers=headers, data=payload)
                    objDetJSON = response_det.text

                    retDB = self.createData(objDetJSON)
                    retDB['departmentId'] = str(dep)

                    if cnt == 0:
                        df_M = retDB
                    else:
                        d_frames = [df_M, retDB]
                        df_M = pd.concat(d_frames)

                    if cnt == 1000:
                        cnt = 0
                        clog.logr('df_M_' + var_1 + '_' + str(cnt_x) + '_' + str(dep) +'.csv', Ind, df_M, subdir)
                        cnt_x += 1
                        df_M = pd.DataFrame()

                    cnt += 1

            except Exception as e:
                x = str(e)
                print('Error X:', x)
        return 0

    except Exception as e:
        x = str(e)
        print('Error: ', x)

        return 1

The above method will invoke the individual API call to fetch the relevant artifact information.

def mergeCsvFilesInDirectory(self, directory_path, output_path, output_file):
    try:
        csv_files = [file for file in os.listdir(directory_path) if file.endswith('.csv')]
        data_frames = []

        for file in csv_files:
            encodings_to_try = ['utf-8', 'utf-8-sig', 'latin-1', 'cp1252']
            for encoding in encodings_to_try:
                try:
                    FullFileName = directory_path + file
                    print('File Name: ', FullFileName)
                    df = pd.read_csv(FullFileName, encoding=encoding)
                    data_frames.append(df)
                    break  # Stop trying other encodings if the reading is successful
                except UnicodeDecodeError:
                    continue

        if not data_frames:
            raise Exception("Unable to read CSV files. Check encoding or file format.")

        merged_df = pd.concat(data_frames, ignore_index=True)

        merged_full_name = os.path.join(output_path, output_file)
        merged_df.to_csv(merged_full_name, index=False)

        for file in csv_files:
            os.remove(os.path.join(directory_path, file))

        return 0

    except Exception as e:
        x = str(e)
        print('Error: ', x)
        return 1

The above method will merge all the small files into a single, more extensive historical data that contains over ten years of data (the first day of ten years of data, to be precise).

For the complete code, please visit the GitHub.

  • 1_ReadMuseumJSON.py (This is the main class that will invoke the class, which will extract the content from the museum API using parallel calls.)
#########################################################
#### Written By: SATYAKI DE                          ####
#### Written On: 27-Jun-2023                         ####
#### Modified On 28-Jun-2023                         ####
####                                                 ####
#### Objective: This is the main calling             ####
#### python script that will invoke the              ####
#### shortcut application created inside MAC         ####
#### enviornment including MacBook, IPad or IPhone.  ####
####                                                 ####
#########################################################
import datetime
from clsConfigClient import clsConfigClient as cf

import clsExtractJSON as cej

########################################################
################    Global Area   ######################
########################################################

cJSON = cej.clsExtractJSON()

basePath = cf.conf['DATA_PATH']
outputPath = cf.conf['OUTPUT_PATH']
mergedFile = cf.conf['MERGED_FILE']

########################################################
################  End Of Global Area   #################
########################################################

# Disbling Warning
def warn(*args, **kwargs):
    pass

import warnings
warnings.warn = warn

def main():
    try:
        var = datetime.datetime.now().strftime("%Y-%m-%d_%H-%M-%S")
        print('*'*120)
        print('Start Time: ' + str(var))
        print('*'*120)

        r1 = cJSON.genData()

        if r1 == 0:
            print()
            print('Successfully Scrapped!')
        else:
            print()
            print('Failed to Scrappe!')

        print('*'*120)
        var1 = datetime.datetime.now().strftime("%Y-%m-%d_%H-%M-%S")
        print('End Time: ' + str(var1))

    except Exception as e:
        x = str(e)
        print('Error: ', x)

if __name__ == '__main__':
    main()

The above script calls the main class after instantiating the class.

  • clsCreateList.py (This is the main class that will extract the relevant attributes from the historical files & then create the right input text to create the documents for contextualize into the Vector DB framework.)
def createRec(self):
    try:
        basePath = self.basePath
        fileName = self.fileName
        Ind = self.Ind
        subdir = self.subdir
        base_url = self.base_url
        outputPath = self.outputPath
        mergedFile = self.mergedFile
        cleanedFile = self.cleanedFile

        FullFileName = outputPath + mergedFile

        df = pd.read_csv(FullFileName)
        df2 = df[listCol]
        dfFin = df2.drop_duplicates().reset_index(drop=True)

        dfFin['artist_URL'] = dfFin['artistWikidata_URL'].combine_first(dfFin['artistULAN_URL'])
        dfFin['object_URL'] = dfFin['objectURL'].combine_first(dfFin['objectWikidata_URL'])
        dfFin['Wiki_URL'] = dfFin['Wikidata_URL'].combine_first(dfFin['AAT_URL']).combine_first(dfFin['URL']).combine_first(dfFin['object_URL'])

        # Dropping the old Dtype Columns
        dfFin.drop(['artistWikidata_URL'], axis=1, inplace=True)
        dfFin.drop(['artistULAN_URL'], axis=1, inplace=True)
        dfFin.drop(['objectURL'], axis=1, inplace=True)
        dfFin.drop(['objectWikidata_URL'], axis=1, inplace=True)
        dfFin.drop(['AAT_URL'], axis=1, inplace=True)
        dfFin.drop(['Wikidata_URL'], axis=1, inplace=True)
        dfFin.drop(['URL'], axis=1, inplace=True)

        # Save the filtered DataFrame to a new CSV file
        #clog.logr(cleanedFile, Ind, dfFin, subdir)
        res = self.addHash(dfFin)

        if res == 0:
            print('Added Hash!')
        else:
            print('Failed to add hash!')

        # Generate the text for each row in the dataframe
        for _, row in dfFin.iterrows():
            x = self.genPrompt(row)
            self.addDocument(x, cleanedFile)

        return documents

    except Exception as e:
        x = str(e)
        print('Record Error: ', x)

        return documents

The above code will read the data from the extensive historical file created from the earlier steps & then it will clean the file by removing all the duplicate records (if any) & finally, it will create three unique URLs that constitute artist, object & wiki.

Also, this application will remove the hyperlink with a specific hash value, which will feed into the vector DB. Vector DB could be better with the URLs. Hence, we will store the URLs in a separate file by storing the associate hash value & later, we’ll fetch it in a lookup from the open AI response.

Then, this application will generate prompts dynamically & finally create the documents for later steps of vector DB consumption by invoking the addDocument() methods.

For more details, please visit the GitHub link.

  • 1_1_testCreateRec.py (This is the main class that will call the above class.)
#########################################################
#### Written By: SATYAKI DE                          ####
#### Written On: 27-Jun-2023                         ####
#### Modified On 28-Jun-2023                         ####
####                                                 ####
#### Objective: This is the main calling             ####
#### python script that will invoke the              ####
#### shortcut application created inside MAC         ####
#### enviornment including MacBook, IPad or IPhone.  ####
####                                                 ####
#########################################################

from clsConfigClient import clsConfigClient as cf
import clsL as log
import clsCreateList as ccl

from datetime import datetime, timedelta

# Disbling Warning
def warn(*args, **kwargs):
    pass

import warnings
warnings.warn = warn

###############################################
###           Global Section                ###
###############################################

#Initiating Logging Instances
clog = log.clsL()
cl = ccl.clsCreateList()

var = datetime.now().strftime(".%H.%M.%S")

documents = []

###############################################
###    End of Global Section                ###
###############################################
def main():
    try:
        var = datetime.now().strftime("%Y-%m-%d_%H-%M-%S")
        print('*'*120)
        print('Start Time: ' + str(var))
        print('*'*120)

        print('*'*240)
        print('Creating Index store:: ')
        print('*'*240)

        documents = cl.createRec()

        print('Inserted Sample Records: ')
        print(str(documents))
        print('\n')

        r1 = len(documents)

        if r1 > 0:
            print()
            print('Successfully Indexed sample records!')
        else:
            print()
            print('Failed to sample Indexed recrods!')

        print('*'*120)
        var1 = datetime.now().strftime("%Y-%m-%d_%H-%M-%S")
        print('End Time: ' + str(var1))

    except Exception as e:
        x = str(e)
        print('Error: ', x)

if __name__ == '__main__':
    main()

The above script invokes the main class after instantiating it & invokes the createRec() methods to tokenize the data into the vector DB.

This above test script will be used to test the above clsCreateList class. However, the class will be used inside another class.

– Satyaki
  • clsFeedVectorDB.py (This is the main class that will feed the documents into the vector DB.)
#########################################################
#### Written By: SATYAKI DE                          ####
#### Written On: 27-Jun-2023                         ####
#### Modified On 28-Sep-2023                         ####
####                                                 ####
#### Objective: This is the main calling             ####
#### python script that will invoke the              ####
#### haystack frameowrk to contextulioze the docs    ####
#### inside the vector DB.                           ####
####                                                 ####
#########################################################

from haystack.document_stores.faiss import FAISSDocumentStore
from haystack.nodes import DensePassageRetriever
import openai
import pandas as pd
import os
import clsCreateList as ccl

from clsConfigClient import clsConfigClient as cf
import clsL as log

from datetime import datetime, timedelta

# Disbling Warning
def warn(*args, **kwargs):
    pass

import warnings
warnings.warn = warn

###############################################
###           Global Section                ###
###############################################

Ind = cf.conf['DEBUG_IND']
openAIKey = cf.conf['OPEN_AI_KEY']

os.environ["TOKENIZERS_PARALLELISM"] = "false"

#Initiating Logging Instances
clog = log.clsL()
cl = ccl.clsCreateList()

var = datetime.now().strftime(".%H.%M.%S")

# Encode your data to create embeddings
documents = []

var_1 = datetime.now().strftime("%Y-%m-%d_%H-%M-%S")
print('*'*120)
print('Start Time: ' + str(var_1))
print('*'*120)

print('*'*240)
print('Creating Index store:: ')
print('*'*240)

documents = cl.createRec()

print('Inserted Sample Records: ')
print(documents[:5])
print('\n')
print('Type:')
print(type(documents))

r1 = len(documents)

if r1 > 0:
    print()
    print('Successfully Indexed records!')
else:
    print()
    print('Failed to Indexed recrods!')

print('*'*120)
var_2 = datetime.now().strftime("%Y-%m-%d_%H-%M-%S")
print('End Time: ' + str(var_2))

# Passing OpenAI API Key
openai.api_key = openAIKey

###############################################
###    End of Global Section                ###
###############################################

class clsFeedVectorDB:
    def __init__(self):
        self.basePath = cf.conf['DATA_PATH']
        self.modelFileName = cf.conf['CACHE_FILE']
        self.vectorDBPath = cf.conf['VECTORDB_PATH']
        self.vectorDBFileName = cf.conf['VECTORDB_FILE_NM']
        self.queryModel = cf.conf['QUERY_MODEL']
        self.passageModel = cf.conf['PASSAGE_MODEL']

    def retrieveDocuments(self, question, retriever, top_k=3):
        return retriever.retrieve(question, top_k=top_k)

    def generateAnswerWithGPT3(self, retrievedDocs, question):
        documents_text = " ".join([doc.content for doc in retrievedDocs])
        prompt = f"Given the following documents: {documents_text}, answer the question: {question}"

        response = openai.Completion.create(
            model="text-davinci-003",
            prompt=prompt,
            max_tokens=150
        )
        return response.choices[0].text.strip()

    def ragAnswerWithHaystackAndGPT3(self, question, retriever):
        retrievedDocs = self.retrieveDocuments(question, retriever)
        return self.generateAnswerWithGPT3(retrievedDocs, question)

    def genData(self, strVal):
        try:
            basePath = self.basePath
            modelFileName = self.modelFileName
            vectorDBPath = self.vectorDBPath
            vectorDBFileName = self.vectorDBFileName
            queryModel = self.queryModel
            passageModel = self.passageModel

            print('*'*120)
            print('Index Your Data for Retrieval:')
            print('*'*120)

            FullFileName = basePath + modelFileName
            FullVectorDBname = vectorDBPath + vectorDBFileName

            sqlite_path = "sqlite:///" + FullVectorDBname + '.db'
            print('Vector DB Path: ', str(sqlite_path))

            indexFile = "vectorDB/" + str(vectorDBFileName) + '.faiss'
            indexConfig = "vectorDB/" + str(vectorDBFileName) + ".json"

            print('File: ', str(indexFile))
            print('Config: ', str(indexConfig))

            # Initialize DocumentStore
            document_store = FAISSDocumentStore(sql_url=sqlite_path)

            libName = "vectorDB/" + str(vectorDBFileName) + '.faiss'

            document_store.write_documents(documents)

            # Initialize Retriever
            retriever = DensePassageRetriever(document_store=document_store,
                                              query_embedding_model=queryModel,
                                              passage_embedding_model=passageModel,
                                              use_gpu=False)

            document_store.update_embeddings(retriever=retriever)

            document_store.save(index_path=libName, config_path="vectorDB/" + str(vectorDBFileName) + ".json")

            print('*'*120)
            print('Testing with RAG & OpenAI...')
            print('*'*120)

            answer = self.ragAnswerWithHaystackAndGPT3(strVal, retriever)

            print('*'*120)
            print('Testing Answer:: ')
            print(answer)
            print('*'*120)

            return 0

        except Exception as e:
            x = str(e)
            print('Error: ', x)

            return 1

In the above script, the following essential steps took place –

  1. First, the application calls the clsCreateList class to store all the documents inside a dictionary.
  2. Then it stores the data inside the vector DB & creates & stores the model, which will be later reused (If you remember, we’ve used this as a model in our previous post).
  3. Finally, test with some sample use cases by providing the proper context to OpenAI & confirm the response.

Here is a short clip of how the RAG models contextualize with the source data.

RAG-Model Contextualization

So, finally, we’ve done it.

I know that this post is relatively bigger than my earlier post. But, I think, you can get all the details once you go through it.

You will get the complete codebase in the following GitHub link.

I’ll bring some more exciting topics in the coming days from the Python verse. Please share & subscribe to my post & let me know your feedback.

Till then, Happy Avenging! 🙂

Hacking the performance of Python Solutions with a custom-built library

Today, I’m very excited to demonstrate an effortless & new way to hack the performance of Python. This post will be a super short & yet crisp presentation of improving the overall performance.

Why not view the demo before going through it?


Demo

Isn’t it exciting? Let’s understand the steps to improve your code.

pip install cython

Cython is a Python-to-C compiler. It can significantly improve performance for specific tasks, especially those with heavy computation and loops. Also, Cython’s syntax is very similar to Python, which makes it easy to learn.

Let’s consider an example where we calculate the sum of squares for a list of numbers. The code without optimization would look like this:

  • perfTest_1.py (First untuned Python class.)
#########################################################
#### Written By: SATYAKI DE                          ####
#### Written On: 31-Jul-2023                         ####
#### Modified On 31-Jul-2023                         ####
####                                                 ####
#### Objective: This is the main calling             ####
#### python script that will invoke the              ####
#### first version of accute computation.            ####
####                                                 ####
#########################################################
from clsConfigClient import clsConfigClient as cf

import time
start = time.time()

n_val = cf.conf['INPUT_VAL']

def compute_sum_of_squares(n):
    return sum([i**2 for i in range(n)])

n = n_val

print(compute_sum_of_squares(n))

print(f"Test - 1: Execution time: {time.time() - start} seconds")

Here, n_val contains the value as – “1000000000”.

Now, let’s optimize it using Cython by installing the abovementioned packages. Then, you will have to create a .pyx file, say “compute.pyx”, with the following code:

cpdef double compute_sum_of_squares(int n):
    return sum([i**2 for i in range(n)])

Now, create a setup.py file to compile it:

###########################################################
#### Written By: SATYAKI DE                            ####
#### Written On: 31-Jul-2023                           ####
#### Modified On 31-Jul-2023                           ####
####                                                   ####
#### Objective: This is the main calling               ####
#### python script that will create the                ####
#### compiled library after executing the compute.pyx. ####
####                                                   ####
###########################################################

from setuptools import setup
from Cython.Build import cythonize

setup(
    ext_modules = cythonize("compute.pyx")
)

Compile it using the command:

python setup.py build_ext --inplace

This will look like the following –

Finally, you can import the function from the compiled “.pyx” file inside the improved code.

  • perfTest_2.py (First untuned Python class.)
#########################################################
#### Written By: SATYAKI DE                          ####
#### Written On: 31-Jul-2023                         ####
#### Modified On 31-Jul-2023                         ####
####                                                 ####
#### Objective: This is the main calling             ####
#### python script that will invoke the              ####
#### optimized & precompiled custom library, which   ####
#### will significantly improve the performance.     ####
####                                                 ####
#########################################################
from clsConfigClient import clsConfigClient as cf
from compute import compute_sum_of_squares

import time
start = time.time()

n_val = cf.conf['INPUT_VAL']

n = n_val

print(compute_sum_of_squares(n))

print(f"Test - 2: Execution time with multiprocessing: {time.time() - start} seconds")

By compiling to C, Cython can speed up loop and function calls, leading to significant speedup for CPU-bound tasks.

Please note that while Cython can dramatically improve performance, it can make the code more complex and harder to debug. Therefore, starting with regular Python and switching to Cython for the performance-critical parts of the code is recommended.


So, finally, we’ve done it. I know that this post is relatively smaller than my earlier post. But, I think, you can get a good hack to improve some of your long-running jobs by applying this trick.

I’ll bring some more exciting topics in the coming days from the Python verse. Please share & subscribe to my post & let me know your feedback.

Till then, Happy Avenging! 🙂

Enable OpenAI chatbot with the selected YouTube video content using LangChain, FAISS & YouTube data-API.

Today, I’m very excited to demonstrate an effortless & new way to extract the transcript from YouTube videos & then answer the questions based on the topics selected by the users. In this post, I plan to deal with the user inputs to consider the case first & then it can summarize the video content through useful advanced analytics with the help of the LangChain & OpenAI-based model.

In this post, I’ve directly subscribed to OpenAI & I’m not using OpenAI from Azure. However, I’ll explore that in the future as well.
Before I explain the process to invoke this new library, why not view the demo first & then discuss it?

Demo

Isn’t it very exciting? This will lead to a whole new ballgame, where one can get critical decision-making information from these human sources along with their traditional advanced analytical data.

How will it help?

Let’s say as per your historical data & analytics, the dashboard is recommending prod-A, prod-B & prod-C as the top three products for potential top-performing brands. Whereas, you are getting some alerts from the TV news on prod-B due to the recent incidents. So, in that case, you don’t want to continue with the prod-B investment. You may find a new product named prod-Z. That may reduce the risk of your investment.


What is LangChain?

LangChain is a framework for developing applications powered by language models. We believe that the most powerful and differentiated applications will not only call out to a language model but will also be:

  1. Data-aware: connect a language model to other sources of data
  2. Agentic: allow a language model to interact with its environment

The LangChain framework works around these principles.

To know more about this, please click the following link.

As you can see, this is one of the critical components in our solution, which will bind the OpenAI bot & it will feed the necessary data to provide the correct response.


What is FAISS?

Faiss is a library for efficient similarity search and clustering of dense vectors. It contains algorithms that search in sets of vectors of any size, up to ones that do not fit in RAM. It also has supporting code for evaluation and parameter tuning.

Faiss developed using C++ with complete wrappers for Python—some of the most beneficial algorithms available both on CPU & in GPU as well. Facebook AI Research develops it.

To know more about this, please click the following link.


FLOW OF EVENTS:

Let us look at the flow diagram as it captures the sequence of events that unfold as part of the process.

Here are the steps that will follow in sequence –

  • The application will first get the topic on which it needs to look from YouTube & find the top 5 videos using the YouTube data-API.
  • Once the application returns a list of websites from the above step, LangChain will drive the application will extract the transcripts from the video & then optimize the response size in smaller chunks to address the costly OpenAI calls. During this time, it will invoke FAISS to create document DBs.
  • Finally, it will send those chunks to OpenAI for the best response based on your supplied template that performs the final analysis with small data required for your query & gets the appropriate response with fewer costs.

CODE:

Why don’t we go through the code made accessible due to this new library for this particular use case?

  • clsConfigClient.py (This is the main calling Python script for the input parameters.)


################################################
#### Written By: SATYAKI DE ####
#### Written On: 15-May-2020 ####
#### Modified On: 28-May-2023 ####
#### ####
#### Objective: This script is a config ####
#### file, contains all the keys for ####
#### personal OpenAI-based video content ####
#### enable bot. ####
#### ####
################################################
import os
import platform as pl
class clsConfigClient(object):
Curr_Path = os.path.dirname(os.path.realpath(__file__))
os_det = pl.system()
if os_det == "Windows":
sep = '\\'
else:
sep = '/'
conf = {
'APP_ID': 1,
'ARCH_DIR': Curr_Path + sep + 'arch' + sep,
'PROFILE_PATH': Curr_Path + sep + 'profile' + sep,
'LOG_PATH': Curr_Path + sep + 'log' + sep,
'DATA_PATH': Curr_Path + sep + 'data' + sep,
'MODEL_PATH': Curr_Path + sep + 'model' + sep,
'TEMP_PATH': Curr_Path + sep + 'temp' + sep,
'MODEL_DIR': 'model',
'APP_DESC_1': 'LangChain Demo!',
'DEBUG_IND': 'N',
'INIT_PATH': Curr_Path,
'FILE_NAME': 'Output.csv',
'MODEL_NAME': 'gpt-3.5-turbo',
'OPEN_AI_KEY': "sk-kfrjfijdrkidjkfjd9474nbfjfkfjfhfhf84i84hnfhjdbv6Bgvv",
'YOUTUBE_KEY': "AIjfjfUYGe64hHJ-LOFO5u-mkso9pPOJGFU",
'TITLE': "LangChain Demo!",
'TEMP_VAL': 0.2,
'PATH' : Curr_Path,
'MAX_CNT' : 5,
'OUT_DIR': 'data'
}

Some of the key entries from the above scripts are as follows –

'MODEL_NAME': 'gpt-3.5-turbo',
'OPEN_AI_KEY': "sk-kfrjfijdrkidjkfjd9474nbfjfkfjfhfhf84i84hnfhjdbv6Bgvv",
'YOUTUBE_KEY': "AIjfjfUYGe64hHJ-LOFO5u-mkso9pPOJGFU",
'TEMP_VAL': 0.2,

From the above code snippet, one can understand that we need both the API keys for YouTube & OpenAI. And they have separate costs & usage, which I’ll share later in the post. Also, notice that the temperature sets to 0.2 ( range between 0 to 1). That means our AI bot will be consistent in response. And our application will use the GPT-3.5-turbo model for its analytic response.

  • clsTemplate.py (Contains all the templates for OpenAI.)


################################################
#### Written By: SATYAKI DE ####
#### Written On: 27-May-2023 ####
#### Modified On: 28-May-2023 ####
#### ####
#### Objective: This script is a config ####
#### file, contains all the template for ####
#### OpenAI prompts to get the correct ####
#### response. ####
#### ####
################################################
# Template to use for the system message prompt
templateVal_1 = """
You are a helpful assistant that that can answer questions about youtube videos
based on the video's transcript: {docs}
Only use the factual information from the transcript to answer the question.
If you feel like you don't have enough information to answer the question, say "I don't know".
Your answers should be verbose and detailed.
"""

view raw

clsTemplate.py

hosted with ❤ by GitHub

The above code is self-explanatory. Here, we’re keeping the correct instructions for our OpenAI to respond within these guidelines.

  • clsVideoContentScrapper.py (Main class to extract the transcript from the YouTube videos & then answer the questions based on the topics selected by the users.)


#####################################################
#### Written By: SATYAKI DE ####
#### Written On: 27-May-2023 ####
#### Modified On 28-May-2023 ####
#### ####
#### Objective: This is the main calling ####
#### python class that will invoke the ####
#### LangChain of package to extract ####
#### the transcript from the YouTube videos & ####
#### then answer the questions based on the ####
#### topics selected by the users. ####
#### ####
#####################################################
from langchain.document_loaders import YoutubeLoader
from langchain.text_splitter import RecursiveCharacterTextSplitter
from langchain.embeddings.openai import OpenAIEmbeddings
from langchain.vectorstores import FAISS
from langchain.chat_models import ChatOpenAI
from langchain.chains import LLMChain
from langchain.prompts.chat import (
ChatPromptTemplate,
SystemMessagePromptTemplate,
HumanMessagePromptTemplate,
)
from googleapiclient.discovery import build
import clsTemplate as ct
from clsConfigClient import clsConfigClient as cf
import os
###############################################
### Global Section ###
###############################################
open_ai_Key = cf.conf['OPEN_AI_KEY']
os.environ["OPENAI_API_KEY"] = open_ai_Key
embeddings = OpenAIEmbeddings(openai_api_key=open_ai_Key)
YouTube_Key = cf.conf['YOUTUBE_KEY']
youtube = build('youtube', 'v3', developerKey=YouTube_Key)
# Disbling Warning
def warn(*args, **kwargs):
pass
import warnings
warnings.warn = warn
###############################################
### End of Global Section ###
###############################################
class clsVideoContentScrapper:
def __init__(self):
self.model_name = cf.conf['MODEL_NAME']
self.temp_val = cf.conf['TEMP_VAL']
self.max_cnt = int(cf.conf['MAX_CNT'])
def createDBFromYoutubeVideoUrl(self, video_url):
try:
loader = YoutubeLoader.from_youtube_url(video_url)
transcript = loader.load()
text_splitter = RecursiveCharacterTextSplitter(chunk_size=1000, chunk_overlap=100)
docs = text_splitter.split_documents(transcript)
db = FAISS.from_documents(docs, embeddings)
return db
except Exception as e:
x = str(e)
print('Error: ', x)
return ''
def getResponseFromQuery(self, db, query, k=4):
try:
"""
gpt-3.5-turbo can handle up to 4097 tokens. Setting the chunksize to 1000 and k to 4 maximizes
the number of tokens to analyze.
"""
mod_name = self.model_name
temp_val = self.temp_val
docs = db.similarity_search(query, k=k)
docs_page_content = " ".join([d.page_content for d in docs])
chat = ChatOpenAI(model_name=mod_name, temperature=temp_val)
# Template to use for the system message prompt
template = ct.templateVal_1
system_message_prompt = SystemMessagePromptTemplate.from_template(template)
# Human question prompt
human_template = "Answer the following question: {question}"
human_message_prompt = HumanMessagePromptTemplate.from_template(human_template)
chat_prompt = ChatPromptTemplate.from_messages(
[system_message_prompt, human_message_prompt]
)
chain = LLMChain(llm=chat, prompt=chat_prompt)
response = chain.run(question=query, docs=docs_page_content)
response = response.replace("\n", "")
return response, docs
except Exception as e:
x = str(e)
print('Error: ', x)
return '', ''
def topFiveURLFromYouTube(self, service, **kwargs):
try:
video_urls = []
channel_list = []
results = service.search().list(**kwargs).execute()
for item in results['items']:
print("Title: ", item['snippet']['title'])
print("Description: ", item['snippet']['description'])
channel = item['snippet']['channelId']
print("Channel Id: ", channel)
# Fetch the channel name using the channel ID
channel_response = service.channels().list(part='snippet',id=item['snippet']['channelId']).execute()
channel_title = channel_response['items'][0]['snippet']['title']
print("Channel Title: ", channel_title)
channel_list.append(channel_title)
print("Video Id: ", item['id']['videoId'])
vidURL = "https://www.youtube.com/watch?v=&quot; + item['id']['videoId']
print("Video URL: " + vidURL)
video_urls.append(vidURL)
print("\n")
return video_urls, channel_list
except Exception as e:
video_urls = []
channel_list = []
x = str(e)
print('Error: ', x)
return video_urls, channel_list
def extractContentInText(self, topic, query):
try:
discussedTopic = []
strKeyText = ''
cnt = 0
max_cnt = self.max_cnt
urlList, channelList = self.topFiveURLFromYouTube(youtube, q=topic, part='id,snippet',maxResults=max_cnt,type='video')
print('Returned List: ')
print(urlList)
print()
for video_url in urlList:
print('Processing Video: ')
print(video_url)
db = self.createDBFromYoutubeVideoUrl(video_url)
response, docs = self.getResponseFromQuery(db, query)
if len(response) > 0:
strKeyText = 'As per the topic discussed in ' + channelList[cnt] + ', '
discussedTopic.append(strKeyText + response)
cnt += 1
return discussedTopic
except Exception as e:
discussedTopic = []
x = str(e)
print('Error: ', x)
return discussedTopic

Let us understand the key methods step by step in detail –

def topFiveURLFromYouTube(self, service, **kwargs):
    try:
        video_urls = []
        channel_list = []
        results = service.search().list(**kwargs).execute()

        for item in results['items']:
            print("Title: ", item['snippet']['title'])
            print("Description: ", item['snippet']['description'])
            channel = item['snippet']['channelId']
            print("Channel Id: ", channel)

            # Fetch the channel name using the channel ID
            channel_response = service.channels().list(part='snippet',id=item['snippet']['channelId']).execute()
            channel_title = channel_response['items'][0]['snippet']['title']
            print("Channel Title: ", channel_title)
            channel_list.append(channel_title)

            print("Video Id: ", item['id']['videoId'])
            vidURL = "https://www.youtube.com/watch?v=" + item['id']['videoId']
            print("Video URL: " + vidURL)
            video_urls.append(vidURL)
            print("\n")

        return video_urls, channel_list

    except Exception as e:
        video_urls = []
        channel_list = []
        x = str(e)
        print('Error: ', x)

        return video_urls, channel_list

The above code will fetch the most relevant YouTube URLs & bind them into a list along with the channel names & then share the lists with the main functions.

def createDBFromYoutubeVideoUrl(self, video_url):
    try:
        loader = YoutubeLoader.from_youtube_url(video_url)
        transcript = loader.load()

        text_splitter = RecursiveCharacterTextSplitter(chunk_size=1000, chunk_overlap=100)
        docs = text_splitter.split_documents(transcript)

        db = FAISS.from_documents(docs, embeddings)
        return db

    except Exception as e:
        x = str(e)
        print('Error: ', x)
        return ''

The provided Python code defines a function createDBFromYoutubeVideoUrl which appears to create a database of text documents from the transcript of a YouTube video. Here’s the explanation in simple English:

  1. The function createDBFromYoutubeVideoUrl has defined with one argument: video_url.
  2. The function uses a try-except block to handle any potential exceptions or errors that may occur.
  3. Inside the try block, the following steps are going to perform:
  • First, it creates a YoutubeLoader object from the provided video_url. This object is likely responsible for interacting with the YouTube video specified by the URL.
  • The loader object then loads the transcript of the video. This object is the text version of everything spoken in the video.
  • It then creates a RecursiveCharacterTextSplitter object with a specified chunk_size of 1000 and chunk_overlap of 100. This object may split the transcript into smaller chunks (documents) of text for easier processing or analysis. Each piece will be around 1000 characters long, and there will overlap of 100 characters between consecutive chunks.
  • The split_documents method of the text_splitter object will split the transcript into smaller documents. These documents are stored in the docs variable.
  • The FAISS.from_documents method is then called with docs and embeddings as arguments to create a FAISS (Facebook AI Similarity Search) index. This index is a database used for efficient similarity search and clustering of high-dimensional vectors, which in this case, are the embeddings of the documents. The FAISS index is stored in the db variable.
  • Finally, the db variable is returned, representing the created database from the video transcript.

4. If an exception occurs during the execution of the try block, the code execution moves to the except block:

  • Here, it first converts the exception e to a string x.
  • Then it prints an error message.
  • Finally, it returns an empty string as an indication of the error.

def getResponseFromQuery(self, db, query, k=4):
      try:
          """
          gpt-3.5-turbo can handle up to 4097 tokens. Setting the chunksize to 1000 and k to 4 maximizes
          the number of tokens to analyze.
          """

          mod_name = self.model_name
          temp_val = self.temp_val

          docs = db.similarity_search(query, k=k)
          docs_page_content = " ".join([d.page_content for d in docs])

          chat = ChatOpenAI(model_name=mod_name, temperature=temp_val)

          # Template to use for the system message prompt
          template = ct.templateVal_1

          system_message_prompt = SystemMessagePromptTemplate.from_template(template)

          # Human question prompt
          human_template = "Answer the following question: {question}"
          human_message_prompt = HumanMessagePromptTemplate.from_template(human_template)

          chat_prompt = ChatPromptTemplate.from_messages(
              [system_message_prompt, human_message_prompt]
          )

          chain = LLMChain(llm=chat, prompt=chat_prompt)

          response = chain.run(question=query, docs=docs_page_content)
          response = response.replace("\n", "")
          return response, docs

      except Exception as e:
          x = str(e)
          print('Error: ', x)

          return '', ''

The Python function getResponseFromQuery is designed to search a given database (db) for a specific query and then generate a response using a language model (possibly GPT-3.5-turbo). The answer is based on the content found and the particular question. Here is a simple English summary:

  1. The function getResponseFromQuery takes three parameters: db, query, and k. The k parameter is optional and defaults to 4 if not provided. db is the database to search, the query is the question or prompts to analyze, and k is the number of similar items to return.
  2. The function initiates a try-except block for handling any errors that might occur.
  3. Inside the try block:
  • The function retrieves the model name and temperature value from the instance of the class this function is a part of.
  • The function then searches the db database for documents similar to the query and saves these in docs.
  • It concatenates the content of the returned documents into a single string docs_page_content.
  • It creates a ChatOpenAI object with the model name and temperature value.
  • It creates a system message prompt from a predefined template.
  • It creates a human message prompt, which is the query.
  • It combines these two prompts to form a chat prompt.
  • An LLMChain object is then created using the ChatOpenAI object and the chat prompt.
  • This LLMChain object is used to generate a response to the query using the content of the documents found in the database. The answer is then formatted by replacing all newline characters with empty strings.
  • Finally, the function returns this response along with the original documents.
  1. If any error occurs during these operations, the function goes to the except block where:
  • The error message is printed.
  • The function returns two empty strings to indicate an error occurred, and no response or documents could be produced.

def extractContentInText(self, topic, query):
    try:
        discussedTopic = []
        strKeyText = ''
        cnt = 0
        max_cnt = self.max_cnt

        urlList, channelList = self.topFiveURLFromYouTube(youtube, q=topic, part='id,snippet',maxResults=max_cnt,type='video')
        print('Returned List: ')
        print(urlList)
        print()

        for video_url in urlList:
            print('Processing Video: ')
            print(video_url)
            db = self.createDBFromYoutubeVideoUrl(video_url)

            response, docs = self.getResponseFromQuery(db, query)

            if len(response) > 0:
                strKeyText = 'As per the topic discussed in ' + channelList[cnt] + ', '
                discussedTopic.append(strKeyText + response)

            cnt += 1

        return discussedTopic
    except Exception as e:
        discussedTopic = []
        x = str(e)
        print('Error: ', x)

        return discussedTopic

This Python function, extractContentInText, is aimed to extract relevant content from the transcripts of top YouTube videos on a specific topic and generate responses to a given query. Here’s a simple English translation:

  1. The function extractContentInText is defined with topic and query as parameters.
  2. It begins with a try-except block to catch and handle any possible exceptions.
  3. In the try block:
  • It initializes several variables: an empty list discussedTopic to store the extracted information, an empty string strKeyText to keep specific parts of the content, a counter cnt initialized at 0, and max_cnt retrieved from the self-object to specify the maximum number of YouTube videos to consider.
  • It calls the topFiveURLFromYouTube function (defined previously) to get the URLs of the top videos on the given topic from YouTube. It also retrieves the list of channel names associated with these videos.
  • It prints the returned list of URLs.
  • Then, it starts a loop over each URL in the urlList.
    • For each URL, it prints the URL, then creates a database from the transcript of the YouTube video using the function createDBFromYoutubeVideoUrl.
    • It then uses the getResponseFromQuery function to get a response to the query based on the content of the database.
    • If the length of the response is greater than 0 (meaning there is a response), it forms a string strKeyText to indicate the channel that the topic was discussed on and then appends the answer to this string. This entire string is then added to the discussedTopic list.
    • It increments the counter cnt by one after each iteration.
    • Finally, it returns the discussedTopic list, which now contains relevant content extracted from the videos.
  1. If any error occurs during these operations, the function goes into the except block:
  • It first resets discussedTopic to an empty list.
  • Then it converts the exception e to a string and prints the error message.
  • Lastly, it returns the empty discussedTopic list, indicating that no content could be extracted due to the error.
  • testLangChain.py (Main Python script to extract the transcript from the YouTube videos & then answer the questions based on the topics selected by the users.)


#####################################################
#### Written By: SATYAKI DE ####
#### Written On: 27-May-2023 ####
#### Modified On 28-May-2023 ####
#### ####
#### Objective: This is the main calling ####
#### python script that will invoke the ####
#### clsVideoContentScrapper class to extract ####
#### the transcript from the YouTube videos. ####
#### ####
#####################################################
import clsL as cl
from clsConfigClient import clsConfigClient as cf
import datetime
import textwrap
import clsVideoContentScrapper as cvsc
# Disbling Warning
def warn(*args, **kwargs):
pass
import warnings
warnings.warn = warn
######################################
### Get your global values ####
######################################
debug_ind = 'Y'
# Initiating Logging Instances
clog = cl.clsL()
data_path = cf.conf['DATA_PATH']
data_file_name = cf.conf['FILE_NAME']
cVCScrapper = cvsc.clsVideoContentScrapper()
######################################
#### Global Flag ########
######################################
def main():
try:
var = datetime.datetime.now().strftime("%Y-%m-%d_%H-%M-%S")
print('*'*120)
print('Start Time: ' + str(var))
print('*'*120)
#query = "What are they saying about Microsoft?"
print('Please share your topic!')
inputTopic = input('User: ')
print('Please ask your questions?')
inputQry = input('User: ')
print()
retList = cVCScrapper.extractContentInText(inputTopic, inputQry)
cnt = 0
for discussedTopic in retList:
finText = str(cnt + 1) + ') ' + discussedTopic
print()
print(textwrap.fill(finText, width=150))
cnt += 1
r1 = len(retList)
if r1 > 0:
print()
print('Successfully Scrapped!')
else:
print()
print('Failed to Scrappe!')
print('*'*120)
var1 = datetime.datetime.now().strftime("%Y-%m-%d_%H-%M-%S")
print('End Time: ' + str(var1))
except Exception as e:
x = str(e)
print('Error: ', x)
if __name__ == "__main__":
main()

Please find the key snippet –

def main():
    try:
        var = datetime.datetime.now().strftime("%Y-%m-%d_%H-%M-%S")
        print('*'*120)
        print('Start Time: ' + str(var))
        print('*'*120)

        #query = "What are they saying about Microsoft?"
        print('Please share your topic!')
        inputTopic = input('User: ')
        print('Please ask your questions?')
        inputQry = input('User: ')
        print()

        retList = cVCScrapper.extractContentInText(inputTopic, inputQry)
        cnt = 0

        for discussedTopic in retList:
            finText = str(cnt + 1) + ') ' + discussedTopic
            print()
            print(textwrap.fill(finText, width=150))

            cnt += 1

        r1 = len(retList)

        if r1 > 0:
            print()
            print('Successfully Scrapped!')
        else:
            print()
            print('Failed to Scrappe!')

        print('*'*120)
        var1 = datetime.datetime.now().strftime("%Y-%m-%d_%H-%M-%S")
        print('End Time: ' + str(var1))

    except Exception as e:
        x = str(e)
        print('Error: ', x)

if __name__ == "__main__":
    main()

The above main application will capture the topics from the user & then will give the user a chance to ask specific questions on the topics, invoking the main class to extract the transcript from YouTube & then feed it as a source using ChainLang & finally deliver the response. If there is no response, then it will skip the overall options.

USAGE & COST FACTOR:

Please find the OpenAI usage –

Please find the YouTube API usage –


So, finally, we’ve done it.

I know that this post is relatively bigger than my earlier post. But, I think, you can get all the details once you go through it.

You will get the complete codebase in the following GitHub link.

I’ll bring some more exciting topics in the coming days from the Python verse. Please share & subscribe to my post & let me know your feedback.

Till then, Happy Avenging! 🙂

Note: All the data & scenarios posted here are representational data & scenarios & available over the internet & for educational purposes only. Some of the images (except my photo) we’ve used are available over the net. We don’t claim ownership of these images. There is always room for improvement & especially in the prediction quality. Sample video taken from Santrel Media & you would find the link over here.

Tuning your model using the python-based low-code machine-learning library PyCaret

Today, I’ll discuss another important topic before I will share the excellent use case next month, as I still need some time to finish that one. We’ll see how we can leverage the brilliant capability of a low-code machine-learning library named PyCaret.

But before going through the details, why don’t we view the demo & then go through it?

Demo

Architecture:

Let us understand the flow of events –

As one can see, the initial training requests are triggered from the PyCaret-driven training models. And the application can successfully process & identify the best models out of the other combinations.

Python Packages:

Following are the python packages that are necessary to develop this use case –

pip install pandas
pip install pycaret

PyCaret is dependent on a combination of other popular python packages. So, you need to install them successfully to run this package.

CODE:

  • clsConfigClient.py (Main configuration file)


################################################
#### Written By: SATYAKI DE ####
#### Written On: 15-May-2020 ####
#### Modified On: 31-Mar-2023 ####
#### ####
#### Objective: This script is a config ####
#### file, contains all the keys for ####
#### personal AI-driven voice assistant. ####
#### ####
################################################
import os
import platform as pl
class clsConfigClient(object):
Curr_Path = os.path.dirname(os.path.realpath(__file__))
os_det = pl.system()
if os_det == "Windows":
sep = '\\'
else:
sep = '/'
conf = {
'APP_ID': 1,
'ARCH_DIR': Curr_Path + sep + 'arch' + sep,
'PROFILE_PATH': Curr_Path + sep + 'profile' + sep,
'LOG_PATH': Curr_Path + sep + 'log' + sep,
'DATA_PATH': Curr_Path + sep + 'data' + sep,
'MODEL_PATH': Curr_Path + sep + 'model' + sep,
'TEMP_PATH': Curr_Path + sep + 'temp' + sep,
'MODEL_DIR': 'model',
'APP_DESC_1': 'PyCaret Training!',
'DEBUG_IND': 'N',
'INIT_PATH': Curr_Path,
'FILE_NAME': 'Titanic.csv',
'MODEL_NAME': 'PyCaret-ft-personal-2023-03-31-04-29-53',
'TITLE': "PyCaret Training!",
'PATH' : Curr_Path,
'OUT_DIR': 'data'
}

I’m skipping this section as it is self-explanatory.


  • clsTrainModel.py (This is the main class that contains the core logic of low-code machine-learning library to evaluate the best model for your solutions.)


#####################################################
#### Written By: SATYAKI DE ####
#### Written On: 31-Mar-2023 ####
#### Modified On 31-Mar-2023 ####
#### ####
#### Objective: This is the main class that ####
#### contains the core logic of low-code ####
#### machine-learning library to evaluate the ####
#### best model for your solutions. ####
#### ####
#####################################################
import clsL as cl
from clsConfigClient import clsConfigClient as cf
import datetime
# Import necessary libraries
import pandas as p
from pycaret.classification import *
# Disbling Warning
def warn(*args, **kwargs):
pass
import warnings
warnings.warn = warn
######################################
### Get your global values ####
######################################
debug_ind = 'Y'
# Initiating Logging Instances
clog = cl.clsL()
###############################################
### End of Global Section ###
###############################################
class clsTrainModel:
def __init__(self):
self.model_path = cf.conf['MODEL_PATH']
self.model_name = cf.conf['MODEL_NAME']
def trainModel(self, FullFileName):
try:
df = p.read_csv(FullFileName)
row_count = int(df.shape[0])
print('Number of rows: ', str(row_count))
print(df)
# Initialize the setup in PyCaret
clf_setup = setup(
data=df,
target="Survived",
train_size=0.8, # 80% for training, 20% for testing
categorical_features=["Sex", "Embarked"],
ordinal_features={"Pclass": ["1", "2", "3"]},
ignore_features=["Name", "Ticket", "Cabin", "PassengerId"],
#silent=True, # Set to False for interactive setup
)
# Compare various models
best_model = compare_models()
# Create a specific model (e.g., Random Forest)
rf_model = create_model("rf")
# Hyperparameter tuning
tuned_rf_model = tune_model(rf_model)
# Evaluate model performance
plot_model(tuned_rf_model, plot="confusion_matrix")
plot_model(tuned_rf_model, plot="auc")
# Finalize the model (train on the complete dataset)
final_rf_model = finalize_model(tuned_rf_model)
# Make predictions on new data
new_data = df.drop("Survived", axis=1)
predictions = predict_model(final_rf_model, data=new_data)
# Writing into the Model
FullModelName = self.model_path + self.model_name
print('Model Output @:: ', str(FullModelName))
print()
# Save the fine-tuned model
save_model(final_rf_model, FullModelName)
return 0
except Exception as e:
x = str(e)
print('Error: ', x)
return 1

Let us understand the code in simple terms –

  1. Import necessary libraries and load the Titanic dataset.
  2. Initialize the PyCaret setup, specifying the target variable, train-test split, categorical and ordinal features, and features to ignore.
  3. Compare various models to find the best-performing one.
  4. Create a specific model (Random Forest in this case).
  5. Perform hyper-parameter tuning on the Random Forest model.
  6. Evaluate the model’s performance using a confusion matrix and AUC-ROC curve.
  7. Finalize the model by training it on the complete dataset.
  8. Make predictions on new data.
  9. Save the trained model for future use.

  • trainPYCARETModel.py (This is the main calling python script that will invoke the training class of PyCaret package.)


#####################################################
#### Written By: SATYAKI DE ####
#### Written On: 31-Mar-2023 ####
#### Modified On 31-Mar-2023 ####
#### ####
#### Objective: This is the main calling ####
#### python script that will invoke the ####
#### training class of Pycaret package. ####
#### ####
#####################################################
import clsL as cl
from clsConfigClient import clsConfigClient as cf
import datetime
import clsTrainModel as tm
# Disbling Warning
def warn(*args, **kwargs):
pass
import warnings
warnings.warn = warn
######################################
### Get your global values ####
######################################
debug_ind = 'Y'
# Initiating Logging Instances
clog = cl.clsL()
data_path = cf.conf['DATA_PATH']
data_file_name = cf.conf['FILE_NAME']
tModel = tm.clsTrainModel()
######################################
#### Global Flag ########
######################################
def main():
try:
var = datetime.datetime.now().strftime("%Y-%m-%d_%H-%M-%S")
print('*'*120)
print('Start Time: ' + str(var))
print('*'*120)
FullFileName = data_path + data_file_name
r1 = tModel.trainModel(FullFileName)
if r1 == 0:
print('Successfully Trained!')
else:
print('Failed to Train!')
print('*'*120)
var1 = datetime.datetime.now().strftime("%Y-%m-%d_%H-%M-%S")
print('End Time: ' + str(var1))
except Exception as e:
x = str(e)
print('Error: ', x)
if __name__ == "__main__":
main()

The above code is pretty self-explanatory as well.


  • testPYCARETModel.py (This is the main calling python script that will invoke the testing script for PyCaret package.)


#####################################################
#### Written By: SATYAKI DE ####
#### Written On: 31-Mar-2023 ####
#### Modified On 31-Mar-2023 ####
#### ####
#### Objective: This is the main calling ####
#### python script that will invoke the ####
#### testing script for PyCaret package. ####
#### ####
#####################################################
import clsL as cl
from clsConfigClient import clsConfigClient as cf
import datetime
from pycaret.classification import load_model, predict_model
import pandas as p
# Disbling Warning
def warn(*args, **kwargs):
pass
import warnings
warnings.warn = warn
######################################
### Get your global values ####
######################################
debug_ind = 'Y'
# Initiating Logging Instances
clog = cl.clsL()
model_path = cf.conf['MODEL_PATH']
model_name = cf.conf['MODEL_NAME']
######################################
#### Global Flag ########
######################################
def main():
try:
var = datetime.datetime.now().strftime("%Y-%m-%d_%H-%M-%S")
print('*'*120)
print('Start Time: ' + str(var))
print('*'*120)
FullFileName = model_path + model_name
# Load the saved model
loaded_model = load_model(FullFileName)
# Prepare new data for testing (make sure it has the same columns as the original data)
new_data = p.DataFrame({
"Pclass": [3, 1],
"Sex": ["male", "female"],
"Age": [22, 38],
"SibSp": [1, 1],
"Parch": [0, 0],
"Fare": [7.25, 71.2833],
"Embarked": ["S", "C"]
})
# Make predictions using the loaded model
predictions = predict_model(loaded_model, data=new_data)
# Display the predictions
print(predictions)
print('*'*120)
var1 = datetime.datetime.now().strftime("%Y-%m-%d_%H-%M-%S")
print('End Time: ' + str(var1))
except Exception as e:
x = str(e)
print('Error: ', x)
if __name__ == "__main__":
main()

In this code, the application uses the stored model & then forecasts based on the optimized PyCaret model tuning.

Conclusion:

The above code demonstrates an end-to-end binary classification pipeline using the PyCaret library for the Titanic dataset. The goal is to predict whether a passenger survived based on the available features. Here are some conclusions you can draw from the code and data:

  1. Ease of use: The code showcases how PyCaret simplifies the machine learning process, from data preprocessing to model training, evaluation, and deployment. With just a few lines of code, you can perform tasks that would require much more effort using lower-level libraries.
  2. Model selection: The compare_models() function provides a quick and easy way to compare various machine learning algorithms and identify the best-performing one based on the chosen evaluation metric (accuracy by default). This selection helps you select a suitable model for the given problem.
  3. Hyper-parameter tuning: The tune_model() function automates the process of hyper-parameter tuning to improve model performance. We tuned a Random Forest model to optimize its predictive power in the example.
  4. Model evaluation: PyCaret provides several built-in visualization tools for assessing model performance. In the example, we used a confusion matrix and AUC-ROC curve to evaluate the performance of the tuned Random Forest model.
  5. Model deployment: The example demonstrates how to make predictions using the trained model and save the model for future use. This deployment showcases how PyCaret can streamline the process of deploying a machine-learning model in a production environment.

It is important to note that the conclusions drawn from the code and data are specific to the Titanic dataset and the chosen features. Adjust the feature engineering, preprocessing, and model selection steps for different datasets or problems accordingly. However, the general workflow and benefits provided by PyCaret would remain the same.


So, finally, we’ve done it.

I know that this post is relatively bigger than my earlier post. But, I think, you can get all the details once you go through it.

You will get the complete codebase in the following GitHub link.

I’ll bring some more exciting topics in the coming days from the Python verse. Please share & subscribe to my post & let me know your feedback.

Till then, Happy Avenging! 🙂

Note: All the data & scenarios posted here are representational data & scenarios & available over the internet & for educational purposes only. Some of the images (except my photo) we’ve used are available over the net. We don’t claim ownership of these images. There is always room for improvement & especially in the prediction quality.