Monitoring & evaluating the leading LLMs (both the established & new) by Python-based evaluator

As we’re leaping more & more into the field of Generative AI, one of the frequent questions or challenges people are getting more & more is the performance & other evaluation factors. These factors will eventually bring the fruit of this technology; otherwise, you will end up in technical debt.

This post will discuss the key snippets of the monitoring app based on the Python-based AI app. But before that, let us first view the demo.

Isn’t it exciting?


Let us deep dive into it. But, here is the flow this solution will follow.

So, the current application will invoke the industry bigshots and some relatively unknown or new LLMs.

In this case, we’ll evaluate Anthropic, Open AI, DeepSeek, and Bharat GPT’s various models. However, Bharat GPT is open source, so we’ll use the Huggingface library and execute it locally against my MacBook Pro M4 Max.

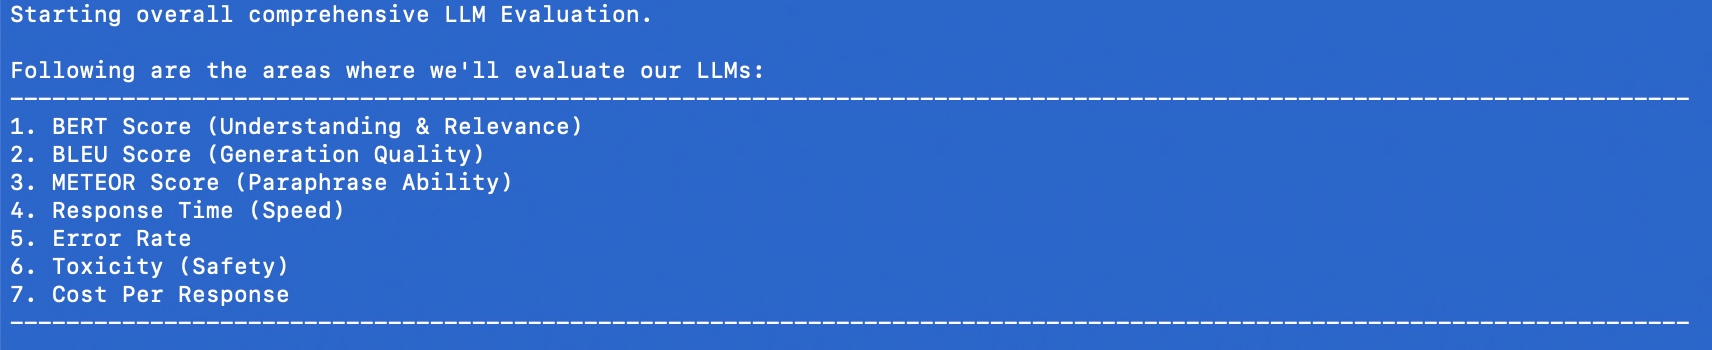
The following are the KPIs we’re going to evaluate:

Here are the lists of dependant python packages that is require to run this application –

pip install certifi==2024.8.30
pip install anthropic==0.42.0
pip install huggingface-hub==0.27.0
pip install nltk==3.9.1
pip install numpy==2.2.1
pip install moviepy==2.1.1
pip install numpy==2.1.3
pip install openai==1.59.3
pip install pandas==2.2.3
pip install pillow==11.1.0
pip install pip==24.3.1
pip install psutil==6.1.1
pip install requests==2.32.3
pip install rouge_score==0.1.2
pip install scikit-learn==1.6.0
pip install setuptools==70.2.0
pip install tokenizers==0.21.0
pip install torch==2.6.0.dev20250104
pip install torchaudio==2.6.0.dev20250104
pip install torchvision==0.22.0.dev20250104
pip install tqdm==4.67.1
pip install transformers==4.47.1
    @retry(stop=stop_after_attempt(3), wait=wait_exponential(multiplier=1, min=4, max=10))
    def get_claude_response(self, prompt: str) -> str:
        response = self.anthropic_client.messages.create(
            model=anthropic_model,
            max_tokens=maxToken,
            messages=[{"role": "user", "content": prompt}]
        )
        return response.content[0].text
  1. The Retry Mechanism
    • The @retry line means this function will automatically try again if it fails.
    • It will stop retrying after 3 attempts (stop_after_attempt(3)).
    • It will wait longer between retries, starting at 4 seconds and increasing up to 10 seconds (wait_exponential(multiplier=1, min=4, max=10)).
  2. The Function Purpose
    • The function takes a message, called prompt, as input (a string of text).
    • It uses a service (likely an AI system like Claude) to generate a response to this prompt.
  3. Sending the Message
    • Inside the function, the code self.anthropic_client.messages.create is the part that actually sends the prompt to the AI.
    • It specifies:Which AI model to use (e.g., anthropic_model).
    • The maximum length of the response (controlled by maxToken).
    • The input message for the AI has a “role” (user), as well as the content of the prompt.
  4. Getting the Response
    • Once the AI generates a response, it’s saved as response.
    • The code retrieves the first part of the response (response.content[0].text) and sends it back to whoever called the function.

Similarly, it will work for Open AI as well.

    @retry(stop=stop_after_attempt(3), wait=wait_exponential(multiplier=1, min=4, max=10))
    def get_deepseek_response(self, prompt: str) -> tuple:
        deepseek_api_key = self.deepseek_api_key

        headers = {
            "Authorization": f"Bearer {deepseek_api_key}",
            "Content-Type": "application/json"
            }
        
        payload = {
            "model": deepseek_model,  
            "messages": [{"role": "user", "content": prompt}],
            "max_tokens": maxToken
            }
        
        response = requests.post(DEEPSEEK_API_URL, headers=headers, json=payload)

        if response.status_code == 200:
            res = response.json()["choices"][0]["message"]["content"]
        else:
            res = "API request failed with status code " + str(response.status_code) + ":" + str(response.text)

        return res
  1. Retry Mechanism:
    • The @retry line ensures the function will try again if it fails.
    • It will stop retrying after 3 attempts (stop_after_attempt(3)).
    • It waits between retries, starting at 4 seconds and increasing up to 10 seconds (wait_exponential(multiplier=1, min=4, max=10)).

  1. What the Function Does:
    • The function takes one input, prompt, which is the message or question you want to send to the AI.
    • It returns the AI’s response or an error message.

  1. Preparing to Communicate with the API:
    • API Key: It gets the API key for the DeepSeek service from self.deepseek_api_key.
    • Headers: These tell the API that the request will use the API key (for security) and that the data format is JSON (structured text).
    • Payload: This is the information sent to the AI. It includes:
      • Model: Specifies which version of the AI to use (deepseek_model).
      • Messages: The input message with the role “user” and your prompt.
      • Max Tokens: Defines the maximum size of the AI’s response (maxToken).

  1. Sending the Request:
    • It uses the requests.post() method to send the payload and headers to the DeepSeek API using the URL DEEPSEEK_API_URL.

  1. Processing the Response:
    • If the API responds successfully (status_code == 200):
      • It extracts the AI’s reply from the response data.
      • Specifically, it gets the first choice’s message content: response.json()["choices"][0]["message"]["content"].
    • If there’s an error:
      • It constructs an error message with the status code and detailed error text from the API.

  1. Returning the Result:
    • The function outputs either the AI’s response or the error message.
    @retry(stop=stop_after_attempt(3), wait=wait_exponential(multiplier=1, min=4, max=10))
    def get_bharatgpt_response(self, prompt: str) -> tuple:
        try:
            messages = [[{"role": "user", "content": prompt}]]
            
            response = pipe(messages, max_new_tokens=maxToken,)

            # Extract 'content' field safely
            res = next((entry.get("content", "")
                        for entry in response[0][0].get("generated_text", [])
                        if isinstance(entry, dict) and entry.get("role") == "assistant"
                        ),
                        None,
                        )
            
            return res
        except Exception as e:
            x = str(e)
            print('Error: ', x)

            return ""
  1. Retry Mechanism:The @retry ensures the function will try again if it fails.
    • It will stop retrying after 3 attempts (stop_after_attempt(3)).
    • The waiting time between retries starts at 4 seconds and increases exponentially up to 10 seconds (wait_exponential(multiplier=1, min=4, max=10)).
  2. What the Function Does:The function takes one input, prompt, which is the message or question you want to send to BharatGPT.
    • It returns the AI’s response or an empty string if something goes wrong.
  3. Sending the Prompt:Messages Structure: The function wraps the user’s prompt in a format that the BharatGPT AI understands:
    • messages = [[{"role": "user", "content": prompt}]]
    • This tells the AI that the prompt is coming from the “user.”
  4. Pipe Function: It uses a pipe() method to send the messages to the AI system.
    • max_new_tokens=maxToken: Limits how long the AI’s response can be.
  5. Extracting the Response:The response from the AI is in a structured format. The code looks for the first piece of text where:
    • The role is “assistant” (meaning it’s the AI’s reply).
    • The text is in the “content” field.
    • The next() function safely extracts this “content” field or returns None if it can’t find it.
  6. Error Handling:If something goes wrong (e.g., the AI doesn’t respond or there’s a technical issue), the code:
    • Captures the error message in e.
    • Prints the error message: print('Error: ', x).
    • Returns an empty string ("") instead of crashing.
  7. Returning the Result:If everything works, the function gives you the AI’s response as plain text.
    • If there’s an error, it gives you an empty string, indicating no response was received.

    def get_model_response(self, model_name: str, prompt: str) -> ModelResponse:
        """Get response from specified model with metrics"""
        start_time = time.time()
        start_memory = psutil.Process(os.getpid()).memory_info().rss / 1024 / 1024

        try:
            if model_name == "claude-3":
                response_content = self.get_claude_response(prompt)
            elif model_name == "gpt4":
                response_content = self.get_gpt4_response(prompt)
            elif model_name == "deepseek-chat":
                response_content = self.get_deepseek_response(prompt)
            elif model_name == "bharat-gpt":
                response_content = self.get_bharatgpt_response(prompt)

            # Model-specific API calls 
            token_count = len(self.bert_tokenizer.encode(response_content))
            
            end_memory = psutil.Process(os.getpid()).memory_info().rss / 1024 / 1024
            memory_usage = end_memory - start_memory
            
            return ModelResponse(
                content=response_content,
                response_time=time.time() - start_time,
                token_count=token_count,
                memory_usage=memory_usage
            )
        except Exception as e:
            logging.error(f"Error getting response from {model_name}: {str(e)}")
            return ModelResponse(
                content="",
                response_time=0,
                token_count=0,
                memory_usage=0,
                error=str(e)
            )

Start Tracking Time and Memory:

    • The function starts a timer (start_time) to measure how long it takes to get a response.
    • It also checks how much memory is being used at the beginning (start_memory).

    Choose the AI Model:

    • Based on the model_name provided, the function selects the appropriate method to get a response:
      • "claude-3" → Calls get_claude_response(prompt).
      • "gpt4" → Calls get_gpt4_response(prompt).
      • "deepseek-chat" → Calls get_deepseek_response(prompt).
      • "bharat-gpt" → Calls get_bharatgpt_response(prompt).

    Process the Response:

    • Once the response is received, the function calculates:
      • Token Count: The number of tokens (small chunks of text) in the response using a tokenizer.
      • Memory Usage: The difference between memory usage after the response (end_memory) and before it (start_memory).

    Return the Results:

    • The function bundles all the information into a ModelResponse object:
      • The AI’s reply (content).
      • How long the response took (response_time).
      • The number of tokens in the reply (token_count).
      • How much memory was used (memory_usage).

    Handle Errors:

    • If something goes wrong (e.g., the AI doesn’t respond), the function:
      • Logs the error message.
      • Returns an empty response with default values and the error message.
        def evaluate_text_quality(self, generated: str, reference: str) -> Dict[str, float]:
            """Evaluate text quality metrics"""
            # BERTScore
            gen_embedding = self.sentence_model.encode([generated])
            ref_embedding = self.sentence_model.encode([reference])
            bert_score = cosine_similarity(gen_embedding, ref_embedding)[0][0]
    
            # BLEU Score
            generated_tokens = word_tokenize(generated.lower())
            reference_tokens = word_tokenize(reference.lower())
            bleu = sentence_bleu([reference_tokens], generated_tokens)
    
            # METEOR Score
            meteor = meteor_score([reference_tokens], generated_tokens)
    
            return {
                'bert_score': bert_score,
                'bleu_score': bleu,
                'meteor_score': meteor
            }

    Inputs:

    • generated: The text produced by the AI.
    • reference: The correct or expected version of the text.

    Calculating BERTScore:

    • Converts the generated and reference texts into numerical embeddings (mathematical representations) using a pre-trained model (self.sentence_model.encode).
    • Measures the similarity between the two embeddings using cosine similarity. This gives the bert_score, which ranges from -1 (completely different) to 1 (very similar).

    Calculating BLEU Score:

    • Breaks the generated and reference texts into individual words (tokens) using word_tokenize.
    • Converts both texts to lowercase for consistent comparison.
    • Calculates the BLEU Score (sentence_bleu), which checks how many words or phrases in the generated text overlap with the reference. BLEU values range from 0 (no match) to 1 (perfect match).

    Calculating METEOR Score:

    • Also uses the tokenized versions of generated and reference texts.
    • Calculates the METEOR Score (meteor_score), which considers exact matches, synonyms, and word order. Scores range from 0 (no match) to 1 (perfect match).

    Returning the Results:

    • Combines the three scores into a dictionary with the keys 'bert_score''bleu_score', and 'meteor_score'.

    Similarly, other functions are developed.

        def run_comprehensive_evaluation(self, evaluation_data: List[Dict]) -> pd.DataFrame:
            """Run comprehensive evaluation on all metrics"""
            results = []
            
            for item in evaluation_data:
                prompt = item['prompt']
                reference = item['reference']
                task_criteria = item.get('task_criteria', {})
                
                for model_name in self.model_configs.keys():
                    # Get multiple responses to evaluate reliability
                    responses = [
                        self.get_model_response(model_name, prompt)
                        for _ in range(3)  # Get 3 responses for reliability testing
                    ]
                    
                    # Use the best response for other evaluations
                    best_response = max(responses, key=lambda x: len(x.content) if not x.error else 0)
                    
                    if best_response.error:
                        logging.error(f"Error in model {model_name}: {best_response.error}")
                        continue
                    
                    # Gather all metrics
                    metrics = {
                        'model': model_name,
                        'prompt': prompt,
                        'response': best_response.content,
                        **self.evaluate_text_quality(best_response.content, reference),
                        **self.evaluate_factual_accuracy(best_response.content, reference),
                        **self.evaluate_task_performance(best_response.content, task_criteria),
                        **self.evaluate_technical_performance(best_response),
                        **self.evaluate_reliability(responses),
                        **self.evaluate_safety(best_response.content)
                    }
                    
                    # Add business impact metrics using task performance
                    metrics.update(self.evaluate_business_impact(
                        best_response,
                        metrics['task_completion']
                    ))
                    
                    results.append(metrics)
            
            return pd.DataFrame(results)
    • Input:
      • evaluation_data: A list of test cases, where each case is a dictionary containing:
        • prompt: The question or input to the AI model.
        • reference: The ideal or expected answer.
        • task_criteria (optional): Additional rules or requirements for the task.
    • Initialize Results:
      • An empty list results is created to store the evaluation metrics for each model and test case.
    • Iterate Through Test Cases:
      • For each item in the evaluation_data:
        • Extract the promptreference, and task_criteria.
    • Evaluate Each Model:
      • Loop through all available AI models (self.model_configs.keys()).
      • Generate three responses for each model to test reliability.
    • Select the Best Response:
      • Out of the three responses, pick the one with the most content (best_response), ignoring responses with errors.
    • Handle Errors:
      • If a response has an error, log the issue and skip further evaluation for that model.
    • Evaluate Metrics:
      • Using the best_response, calculate a variety of metrics, including:
        • Text Quality: How similar the response is to the reference.
        • Factual Accuracy: Whether the response is factually correct.
        • Task Performance: How well it meets task-specific criteria.
        • Technical Performance: Evaluate time, memory, or other system-related metrics.
        • Reliability: Check consistency across multiple responses.
        • Safety: Ensure the response is safe and appropriate.
    • Evaluate Business Impact:
      • Add metrics for business impact (e.g., how well the task was completed, using task_completion as a key factor).
    • Store Results:
      • Add the calculated metrics for this model and prompt to the results list.
    • Return Results as a DataFrame:
      • Convert the results list into a structured table (a pandas DataFrame) for easy analysis and visualization.

    Great! So, now, we’ve explained the code.

    Let us understand the final outcome of this run & what we can conclude from that.

    1. BERT Score (Semantic Understanding):
      • GPT4 leads slightly at 0.8322 (83.22%)
      • Bharat-GPT close second at 0.8118 (81.18%)
      • Claude-3 at 0.8019 (80.19%)
      • DeepSeek-Chat at 0.7819 (78.19%) Think of this like a “comprehension score” – how well the models understand the context. All models show strong understanding, with only a 5% difference between best and worst.
    2. BLEU Score (Word-for-Word Accuracy):
      • Bharat-GPT leads at 0.0567 (5.67%)
      • Claude-3 at 0.0344 (3.44%)
      • GPT4 at 0.0306 (3.06%)
      • DeepSeek-Chat lowest at 0.0189 (1.89%) These low scores suggest models use different wording than references, which isn’t necessarily bad.
    3. METEOR Score (Meaning Preservation):
      • Bharat-GPT leads at 0.4684 (46.84%)
      • Claude-3 close second at 0.4507 (45.07%)
      • GPT4 at 0.2960 (29.60%)
      • DeepSeek-Chat at 0.2652 (26.52%) This shows how well models maintain meaning while using different words.
    4. Response Time (Speed):
      • Claude-3 fastest: 4.40 seconds
      • Bharat-GPT: 6.35 seconds
      • GPT4: 6.43 seconds
      • DeepSeek-Chat slowest: 8.52 seconds
    5. Safety and Reliability:
      • Error Rate: Perfect 0.0 for all models
      • Toxicity: All very safe (below 0.15%) 
        • Claude-3 safest at 0.0007GPT4 at 0.0008Bharat-GPT at 0.0012
        • DeepSeek-Chat at 0.0014
    6. Cost Efficiency:
      • Claude-3 most economical: $0.0019 per response
      • Bharat-GPT close: $0.0021
      • GPT4: $0.0038
      • DeepSeek-Chat highest: $0.0050

    Key Takeaways by Model:

    1. Claude-3: ✓ Fastest responses ✓ Most cost-effective ✓ Excellent meaning preservation ✓ Lowest toxicity
    2. Bharat-GPT: ✓ Best BLEU and METEOR scores ✓ Strong semantic understanding ✓ Cost-effective ✗ Moderate response time
    3. GPT4: ✓ Best semantic understanding ✓ Good safety metrics ✗ Higher cost ✗ Moderate response time
    4. DeepSeek-Chat: ✗ Generally lower performance ✗ Slowest responses ✗ Highest cost ✗ Slightly higher toxicity

    Reliability of These Statistics:

    Strong Points:

    • Comprehensive metric coverage
    • Consistent patterns across evaluations
    • Zero error rates show reliability
    • Clear differentiation between models

    Limitations:

    • BLEU scores are quite low across all models
    • Doesn’t measure creative or innovative responses
    • May not reflect specific use case performance
    • Single snapshot rather than long-term performance

    Final Observation:

    1. Best Overall Value: Claude-3
      • Fast, cost-effective, safe, good performance
    2. Best for Accuracy: Bharat-GPT
      • Highest meaning preservation and precision
    3. Best for Understanding: GPT4
      • Strongest semantic comprehension
    4. Consider Your Priorities: 
      • Speed → Choose Claude-3
      • Cost → Choose Claude-3 or Bharat-GPT
      • Accuracy → Choose Bharat-GPT
      • Understanding → Choose GPT4

    These statistics provide reliable comparative data but should be part of a broader decision-making process that includes your specific needs, budget, and use cases.


    For the Bharat GPT model, we’ve tested this locally on my MacBook Pro 4 Max. And, the configuration is as follows –

    I’ve tried the API version locally, & it provided a similar performance against the stats that we received by running locally. Unfortunately, they haven’t made the API version public yet.

    So, apart from the Anthropic & Open AI, I’ll watch this new LLM (Bharat GPT) for overall stats in the coming days.


    So, we’ve done it.

    You can find the detailed code at the GitHub link.

    I’ll bring some more exciting topics in the coming days from the Python verse.

    Till then, Happy Avenging! 🙂

    Enabling & Exploring Stable Defussion – Part 3

    Before we dive into the details of this post, let us provide the previous two links that precede it.

    Enabling & Exploring Stable Defussion – Part 1

    Enabling & Exploring Stable Defussion – Part 2

    For, reference, we’ll share the demo before deep dive into the actual follow-up analysis in the below section –


    Now, let us continue our discussions from where we left.

    class clsText2Image:
        def __init__(self, pipe, output_path, filename):
    
            self.pipe = pipe
            
            # More aggressive attention slicing
            self.pipe.enable_attention_slicing(slice_size=1)
    
            self.output_path = f"{output_path}{filename}"
            
            # Warm up the pipeline
            self._warmup()
        
        def _warmup(self):
            """Warm up the pipeline to optimize memory allocation"""
            with torch.no_grad():
                _ = self.pipe("warmup", num_inference_steps=1, height=512, width=512)
            torch.mps.empty_cache()
            gc.collect()
        
        def generate(self, prompt, num_inference_steps=12, guidance_scale=3.0):
            try:
                torch.mps.empty_cache()
                gc.collect()
                
                with torch.autocast(device_type="mps"):
                    with torch.no_grad():
                        image = self.pipe(
                            prompt,
                            num_inference_steps=num_inference_steps,
                            guidance_scale=guidance_scale,
                            height=1024,
                            width=1024,
                        ).images[0]
                
                image.save(self.output_path)
                return 0
            except Exception as e:
                print(f'Error: {str(e)}')
                return 1
            finally:
                torch.mps.empty_cache()
                gc.collect()
    
        def genImage(self, prompt):
            try:
    
                # Initialize generator
                x = self.generate(prompt)
    
                if x == 0:
                    print('Successfully processed first pass!')
                else:
                    print('Failed complete first pass!')
                    raise 
    
                return 0
    
            except Exception as e:
                print(f"\nAn unexpected error occurred: {str(e)}")
    
                return 1

    This is the initialization method for the clsText2Image class:

    • Takes a pre-configured pipe (text-to-image pipeline), an output_path, and a filename.
    • Enables more aggressive memory optimization by setting “attention slicing.”
    • Prepares the full file path for saving generated images.
    • Calls a _warmup method to pre-load the pipeline and optimize memory allocation.

    This private method warms up the pipeline:

    • Sends a dummy “warmup” request with basic parameters to allocate memory efficiently.
    • Clears any cached memory (torch.mps.empty_cache()) and performs garbage collection (gc.collect()).
    • Ensures smoother operation for future image generation tasks.

    This method generates an image from a text prompt:

    • Clears memory cache and performs garbage collection before starting.
    • Uses the text-to-image pipeline (pipe) to generate an image:
      • Takes the prompt, number of inference steps, and guidance scale as input.
      • Outputs an image at 1024×1024 resolution.
    • Saves the generated image to the specified output path.
    • Returns 0 on success or 1 on failure.
    • Ensures cleanup by clearing memory and collecting garbage, even in case of errors.

    This method simplifies image generation:

    • Calls the generate method with the given prompt.
    • Prints a success message if the image is generated (0 return value).
    • On failure, logs the error and raises an exception.
    • Returns 0 on success or 1 on failure.
    class clsImage2Video:
        def __init__(self, pipeline):
            
            # Optimize model loading
            torch.mps.empty_cache()
            self.pipeline = pipeline
    
        def generate_frames(self, pipeline, init_image, prompt, duration_seconds=10):
            try:
                torch.mps.empty_cache()
                gc.collect()
    
                base_frames = []
                img = Image.open(init_image).convert("RGB").resize((1024, 1024))
                
                for _ in range(10):
                    result = pipeline(
                        prompt=prompt,
                        image=img,
                        strength=0.45,
                        guidance_scale=7.5,
                        num_inference_steps=25
                    ).images[0]
    
                    base_frames.append(np.array(result))
                    img = result
                    torch.mps.empty_cache()
    
                frames = []
                for i in range(len(base_frames)-1):
                    frame1, frame2 = base_frames[i], base_frames[i+1]
                    for t in np.linspace(0, 1, int(duration_seconds*24/10)):
                        frame = (1-t)*frame1 + t*frame2
                        frames.append(frame.astype(np.uint8))
                
                return frames
            except Exception as e:
                frames = []
                print(f'Error: {str(e)}')
    
                return frames
            finally:
                torch.mps.empty_cache()
                gc.collect()
    
        # Main method
        def genVideo(self, prompt, inputImage, targetVideo, fps):
            try:
                print("Starting animation generation...")
                
                init_image_path = inputImage
                output_path = targetVideo
                fps = fps
                
                frames = self.generate_frames(
                    pipeline=self.pipeline,
                    init_image=init_image_path,
                    prompt=prompt,
                    duration_seconds=20
                )
                
                imageio.mimsave(output_path, frames, fps=30)
    
                print("Animation completed successfully!")
    
                return 0
            except Exception as e:
                x = str(e)
                print('Error: ', x)
    
                return 1

    This initializes the clsImage2Video class:

    • Clears the GPU cache to optimize memory before loading.
    • Sets up the pipeline for generating frames, which uses an image-to-video transformation model.

    This function generates frames for a video:

    • Starts by clearing GPU memory and running garbage collection.
    • Loads the init_image, resizes it to 1024×1024 pixels, and converts it to RGB format.
    • Iteratively applies the pipeline to transform the image:
      • Uses the prompt and specified parameters like strengthguidance_scale, and num_inference_steps.
      • Stores the resulting frames in a list.
    • Interpolates between consecutive frames to create smooth transitions:
      • Uses linear blending for smooth animation across a specified duration and frame rate (24 fps for 10 segments).
    • Returns the final list of generated frames or an empty list if an error occurs.
    • Always clears memory after execution.

    This is the main function for creating a video from an image and text prompt:

    • Logs the start of the animation generation process.
    • Calls generate_frames() with the given pipelineinputImage, and prompt to create frames.
    • Saves the generated frames as a video using the imageio library, setting the specified frame rate (fps).
    • Logs a success message and returns 0 if the process is successful.
    • On error, logs the issue and returns 1.

    Now, let us understand the performance. But, before that let us explore the device on which we’ve performed these stress test that involves GPU & CPUs as well.

    And, here is the performance stats –

    From the above snapshot, we can clearly communicate that the GPU is 100% utilized. However, the CPU has shown a significant % of availability.

    As you can see, the first pass converts the input prompt to intermediate images within 1 min 30 sec. However, the second pass constitutes multiple hops (11 hops) on an avg 22 seconds. Overall, the application will finish in 5 minutes 36 seconds for a 10-second video clip.


    So, we’ve done it.

    You can find the detailed code at the GitHub link.

    I’ll bring some more exciting topics in the coming days from the Python verse.

    Till then, Happy Avenging! 🙂

    Enabling & Exploring Stable Defussion – Part 2

    As we’ve started explaining, the importance & usage of Stable Defussion in our previous post:

    Enabling & Exploring Stable Defussion – Part 1

    In today’s post, we’ll discuss another approach, where we built the custom Python-based SDK solution that consumes HuggingFace Library, which generates video out of the supplied prompt.

    But, before that, let us view the demo generated from a custom solution.

    Isn’t it exciting? Let us dive deep into the details.


    Let us understand basic flow of events for the custom solution –

    So, the application will interact with the python-sdk like “stable-diffusion-3.5-large” & “dreamshaper-xl-1-0”, which is available in HuggingFace. As part of the process, these libraries will load all the large models inside the local laptop that require some time depend upon the bandwidth of your internet.

    Before we even deep dive into the code, let us understand the flow of Python scripts as shown below:

    From the above diagram, we can understand that the main application will be triggered by “generateText2Video.py”. As you can see that “clsConfigClient.py” has all the necessary parameter information that will be supplied to all the scripts.

    “generateText2Video.py” will trigger the main class named “clsText2Video.py”, which then calls all the subsequent classes.

    Great! Since we now have better visibility of the script flow, let’s examine the key snippets individually.


    class clsText2Video:
        def __init__(self, model_id_1, model_id_2, output_path, filename, vidfilename, fps, force_cpu=False):
            self.model_id_1 = model_id_1
            self.model_id_2 = model_id_2
            self.output_path = output_path
            self.filename = filename
            self.vidfilename = vidfilename
            self.force_cpu = force_cpu
            self.fps = fps
    
            # Initialize in main process
            os.environ["TOKENIZERS_PARALLELISM"] = "true"
            self.r1 = cm.clsMaster(force_cpu)
            self.torch_type = self.r1.getTorchType()
            
            torch.mps.empty_cache()
            self.pipe = self.r1.getText2ImagePipe(self.model_id_1, self.torch_type)
            self.pipeline = self.r1.getImage2VideoPipe(self.model_id_2, self.torch_type)
    
            self.text2img = cti.clsText2Image(self.pipe, self.output_path, self.filename)
            self.img2vid = civ.clsImage2Video(self.pipeline)
    
        def getPrompt2Video(self, prompt):
            try:
                input_image = self.output_path + self.filename
                target_video = self.output_path + self.vidfilename
    
                if self.text2img.genImage(prompt) == 0:
                    print('Pass 1: Text to intermediate images generated!')
                    
                    if self.img2vid.genVideo(prompt, input_image, target_video, self.fps) == 0:
                        print('Pass 2: Successfully generated!')
                        return 0
                return 1
            except Exception as e:
                print(f"\nAn unexpected error occurred: {str(e)}")
                return 1

    Now, let us interpret:

    This is the initialization method for the class. It does the following:

    • Sets up configurations like model IDs, output paths, filenames, video filename, frames per second (fps), and whether to use the CPU (force_cpu).
    • Configures an environment variable for tokenizer parallelism.
    • Initializes helper classes (clsMaster) to manage system resources and retrieve appropriate PyTorch settings.
    • Creates two pipelines:
      • pipe: For converting text to images using the first model.
      • pipeline: For converting images to video using the second model.
    • Initializes text2img and img2vid objects:
      • text2img handles text-to-image conversions.
      • img2vid handles image-to-video conversions.

    This method generates a video from a text prompt in two steps:

    1. Text-to-Image Conversion:
      • Calls genImage(prompt) using the text2img object to create an intermediate image file.
      • If successful, it prints confirmation.
    2. Image-to-Video Conversion:
      • Uses the img2vid object to convert the intermediate image into a video file.
      • Includes the input image path, target video path, and frames per second (fps).
      • If successful, it prints confirmation.
    • If either step fails, the method returns 1.
    • Logs any unexpected errors and returns 1 in such cases.
    # Set device for Apple Silicon GPU
    def setup_gpu(force_cpu=False):
        if not force_cpu and torch.backends.mps.is_available() and torch.backends.mps.is_built():
            print('Running on Apple Silicon MPS GPU!')
            return torch.device("mps")
        return torch.device("cpu")
    
    ######################################
    ####         Global Flag      ########
    ######################################
    
    class clsMaster:
        def __init__(self, force_cpu=False):
            self.device = setup_gpu(force_cpu)
    
        def getTorchType(self):
            try:
                # Check if MPS (Apple Silicon GPU) is available
                if not torch.backends.mps.is_available():
                    torch_dtype = torch.float32
                    raise RuntimeError("MPS (Metal Performance Shaders) is not available on this system.")
                else:
                    torch_dtype = torch.float16
                
                return torch_dtype
            except Exception as e:
                torch_dtype = torch.float16
                print(f'Error: {str(e)}')
    
                return torch_dtype
    
        def getText2ImagePipe(self, model_id, torchType):
            try:
                device = self.device
    
                torch.mps.empty_cache()
                self.pipe = StableDiffusion3Pipeline.from_pretrained(model_id, torch_dtype=torchType, use_safetensors=True, variant="fp16",).to(device)
    
                return self.pipe
            except Exception as e:
                x = str(e)
                print('Error: ', x)
    
                torch.mps.empty_cache()
                self.pipe = StableDiffusion3Pipeline.from_pretrained(model_id, torch_dtype=torchType,).to(device)
    
                return self.pipe
            
        def getImage2VideoPipe(self, model_id, torchType):
            try:
                device = self.device
    
                torch.mps.empty_cache()
                self.pipeline = StableDiffusionXLImg2ImgPipeline.from_pretrained(model_id, torch_dtype=torchType, use_safetensors=True, use_fast=True).to(device)
    
                return self.pipeline
            except Exception as e:
                x = str(e)
                print('Error: ', x)
    
                torch.mps.empty_cache()
                self.pipeline = StableDiffusionXLImg2ImgPipeline.from_pretrained(model_id, torch_dtype=torchType).to(device)
    
                return self.pipeline

    Let us interpret:

    This function determines whether to use the Apple Silicon GPU (MPS) or the CPU:

    • If force_cpu is False and the MPS GPU is available, it sets the device to “mps” (Apple GPU) and prints a message.
    • Otherwise, it defaults to the CPU.

    This is the initializer for the clsMaster class:

    • It sets the device to either GPU or CPU using the setup_gpu function (mentioned above) based on the force_cpu flag.

    This method determines the PyTorch data type to use:

    • Checks if MPS GPU is available:
      • If available, uses torch.float16 for optimized performance.
      • If unavailable, defaults to torch.float32 and raises a warning.
    • Handles errors gracefully by defaulting to torch.float16 and printing the error.

    This method initializes a text-to-image pipeline:

    • Loads the Stable Diffusion model with the given model_id and torchType.
    • Configures it for MPS GPU or CPU, based on the device.
    • Clears the GPU cache before loading the model to optimize memory usage.
    • If an error occurs, attempts to reload the pipeline without safetensors.

    This method initializes an image-to-video pipeline:

    • Similar to getText2ImagePipe, it loads the Stable Diffusion XL Img2Img pipeline with the specified model_id and torchType.
    • Configures it for MPS GPU or CPU and clears the cache before loading.
    • On error, reloads the pipeline without additional optimization settings and prints the error.

    Let us continue this in the next post:

    Enabling & Exploring Stable Defussion – Part 3

    Till then, Happy Avenging! 🙂

    Building solutions using LLM AutoGen in Python – Part 3

    Before we dive into the details of this post, let us provide the previous two links that precede it.

    Building solutions using LLM AutoGen in Python – Part 1

    Building solutions using LLM AutoGen in Python – Part 2

    For, reference, we’ll share the demo before deep dive into the actual follow-up analysis in the below section –


    In this post, we will understand the initial code generated & then the revised code to compare them for a better understanding of the impact of revised prompts.

    But, before that let us broadly understand the communication types between the agents.

    • Agents InvolvedAgent1Agent2
    • Flow:
      • Agent1 sends a request directly to Agent2.
      • Agent2 processes the request and sends the response back to Agent1.
    • Use Case: Simple query-response interactions without intermediaries.
    • Agents InvolvedUserAgentMediatorSpecialistAgent1SpecialistAgent2
    • Flow:
      • UserAgent sends input to Mediator.
      • Mediator delegates tasks to SpecialistAgent1 and SpecialistAgent2.
      • Specialists process tasks and return results to Mediator.
      • Mediator consolidates results and sends them back to UserAgent.
    • Agents InvolvedBroadcasterAgentAAgentBAgentC
    • Flow:
      • Broadcaster sends a message to multiple agents simultaneously.
      • Agents that find the message relevant (AgentAAgentC) acknowledge or respond.
    • Use Case: System-wide notifications or alerts.
    • Agents InvolvedSupervisorWorker1Worker2
    • Flow:
      • Supervisor assigns tasks to Worker1 and Worker2.
      • Workers execute tasks and report progress back to Supervisor.
    • Use Case: Task delegation in structured organizations.
    • Agents InvolvedPublisherSubscriber1Topic
    • Flow:
      • Publisher publishes an event or message to a Topic.
      • Subscriber1, who is subscribed to the Topic, receives the event.
    • Use Case: Decoupled systems where publishers and subscribers do not need direct knowledge of each other.
    • Agents InvolvedTriggerEventReactiveAgentNextStep
    • Flow:
      • An event occurs (TriggerEvent).
      • ReactiveAgent detects the event and acts.
      • The action leads to the NextStep in the process.
    • Use Case: Systems that need to respond to asynchronous events or changes in the environment.

    Since, we now understand the basic communication types. Let us understand the AutoGen generated first code & the last code (That satisfies our need) –

    # filename: simple_snake.py (Generated by AutoGen)
    
    import pygame
    import time
    import random
     
    snake_speed = 15
     
    # Window color
    white = pygame.Color(255, 255, 255)
     
    # Snake color
    green = pygame.Color(0, 255, 0)
     
    snake_position = [100, 50]
     
    # defining first 4 blocks 
    # of snake body
    snake_body = [ [100, 50], 
                   [90, 50],
                   [80, 50],
                   [70, 50]
                ]
    # fruit position
    fruit_position = [random.randrange(1, (1000//10)) * 10, 
                      random.randrange(1, (600//10)) * 10]
    fruit_spawn = True
     
    direction = 'RIGHT'
    change_to = direction
     
    score = 0
     
    # Initialising pygame
    pygame.init()
     
    # Initialise game window
    win = pygame.display.set_mode((1000, 600))
    pygame.display.set_caption("Snake game for kids")
     
    # FPS (frames per second) controller
    fps_controller = pygame.time.Clock()
     
      
    while True:
        # handling key events
        for event in pygame.event.get():
            if event.type == pygame.KEYDOWN:
                if event.key == pygame.K_UP:
                    change_to = 'UP'
                if event.key == pygame.K_DOWN:
                    change_to = 'DOWN'
                if event.key == pygame.K_LEFT:
                    change_to = 'LEFT'
                if event.key == pygame.K_RIGHT:
                    change_to = 'RIGHT'
    
        # If two keys pressed simultaneously
        # we don't want snake to move into two
        # directions simultaneously
        if change_to == 'UP' and direction != 'DOWN':
            direction = 'UP'
        if change_to == 'DOWN' and direction != 'UP':
            direction = 'DOWN'
        if change_to == 'LEFT' and direction != 'RIGHT':
            direction = 'LEFT'
        if change_to == 'RIGHT' and direction != 'LEFT':
            direction = 'RIGHT'
     
        # Moving the snake
        if direction == 'UP':
            snake_position[1] -= 10
        if direction == 'DOWN':
            snake_position[1] += 10
        if direction == 'LEFT':
            snake_position[0] -= 10
        if direction == 'RIGHT':
            snake_position[0] += 10
     
        # Snake body growing mechanism
        # if fruits and snakes collide then scores
        # will increase by 10
        snake_body.insert(0, list(snake_position))
        if snake_position[0] == fruit_position[0] and snake_position[1] == fruit_position[1]:
            score += 10
            fruit_spawn = False
        else:
            snake_body.pop()
             
        if not fruit_spawn:
            fruit_position = [random.randrange(1, (1000//10)) * 10, 
                              random.randrange(1, (600//10)) * 10]
             
        fruit_spawn = True
        win.fill(white)
        
        for pos in snake_body:
            pygame.draw.rect(win, green, pygame.Rect(pos[0], pos[1], 10, 10))
        pygame.draw.rect(win, white, pygame.Rect(
        fruit_position[0], fruit_position[1], 10, 10))
     
        # Game Over conditions
        if snake_position[0] < 0 or snake_position[0] > 1000-10:
            break
        if snake_position[1] < 0 or snake_position[1] > 600-10:
            break
     
        # Touching the snake body
        for block in snake_body[1:]:
            if snake_position[0] == block[0] and snake_position[1] == block[1]:
                break
        
        # refresh game screen
        pygame.display.update()
    
        # Frame Per Second /Refresh rate
        fps_controller.tick(snake_speed)
    
    # displaying final score after game over
    print(f"You scored {score} in the game.")

    Now, let us remember the prompt refinement that we’ve done (We’ve already posted that in our last post as well) –

    I want to place the snake within the boundary of the visual wall & it should bounce each wall & then hit the target. And, it should increase the size. And, every time when it hits the target it will increase the score by 10. And, the application will run for 2 minutes, which will be displayed on the screen. This will exit once 2 minute is over.
    # filename: simple_snake.py (Generated by AutoGen)
    
    import pygame
    import time
    import random
    import math
    
    pygame.init()
    
    white = (255, 255, 255)
    yellow = (255, 255, 102)
    green = (0, 255, 0)
    red = (255, 0, 0)
    black = (0, 0, 0)
    blue = (0, 0, 255)
    
    dis_width = 800
    dis_height = 600
    
    dis = pygame.display.set_mode((dis_width, dis_height))
    pygame.display.set_caption('Snake Game')
    
    clock = pygame.time.Clock()
    snake_block = 10
    snake_speed = 30
    font_style = pygame.font.SysFont(None, 50)
    score_font = pygame.font.SysFont(None, 35)
    
    def our_snake(snake_block, snake_List):
        for x in snake_List:
            pygame.draw.rect(dis, green, [x[0], x[1], snake_block, snake_block])
    
    def message(msg,color):
        mesg = font_style.render(msg, True, color)
        dis.blit(mesg, [dis_width / 3, dis_height / 3])
    
    def gameLoop():  # creating a function
        game_over = False
        game_close = False
    
        # snake starting coordinates
        x1 = dis_width / 2
        y1 = dis_height / 2
    
        # snake initial movement direction
        x1_change = 0
        y1_change = 0
    
        # initialize snake length and list of coordinates
        snake_List = []
        Length_of_snake = 1
    
        # random starting point for the food
        foodx = round(random.randrange(0, dis_width - snake_block) / 10.0) * 10.0
        foody = round(random.randrange(0, dis_height - snake_block) / 10.0) * 10.0
    
        # initialize score
        score = 0
    
        # store starting time
        start_time = time.time()
    
        while not game_over:
    
            # Remaining time
            elapsed_time = time.time() - start_time
            remaining_time = 120 - elapsed_time  # 2 minutes game
            if remaining_time <= 0:
                game_over = True
    
            # event handling loop
            for event in pygame.event.get():
                if event.type == pygame.QUIT:
                    game_over = True  # when closing window
                if event.type == pygame.MOUSEBUTTONUP:
                    # get mouse click coordinates
                    pos = pygame.mouse.get_pos()
    
                    # calculate new direction vector from snake to click position
                    x1_change = pos[0] - x1
                    y1_change = pos[1] - y1
    
                    # normalize direction vector
                    norm = math.sqrt(x1_change ** 2 + y1_change ** 2)
                    if norm != 0:
                        x1_change /= norm
                        y1_change /= norm
    
                    # multiply direction vector by step size
                    x1_change *= snake_block
                    y1_change *= snake_block
    
            x1 += x1_change
            y1 += y1_change
            dis.fill(white)
            pygame.draw.rect(dis, red, [foodx, foody, snake_block, snake_block])
            pygame.draw.rect(dis, green, [x1, y1, snake_block, snake_block])
            snake_Head = []
            snake_Head.append(x1)
            snake_Head.append(y1)
            snake_List.append(snake_Head)
            if len(snake_List) > Length_of_snake:
                del snake_List[0]
    
            our_snake(snake_block, snake_List)
    
            # Bounces the snake back if it hits the edge
            if x1 < 0 or x1 > dis_width:
                x1_change *= -1
            if y1 < 0 or y1 > dis_height:
                y1_change *= -1
    
            # Display score
            value = score_font.render("Your Score: " + str(score), True, black)
            dis.blit(value, [0, 0])
    
            # Display remaining time
            time_value = score_font.render("Remaining Time: " + str(int(remaining_time)), True, blue)
            dis.blit(time_value, [0, 30])
    
            pygame.display.update()
    
            # Increase score and length of snake when snake gets the food
            if abs(x1 - foodx) < snake_block and abs(y1 - foody) < snake_block:
                foodx = round(random.randrange(0, dis_width - snake_block) / 10.0) * 10.0
                foody = round(random.randrange(0, dis_height - snake_block) / 10.0) * 10.0
                Length_of_snake += 1
                score += 10
    
            # Snake movement speed
            clock.tick(snake_speed)
    
        pygame.quit()
        quit()
    
    gameLoop()
    

    Now, let us understand the difference here –

    The first program is a snake game controlled by arrow keys that end if the Snake hits a wall or itself. The second game uses mouse clicks for control, bounces off walls instead of ending, includes a 2-minute timer, and displays the remaining time.

    So, we’ve done it. 🙂

    You can find the detailed code in the following Github link.


    I’ll bring some more exciting topics in the coming days from the Python verse.

    Till then, Happy Avenging! 🙂

    Building the optimized Indic Language bot by using the Python-based Sarvam AI LLMs – Part 2

    As we discover in our previous post about the Sarvam AI basic capabilities & a glimpse of code review. Today, we’ll finish the rest of the part & some of the matrices comparing against other popular LLMs.

    Before that, you can refer to the previous post for a recap, which is available here.

    Also, we’re providing the demo here –


    Now, let us jump into the rest of the code –

    clsSarvamAI.py (This script will capture the audio input in Indic languages & then provide an LLM response in the form of audio in Indic languages. In this post, we’ll discuss part of the code. In the next part, we’ll be discussing the next important methods. Note that we’re only going to discuss a few important functions here.)

    def createWavFile(self, audio, output_filename="output.wav", target_sample_rate=16000):
          try:
              # Get the raw audio data as bytes
              audio_data = audio.get_raw_data()
    
              # Get the original sample rate
              original_sample_rate = audio.sample_rate
    
              # Open the output file in write mode
              with wave.open(output_filename, 'wb') as wf:
                  # Set parameters: nchannels, sampwidth, framerate, nframes, comptype, compname
                  wf.setnchannels(1)  # Assuming mono audio
                  wf.setsampwidth(2)  # 16-bit audio (int16)
                  wf.setframerate(original_sample_rate)
    
                  # Write audio data in chunks
                  chunk_size = 1024 * 10  # Chunk size (adjust based on memory constraints)
                  for i in range(0, len(audio_data), chunk_size):
                      wf.writeframes(audio_data[i:i+chunk_size])
    
              # Log the current timestamp
              var = datetime.datetime.now().strftime("%Y-%m-%d_%H-%M-%S")
              print('Audio Time: ', str(var))
    
              return 0
    
          except Exception as e:
              print('Error: <Wav File Creation>: ', str(e))
              return 1

    Purpose:

    This method saves recorded audio data into a WAV file format.

    What it Does:

    • Takes raw audio data and converts it into bytes.
    • Gets the original sample rate of the audio.
    • Opens a new WAV file in write mode.
    • Sets the parameters for the audio file (like the number of channels, sample width, and frame rate).
    • Writes the audio data into the file in small chunks to manage memory usage.
    • Logs the current time to keep track of when the audio was saved.
    • Returns 0 on success or 1 if there was an error.

    The “createWavFile” method takes the recorded audio and saves it as a WAV file on your computer. It converts the audio into bytes and writes them into small file parts. If something goes wrong, it prints an error message.


    def chunkBengaliResponse(self, text, max_length=500):
          try:
              chunks = []
              current_chunk = ""
    
              # Use regex to split on sentence-ending punctuation
              sentences = re.split(r'(।|\?|!)', text)
    
              for i in range(0, len(sentences), 2):
                  sentence = sentences[i] + (sentences[i+1] if i+1 < len(sentences) else '')
    
                  if len(current_chunk) + len(sentence) <= max_length:
                      current_chunk += sentence
                  else:
                      if current_chunk:
                          chunks.append(current_chunk.strip())
                      current_chunk = sentence
    
              if current_chunk:
                  chunks.append(current_chunk.strip())
    
              return chunks
          except Exception as e:
              x = str(e)
              print('Error: <<Chunking Bengali Response>>: ', x)
    
              return ''

    Purpose:

    This method breaks down a large piece of text (in Bengali) into smaller, manageable chunks.

    What it Does:

    • Initializes an empty list to store the chunks of text.
    • It uses a regular expression to split the text based on punctuation marks like full stops (।), question marks (?), and exclamation points (!).
    • Iterates through the split sentences to form chunks that do not exceed a specified maximum length (max_length).
    • Adds each chunk to the list until the entire text is processed.
    • Returns the list of chunks or an empty string if an error occurs.

    The chunkBengaliResponse method takes a long Bengali text and splits it into smaller, easier-to-handle parts. It uses punctuation marks to determine where to split. If there’s a problem while splitting, it prints an error message.


    def playWav(self, audio_data):
          try:
              # Create a wav file object from the audio data
              WavFile = wave.open(io.BytesIO(audio_data), 'rb')
    
              # Extract audio parameters
              channels = WavFile.getnchannels()
              sample_width = WavFile.getsampwidth()
              framerate = WavFile.getframerate()
              n_frames = WavFile.getnframes()
    
              # Read the audio data
              audio = WavFile.readframes(n_frames)
              WavFile.close()
    
              # Convert audio data to numpy array
              dtype_map = {1: np.int8, 2: np.int16, 3: np.int32, 4: np.int32}
              audio_np = np.frombuffer(audio, dtype=dtype_map[sample_width])
    
              # Reshape audio if stereo
              if channels == 2:
                  audio_np = audio_np.reshape(-1, 2)
    
              # Play the audio
              sd.play(audio_np, framerate)
              sd.wait()
    
              return 0
          except Exception as e:
              x = str(e)
              print('Error: <<Playing the Wav>>: ', x)
    
              return 1

    Purpose:

    This method plays audio data stored in a WAV file format.

    What it Does:

    • Reads the audio data from a WAV file object.
    • Extracts parameters like the number of channels, sample width, and frame rate.
    • Converts the audio data into a format that the sound device can process.
    • If the audio is stereo (two channels), it reshapes the data for playback.
    • Plays the audio through the speakers.
    • Returns 0 on success or 1 if there was an error.

    The playWav method takes audio data from a WAV file and plays it through your computer’s speakers. It reads the data and converts it into a format your speakers can understand. If there’s an issue playing the audio, it prints an error message.


      def audioPlayerWorker(self, queue):
          try:
              while True:
                  var = datetime.datetime.now().strftime("%Y-%m-%d_%H-%M-%S")
                  print('Response Audio Time: ', str(var))
                  audio_bytes = queue.get()
                  if audio_bytes is None:
                      break
                  self.playWav(audio_bytes)
                  queue.task_done()
    
              return 0
          except Exception as e:
              x = str(e)
              print('Error: <<Audio Player Worker>>: ', x)
    
              return 1

    Purpose:

    This method continuously plays audio from a queue until there is no more audio to play.

    What it Does:

    • It enters an infinite loop to keep checking for audio data in the queue.
    • Retrieves audio data from the queue and plays it using the “playWav”-method.
    • Logs the current time each time an audio response is played.
    • It breaks the loop if it encounters a None value, indicating no more audio to play.
    • Returns 0 on success or 1 if there was an error.

    The audioPlayerWorker method keeps checking a queue for new audio to play. It plays each piece of audio as it comes in and stops when there’s no more audio. If there’s an error during playback, it prints an error message.


      async def processChunk(self, chText, url_3, headers):
          try:
              sarvamAPIKey = self.sarvamAPIKey
              model_1 = self.model_1
              langCode_1 = self.langCode_1
              speakerName = self.speakerName
    
              print()
              print('Chunk Response: ')
              vText = chText.replace('*','').replace(':',' , ')
              print(vText)
    
              payload_3 = {
                  "inputs": [vText],
                  "target_language_code": langCode_1,
                  "speaker": speakerName,
                  "pitch": 0.15,
                  "pace": 0.95,
                  "loudness": 2.1,
                  "speech_sample_rate": 16000,
                  "enable_preprocessing": True,
                  "model": model_1
              }
              response_3 = requests.request("POST", url_3, json=payload_3, headers=headers)
              audio_data = response_3.text
              data = json.loads(audio_data)
              byte_data = data['audios'][0]
              audio_bytes = base64.b64decode(byte_data)
    
              return audio_bytes
          except Exception as e:
              x = str(e)
              print('Error: <<Process Chunk>>: ', x)
              audio_bytes = base64.b64decode('')
    
              return audio_bytes

    Purpose:

    This asynchronous method processes a chunk of text to generate audio using an external API.

    What it Does:

    • Cleans up the text chunk by removing unwanted characters.
    • Prepares a payload with the cleaned text and other parameters required for text-to-speech conversion.
    • Sends a POST request to an external API to generate audio from the text.
    • Decodes the audio data received from the API (in base64 format) into raw audio bytes.
    • Returns the audio bytes or an empty byte string if there is an error.

    The processChunk method takes a text, sends it to an external service to be converted into speech, and returns the audio data. If something goes wrong, it prints an error message.


      async def processAudio(self, audio):
          try:
              model_2 = self.model_2
              model_3 = self.model_3
              url_1 = self.url_1
              url_2 = self.url_2
              url_3 = self.url_3
              sarvamAPIKey = self.sarvamAPIKey
              audioFile = self.audioFile
              WavFile = self.WavFile
              langCode_1 = self.langCode_1
              langCode_2 = self.langCode_2
              speakerGender = self.speakerGender
    
              headers = {
                  "api-subscription-key": sarvamAPIKey
              }
    
              audio_queue = Queue()
              data = {
                  "model": model_2,
                  "prompt": templateVal_1
              }
              files = {
                  "file": (audioFile, open(WavFile, "rb"), "audio/wav")
              }
    
              response_1 = requests.post(url_1, headers=headers, data=data, files=files)
              tempDert = json.loads(response_1.text)
              regionalT = tempDert['transcript']
              langCd = tempDert['language_code']
              statusCd = response_1.status_code
              payload_2 = {
                  "input": regionalT,
                  "source_language_code": langCode_2,
                  "target_language_code": langCode_1,
                  "speaker_gender": speakerGender,
                  "mode": "formal",
                  "model": model_3,
                  "enable_preprocessing": True
              }
    
              response_2 = requests.request("POST", url_2, json=payload_2, headers=headers)
              regionalT_2 = response_2.text
              data_ = json.loads(regionalT_2)
              regionalText = data_['translated_text']
              chunked_response = self.chunkBengaliResponse(regionalText)
    
              audio_thread = Thread(target=self.audioPlayerWorker, args=(audio_queue,))
              audio_thread.start()
    
              for chText in chunked_response:
                  audio_bytes = await self.processChunk(chText, url_3, headers)
                  audio_queue.put(audio_bytes)
    
              audio_queue.join()
              audio_queue.put(None)
              audio_thread.join()
    
              var = datetime.datetime.now().strftime("%Y-%m-%d_%H-%M-%S")
              print('Retrieval Time: ', str(var))
    
              return 0
    
          except Exception as e:
              x = str(e)
              print('Error: <<Processing Audio>>: ', x)
    
              return 1

    Purpose:

    This asynchronous method handles the complete audio processing workflow, including speech recognition, translation, and audio playback.

    What it Does:

    • Initializes various configurations and headers required for processing.
    • Sends the recorded audio to an API to get the transcript and detected language.
    • Translates the transcript into another language using another API.
    • Splits the translated text into smaller chunks using the chunkBengaliResponse method.
    • Starts an audio playback thread to play each processed audio chunk.
    • Sends each text chunk to the processChunk method to convert to speech and adds the audio data to the queue for playback.
    • Waits for all audio chunks to be processed and played before finishing.
    • Logs the current time when the process is complete.
    • Returns 0 on success or 1 if there was an error.

    The “processAudio”-method takes recorded audio, recognizes what was said, translates it into another language, splits the translated text into parts, converts each part into speech, and plays it back. It uses different services to do this; if there’s a problem at any step, it prints an error message.

    And, here is the performance stats (Captured from Sarvam AI website) –


    So, finally, we’ve done it. You can view the complete code in this GitHub link.

    I’ll bring some more exciting topics in the coming days from the Python verse.

    Till then, Happy Avenging! 🙂

    Building & deploying a RAG architecture rapidly using Langflow & Python

    I’ve been looking for a solution that can help deploy any RAG solution involving Python faster. It would be more effective if an available UI helped deliver the solution faster. And, here comes the solution that does exactly what I needed – “LangFlow.”

    Before delving into the details, I strongly recommend taking a look at the demo. It’s a great way to get a comprehensive understanding of LangFlow and its capabilities in deploying RAG architecture rapidly.

    Demo

    This describes the entire architecture; hence, I’ll share the architecture components I used to build the solution.

    To know more about RAG-Architecture, please refer to the following link.

    As we all know, we can parse the data from the source website URL (in this case, I’m referring to my photography website to extract the text of one of my blogs) and then embed it into the newly created Astra DB & new collection, where I will be storing the vector embeddings.

    As you can see from the above diagram, the flow that I configured within 5 minutes and the full functionality of writing a complete solution (underlying Python application) within no time that extracts chunks, converts them into embeddings, and finally stores them inside the Astra DB.

    Now, let us understand the next phase, where, based on the ask from a chatbot, I need to convert that question into Vector DB & then find the similarity search to bring the relevant vectors as shown below –

    You need to configure this entire flow by dragging the necessary widgets from the left-side panel as marked in the Blue-Box shown below –

    For this specific use case, we’ve created an instance of Astra DB & then created an empty vector collection. Also, we need to ensure that we generate the API-Key & and provide the right roles assigned with the token. After successfully creating the token, you need to copy the endpoint, token & collection details & paste them into the desired fields of the Astra-DB components inside the LangFlow. Think of it as a framework where one needs to provide all the necessary information to build & run the entire flow successfully.

    Following are some of the important snapshots from the Astra-DB –

    Step – 1

    Step – 2

    Once you run the vector DB population, this will insert extracted text & then convert it into vectors, which will show in the following screenshot –

    You can see the sample vectors along with the text chunks inside the Astra DB data explorer as shown below –

    Some of the critical components are highlighted in the Blue-box which is important for us to monitor the vector embeddings.

    Now, here is how you can modify the current Python code of any available widgets or build your own widget by using the custom widget.

    The first step is to click the code button highlighted in the Red-box as shown below –

    The next step is when you click that button, which will open the detailed Python code representing the entire widget build & its functionality. This button is the place where you can add, modify, or keep it as it is depending upon your need, which will shown below –

    Once one builds the entire solution, you must click the final compile button (shown in the red box), which will eventually compile all the individual widgets. However, you can build the compile button for the individual widgets as soon as you make the solution. So you can pinpoint any potential problems at that very step.

    Let us understand one sample code of a widget. In this case, we will take vector embedding insertion into the Astra DB. Let us see the code –

    from typing import List, Optional, Union
    from langchain_astradb import AstraDBVectorStore
    from langchain_astradb.utils.astradb import SetupMode
    
    from langflow.custom import CustomComponent
    from langflow.field_typing import Embeddings, VectorStore
    from langflow.schema import Record
    from langchain_core.retrievers import BaseRetriever
    
    
    class AstraDBVectorStoreComponent(CustomComponent):
        display_name = "Astra DB"
        description = "Builds or loads an Astra DB Vector Store."
        icon = "AstraDB"
        field_order = ["token", "api_endpoint", "collection_name", "inputs", "embedding"]
    
        def build_config(self):
            return {
                "inputs": {
                    "display_name": "Inputs",
                    "info": "Optional list of records to be processed and stored in the vector store.",
                },
                "embedding": {"display_name": "Embedding", "info": "Embedding to use"},
                "collection_name": {
                    "display_name": "Collection Name",
                    "info": "The name of the collection within Astra DB where the vectors will be stored.",
                },
                "token": {
                    "display_name": "Token",
                    "info": "Authentication token for accessing Astra DB.",
                    "password": True,
                },
                "api_endpoint": {
                    "display_name": "API Endpoint",
                    "info": "API endpoint URL for the Astra DB service.",
                },
                "namespace": {
                    "display_name": "Namespace",
                    "info": "Optional namespace within Astra DB to use for the collection.",
                    "advanced": True,
                },
                "metric": {
                    "display_name": "Metric",
                    "info": "Optional distance metric for vector comparisons in the vector store.",
                    "advanced": True,
                },
                "batch_size": {
                    "display_name": "Batch Size",
                    "info": "Optional number of records to process in a single batch.",
                    "advanced": True,
                },
                "bulk_insert_batch_concurrency": {
                    "display_name": "Bulk Insert Batch Concurrency",
                    "info": "Optional concurrency level for bulk insert operations.",
                    "advanced": True,
                },
                "bulk_insert_overwrite_concurrency": {
                    "display_name": "Bulk Insert Overwrite Concurrency",
                    "info": "Optional concurrency level for bulk insert operations that overwrite existing records.",
                    "advanced": True,
                },
                "bulk_delete_concurrency": {
                    "display_name": "Bulk Delete Concurrency",
                    "info": "Optional concurrency level for bulk delete operations.",
                    "advanced": True,
                },
                "setup_mode": {
                    "display_name": "Setup Mode",
                    "info": "Configuration mode for setting up the vector store, with options likeSync,Async, orOff”.",
                    "options": ["Sync", "Async", "Off"],
                    "advanced": True,
                },
                "pre_delete_collection": {
                    "display_name": "Pre Delete Collection",
                    "info": "Boolean flag to determine whether to delete the collection before creating a new one.",
                    "advanced": True,
                },
                "metadata_indexing_include": {
                    "display_name": "Metadata Indexing Include",
                    "info": "Optional list of metadata fields to include in the indexing.",
                    "advanced": True,
                },
                "metadata_indexing_exclude": {
                    "display_name": "Metadata Indexing Exclude",
                    "info": "Optional list of metadata fields to exclude from the indexing.",
                    "advanced": True,
                },
                "collection_indexing_policy": {
                    "display_name": "Collection Indexing Policy",
                    "info": "Optional dictionary defining the indexing policy for the collection.",
                    "advanced": True,
                },
            }
    
        def build(
            self,
            embedding: Embeddings,
            token: str,
            api_endpoint: str,
            collection_name: str,
            inputs: Optional[List[Record]] = None,
            namespace: Optional[str] = None,
            metric: Optional[str] = None,
            batch_size: Optional[int] = None,
            bulk_insert_batch_concurrency: Optional[int] = None,
            bulk_insert_overwrite_concurrency: Optional[int] = None,
            bulk_delete_concurrency: Optional[int] = None,
            setup_mode: str = "Sync",
            pre_delete_collection: bool = False,
            metadata_indexing_include: Optional[List[str]] = None,
            metadata_indexing_exclude: Optional[List[str]] = None,
            collection_indexing_policy: Optional[dict] = None,
        ) -> Union[VectorStore, BaseRetriever]:
            try:
                setup_mode_value = SetupMode[setup_mode.upper()]
            except KeyError:
                raise ValueError(f"Invalid setup mode: {setup_mode}")
            if inputs:
                documents = [_input.to_lc_document() for _input in inputs]
    
                vector_store = AstraDBVectorStore.from_documents(
                    documents=documents,
                    embedding=embedding,
                    collection_name=collection_name,
                    token=token,
                    api_endpoint=api_endpoint,
                    namespace=namespace,
                    metric=metric,
                    batch_size=batch_size,
                    bulk_insert_batch_concurrency=bulk_insert_batch_concurrency,
                    bulk_insert_overwrite_concurrency=bulk_insert_overwrite_concurrency,
                    bulk_delete_concurrency=bulk_delete_concurrency,
                    setup_mode=setup_mode_value,
                    pre_delete_collection=pre_delete_collection,
                    metadata_indexing_include=metadata_indexing_include,
                    metadata_indexing_exclude=metadata_indexing_exclude,
                    collection_indexing_policy=collection_indexing_policy,
                )
            else:
                vector_store = AstraDBVectorStore(
                    embedding=embedding,
                    collection_name=collection_name,
                    token=token,
                    api_endpoint=api_endpoint,
                    namespace=namespace,
                    metric=metric,
                    batch_size=batch_size,
                    bulk_insert_batch_concurrency=bulk_insert_batch_concurrency,
                    bulk_insert_overwrite_concurrency=bulk_insert_overwrite_concurrency,
                    bulk_delete_concurrency=bulk_delete_concurrency,
                    setup_mode=setup_mode_value,
                    pre_delete_collection=pre_delete_collection,
                    metadata_indexing_include=metadata_indexing_include,
                    metadata_indexing_exclude=metadata_indexing_exclude,
                    collection_indexing_policy=collection_indexing_policy,
                )
    
            return vector_store
    

    Method: build_config:

    • This method defines the configuration options for the component.
    • Each configuration option includes a display_name and info, which provides details about the option.
    • Some options are marked as advanced, indicating they are optional and more complex.

    Method: build:

    • This method is used to create an instance of the Astra DB Vector Store.
    • It takes several parameters, including embedding, token, api_endpoint, collection_name, and various optional parameters.
    • It converts the setup_mode string to an enum value.
    • If inputs are provided, they are converted to a format suitable for storing in the vector store.
    • Depending on whether inputs are provided, a new vector store from documents can be created, or an empty vector store can be initialized with the given configurations.
    • Finally, it returns the created vector store instance.

    And, here is the the screenshot of your run –

    And, this is the last steps to run the Integrated Chatbot as shown below –

    As one can see the left side highlighted shows the reference text & chunks & the right side actual response.


    So, we’ve done it. And, you know the fun fact. I did this entire workflow within 35 minutes alone. 😛

    I’ll bring some more exciting topics in the coming days from the Python verse.

    To learn more about LangFlow, please click here.

    To learn about Astra DB, you need to click the following link.

    To learn about my blog & photography, you can click the following url.

    Till then, Happy Avenging!  🙂

    Building a real-time Gen AI Improvement Matrices (GAIIM) using Python, UpTrain, Open AI & React

    How does the RAG work better for various enterprise-level Gen AI use cases? What needs to be there to make the LLM model work more efficiently & able to check the response & validate their response, including the bias, hallucination & many more?

    This is my post (after a slight GAP), which will capture and discuss some of the burning issues that many AI architects are trying to explore. In this post, I’ve considered a newly formed AI start-up from India, which developed an open-source framework that can easily evaluate all the challenges that one is facing with their LLMs & easily integrate with your existing models for better understanding including its limitations. You will get plenty of insights about it.

    But, before we dig deep, why not see the demo first –

    Isn’t it exciting? Let’s deep dive into the flow of events.


    Let’s explore the broad-level architecture/flow –

    Let us understand the steps of the above architecture. First, our Python application needs to trigger and enable the API, which will interact with the Open AI and UpTrain AI to fetch all the LLM KPIs based on the input from the React app named “Evaluation.”

    Once the response is received from UpTrain AI, the Python application then organizes the results in a better readable manner without changing the core details coming out from their APIs & then shares that back with the react interface.

    Let’s examine the react app’s sample inputs to better understand the input that will be passed to the Python-based API solution, which is wrapper capability to call multiple APIs from the UpTrain & then accumulate them under one response by parsing the data & reorganizing the data with the help of Open AI & sharing that back.

    Highlighted in RED are some of the critical inputs you need to provide to get most of the KPIs. And, here are the sample text inputs for your reference –

    Q. Enter input question.
    A. What are the four largest moons of Jupiter?
    Q. Enter the context document.
    A. Jupiter, the largest planet in our solar system, boasts a fascinating array of moons. Among these, the four largest are collectively known as the Galilean moons, named after the renowned astronomer Galileo Galilei, who first observed them in 1610. These four moons, Io, Europa, Ganymede, and Callisto, hold significant scientific interest due to their unique characteristics and diverse geological features.
    Q. Enter LLM response.
    A. The four largest moons of Jupiter, known as the Galilean moons, are Io, Europa, Ganymede, and Marshmello.
    Q. Enter the persona response.
    A. strict and methodical teacher
    Q. Enter the guideline.
    A. Response shouldn’t contain any specific numbers
    Q. Enter the ground truth.
    A. The Jupiter is the largest & gaseous planet in the solar system.
    Q. Choose the evaluation method.
    A. llm

    Once you fill in the App should look like this –

    Once you fill in, the app should look like the below screenshot –


    Let us understand the sample packages that are required for this task.

    pip install Flask==3.0.3
    pip install Flask-Cors==4.0.0
    pip install numpy==1.26.4
    pip install openai==1.17.0
    pip install pandas==2.2.2
    pip install uptrain==0.6.13

    Note that, we’re not going to discuss the entire script here. Only those parts are relevant. However, you can get the complete scripts in the GitHub repository.

    def askFeluda(context, question):
        try:
            # Combine the context and the question into a single prompt.
            prompt_text = f"{context}\n\n Question: {question}\n Answer:"
    
            # Retrieve conversation history from the session or database
            conversation_history = []
    
            # Add the new message to the conversation history
            conversation_history.append(prompt_text)
    
            # Call OpenAI API with the updated conversation
            response = client.with_options(max_retries=0).chat.completions.create(
                messages=[
                    {
                        "role": "user",
                        "content": prompt_text,
                    }
                ],
                model=cf.conf['MODEL_NAME'],
                max_tokens=150,  # You can adjust this based on how long you expect the response to be
                temperature=0.3,  # Adjust for creativity. Lower values make responses more focused and deterministic
                top_p=1,
                frequency_penalty=0,
                presence_penalty=0
            )
    
            # Extract the content from the first choice's message
            chat_response = response.choices[0].message.content
    
            # Print the generated response text
            return chat_response.strip()
        except Exception as e:
            return f"An error occurred: {str(e)}"

    This function will ask the supplied questions with contexts or it will supply the UpTrain results to summarize the JSON into more easily readable plain texts. For our test, we’ve used “gpt-3.5-turbo”.

    def evalContextRelevance(question, context, resFeluda, personaResponse):
        try:
            data = [{
                'question': question,
                'context': context,
                'response': resFeluda
            }]
    
            results = eval_llm.evaluate(
                data=data,
                checks=[Evals.CONTEXT_RELEVANCE, Evals.FACTUAL_ACCURACY, Evals.RESPONSE_COMPLETENESS, Evals.RESPONSE_RELEVANCE, CritiqueTone(llm_persona=personaResponse), Evals.CRITIQUE_LANGUAGE, Evals.VALID_RESPONSE, Evals.RESPONSE_CONCISENESS]
            )
    
            return results
        except Exception as e:
            x = str(e)
    
            return x

    The above methods initiate the model from UpTrain to get all the stats, which will be helpful for your LLM response. In this post, we’ve captured the following KPIs –

    - Context Relevance Explanation
    - Factual Accuracy Explanation
    - Guideline Adherence Explanation
    - Response Completeness Explanation
    - Response Fluency Explanation
    - Response Relevance Explanation
    - Response Tonality Explanation
    # Function to extract and print all the keys and their values
    def extractPrintedData(data):
        for entry in data:
            print("Parsed Data:")
            for key, value in entry.items():
    
    
                if key == 'score_context_relevance':
                    s_1_key_val = value
                elif key == 'explanation_context_relevance':
                    cleaned_value = preprocessParseData(value)
                    print(f"{key}: {cleaned_value}\n")
                    s_1_val = cleaned_value
                elif key == 'score_factual_accuracy':
                    s_2_key_val = value
                elif key == 'explanation_factual_accuracy':
                    cleaned_value = preprocessParseData(value)
                    print(f"{key}: {cleaned_value}\n")
                    s_2_val = cleaned_value
                elif key == 'score_response_completeness':
                    s_3_key_val = value
                elif key == 'explanation_response_completeness':
                    cleaned_value = preprocessParseData(value)
                    print(f"{key}: {cleaned_value}\n")
                    s_3_val = cleaned_value
                elif key == 'score_response_relevance':
                    s_4_key_val = value
                elif key == 'explanation_response_relevance':
                    cleaned_value = preprocessParseData(value)
                    print(f"{key}: {cleaned_value}\n")
                    s_4_val = cleaned_value
                elif key == 'score_critique_tone':
                    s_5_key_val = value
                elif key == 'explanation_critique_tone':
                    cleaned_value = preprocessParseData(value)
                    print(f"{key}: {cleaned_value}\n")
                    s_5_val = cleaned_value
                elif key == 'score_fluency':
                    s_6_key_val = value
                elif key == 'explanation_fluency':
                    cleaned_value = preprocessParseData(value)
                    print(f"{key}: {cleaned_value}\n")
                    s_6_val = cleaned_value
                elif key == 'score_valid_response':
                    s_7_key_val = value
                elif key == 'score_response_conciseness':
                    s_8_key_val = value
                elif key == 'explanation_response_conciseness':
                    print('Raw Value: ', value)
                    cleaned_value = preprocessParseData(value)
                    print(f"{key}: {cleaned_value}\n")
                    s_8_val = cleaned_value
    
        print('$'*200)
    
        results = {
            "Factual_Accuracy_Score": s_2_key_val,
            "Factual_Accuracy_Explanation": s_2_val,
            "Context_Relevance_Score": s_1_key_val,
            "Context_Relevance_Explanation": s_1_val,
            "Response_Completeness_Score": s_3_key_val,
            "Response_Completeness_Explanation": s_3_val,
            "Response_Relevance_Score": s_4_key_val,
            "Response_Relevance_Explanation": s_4_val,
            "Response_Fluency_Score": s_6_key_val,
            "Response_Fluency_Explanation": s_6_val,
            "Response_Tonality_Score": s_5_key_val,
            "Response_Tonality_Explanation": s_5_val,
            "Guideline_Adherence_Score": s_8_key_val,
            "Guideline_Adherence_Explanation": s_8_val,
            "Response_Match_Score": s_7_key_val
            # Add other evaluations similarly
        }
    
        return results

    The above method parsed the initial data from UpTrain before sending it to OpenAI for a better summary without changing any text returned by it.

    @app.route('/evaluate', methods=['POST'])
    def evaluate():
        data = request.json
    
        if not data:
            return {jsonify({'error': 'No data provided'}), 400}
    
        # Extracting input data for processing (just an example of logging received data)
        question = data.get('question', '')
        context = data.get('context', '')
        llmResponse = ''
        personaResponse = data.get('personaResponse', '')
        guideline = data.get('guideline', '')
        groundTruth = data.get('groundTruth', '')
        evaluationMethod = data.get('evaluationMethod', '')
    
        print('question:')
        print(question)
    
        llmResponse = askFeluda(context, question)
        print('='*200)
        print('Response from Feluda::')
        print(llmResponse)
        print('='*200)
    
        # Getting Context LLM
        cLLM = evalContextRelevance(question, context, llmResponse, personaResponse)
    
        print('&'*200)
        print('cLLM:')
        print(cLLM)
        print(type(cLLM))
        print('&'*200)
    
        results = extractPrintedData(cLLM)
    
        print('JSON::')
        print(results)
    
        resJson = jsonify(results)
    
        return resJson

    The above function is the main method, which first receives all the input parameters from the react app & then invokes one-by-one functions to get the LLM response, and LLM performance & finally summarizes them before sending it to react-app.

    For any other scripts, please refer to the above-mentioned GitHub link.


    Let us see some of the screenshots of the test run –


    So, we’ve done it.

    I’ll bring some more exciting topics in the coming days from the Python verse.

    Till then, Happy Avenging! 🙂

    Enabling & Exploring Stable Defussion – Part 1

    This new solution will evaluate the power of Stable Defussion, which is created solutions as we progress & refine our prompt from scratch by using Stable Defussion & Python. This post opens new opportunities for IT companies & business start-ups looking to deliver solutions & have better performance compared to the paid version of Stable Defussion AI’s API performance. This project is for the advanced Python, Stable Defussion for data Science Newbies & AI evangelists.

    In a series of posts, I’ll explain and focus on the Stable Defussion API and custom solution using the Python-based SDK of Stable Defussion.

    But, before that, let us view the video that it generates from the prompt by using the third-party API:

    Prompt to Video

    And, let us understand the prompt that we supplied to create the above video –

    Isn’t it exciting?

    However, I want to stress this point: the video generated by the Stable Defusion (Stability AI) API was able to partially apply the animation effect. Even though the animation applies to the cloud, It doesn’t apply the animation to the wave. But, I must admit, the quality of the video is quite good.


    Let us understand the code and how we run the solution, and then we can try to understand its performance along with the other solutions later in the subsequent series.

    As you know, we’re exploring the code base of the third-party API, which will actually execute a series of API calls that create a video out of the prompt.

    Let us understand some of the important snippet –

    class clsStabilityAIAPI:
        def __init__(self, STABLE_DIFF_API_KEY, OUT_DIR_PATH, FILE_NM, VID_FILE_NM):
            self.STABLE_DIFF_API_KEY = STABLE_DIFF_API_KEY
            self.OUT_DIR_PATH = OUT_DIR_PATH
            self.FILE_NM = FILE_NM
            self.VID_FILE_NM = VID_FILE_NM
    
        def delFile(self, fileName):
            try:
                # Deleting the intermediate image
                os.remove(fileName)
    
                return 0 
            except Exception as e:
                x = str(e)
                print('Error: ', x)
    
                return 1
    
        def generateText2Image(self, inputDescription):
            try:
                STABLE_DIFF_API_KEY = self.STABLE_DIFF_API_KEY
                fullFileName = self.OUT_DIR_PATH + self.FILE_NM
                
                if STABLE_DIFF_API_KEY is None:
                    raise Exception("Missing Stability API key.")
                
                response = requests.post(f"{api_host}/v1/generation/{engine_id}/text-to-image",
                                        headers={
                                            "Content-Type": "application/json",
                                            "Accept": "application/json",
                                            "Authorization": f"Bearer {STABLE_DIFF_API_KEY}"
                                            },
                                            json={
                                                "text_prompts": [{"text": inputDescription}],
                                                "cfg_scale": 7,
                                                "height": 1024,
                                                "width": 576,
                                                "samples": 1,
                                                "steps": 30,
                                                },)
                
                if response.status_code != 200:
                    raise Exception("Non-200 response: " + str(response.text))
                
                data = response.json()
    
                for i, image in enumerate(data["artifacts"]):
                    with open(fullFileName, "wb") as f:
                        f.write(base64.b64decode(image["base64"]))      
                
                return fullFileName
    
            except Exception as e:
                x = str(e)
                print('Error: ', x)
    
                return 'N/A'
    
        def image2VideoPassOne(self, imgNameWithPath):
            try:
                STABLE_DIFF_API_KEY = self.STABLE_DIFF_API_KEY
    
                response = requests.post(f"https://api.stability.ai/v2beta/image-to-video",
                                        headers={"authorization": f"Bearer {STABLE_DIFF_API_KEY}"},
                                        files={"image": open(imgNameWithPath, "rb")},
                                        data={"seed": 0,"cfg_scale": 1.8,"motion_bucket_id": 127},
                                        )
                
                print('First Pass Response:')
                print(str(response.text))
                
                genID = response.json().get('id')
    
                return genID 
            except Exception as e:
                x = str(e)
                print('Error: ', x)
    
                return 'N/A'
    
        def image2VideoPassTwo(self, genId):
            try:
                generation_id = genId
                STABLE_DIFF_API_KEY = self.STABLE_DIFF_API_KEY
                fullVideoFileName = self.OUT_DIR_PATH + self.VID_FILE_NM
    
                response = requests.request("GET", f"https://api.stability.ai/v2beta/image-to-video/result/{generation_id}",
                                            headers={
                                                'accept': "video/*",  # Use 'application/json' to receive base64 encoded JSON
                                                'authorization': f"Bearer {STABLE_DIFF_API_KEY}"
                                                },) 
                
                print('Retrieve Status Code: ', str(response.status_code))
                
                if response.status_code == 202:
                    print("Generation in-progress, try again in 10 seconds.")
    
                    return 5
                elif response.status_code == 200:
                    print("Generation complete!")
                    with open(fullVideoFileName, 'wb') as file:
                        file.write(response.content)
    
                    print("Successfully Retrieved the video file!")
    
                    return 0
                else:
                    raise Exception(str(response.json()))
                
            except Exception as e:
                x = str(e)
                print('Error: ', x)
    
                return 1

    Now, let us understand the code –

    This function is called when an object of the class is created. It initializes four properties:

    • STABLE_DIFF_API_KEY: the API key for Stability AI services.
    • OUT_DIR_PATH: the folder path to save files.
    • FILE_NM: the name of the generated image file.
    • VID_FILE_NM: the name of the generated video file.

    This function deletes a file specified by fileName.

    • If successful, it returns 0.
    • If an error occurs, it logs the error and returns 1.

    This function generates an image based on a text description:

    • Sends a request to the Stability AI text-to-image endpoint using the API key.
    • Saves the resulting image to a file.
    • Returns the file’s path on success or 'N/A' if an error occurs.

    This function uploads an image to create a video in its first phase:

    • Sends the image to Stability AI’s image-to-video endpoint.
    • Logs the response and extracts the id (generation ID) for the next phase.
    • Returns the id if successful or 'N/A' on failure.

    This function retrieves the video created in the second phase using the genId:

    • Checks the video generation status from the Stability AI endpoint.
    • If complete, saves the video file and returns 0.
    • If still processing, returns 5.
    • Logs and returns 1 for any errors.

    As you can see, the code is pretty simple to understand & we’ve taken all the necessary actions in case of any unforeseen network issues or even if the video is not ready after our job submission in the following lines of the main calling script (generateText2VideoAPI.py) –

    waitTime = 10
    time.sleep(waitTime)
    
    # Failed case retry
    retries = 1
    success = False
    
    try:
        while not success:
            try:
                z = r1.image2VideoPassTwo(gID)
            except Exception as e:
                success = False
    
            if z == 0:
                success = True
            else:
                wait = retries * 2 * 15
                str_R1 = "retries Fail! Waiting " + str(wait) + " seconds and retrying!"
    
                print(str_R1)
    
                time.sleep(wait)
                retries += 1
    
            # Checking maximum retries
            if retries >= maxRetryNo:
                success = True
                raise  Exception
    except:
        print()

    And, let us see how the run looks like –

    Let us understand the CPU utilization –

    As you can see, CPU utilization is minimal since most tasks are at the API end.


    So, we’ve done it. 🙂

    Please find the next series on this topic below:

    Enabling & Exploring Stable Defussion – Part 2

    Enabling & Exploring Stable Defussion – Part 3

    Please let me know your feedback after reviewing all the posts! 🙂

    Building a real-time streamlit app by consuming events from Ably channels

    I’ll bring an exciting streamlit app that will reflect the real-time dashboard by consuming all the events from the Ably channel.

    One more time, I’ll be utilizing my IoT emulator that will feed the real-time events based on the user inputs to the Ably channel, which will be subscribed to by the Streamlit-based app.

    However, I would like to share the run before we dig deep into this.


    Demo

    Isn’t this exciting? How we can use our custom-built IoT emulator & capture real-time events to Ably Queue, then transform those raw events into more meaningful KPIs? Let’s deep dive then.

    Let’s explore the broad-level architecture/flow –

    As you can see, the green box is a demo IoT application that generates events & pushes them into the Ably Queue. At the same time, the streamlit-based Dashboard app consumes the events & transforms them into more meaningful metrics.

    Let us understand the sample packages that are required for this task.

    pip install ably==2.0.3
    pip install numpy==1.26.3
    pip install pandas==2.2.0
    pip install plotly==5.19.0
    pip install requests==2.31.0
    pip install streamlit==1.30.0
    pip install streamlit-autorefresh==1.0.1
    pip install streamlit-echarts==0.4.0

    Since this is an extension to our previous post, we’re not going to discuss other scripts, which we’ve already discussed over there. Instead, we will talk about the enhanced scripts & the new scripts that are required for this use case.

    1. app.py (This script will consume real-time streaming data coming out from a hosted API source using another popular third-party service named Ably. Ably mimics the pub sub-streaming concept, which might be extremely useful for any start-up. This will then translate into many meaningful KPIs in a streamlit-based dashboard app.)

    Note that, we’re not going to discuss the entire script here. Only those parts are relevant. However, you can get the complete scripts in the GitHub repository.

    def createHumidityGauge(humidity_value):
        fig = go.Figure(go.Indicator(
            mode = "gauge+number",
            value = humidity_value,
            domain = {'x': [0, 1], 'y': [0, 1]},
            title = {'text': "Humidity", 'font': {'size': 24}},
            gauge = {
                'axis': {'range': [None, 100], 'tickwidth': 1, 'tickcolor': "darkblue"},
                'bar': {'color': "darkblue"},
                'bgcolor': "white",
                'borderwidth': 2,
                'bordercolor': "gray",
                'steps': [
                    {'range': [0, 50], 'color': 'cyan'},
                    {'range': [50, 100], 'color': 'royalblue'}],
                'threshold': {
                    'line': {'color': "red", 'width': 4},
                    'thickness': 0.75,
                    'value': humidity_value}
            }
        ))
    
        fig.update_layout(height=220, paper_bgcolor = "white", font = {'color': "darkblue", 'family': "Arial"}, margin=dict(t=0, l=5, r=5, b=0))
    
        return fig

    The above function creates a customized humidity gauge that visually represents a given humidity value, making it easy to read and understand at a glance.

    This code defines a function createHumidityGauge that creates a visual gauge (like a meter) to display a humidity value. Here’s a simple breakdown of what it does:

    1. Function Definition: It starts by defining a function named createHumidityGauge that takes one parameter, humidity_value, which is the humidity level you want to display on the gauge.
    2. Creating the Gauge: Inside the function, it creates a figure using Plotly (a plotting library) with a specific type of chart called an Indicator. This Indicator is set to display in “gauge+number” mode, meaning it shows both a gauge visual and the numeric value of the humidity.
    3. Setting Gauge Properties:
      • The value is set to the humidity_value parameter, so the gauge shows this humidity level.
      • The domain sets the position of the gauge on the plot, which is set to fill the available space ([0, 1] for both x and y axes).
      • The title is set to “Humidity” with a font size of 24, labeling the gauge.
      • The gauge section defines the appearance and behavior of the gauge, including:
        • An axis that goes from 0 to 100 (assuming humidity is measured as a percentage from 0% to 100%).
        • The color and style of the gauge’s bar and background.
        • Colored steps indicating different ranges of humidity (cyan for 0-50% and royal blue for 50-100%).
        • A threshold line that appears at the value of the humidity, marked in red to stand out.
    4. Finalizing the Gauge Appearance: The function then updates the layout of the figure to set its height, background color, font style, and margins to make sure the gauge looks nice and is visible.
    5. Returning the Figure: Finally, the function returns the fig object, which is the fully configured gauge, ready to be displayed.

    Other similar functions will repeat the same steps.

    def createTemperatureLineChart(data):
        # Assuming 'data' is a DataFrame with a 'Timestamp' index and a 'Temperature' column
        fig = px.line(data, x=data.index, y='Temperature', title='Temperature Vs Time')
        fig.update_layout(height=270)  # Specify the desired height here
        return fig

    The above function takes a set of temperature data indexed by timestamp and creates a line chart that visually represents how the temperature changes over time.

    This code defines a function “createTemperatureLineChart” that creates a line chart to display temperature data over time. Here’s a simple summary of what it does:

    1. Function Definition: It starts with defining a function named createTemperatureLineChart that takes one parameter, data, which is expected to be a DataFrame (a type of data structure used in pandas, a Python data analysis library). This data frame should have a ‘Timestamp’ as its index (meaning each row represents a different point in time) and a ‘Temperature’ column containing temperature values.
    2. Creating the Line Chart: The function uses Plotly Express (a plotting library) to create a line chart with the following characteristics:
      • The x-axis represents time, taken from the DataFrame’s index (‘Timestamp’).
      • The y-axis represents temperature, taken from the ‘Temperature’ column in the DataFrame.
      • The chart is titled ‘Temperature Vs Time’, clearly indicating what the chart represents.
    3. Customizing the Chart: It then updates the layout of the chart to set a specific height (270 pixels) for the chart, making it easier to view.
    4. Returning the Chart: Finally, the function returns the fig object, which is the fully prepared line chart, ready to be displayed.

    Similar functions will repeat for other KPIs.

        st.sidebar.header("KPIs")
        selected_kpis = st.sidebar.multiselect(
            "Select KPIs", options=["Temperature", "Humidity", "Pressure"], default=["Temperature"]
        )

    The above code will create a sidebar with drop-down lists, which will show the KPIs (“Temperature”, “Humidity”, “Pressure”).

    # Split the layout into columns for KPIs and graphs
        gauge_col, kpi_col, graph_col = st.columns(3)
    
        # Auto-refresh setup
        st_autorefresh(interval=7000, key='data_refresh')
    
        # Fetching real-time data
        data = getData(var1, DInd)
    
        st.markdown(
            """
            <style>
            .stEcharts { margin-bottom: -50px; }  /* Class might differ, inspect the HTML to find the correct class name */
            </style>
            """,
            unsafe_allow_html=True
        )
    
        # Display gauges at the top of the page
        gauges = st.container()
    
        with gauges:
            col1, col2, col3 = st.columns(3)
            with col1:
                humidity_value = round(data['Humidity'].iloc[-1], 2)
                humidity_gauge_fig = createHumidityGauge(humidity_value)
                st.plotly_chart(humidity_gauge_fig, use_container_width=True)
    
            with col2:
                temp_value = round(data['Temperature'].iloc[-1], 2)
                temp_gauge_fig = createTempGauge(temp_value)
                st.plotly_chart(temp_gauge_fig, use_container_width=True)
    
            with col3:
                pressure_value = round(data['Pressure'].iloc[-1], 2)
                pressure_gauge_fig = createPressureGauge(pressure_value)
                st.plotly_chart(pressure_gauge_fig, use_container_width=True)
    
    
        # Next row for actual readings and charts side-by-side
        readings_charts = st.container()
    
    
        # Display KPIs and their trends
        with readings_charts:
            readings_col, graph_col = st.columns([1, 2])
    
            with readings_col:
                st.subheader("Latest Readings")
                if "Temperature" in selected_kpis:
                    st.metric("Temperature", f"{temp_value:.2f}%")
    
                if "Humidity" in selected_kpis:
                    st.metric("Humidity", f"{humidity_value:.2f}%")
    
                if "Pressure" in selected_kpis:
                    st.metric("Pressure", f"{pressure_value:.2f}%")
    
    
            # Graph placeholders for each KPI
            with graph_col:
                if "Temperature" in selected_kpis:
                    temperature_fig = createTemperatureLineChart(data.set_index("Timestamp"))
    
                    # Display the Plotly chart in Streamlit with specified dimensions
                    st.plotly_chart(temperature_fig, use_container_width=True)
    
                if "Humidity" in selected_kpis:
                    humidity_fig = createHumidityLineChart(data.set_index("Timestamp"))
    
                    # Display the Plotly chart in Streamlit with specified dimensions
                    st.plotly_chart(humidity_fig, use_container_width=True)
    
                if "Pressure" in selected_kpis:
                    pressure_fig = createPressureLineChart(data.set_index("Timestamp"))
    
                    # Display the Plotly chart in Streamlit with specified dimensions
                    st.plotly_chart(pressure_fig, use_container_width=True)
    1. The code begins by splitting the Streamlit web page layout into three columns to separately display Key Performance Indicators (KPIs), gauges, and graphs.
    2. It sets up an auto-refresh feature with a 7-second interval, ensuring the data displayed is regularly updated without manual refreshes.
    3. Real-time data is fetched using a function called getData, which takes unspecified parameters var1 and DInd.
    4. A CSS style is injected into the Streamlit page to adjust the margin of Echarts elements, which may be used to improve the visual layout of the page.
    5. A container for gauges is created at the top of the page, with three columns inside it dedicated to displaying humidity, temperature, and pressure gauges.
    6. Each gauge (humidity, temperature, and pressure) is created by rounding the last value from the fetched data to two decimal places and then visualized using respective functions that create Plotly gauge charts.
    7. Below the gauges, another container is set up for displaying the latest readings and their corresponding graphs in a side-by-side layout, using two columns.
    8. The left column under “Latest Readings” displays the latest values for selected KPIs (temperature, humidity, pressure) as metrics.
    9. In the right column, for each selected KPI, a line chart is created using data with timestamps as indices and displayed using Plotly charts, allowing for a visual trend analysis.
    10. This structured approach enables a dynamic and interactive dashboard within Streamlit, offering real-time insights into temperature, humidity, and pressure with both numeric metrics and graphical trends, optimized for regular data refreshes and user interactivity.

    Let us understand some of the important screenshots of this application –


    So, we’ve done it.

    I’ll bring some more exciting topics in the coming days from the Python verse.

    Till then, Happy Avenging! 🙂

    Text2SQL Data Extractor (T2SDE) using Python & Open AI LLM

    Today, I will share a new post that will contextualize the source files & then read the data into the pandas data frame, and then dynamically create the SQL & execute it. Then, fetch the data from the sources based on the query generated dynamically. This project is for the advanced Python developer and data Science Newbie.

    In this post, I’ve directly subscribed to OpenAI & I’m not using OpenAI from Azure. However, I’ll explore that in the future as well.

    Before I explain the process to invoke this new library, why not view the demo first & then discuss it?

    Demo

    Let us look at the flow diagram as it captures the sequence of events that unfold as part of the process.


    The application will take the metadata captured from source data dynamically. It blends the metadata and enhances the prompt to pass to the Flask server. The Flask server has all the limits of contexts.

    Once the application receives the correct generated SQL, it will then apply the SQL using the SQLAlchemy package to get the desired results.

    The following are the important packages that are essential to this project –

    pip install openai==1.6.1
    pip install pandas==2.1.4
    pip install Flask==3.0.0
    pip install SQLAlchemy==2.0.23

    We’ll have both the server and the main application. Today, we’ll be going in reverse mode. We first discuss the main script & then explain all the other class scripts.

    • 1_invokeSQLServer.py (This is the main calling Python script to invoke the OpenAI-Server.)

    Please find some of the key snippet from this discussion –

    @app.route('/message', methods=['POST'])
    def message():
        input_text = request.json.get('input_text', None)
        session_id = request.json.get('session_id', None)
    
        print('*' * 240)
        print('User Input:')
        print(str(input_text))
        print('*' * 240)
    
        # Retrieve conversation history from the session or database
        conversation_history = session.get(session_id, [])
    
        # Add the new message to the conversation history
        conversation_history.append(input_text)
    
        # Call OpenAI API with the updated conversation
        response = client.with_options(max_retries=0).chat.completions.create(
            messages=[
                {
                    "role": "user",
                    "content": input_text,
                }
            ],
            model=cf.conf['MODEL_NAME'],
        )
    
        # Extract the content from the first choice's message
        chat_response = response.choices[0].message.content
        print('*' * 240)
        print('Resposne::')
        print(chat_response)
        print('*' * 240)
    
        conversation_history.append(chat_response)
    
        # Store the updated conversation history in the session or database
        session[session_id] = conversation_history
    
        return chat_response

    This code defines a web application route that handles POST requests sent to the /message endpoint:

    1. Route Declaration: The @app.route('/message', methods=['POST']) part specifies that the function message() is executed when the server receives a POST request at the /message URL.
    2. Function Definition: Inside the message() function:
      • It retrieves two pieces of data from the request’s JSON body: input_text (the user’s input message) and session_id (a unique identifier for the user’s session).
      • It prints the user’s input message, surrounded by lines of asterisks for emphasis.
    3. Conversation History Management:
      • The code retrieves the conversation history associated with the given session_id. This history is a list of messages.
      • It then adds the new user message (input_text) to this conversation history.
    4. OpenAI API Call:
      • The function makes a call to the OpenAI API, passing the user’s message. It specifies not to retry the request if it fails (max_retries=0).
      • The model used for the OpenAI API call is taken from some configurations (cf.conf['MODEL_NAME']).
    5. Processing API Response:
      • The response from the OpenAI API is processed to extract the content of the chat response.
      • This chat response is printed.
    6. Updating Conversation History:
      • The chat response is added to the conversation history.
      • The updated conversation history is then stored back in the session or database, associated with the session_id.
    7. Returning the Response: Finally, the function returns the chat response.

    • clsDynamicSQLProcess.py (This Python class generates the SQL & then executes the flask server to invoke the OpenAI-Server.)

    Now, let us understand the few important piece of snippet –

    def text2SQLBegin(self, DBFileNameList, fileDBPath, srcQueryPrompt, joinCond, debugInd='N'):
    
            question = srcQueryPrompt
            create_table_statement = ''
            jStr = ''
    
            print('DBFileNameList::', DBFileNameList)
            print('prevSessionDBFileNameList::', self.prevSessionDBFileNameList)
    
            if set(self.prevSessionDBFileNameList) == set(DBFileNameList):
                self.flag = 'Y'
            else:
                self.flag = 'N'
    
            if self.flag == 'N':
    
                for i in DBFileNameList:
                    DBFileName = i
    
                    FullDBname = fileDBPath + DBFileName
                    print('File: ', str(FullDBname))
    
                    tabName, _ = DBFileName.split('.')
    
                    # Reading the source data
                    df = pd.read_csv(FullDBname)
    
                    # Convert all string columns to lowercase
                    df = df.apply(lambda x: x.str.lower() if x.dtype == "object" else x)
    
                    # Convert DataFrame to SQL table
                    df.to_sql(tabName, con=engine, index=False)
    
                    # Create a MetaData object and reflect the existing database
                    metadata = MetaData()
                    metadata.reflect(bind=engine)
    
                    # Access the 'users' table from the reflected metadata
                    table = metadata.tables[tabName]
    
                    # Generate the CREATE TABLE statement
                    create_table_statement = create_table_statement + str(CreateTable(table)) + '; \n'
    
                    tabName = ''
    
                for joinS in joinCond:
                    jStr = jStr + joinS + '\n'
    
                self.prevSessionDBFileNameList = DBFileNameList
                self.prev_create_table_statement = create_table_statement
    
                masterSessionDBFileNameList = self.prevSessionDBFileNameList
                mast_create_table_statement = self.prev_create_table_statement
    
            else:
                masterSessionDBFileNameList = self.prevSessionDBFileNameList
                mast_create_table_statement = self.prev_create_table_statement
    
            inputPrompt = (templateVal_1 + mast_create_table_statement + jStr + templateVal_2).format(question=question)
    
            if debugInd == 'Y':
                print('INPUT PROMPT::')
                print(inputPrompt)
    
            print('*' * 240)
            print('Find the Generated SQL:')
            print()
    
            DBFileNameList = []
            create_table_statement = ''
    
            return inputPrompt
    1. Function Overview: The text2SQLBegin function processes a list of database file names (DBFileNameList), a file path (fileDBPath), a query prompt (srcQueryPrompt), join conditions (joinCond), and a debug indicator (debugInd) to generate SQL commands.
    2. Initial Setup: It starts by initializing variables for the question, the SQL table creation statement, and a string for join conditions.
    3. Debug Prints: The function prints the current and previous session database file names for debugging purposes.
    4. Flag Setting: A flag is set to ‘Y’ if the current session’s database file names match the previous session’s; otherwise, it’s set to ‘N’.
    5. Processing New Session Data: If the flag is ‘N’, indicating new session data:
      • For each database file, it reads the data, converts string columns to lowercase, and creates a corresponding SQL table in a database using the pandas library.
      • Metadata is generated for each table and a CREATE TABLE SQL statement is created.
    6. Join Conditions and Statement Aggregation: Join conditions are concatenated, and previous session information is updated with the current session’s data.
    7. Handling Repeated Sessions: If the session data is repeated (flag is ‘Y’), it uses the previous session’s SQL table creation statements and database file names.
    8. Final Input Prompt Creation: It constructs the final input prompt by combining template values with the create table statement, join conditions, and the original question.
    9. Debug Printing: If debug mode is enabled, it prints the final input prompt.
    10. Conclusion: The function clears the DBFileNameList and create_table_statement variables, and returns the constructed input prompt.
      def text2SQLEnd(self, srcContext, debugInd='N'):
          url = self.url
    
          payload = json.dumps({"input_text": srcContext,"session_id": ""})
          headers = {'Content-Type': 'application/json', 'Cookie': cf.conf['HEADER_TOKEN']}
    
          response = requests.request("POST", url, headers=headers, data=payload)
    
          return response.text

    The text2SQLEnd function sends an HTTP POST request to a specified URL and returns the response. It takes two parameters: srcContext which contains the input text, and an optional debugInd for debugging purposes. The function constructs the request payload by converting the input text and an empty session ID to JSON format. It sets the request headers, including a content type of ‘application/json’ and a token from the configuration file. The function then sends the POST request using the requests library and returns the text content of the response.

      def sql2Data(self, srcSQL):
          # Executing the query on top of your data
          resultSQL = pd.read_sql_query(srcSQL, con=engine)
    
          return resultSQL

    The sql2Data function is designed to execute a SQL query on a database and return the result. It takes a single parameter, srcSQL, which contains the SQL query to be executed. The function uses the pandas library to run the provided SQL query (srcSQL) against a database connection (engine). It then returns the result of this query, which is typically a DataFrame object containing the data retrieved from the database.

    def genData(self, srcQueryPrompt, fileDBPath, DBFileNameList, joinCond, debugInd='N'):
        try:
            authorName = self.authorName
            website = self.website
            var = datetime.now().strftime("%Y-%m-%d_%H-%M-%S")
    
            print('*' * 240)
            print('SQL Start Time: ' + str(var))
            print('*' * 240)
    
            print('*' * 240)
            print()
    
            if debugInd == 'Y':
                print('Author Name: ', authorName)
                print('For more information, please visit the following Website: ', website)
                print()
    
                print('*' * 240)
            print('Your Data for Retrieval:')
            print('*' * 240)
    
            if debugInd == 'Y':
    
                print()
                print('Converted File to Dataframe Sample:')
                print()
    
            else:
                print()
    
            context = self.text2SQLBegin(DBFileNameList, fileDBPath, srcQueryPrompt, joinCond, debugInd)
            srcSQL = self.text2SQLEnd(context, debugInd)
    
            print(srcSQL)
            print('*' * 240)
            print()
            resDF = self.sql2Data(srcSQL)
    
            print('*' * 240)
            print('SQL End Time: ' + str(var))
            print('*' * 240)
    
            return resDF
    
        except Exception as e:
            x = str(e)
            print('Error: ', x)
    
            df = pd.DataFrame()
    
            return df
    1. Initialization and Debug Information: The function begins by initializing variables like authorName, website, and a timestamp (var). It then prints the start time of the SQL process. If the debug indicator (debugInd) is ‘Y’, it prints additional information like the author’s name and website.
    2. Generating SQL Context and Query: The function calls text2SQLBegin with various parameters (file paths, database file names, query prompt, join conditions, and the debug indicator) to generate an SQL context. Then it calls text2SQLEnd with this context and the debug indicator to generate the actual SQL query.
    3. Executing the SQL Query: It prints the generated SQL query for visibility, especially in debug mode. The query is then executed by calling sql2Data, which returns the result as a data frame (resDF).
    4. Finalization and Error Handling: After executing the query, it prints the SQL end time. In case of any exceptions during the process, it catches the error, prints it, and returns an empty DataFrame.
    5. Return Value: The function returns the DataFrame (resDF) containing the results of the executed SQL query. If an error occurs, it returns an empty DataFrame instead.

    Let us explore the directory structure starting from the parent to some of the important child folder should look like this –

    Let us understand the important screenshots of this entire process –


    So, finally, we’ve done it.

    You will get the complete codebase in the following GitHub link.

    I’ll bring some more exciting topics in the coming days from the Python verse. Please share & subscribe to my post & let me know your feedback.

    Till then, Happy Avenging! 🙂