This site mainly deals with various use cases demonstrated using Python, Data Science, Cloud basics, SQL Server, Oracle, Teradata along with SQL & their implementation. Expecting yours active participation & time. This blog can be access from your TP, Tablet & mobile also. Please provide your feedback.
Today, we’ll discuss another topic in our two-part series. We will understand the importance of the MCP protocol for communicating between agents.
This will be an in-depth highly technical as well as depicting using easy-to-understand visuals.
But, before that, let us understand the demo first.
Isn’t it exciting?
MCP Protocol:
Let us first understand in easy language about the MCP protocol.
MCP (Multi-Agent Communication Protocol) is a custom message exchange system that facilitates structured and scalable communication among multiple AI agents operating within an application. These agents collaborate asynchronously or in real-time to complete complex tasks by sharing results, context, and commands through a common messaging layer.
How MCP Protocol Helps:
Feature
Benefit
Agent-Oriented Architecture
Each agent handles a focused task, improving modularity and scalability.
Event-Driven Message Passing
Agents communicate based on triggers, not polling—leading to faster and efficient responses.
Structured Communication Format
All messages follow a standard format (e.g., JSON) with metadata for sender, recipient, type, and payload.
State Preservation
Agents maintain context across messages using memory (e.g., ConversationBufferMemory) to ensure coherence.
How It Works (Step-by-Step):
📥 User uploads or streams a video.
🧑💻 MCP Protocol triggers the Transcription Agent to start converting audio into text.
🌐 Translation Agent receives this text (if a different language is needed).
🧾 Summarization Agent receives the translated or original transcript and generates a concise summary.
📚 Research Agent checks for references or terminology used in the video.
📄 Documentation Agent compiles the output into a structured report.
🔁 All communication between agents flows through MCP, ensuring consistent message delivery and coordination.
Now, let us understand the solution that we intend to implement for our solutions:
This app provides live summarization and contextual insights from videos such as webinars, interviews, or YouTube recordings using multiple cooperating AI agents. These agents may include:
Transcription Agent: Converts spoken words to text.
Translation Agent: Translates text to different languages (if needed).
Summarization Agent: Generates concise summaries.
Research Agent: Finds background or supplementary data related to the discussion.
Documentation Agent: Converts outputs into structured reports or learning materials.
We need to understand one more thing before deep diving into the code. Part of your conversation may be mixed, like part Hindi & part English. So, in that case, it will break the sentences into chunks & then convert all of them into the same language. Hence, the following rules are applied while translating the sentences –
Now, we will go through the basic frame of the system & try to understand how it fits all the principles that we discussed above for this particular solution mapped against the specific technology –
Documentation Agent built with the LangChain framework
Research Agent built with the AutoGen framework
MCP Broker for seamless communication between agents
Process Flow:
Let us understand from the given picture the flow of the process that our app is trying to implement –
Great! So, now, we’ll focus on some of the key Python scripts & go through their key features.
But, before that, we share the group of scripts that belong to specific tasks.
Message-Chaining Protocol (MCP) Implementation:
clsMCPMessage.py
clsMCPBroker.py
YouTube Transcript Extraction:
clsYouTubeVideoProcessor.py
Language Detection:
clsLanguageDetector.py
Translation Services & Agents:
clsTranslationAgent.py
clsTranslationService.py
Documentation Agent:
clsDocumentationAgent.py
Research Agent:
clsResearchAgent.py
Now, we’ll review some of the script in this post, along with the next post, as a continuation from this post.
CODE:
clsMCPMessage.py (This is one of the main or key scripts that will help enable implementation of the MCP protocols)
classclsMCPMessage(BaseModel):"""Message format for MCP protocol"""id:str=Field(default_factory=lambda:str(uuid.uuid4())) timestamp:float=Field(default_factory=time.time) sender:str receiver:str message_type:str# "request", "response", "notification" content: Dict[str, Any] reply_to: Optional[str]=None conversation_id:str metadata: Dict[str, Any]={}classclsMCPBroker:"""Message broker for MCP protocol communication between agents"""def__init__(self):self.message_queues: Dict[str, queue.Queue]={}self.subscribers: Dict[str, List[str]]={}self.conversation_history: Dict[str, List[clsMCPMessage]]={}defregister_agent(self,agent_id:str)->None:"""Register an agent with the broker"""if agent_id notinself.message_queues:self.message_queues[agent_id]= queue.Queue()self.subscribers[agent_id]=[]defsubscribe(self,subscriber_id:str,publisher_id:str)->None:"""Subscribe an agent to messages from another agent"""if publisher_id inself.subscribers:if subscriber_id notinself.subscribers[publisher_id]:self.subscribers[publisher_id].append(subscriber_id)defpublish(self,message: clsMCPMessage)->None:"""Publish a message to its intended receiver"""# Store in conversation historyif message.conversation_id notinself.conversation_history:self.conversation_history[message.conversation_id]=[]self.conversation_history[message.conversation_id].append(message)# Deliver to direct receiverif message.receiver inself.message_queues:self.message_queues[message.receiver].put(message)# Deliver to subscribers of the senderfor subscriber inself.subscribers.get(message.sender,[]):if subscriber != message.receiver:# Avoid duplicatesself.message_queues[subscriber].put(message)defget_message(self,agent_id:str,timeout: Optional[float]=None)-> Optional[clsMCPMessage]:"""Get a message for the specified agent"""try:returnself.message_queues[agent_id].get(timeout=timeout)except(queue.Empty,KeyError):returnNonedefget_conversation_history(self,conversation_id:str)-> List[clsMCPMessage]:"""Get the history of a conversation"""returnself.conversation_history.get(conversation_id,[])
Imagine a system where different virtual agents (like robots or apps) need to talk to each other. To do that, they send messages back and forth—kind of like emails or text messages. This code is responsible for:
Making sure those messages are properly written (like filling out all parts of a form).
Making sure messages are delivered to the right people.
Keeping a record of conversations so you can go back and review what was said.
This part (clsMCPMessage) is like a template or a form that every message needs to follow. Each message has:
ID: A unique number so every message is different (like a serial number).
Time Sent: When the message was created.
Sender & Receiver: Who sent the message and who is supposed to receive it.
Type of Message: Is it a request, a response, or just a notification?
Content: The actual information or question the message is about.
Reply To: If this message is answering another one, this tells which one.
Conversation ID: So we know which group of messages belongs to the same conversation.
Extra Info (Metadata): Any other small details that might help explain the message.
This (clsMCPBroker) is the system (or “post office”) that makes sure messages get to where they’re supposed to go. Here’s what it does:
1. Registering an Agent
Think of this like signing up a new user in the system.
Each agent gets their own personal mailbox (called a “message queue”) so others can send them messages.
2. Subscribing to Another Agent
If Agent A wants to receive copies of messages from Agent B, they can “subscribe” to B.
This is like signing up for B’s newsletter—whenever B sends something, A gets a copy.
3. Sending a Message
When someone sends a message:
It is saved into a conversation history (like keeping emails in your inbox).
It is delivered to the main person it was meant for.
And, if anyone subscribed to the sender, they get a copy too—unless they’re already the main receiver (to avoid sending duplicates).
4. Receiving Messages
Each agent can check their personal mailbox to see if they got any new messages.
If there are no messages, they’ll either wait for some time or move on.
5. Viewing Past Conversations
You can look up all messages that were part of a specific conversation.
This is helpful for remembering what was said earlier.
In systems where many different smart tools or services need to work together and communicate, this kind of communication system makes sure everything is:
Organized
Delivered correctly
Easy to trace back when needed
So, in this post, we’ll finish it here. We’ll cover the rest of the post in the next post.
I’ll bring some more exciting topics in the coming days from the Python verse.
Till then, Happy Avenging! 🙂
Note: All the data & scenarios posted here are representational data & scenarios & available over the internet & for educational purposes only. There is always room for improvement in this kind of model & the solution associated with it. I’ve shown the basic ways to achieve the same for educational purposes only.
Today, we’re going to discuss creating a local LLM server and then utilizing it to execute various popular LLM models. We will club the local Apple GPUs together via a new framework that binds all the available Apple Silicon devices into one big LLM server. This enables people to run many large models, which was otherwise not possible due to the lack of GPUs.
This is certainly a new way; One can create virtual computation layers by adding nodes to the resource pool, increasing the computation capacity.
Why not witness a small demo to energize ourselves –
Let us understand the scenario. I’ve one Mac Book Pro M4 & 2 Mac Mini Pro M4 (Base models). So, I want to add them & expose them as a cluster as follows –
As you can see, I’ve connected my MacBook Pro with both the Mac Mini using high-speed thunderbolt cables for better data transmissions. And, I’ll be using an open-source framework called “Exo” to create it.
Also, you can see that my total computing capacity is 53.11 TFlops, which is slightly more than the last category.
What is Exo?
“Exo” is an open-source framework that helps you merge all your available devices into a large cluster of available resources. This extracts all the computing juice needed to handle complex tasks, including the big LLMs, which require very expensive GPU-based servers.
For more information on “Exo”, please refer to the following link.
In our previous diagram, we can see that the framework also offers endpoints.
One option is a local ChatGPT interface, where any question you ask will receive a response from models by combining all available computing power.
The other endpoint offers users a choice of any standard LLM API endpoint, which helps them integrate it into their solutions.
Let us see, how the devices are connected together –
How to establish the Cluster?
To proceed with this, you need to have at least Python 3.12, Anaconda or Miniconda & Xcode installed in all of your machines. Also, you need to install some Apple-specific MLX packages or libraries to get the best performance.
Depending on your choice, you need to use the following link to download Anaconda or Miniconda.
You can download the following link to download the Python 3.12. However, I’ve used Python 3.13 on some machines & some machines, I’ve used Python 3.12. And it worked without any problem.
Sometimes, after installing Anaconda or Miniconda, the environment may not implicitly be activated after successful installation. In that case, you may need to use the following commands in the terminal -> source ~/.bash_profile
To verify, whether the conda has been successfully installed & activated, you need to type the following command –
And, you need to perform the same process in other available devices as well.
Now, we’re ready to proceed with the final command –
(.venv) (exo1) satyaki_de@Satyakis-MacBook-Pro-Maxexo%exo/opt/anaconda3/envs/exo1/lib/python3.13/site-packages/google/protobuf/runtime_version.py:112: UserWarning:Protobufgencodeversion5.27.2isolderthantheruntimeversion5.28.1atnode_service.proto.Pleaseavoidchecked-inProtobufgencodethatcanbeobsolete.warnings.warn(NoneofPyTorch,TensorFlow>=2.0,orFlaxhavebeenfound.Modelswon't be available and only tokenizers, configuration and file/data utilities can be used.NoneofPyTorch,TensorFlow>=2.0,orFlaxhavebeenfound.Modelswon't be available and only tokenizers, configuration and file/data utilities can be used.Selectedinferenceengine: None__________/_ \ \//_ \ |__/>< (_) | \___/_/\_\___/Detectedsystem: AppleSiliconMacInferenceenginenameafterselection: mlxUsinginferenceengine: MLXDynamicShardInferenceEnginewithsharddownloader: SingletonShardDownloader[60771,54631,54661]Chatinterfacestarted:-http://127.0.0.1:52415-http://XXX.XXX.XX.XX:52415-http://XXX.XXX.XXX.XX:52415-http://XXX.XXX.XXX.XXX:52415ChatGPTAPIendpointservedat:-http://127.0.0.1:52415/v1/chat/completions-http://XXX.XXX.X.XX:52415/v1/chat/completions-http://XXX.XXX.XXX.XX:52415/v1/chat/completions-http://XXX.XXX.XXX.XXX:52415/v1/chat/completionshas_read=True,has_write=True╭────────────────────────────────────────────────────────────────────────────────────────────── ExoCluster (2nodes) ───────────────────────────────────────────────────────────────────────────────────────────────╮ReceivedexitsignalSIGTERM...Thankyouforusingexo.__________/_ \ \//_ \ |__/>< (_) | \___/_/\_\___/
Note that I’ve masked the IP addresses for security reasons.
Run Time:
At the beginning, if we trigger the main MacBook Pro Max, the “Exo” screen should looks like this –
And if you open the URL, you will see the following ChatGPT-like interface –
Connecting without the Thunderbolt bridge with the relevant port or a hub may cause performance degradation. Hence, how you connect will play a major role in the success of this intention. However, this is certainly a great idea to proceed with.
So, we’ve done it.
We’ll cover the detailed performance testing, Optimized configurations & many other useful details in our next post.
Till then, Happy Avenging! 🙂
Note: All the data & scenarios posted here are representational data & scenarios & available over the internet & for educational purposes only. There is always room for improvement in this kind of model & the solution associated with it. I’ve shown the basic ways to achieve the same for educational purposes only.
Starts by clearing GPU memory and running garbage collection.
Loads the init_image, resizes it to 1024×1024 pixels, and converts it to RGB format.
Iteratively applies the pipeline to transform the image:
Uses the prompt and specified parameters like strength, guidance_scale, and num_inference_steps.
Stores the resulting frames in a list.
Interpolates between consecutive frames to create smooth transitions:
Uses linear blending for smooth animation across a specified duration and frame rate (24 fps for 10 segments).
Returns the final list of generated frames or an empty list if an error occurs.
Always clears memory after execution.
3. genVideo(prompt, inputImage, targetVideo, fps)
This is the main function for creating a video from an image and text prompt:
Logs the start of the animation generation process.
Calls generate_frames() with the given pipeline, inputImage, and prompt to create frames.
Saves the generated frames as a video using the imageio library, setting the specified frame rate (fps).
Logs a success message and returns 0 if the process is successful.
On error, logs the issue and returns 1.
Now, let us understand the performance. But, before that let us explore the device on which we’ve performed these stress test that involves GPU & CPUs as well.
And, here is the performance stats –
From the above snapshot, we can clearly communicate that the GPU is 100% utilized. However, the CPU has shown a significant % of availability.
As you can see, the first pass converts the input prompt to intermediate images within 1 min 30 sec. However, the second pass constitutes multiple hops (11 hops) on an avg 22 seconds. Overall, the application will finish in 5 minutes 36 seconds for a 10-second video clip.
So, we’ve done it.
You can find the detailed code at the GitHub link.
I’ll bring some more exciting topics in the coming days from the Python verse.
Till then, Happy Avenging! 🙂
Note: All the data & scenarios posted here are representational data & scenarios & available over the internet & for educational purposes only. There is always room for improvement in this kind of model & the solution associated with it. I’ve shown the basic ways to achieve the same for educational purposes only.
In today’s post, we’ll discuss another approach, where we built the custom Python-based SDK solution that consumes HuggingFace Library, which generates video out of the supplied prompt.
But, before that, let us view the demo generated from a custom solution.
Isn’t it exciting? Let us dive deep into the details.
FLOW:
Let us understand basic flow of events for the custom solution –
So, the application will interact with the python-sdk like “stable-diffusion-3.5-large” & “dreamshaper-xl-1-0”, which is available in HuggingFace. As part of the process, these libraries will load all the large models inside the local laptop that require some time depend upon the bandwidth of your internet.
Before we even deep dive into the code, let us understand the flow of Python scripts as shown below:
From the above diagram, we can understand that the main application will be triggered by “generateText2Video.py”. As you can see that “clsConfigClient.py” has all the necessary parameter information that will be supplied to all the scripts.
“generateText2Video.py” will trigger the main class named “clsText2Video.py”, which then calls all the subsequent classes.
Great! Since we now have better visibility of the script flow, let’s examine the key snippets individually.
CODE:
clsText2Video.py (The main class that initiates the fellow classes to convert from prompt to video):
Note: All the data & scenarios posted here are representational data & scenarios & available over the internet & for educational purposes only. There is always room for improvement in this kind of model & the solution associated with it. I’ve shown the basic ways to achieve the same for educational purposes only.
Today, I will share a new post that will contextualize the source files & then read the data into the pandas data frame, and then dynamically create the SQL & execute it. Then, fetch the data from the sources based on the query generated dynamically. This project is for the advanced Python developer and data Science Newbie.
In this post, I’ve directly subscribed to OpenAI & I’m not using OpenAI from Azure. However, I’ll explore that in the future as well.
Before I explain the process to invoke this new library, why not view the demo first & then discuss it?
Demo
FLOW OF EVENTS:
Let us look at the flow diagram as it captures the sequence of events that unfold as part of the process.
The application will take the metadata captured from source data dynamically. It blends the metadata and enhances the prompt to pass to the Flask server. The Flask server has all the limits of contexts.
Once the application receives the correct generated SQL, it will then apply the SQL using the SQLAlchemy package to get the desired results.
IMPORTANT PACKAGES:
The following are the important packages that are essential to this project –
We’ll have both the server and the main application. Today, we’ll be going in reverse mode. We first discuss the main script & then explain all the other class scripts.
1_invokeSQLServer.py (This is the main calling Python script to invoke the OpenAI-Server.)
Please find some of the key snippet from this discussion –
This code defines a web application route that handles POST requests sent to the /message endpoint:
Route Declaration: The @app.route('/message', methods=['POST']) part specifies that the function message() is executed when the server receives a POST request at the /message URL.
Function Definition: Inside the message() function:
It retrieves two pieces of data from the request’s JSON body: input_text (the user’s input message) and session_id (a unique identifier for the user’s session).
It prints the user’s input message, surrounded by lines of asterisks for emphasis.
Conversation History Management:
The code retrieves the conversation history associated with the given session_id. This history is a list of messages.
It then adds the new user message (input_text) to this conversation history.
OpenAI API Call:
The function makes a call to the OpenAI API, passing the user’s message. It specifies not to retry the request if it fails (max_retries=0).
The model used for the OpenAI API call is taken from some configurations (cf.conf['MODEL_NAME']).
Processing API Response:
The response from the OpenAI API is processed to extract the content of the chat response.
This chat response is printed.
Updating Conversation History:
The chat response is added to the conversation history.
The updated conversation history is then stored back in the session or database, associated with the session_id.
Returning the Response: Finally, the function returns the chat response.
clsDynamicSQLProcess.py (This Python class generates the SQL & then executes the flask server to invoke the OpenAI-Server.)
Now, let us understand the few important piece of snippet –
Function Overview: The text2SQLBegin function processes a list of database file names (DBFileNameList), a file path (fileDBPath), a query prompt (srcQueryPrompt), join conditions (joinCond), and a debug indicator (debugInd) to generate SQL commands.
Initial Setup: It starts by initializing variables for the question, the SQL table creation statement, and a string for join conditions.
Debug Prints: The function prints the current and previous session database file names for debugging purposes.
Flag Setting: A flag is set to ‘Y’ if the current session’s database file names match the previous session’s; otherwise, it’s set to ‘N’.
Processing New Session Data: If the flag is ‘N’, indicating new session data:
For each database file, it reads the data, converts string columns to lowercase, and creates a corresponding SQL table in a database using the pandas library.
Metadata is generated for each table and a CREATE TABLE SQL statement is created.
Join Conditions and Statement Aggregation: Join conditions are concatenated, and previous session information is updated with the current session’s data.
Handling Repeated Sessions: If the session data is repeated (flag is ‘Y’), it uses the previous session’s SQL table creation statements and database file names.
Final Input Prompt Creation: It constructs the final input prompt by combining template values with the create table statement, join conditions, and the original question.
Debug Printing: If debug mode is enabled, it prints the final input prompt.
Conclusion: The function clears the DBFileNameList and create_table_statement variables, and returns the constructed input prompt.
The text2SQLEnd function sends an HTTP POST request to a specified URL and returns the response. It takes two parameters: srcContext which contains the input text, and an optional debugInd for debugging purposes. The function constructs the request payload by converting the input text and an empty session ID to JSON format. It sets the request headers, including a content type of ‘application/json’ and a token from the configuration file. The function then sends the POST request using the requests library and returns the text content of the response.
The sql2Data function is designed to execute a SQL query on a database and return the result. It takes a single parameter, srcSQL, which contains the SQL query to be executed. The function uses the pandas library to run the provided SQL query (srcSQL) against a database connection (engine). It then returns the result of this query, which is typically a DataFrame object containing the data retrieved from the database.
defgenData(self,srcQueryPrompt,fileDBPath,DBFileNameList,joinCond,debugInd='N'):try:authorName=self.authorNamewebsite=self.websitevar=datetime.now().strftime("%Y-%m-%d_%H-%M-%S")print('*'*240)print('SQL Start Time: '+str(var))print('*'*240)print('*'*240)print()ifdebugInd=='Y':print('Author Name: ',authorName)print('For more information, please visit the following Website: ',website)print()print('*'*240)print('Your Data for Retrieval:')print('*'*240)ifdebugInd=='Y':print()print('Converted File to Dataframe Sample:')print()else:print()context=self.text2SQLBegin(DBFileNameList,fileDBPath,srcQueryPrompt,joinCond,debugInd)srcSQL=self.text2SQLEnd(context,debugInd)print(srcSQL)print('*'*240)print()resDF=self.sql2Data(srcSQL)print('*'*240)print('SQL End Time: '+str(var))print('*'*240)returnresDFexceptExceptionas e:x=str(e)print('Error: ',x)df=pd.DataFrame()returndf
Initialization and Debug Information: The function begins by initializing variables like authorName, website, and a timestamp (var). It then prints the start time of the SQL process. If the debug indicator (debugInd) is ‘Y’, it prints additional information like the author’s name and website.
Generating SQL Context and Query: The function calls text2SQLBegin with various parameters (file paths, database file names, query prompt, join conditions, and the debug indicator) to generate an SQL context. Then it calls text2SQLEnd with this context and the debug indicator to generate the actual SQL query.
Executing the SQL Query: It prints the generated SQL query for visibility, especially in debug mode. The query is then executed by calling sql2Data, which returns the result as a data frame (resDF).
Finalization and Error Handling: After executing the query, it prints the SQL end time. In case of any exceptions during the process, it catches the error, prints it, and returns an empty DataFrame.
Return Value: The function returns the DataFrame (resDF) containing the results of the executed SQL query. If an error occurs, it returns an empty DataFrame instead.
DIRECTORY STRUCTURES:
Let us explore the directory structure starting from the parent to some of the important child folder should look like this –
Let us understand the important screenshots of this entire process –
So, finally, we’ve done it.
You will get the complete codebase in the following GitHub link.
I’ll bring some more exciting topics in the coming days from the Python verse. Please share & subscribe to my post & let me know your feedback.
Till then, Happy Avenging! 🙂
Note: All the data & scenarios posted here are representational data & scenarios & available over the internet & for educational purposes only. Some of the images (except my photo) we’ve used are available over the net. We don’t claim ownership of these images. There is always room for improvement & especially in the prediction quality.
Today, I’ll be presenting another exciting capability of architecture in the world of LLMs, where you need to answer one crucial point & that is how valid the response generated by these LLMs is against your data. This response is critical when discussing business growth & need to take the right action at the right time.
Why not view the demo before going through it?
Demo
Isn’t it exciting? Great! Let us understand this in detail.
Flow of Architecture:
The first dotted box (extreme-left) represents the area that talks about the data ingestion from different sources, including third-party PDFs. It is expected that organizations should have ready-to-digest data sources. Examples: Data Lake, Data Mart, One Lake, or any other equivalent platforms. Those PDFs will provide additional insights beyond the conventional advanced analytics.
You need to have some kind of OCR solution that will extract all the relevant information in the form of text from the documents.
The next important part is how you define the chunking & embedding of data chunks into Vector DB. Chunking & indexing strategies, along with the overlapping chain, play a crucial importance in tying that segregated piece of context into a single context that will be fed into the source for your preferred LLMs.
This system employs a vector similarity search to browse through unstructured information and concurrently accesses the database to retrieve the context, ensuring that the responses are not only comprehensive but also anchored in validated knowledge.
This approach is particularly vital for addressing multi-hop questions, where a single query can be broken down into multiple sub-questions and may require information from numerous documents to generate an accurate answer.
clsFeedVectorDB.py (This is the main class that will invoke the Faiss framework to contextualize the docs inside the vector DB with the source file name to validate the answer from Gen AI using Globe.6B embedding models.)
Let us understand some of the key snippets from the above script (Full scripts will be available in the GitHub Repo) –
# Samplefunctiontoconverttexttoavectordeftext2Vector(self,text): # Encode the text using the tokenizerwords = [wordforwordintext.lower().split()ifwordinself.model] # Ifnowordsinthemodel, returnazerovectorifnot words:returnnp.zeros(self.model.vector_size) # Computetheaverageofthewordvectorsvector=np.mean([self.model[word] forwordinwords],axis=0)returnvector.reshape(1,-1)
This code is for a function called “text2Vector” that takes some text as input and converts it into a numerical vector. Let me break it down step by step:
It starts by taking some text as input, and this text is expected to be a sentence or a piece of text.
The text is then split into individual words, and each word is converted to lowercase.
It checks if each word is present in a pre-trained language model (probably a word embedding model like Word2Vec or GloVe). If a word is not in the model, it’s ignored.
If none of the words from the input text are found in the model, the function returns a vector filled with zeros. This vector has the same size as the word vectors in the model.
If there are words from the input text in the model, the function calculates the average vector of these words. It does this by taking the word vectors for each word found in the model and computing their mean (average). This results in a single vector that represents the input text.
Finally, the function reshapes this vector into a 2D array with one row and as many columns as there are elements in the vector. The reason for this reshaping is often related to compatibility with other parts of the code or libraries used in the project.
So, in simple terms, this function takes a piece of text, looks up the word vectors for the words in that text, and calculates the average of those vectors to create a single numerical representation of the text. If none of the words are found in the model, it returns a vector of zeros.
defgenData(self):try:basePath=self.basePathmodelFileName=self.modelFileNamevectorDBPath=self.vectorDBPathvectorDBFileName=self.vectorDBFileName # CreateaFAISSindexdimension=int(cf.conf['NO_OF_MODEL_DIM']) # Assuming100-dimensionalvectorsindex=faiss.IndexFlatL2(dimension)print('*'*240)print('Vector Index Your Data for Retrieval:')print('*'*240)FullVectorDBname=vectorDBPath+vectorDBFileNameindexFile=str(vectorDBPath) +str(vectorDBFileName) +'.index'print('File: ',str(indexFile))data={} # Listallfilesinthespecifieddirectoryfiles=os.listdir(basePath) # Filteroutfilesthatarenottextfilestext_files= [fileforfileinfilesiffile.endswith('.txt')] # Readeachtextfileforfilein text_files:file_path=os.path.join(basePath,file)print('*'*240)print('Processing File:')print(str(file_path))try: # Attempttoopenwithutf-8encodingwithopen(file_path,'r',encoding='utf-8') as file:forline_number,lineinenumerate(file,start=1): # Assumeeachlineisaseparatedocumentvector=self.text2Vector(line)vector=vector.reshape(-1)index_id=index.ntotalindex.add(np.array([vector])) # Addingthevectortotheindexdata[index_id] ={'text':line,'line_number':line_number,'file_name':file_path} # Storingthelineandfilenameexcept UnicodeDecodeError: # Ifutf-8fails,tryadifferentencodingtry:withopen(file_path,'r',encoding='ISO-8859-1') as file:forline_number,lineinenumerate(file,start=1): # Assumeeachlineisaseparatedocumentvector=self.text2Vector(line)vector=vector.reshape(-1)index_id=index.ntotalindex.add(np.array([vector])) # Addingthevectortotheindexdata[index_id] ={'text':line,'line_number':line_number,'file_name':file_path} # StoringthelineandfilenameexceptExceptionas e:print(f"Could not read file {file}: {e}")continueprint('*'*240) # SavethedatadictionaryusingpickledataCache=vectorDBPath+modelFileNamewithopen(dataCache,'wb') as f:pickle.dump(data,f) # Savetheindexanddataforlaterusefaiss.write_index(index,indexFile)print('*'*240)return0exceptExceptionas e:x=str(e)print('Error: ',x)return1
This code defines a function called genData, and its purpose is to prepare and store data for later retrieval using a FAISS index. Let’s break down what it does step by step:
It starts by assigning several variables, such as basePath, modelFileName, vectorDBPath, and vectorDBFileName. These variables likely contain file paths and configuration settings.
It creates a FAISS index with a specified dimension (assuming 100-dimensional vectors in this case) using faiss.IndexFlatL2. FAISS is a library for efficient similarity search and clustering of high-dimensional data.
It prints the file name and lines where the index will be stored. It initializes an empty dictionary called data to store information about the processed text data.
It lists all the files in a directory specified by basePath. It filters out only the files that have a “.txt” extension as text files.
It then reads each of these text files one by one. For each file:
It attempts to open the file with UTF-8 encoding.
It reads the file line by line.
For each line, it calls a function text2Vector to convert the text into a numerical vector representation. This vector is added to the FAISS index.
It also stores some information about the line, such as the line number and the file name, in the data dictionary.
If there is an issue with UTF-8 encoding, it tries to open the file with a different encoding, “ISO-8859-1”. The same process of reading and storing data continues.
If there are any exceptions (errors) during this process, it prints an error message but continues processing other files.
Once all the files are processed, it saves the data dictionary using the pickle library to a file specified by dataCache.
It also saves the FAISS index to a file specified by indexFile.
Finally, it returns 0 if the process completes successfully or 1 if there was an error during execution.
In summary, this function reads text files, converts their contents into numerical vectors, and builds a FAISS index for efficient similarity search. It also saves the processed data and the index for later use. If there are any issues during the process, it prints error messages but continues processing other files.
clsRAGOpenAI.py (This is the main class that will invoke the RAG class, which will get the contexts with references including source files, line numbers, and source texts. This will help the customer to validate the source against the OpenAI response to understand & control the data bias & other potential critical issues.)
Let us understand some of the key snippets from the above script (Full scripts will be available in the GitHub Repo) –
defragAnswerWithHaystackAndGPT3(self,queryVector,k,question):modelName=self.modelNamemaxToken=self.maxTokentemp=self.temp # AssuminggetTopKContextsisamethodthatreturnsthetopKcontextscontexts=self.getTopKContexts(queryVector,k)messages= [] # Addcontextsas system messagesforfile_name,line_number,textin contexts:messages.append({"role":"system","content":f"Document: {file_name} \nLine Number: {line_number} \nContent: {text}"})prompt=self.generateOpenaiPrompt(queryVector,k)prompt=prompt+"Question: "+str(question) +". \n Answer based on the above documents." # Adduserquestionmessages.append({"role":"user","content":prompt}) # Createchatcompletioncompletion=client.chat.completions.create(model=modelName,messages=messages,temperature=temp,max_tokens=maxToken ) # Assumingthelastmessageintheresponseistheanswerlast_response=completion.choices[0].message.contentsource_refernces= ['FileName: '+str(context[0]) +' - Line Numbers: '+str(context[1]) +' - Source Text (Reference): '+str(context[2]) forcontextincontexts]returnlast_response,source_refernces
This code defines a function called ragAnswerWithHaystackAndGPT3. Its purpose is to use a combination of the Haystack search method and OpenAI’s GPT-3 model to generate an answer to a user’s question. Let’s break down what it does step by step:
It starts by assigning several variables, such as modelName, maxToken, and temp. These variables likely contain model-specific information and settings for GPT-3.
It calls a method getTopKContexts to retrieve the top K contexts (which are likely documents or pieces of text) related to the user’s query. These contexts are stored in the contexts variable.
It initializes an empty list called messages to store messages that will be used in the conversation with the GPT-3 model.
It iterates through each context and adds them as system messages to the messages list. These system messages provide information about the documents or sources being used in the conversation.
It creates a prompt that combines the query, retrieved contexts, and the user’s question. This prompt is then added as a user message to the messages list. It effectively sets up the conversation for GPT-3, where the user’s question is followed by context.
It makes a request to the GPT-3 model using the client.chat.completions.create method, passing in the model name, the constructed messages, and other settings such as temperature and maximum tokens.
After receiving a response from GPT-3, it assumes that the last message in the response contains the answer generated by the model.
It also constructs source_references, which is a list of references to the documents or sources used in generating the answer. This information includes the file name, line numbers, and source text for each context.
Finally, it returns the generated answer (last_response) and the source references to the caller.
In summary, this function takes a user’s query, retrieves relevant contexts or documents, sets up a conversation with GPT-3 that includes the query and contexts, and then uses GPT-3 to generate an answer. It also provides references to the sources used in generating the answer.
This code defines a function called getTopKContexts. Its purpose is to retrieve the top K relevant contexts or pieces of information from a pre-built index based on a query vector. Here’s a breakdown of what it does:
It takes two parameters as input: queryVector, which is a numerical vector representing a query, and k, which specifies how many relevant contexts to retrieve.
Inside a try-except block, it attempts the following steps:
It uses the index.search method to find the top K closest contexts to the given queryVector. This method returns two arrays: distances (measuring how similar the contexts are to the query) and indices (indicating the positions of the closest contexts in the data).
It creates a list called “resDict", which contains tuples for each of the top K contexts. Each tuple contains three pieces of information: the file name (file_name), the line number (line_number), and the text content (text) of the context. These details are extracted from a data dictionary.
If the process completes successfully, it returns the list of top K contexts (resDict) to the caller.
If there’s an exception (an error) during this process, it captures the error message as a string (x), prints the error message, and then returns the error message itself.
In summary, this function takes a query vector and finds the K most relevant contexts or pieces of information based on their similarity to the query. It returns these contexts as a list of tuples containing file names, line numbers, and text content. If there’s an error, it prints an error message and returns the error message string.
defgenerateOpenaiPrompt(self,queryVector,k):contexts=self.getTopKContexts(queryVector,k)template=ct.templateVal_1prompt=templateforfile_name,line_number,textin contexts:prompt+=f"Document: {file_name}\n Line Number: {line_number} \n Content: {text}\n\n"returnprompt
This code defines a function called generateOpenaiPrompt. Its purpose is to create a prompt or a piece of text that combines a template with information from the top K relevant contexts retrieved earlier. Let’s break down what it does:
It starts by calling the getTopKContexts function to obtain the top K relevant contexts based on a given queryVector.
It initializes a variable called template with a predefined template value (likely defined elsewhere in the code).
It sets the prompt variable to the initial template.
Then, it enters a loop where it iterates through each of the relevant contexts retrieved earlier (contexts are typically documents or text snippets).
For each context, it appends information to the prompt. Specifically, it adds lines to the prompt that include:
The document’s file name (Document: [file_name]).
The line number within the document (Line Number: [line_number]).
The content of the context itself (Content: [text]).
It adds some extra spacing (newlines) between each context to ensure readability.
Finally, it returns the complete – prompt, which is a combination of the template and information from the relevant contexts.
In summary, this function takes a query vector, retrieves relevant contexts, and creates a prompt by combining a template with information from these contexts. This prompt can then be used as input for an AI model or system, likely for generating responses or answers based on the provided context.
Let us understand the directory structure of this entire application –
To learn more about this package, please visit the following GitHub link.
So, finally, we’ve done it. I know that this post is relatively smaller than my earlier post. But, I think, you can get a good hack to improve some of your long-running jobs by applying this trick.
I’ll bring some more exciting topics in the coming days from the Python verse. Please share & subscribe to my post & let me know your feedback.
Till then, Happy Avenging! 🙂
Note: All the data & scenarios posted here are representational data & scenarios & available over the internet & for educational purposes only. Some of the images (except my photo) we’ve used are available over the net. We don’t claim ownership of these images. There is always room for improvement & especially in the prediction quality.
Today, we’ll share the second installment of the RAG implementation. If you are new here, please visit the previous post for full context.
In this post, we’ll be discussing the Haystack framework more. Again, before discussing the main context, I want to present the demo here.
Demo
FLOW OF EVENTS:
Let us look at the flow diagram as it captures the sequence of events that unfold as part of the process, where today, we’ll pay our primary attention.
As you can see today, we’ll discuss the red dotted line, which contextualizes the source data into the Vector DBs.
Let us understand the flow of events here –
The main Python application will consume the nested JSON by invoking the museum API in multiple threads.
The application will clean the nested data & extract the relevant attributes after flattening the JSON.
It will create the unstructured text-based context, which is later fed to the Vector DB framework.
We’re using the Metropolitan Museum API to feed the data to our Vector DB. For more information, please visit the following link. And this is free to use & moreover, we’re using it for education scenarios.
CODE:
We’ll discuss the tokenization part highlighted in a red dotted line from the above picture.
Python:
We’ll discuss the scripts in the diagram as part of the flow mentioned above.
clsExtractJSON.py (This is the main class that will extract the content from the museum API using parallel calls.)
The above code translates into the following steps –
The above method first calls the generateFirstDayOfLastTenYears() plan to populate records for every department after getting all the unique departments by calling another API.
Then, it will call the getDataThread() methods to fetch all the relevant APIs simultaneously to reduce the overall wait time & create individual smaller files.
Finally, the application will invoke the mergeCsvFilesInDirectory() method to merge all the chunk files into one extensive historical data.
The above method will merge all the small files into a single, more extensive historical data that contains over ten years of data (the first day of ten years of data, to be precise).
For the complete code, please visit the GitHub.
1_ReadMuseumJSON.py (This is the main class that will invoke the class, which will extract the content from the museum API using parallel calls.)
The above script calls the main class after instantiating the class.
clsCreateList.py (This is the main class that will extract the relevant attributes from the historical files & then create the right input text to create the documents for contextualize into the Vector DB framework.)
The above code will read the data from the extensive historical file created from the earlier steps & then it will clean the file by removing all the duplicate records (if any) & finally, it will create three unique URLs that constitute artist, object & wiki.
Also, this application will remove the hyperlink with a specific hash value, which will feed into the vector DB. Vector DB could be better with the URLs. Hence, we will store the URLs in a separate file by storing the associate hash value & later, we’ll fetch it in a lookup from the open AI response.
Then, this application will generate prompts dynamically & finally create the documents for later steps of vector DB consumption by invoking the addDocument() methods.
For more details, please visit the GitHub link.
1_1_testCreateRec.py (This is the main class that will call the above class.)
In the above script, the following essential steps took place –
First, the application calls the clsCreateList class to store all the documents inside a dictionary.
Then it stores the data inside the vector DB & creates & stores the model, which will be later reused (If you remember, we’ve used this as a model in our previous post).
Finally, test with some sample use cases by providing the proper context to OpenAI & confirm the response.
Here is a short clip of how the RAG models contextualize with the source data.
RAG-ModelContextualization
So, finally, we’ve done it.
I know that this post is relatively bigger than my earlier post. But, I think, you can get all the details once you go through it.
You will get the complete codebase in the following GitHub link.
I’ll bring some more exciting topics in the coming days from the Python verse. Please share & subscribe to my post & let me know your feedback.
Till then, Happy Avenging! 🙂
Note: All the data & scenarios posted here are representational data & scenarios & available over the internet & for educational purposes only. Some of the images (except my photo) we’ve used are available over the net. We don’t claim ownership of these images. There is always room for improvement & especially in the prediction quality.
Today, I will share a new post in a part series about creating end-end LLMs that feed source data with RAG implementation. I’ll also use OpenAI python-based SDK and Haystack embeddings in this case.
In this post, I’ve directly subscribed to OpenAI & I’m not using OpenAI from Azure. However, I’ll explore that in the future as well.
Before I explain the process to invoke this new library, why not view the demo first & then discuss it?
Demo
FLOW OF EVENTS:
Let us look at the flow diagram as it captures the sequence of events that unfold as part of the process.
As you can see, to enable this large & complex solution, we must first establish the capabilities to build applications powered by LLMs, Transformer models, vector search, and more. You can use state-of-the-art NLP models to perform question-answering, answer generation, semantic document search, or build tools capable of complex decision-making and query resolution. Hence, steps no. 1 & 2 showcased the data embedding & creating that informed repository. We’ll be discussing that in our second part.
Once you have the informed repository, the system can interact with the end-users. As part of the query (shown in step 3), the prompt & the question are shared with the process engine, which then turned to reduce the volume & get relevant context from our informed repository & get the tuned context as part of the response (Shown in steps 4, 5 & 6).
Then, this tuned context is shared with the OpenAI for better response & summary & concluding remarks that are very user-friendly & easier to understand for end-users (Shown in steps 8 & 9).
IMPORTANT PACKAGES:
The following are the important packages that are essential to this project –
Let us understand some of the important sections of the above script –
Function – login():
The login function retrieves a ‘username’ and ‘password’ from a JSON request and prints them. It checks if the provided credentials are missing from users or password lists, returning a failure JSON response if so. It creates and returns an access token in a JSON response if valid.
Function – get_chat():
The get_chat function retrieves the running session count and user input from a JSON request. Based on the session count, it extracts catalog data or processes the user’s message from the RAG framework that finally receives the refined response from the OpenAI, extracting hash values, image URLs, and wiki URLs. If an error arises, the function captures and returns the error as a JSON message.
Function – updateCounter():
The updateCounter function checks if a given CSV file exists and retrieves its counter value. It then increments the counter and writes it back to the CSV. If any errors occur, an error message is printed, and the function returns a value of 1.
Function – extractRemoveUrls():
The extractRemoveUrls function attempts to filter a data frame, resDf, based on a provided hash value to extract image and wiki URLs. If the data frame contains matching entries, it retrieves the corresponding URLs. Any errors encountered are printed, but the function always returns the image and wiki URLs, even if they are empty.
clsContentScrapper.py (This is the main class that brings the default options for the users if they agree with the initial prompt by the bot.)
Let us understand the the core part that require from this class.
Function – extractCatalog():
The extractCatalog function uses specific headers to make a GET request to a constructed URL. The URL is derived by appending ‘/departments’ to a base_url, and a header token is used in the request headers. If successful, it returns the text of the response; if there’s an exception, it prints the error and returns the error message.
clsRAGOpenAI.py (This is the main class that brings the RAG-enabled context that is fed to OpenAI for fine-tuned response with less cost.)
############################################################# Written By:SATYAKIDE ######## Written On:27-Jun-2023 ######## ModifiedOn28-Jun-2023 ######## ######## Objective:Thisisthemaincalling ######## pythonscriptthatwillinvokethe ######## shortcutapplicationcreatedinsideMAC ######## enviornmentincludingMacBook,IPadorIPhone. ######## #############################################################fromhaystack.document_stores.faissimportFAISSDocumentStorefromhaystack.nodesimportDensePassageRetrieverimportopenaifromclsConfigClientimportclsConfigClientascfimportclsLaslog# DisblingWarningdefwarn(*args,**kwargs):passimportwarningswarnings.warn = warnimportosimportre################################################## GlobalSection ##################################################Ind = cf.conf['DEBUG_IND']queryModel = cf.conf['QUERY_MODEL']passageModel = cf.conf['PASSAGE_MODEL']#InitiatingLoggingInstancesclog = log.clsL()os.environ["TOKENIZERS_PARALLELISM"] = "false"vectorDBFileName = cf.conf['VECTORDB_FILE_NM']indexFile = "vectorDB/" + str(vectorDBFileName) + '.faiss'indexConfig = "vectorDB/" + str(vectorDBFileName) + ".json"print('File: ',str(indexFile))print('Config: ',str(indexConfig))# Also,provide`config_path`parameterifyousetitwhencallingthe`save()`method:new_document_store = FAISSDocumentStore.load(index_path=indexFile,config_path=indexConfig)# InitializeRetrieverretriever = DensePassageRetriever(document_store=new_document_store,query_embedding_model=queryModel,passage_embedding_model=passageModel,use_gpu=False)################################################## EndofGlobalSection ##################################################classclsRAGOpenAI:def__init__(self):self.basePath = cf.conf['DATA_PATH']self.fileName = cf.conf['FILE_NAME']self.Ind = cf.conf['DEBUG_IND']self.subdir = str(cf.conf['OUT_DIR'])self.base_url = cf.conf['BASE_URL']self.outputPath = cf.conf['OUTPUT_PATH']self.vectorDBPath = cf.conf['VECTORDB_PATH']self.openAIKey = cf.conf['OPEN_AI_KEY']self.temp = cf.conf['TEMP_VAL']self.modelName = cf.conf['MODEL_NAME']self.maxToken = cf.conf['MAX_TOKEN']defextractHash(self,text):try: # Regularexpressionpatterntomatch'Ref: {'followedbyanumberandthen'}'pattern = r"Ref: \{'(\d+)'\}"match = re.search(pattern,text)ifmatch:returnmatch.group(1)else:returnNoneexceptExceptionase:x = str(e)print('Error: ',x)returnNonedefremoveSentencesWithNaN(self,text):try: # Splittextintosentencesusingregularexpressionsentences = re.split('(?<!\w\.\w.)(?<![A-Z][a-z]\.)(?<=\.|\?)\s',text) # Filteroutsentencescontaining'nan'filteredSentences = [sentenceforsentenceinsentencesif'nan'notinsentence] # Rejointhesentencesreturn''.join(filteredSentences)exceptExceptionase:x = str(e)print('Error: ',x)return''defretrieveDocumentsReader(self,question,top_k=9):returnretriever.retrieve(question,top_k=top_k)defgenerateAnswerWithGPT3(self,retrieved_docs,question):try:openai.api_key = self.openAIKeytemp = self.tempmodelName = self.modelNamemaxToken = self.maxTokendocumentsText = "".join([doc.contentfordocinretrieved_docs])filteredDocs = self.removeSentencesWithNaN(documentsText)hashValue = self.extractHash(filteredDocs)print('RAG Docs:: ')print(filteredDocs) #prompt = f"Given the following documents: {documentsText}, answer the question accurately based on the above data with the supplied http urls: {question}" # Setupachat-stylepromptwithyourdatamessages = [{"role": "system", "content": "Youareahelpfulassistant,answerthequestionaccuratelybasedontheabovedatawiththesuppliedhttpurls. Onlyrelevantcontentneedstopublish. Pleasedonotprovidethefactsorthetextsthatresultscrossingthemax_tokenlimits."},{"role": "user", "content": filteredDocs} ] # Chatstyleinvokingthelatestmodelresponse = openai.ChatCompletion.create(model=modelName,messages=messages,temperature = temp,max_tokens=maxToken )returnhashValue,response.choices[0].message['content'].strip().replace('\n','\\n')exceptExceptionase:x = str(e)print('failed to get from OpenAI: ',x)return'Not Available!'defragAnswerWithHaystackAndGPT3(self,question):retrievedDocs = self.retrieveDocumentsReader(question)returnself.generateAnswerWithGPT3(retrievedDocs,question)defgetData(self,strVal):try:print('*'*120)print('Index Your Data for Retrieval:')print('*'*120)print('Response from New Docs: ')print()hashValue,answer = self.ragAnswerWithHaystackAndGPT3(strVal)print('GPT3 Answer::')print(answer)print('Hash Value:')print(str(hashValue))print('*'*240)print('End Of Use RAG to Generate Answers:')print('*'*240)returnhashValue,answerexceptExceptionase:x = str(e)print('Error: ',x)answer = xhashValue = 1returnhashValue,answer
Let us understand some of the important block –
Function – ragAnswerWithHaystackAndGPT3():
The ragAnswerWithHaystackAndGPT3 function retrieves relevant documents for a given question using the retrieveDocumentsReader method. It then generates an answer for the query using GPT-3 with the retrieved documents via the generateAnswerWithGPT3 method. The final response is returned.
Function – generateAnswerWithGPT3():
The generateAnswerWithGPT3 function, given a list of retrieved documents and a question, communicates with OpenAI’s GPT-3 to generate an answer. It first processes the documents, filtering and extracting a hash value. Using a chat-style format, it prompts GPT-3 with the processed documents and captures its response. If an error occurs, an error message is printed, and “Not Available!” is returned.
Function – retrieveDocumentsReader():
The retrieveDocumentsReader function takes in a question and an optional parameter, top_k (defaulted to 9). It is called the retriever.retrieve method with the given parameters. The result of the retrieval will generate at max nine responses from the RAG engine, which will be fed to OpenAI.
React:
App.js (This is the main react script, that will create the interface & parse the data apart from the authentication)
// App.jsimportReact,{useState}from'react';importaxiosfrom'axios';import'./App.css';constApp=()=>{const[isLoggedIn,setIsLoggedIn]=useState(false);const[username,setUsername]=useState('');const[password,setPassword]=useState('');const[message,setMessage]=useState('');const[chatLog,setChatLog]=useState([{sender:'MuBot',message:'Welcome to MuBot! Please explore the world of History from our brilliant collections! Do you want to proceed to see the catalog?'}]);consthandleLogin=async(e)=>{e.preventDefault();try{constresponse=awaitaxios.post('http://localhost:5000/login',{username,password});if (response.status===200) {setIsLoggedIn(true);}}catch (error) {console.error('Login error:',error);}};constsendMessage=async(username)=>{if (message.trim() ==='') return;// Create a new chat entryconstnewChatEntry={sender:'user',message:message.trim(),};// Clear the input fieldsetMessage('');try{// Make API request to Python-based APIconstresponse=awaitaxios.post('http://localhost:5000/chat',{message:newChatEntry.message});// Replace with your API endpoint URLconstresponseData=response.data;// Print the response to the console for debuggingconsole.log('API Response:',responseData);// Parse the nested JSON from the 'message' attributeconstjsonData=JSON.parse(responseData.message);// Check if the data contains 'departments'if (jsonData.departments) {// Extract the 'departments' attribute from the parsed dataconstdepartments=jsonData.departments;// Extract the department names and create a single string with line breaksconstbotResponseText=departments.reduce((acc,department)=>{returnacc+department.departmentId+''+department.displayName+'\n';},'');// Update the chat log with the bot's responsesetChatLog((prevChatLog)=> [...prevChatLog,{sender:'user',message:message},{sender:'bot',message:botResponseText},]);}elseif (jsonData.records){// Data structure 2: Artwork informationconstrecords=jsonData.records;// Prepare chat entriesconstchatEntries= [];// Iterate through records and extract text, image, and wiki informationrecords.forEach((record)=>{consttextInfo=Object.entries(record).map(([key,value])=>{if (key!=='Image'&&key!=='Wiki') {return`${key}: ${value}`;}returnnull;}).filter((info)=>info!==null).join('\n');constimageLink=record.Image;//const wikiLinks = JSON.parse(record.Wiki.replace(/'/g, '"'));//const wikiLinks = record.Wiki;constwikiLinks=record.Wiki.split(',').map(link=>link.trim());console.log('Wiki:',wikiLinks);// Check if there is a valid image linkconsthasValidImage=imageLink&&imageLink!=='[]';constimageElement=hasValidImage? (<imgsrc={imageLink}alt="Artwork"style={{maxWidth:'100%'}}/> ) :null;// Create JSX elements for rendering the wiki links (if available)constwikiElements=wikiLinks.map((link,index)=> (<divkey={index}><ahref={link}target="_blank"rel="noopener noreferrer"> Wiki Link {index+1}</a></div> ));if (textInfo) {chatEntries.push({sender:'bot',message:textInfo});}if (imageElement) {chatEntries.push({sender:'bot',message:imageElement});}if (wikiElements.length >0) {chatEntries.push({sender:'bot',message:wikiElements});}});// Update the chat log with the bot's responsesetChatLog((prevChatLog)=> [...prevChatLog,{sender:'user',message},...chatEntries, ]);}}catch (error) {console.error('Error sending message:',error);}};if (!isLoggedIn) {return (<divclassName="login-container"><h2>Welcome to the MuBot</h2><formonSubmit={handleLogin}className="login-form"><inputtype="text"placeholder="Enter your name"value={username}onChange={(e)=>setUsername(e.target.value)}required/><inputtype="password"placeholder="Enter your password"value={password}onChange={(e)=>setPassword(e.target.value)}required/><buttontype="submit">Login</button></form></div> );}return (<divclassName="chat-container"><divclassName="chat-header"><h2>Hello, {username}</h2><h3>Chat with MuBot</h3></div><divclassName="chat-log">{chatLog.map((chatEntry,index)=> (<divkey={index}className={`chat-entry ${chatEntry.sender==='user'?'user':'bot'}`}><spanclassName="user-name">{chatEntry.sender==='user'?username:'MuBot'}</span><pclassName="chat-message">{chatEntry.message}</p></div> ))}</div><divclassName="chat-input"><inputtype="text"placeholder="Type your message..."value={message}onChange={(e)=>setMessage(e.target.value)}onKeyPress={(e)=>{if (e.key==='Enter') {sendMessage();}}}/><buttononClick={sendMessage}>Send</button></div></div> );};exportdefaultApp;
Please find some of the important logic –
Function – handleLogin():
The handleLogin asynchronous function responds to an event by preventing its default action. It attempts to post a login request with a username and password to a local server endpoint. If the response is successful with a status of 200, it updates a state variable to indicate a successful login; otherwise, it logs any encountered errors.
Function – sendMessage():
The sendMessage asynchronous function is designed to handle the user’s chat interaction:
If the message is empty (after trimming spaces), the function exits without further action.
A chat entry object is created with the sender set as ‘user’ and the trimmed message.
The input field’s message is cleared, and an API request is made to a local server endpoint with the chat message.
If the API responds with a ‘departments’ attribute in its JSON, a bot response is crafted by iterating over department details.
If the API responds with ‘records’ indicating artwork information, the bot crafts responses for each record, extracting text, images, and wiki links, and generating JSX elements for rendering them.
After processing the API response, the chat log state is updated with the user’s original message and the bot’s responses.
Errors, if encountered, are logged to the console.
This function enables interactive chat with bot responses that vary based on the nature of the data received from the API.
DIRECTORY STRUCTURES:
Let us explore the directory structure starting from the parent to some of the important child folder should look like this –
So, finally, we’ve done it.
I know that this post is relatively bigger than my earlier post. But, I think, you can get all the details once you go through it.
You will get the complete codebase in the following GitHub link.
I’ll bring some more exciting topics in the coming days from the Python verse. Please share & subscribe to my post & let me know your feedback.
Till then, Happy Avenging! 🙂
Note: All the data & scenarios posted here are representational data & scenarios & available over the internet & for educational purposes only. Some of the images (except my photo) we’ve used are available over the net. We don’t claim ownership of these images. There is always room for improvement & especially in the prediction quality.
Today, I’m very excited to demonstrate an effortless & new way to extract the transcript from YouTube videos & then answer the questions based on the topics selected by the users. In this post, I plan to deal with the user inputs to consider the case first & then it can summarize the video content through useful advanced analytics with the help of the LangChain & OpenAI-based model.
In this post, I’ve directly subscribed to OpenAI & I’m not using OpenAI from Azure. However, I’ll explore that in the future as well. Before I explain the process to invoke this new library, why not view the demo first & then discuss it?
Demo
Isn’t it very exciting? This will lead to a whole new ballgame, where one can get critical decision-making information from these human sources along with their traditional advanced analytical data.
How will it help?
Let’s say as per your historical data & analytics, the dashboard is recommending prod-A, prod-B & prod-C as the top three products for potential top-performing brands. Whereas, you are getting some alerts from the TV news on prod-B due to the recent incidents. So, in that case, you don’t want to continue with the prod-B investment. You may find a new product named prod-Z. That may reduce the risk of your investment.
What is LangChain?
LangChain is a framework for developing applications powered by language models. We believe that the most powerful and differentiated applications will not only call out to a language model but will also be:
Data-aware: connect a language model to other sources of data
Agentic: allow a language model to interact with its environment
The LangChain framework works around these principles.
To know more about this, please click the following link.
As you can see, this is one of the critical components in our solution, which will bind the OpenAI bot & it will feed the necessary data to provide the correct response.
What is FAISS?
Faiss is a library for efficient similarity search and clustering of dense vectors. It contains algorithms that search in sets of vectors of any size, up to ones that do not fit in RAM. It also has supporting code for evaluation and parameter tuning.
Faiss developed using C++ with complete wrappers for Python—some of the most beneficial algorithms available both on CPU & in GPU as well. Facebook AI Research develops it.
To know more about this, please click the following link.
FLOW OF EVENTS:
Let us look at the flow diagram as it captures the sequence of events that unfold as part of the process.
Here are the steps that will follow in sequence –
The application will first get the topic on which it needs to look from YouTube & find the top 5 videos using the YouTube data-API.
Once the application returns a list of websites from the above step, LangChain will drive the application will extract the transcripts from the video & then optimize the response size in smaller chunks to address the costly OpenAI calls. During this time, it will invoke FAISS to create document DBs.
Finally, it will send those chunks to OpenAI for the best response based on your supplied template that performs the final analysis with small data required for your query & gets the appropriate response with fewer costs.
CODE:
Why don’t we go through the code made accessible due to this new library for this particular use case?
clsConfigClient.py (This is the main calling Python script for the input parameters.)
This file contains hidden or bidirectional Unicode text that may be interpreted or compiled differently than what appears below. To review, open the file in an editor that reveals hidden Unicode characters. Learn more about bidirectional Unicode characters
From the above code snippet, one can understand that we need both the API keys for YouTube & OpenAI. And they have separate costs & usage, which I’ll share later in the post. Also, notice that the temperature sets to 0.2 ( range between 0 to 1). That means our AI bot will be consistent in response. And our application will use the GPT-3.5-turbo model for its analytic response.
clsTemplate.py (Contains all the templates for OpenAI.)
This file contains hidden or bidirectional Unicode text that may be interpreted or compiled differently than what appears below. To review, open the file in an editor that reveals hidden Unicode characters. Learn more about bidirectional Unicode characters
The above code is self-explanatory. Here, we’re keeping the correct instructions for our OpenAI to respond within these guidelines.
clsVideoContentScrapper.py (Main class to extract the transcript from the YouTube videos & then answer the questions based on the topics selected by the users.)
This file contains hidden or bidirectional Unicode text that may be interpreted or compiled differently than what appears below. To review, open the file in an editor that reveals hidden Unicode characters. Learn more about bidirectional Unicode characters
The above code will fetch the most relevant YouTube URLs & bind them into a list along with the channel names & then share the lists with the main functions.
The provided Python code defines a function createDBFromYoutubeVideoUrl which appears to create a database of text documents from the transcript of a YouTube video. Here’s the explanation in simple English:
The function createDBFromYoutubeVideoUrl has defined with one argument: video_url.
The function uses a try-except block to handle any potential exceptions or errors that may occur.
Inside the try block, the following steps are going to perform:
First, it creates a YoutubeLoader object from the provided video_url. This object is likely responsible for interacting with the YouTube video specified by the URL.
The loader object then loads the transcript of the video. This object is the text version of everything spoken in the video.
It then creates a RecursiveCharacterTextSplitter object with a specified chunk_size of 1000 and chunk_overlap of 100. This object may split the transcript into smaller chunks (documents) of text for easier processing or analysis. Each piece will be around 1000 characters long, and there will overlap of 100 characters between consecutive chunks.
The split_documents method of the text_splitter object will split the transcript into smaller documents. These documents are stored in the docs variable.
The FAISS.from_documents method is then called with docs and embeddings as arguments to create a FAISS (Facebook AI Similarity Search) index. This index is a database used for efficient similarity search and clustering of high-dimensional vectors, which in this case, are the embeddings of the documents. The FAISS index is stored in the db variable.
Finally, the db variable is returned, representing the created database from the video transcript.
4. If an exception occurs during the execution of the try block, the code execution moves to the except block:
Here, it first converts the exception e to a string x.
Then it prints an error message.
Finally, it returns an empty string as an indication of the error.
defgetResponseFromQuery(self,db,query,k=4):try:""" gpt-3.5-turbo can handle up to 4097 tokens. Setting the chunksize to 1000 and k to 4 maximizesthenumberoftokenstoanalyze.""" mod_name = self.model_nametemp_val=self.temp_valdocs=db.similarity_search(query,k=k)docs_page_content="".join([d.page_contentfordindocs])chat=ChatOpenAI(model_name=mod_name,temperature=temp_val) # Templatetouseforthesystemmessageprompttemplate=ct.templateVal_1system_message_prompt=SystemMessagePromptTemplate.from_template(template) # Humanquestionprompthuman_template="Answer the following question: {question}"human_message_prompt=HumanMessagePromptTemplate.from_template(human_template)chat_prompt=ChatPromptTemplate.from_messages( [system_message_prompt,human_message_prompt] )chain=LLMChain(llm=chat,prompt=chat_prompt)response=chain.run(question=query,docs=docs_page_content)response=response.replace("\n","")returnresponse,docsexceptExceptionas e:x=str(e)print('Error: ',x)return'',''
The Python function getResponseFromQuery is designed to search a given database (db) for a specific query and then generate a response using a language model (possibly GPT-3.5-turbo). The answer is based on the content found and the particular question. Here is a simple English summary:
The function getResponseFromQuery takes three parameters: db, query, and k. The k parameter is optional and defaults to 4 if not provided. db is the database to search, the query is the question or prompts to analyze, and k is the number of similar items to return.
The function initiates a try-except block for handling any errors that might occur.
Inside the try block:
The function retrieves the model name and temperature value from the instance of the class this function is a part of.
The function then searches the db database for documents similar to the query and saves these in docs.
It concatenates the content of the returned documents into a single string docs_page_content.
It creates a ChatOpenAI object with the model name and temperature value.
It creates a system message prompt from a predefined template.
It creates a human message prompt, which is the query.
It combines these two prompts to form a chat prompt.
An LLMChain object is then created using the ChatOpenAI object and the chat prompt.
This LLMChain object is used to generate a response to the query using the content of the documents found in the database. The answer is then formatted by replacing all newline characters with empty strings.
Finally, the function returns this response along with the original documents.
If any error occurs during these operations, the function goes to the except block where:
The error message is printed.
The function returns two empty strings to indicate an error occurred, and no response or documents could be produced.
defextractContentInText(self,topic,query):try:discussedTopic= []strKeyText=''cnt=0max_cnt=self.max_cnturlList,channelList=self.topFiveURLFromYouTube(youtube,q=topic,part='id,snippet',maxResults=max_cnt,type='video')print('Returned List: ')print(urlList)print()forvideo_urlin urlList:print('Processing Video: ')print(video_url)db=self.createDBFromYoutubeVideoUrl(video_url)response,docs=self.getResponseFromQuery(db,query)iflen(response) >0:strKeyText='As per the topic discussed in '+channelList[cnt] +', 'discussedTopic.append(strKeyText+response)cnt+=1returndiscussedTopicexceptExceptionas e:discussedTopic= []x=str(e)print('Error: ',x)returndiscussedTopic
This Python function, extractContentInText, is aimed to extract relevant content from the transcripts of top YouTube videos on a specific topic and generate responses to a given query. Here’s a simple English translation:
The function extractContentInText is defined with topic and query as parameters.
It begins with a try-except block to catch and handle any possible exceptions.
In the try block:
It initializes several variables: an empty list discussedTopic to store the extracted information, an empty string strKeyText to keep specific parts of the content, a counter cnt initialized at 0, and max_cnt retrieved from the self-object to specify the maximum number of YouTube videos to consider.
It calls the topFiveURLFromYouTube function (defined previously) to get the URLs of the top videos on the given topic from YouTube. It also retrieves the list of channel names associated with these videos.
It prints the returned list of URLs.
Then, it starts a loop over each URL in the urlList.
For each URL, it prints the URL, then creates a database from the transcript of the YouTube video using the function createDBFromYoutubeVideoUrl.
It then uses the getResponseFromQuery function to get a response to the query based on the content of the database.
If the length of the response is greater than 0 (meaning there is a response), it forms a string strKeyText to indicate the channel that the topic was discussed on and then appends the answer to this string. This entire string is then added to the discussedTopic list.
It increments the counter cnt by one after each iteration.
Finally, it returns the discussedTopic list, which now contains relevant content extracted from the videos.
If any error occurs during these operations, the function goes into the except block:
It first resets discussedTopic to an empty list.
Then it converts the exception e to a string and prints the error message.
Lastly, it returns the empty discussedTopic list, indicating that no content could be extracted due to the error.
testLangChain.py (Main Python script to extract the transcript from the YouTube videos & then answer the questions based on the topics selected by the users.)
This file contains hidden or bidirectional Unicode text that may be interpreted or compiled differently than what appears below. To review, open the file in an editor that reveals hidden Unicode characters. Learn more about bidirectional Unicode characters
defmain():try:var=datetime.datetime.now().strftime("%Y-%m-%d_%H-%M-%S")print('*'*120)print('Start Time: '+str(var))print('*'*120) #query="What are they saying about Microsoft?"print('Please share your topic!')inputTopic=input('User: ')print('Please ask your questions?')inputQry=input('User: ')print()retList=cVCScrapper.extractContentInText(inputTopic,inputQry)cnt=0fordiscussedTopicin retList:finText=str(cnt+1) +') '+discussedTopicprint()print(textwrap.fill(finText,width=150))cnt+=1r1=len(retList)ifr1>0:print()print('Successfully Scrapped!')else:print()print('Failed to Scrappe!')print('*'*120)var1=datetime.datetime.now().strftime("%Y-%m-%d_%H-%M-%S")print('End Time: '+str(var1))exceptExceptionas e:x=str(e)print('Error: ',x)if__name__=="__main__":main()
The above main application will capture the topics from the user & then will give the user a chance to ask specific questions on the topics, invoking the main class to extract the transcript from YouTube & then feed it as a source using ChainLang & finally deliver the response. If there is no response, then it will skip the overall options.
USAGE & COST FACTOR:
Please find the OpenAI usage –
Please find the YouTube API usage –
So, finally, we’ve done it.
I know that this post is relatively bigger than my earlier post. But, I think, you can get all the details once you go through it.
You will get the complete codebase in the following GitHub link.
I’ll bring some more exciting topics in the coming days from the Python verse. Please share & subscribe to my post & let me know your feedback.
Till then, Happy Avenging! 🙂
Note: All the data & scenarios posted here are representational data & scenarios & available over the internet & for educational purposes only. Some of the images (except my photo) we’ve used are available over the net. We don’t claim ownership of these images. There is always room for improvement & especially in the prediction quality. Sample video taken from Santrel Media & you would find the link over here.
Today, I’m very excited to demonstrate an effortless & new way to fine-tune the GPT-3 model using Python with the help of my new build (unpublished) PyPi package. In this post, I plan to deal with the custom website link as a response from this website depending upon the user queries with the help of the OpenAI-based tuned model.
In this post, I’ve directly subscribed to OpenAI & I’m not using OpenAI from Azure. However, I’ll explore that in the future as well.
Before I explain the process to invoke this new library, why not view the demo first & then discuss it?
Demo
Isn’t it exciting? Finally, we can efficiently handle your custom website URL using OpenAI tuned model.
What is ChatGPT?
ChatGPT is an advanced artificial intelligence language model developed by OpenAI based on the GPT-4 architecture. As an AI model, it is designed to understand and generate human-like text-based on the input it receives. ChatGPT can engage in various tasks, such as answering questions, providing recommendations, creating content, and simulating conversation. While it is highly advanced and versatile, it’s important to note that ChatGPT’s knowledge is limited to the data it was trained on, with a cutoff date of September 2021.
When to tune GPT model?
Tuning a GPT or any AI model might be necessary for various reasons. Here are some common scenarios when you should consider adjusting or fine-tuning a GPT model:
Domain-specific knowledge: If you need your model to have a deeper understanding of a specific domain or industry, you can fine-tune it with domain-specific data to improve its performance.
New or updated data: If new or updated information is not part of the original training data, you should fine-tune the model to ensure it has the most accurate and up-to-date knowledge.
Customization: If you require the model to have a specific style, tone, or focus, you can fine-tune it with data that reflects those characteristics.
Ethical or safety considerations: To make the model safer and more aligned with human values, you should fine-tune it to reduce biased or harmful outputs.
Improve performance: If the base model’s performance is unsatisfactory for a particular task or application, you can fine-tune it on a dataset more relevant to the job, often leading to better results.
Remember that tuning or fine-tuning a GPT model requires access to appropriate data and computational resources and an understanding of the model’s architecture and training techniques. Additionally, monitoring and evaluating the model’s performance after fine-tuning is essential to ensure that the desired improvements have been achieved.
FLOW OF EVENTS:
Let us look at the flow diagram as it captures the sequence of events that unfold as part of the process.
The initial Python-based client interacts with the tuned OpenAI models. This process enables it to get a precise response with custom data in a very convenient way. So that anyone can understand.
SOURCE DATA:
Let us understand how to feed the source data as it will deal with your website URL link.
The first data that we are going to talk about is the one that contains the hyperlink. Let us explore the sample here.
From the above diagram, one can easily understand that the application will interpret a unique hash number associated with a specific URL. This data will be used to look up the URL after the OpenAI response from the tuned model as a result of any user query.
Now, let us understand the actual source data.
If we closely check, we’ll see the source file contains two columns – prompt & completion. And the website reference is put inside the curly braces as shown – “{Hash Code that represents your URL}.”
During the response, the newly created library replaces the hash value with the correct URL after the successful lookup & presents the complete answer.
CODE:
Why don’t we go through the code made accessible due to this new library for this particular use case?
clsConfigClient.py (This is the main calling Python script for the input parameters.)
This file contains hidden or bidirectional Unicode text that may be interpreted or compiled differently than what appears below. To review, open the file in an editor that reveals hidden Unicode characters. Learn more about bidirectional Unicode characters
trainChatGPTModel.py (This is the main calling Python script that will invoke the newly created fine-tune GPT-3 enabler.)
This file contains hidden or bidirectional Unicode text that may be interpreted or compiled differently than what appears below. To review, open the file in an editor that reveals hidden Unicode characters. Learn more about bidirectional Unicode characters
As one can see, the package needs only the source data file to fine-tune GPT-3 model.
checkFineTuneChatGPTModelStat.py (This is the main Python script that will check the status of the tuned process that will happen inside the OpenAI-cloud environment.)
This file contains hidden or bidirectional Unicode text that may be interpreted or compiled differently than what appears below. To review, open the file in an editor that reveals hidden Unicode characters. Learn more about bidirectional Unicode characters
To check the status of the fine-tuned job inside the OpenAI environment, one needs to provide the fine tune id, which generally starts with -> “ft-*.” One would get this value after the train script’s successful run.
input_text=str(input("Please provide the fine tune Id (Start with ft-*): "))url=url_part+input_textprint('URL: ',url)r1=tmodel.checkStat(url,open_api_key)
The above snippet is self-explanatory as one is passing the fine tune id along with the OpenAI API key.
testChatGPTModel.py (This is the main testing Python script that will invoke the newly created fine-tune GPT-3 enabler to get a response with custom data.)
This file contains hidden or bidirectional Unicode text that may be interpreted or compiled differently than what appears below. To review, open the file in an editor that reveals hidden Unicode characters. Learn more about bidirectional Unicode characters
In the above lines, the application gets the correct URL value from the look file we’ve prepared for this specific use case.
deleteChatGPTModel.py (This is the main Python script that will delete the old intended tuned model, which is no longer needed.)
This file contains hidden or bidirectional Unicode text that may be interpreted or compiled differently than what appears below. To review, open the file in an editor that reveals hidden Unicode characters. Learn more about bidirectional Unicode characters
We’ve demonstrated that using a straightforward method, one can delete any old tuned model from OpenAI that is no longer required.
KEY FEATURES TO CONSIDER DURING TUNING:
Data quality: Ensure that the data used for fine-tuning is clean, relevant, and representative of the domain you want the model to understand. Check for biases, inconsistencies, and errors in the dataset.
Overfitting: Be cautious of overfitting, which occurs when the model performs exceptionally well on the training data but poorly on unseen data. You can address overfitting by using regularization techniques, early stopping, or cross-validation.
Model size and resource requirements: GPT models can be resource-intensive. Be mindful of the hardware limitations and computational resources available when selecting the model size and the time and cost associated with training.
Hyperparameter tuning: Select appropriate hyperparameters for your fine-tuning processes, such as learning rate, batch size, and the number of epochs. Experiment with different combinations to achieve the best results without overfitting.
Evaluation metrics: Choose suitable evaluation metrics to assess the performance of your fine-tuned model. Consider using multiple metrics to understand your model’s performance comprehensively.
Ethical considerations: Be aware of potential biases in your dataset and how the model’s predictions might impact users. Address ethical concerns during the fine-tuning process and consider using techniques such as data augmentation or adversarial training to mitigate these biases.
Monitoring and maintenance: Continuously monitor the model’s performance after deployment, and be prepared to re-tune or update it as needed. Regular maintenance ensures that the model remains relevant and accurate.
Documentation: Document your tuning process, including the data used, model architecture, hyperparameters, and evaluation metrics. This factor will facilitate easier collaboration, replication, and model maintenance.
Cost: OpenAI fine-tuning can be extremely expensive, even for a small volume of data. Hence, organization-wise, one needs to be extremely careful while using this feature.
COST FACTOR:
Before we discuss the actual spending, let us understand the tested data volume to train & tune the model.
So, we’re talking about a total size of 500 KB (at max). And, we did 10 epochs during the training as you can see from the config file mentioned above.
So, it is pretty expensive. Use it wisely.
So, finally, we’ve done it.
I know that this post is relatively bigger than my earlier post. But, I think, you can get all the details once you go through it.
You will get the complete codebase in the following GitHub link.
I’ll bring some more exciting topics in the coming days from the Python verse. Please share & subscribe to my post & let me know your feedback.
Till then, Happy Avenging! 🙂
Note: All the data & scenarios posted here are representational data & scenarios & available over the internet & for educational purposes only. Some of the images (except my photo) we’ve used are available over the net. We don’t claim ownership of these images. There is always room for improvement & especially in the prediction quality.

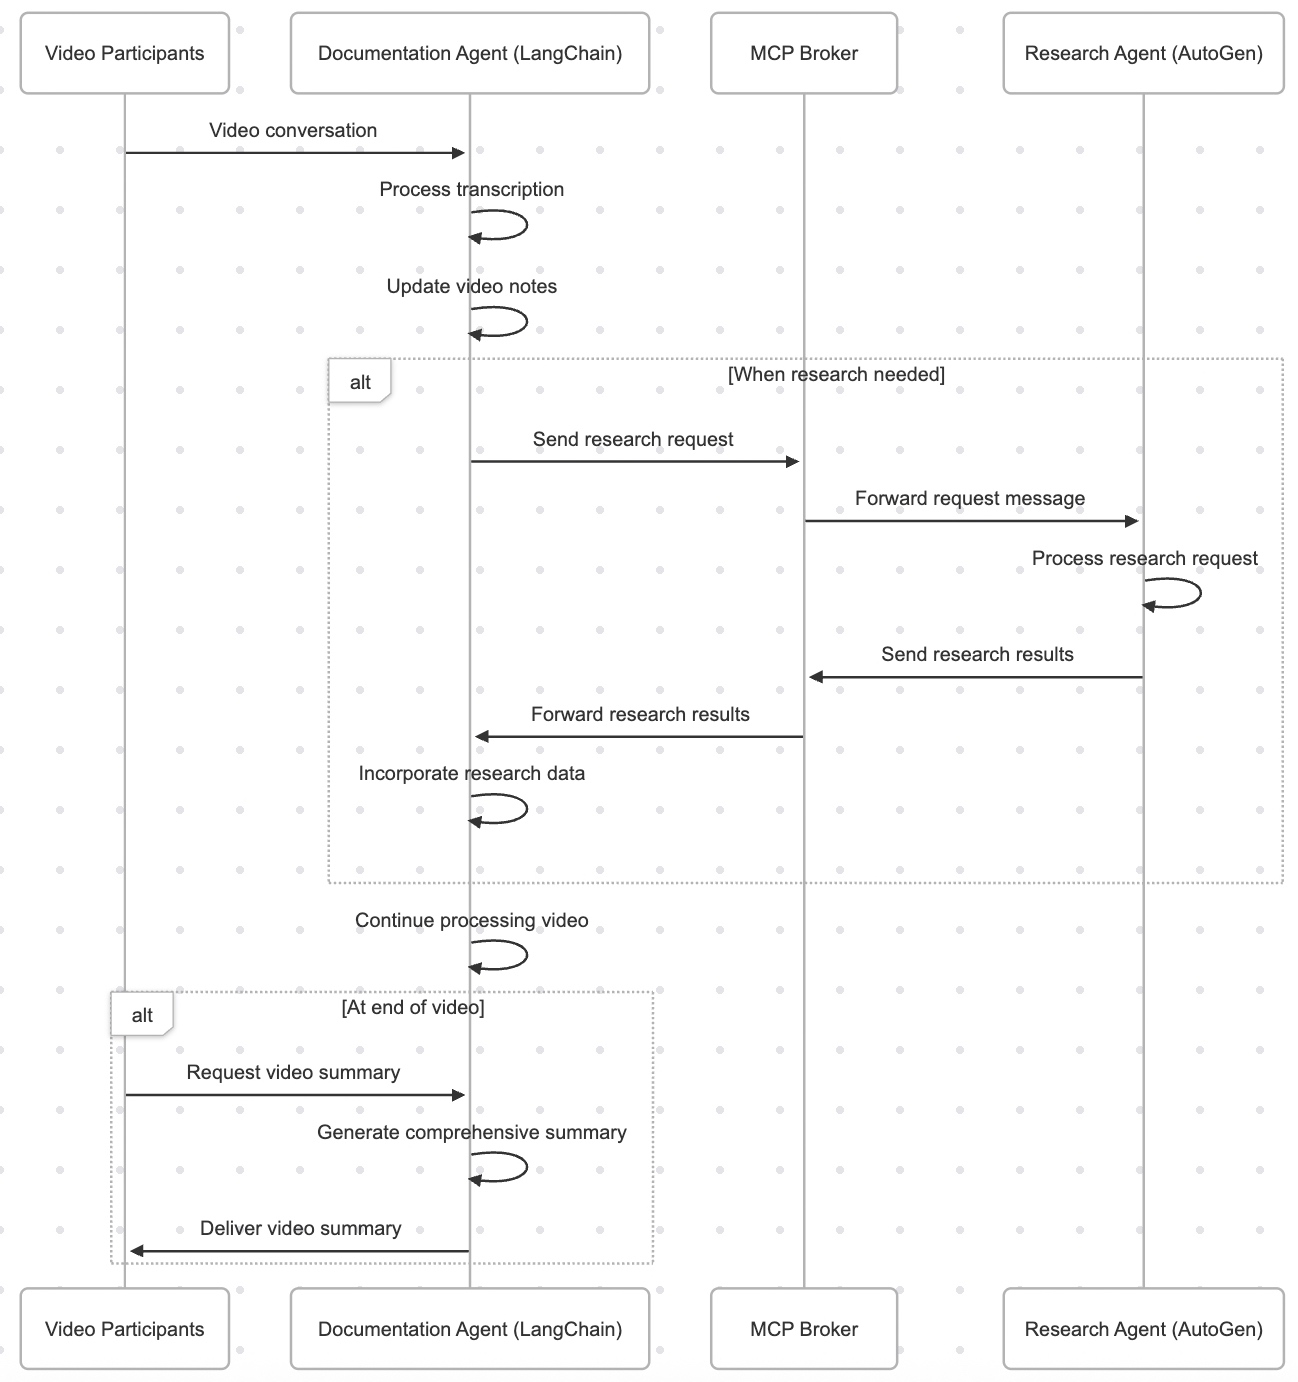


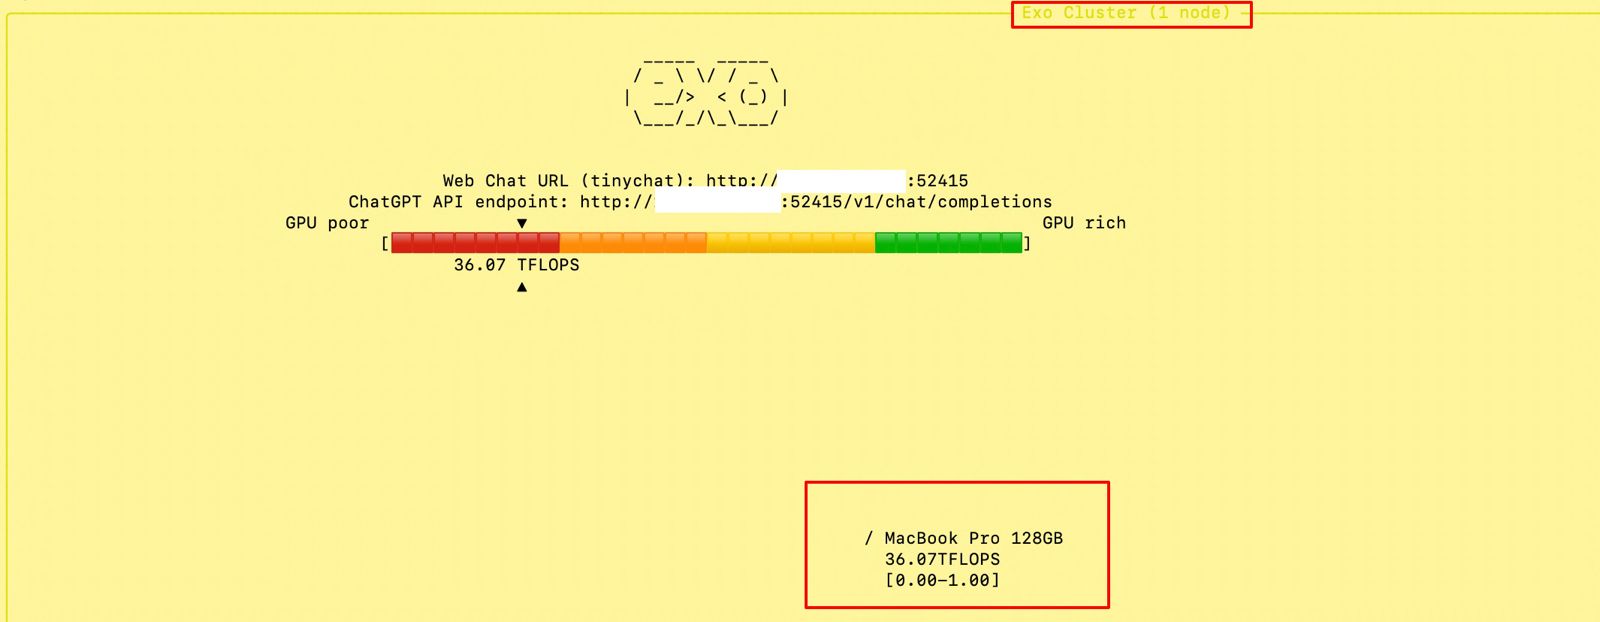


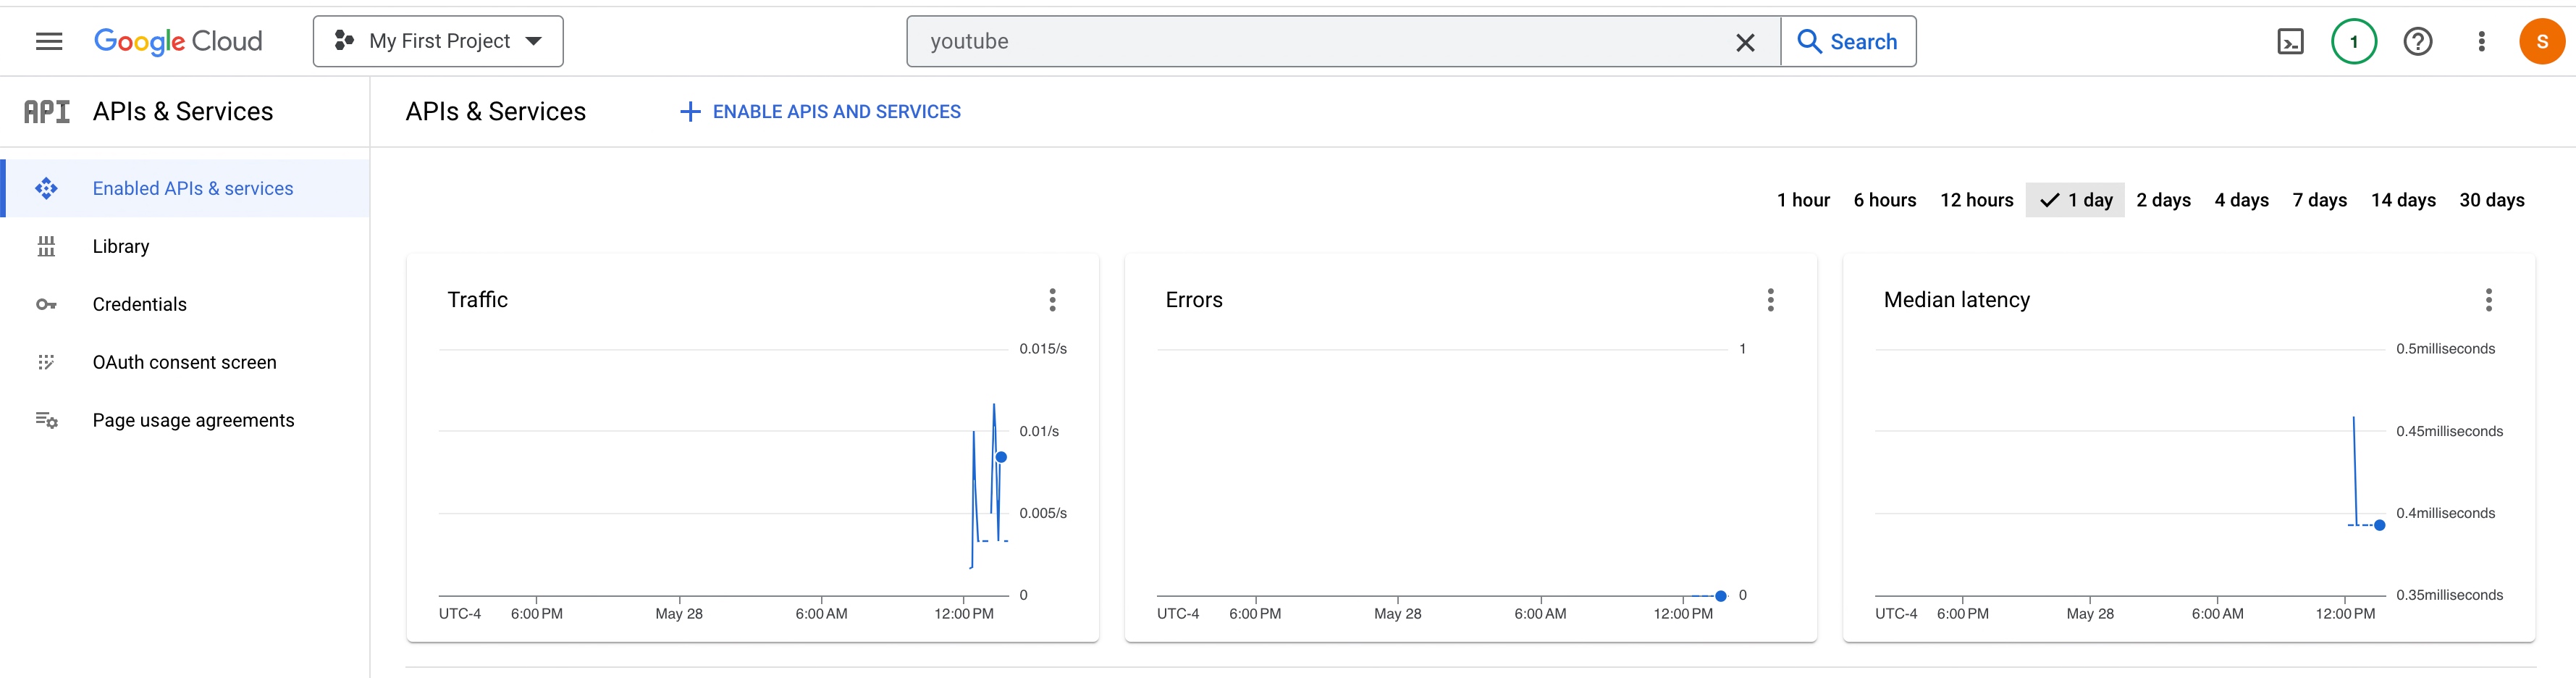

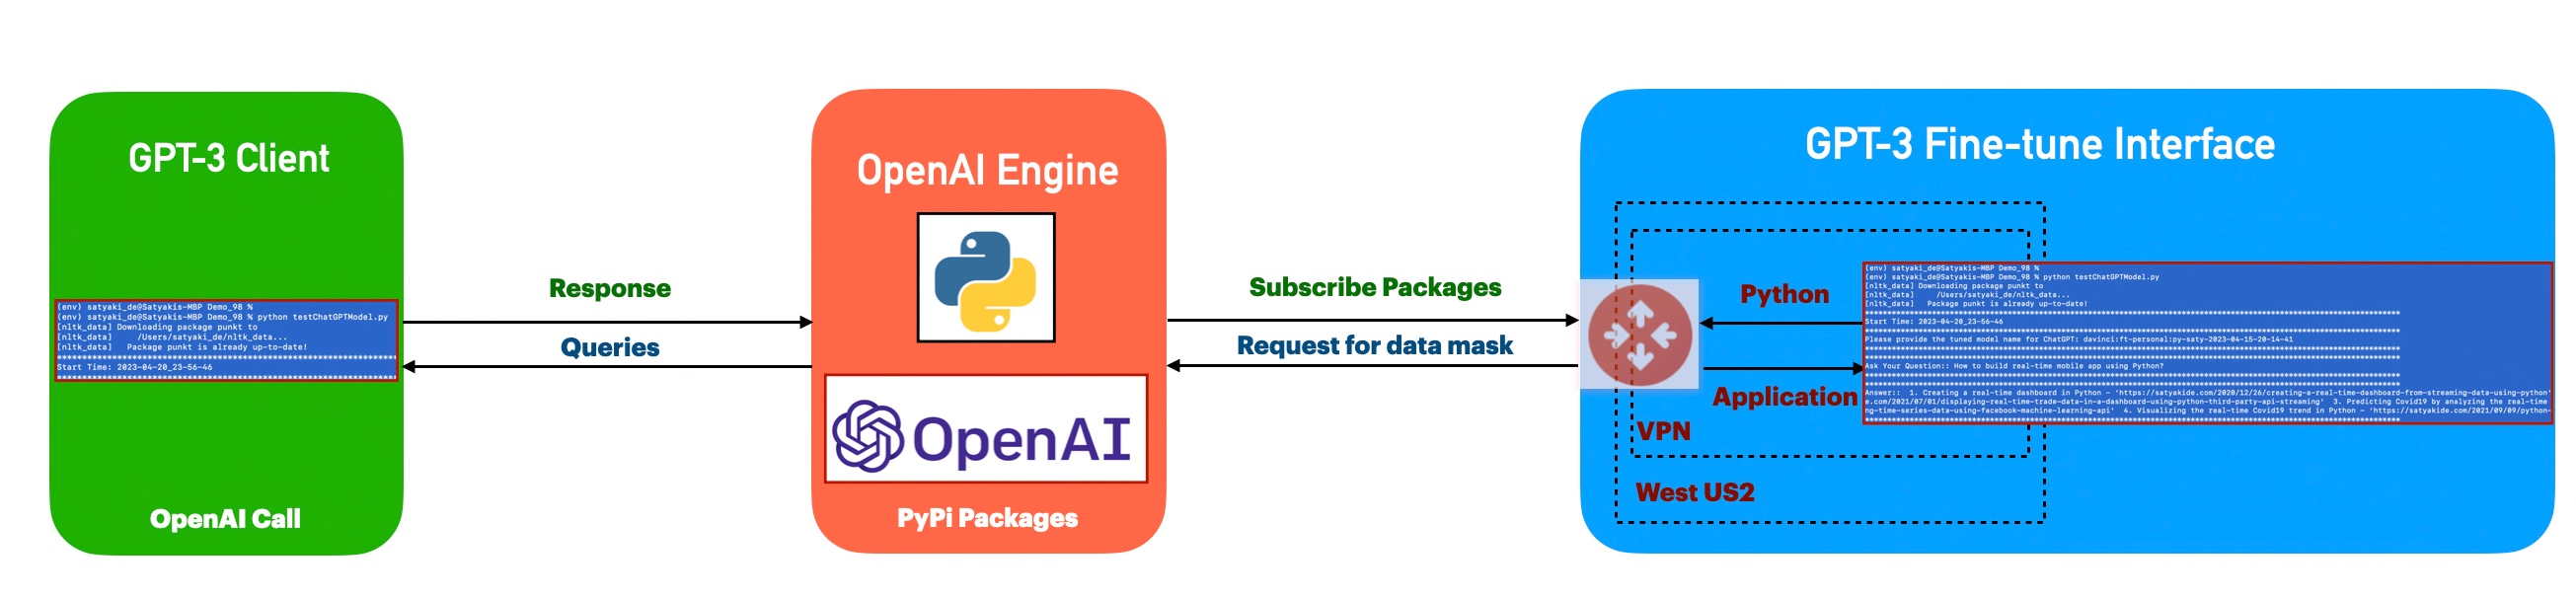
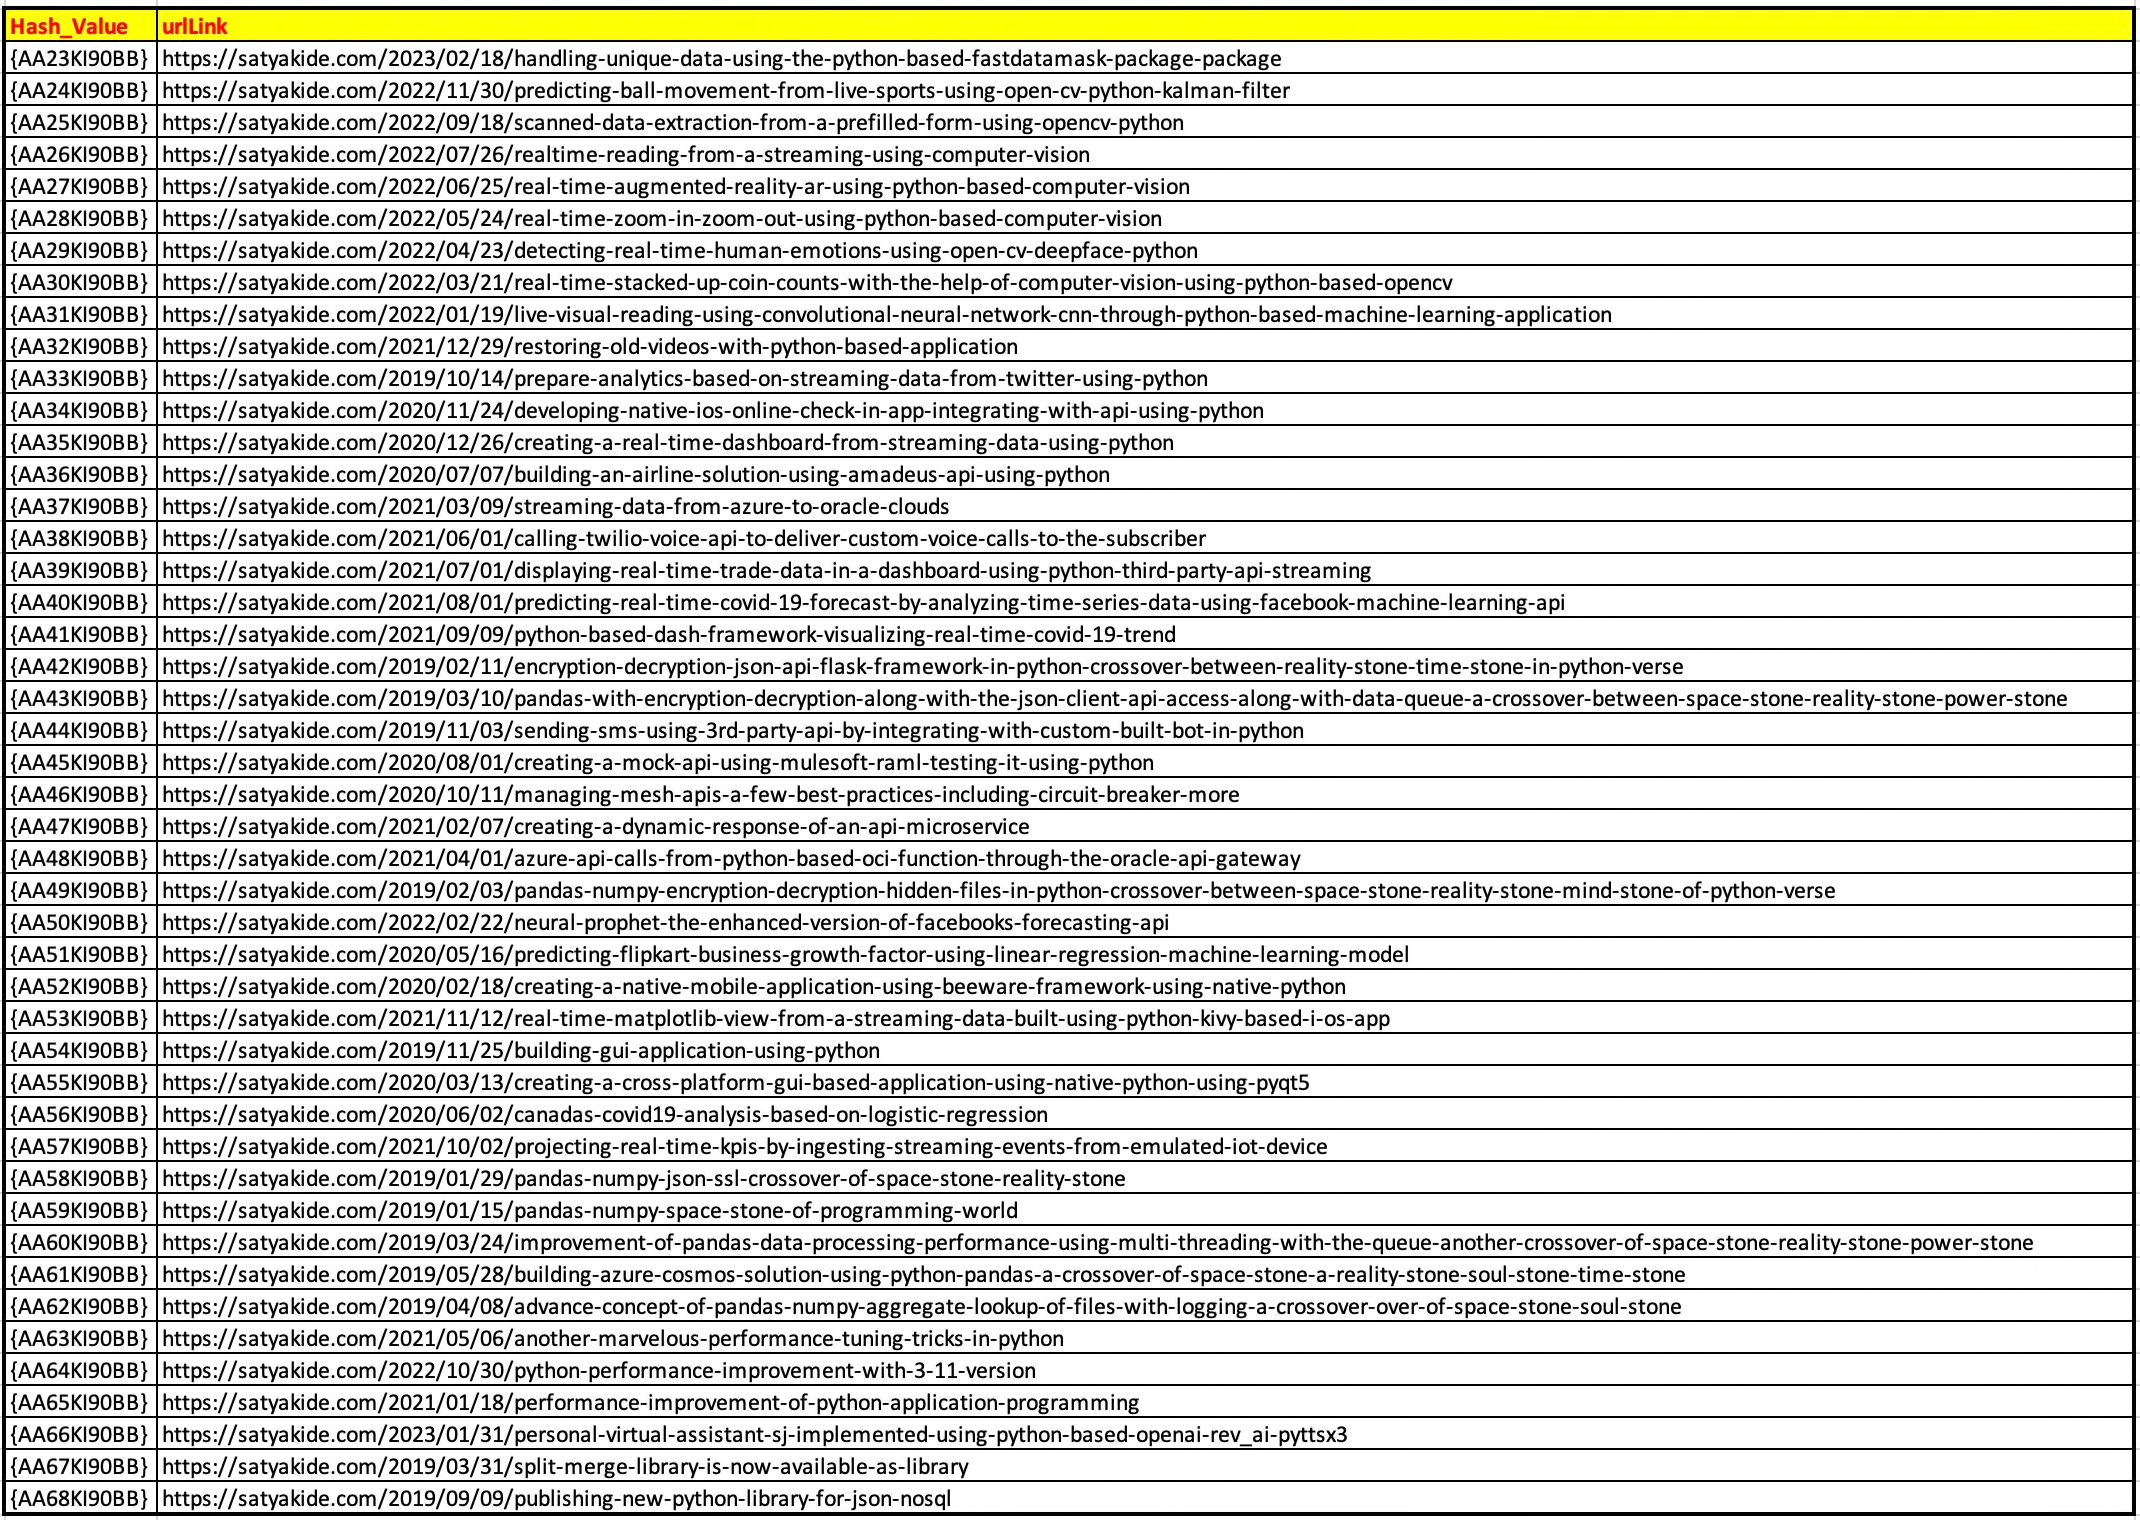


You must be logged in to post a comment.