This site mainly deals with various use cases demonstrated using Python, Data Science, Cloud basics, SQL Server, Oracle, Teradata along with SQL & their implementation. Expecting yours active participation & time. This blog can be access from your TP, Tablet & mobile also. Please provide your feedback.
This is a continuation of my previous post, which can be found here.
Let us recap the key takaways from our previous post –
Enterprise AI, utilizing the Model Context Protocol (MCP), leverages an open standard that enables AI systems to securely and consistently access enterprise data and tools. MCP replaces brittle “N×M” integrations between models and systems with a standardized client–server pattern: an MCP host (e.g., IDE or chatbot) runs an MCP client that communicates with lightweight MCP servers, which wrap external systems via JSON-RPC. Servers expose three assets—Resources (data), Tools (actions), and Prompts (templates)—behind permissions, access control, and auditability. This design enables real-time context, reduces hallucinations, supports model- and cloud-agnostic interoperability, and accelerates “build once, integrate everywhere” deployment. A typical flow (e.g., retrieving a customer’s latest order) encompasses intent parsing, authorized tool invocation, query translation/execution, and the return of a normalized JSON result to the model for natural-language delivery. Performance introduces modest overhead (RPC hops, JSON (de)serialization, network transit) and scale considerations (request volume, significant results, context-window pressure). Mitigations include in-memory/semantic caching, optimized SQL with indexing, pagination, and filtering, connection pooling, and horizontal scaling with load balancing. In practice, small latency costs are often outweighed by the benefits of higher accuracy, stronger governance, and a decoupled, scalable architecture.
How does MCP compare with other AI integration approaches?
Compared to other approaches, the Model Context Protocol (MCP) offers a uniquely standardized and secure framework for AI-tool integration, shifting from brittle, custom-coded connections to a universal plug-and-play model. It is not a replacement for underlying systems, such as APIs or databases, but instead acts as an intelligent, secure abstraction layer designed explicitly for AI agents.
MCP vs. Custom API integrations:
This approach was the traditional method for AI integration before standards like MCP emerged.
Custom API integrations (traditional): Each AI application requires a custom-built connector for every external system it needs to access, leading to an N x M integration problem (the number of connectors grows exponentially with the number of models and systems). This approach is resource-intensive, challenging to maintain, and prone to breaking when underlying APIs change.
MCP: The standardized protocol eliminates the N x M problem by creating a universal interface. Tool creators build a single MCP server for their system, and any MCP-compatible AI agent can instantly access it. This process decouples the AI model from the underlying implementation details, drastically reducing integration and maintenance costs.
For more detailed information, please refer to the following link.
MCP vs. Retrieval-Augmented Generation (RAG):
RAG is a technique that retrieves static documents to augment an LLM’s knowledge, while MCP focuses on live interactions. They are complementary, not competing.
RAG:
Focus: Retrieving and summarizing static, unstructured data, such as documents, manuals, or knowledge bases.
Best for: Providing background knowledge and general information, as in a policy lookup tool or customer service bot.
Data type: Unstructured, static knowledge.
MCP:
Focus: Accessing and acting on real-time, structured, and dynamic data from databases, APIs, and business systems.
Best for: Agentic use cases involving real-world actions, like pulling live sales reports from a CRM or creating a ticket in a project management tool.
Data type: Structured, real-time, and dynamic data.
MCP vs. LLM plugins and extensions:
Before MCP, platforms like OpenAI offered proprietary plugin systems to extend LLM capabilities.
LLM plugins:
Proprietary: Tied to a specific AI vendor (e.g., OpenAI).
Limited: Rely on the vendor’s API function-calling mechanism, which focuses on call formatting but not standardized execution.
Centralized: Managed by the AI vendor, creating a risk of vendor lock-in.
MCP:
Open standard: Based on a public, interoperable protocol (JSON-RPC 2.0), making it model-agnostic and usable across different platforms.
Infrastructure layer: Provides a standardized infrastructure for agents to discover and use any compliant tool, regardless of the underlying LLM.
Decentralized: Promotes a flexible ecosystem and reduces the risk of vendor lock-in.
How enterprise AI with MCP has opened up a specific Architecture pattern for Azure, AWS & GCP?
Microsoft Azure:
The “agent factory” pattern: Azure focuses on providing managed services for building and orchestrating AI agents, tightly integrated with its enterprise security and governance features. The MCP architecture is a core component of the Azure AI Foundry, serving as a secure, managed “agent factory.”
Azure architecture pattern with MCP:
AI orchestration layer: The Azure AI Agent Service, within Azure AI Foundry, acts as the central host and orchestrator. It provides the control plane for creating, deploying, and managing multiple specialized agents, and it natively supports the MCP standard.
AI model layer: Agents in the Foundry can be powered by various models, including those from Azure OpenAI Service, commercial models from partners, or open-source models.
MCP server and tool layer: MCP servers are deployed using serverless functions, such as Azure Functions or Azure Logic Apps, to wrap existing enterprise systems. These servers expose tools for interacting with enterprise data sources like SharePoint, Azure AI Search, and Azure Blob Storage.
Data and security layer: Data is secured using Microsoft Entra ID (formerly Azure AD) for authentication and access control, with robust security policies enforced via Azure API Management. Access to data sources, such as databases and storage, is managed securely through private networks and Managed Identity.
Amazon Web Services (AWS):
The “composable serverless agent” pattern: AWS emphasizes a modular, composable, and serverless approach, leveraging its extensive portfolio of services to build sophisticated, flexible, and scalable AI solutions. The MCP architecture here aligns with the principle of creating lightweight, event-driven services that AI agents can orchestrate.
AWS architecture pattern with MCP:
The AI orchestration layer, which includesAmazon Bedrock Agents or custom agent frameworks deployed via AWS Fargate or Lambda, acts as the MCP hosts. Bedrock Agents provide built-in orchestration, while custom agents offer greater flexibility and customization options.
AI model layer: The models are sourced from Amazon Bedrock, which provides a wide selection of foundation models.
MCP server and tool layer: MCP servers are deployed as serverless AWS Lambda functions. AWS offers pre-built MCP servers for many of its services, including the AWS Serverless MCP Server for managing serverless applications and the AWS Lambda Tool MCP Server for invoking existing Lambda functions as tools.
Data and security layer: Access is tightly controlled using AWS Identity and Access Management (IAM) roles and policies, with fine-grained permissions for each MCP server. Private data sources like databases (Amazon DynamoDB) and storage (Amazon S3) are accessed securely within a Virtual Private Cloud (VPC).
Google Cloud Platform (GCP):
The “unified workbench” pattern: GCP focuses on providing a unified, open, and data-centric platform for AI development. The MCP architecture on GCP integrates natively with the Vertex AI platform, treating MCP servers as first-class tools that can be dynamically discovered and used within a single workbench.
GCP architecture pattern with MCP:
AI orchestration layer: The Vertex AI Agent Builder serves as the central environment for building and managing conversational AI and other agents. It orchestrates workflows and manages tool invocation for agents.
AI model layer: Agents use foundation models available through the Vertex AI Model Garden or the Gemini API.
MCP server and tool layer: MCP servers are deployed as containerized microservices on Cloud Run or managed by services like App Engine. These servers contain tools that interact with GCP services, such as BigQuery, Cloud Storage, and Cloud SQL. GCP offers pre-built MCP server implementations, such as the GCP MCP Toolbox, for integration with its databases.
Data and security layer:Vertex AI Vector Search and other data sources are encapsulated within the MCP server tools to provide contextual information. Access to these services is managed by Identity and Access Management (IAM) and secured through virtual private clouds. The MCP server can leverage Vertex AI Context Caching for improved performance.
Note that all the native technology is referred to in each respective cloud. Hence, some of the better technologies can be used in place of the tool mentioned here. This is more of a concept-level comparison rather than industry-wise implementation approaches.
We’ll go ahead and conclude this post here & continue discussing on a further deep dive in the next post.
Till then, Happy Avenging! 🙂
Note: All the data & scenarios posted here are representational data & scenarios & available over the internet & for educational purposes only. There is always room for improvement in this kind of model & the solution associated with it. I’ve shown the basic ways to achieve the same for educational purposes only.
This is a continuation of my previous post, which can be found here.
Let us recap the key takaways from our previous post –
Agentic AI refers to autonomous systems that pursue goals with minimal supervision by planning, reasoning about next steps, utilizing tools, and maintaining context across sessions. Core capabilities include goal-directed autonomy, interaction with tools and environments (e.g., APIs, databases, devices), multi-step planning and reasoning under uncertainty, persistence, and choiceful decision-making.
Architecturally, three modules coordinate intelligent behavior: Sensing (perception pipelines that acquire multimodal data, extract salient patterns, and recognize entities/events); Observation/Deliberation (objective setting, strategy formation, and option evaluation relative to resources and constraints); and Action (execution via software interfaces, communications, or physical actuation to deliver outcomes). These functions are enabled by machine learning, deep learning, computer vision, natural language processing, planning/decision-making, uncertainty reasoning, and simulation/modeling.
At enterprise scale, open standards align autonomy with governance: the Model Context Protocol (MCP) grants an agent secure, principled access to enterprise tools and data (vertical integration), while Agent-to-Agent (A2A) enables specialized agents to coordinate, delegate, and exchange information (horizontal collaboration). Together, MCP and A2A help organizations transition from isolated pilots to scalable programs, delivering end-to-end automation, faster integration, enhanced security and auditability, vendor-neutral interoperability, and adaptive problem-solving that responds to real-time context.
Great! Let’s dive into this topic now.
Enterprise AI with MCP refers to the application of the Model Context Protocol (MCP), an open standard, to enable AI systems to securely and consistently access external enterprise data and applications.
The problem MCP solves in enterprise AI:
Before MCP, enterprise AI integration was characterized by a “many-to-many” or “N x M” problem. Companies had to build custom, fragile, and costly integrations between each AI model and every proprietary data source, which was not scalable. These limitations left AI agents with limited, outdated, or siloed information, restricting their potential impact. MCP addresses this by offering a standardized architecture for AI and data systems to communicate with each other.
How does MCP work?
The MCP framework uses a client-server architecture to enable communication between AI models and external tools and data sources.
MCP Host: The AI-powered application or environment, such as an AI-enhanced IDE or a generative AI chatbot like Anthropic’s Claude or OpenAI’s ChatGPT, where the user interacts.
MCP Client: A component within the host application that manages the connection to MCP servers.
MCP Server: A lightweight service that wraps around an external system (e.g., a CRM, database, or API) and exposes its capabilities to the AI client in a standardized format, typically using JSON-RPC 2.0.
An MCP server provides AI clients with three key resources:
Resources: Structured or unstructured data that an AI can access, such as files, documents, or database records.
Tools: The functionality to perform specific actions within an external system, like running a database query or sending an email.
Prompts: Pre-defined text templates or workflows to help guide the AI’s actions.
Benefits of MCP for enterprise AI:
Standardized integration: Developers can build integrations against a single, open standard, which dramatically reduces the complexity and time required to deploy and scale AI initiatives.
Enhanced security and governance: MCP incorporates native support for security and compliance measures. It provides permission models, access control, and auditing capabilities to ensure AI systems only access data and tools within specified boundaries.
Real-time contextual awareness: By connecting AI agents to live enterprise data sources, MCP ensures they have access to the most current and relevant information, which reduces hallucinations and improves the accuracy of AI outputs.
Greater interoperability: MCP is model-agnostic & can be used with a variety of AI models (e.g., Anthropic’s Claude or OpenAI’s models) and across different cloud environments. This approach helps enterprises avoid vendor lock-in.
Accelerated development: The “build once, integrate everywhere” approach enables internal teams to focus on innovation instead of writing custom connectors for every system.
Flow of activities:
Let us understand one sample case & the flow of activities.
A customer support agent uses an AI assistant to get information about a customer’s recent orders. The AI assistant utilizes an MCP-compliant client to communicate with an MCP server, which is connected to the company’s PostgreSQL database.
The interaction flow:
1. User request: The support agent asks the AI assistant, “What was the most recent order placed by Priyanka Chopra Jonas?”
2. AI model processes intent: The AI assistant, running on an MCP host, analyzes the natural language query. It recognizes that to answer this question, it needs to perform a database query. It then identifies the appropriate tool from the MCP server’s capabilities.
3. Client initiates tool call: The AI assistant’s MCP client sends a JSON-RPC request to the MCP server connected to the PostgreSQL database. The request specifies the tool to be used, such as get_customer_orders, and includes the necessary parameters:
5. Database returns data: The PostgreSQL database executes the query and returns the requested data to the MCP server.
6. Server formats the response: The MCP server receives the raw database output and formats it into a standardized JSON response that the MCP client can understand.
7. Client returns data to the model: The MCP client receives the JSON response and passes it back to the AI assistant’s language model.
8. AI model generates final response: The language model incorporates this real-time data into its response and presents it to the user in a natural, conversational format.
“Priyanka Chopra Jonas’s most recent order was placed on August 25, 2025, with an order ID of 98765, for a total of $11025.50.”
What are the performance implications of using MCP for database access?
Using the Model Context Protocol (MCP) for database access introduces a layer of abstraction that affects performance in several ways. While it adds some latency and processing overhead, strategic implementation can mitigate these effects. For AI applications, the benefits often outweigh the costs, particularly in terms of improved accuracy, security, and scalability.
Sources of performance implications::
Added latency and processing overhead:
The MCP architecture introduces extra communication steps between the AI agent and the database, each adding a small amount of latency.
RPC overhead: The JSON-RPC call from the AI’s client to the MCP server adds a small processing and network delay. This is an out-of-process request, as opposed to a simple local function call.
JSON serialization: Request and response data must be serialized and deserialized into JSON format, which requires processing time.
Network transit: For remote MCP servers, the data must travel over the network, adding latency. However, for a local or on-premise setup, this is minimal. The physical location of the MCP server relative to the AI model and the database is a significant factor.
Scalability and resource consumption:
The performance impact scales with the complexity and volume of the AI agent’s interactions.
High request volume: A single AI agent working on a complex task might issue dozens of parallel database queries. In high-traffic scenarios, managing numerous simultaneous connections can strain system resources and require robust infrastructure.
Excessive data retrieval: A significant performance risk is an AI agent retrieving a massive dataset in a single query. This process can consume a large number of tokens, fill the AI’s context window, and cause bottlenecks at the database and client levels.
Context window usage: Tool definitions and the results of tool calls consume space in the AI’s context window. If a large number of tools are in use, this can limit the AI’s “working memory,” resulting in slower and less effective reasoning.
Optimizations for high performance::
Caching:
Caching is a crucial strategy for mitigating the performance overhead of MCP.
In-memory caching: The MCP server can cache results from frequent or expensive database queries in memory (e.g., using Redis or Memcached). This approach enables repeat requests to be served almost instantly without requiring a database hit.
Semantic caching: Advanced techniques can cache the results of previous queries and serve them for semantically similar future requests, reducing token consumption and improving speed for conversational applications.
Efficient queries and resource management:
Designing the MCP server and its database interactions for efficiency is critical.
Optimized SQL: The MCP server should generate optimized SQL queries. Database indexes should be utilized effectively to expedite lookups and minimize load.
Pagination and filtering: To prevent a single query from overwhelming the system, the MCP server should implement pagination. The AI agent can be prompted to use filtering parameters to retrieve only the necessary data.
Connection pooling: This technique reuses existing database connections instead of opening a new one for each request, thereby reducing latency and database load.
Load balancing and scaling:
For large-scale enterprise deployments, scaling is essential for maintaining performance.
Multiple servers: The workload can be distributed across various MCP servers. One server could handle read requests, and another could handle writes.
Load balancing: A reverse proxy or other load-balancing solution can distribute incoming traffic across MCP server instances. Autoscaling can dynamically add or remove servers in response to demand.
The performance trade-off in perspective:
For AI-driven tasks, a slight increase in latency for database access is often a worthwhile trade-off for significant gains.
Improved accuracy: Accessing real-time, high-quality data through MCP leads to more accurate and relevant AI responses, reducing “hallucinations”.
Scalable ecosystem: The standardization of MCP reduces development overhead and allows for a more modular, scalable ecosystem, which saves significant engineering resources compared to building custom integrations.
Decoupled architecture: The MCP server decouples the AI model from the database, allowing each to be optimized and scaled independently.
We’ll go ahead and conclude this post here & continue discussing on a further deep dive in the next post.
Till then, Happy Avenging! 🙂
Note: All the data & scenarios posted here are representational data & scenarios & available over the internet & for educational purposes only. There is always room for improvement in this kind of model & the solution associated with it. I’ve shown the basic ways to achieve the same for educational purposes only.
Today, we won’t be discussing any solutions. Today, we’ll be discussing the Agentic AI & its implementation in the Enterprise landscape in a series of upcoming posts.
So, hang tight! We’re about to launch a new venture as part of our knowledge drive.
What is Agentic AI?
Agentic AI refers to artificial intelligence systems that can act autonomously to achieve goals, making decisions and taking actions without constant human oversight. Unlike traditional AI, which responds to prompts, agentic AI can plan, reason about next steps, utilize tools, and work toward objectives over extended periods of time.
Key characteristics of agentic AI include:
Autonomy and Goal-Directed Behavior: These systems can pursue objectives independently, breaking down complex tasks into smaller steps and executing them sequentially.
Tool Use and Environment Interaction: Agentic AI can interact with external systems, APIs, databases, and software tools to gather information and perform actions in the real world.
Planning and Reasoning: They can develop multi-step strategies, adapt their approach based on feedback, and reason through problems to find solutions.
Persistence: Unlike single-interaction AI, agentic systems can maintain context and continue working on tasks across multiple interactions or sessions.
Decision Making: They can evaluate options, weigh trade-offs, and make choices about how to proceed when faced with uncertainty.
Foundational Elements of Agentic AI Architectures:
Agentic AI systems have several interconnected components that work together to enable intelligent behaviour. Each element plays a crucial role in the overall functioning of the AI system, and they must interact seamlessly to achieve desired outcomes. Let’s explore each of these components in more detail.
Sensing:
The sensing module serves as the AI’s eyes and ears, enabling it to understand its surroundings and make informed decisions. Think of it as the system that helps the AI “see” and “hear” the world around it, much like how humans use their senses.
Gathering Information: The system collects data from multiple sources, including cameras for visual information, microphones for audio, sensors for physical touch, and digital systems for data. This step provides the AI with a comprehensive understanding of what’s happening.
Making Sense of Data: Raw information from sensors can be messy and overwhelming. This component processes the data to identify the essential patterns and details that actually matter for making informed decisions.
Recognizing What’s Important: Utilizing advanced techniques such as computer vision (for images), natural language processing (for text and speech), and machine learning (for data patterns), the system identifies and understands objects, people, events, and situations within the environment.
This sensing capability enables AI systems to transition from merely following pre-programmed instructions to genuinely understanding their environment and making informed decisions based on real-world conditions. It’s the difference between a basic automated system and an intelligent agent that can adapt to changing situations.
Observation:
The observation module serves as the AI’s decision-making center, where it sets objectives, develops strategies, and selects the most effective actions to take. This step is where the AI transforms what it perceives into purposeful action, much like humans think through problems and devise plans.
Setting Clear Objectives: The system establishes specific goals and desired outcomes, giving the AI a clear sense of direction and purpose. This approach helps ensure all actions are working toward meaningful results rather than random activity.
Strategic Planning: Using information about its own capabilities and the current situation, the AI creates step-by-step plans to reach its goals. It considers potential obstacles, available resources, and different approaches to find the most effective path forward.
Intelligent Decision-Making: When faced with multiple options, the system evaluates each choice against the current circumstances, established goals, and potential outcomes. It then selects the action most likely to move the AI closer to achieving its objectives.
This observation capability is what transforms an AI from a simple tool that follows commands into an intelligent system that can work independently toward business goals. It enables the AI to handle complex, multi-step tasks and adapt its approach when conditions change, making it valuable for a wide range of applications, from customer service to project management.
Action:
The action module serves as the AI’s hands and voice, turning decisions into real-world results. This step is where the AI actually puts its thinking and planning into action, carrying out tasks that make a tangible difference in the environment.
Control Systems: The system utilizes various tools to interact with the world, including motors for physical movement, speakers for communication, network connections for digital tasks, and software interfaces for system operation. These serve as the AI’s means of reaching out and making adjustments.
Task Implementation: Once the cognitive module determines the action to take, this component executes the actual task. Whether it’s sending an email, moving a robotic arm, updating a database, or scheduling a meeting, this module handles the execution from start to finish.
This action capability is what makes AI systems truly useful in business environments. Without it, an AI could analyze data and make significant decisions, but it couldn’t help solve problems or complete tasks. The action module bridges the gap between artificial intelligence and real-world impact, enabling AI to automate processes, respond to customers, manage systems, and deliver measurable business value.
Technology that is primarily involved in the Agentic AI is as follows –
1. Machine Learning
2. Deep Learning
3. Computer Vision
4. Natural Language Processing (NLP)
5. Planning and Decision-Making
6. Uncertainty and Reasoning
7. Simulation and Modeling
Agentic AI at Scale: MCP + A2A:
In an enterprise setting, agentic AI systems utilize the Model Context Protocol (MCP) and the Agent-to-Agent (A2A) protocol as complementary, open standards to achieve autonomous, coordinated, and secure workflows. An MCP-enabled agent gains the ability to access and manipulate enterprise tools and data. At the same time, A2A allows a network of these agents to collaborate on complex tasks by delegating and exchanging information.
This combined approach allows enterprises to move from isolated AI experiments to strategic, scalable, and secure AI programs.
How do the protocols work together in an enterprise?
Protocol
Function in Agentic AI
Focus
Example use case
Model Context Protocol (MCP)
Equips a single AI agent with the tools and data it needs to perform a specific job.
Vertical integration: connecting agents to enterprise systems like databases, CRMs, and APIs.
A sales agent uses MCP to query the company CRM for a client’s recent purchase history.
Agent-to-Agent (A2A)
Enables multiple specialized agents to communicate, delegate tasks, and collaborate on a larger, multi-step goal.
Horizontal collaboration: allowing agents from different domains to work together seamlessly.
An orchestrating agent uses A2A to delegate parts of a complex workflow to specialized HR, IT, and sales agents.
Advantages for the enterprise:
End-to-end automation: Agents can handle tasks from start to finish, including complex, multi-step workflows, autonomously.
Greater agility and speed: Enterprise-wide adoption of these protocols reduces the cost and complexity of integrating AI, accelerating deployment timelines for new applications.
Enhanced security and governance: Enterprise AI platforms built on these open standards incorporate robust security policies, centralized access controls, and comprehensive audit trails.
Vendor neutrality and interoperability: As open standards, MCP and A2A allow AI agents to work together seamlessly, regardless of the underlying vendor or platform.
Adaptive problem-solving: Agents can dynamically adjust their strategies and collaborate based on real-time data and contextual changes, leading to more resilient and efficient systems.
We will discuss this topic further in our upcoming posts.
Till then, Happy Avenging! 🙂
Note: All the data & scenarios posted here are representational data & scenarios & available over the internet & for educational purposes only. There is always room for improvement in this kind of model & the solution associated with it. I’ve shown the basic ways to achieve the same for educational purposes only.
Today, we’re going to discuss creating a local LLM server and then utilizing it to execute various popular LLM models. We will club the local Apple GPUs together via a new framework that binds all the available Apple Silicon devices into one big LLM server. This enables people to run many large models, which was otherwise not possible due to the lack of GPUs.
This is certainly a new way; One can create virtual computation layers by adding nodes to the resource pool, increasing the computation capacity.
Why not witness a small demo to energize ourselves –
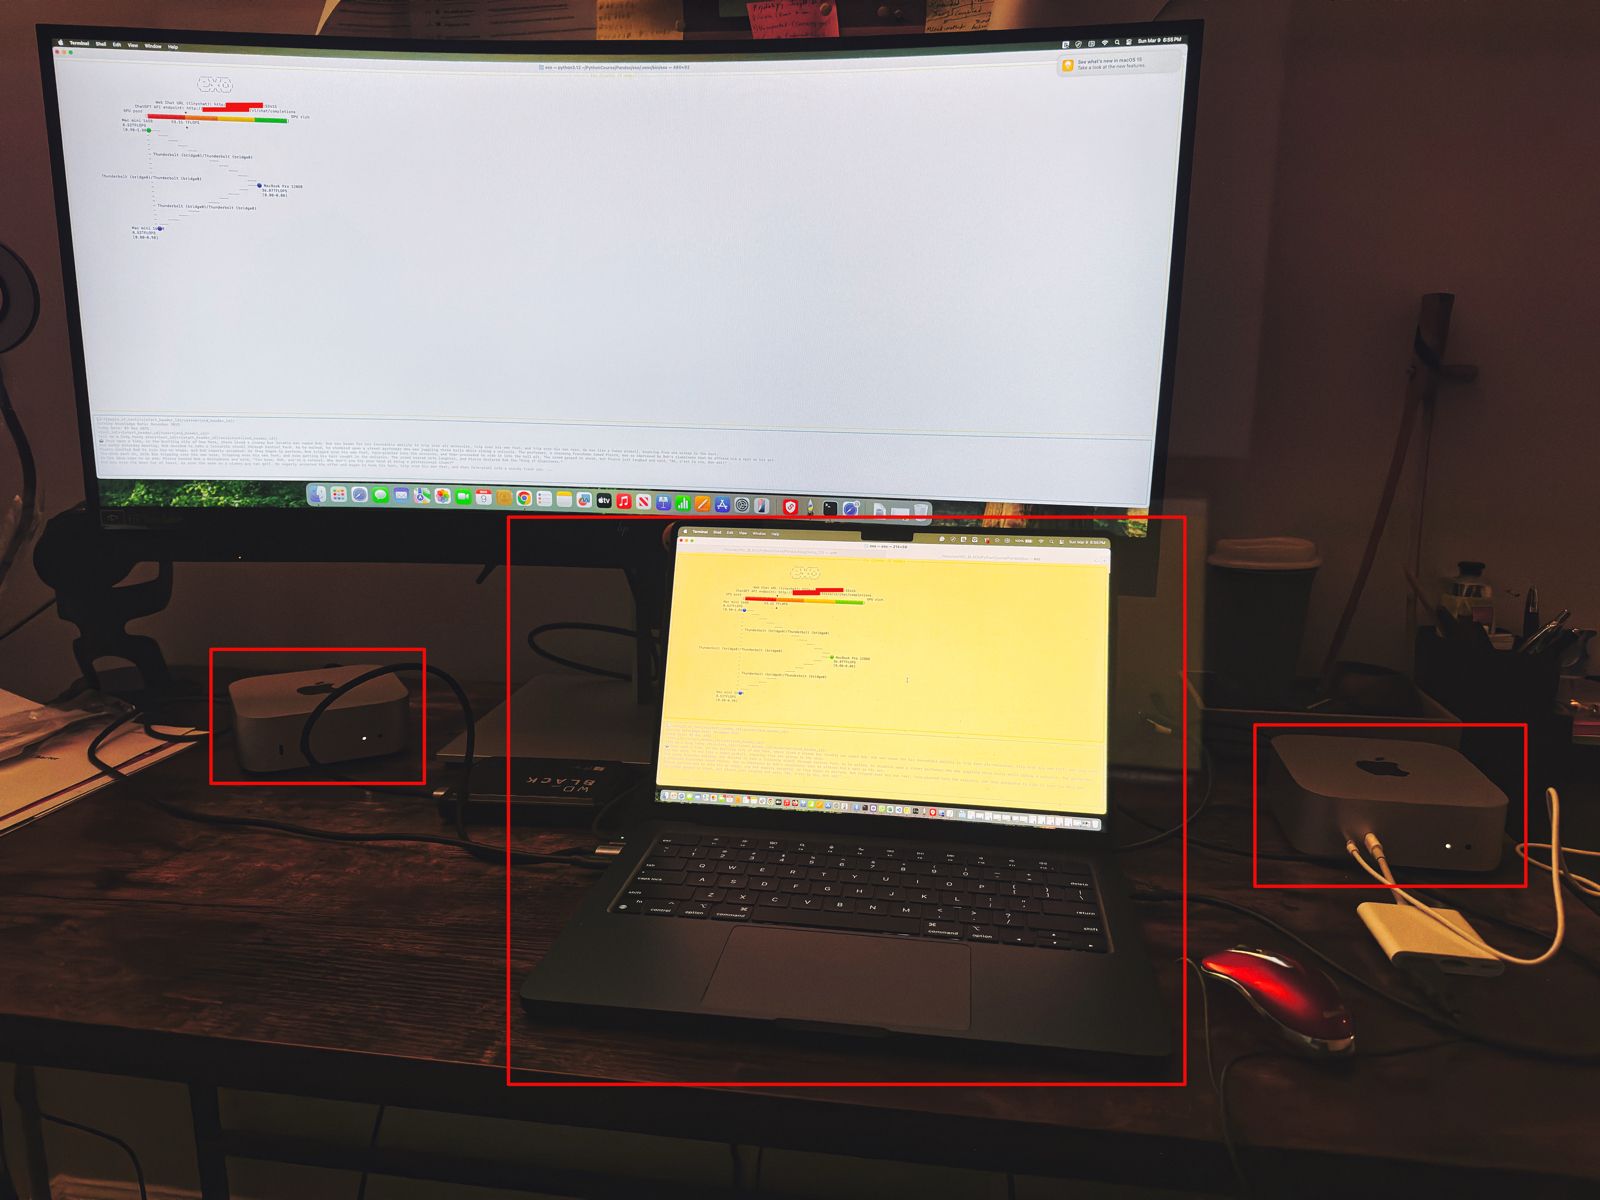
Let us understand the scenario. I’ve one Mac Book Pro M4 & 2 Mac Mini Pro M4 (Base models). So, I want to add them & expose them as a cluster as follows –
As you can see, I’ve connected my MacBook Pro with both the Mac Mini using high-speed thunderbolt cables for better data transmissions. And, I’ll be using an open-source framework called “Exo” to create it.
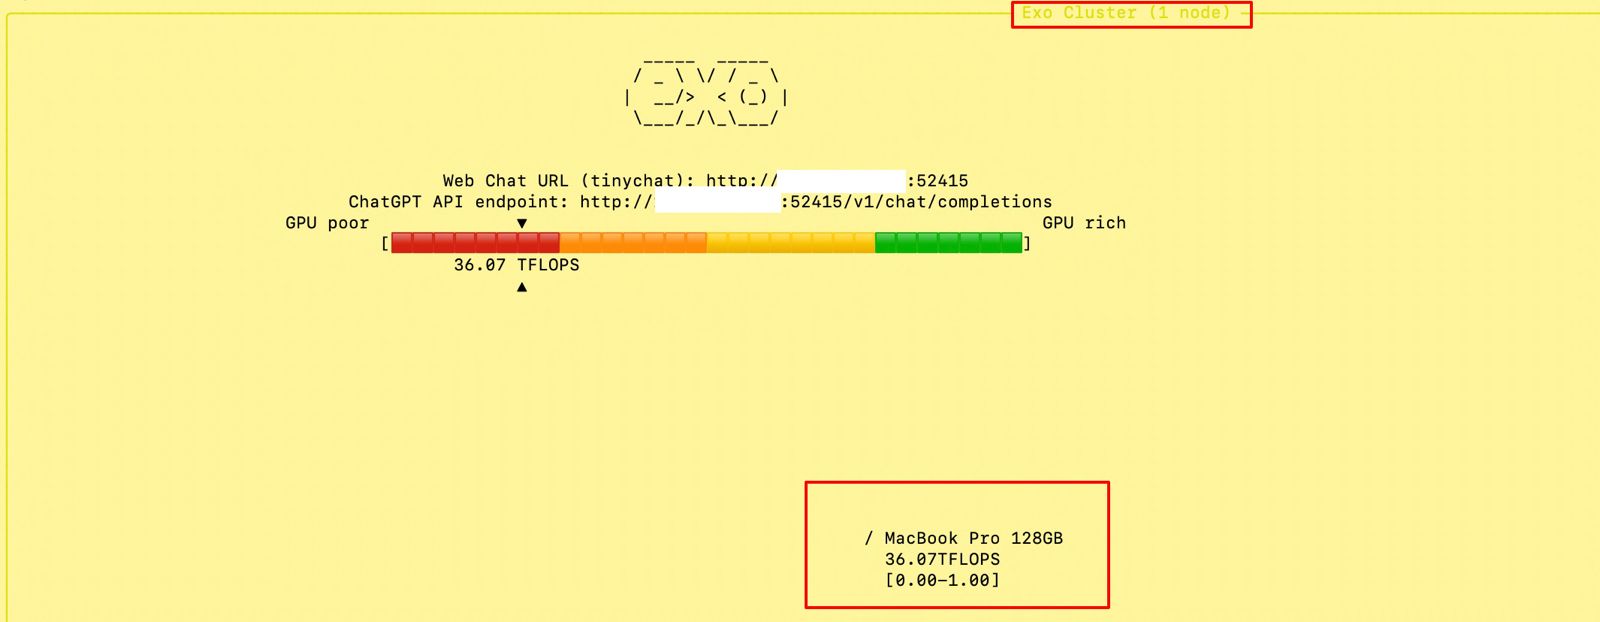
Also, you can see that my total computing capacity is 53.11 TFlops, which is slightly more than the last category.
What is Exo?
“Exo” is an open-source framework that helps you merge all your available devices into a large cluster of available resources. This extracts all the computing juice needed to handle complex tasks, including the big LLMs, which require very expensive GPU-based servers.
For more information on “Exo”, please refer to the following link.
In our previous diagram, we can see that the framework also offers endpoints.
One option is a local ChatGPT interface, where any question you ask will receive a response from models by combining all available computing power.
The other endpoint offers users a choice of any standard LLM API endpoint, which helps them integrate it into their solutions.
Let us see, how the devices are connected together –
How to establish the Cluster?
To proceed with this, you need to have at least Python 3.12, Anaconda or Miniconda & Xcode installed in all of your machines. Also, you need to install some Apple-specific MLX packages or libraries to get the best performance.
Depending on your choice, you need to use the following link to download Anaconda or Miniconda.
You can download the following link to download the Python 3.12. However, I’ve used Python 3.13 on some machines & some machines, I’ve used Python 3.12. And it worked without any problem.
Sometimes, after installing Anaconda or Miniconda, the environment may not implicitly be activated after successful installation. In that case, you may need to use the following commands in the terminal -> source ~/.bash_profile
To verify, whether the conda has been successfully installed & activated, you need to type the following command –
And, you need to perform the same process in other available devices as well.
Now, we’re ready to proceed with the final command –
(.venv) (exo1) satyaki_de@Satyakis-MacBook-Pro-Maxexo%exo/opt/anaconda3/envs/exo1/lib/python3.13/site-packages/google/protobuf/runtime_version.py:112: UserWarning:Protobufgencodeversion5.27.2isolderthantheruntimeversion5.28.1atnode_service.proto.Pleaseavoidchecked-inProtobufgencodethatcanbeobsolete.warnings.warn(NoneofPyTorch,TensorFlow>=2.0,orFlaxhavebeenfound.Modelswon't be available and only tokenizers, configuration and file/data utilities can be used.NoneofPyTorch,TensorFlow>=2.0,orFlaxhavebeenfound.Modelswon't be available and only tokenizers, configuration and file/data utilities can be used.Selectedinferenceengine: None__________/_ \ \//_ \ |__/>< (_) | \___/_/\_\___/Detectedsystem: AppleSiliconMacInferenceenginenameafterselection: mlxUsinginferenceengine: MLXDynamicShardInferenceEnginewithsharddownloader: SingletonShardDownloader[60771,54631,54661]Chatinterfacestarted:-http://127.0.0.1:52415-http://XXX.XXX.XX.XX:52415-http://XXX.XXX.XXX.XX:52415-http://XXX.XXX.XXX.XXX:52415ChatGPTAPIendpointservedat:-http://127.0.0.1:52415/v1/chat/completions-http://XXX.XXX.X.XX:52415/v1/chat/completions-http://XXX.XXX.XXX.XX:52415/v1/chat/completions-http://XXX.XXX.XXX.XXX:52415/v1/chat/completionshas_read=True,has_write=True╭────────────────────────────────────────────────────────────────────────────────────────────── ExoCluster (2nodes) ───────────────────────────────────────────────────────────────────────────────────────────────╮ReceivedexitsignalSIGTERM...Thankyouforusingexo.__________/_ \ \//_ \ |__/>< (_) | \___/_/\_\___/
Note that I’ve masked the IP addresses for security reasons.
Run Time:
At the beginning, if we trigger the main MacBook Pro Max, the “Exo” screen should looks like this –
And if you open the URL, you will see the following ChatGPT-like interface –
Connecting without the Thunderbolt bridge with the relevant port or a hub may cause performance degradation. Hence, how you connect will play a major role in the success of this intention. However, this is certainly a great idea to proceed with.
So, we’ve done it.
We’ll cover the detailed performance testing, Optimized configurations & many other useful details in our next post.
Till then, Happy Avenging! 🙂
Note: All the data & scenarios posted here are representational data & scenarios & available over the internet & for educational purposes only. There is always room for improvement in this kind of model & the solution associated with it. I’ve shown the basic ways to achieve the same for educational purposes only.
Today, I will share a new post in a part series about creating end-end LLMs that feed source data with RAG implementation. I’ll also use OpenAI python-based SDK and Haystack embeddings in this case.
In this post, I’ve directly subscribed to OpenAI & I’m not using OpenAI from Azure. However, I’ll explore that in the future as well.
Before I explain the process to invoke this new library, why not view the demo first & then discuss it?
Demo
FLOW OF EVENTS:
Let us look at the flow diagram as it captures the sequence of events that unfold as part of the process.
As you can see, to enable this large & complex solution, we must first establish the capabilities to build applications powered by LLMs, Transformer models, vector search, and more. You can use state-of-the-art NLP models to perform question-answering, answer generation, semantic document search, or build tools capable of complex decision-making and query resolution. Hence, steps no. 1 & 2 showcased the data embedding & creating that informed repository. We’ll be discussing that in our second part.
Once you have the informed repository, the system can interact with the end-users. As part of the query (shown in step 3), the prompt & the question are shared with the process engine, which then turned to reduce the volume & get relevant context from our informed repository & get the tuned context as part of the response (Shown in steps 4, 5 & 6).
Then, this tuned context is shared with the OpenAI for better response & summary & concluding remarks that are very user-friendly & easier to understand for end-users (Shown in steps 8 & 9).
IMPORTANT PACKAGES:
The following are the important packages that are essential to this project –
Let us understand some of the important sections of the above script –
Function – login():
The login function retrieves a ‘username’ and ‘password’ from a JSON request and prints them. It checks if the provided credentials are missing from users or password lists, returning a failure JSON response if so. It creates and returns an access token in a JSON response if valid.
Function – get_chat():
The get_chat function retrieves the running session count and user input from a JSON request. Based on the session count, it extracts catalog data or processes the user’s message from the RAG framework that finally receives the refined response from the OpenAI, extracting hash values, image URLs, and wiki URLs. If an error arises, the function captures and returns the error as a JSON message.
Function – updateCounter():
The updateCounter function checks if a given CSV file exists and retrieves its counter value. It then increments the counter and writes it back to the CSV. If any errors occur, an error message is printed, and the function returns a value of 1.
Function – extractRemoveUrls():
The extractRemoveUrls function attempts to filter a data frame, resDf, based on a provided hash value to extract image and wiki URLs. If the data frame contains matching entries, it retrieves the corresponding URLs. Any errors encountered are printed, but the function always returns the image and wiki URLs, even if they are empty.
clsContentScrapper.py (This is the main class that brings the default options for the users if they agree with the initial prompt by the bot.)
Let us understand the the core part that require from this class.
Function – extractCatalog():
The extractCatalog function uses specific headers to make a GET request to a constructed URL. The URL is derived by appending ‘/departments’ to a base_url, and a header token is used in the request headers. If successful, it returns the text of the response; if there’s an exception, it prints the error and returns the error message.
clsRAGOpenAI.py (This is the main class that brings the RAG-enabled context that is fed to OpenAI for fine-tuned response with less cost.)
############################################################# Written By:SATYAKIDE ######## Written On:27-Jun-2023 ######## ModifiedOn28-Jun-2023 ######## ######## Objective:Thisisthemaincalling ######## pythonscriptthatwillinvokethe ######## shortcutapplicationcreatedinsideMAC ######## enviornmentincludingMacBook,IPadorIPhone. ######## #############################################################fromhaystack.document_stores.faissimportFAISSDocumentStorefromhaystack.nodesimportDensePassageRetrieverimportopenaifromclsConfigClientimportclsConfigClientascfimportclsLaslog# DisblingWarningdefwarn(*args,**kwargs):passimportwarningswarnings.warn = warnimportosimportre################################################## GlobalSection ##################################################Ind = cf.conf['DEBUG_IND']queryModel = cf.conf['QUERY_MODEL']passageModel = cf.conf['PASSAGE_MODEL']#InitiatingLoggingInstancesclog = log.clsL()os.environ["TOKENIZERS_PARALLELISM"] = "false"vectorDBFileName = cf.conf['VECTORDB_FILE_NM']indexFile = "vectorDB/" + str(vectorDBFileName) + '.faiss'indexConfig = "vectorDB/" + str(vectorDBFileName) + ".json"print('File: ',str(indexFile))print('Config: ',str(indexConfig))# Also,provide`config_path`parameterifyousetitwhencallingthe`save()`method:new_document_store = FAISSDocumentStore.load(index_path=indexFile,config_path=indexConfig)# InitializeRetrieverretriever = DensePassageRetriever(document_store=new_document_store,query_embedding_model=queryModel,passage_embedding_model=passageModel,use_gpu=False)################################################## EndofGlobalSection ##################################################classclsRAGOpenAI:def__init__(self):self.basePath = cf.conf['DATA_PATH']self.fileName = cf.conf['FILE_NAME']self.Ind = cf.conf['DEBUG_IND']self.subdir = str(cf.conf['OUT_DIR'])self.base_url = cf.conf['BASE_URL']self.outputPath = cf.conf['OUTPUT_PATH']self.vectorDBPath = cf.conf['VECTORDB_PATH']self.openAIKey = cf.conf['OPEN_AI_KEY']self.temp = cf.conf['TEMP_VAL']self.modelName = cf.conf['MODEL_NAME']self.maxToken = cf.conf['MAX_TOKEN']defextractHash(self,text):try: # Regularexpressionpatterntomatch'Ref: {'followedbyanumberandthen'}'pattern = r"Ref: \{'(\d+)'\}"match = re.search(pattern,text)ifmatch:returnmatch.group(1)else:returnNoneexceptExceptionase:x = str(e)print('Error: ',x)returnNonedefremoveSentencesWithNaN(self,text):try: # Splittextintosentencesusingregularexpressionsentences = re.split('(?<!\w\.\w.)(?<![A-Z][a-z]\.)(?<=\.|\?)\s',text) # Filteroutsentencescontaining'nan'filteredSentences = [sentenceforsentenceinsentencesif'nan'notinsentence] # Rejointhesentencesreturn''.join(filteredSentences)exceptExceptionase:x = str(e)print('Error: ',x)return''defretrieveDocumentsReader(self,question,top_k=9):returnretriever.retrieve(question,top_k=top_k)defgenerateAnswerWithGPT3(self,retrieved_docs,question):try:openai.api_key = self.openAIKeytemp = self.tempmodelName = self.modelNamemaxToken = self.maxTokendocumentsText = "".join([doc.contentfordocinretrieved_docs])filteredDocs = self.removeSentencesWithNaN(documentsText)hashValue = self.extractHash(filteredDocs)print('RAG Docs:: ')print(filteredDocs) #prompt = f"Given the following documents: {documentsText}, answer the question accurately based on the above data with the supplied http urls: {question}" # Setupachat-stylepromptwithyourdatamessages = [{"role": "system", "content": "Youareahelpfulassistant,answerthequestionaccuratelybasedontheabovedatawiththesuppliedhttpurls. Onlyrelevantcontentneedstopublish. Pleasedonotprovidethefactsorthetextsthatresultscrossingthemax_tokenlimits."},{"role": "user", "content": filteredDocs} ] # Chatstyleinvokingthelatestmodelresponse = openai.ChatCompletion.create(model=modelName,messages=messages,temperature = temp,max_tokens=maxToken )returnhashValue,response.choices[0].message['content'].strip().replace('\n','\\n')exceptExceptionase:x = str(e)print('failed to get from OpenAI: ',x)return'Not Available!'defragAnswerWithHaystackAndGPT3(self,question):retrievedDocs = self.retrieveDocumentsReader(question)returnself.generateAnswerWithGPT3(retrievedDocs,question)defgetData(self,strVal):try:print('*'*120)print('Index Your Data for Retrieval:')print('*'*120)print('Response from New Docs: ')print()hashValue,answer = self.ragAnswerWithHaystackAndGPT3(strVal)print('GPT3 Answer::')print(answer)print('Hash Value:')print(str(hashValue))print('*'*240)print('End Of Use RAG to Generate Answers:')print('*'*240)returnhashValue,answerexceptExceptionase:x = str(e)print('Error: ',x)answer = xhashValue = 1returnhashValue,answer
Let us understand some of the important block –
Function – ragAnswerWithHaystackAndGPT3():
The ragAnswerWithHaystackAndGPT3 function retrieves relevant documents for a given question using the retrieveDocumentsReader method. It then generates an answer for the query using GPT-3 with the retrieved documents via the generateAnswerWithGPT3 method. The final response is returned.
Function – generateAnswerWithGPT3():
The generateAnswerWithGPT3 function, given a list of retrieved documents and a question, communicates with OpenAI’s GPT-3 to generate an answer. It first processes the documents, filtering and extracting a hash value. Using a chat-style format, it prompts GPT-3 with the processed documents and captures its response. If an error occurs, an error message is printed, and “Not Available!” is returned.
Function – retrieveDocumentsReader():
The retrieveDocumentsReader function takes in a question and an optional parameter, top_k (defaulted to 9). It is called the retriever.retrieve method with the given parameters. The result of the retrieval will generate at max nine responses from the RAG engine, which will be fed to OpenAI.
React:
App.js (This is the main react script, that will create the interface & parse the data apart from the authentication)
// App.jsimportReact,{useState}from'react';importaxiosfrom'axios';import'./App.css';constApp=()=>{const[isLoggedIn,setIsLoggedIn]=useState(false);const[username,setUsername]=useState('');const[password,setPassword]=useState('');const[message,setMessage]=useState('');const[chatLog,setChatLog]=useState([{sender:'MuBot',message:'Welcome to MuBot! Please explore the world of History from our brilliant collections! Do you want to proceed to see the catalog?'}]);consthandleLogin=async(e)=>{e.preventDefault();try{constresponse=awaitaxios.post('http://localhost:5000/login',{username,password});if (response.status===200) {setIsLoggedIn(true);}}catch (error) {console.error('Login error:',error);}};constsendMessage=async(username)=>{if (message.trim() ==='') return;// Create a new chat entryconstnewChatEntry={sender:'user',message:message.trim(),};// Clear the input fieldsetMessage('');try{// Make API request to Python-based APIconstresponse=awaitaxios.post('http://localhost:5000/chat',{message:newChatEntry.message});// Replace with your API endpoint URLconstresponseData=response.data;// Print the response to the console for debuggingconsole.log('API Response:',responseData);// Parse the nested JSON from the 'message' attributeconstjsonData=JSON.parse(responseData.message);// Check if the data contains 'departments'if (jsonData.departments) {// Extract the 'departments' attribute from the parsed dataconstdepartments=jsonData.departments;// Extract the department names and create a single string with line breaksconstbotResponseText=departments.reduce((acc,department)=>{returnacc+department.departmentId+''+department.displayName+'\n';},'');// Update the chat log with the bot's responsesetChatLog((prevChatLog)=> [...prevChatLog,{sender:'user',message:message},{sender:'bot',message:botResponseText},]);}elseif (jsonData.records){// Data structure 2: Artwork informationconstrecords=jsonData.records;// Prepare chat entriesconstchatEntries= [];// Iterate through records and extract text, image, and wiki informationrecords.forEach((record)=>{consttextInfo=Object.entries(record).map(([key,value])=>{if (key!=='Image'&&key!=='Wiki') {return`${key}: ${value}`;}returnnull;}).filter((info)=>info!==null).join('\n');constimageLink=record.Image;//const wikiLinks = JSON.parse(record.Wiki.replace(/'/g, '"'));//const wikiLinks = record.Wiki;constwikiLinks=record.Wiki.split(',').map(link=>link.trim());console.log('Wiki:',wikiLinks);// Check if there is a valid image linkconsthasValidImage=imageLink&&imageLink!=='[]';constimageElement=hasValidImage? (<imgsrc={imageLink}alt="Artwork"style={{maxWidth:'100%'}}/> ) :null;// Create JSX elements for rendering the wiki links (if available)constwikiElements=wikiLinks.map((link,index)=> (<divkey={index}><ahref={link}target="_blank"rel="noopener noreferrer"> Wiki Link {index+1}</a></div> ));if (textInfo) {chatEntries.push({sender:'bot',message:textInfo});}if (imageElement) {chatEntries.push({sender:'bot',message:imageElement});}if (wikiElements.length >0) {chatEntries.push({sender:'bot',message:wikiElements});}});// Update the chat log with the bot's responsesetChatLog((prevChatLog)=> [...prevChatLog,{sender:'user',message},...chatEntries, ]);}}catch (error) {console.error('Error sending message:',error);}};if (!isLoggedIn) {return (<divclassName="login-container"><h2>Welcome to the MuBot</h2><formonSubmit={handleLogin}className="login-form"><inputtype="text"placeholder="Enter your name"value={username}onChange={(e)=>setUsername(e.target.value)}required/><inputtype="password"placeholder="Enter your password"value={password}onChange={(e)=>setPassword(e.target.value)}required/><buttontype="submit">Login</button></form></div> );}return (<divclassName="chat-container"><divclassName="chat-header"><h2>Hello, {username}</h2><h3>Chat with MuBot</h3></div><divclassName="chat-log">{chatLog.map((chatEntry,index)=> (<divkey={index}className={`chat-entry ${chatEntry.sender==='user'?'user':'bot'}`}><spanclassName="user-name">{chatEntry.sender==='user'?username:'MuBot'}</span><pclassName="chat-message">{chatEntry.message}</p></div> ))}</div><divclassName="chat-input"><inputtype="text"placeholder="Type your message..."value={message}onChange={(e)=>setMessage(e.target.value)}onKeyPress={(e)=>{if (e.key==='Enter') {sendMessage();}}}/><buttononClick={sendMessage}>Send</button></div></div> );};exportdefaultApp;
Please find some of the important logic –
Function – handleLogin():
The handleLogin asynchronous function responds to an event by preventing its default action. It attempts to post a login request with a username and password to a local server endpoint. If the response is successful with a status of 200, it updates a state variable to indicate a successful login; otherwise, it logs any encountered errors.
Function – sendMessage():
The sendMessage asynchronous function is designed to handle the user’s chat interaction:
If the message is empty (after trimming spaces), the function exits without further action.
A chat entry object is created with the sender set as ‘user’ and the trimmed message.
The input field’s message is cleared, and an API request is made to a local server endpoint with the chat message.
If the API responds with a ‘departments’ attribute in its JSON, a bot response is crafted by iterating over department details.
If the API responds with ‘records’ indicating artwork information, the bot crafts responses for each record, extracting text, images, and wiki links, and generating JSX elements for rendering them.
After processing the API response, the chat log state is updated with the user’s original message and the bot’s responses.
Errors, if encountered, are logged to the console.
This function enables interactive chat with bot responses that vary based on the nature of the data received from the API.
DIRECTORY STRUCTURES:
Let us explore the directory structure starting from the parent to some of the important child folder should look like this –
So, finally, we’ve done it.
I know that this post is relatively bigger than my earlier post. But, I think, you can get all the details once you go through it.
You will get the complete codebase in the following GitHub link.
I’ll bring some more exciting topics in the coming days from the Python verse. Please share & subscribe to my post & let me know your feedback.
Till then, Happy Avenging! 🙂
Note: All the data & scenarios posted here are representational data & scenarios & available over the internet & for educational purposes only. Some of the images (except my photo) we’ve used are available over the net. We don’t claim ownership of these images. There is always room for improvement & especially in the prediction quality.
Today, I’ll be using another exciting installment of Computer Vision. The application will read the real-time human hand gesture to control WebCAM’s zoom-in or zoom-out capability.
Why don’t we see the demo first before jumping into the technical details?
Demo
Architecture:
Let us understand the architecture –
Broad Diagram
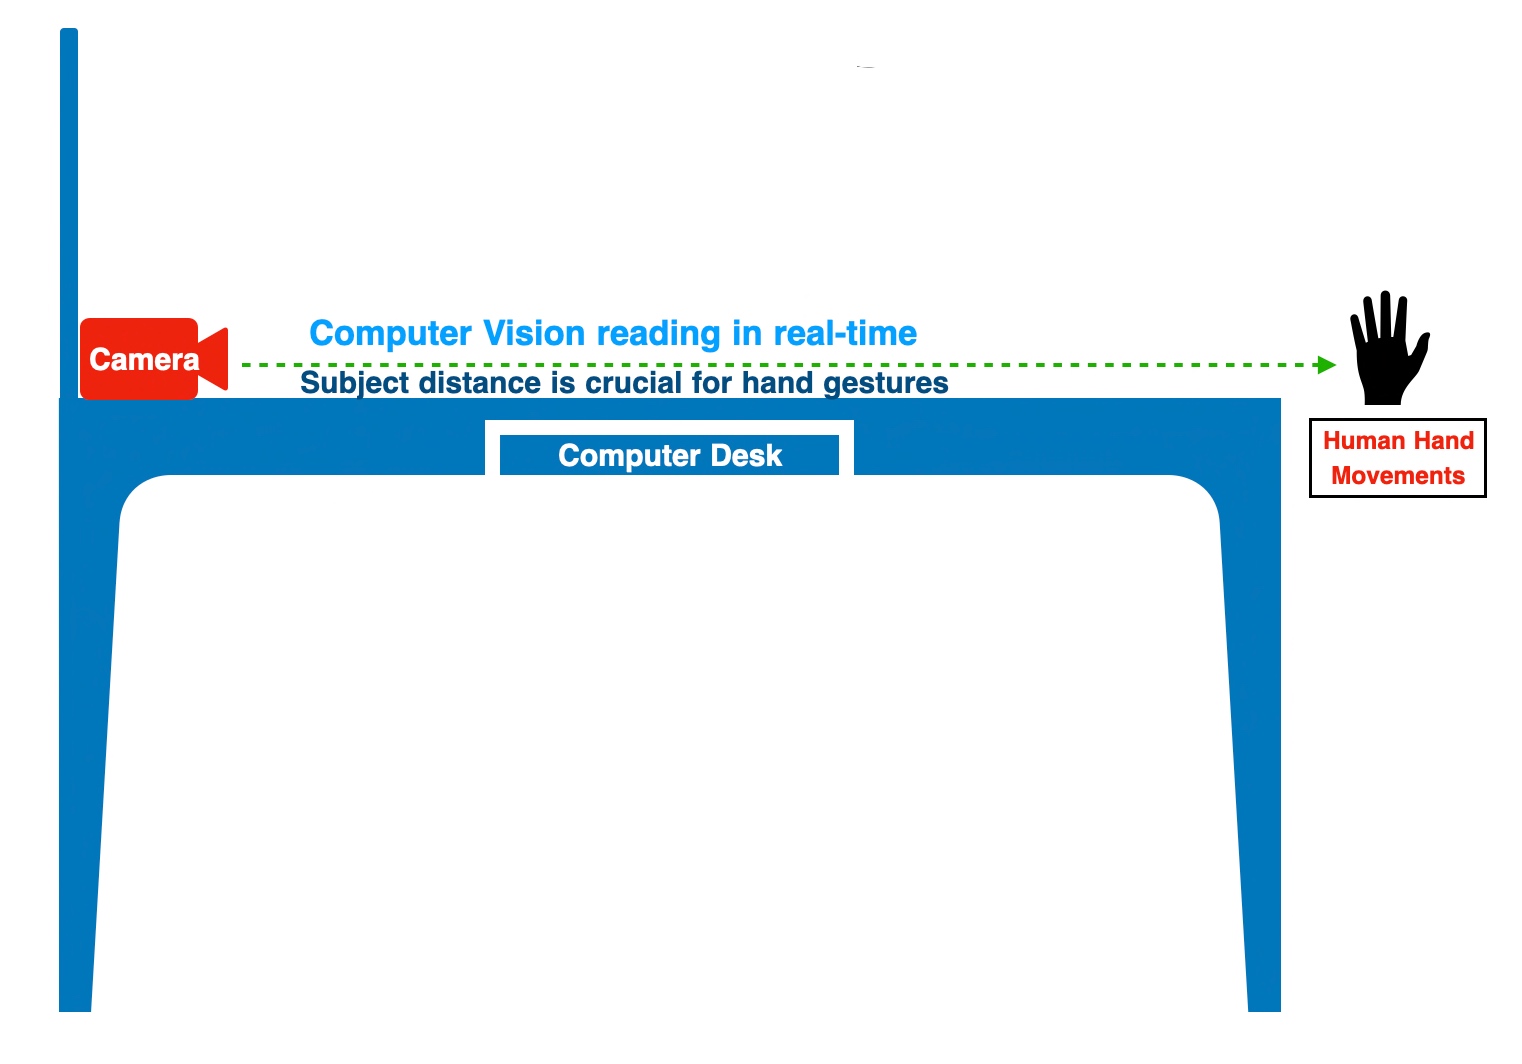
As one can see, the application reads individual frames from WebCAM & then map the human hand gestures with a media pipe. And finally, calculate the distance between particular pipe points projected on human hands.
Let’s take another depiction of the experiment to better understand the above statement.
Camera & Subject Position
Python Packages:
Following are the python packages that are necessary to develop this brilliant use case –
pip install mediapipe
pip install opencv-python
CODE:
Let us now understand the code. For this use case, we will only discuss three python scripts. However, we need more than these three. However, we have already discussed them in some of the early posts. Hence, we will skip them here.
clsConfig.py (Configuration script for the application.)
This file contains hidden or bidirectional Unicode text that may be interpreted or compiled differently than what appears below. To review, open the file in an editor that reveals hidden Unicode characters. Learn more about bidirectional Unicode characters
2. clsVideoZoom.py (This script will zoom the video streaming depending upon the hand gestures.)
This file contains hidden or bidirectional Unicode text that may be interpreted or compiled differently than what appears below. To review, open the file in an editor that reveals hidden Unicode characters. Learn more about bidirectional Unicode characters
The above method will zoom in & zoom out depending upon the scale value that the human hand gesture will receive.
cap = cv2.VideoCapture(0)
detector = hms.clsHandMotionScanner(detectionCon=0.7)
The following lines will read the individual frames from webCAM. Instantiate another open-source customized class, which will find the hand’s position.
To understand the above lines, let’s look into the following diagram –
Source: Mediapipe
As one can see, the thumbs tip value is 4 & Index fingertip is 8. The application will mark these points with a solid circle.
lenVal = math.hypot(x2-x1, y2-y1)
The above line will calculate the distance between the thumbs tip & index fingertip.
# Camera Zoom Range is 0.01, 1

minVal = self.minVal
maxVal = self.maxVal

zRange = np.interp(lenVal, [50, 270], [minVal, maxVal])
zRangeBar = np.interp(lenVal, [50, 270], [400, 150])
In the above lines, the application will translate the values captured between the two fingertips & then translate them into a more meaningful camera zoom range from 0.01 to 1.
if lenVal < 50:
    cv2.circle(img, (cx,cy), 15, (0,255,0), cv2.FILLED)
The application will not consider a value below 50 as 0.01 for the WebCAM start value.
The application will capture the frame rate & share the original video frame and the test frame, where it will zoom in or out depending on the hand gesture.
3. clsHandMotionScanner.py (This is an enhance version of open source script, which will capture the hand position.)
This file contains hidden or bidirectional Unicode text that may be interpreted or compiled differently than what appears below. To review, open the file in an editor that reveals hidden Unicode characters. Learn more about bidirectional Unicode characters
def findHands(self, img, draw=True):
    try:
        # Send rgb image to hands
        imgRGB = cv2.cvtColor(img,cv2.COLOR_BGR2RGB)
        self.results = self.hands.process(imgRGB)

        # process the frame
        if self.results.multi_hand_landmarks:
            for handLms in self.results.multi_hand_landmarks:

                if draw:
                    #Draw dots and connect them
                    self.mpDraw.draw_landmarks(img,handLms,self.mpHands.HAND_CONNECTIONS)

        return img
    except Exception as e:
        x = str(e)
        print('Error: ', x)

        return img
The above function will identify individual key points & marked them as dots on top of human hands.
def findPosition(self, img, handNo=0, draw=True):
      try:
          lmlist = []

          # check wether any landmark was detected
          if self.results.multi_hand_landmarks:
              #Which hand are we talking about
              myHand = self.results.multi_hand_landmarks[handNo]
              # Get id number and landmark information
              for id, lm in enumerate(myHand.landmark):
                  # id will give id of landmark in exact index number
                  # height width and channel
                  h,w,c = img.shape
                  #find the position - center
                  cx,cy = int(lm.x*w), int(lm.y*h)
                  lmlist.append([id,cx,cy])

              # Draw circle for 0th landmark
              if draw:
                  cv2.circle(img,(cx,cy), 15 , (255,0,255), cv2.FILLED)

          return lmlist
      except Exception as e:
          x = str(e)
          print('Error: ', x)

          lmlist = []
          return lmlist
The above line will capture the position of each media pipe point along with the x & y coordinate & store them in a list, which will be later parsed for main use case.
4. viewHandMotion.py (Main calling script.)
This file contains hidden or bidirectional Unicode text that may be interpreted or compiled differently than what appears below. To review, open the file in an editor that reveals hidden Unicode characters. Learn more about bidirectional Unicode characters
The above lines are self-explanatory. So, I’m not going to discuss anything on this script.
FOLDER STRUCTURE:
Here is the folder structure that contains all the files & directories in MAC O/S –
Directory
So, we’ve done it.
You will get the complete codebase in the following Github link.
I’ll bring some more exciting topic in the coming days from the Python verse. Please share & subscribe my post & let me know your feedback.
Till then, Happy Avenging! 🙂
Note: All the data & scenario posted here are representational data & scenarios & available over the internet & for educational purpose only. Some of the images (except my photo) that we’ve used are available over the net. We don’t claim the ownership of these images. There is an always room for improvement & especially the prediction quality.
This week we’re planning to touch on one of the exciting posts of visually reading characters from WebCAM & predict the letters using CNN methods. Before we dig deep, why don’t we see the demo run first?
Demo
Isn’t it fascinating? As we can see, the computer can record events and read like humans. And, thanks to the brilliant packages available in Python, which can help us predict the correct letter out of an Image.
What do we need to test it out?
Preferably an external WebCAM.
A moderate or good Laptop to test out this.
Python
And a few other packages that we’ll mention next block.
What Python packages do we need?
Some of the critical packages that we must need to test out this application are –
In deep learning, a convolutional neural network (CNN/ConvNet) is a class of deep neural networks most commonly applied to analyze visual imagery.
Different Steps of CNN
We can understand from the above picture that a CNN generally takes an image as input. The neural network analyzes each pixel separately. The weights and biases of the model are then tweaked to detect the desired letters (In our use case) from the image. Like other algorithms, the data also has to pass through pre-processing stage. However, a CNN needs relatively less pre-processing than most other Deep Learning algorithms.
If you want to know more about this, there is an excellent article on CNN with some on-point animations explaining this concept. Please read it here.
Where do we get the data sets for our testing?
For testing, we are fortunate enough to have Kaggle with us. We have received a wide variety of sample data, which you can get from here.
Our use-case:
Architecture
From the above diagram, one can see that the python application will consume a live video feed of any random letters (both printed & handwritten) & predict the character as part of the machine learning model that we trained.
Code:
clsConfig.py (Configuration file for the entire application.)
This file contains hidden or bidirectional Unicode text that may be interpreted or compiled differently than what appears below. To review, open the file in an editor that reveals hidden Unicode characters. Learn more about bidirectional Unicode characters
Since we have 26 letters, we have classified it as 26 in the numOfClasses.
Since we are talking about characters, we had to come up with a process of identifying each character as numbers & then processing our entire logic. Hence, the above parameter named word_dict captured all the characters in a python dictionary & stored them. Moreover, the application translates the final number output to more appropriate characters as the prediction.
2. clsAlphabetReading.py (Main training class to teach the model to predict alphabets from visual reader.)
This file contains hidden or bidirectional Unicode text that may be interpreted or compiled differently than what appears below. To review, open the file in an editor that reveals hidden Unicode characters. Learn more about bidirectional Unicode characters
We are splitting the data into Train, Test & Validation sets to get more accurate predictions and reshaping the raw data into the image by consuming the 784 data columns to 28×28 pixel images.
Since we are talking about characters, we had to come up with a process of identifying The following snippet will plot the character equivalent number into a matplotlib chart & showcase the overall distribution trend after splitting.
Y_Train_Num = np.int0(y)
count = np.zeros(numOfClasses, dtype='int')
for i in Y_Train_Num:
    count[i] +=1

alphabets = []
for i in word_dict.values():
    alphabets.append(i)

fig, ax = plt.subplots(1,1, figsize=(7,7))
ax.barh(alphabets, count)

plt.xlabel("Number of elements ")
plt.ylabel("Alphabets")
plt.grid()
plt.show(block=False)
plt.pause(sleepTime)
plt.close()
Note that we have tweaked the plt.show property with (block=False). This property will enable us to continue execution without human interventions after the initial pause.
# Model reshaping the training & test dataset
X_Train = X_Train.reshape(X_Train.shape[0],X_Train.shape[1],X_Train.shape[2],1)
print("Shape of Train Data: ", X_Train.shape)

X_Test = X_Test.reshape(X_Test.shape[0], X_Test.shape[1], X_Test.shape[2],1)
print("Shape of Test Data: ", X_Test.shape)

X_Validation = X_Validation.reshape(X_Validation.shape[0], X_Validation.shape[1], X_Validation.shape[2],1)
print("Shape of Validation data: ", X_Validation.shape)

# Converting the labels to categorical values
Y_Train_Catg = to_categorical(Y_Train, num_classes = numOfClasses, dtype='int')
print("Shape of Train Labels: ", Y_Train_Catg.shape)

Y_Test_Catg = to_categorical(Y_Test, num_classes = numOfClasses, dtype='int')
print("Shape of Test Labels: ", Y_Test_Catg.shape)

Y_Validation_Catg = to_categorical(Y_Validation, num_classes = numOfClasses, dtype='int')
print("Shape of validation labels: ", Y_Validation_Catg.shape)
In the above diagram, the application did reshape all three categories of data before calling the primary CNN function.
In the above snippet, the convolution layers are followed by maxpool layers, which reduce the number of features extracted. The output of the maxpool layers and convolution layers are flattened into a vector of a single dimension and supplied as an input to the Dense layer—the CNN model prepared for training the model using the training dataset.
We have used optimization parameters like Adam, RMSProp & the application we trained for eight epochs for better accuracy & predictions.
# Displaying the accuracies & losses for train & validation set
print("Validation Accuracy :", history.history['val_accuracy'])
print("Training Accuracy :", history.history['accuracy'])
print("Validation Loss :", history.history['val_loss'])
print("Training Loss :", history.history['loss'])

# Displaying the Loss Graph
plt.figure(1)
plt.plot(history.history['loss'])
plt.plot(history.history['val_loss'])
plt.legend(['training','validation'])
plt.title('Loss')
plt.xlabel('epoch')
plt.show(block=False)
plt.pause(sleepTime1)
plt.close()

# Dsiplaying the Accuracy Graph
plt.figure(2)
plt.plot(history.history['accuracy'])
plt.plot(history.history['val_accuracy'])
plt.legend(['training','validation'])
plt.title('Accuracy')
plt.xlabel('epoch')
plt.show(block=False)
plt.pause(sleepTime1)
plt.close()
Also, we have captured the validation Accuracy & Loss & plot them into two separate graphs for better understanding.
Also, the application is trying to get the accuracy of the model that we trained & validated with the training & validation data. This time we have used test data to predict the confidence score.
# Displaying some of the test images & their predicted labels
fig, ax = plt.subplots(3,3, figsize=(8,9))
axes = ax.flatten()

for i in range(9):
    axes[i].imshow(np.reshape(X_Test[i], reshapeVal1), cmap="Greys")
    pred = word_dict[np.argmax(Y_Test_Catg[i])]
    print('Prediction: ', pred)
    axes[i].set_title("Test Prediction: " + pred)
    axes[i].grid()
plt.show(block=False)
plt.pause(sleepTime1)
plt.close()
Finally, the application testing with some random test data & tried to plot the output & prediction assessment.
As a part of the last step, the application will generate the models using a pickle package & save them under a specific location, which the reader application will use.
3. trainingVisualDataRead.py (Main application that will invoke the training class to predict alphabet through WebCam using Convolutional Neural Network (CNN).)
This file contains hidden or bidirectional Unicode text that may be interpreted or compiled differently than what appears below. To review, open the file in an editor that reveals hidden Unicode characters. Learn more about bidirectional Unicode characters
The python application will invoke the class & capture the returned value inside the r1 variable.
4. readingVisualData.py (Reading the model to predict Alphabet using WebCAM.)
This file contains hidden or bidirectional Unicode text that may be interpreted or compiled differently than what appears below. To review, open the file in an editor that reveals hidden Unicode characters. Learn more about bidirectional Unicode characters
We have initially cloned the original video frame & then it converted from BGR2GRAYSCALE while applying the threshold on it doe better prediction outcomes. Then the image has resized & reshaped for model input. Finally, the np.argmax function extracted the class index with the highest predicted probability. Furthermore, it is translated using the word_dict dictionary to an Alphabet & displayed on top of the Live View.
Also, derive the confidence score of that probability & display that on top of the Live View.
if cv2.waitKey(1) & 0xFF == ord('q'):
    r1=0
    break
The above code will let the developer exit from this application by pressing the “Esc” or “q”-key from the keyboard & the program will terminate.
So, we’ve done it.
You will get the complete codebase in the following Github link.
I’ll bring some more exciting topic in the coming days from the Python verse. Please share & subscribe my post & let me know your feedback.
Till then, Happy Avenging! 😀
Note: All the data & scenario posted here are representational data & scenarios & available over the internet & for educational purpose only. Some of the images (except my photo) that we’ve used are available over the net. We don’t claim the ownership of these images. There is an always room for improvement & especially the prediction quality of Alphabet.


You must be logged in to post a comment.