This site mainly deals with various use cases demonstrated using Python, Data Science, Cloud basics, SQL Server, Oracle, Teradata along with SQL & their implementation. Expecting yours active participation & time. This blog can be access from your TP, Tablet & mobile also. Please provide your feedback.
Today, I’ll be demonstrating a short but significant topic. There are widespread facts that, on many occasions, Python is relatively slower than other strongly typed programming languages like C++, Java, or even the latest version of PHP.
I found a relatively old post with a comparison shown between Python and the other popular languages. You can find the details at this link.
However, I haven’t verified the outcome. So, I can’t comment on the final statistics provided on that link.
My purpose is to find cases where I can take certain tricks to improve performance drastically.
One preferable option would be the use of Cython. That involves the middle ground between C & Python & brings the best out of both worlds.
The other option would be the use of GPU for vector computations. That would drastically increase the processing power. Today, we’ll be exploring this option.
Let’s find out what we need to prepare our environment before we try out on this.
Step – 1 (Installing dependent packages):
pip install pyopencl
pip install plaidml-keras
So, we will be taking advantage of the Keras package to use our GPU. And, the screen should look like this –
Installation Process of Python-based Packages
Once we’ve installed the packages, we’ll configure the package showing on the next screen.
Configuration of Packages
For our case, we need to install pandas as we’ll be using numpy, which comes default with it.
Installation of supplemental packages
Let’s explore our standard snippet to test this use case.
Case 1 (Normal computational code in Python):
##############################################
#### Written By: SATYAKI DE               ####
#### Written On: 18-Jan-2020              ####
####                                      ####
#### Objective: Main calling scripts for  ####
#### normal execution.                    ####
##############################################

import numpy as np
from timeit import default_timer as timer

def pow(a, b, c):
    for i in range(a.size):
         c[i] = a[i] ** b[i]

def main():
    vec_size = 100000000

    a = b = np.array(np.random.sample(vec_size), dtype=np.float32)
    c = np.zeros(vec_size, dtype=np.float32)

    start = timer()
    pow(a, b, c)
    duration = timer() - start

    print(duration)

if __name__ == '__main__':
    main()
Case 2 (GPU-based computational code in Python):
#################################################
#### Written By: SATYAKI DE                  ####
#### Written On: 18-Jan-2020                 ####
####                                         ####
#### Objective: Main calling scripts for     ####
#### use of GPU to speed-up the performance. ####
#################################################

import numpy as np
from timeit import default_timer as timer

# Adding GPU Instance
from os import environ
environ["KERAS_BACKEND"] = "plaidml.keras.backend"

def pow(a, b):
    return a ** b

def main():
    vec_size = 100000000

    a = b = np.array(np.random.sample(vec_size), dtype=np.float32)
    c = np.zeros(vec_size, dtype=np.float32)

    start = timer()
    c = pow(a, b)
    duration = timer() - start

    print(duration)

if __name__ == '__main__':
    main()
And, here comes the output for your comparisons –
Case 1 Vs Case 2:
Performance Comparisons
As you can see, there is a significant improvement that we can achieve using this. However, it has limited scope. Not everywhere you get the benefits. Until or unless Python decides to work on the performance side, you better need to explore either of the two options that I’ve discussed here (I didn’t mention a lot on Cython here. Maybe some other day.).
To get the codebase you can refer the following Github link.
So, finally, we have done it.
I’ll bring some more exciting topic in the coming days from the Python verse.
Till then, Happy Avenging! 😀
Note: All the data & scenario posted here are representational data & scenarios & available over the internet & for educational purpose only.
Today, I’ll be using a popular tool known as Mulesoft to generate a mock API & then we’ll be testing the same using python. Mulesoft is an excellent tool to rapidly develop API & also can integrate multiple cloud environments as an Integration platform. You can use their Anypoint platform to quickly design such APIs for your organization. You can find the details in the following link. However, considering the cost, many organization has to devise their own product or tool to do the same. That’s where developing a Python or Node.js or C# comes adequately considering the cloud platform.
Before we start, let us quickly know what Mock API is?
A mock API server imitates a real API server by providing realistic responses to requests. They can be on your local machine or the public Internet. Responses can be static or dynamic, and simulate the data the real API would return, matching the schema with data types, objects, and arrays.
And why do we need that?
A mock API server is useful during development and testing when live data is either unavailable or unreliable. While designing an API, you can use mock APIs to work concurrently on the front and back-end, as well as to gather feedback from developers. Our mock API sever guide for testing covers how you can use a mock API server so the absence of a real API doesn’t hold you back.
Often with internal projects, the API consumer (such as a front end developer through REST APIs) moves faster than the backend team building the API. This API mocking guide shows how a mock API server allows developers to consume a working API with the same interface as the eventual production API. As an added benefit, the backend team can discover where the mock API doesn’t meet the developer’s needs without spending developer time on features that may be removed or changed. This fast feedback loop can make engineering teams much more efficient.
If you need more information on this topic, you can refer to the following link.
Great! Since now we have a background of mock API – let’s explore how Mulesoft can help us here?
Mulesoft used the “RESTfulAPIModelingLanguage (RAML)” language. We’ll be using this language to develop our mock API. To know more about this, you can view the following link.
Under the developer section, you can find Tutorials as shown in the screenshot given below –
You can select any of the categories & learn basic scripting from it.
Now, let’s take a look at the process of creating a Mulesoft free account to test our theories.
Step 1:
Click the following link, and you will see the page as shown below –
Step 2:
Now, click the login shown in the RED square. You will see the following page –
Step 3:
Please provide your credentials if you already have an account. Else, you have to click the “Sign-Up” & then you will need to provide the few details as shown below –
Step 4:
Once, you successfully create the account, you will see the following page –
So, now we are set. To design an API, you will need to click the design center as marked within the white square.
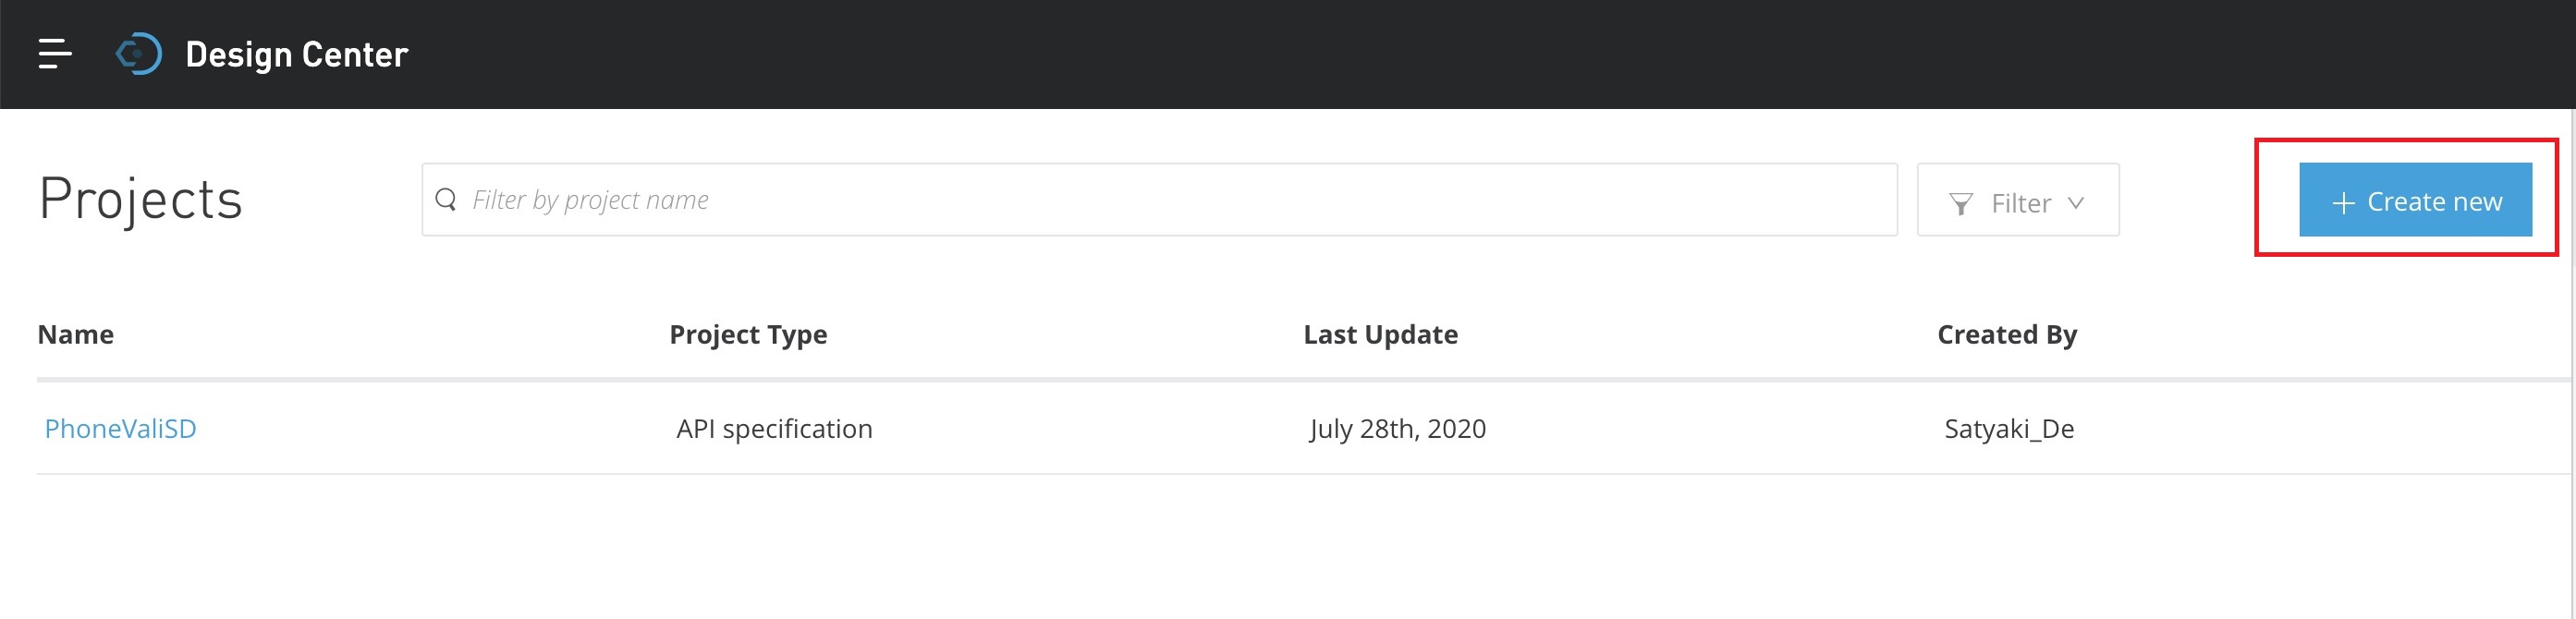
Once you click the “Start designing” button, this will land into the next screen.
As shown above, you need to click the “Create new” for fresh API design.
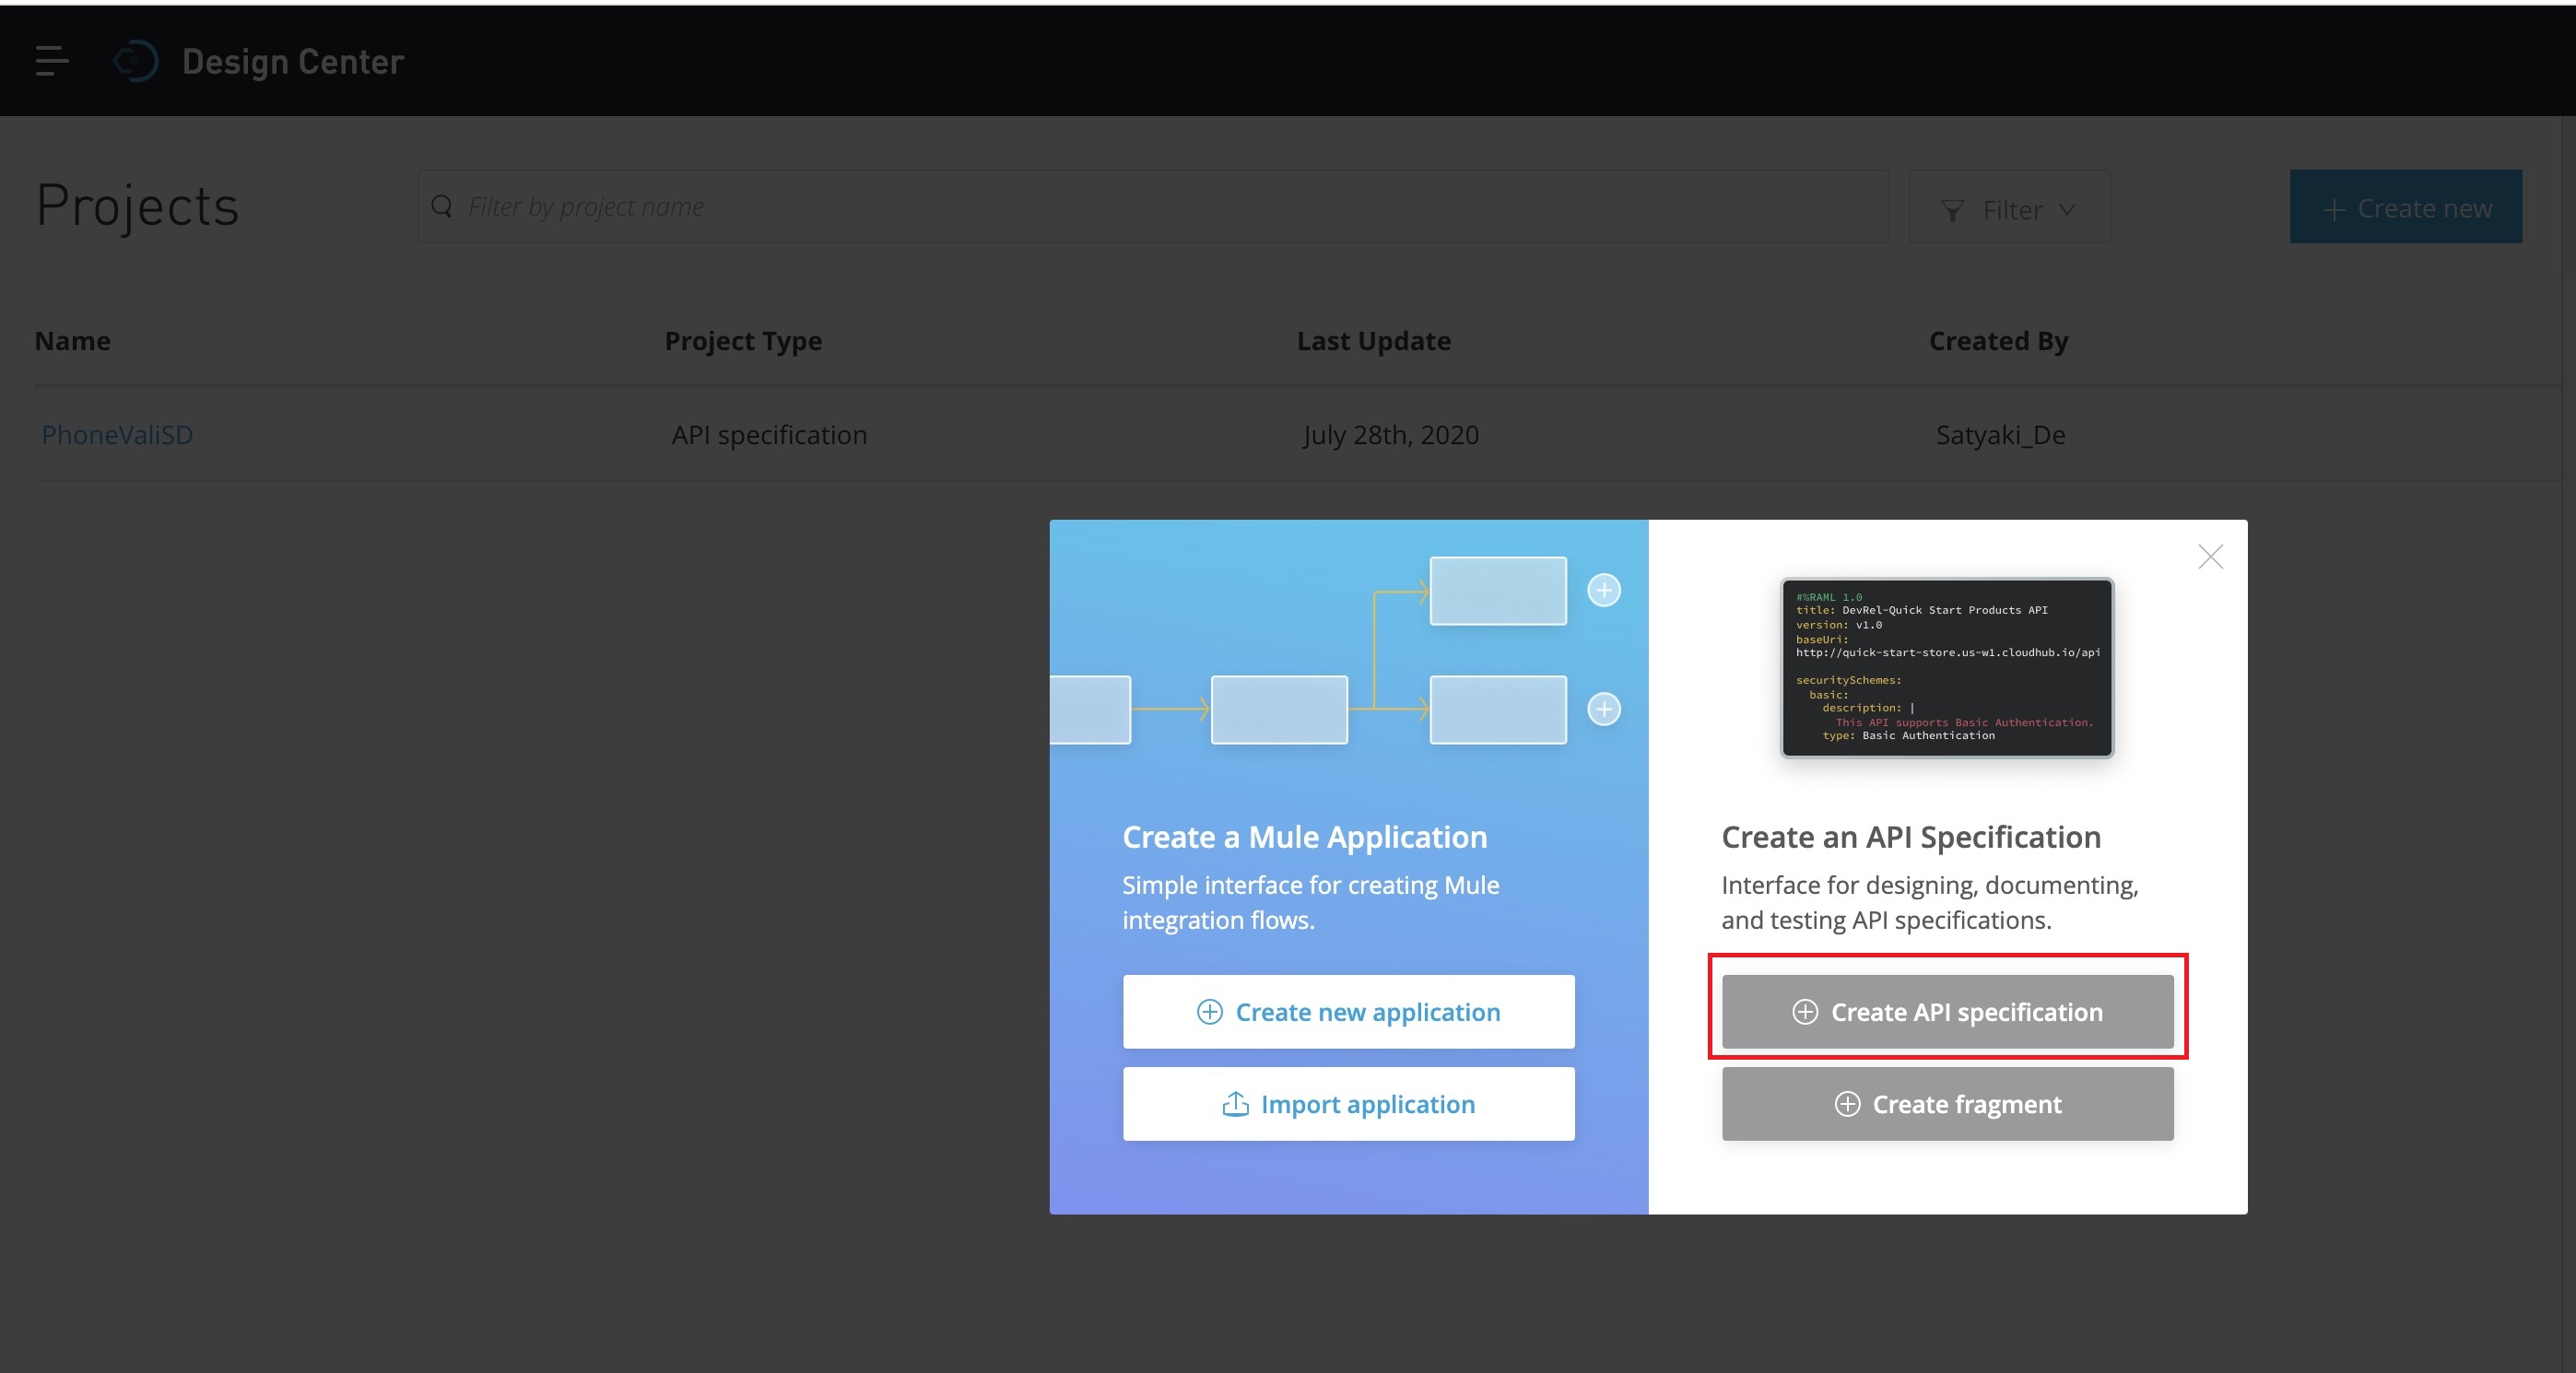
This will prompt you the next screen –
Now, you need to create the – “Create API specification” as marked in the RED square box. And, that will prompt you the following screen –
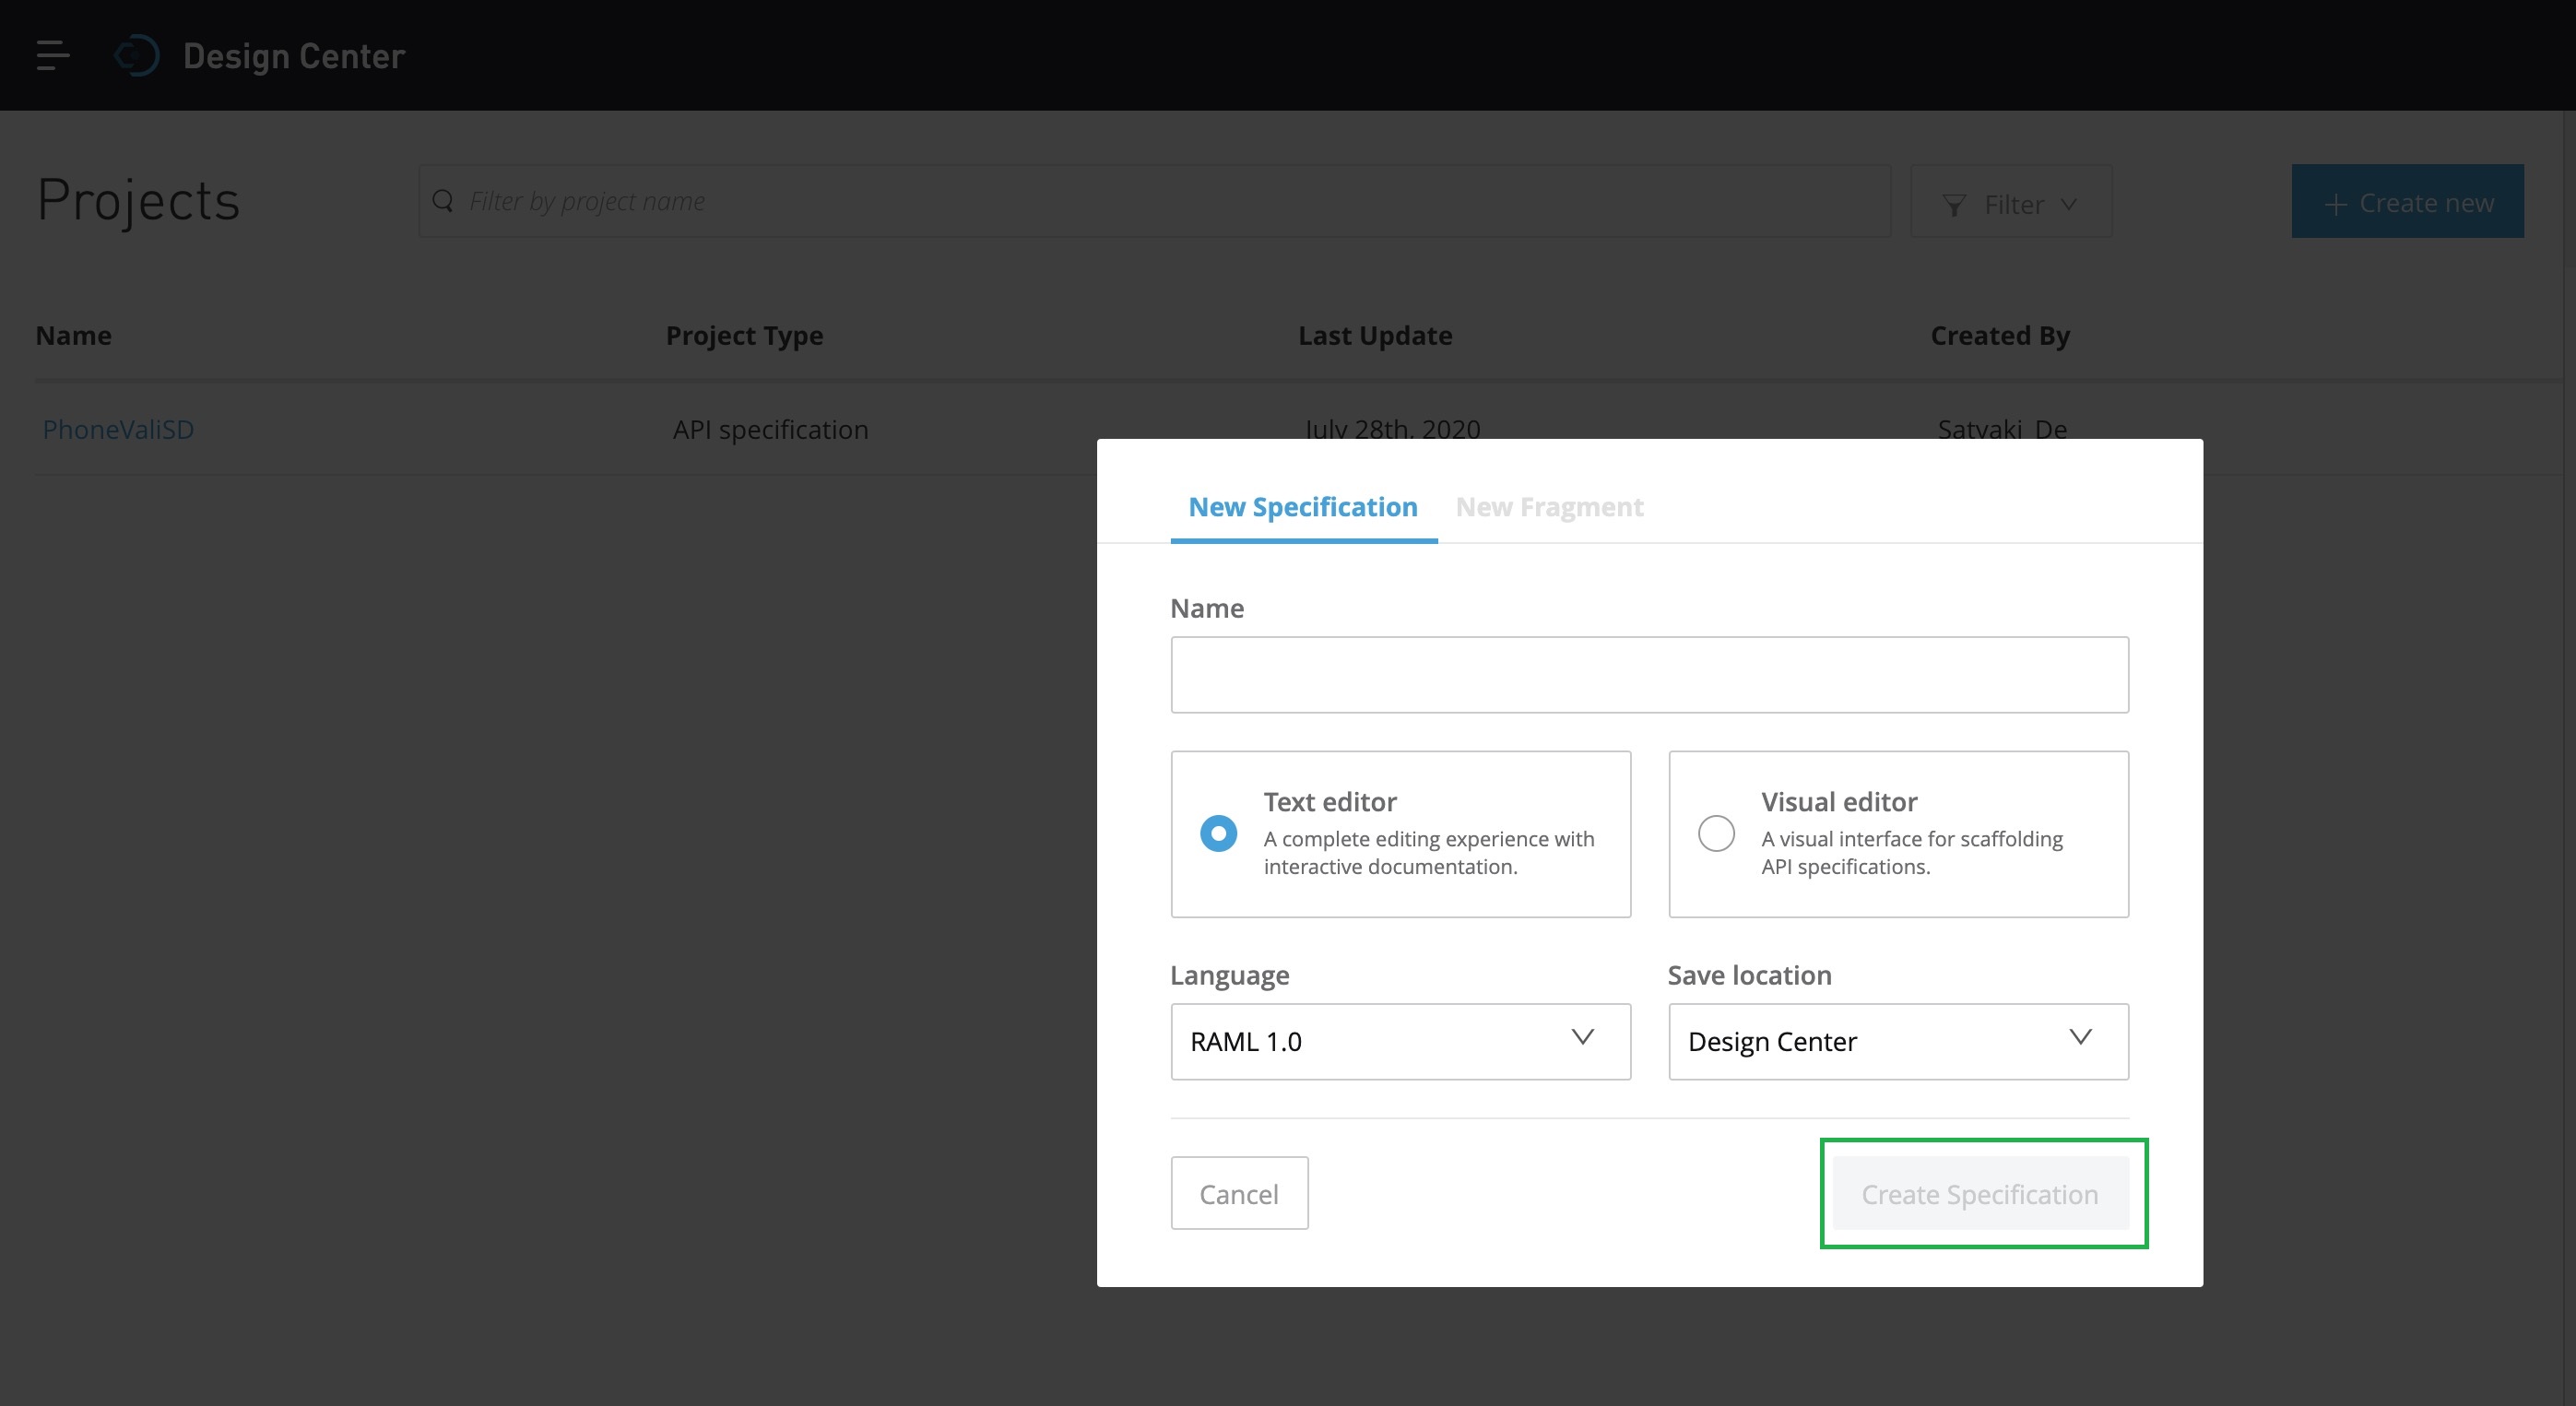
You have to provide a meaningful name of our API & you can choose either Text or Visual editor. For this task, we’ll be selecting the Text Editor. And we’ll select RAML 1.0 as our preferred language. Once, we provide all the relevant information, the “Create Specification” button marked in Green will be activated. And then you need to click it. It will lead you to the next screen –
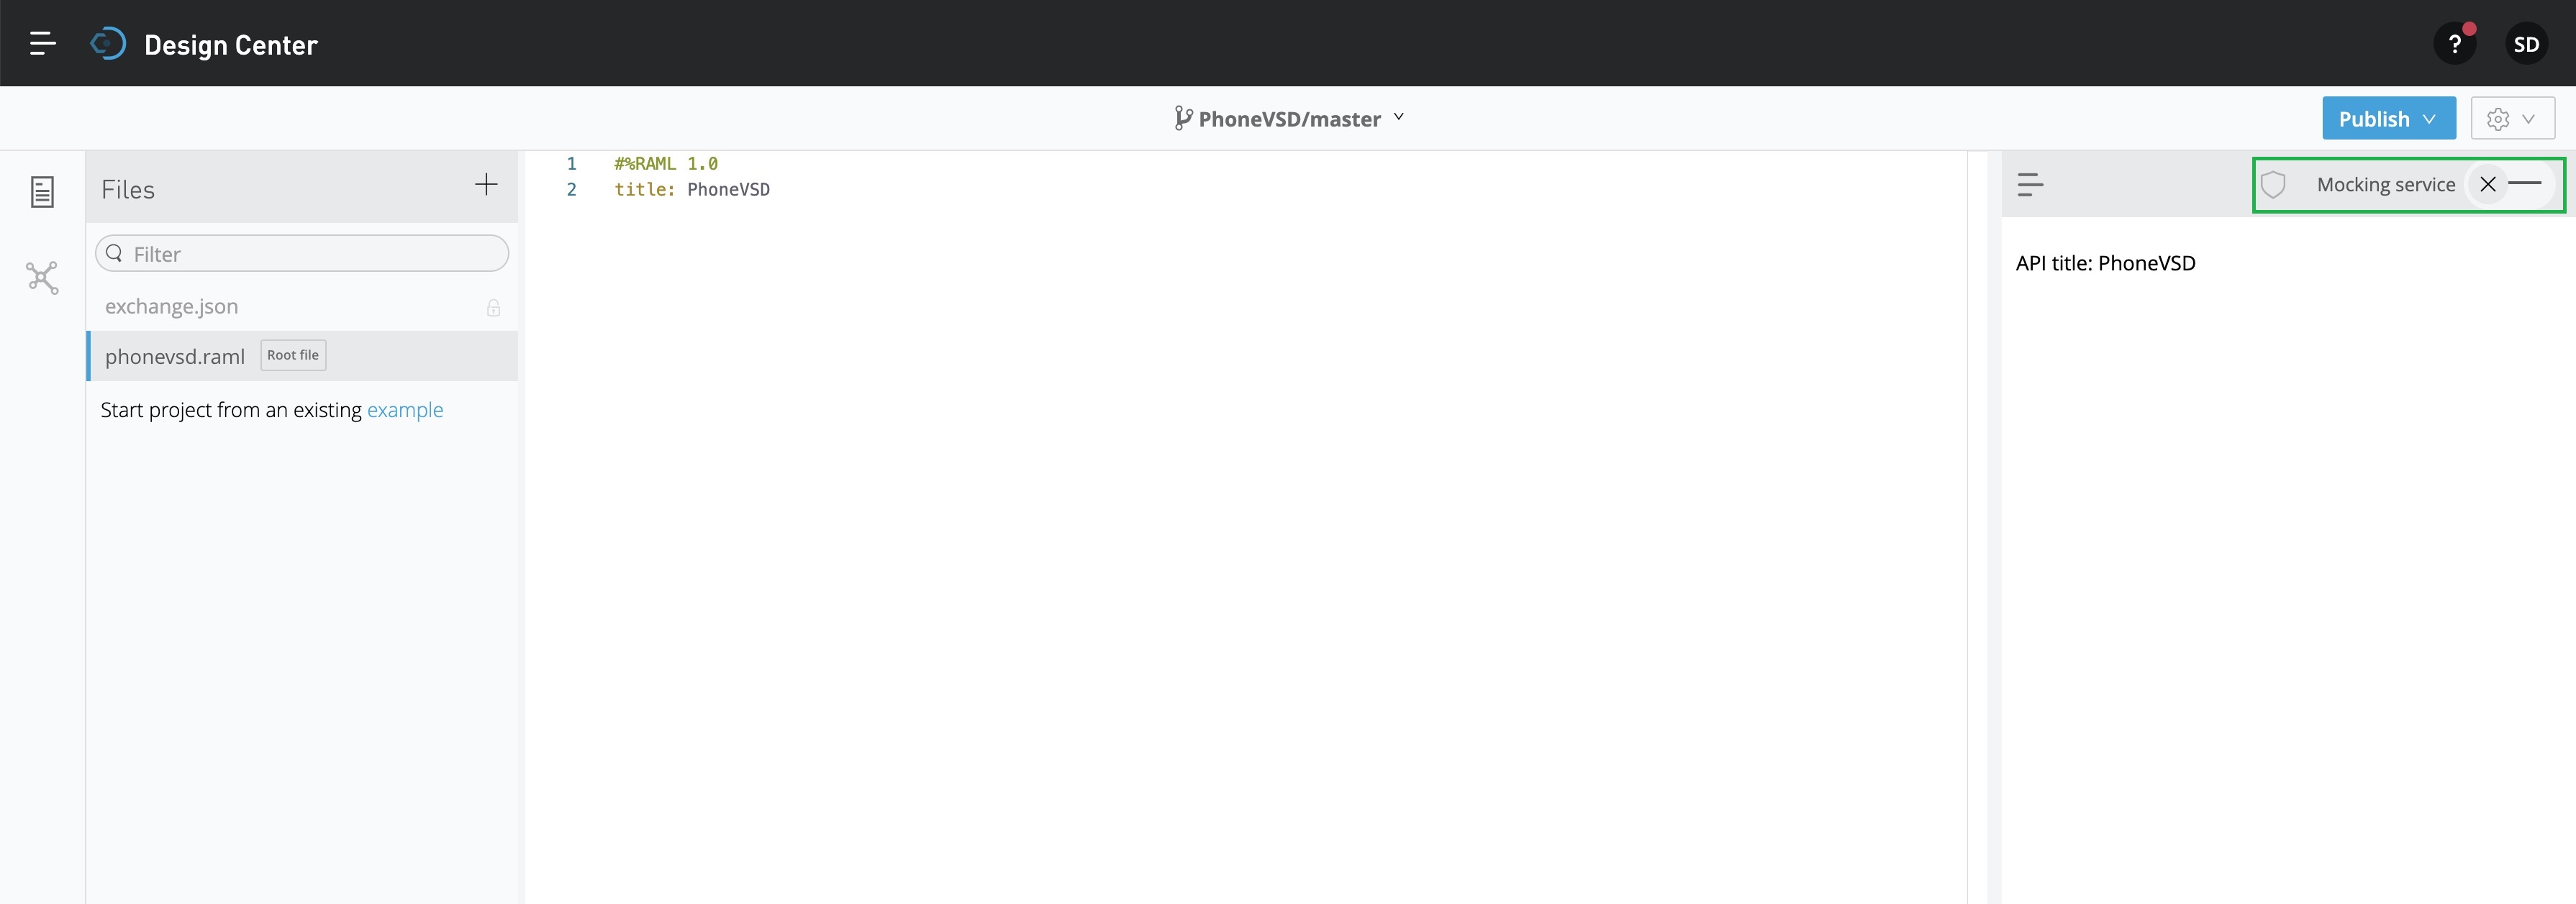
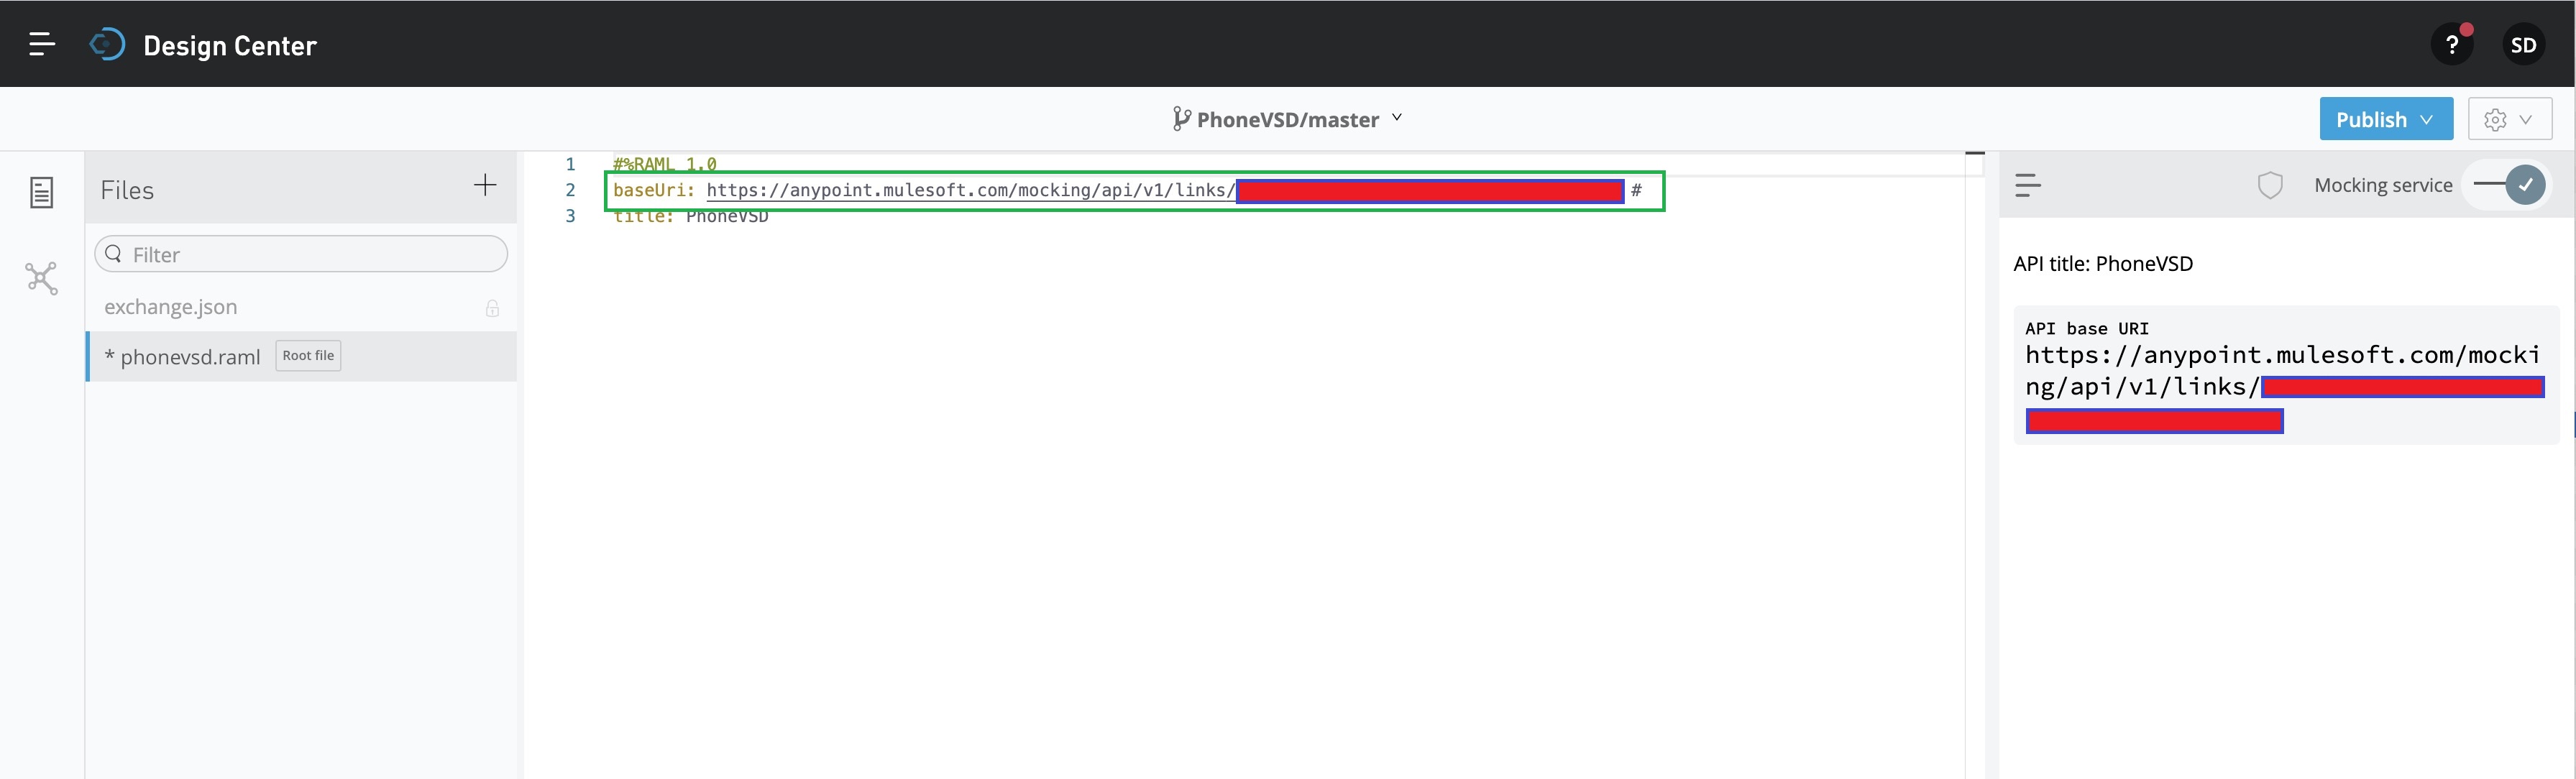
Since we’ll be preparing this for mock API, we need to activate that by clicking the toggle button marked in the GREEN square box on the top-right side. And, this will generate an automated baseUri script as shown below –
Now, we’re ready to develop our RAML code for the mock API. Let’s look into the RAML code.
1. phonevalisd.raml (This is the mock API script, which will send the response of an API request by returning a mock JSON if successful conditions met.)
#%RAML 1.0# Created By - Satyaki De# Date: 01-Mar-2020# Description: This is an Mock API
baseUri: https://anypoint.mulesoft.com/mocking/api/v1/links/09KK0pos-1080-4049-9e04-a093456a64a8/#
title: PhoneVSD
securitySchemes:
    basic :
        type: Basic Authentication
displayName: Satyaki's Basic Authentication
description: API Only works with the basic authentication
protocols:
- HTTP
description: This is a REST API Json base service to verify any phone numbers.
documentation:
- title: PHONE VERIFY API
content: This is a Mock API, which will simulate the activity of a Phone Validation API.
types:
apiresponse:
properties:
valid: boolean
number: string
local_format: string
international_format: string
country_prefix: string
country_code: string
country_name: string
location: string
carrier: string
line_type: string
/validate:
get:
queryParameters:
access_key: string
number: string
country_code: string
format: string
description: For Validating the phone
displayName: Validate phone
protocols:
- HTTP
responses:
      403:
        body:
          application/json:
            properties:
              message: string
            example:
              {
                message : "Resource does not exists!"
              }
      400:
        body:
          application/json:
            properties:
              message: string
            example:
              {
                message : "API Key is invalid!"
              }
      200:
        body:
          application/json:
            type: apiresponse
            example:
              {
                "valid":true,
                "number":"17579758240",
                "local_format":"7579758240",
                "international_format":"+17579758240",
                "country_prefix":"+1",
                "country_code":"US",
                "country_name":"United States of America",
                "location":"Nwptnwszn1",
                "carrier":"MetroPCS Communications Inc.",
                "line_type":"mobile"
              }
Let’s quickly explore the critical snippet from the above script.
We’ve created a provision for a few specific cases of response as part of our business logic & standards.
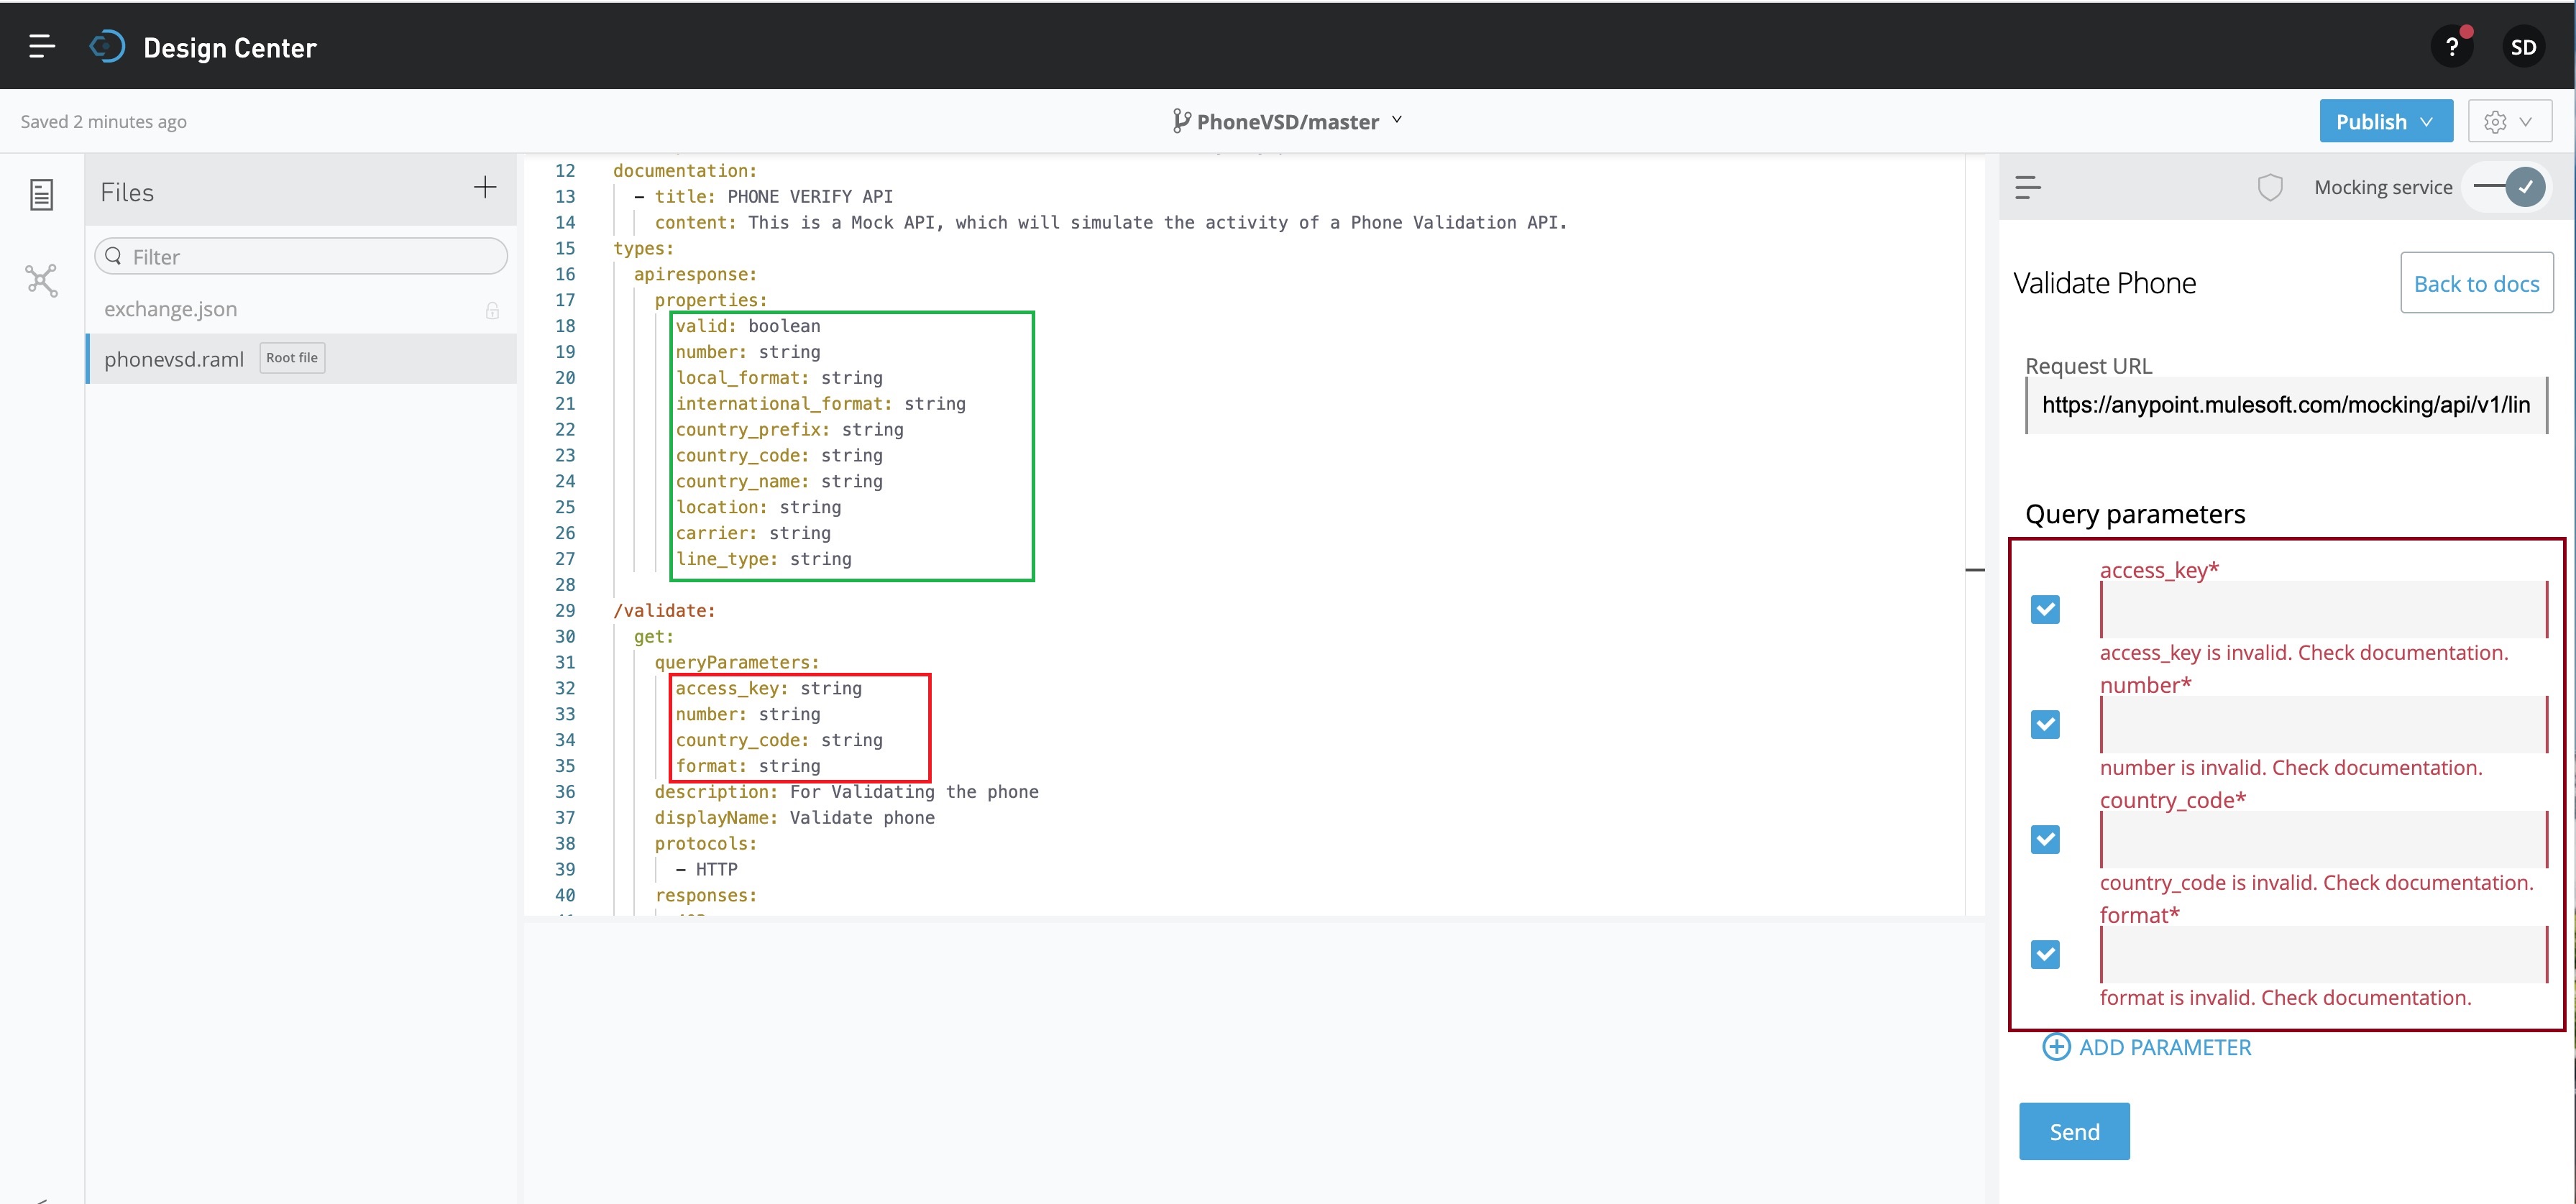
Once, we’re done with our coding, we need to focus on two places as shown in the below picture –
The snippet marked in RED square box, identifying our mandatory input parameters shown in the code as well as the right-hand side of the walls.
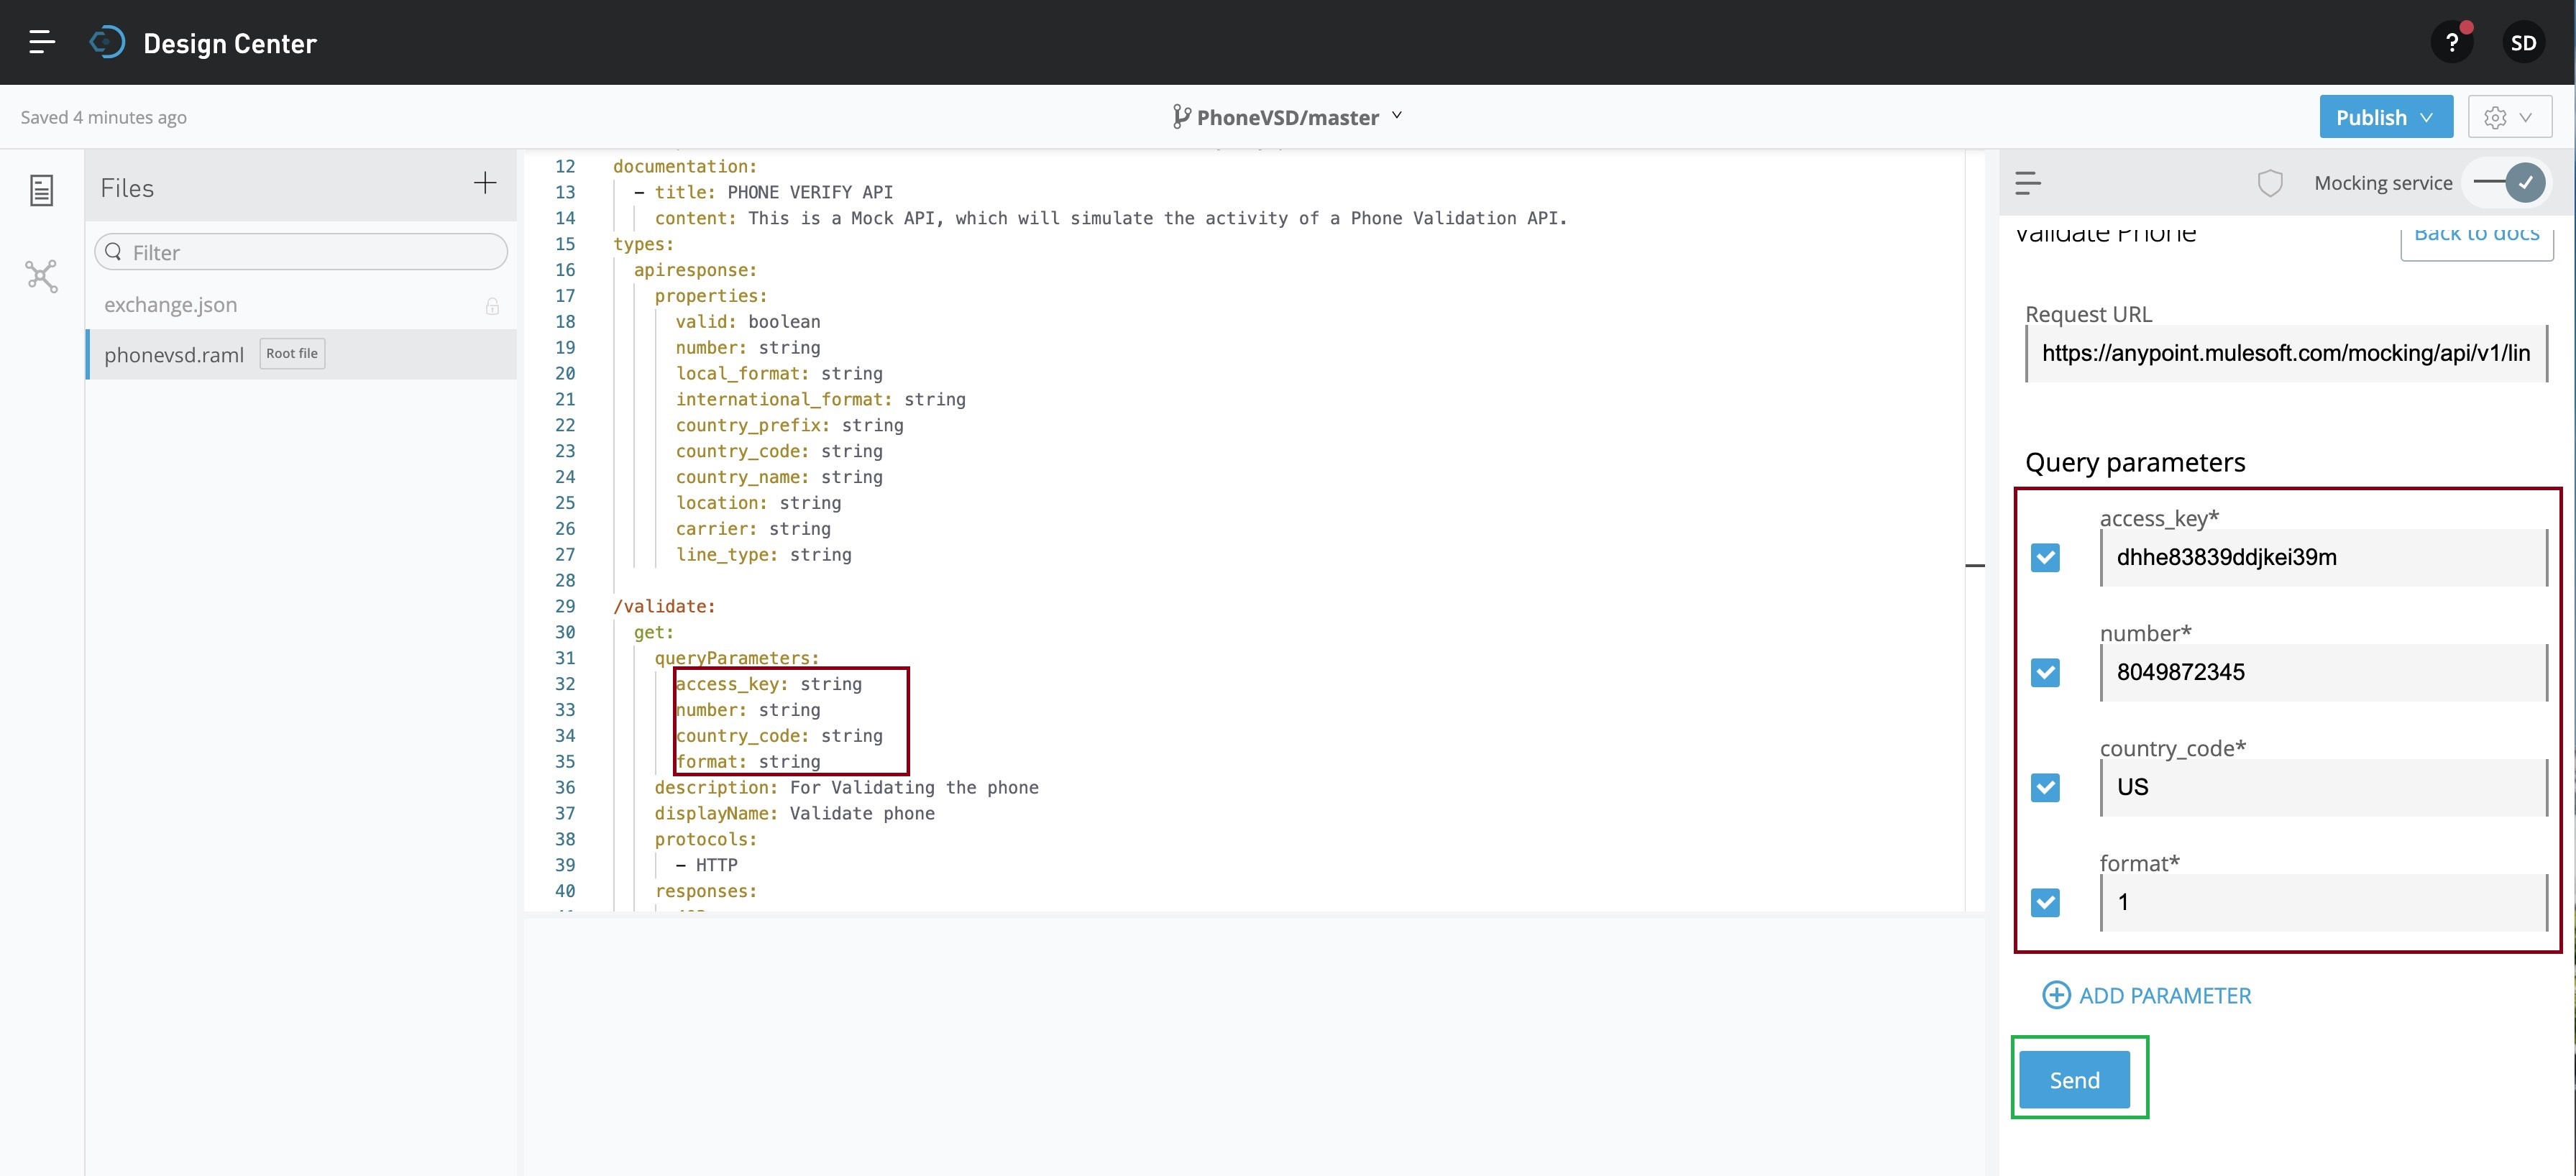
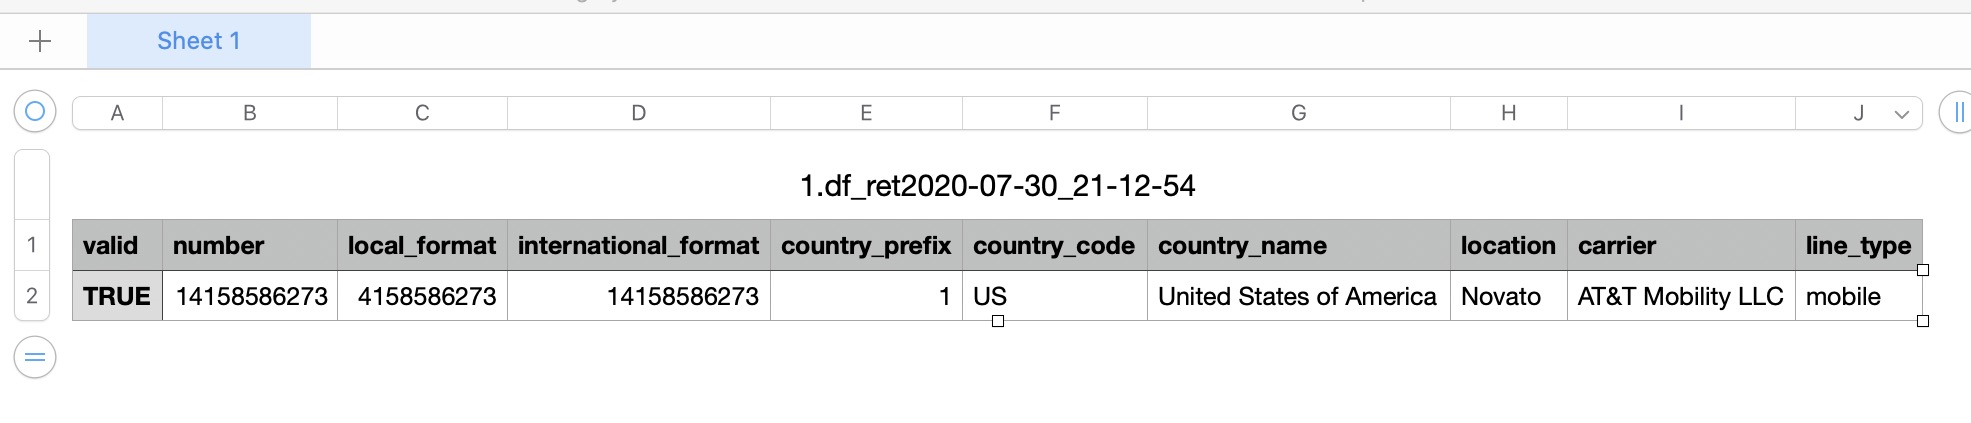
To test this mock API locally, you can pass these key parameters as follows –
Now, you have to click the Send button marked in a GREEN square box. This will send your query parameters & as per our API response, you can see the output just below the Send button as follows –
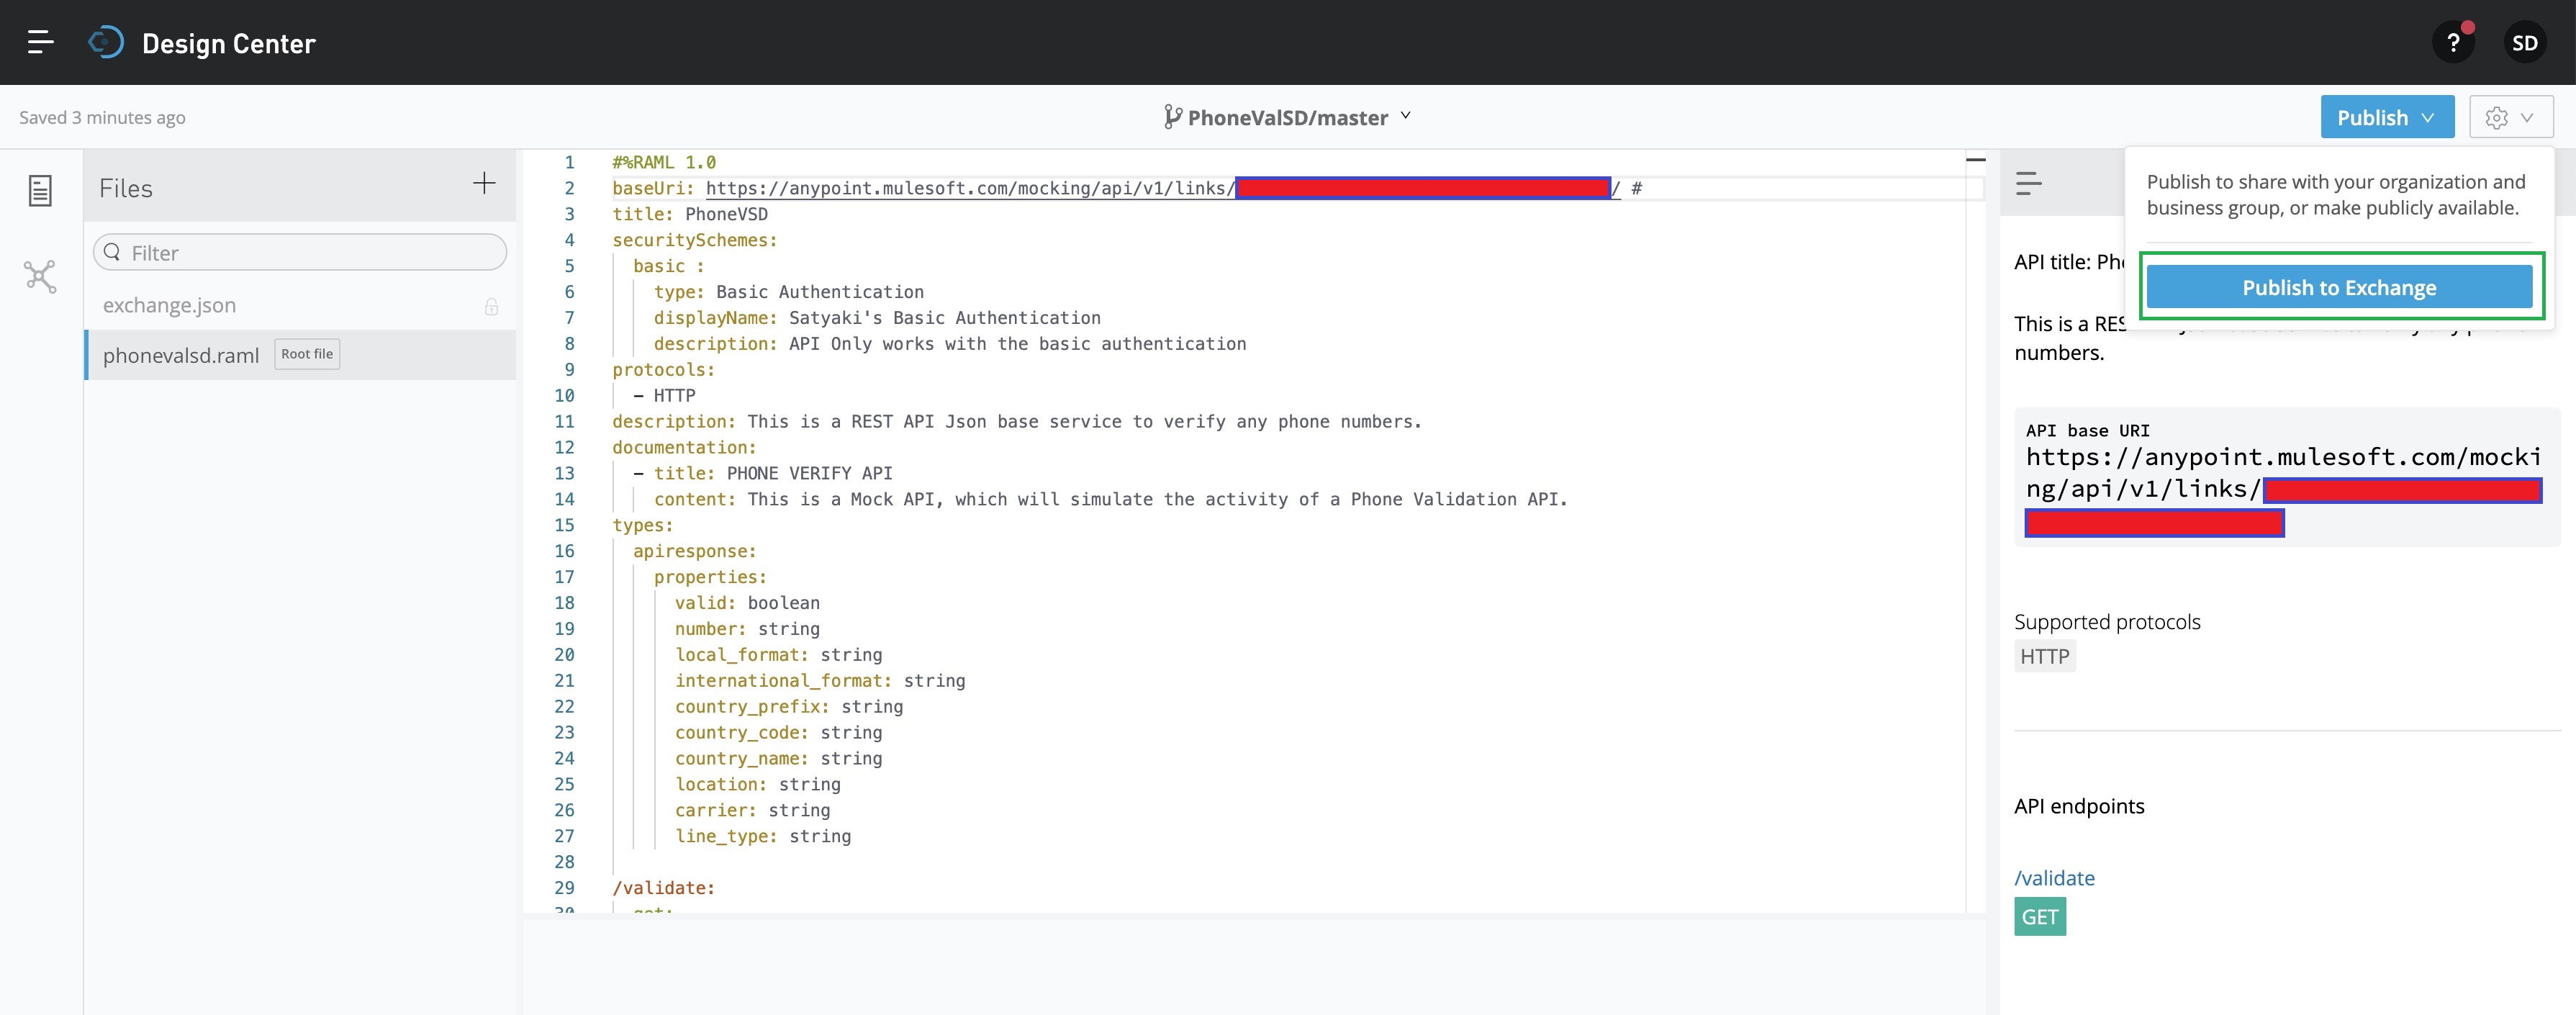
Now, we’re good to publish this mock API in the Mulesoft Anywhere portal. This will help us to test it from an external application i.e., Python-based application for our case. So, click the “Publish” button highlighted with the Blue square box. That will prompt the following screen –
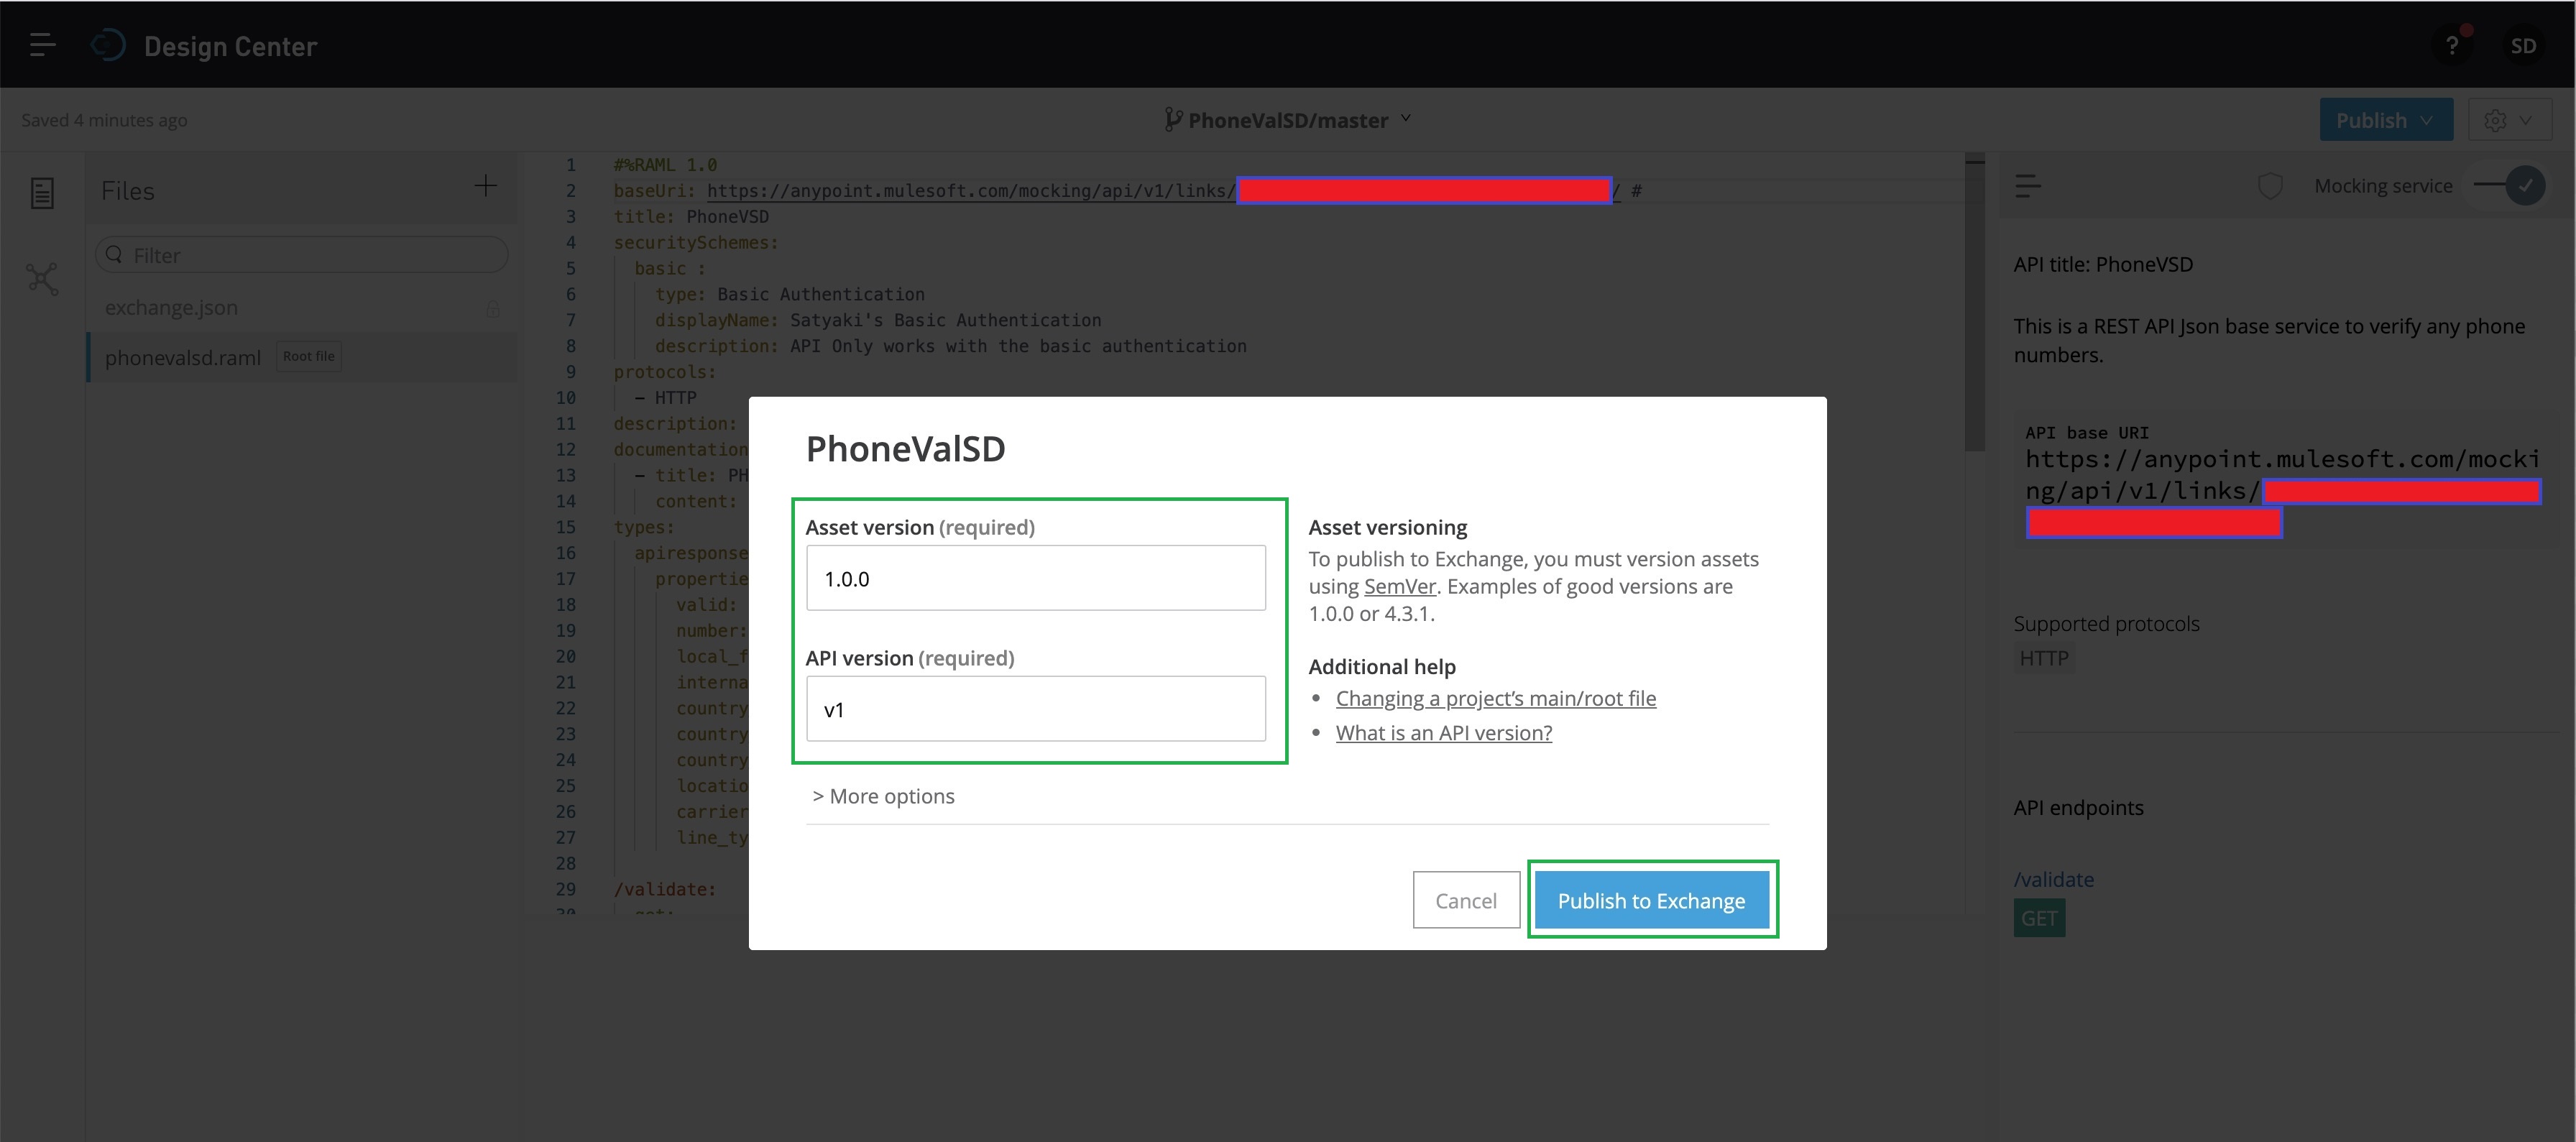
Now, we’ll click the “Public to Exchange” button marked with the GREEN square box. This will prompt the next screen as shown below –
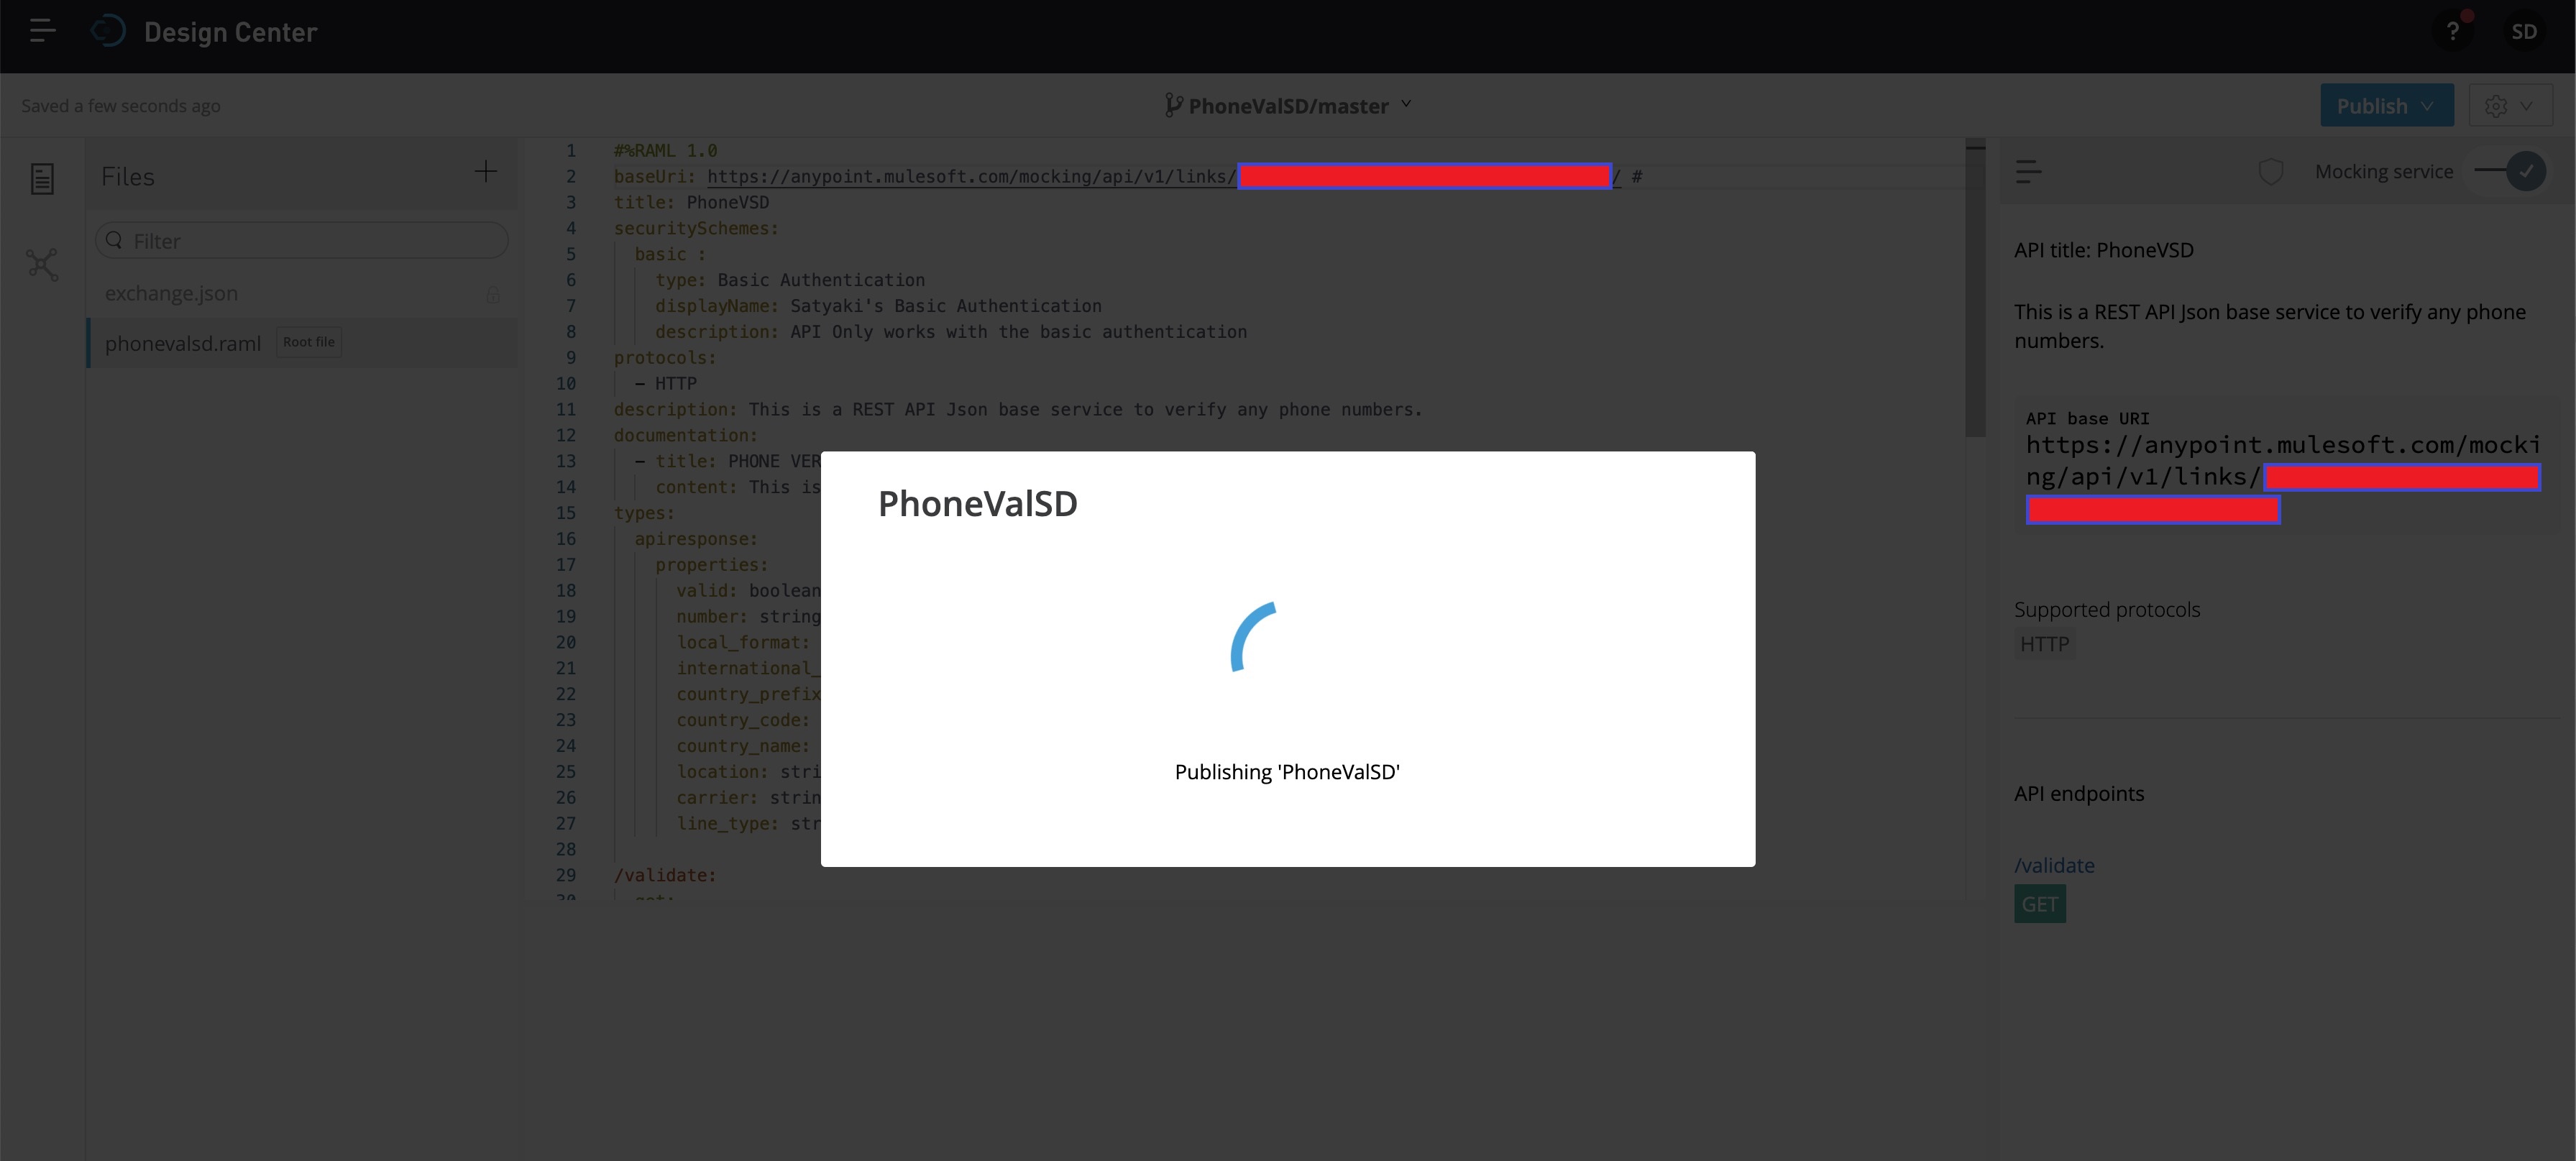
Now, you need to fill up the relevant details & then click – “Publish to Exchange,” as shown above. And, that will lead to the following screen –
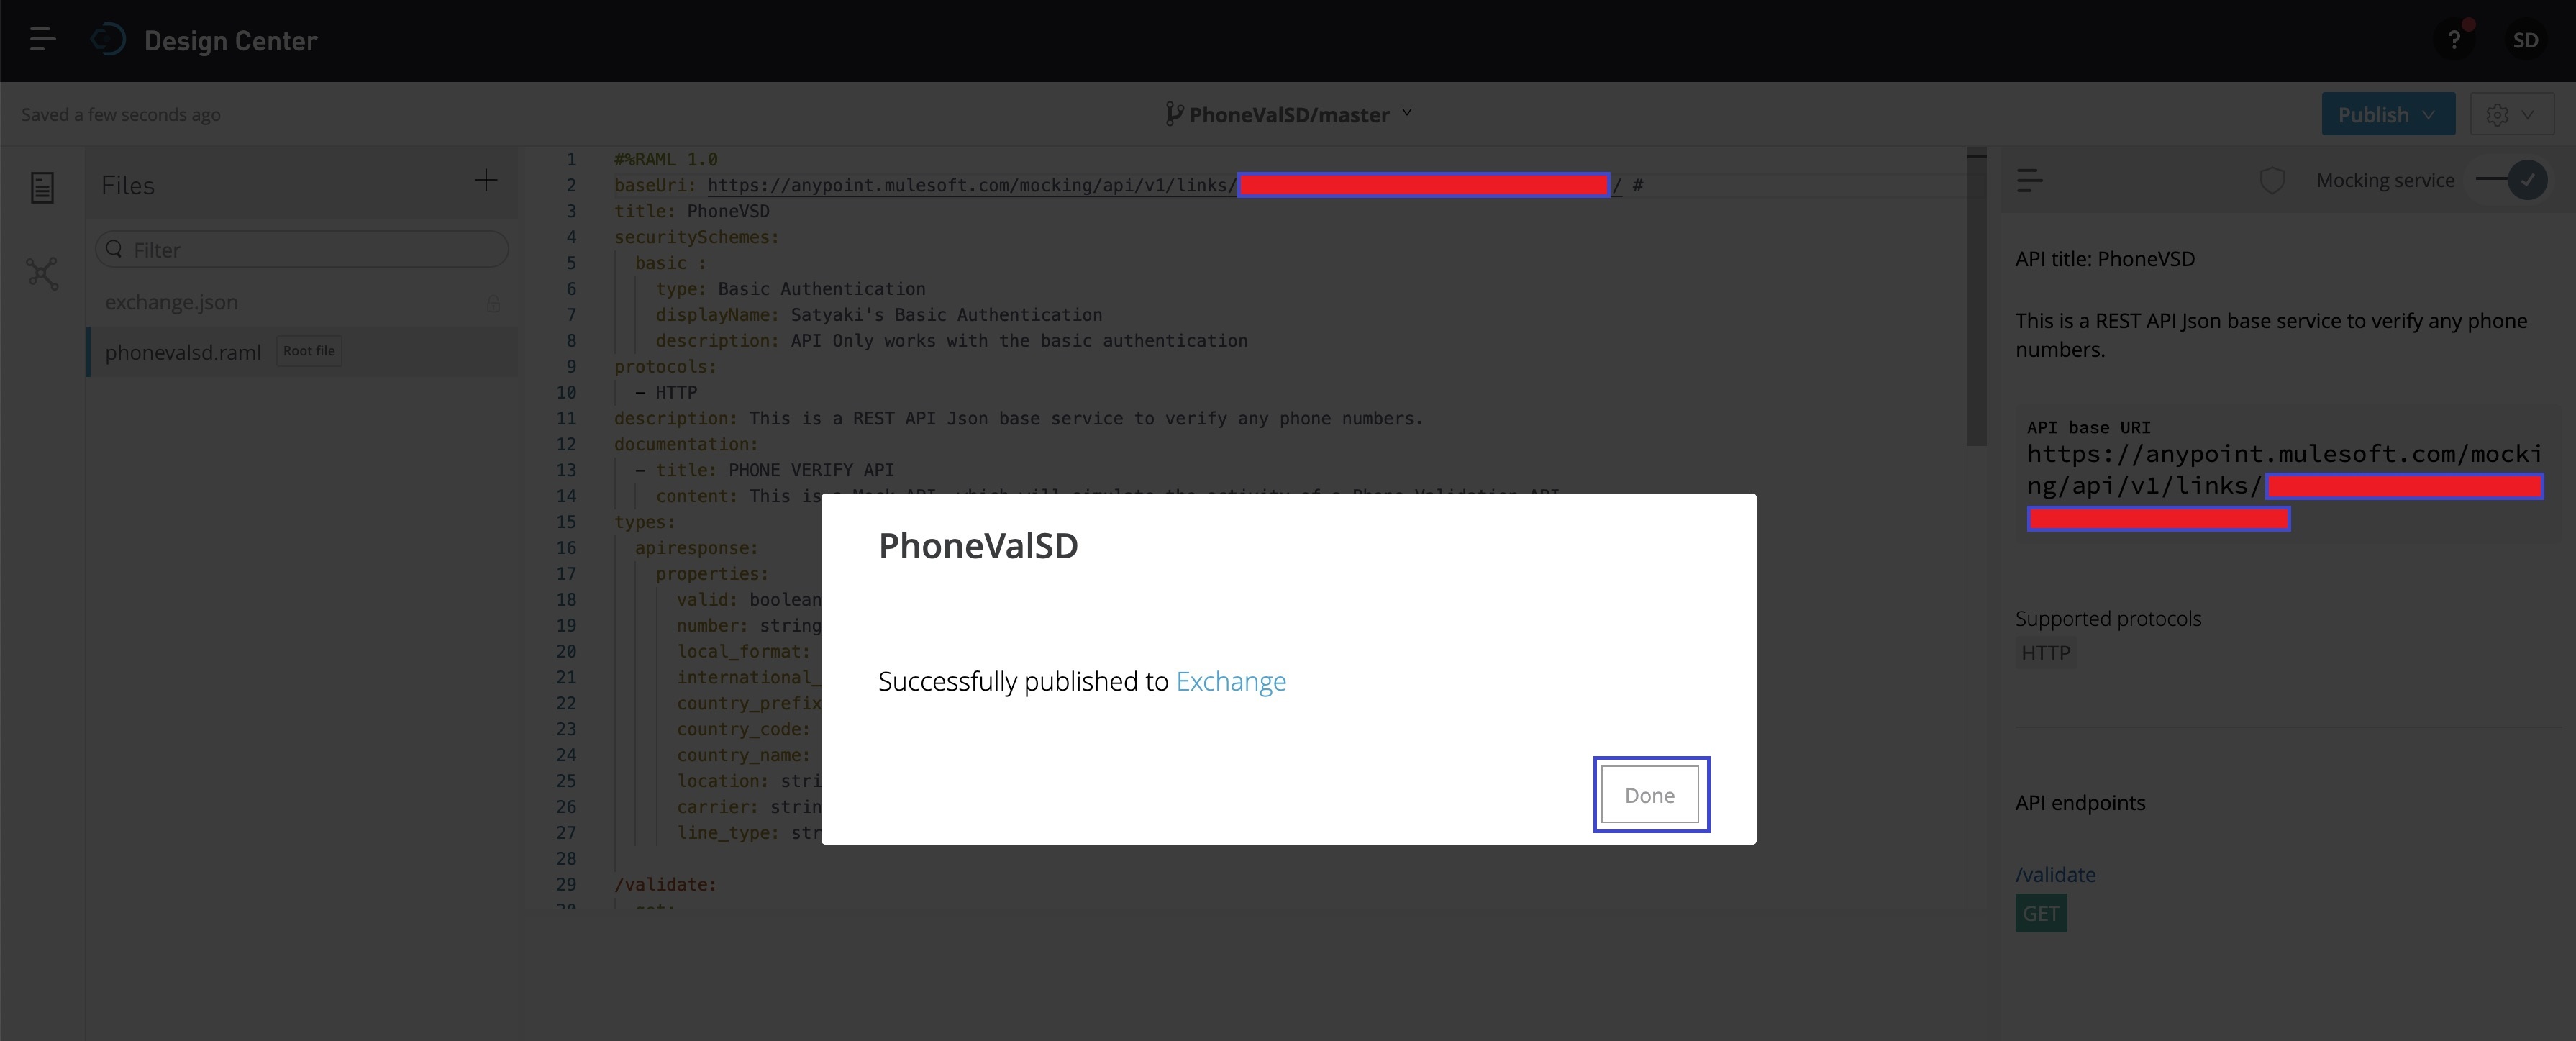
And, after a few second you will see the next screen –
Now, you can click “Done” to close this popup. And, to verify the status, you can check it by clicking the top-left side of the code-editor & then click “Design Center” as shown below –
So, we’re done with our Mulesoft mock API design & deployment. Let’s test it from our Python application. We’ll be only discussing the key snippets here.
2. clsConfig.py (This is the parameter file for our mock API script.)
################################################## Written By: SATYAKI DE ######## Written On: 04-Apr-2020 ######## ######## Objective: This script is a config ######## file, contains all the keys for ######## Mulesoft Mock API. Application will ######## process these information & perform ######## the call to our newly developed Mock ######## API in Mulesoft. ##################################################importosimportplatformasplclassclsConfig(object):
Curr_Path = os.path.dirname(os.path.realpath(__file__))
os_det = pl.system()
if os_det =="Windows":
sep ='\\'else:
sep ='/'
config = {
'APP_ID': 1,
'URL': "https://anypoint.mulesoft.com/mocking/api/v1/links/a23e4e71-9c25-317b-834b-10b0debc3a30/validate",
'CLIENT_SECRET': 'a12345670bacb1e3cec55e2f1234567d',
'API_TYPE': "application/json",
'CACHE': "no-cache",
'CON': "keep-alive",
'ARCH_DIR': Curr_Path + sep +'arch'+ sep,
'PROFILE_PATH': Curr_Path + sep +'profile'+ sep,
'LOG_PATH': Curr_Path + sep +'log'+ sep,
'REPORT_PATH': Curr_Path + sep +'report',
'SRC_PATH': Curr_Path + sep +'Src_File'+ sep,
'APP_DESC_1': 'Mule Mock API Calling!',
'DEBUG_IND': 'N',
'INIT_PATH': Curr_Path
}
Today, We’ll be exploring the potential business growth factor using the “Linear-Regression Machine Learning” model. We’ve prepared a set of dummy data & based on that, we’ll predict.
Let’s explore a few sample data –
So, based on these data, we would like to predict YearlyAmountSpent dependent on any one of the following features, i.e. [ Time On App / Time On Website / Flipkart Membership Duration (In Year) ].
You need to install the following packages –
pip install pandas
pip install matplotlib
pip install sklearn
We’ll be discussing only the main calling script & class script. However, we’ll be posting the parameters without discussing it. And, we won’t discuss clsL.py as we’ve already discussed that in our previous post.
1. clsConfig.py (This script contains all the parameter details.)
#################################################### Written By: SATYAKI DE ######## Written On: 15-May-2020 ######## ######## Objective: This script is a config ######## file, contains all the keys for ######## Machine-Learning. Application will ######## process these information & perform ######## various analysis on Linear-Regression. ####################################################importosimportplatformasplclassclsConfig(object):
Curr_Path = os.path.dirname(os.path.realpath(__file__))
os_det = pl.system()
if os_det =="Windows":
sep ='\\'else:
sep ='/'
config = {
'APP_ID': 1,
'ARCH_DIR': Curr_Path + sep +'arch'+ sep,
'PROFILE_PATH': Curr_Path + sep +'profile'+ sep,
'LOG_PATH': Curr_Path + sep +'log'+ sep,
'REPORT_PATH': Curr_Path + sep +'report',
'FILE_NAME': Curr_Path + sep +'Data'+ sep +'FlipkartCustomers.csv',
'SRC_PATH': Curr_Path + sep +'Data'+ sep,
'APP_DESC_1': 'IBM Watson Language Understand!',
'DEBUG_IND': 'N',
'INIT_PATH': Curr_Path
}
2. clsLinearRegression.py (This is the main script, which will invoke the Machine-Learning API & return 0 if successful.)
################################################## Written By: SATYAKI DE ######## Written On: 15-May-2020 ######## Modified On 15-May-2020 ######## ######## Objective: Main scripts for Linear ######## Regression. ##################################################importpandasaspimportnumpyasnpimportregexasreimportmatplotlib.pyplotaspltfromclsConfigimport clsConfig as cf
# %matplotlib inline -- for Jupyter NotebookclassclsLinearRegression:
def__init__(self):
self.fileName = cf.config['FILE_NAME']
defpredictResult(self):
try:
inputFileName =self.fileName
# Reading from Input File
df = p.read_csv(inputFileName)
print()
print('Projecting sample rows: ')
print(df.head())
print()
x_row = df.shape[0]
x_col = df.shape[1]
print('Total Number of Rows: ', x_row)
print('Total Number of columns: ', x_col)
# Adding Features
x = df[['TimeOnApp', 'TimeOnWebsite', 'FlipkartMembershipInYear']]
# Target Variable - Trying to predict
y = df['YearlyAmountSpent']
# Now Train-Test Split of your source datafromsklearn.model_selectionimport train_test_split
# test_size => % of allocated data for your test cases# random_state => A specific set of random split on your data
X_train, X_test, Y_train, Y_test = train_test_split(x, y, test_size=0.4, random_state=101)
# Importing Modelfromsklearn.linear_modelimport LinearRegression
# Creating an Instance
lm = LinearRegression()
# Train or Fit my model on Training Data
lm.fit(X_train, Y_train)
# Creating a prediction value
flipKartSalePrediction = lm.predict(X_test)
# Creating a scatter plot based on Actual Value & Predicted Value
plt.scatter(Y_test, flipKartSalePrediction)
# Adding meaningful Label
plt.xlabel('Actual Values')
plt.ylabel('Predicted Values')
# Checking Individual Metricsfromsklearnimport metrics
print()
mea_val = metrics.mean_absolute_error(Y_test, flipKartSalePrediction)
print('Mean Absolute Error (MEA): ', mea_val)
mse_val = metrics.mean_squared_error(Y_test, flipKartSalePrediction)
print('Mean Square Error (MSE): ', mse_val)
rmse_val = np.sqrt(metrics.mean_squared_error(Y_test, flipKartSalePrediction))
print('Square root Mean Square Error (RMSE): ', rmse_val)
print()
# Check Variance Score - R^2 Valueprint('Variance Score:')
var_score =str(round(metrics.explained_variance_score(Y_test, flipKartSalePrediction) *100, 2)).strip()
print('Our Model is', var_score, '% accurate. ')
print()
# Finding Coeficent on X_train.columnsprint()
print('Finding Coeficent: ')
cedf = p.DataFrame(lm.coef_, x.columns, columns=['Coefficient'])
print('Printing the All the Factors: ')
print(cedf)
print()
# Getting the Max Value from it
cedf['MaxFactorForBusiness'] = cedf['Coefficient'].max()
# Filtering the max Value to identify the biggest Business factor
dfMax = cedf[(cedf['MaxFactorForBusiness'] == cedf['Coefficient'])]
# Dropping the derived column
dfMax.drop(columns=['MaxFactorForBusiness'], inplace=True)
dfMax = dfMax.reset_index()
print(dfMax)
# Extracting Actual Business Factor from Pandas dataframe
str_factor_temp =str(dfMax.iloc[0]['index'])
str_factor = re.sub("([a-z])([A-Z])", "\g<1> \g<2>", str_factor_temp)
str_value =str(round(float(dfMax.iloc[0]['Coefficient']),2))
print()
print('*'*80)
print('Major Busienss Activity - (', str_factor, ') - ', str_value, '%')
print('*'*80)
print()
# This is require when you are trying to print from conventional# front & not using Jupyter notebook.
plt.show()
return0exceptExceptionas e:
x =str(e)
print('Error : ', x)
return1
Our application creating a subset of the main datagram, which contains all the features.
# Target Variable - Trying to predicty = df['YearlyAmountSpent']
Now, the application is setting the target variable into ‘Y.’
# Now Train-Test Split of your source datafrom sklearn.model_selection import train_test_split# test_size => % of allocated data for your test cases# random_state => A specific set of random split on your dataX_train, X_test, Y_train, Y_test = train_test_split(x, y, test_size=0.4, random_state=101)
As per “Supervised Learning,” our application is splitting the dataset into two subsets. One is to train the model & another segment is to test your final model. However, you can divide the data into three sets that include the performance statistics for a large dataset. In our case, we don’t need that as this data is significantly less.
# Train or Fit my model on Training Datalm.fit(X_train, Y_train)
Our application is now training/fit the data into the model.
# Creating a scatter plot based on Actual Value & Predicted Valueplt.scatter(Y_test, flipKartSalePrediction)
Our application projected the outcome based on the predicted data in a scatterplot graph.
Also, the following concepts captured by using our program. For more details, I’ve provided the external link for your reference –
Finally, extracting the coefficient to find out, which particular feature will lead Flikkart for better sale & growth by taking the maximum of coefficient value month the all features are as shown below –
cedf = p.DataFrame(lm.coef_, x.columns, columns=['Coefficient'])# Getting the Max Value from itcedf['MaxFactorForBusiness'] = cedf['Coefficient'].max()# Filtering the max Value to identify the biggest Business factordfMax = cedf[(cedf['MaxFactorForBusiness'] == cedf['Coefficient'])]# Dropping the derived columndfMax.drop(columns=['MaxFactorForBusiness'], inplace=True)dfMax = dfMax.reset_index()
Note that we’ve used a regular expression to split the camel-case column name from our feature & represent that with a much more meaningful name without changing the column name.
# Extracting Actual Business Factor from Pandas dataframestr_factor_temp = str(dfMax.iloc[0]['index'])str_factor = re.sub("([a-z])([A-Z])", "\g<1> \g<2>", str_factor_temp)str_value = str(round(float(dfMax.iloc[0]['Coefficient']),2))print('Major Busienss Activity - (', str_factor, ') - ', str_value, '%')
3. callLinear.py (This is the first calling script.)
################################################## Written By: SATYAKI DE ######## Written On: 15-May-2020 ######## Modified On 15-May-2020 ######## ######## Objective: Main calling scripts. ##################################################fromclsConfigimport clsConfig as cf
importclsLasclimportloggingimportdatetimeimportclsLinearRegressionascw# Disbling Warningdefwarn(*args, **kwargs):
passimportwarnings
warnings.warn = warn
# Lookup functions from# Azure cloud SQL DB
var = datetime.datetime.now().strftime("%Y-%m-%d_%H-%M-%S")
defmain():
try:
ret_1 =0
general_log_path =str(cf.config['LOG_PATH'])
# Enabling Logging Info
logging.basicConfig(filename=general_log_path +'MachineLearning_LinearRegression.log', level=logging.INFO)
# Initiating Log Class
l = cl.clsL()
# Moving previous day log files to archive directory
log_dir = cf.config['LOG_PATH']
curr_ver =datetime.datetime.now().strftime("%Y-%m-%d")
tmpR0 ="*"*157
logging.info(tmpR0)
tmpR9 ='Start Time: '+str(var)
logging.info(tmpR9)
logging.info(tmpR0)
print("Log Directory::", log_dir)
tmpR1 ='Log Directory::'+ log_dir
logging.info(tmpR1)
print('Machine Learning - Linear Regression Prediction : ')
print('-'*200)
# Create the instance of the Linear-Regression Class
x2 = cw.clsLinearRegression()
ret = x2.predictResult()
if ret ==0:
print('Successful Linear-Regression Prediction Generated!')
else:
print('Failed to generate Linear-Regression Prediction!')
print("-"*200)
print()
print('Finding Analysis points..')
print("*"*200)
logging.info('Finding Analysis points..')
logging.info(tmpR0)
tmpR10 ='End Time: '+str(var)
logging.info(tmpR10)
logging.info(tmpR0)
exceptValueErroras e:
print(str(e))
logging.info(str(e))
exceptExceptionas e:
print("Top level Error: args:{0}, message{1}".format(e.args, e.message))
if __name__ =="__main__":
main()
Key snippet from the above script –
# Create the instance of the Linear-Regressionx2 = cw.clsLinearRegression()ret = x2.predictResult()
In the above snippet, our application initially creating an instance of the main class & finally invokes the “predictResult” method.
Let’s run our application –
Step 1:
First, the application will fetch the following sample rows from our source file – if it is successful.
Step 2:
Then, It will create the following scatterplot by executing the following snippet –
# Creating a scatter plot based on Actual Value & Predicted Valueplt.scatter(Y_test, flipKartSalePrediction)
Note that our model is pretty accurate & it has a balanced success rate compared to our predicted numbers.
Step 3:
Finally, it is successfully able to project the critical feature are shown below –
From the above picture, you can see that our model is pretty accurate (89% approx).
Also, highlighted red square identifying the key-features & their confidence score & finally, the projecting the winner feature marked in green.
So, as per that, we’ve come to one conclusion that Flipkart’s business growth depends on the tenure of their subscriber, i.e., old members are prone to buy more than newer members.
Let’s look into our directory structure –
So, we’ve done it.
I’ll be posting another new post in the coming days. Till then, Happy Avenging! 😀
Note: All the data posted here are representational data & available over the internet & for educational purpose only.
Today, I’ll be discussing the following topic – “How to analyze text using IBM Watson implementing through Python.”
IBM has significantly improved in the field of Visual Image Analysis or Text language analysis using its IBM Watson cloud platform. In this particular topic, we’ll be exploring the natural languages only.
To access IBM API, we need to first create an IBM Cloud account from this site.
Let us quickly go through the steps to create the IBM Language Understanding service. Click the Catalog on top of your browser menu as shown in the below picture –
After that, click the AI option on your left-hand side of the panel marked in RED.
Click the Watson-Studio & later choose the plan. In our case, We’ll select the “Lite” option as IBM provided this platform for all the developers to explore their cloud for free.
Clicking the create option will lead to a blank page of Watson Studio as shown below –
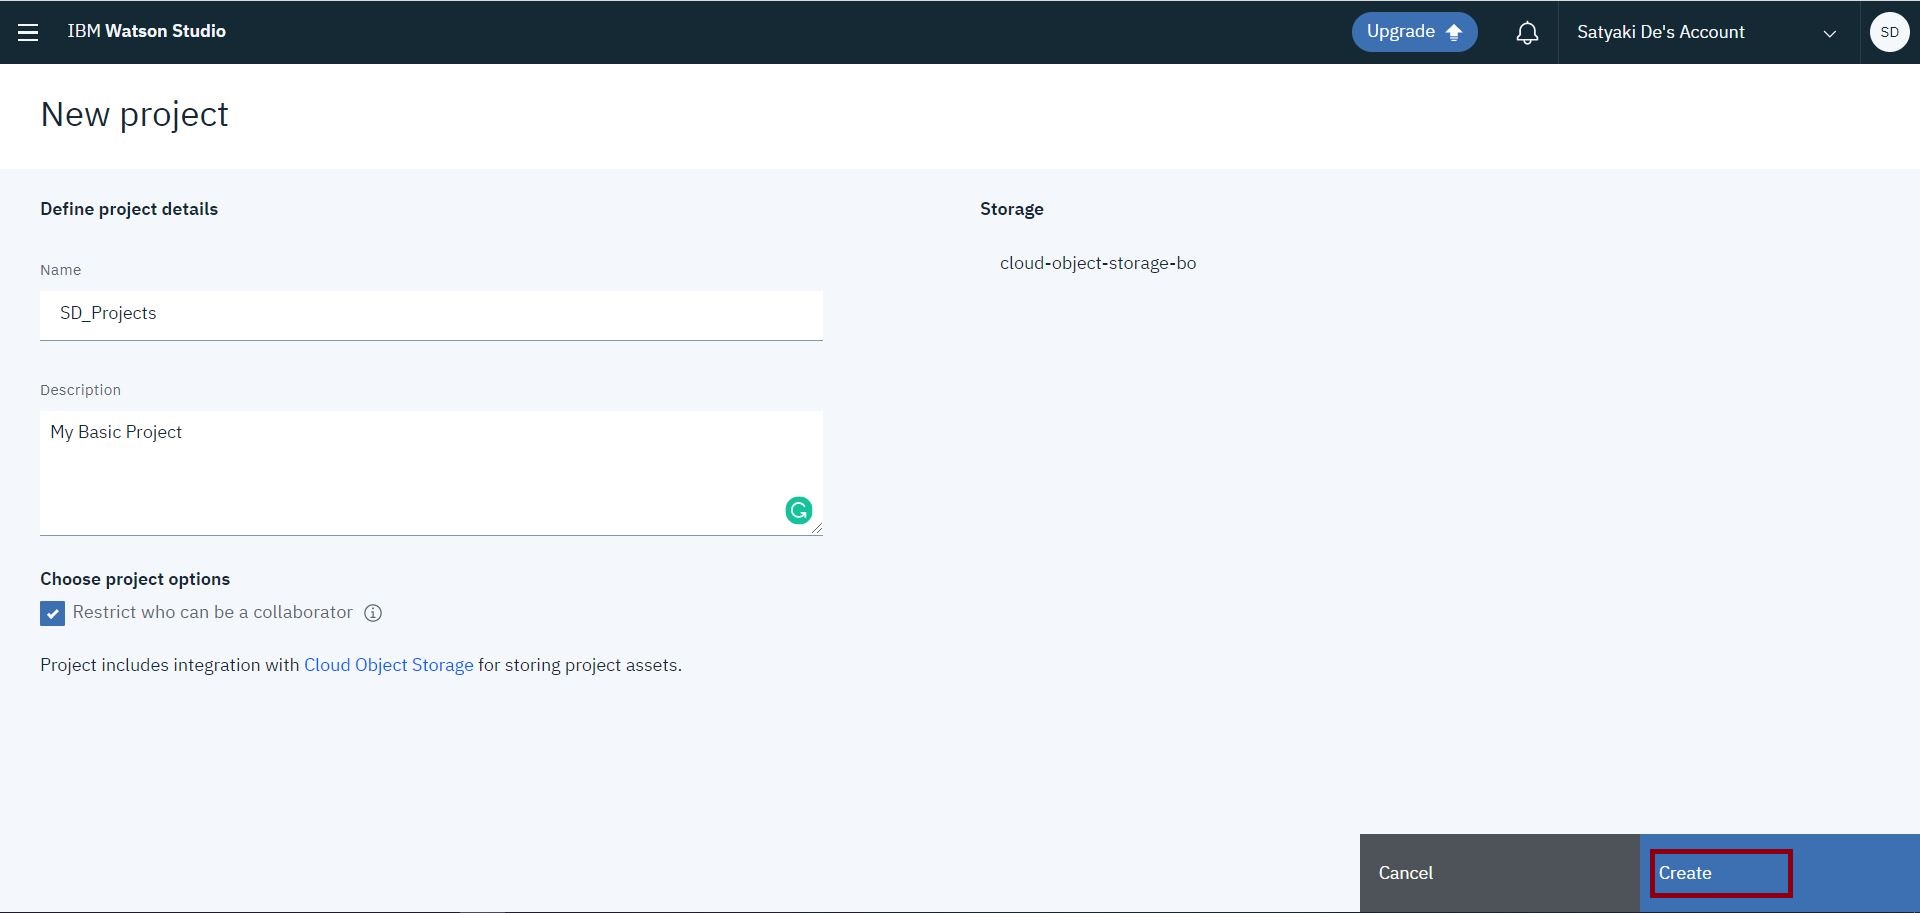
And, now, we need to click the Get Started button to launch it. This will lead to Create Project page, which can be done using the following steps –
Now, clicking the create a project will lead you to the next screen –
You can choose either an empty project, or you can create it from a sample file. In this case, we’ll be selecting the first option & this will lead us to the below page –
And, then you will click the “Create” option, which will lead you to the next screen –
Now, you need to click “Add to Project.” This will give you a variety of services that you want to explore/use from the list. If you want to create your own natural language classifier, which you can do that as follows –
Once, you click it – you need to select the associate service –
Here, you need to click the hyperlink, which prompts to the next screen –
You need to check the price for both the Visual & Natural Language Classifier. They are pretty expensive. The visual classifier has the Lite plan. However, it has limitations of output.
Clicking the “Create” will prompt to the next screen –
After successful creation, you will be redirected to the following page –
Now, We’ll be adding our “Natural Language Understand” for our test –
This will prompt the next screen –
Once, it is successful. You will see the service registered as shown below –
If you click the service marked in RED, it will lead you to another page, where you will get the API Key & Url. You need both of this information in Python application to access this API as shown below –
Now, we’re ready with the necessary cloud set-up. After this, we need to install the Python package for IBM Cloud as shown below –
We’ve noticed that, recently, IBM has launched one upgraded package. Hence, we installed that one as well. I would recommend you to install this second package directly instead of the first one shown above –
Now, we’re done with our set-up.
Let’s see the directory structure –
We’ll be discussing only the main calling script & class script. However, we’ll be posting the parameters without discussing it. And, we won’t discuss clsL.py as we’ve already discussed that in our previous post.
1. clsConfig.py (This script contains all the parameter details.)
################################################## Written By: SATYAKI DE ######## Written On: 04-Apr-2020 ######## ######## Objective: This script is a config ######## file, contains all the keys for ######## IBM Cloud API. Application will ######## process these information & perform ######## various analysis on IBM Watson cloud.##################################################importosimportplatformasplclassclsConfig(object):
Curr_Path = os.path.dirname(os.path.realpath(__file__))
os_det = pl.system()
if os_det =="Windows":
sep ='\\'else:
sep ='/'
config = {
'APP_ID': 1,
'SERVICE_URL': "https://api.eu-gb.natural-language-understanding.watson.cloud.ibm.com/instances/xxxxxxxxxxxxxxXXXXXXXXXXxxxxxxxxxxxxxxxx",
'API_KEY': "Xxxxxxxxxxxxxkdkdfifd984djddkkdkdkdsSSdkdkdd",
'API_TYPE': "application/json",
'CACHE': "no-cache",
'CON': "keep-alive",
'ARCH_DIR': Curr_Path + sep +'arch'+ sep,
'PROFILE_PATH': Curr_Path + sep +'profile'+ sep,
'LOG_PATH': Curr_Path + sep +'log'+ sep,
'REPORT_PATH': Curr_Path + sep +'report',
'SRC_PATH': Curr_Path + sep +'Src_File'+ sep,
'APP_DESC_1': 'IBM Watson Language Understand!',
'DEBUG_IND': 'N',
'INIT_PATH': Curr_Path
}
Note that you will be placing your API_KEY & URL here, as shown in the configuration file.
2. clsIBMWatson.py (This is the main script, which will invoke the IBM Watson API based on the input from the user & return 0 if successful.)
################################################## Written By: SATYAKI DE ######## Written On: 04-Apr-2020 ######## Modified On 04-Apr-2020 ######## ######## Objective: Main scripts to invoke ######## IBM Watson Language Understand API. ##################################################importloggingfromclsConfigimport clsConfig as cf
importclsLasclimportjsonfromibm_watsonimport NaturalLanguageUnderstandingV1
fromibm_cloud_sdk_core.authenticatorsimport IAMAuthenticator
fromibm_watson.natural_language_understanding_v1import Features, EntitiesOptions, KeywordsOptions, SentimentOptions, CategoriesOptions, ConceptsOptions
fromibm_watsonimport ApiException
classclsIBMWatson:
def__init__(self):
self.api_key = cf.config['API_KEY']
self.service_url = cf.config['SERVICE_URL']
defcalculateExpressionFromUrl(self, inputUrl, inputVersion):
try:
api_key =self.api_key
service_url =self.service_url
print('-'*60)
print('Beginning of the IBM Watson for Input Url.')
print('-'*60)
authenticator = IAMAuthenticator(api_key)

# Authentication via service credentials provided in our config files
service = NaturalLanguageUnderstandingV1(version=inputVersion, authenticator=authenticator)
service.set_service_url(service_url)
response = service.analyze(
    url=inputUrl,
    features=Features(entities=EntitiesOptions(),
                      sentiment=SentimentOptions(),
                      concepts=ConceptsOptions())).get_result()
print(json.dumps(response, indent=2))
return0except ApiException as ex:
print('-'*60)
print("Method failed for Url with status code "+str(ex.code) +": "+ ex.message)
print('-'*60)
return1defcalculateExpressionFromText(self, inputText, inputVersion):
try:
api_key =self.api_key
service_url =self.service_url
print('-'*60)
print('Beginning of the IBM Watson for Input Url.')
print('-'*60)
authenticator = IAMAuthenticator(api_key)
# Authentication via service credentials provided in our config files
service = NaturalLanguageUnderstandingV1(version=inputVersion, authenticator=authenticator)
service.set_service_url(service_url)
response = service.analyze(
text=inputText,
features=Features(entities=EntitiesOptions(),
sentiment=SentimentOptions(),
concepts=ConceptsOptions())).get_result()
print(json.dumps(response, indent=2))
return0except ApiException as ex:
print('-'*60)
print("Method failed for Url with status code "+str(ex.code) +": "+ ex.message)
print('-'*60)
return1
Some of the key lines from the above snippet –
authenticator = IAMAuthenticator(api_key)# Authentication via service credentials provided in our config filesservice = NaturalLanguageUnderstandingV1(version=inputVersion, authenticator=authenticator)service.set_service_url(service_url)
By providing the API Key & Url, the application is initiating the service for Watson.
Based on your type of input, it will bring the features of entities, sentiment & concepts here. Apart from that, you can additionally check the following features as well – Keywords & Categories.
3. callIBMWatsonAPI.py (This is the first calling script. Based on user choice, it will receive input either as Url or as the plain text & then analyze it.)
################################################## Written By: SATYAKI DE ######## Written On: 04-Apr-2020 ######## Modified On 04-Apr-2020 ######## ######## Objective: Main calling scripts. ##################################################fromclsConfigimport clsConfig as cf
importclsLasclimportloggingimportdatetimeimportclsIBMWatsonascw# Disbling Warningdefwarn(*args, **kwargs):
passimportwarnings
warnings.warn = warn
# Lookup functions from# Azure cloud SQL DB
var = datetime.datetime.now().strftime("%Y-%m-%d_%H-%M-%S")
defmain():
try:
ret_1 =0
general_log_path =str(cf.config['LOG_PATH'])
# Enabling Logging Info
logging.basicConfig(filename=general_log_path +'IBMWatson_NaturalLanguageAnalysis.log', level=logging.INFO)
# Initiating Log Class
l = cl.clsL()
# Moving previous day log files to archive directory
log_dir = cf.config['LOG_PATH']
curr_ver =datetime.datetime.now().strftime("%Y-%m-%d")
tmpR0 ="*"*157
logging.info(tmpR0)
tmpR9 ='Start Time: '+str(var)
logging.info(tmpR9)
logging.info(tmpR0)
print("Log Directory::", log_dir)
tmpR1 ='Log Directory::'+ log_dir
logging.info(tmpR1)
print('Welcome to IBM Wantson Language Understanding Calling Program: ')
print('-'*60)
print('Please Press 1 for Understand the language from Url.')
print('Please Press 2 for Understand the language from your input-text.')
input_choice =int(input('Please provide your choice:'))
# Create the instance of the IBM Watson Class
x2 = cw.clsIBMWatson()
# Let's pass this to our map sectionif input_choice ==1:
textUrl =str(input('Please provide the complete input url:'))
ret_1 = x2.calculateExpressionFromUrl(textUrl, curr_ver)
elif input_choice ==2:
inputText =str(input('Please provide the input text:'))
ret_1 = x2.calculateExpressionFromText(inputText, curr_ver)
else:
print('Invalid options!')
if ret_1 ==0:
print('Successful IBM Watson Language Understanding Generated!')
else:
print('Failed to generate IBM Watson Language Understanding!')
print("-"*60)
print()
print('Finding Analysis points..')
print("*"*157)
logging.info('Finding Analysis points..')
logging.info(tmpR0)
tmpR10 ='End Time: '+str(var)
logging.info(tmpR10)
logging.info(tmpR0)
exceptValueErroras e:
print(str(e))
print("Invalid option!")
logging.info("Invalid option!")
exceptExceptionas e:
print("Top level Error: args:{0}, message{1}".format(e.args, e.message))
if __name__ =="__main__":
main()
This script is pretty straight forward as it is first creating an instance of the main class & then based on the user input, it is calling the respective functions here.
As of now, IBM Watson can work on a list of languages, which are available here.
If you want to start from scratch, please refer to the following link.
Please find the screenshot of our application run –
Case 1 (With Url):
Case 2 (With Plain text):
Now, Don’t forget to delete all the services from your IBM Cloud.
As you can see, from the service, you need to delete all the services one-by-one as shown in the figure.
So, we’ve done it.
To explore my photography, you can visit the following link.
I’ll be posting another new post in the coming days. Till then, Happy Avenging! 😀
Note: All the data posted here are representational data & available over the internet & for educational purpose only.


You must be logged in to post a comment.