Creating a local LLM Cluster Server using Apple Silicon GPU

Today, we’re going to discuss creating a local LLM server and then utilizing it to execute various popular LLM models. We will club the local Apple GPUs together via a new framework that binds all the available Apple Silicon devices into one big LLM server. This enables people to run many large models, which was otherwise not possible due to the lack of GPUs.

This is certainly a new way; One can create virtual computation layers by adding nodes to the resource pool, increasing the computation capacity.

Why not witness a small demo to energize ourselves –

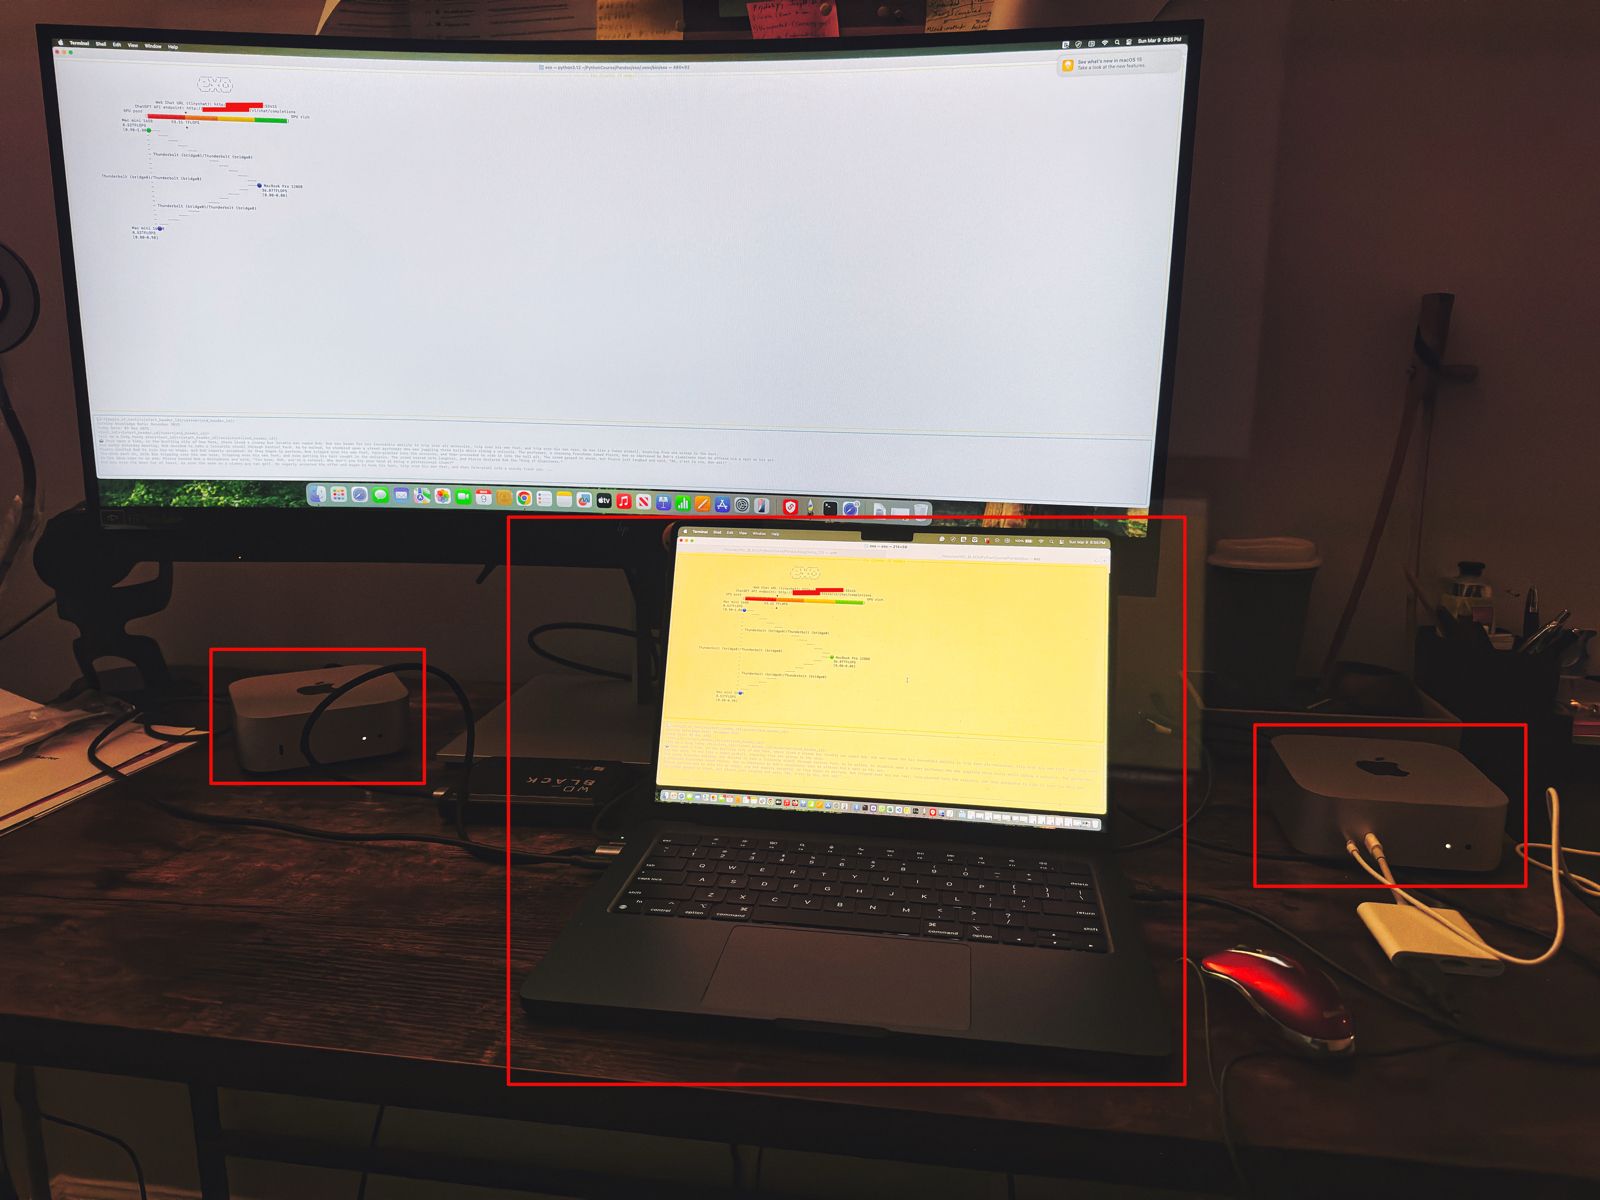
Let us understand the scenario. I’ve one Mac Book Pro M4 & 2 Mac Mini Pro M4 (Base models). So, I want to add them & expose them as a cluster as follows –

As you can see, I’ve connected my MacBook Pro with both the Mac Mini using high-speed thunderbolt cables for better data transmissions. And, I’ll be using an open-source framework called “Exo” to create it.

Also, you can see that my total computing capacity is 53.11 TFlops, which is slightly more than the last category.

“Exo” is an open-source framework that helps you merge all your available devices into a large cluster of available resources. This extracts all the computing juice needed to handle complex tasks, including the big LLMs, which require very expensive GPU-based servers.

For more information on “Exo”, please refer to the following link.

In our previous diagram, we can see that the framework also offers endpoints.

  • One option is a local ChatGPT interface, where any question you ask will receive a response from models by combining all available computing power.
  • The other endpoint offers users a choice of any standard LLM API endpoint, which helps them integrate it into their solutions.

Let us see, how the devices are connected together –

To proceed with this, you need to have at least Python 3.12, Anaconda or Miniconda & Xcode installed in all of your machines. Also, you need to install some Apple-specific MLX packages or libraries to get the best performance.

Depending on your choice, you need to use the following link to download Anaconda or Miniconda.

You can download the following link to download the Python 3.12. However, I’ve used Python 3.13 on some machines & some machines, I’ve used Python 3.12. And it worked without any problem.

Sometimes, after installing Anaconda or Miniconda, the environment may not implicitly be activated after successful installation. In that case, you may need to use the following commands in the terminal -> source ~/.bash_profile

To verify, whether the conda has been successfully installed & activated, you need to type the following command –

(base) satyaki_de@Satyakis-MacBook-Pro-Max Pandas % conda --version
conda 24.11.3
(base) satyaki_de@Satyakis-MacBook-Pro-Max Pandas % 

Once you verify it. Now, we need to install the following supplemental packages in all the machines as –

satyaki_de@Satyakis-MacBook-Pro-Max Pandas % 
satyaki_de@Satyakis-MacBook-Pro-Max Pandas % conda install anaconda::m4
Channels:
 - defaults
 - anaconda
Platform: osx-arm64
Collecting package metadata (repodata.json): done
Solving environment: done

## Package Plan ##

  environment location: /opt/anaconda3

  added / updated specs:
    - anaconda::m4


The following packages will be downloaded:

    package                    |            build
    ---------------------------|-----------------
    m4-1.4.18                  |       h1230e6a_1         202 KB  anaconda
    ------------------------------------------------------------
                                           Total:         202 KB

The following NEW packages will be INSTALLED:

  m4                 anaconda/osx-arm64::m4-1.4.18-h1230e6a_1 


Proceed ([y]/n)? y


Downloading and Extracting Packages:
                                                                                                                                                                                                                      
Preparing transaction: done
Verifying transaction: done
Executing transaction: done

Also, you can use this package to install in your machines –

(base) satyakidemini2@Satyakis-Mac-mini-2 exo % 
(base) satyakidemini2@Satyakis-Mac-mini-2 exo % pip install mlx
Collecting mlx
  Downloading mlx-0.23.2-cp312-cp312-macosx_14_0_arm64.whl.metadata (5.3 kB)
Downloading mlx-0.23.2-cp312-cp312-macosx_14_0_arm64.whl (27.6 MB)
   ━━━━━━━━━━━━━━━━━━━━━━━━━━━━━━━━━━━━━━━━ 27.6/27.6 MB 8.8 MB/s eta 0:00:00
Installing collected packages: mlx
Successfully installed mlx-0.23.2
(base) satyakidemini2@Satyakis-Mac-mini-2 exo % 

Till now, we’ve installed all the important packages. Now, we need to setup the final “eco” framework in all the machines like our previous steps.

Now, we’ll first clone the “eco” framework by the following commands –

(base) satyaki_de@Satyakis-MacBook-Pro-Max Pandas % 
(base) satyaki_de@Satyakis-MacBook-Pro-Max Pandas % git clone https://github.com/exo-explore/exo.git
Cloning into 'exo'...
remote: Enumerating objects: 9736, done.
remote: Counting objects: 100% (411/411), done.
remote: Compressing objects: 100% (148/148), done.
remote: Total 9736 (delta 333), reused 263 (delta 263), pack-reused 9325 (from 3)
Receiving objects: 100% (9736/9736), 12.18 MiB | 8.41 MiB/s, done.
Resolving deltas: 100% (5917/5917), done.
Updating files: 100% (178/178), done.
Filtering content: 100% (9/9), 3.16 MiB | 2.45 MiB/s, done.
(base) satyaki_de@Satyakis-MacBook-Pro-Max Pandas % 

And, the content of the “Exo” folder should look like this –

total 28672
drwx------  1 satyaki_de  staff  1048576 Mar  9 17:06 docs
-rwx------  1 satyaki_de  staff     1337 Mar  9 17:06 configure_mlx.sh
-rwx------  1 satyaki_de  staff    11107 Mar  9 17:06 README.md
-rwx------  1 satyaki_de  staff    35150 Mar  9 17:06 LICENSE
drwx------  1 satyaki_de  staff  1048576 Mar  9 17:06 examples
drwx------  1 satyaki_de  staff  1048576 Mar  9 17:06 exo
drwx------  1 satyaki_de  staff  1048576 Mar  9 17:06 extra
drwx------  1 satyaki_de  staff  1048576 Mar  9 17:06 scripts
-rwx------  1 satyaki_de  staff      390 Mar  9 17:06 install.sh
-rwx------  1 satyaki_de  staff      792 Mar  9 17:06 format.py
drwx------  1 satyaki_de  staff  1048576 Mar  9 17:06 test
-rwx------  1 satyaki_de  staff     2476 Mar  9 17:06 setup.py
drwx------  1 satyaki_de  staff  1048576 Mar  9 17:10 build
drwx------  1 satyaki_de  staff  1048576 Mar  9 17:17 exo.egg-info

Similar commands need to fire to other devices. Here, I’m showing one Mac-Mini examples –

(base) satyakidemini2@Satyakis-Mac-mini-2 Pandas % 
(base) satyakidemini2@Satyakis-Mac-mini-2 Pandas % git clone https://github.com/exo-explore/exo.git
Cloning into 'exo'...
remote: Enumerating objects: 9736, done.
remote: Counting objects: 100% (424/424), done.
remote: Compressing objects: 100% (146/146), done.
remote: Total 9736 (delta 345), reused 278 (delta 278), pack-reused 9312 (from 4)
Receiving objects: 100% (9736/9736), 12.18 MiB | 6.37 MiB/s, done.
Resolving deltas: 100% (5920/5920), done.
(base) satyakidemini2@Satyakis-Mac-mini-2 Pandas % 

After that, I’ll execute the following sets of commands to install the framework –

(base) satyaki_de@Satyakis-MacBook-Pro-Max Pandas % cd exo
(base) satyaki_de@Satyakis-MacBook-Pro-Max exo % 
(base) satyaki_de@Satyakis-MacBook-Pro-Max exo % conda create --name exo1 python=3.13
WARNING: A conda environment already exists at '/opt/anaconda3/envs/exo1'

Remove existing environment?
This will remove ALL directories contained within this specified prefix directory, including any other conda environments.

 (y/[n])? y

Channels:
 - defaults
Platform: osx-arm64
Collecting package metadata (repodata.json): done
Solving environment: done

## Package Plan ##

  environment location: /opt/anaconda3/envs/exo1

  added / updated specs:
    - python=3.13


The following NEW packages will be INSTALLED:

  bzip2              pkgs/main/osx-arm64::bzip2-1.0.8-h80987f9_6 
  ca-certificates    pkgs/main/osx-arm64::ca-certificates-2025.2.25-hca03da5_0 
  expat              pkgs/main/osx-arm64::expat-2.6.4-h313beb8_0 
  libcxx             pkgs/main/osx-arm64::libcxx-14.0.6-h848a8c0_0 
  libffi             pkgs/main/osx-arm64::libffi-3.4.4-hca03da5_1 
  libmpdec           pkgs/main/osx-arm64::libmpdec-4.0.0-h80987f9_0 
  ncurses            pkgs/main/osx-arm64::ncurses-6.4-h313beb8_0 
  openssl            pkgs/main/osx-arm64::openssl-3.0.16-h02f6b3c_0 
  pip                pkgs/main/osx-arm64::pip-25.0-py313hca03da5_0 
  python             pkgs/main/osx-arm64::python-3.13.2-h4862095_100_cp313 
  python_abi         pkgs/main/osx-arm64::python_abi-3.13-0_cp313 
  readline           pkgs/main/osx-arm64::readline-8.2-h1a28f6b_0 
  setuptools         pkgs/main/osx-arm64::setuptools-75.8.0-py313hca03da5_0 
  sqlite             pkgs/main/osx-arm64::sqlite-3.45.3-h80987f9_0 
  tk                 pkgs/main/osx-arm64::tk-8.6.14-h6ba3021_0 
  tzdata             pkgs/main/noarch::tzdata-2025a-h04d1e81_0 
  wheel              pkgs/main/osx-arm64::wheel-0.45.1-py313hca03da5_0 
  xz                 pkgs/main/osx-arm64::xz-5.6.4-h80987f9_1 
  zlib               pkgs/main/osx-arm64::zlib-1.2.13-h18a0788_1 


Proceed ([y]/n)? y


Downloading and Extracting Packages:

Preparing transaction: done
Verifying transaction: done
Executing transaction: done
#
# To activate this environment, use
#
#     $ conda activate exo1
#
# To deactivate an active environment, use
#
#     $ conda deactivate

(base) satyaki_de@Satyakis-MacBook-Pro-Max exo % conda activate exo1
(exo1) satyaki_de@Satyakis-MacBook-Pro-Max exo % 
(exo1) satyaki_de@Satyakis-MacBook-Pro-Max exo % ls -lrt
total 24576
drwx------  1 satyaki_de  staff  1048576 Mar  9 17:06 docs
-rwx------  1 satyaki_de  staff     1337 Mar  9 17:06 configure_mlx.sh
-rwx------  1 satyaki_de  staff    11107 Mar  9 17:06 README.md
-rwx------  1 satyaki_de  staff    35150 Mar  9 17:06 LICENSE
drwx------  1 satyaki_de  staff  1048576 Mar  9 17:06 examples
drwx------  1 satyaki_de  staff  1048576 Mar  9 17:06 exo
drwx------  1 satyaki_de  staff  1048576 Mar  9 17:06 extra
drwx------  1 satyaki_de  staff  1048576 Mar  9 17:06 scripts
-rwx------  1 satyaki_de  staff      390 Mar  9 17:06 install.sh
-rwx------  1 satyaki_de  staff      792 Mar  9 17:06 format.py
drwx------  1 satyaki_de  staff  1048576 Mar  9 17:06 test
-rwx------  1 satyaki_de  staff     2476 Mar  9 17:06 setup.py
(exo1) satyaki_de@Satyakis-MacBook-Pro-Max exo % 
(exo1) satyaki_de@Satyakis-MacBook-Pro-Max exo % pip install .
Processing /Volumes/WD_BLACK/PythonCourse/Pandas/exo
  Preparing metadata (setup.py) ... done
Collecting tinygrad@ git+https://github.com/tinygrad/tinygrad.git@ec120ce6b9ce8e4ff4b5692566a683ef240e8bc8 (from exo==0.0.1)
  Cloning https://github.com/tinygrad/tinygrad.git (to revision ec120ce6b9ce8e4ff4b5692566a683ef240e8bc8) to /private/var/folders/26/dj11b57559b8r8rl6ztdpc840000gn/T/pip-install-q18fzk3r/tinygrad_7917114c483a4d9c83c795b69dbeb5c7
  Running command git clone --filter=blob:none --quiet https://github.com/tinygrad/tinygrad.git /private/var/folders/26/dj11b57559b8r8rl6ztdpc840000gn/T/pip-install-q18fzk3r/tinygrad_7917114c483a4d9c83c795b69dbeb5c7
  Running command git rev-parse -q --verify 'sha^ec120ce6b9ce8e4ff4b5692566a683ef240e8bc8'
  Running command git fetch -q https://github.com/tinygrad/tinygrad.git ec120ce6b9ce8e4ff4b5692566a683ef240e8bc8
  Running command git checkout -q ec120ce6b9ce8e4ff4b5692566a683ef240e8bc8
  Resolved https://github.com/tinygrad/tinygrad.git to commit ec120ce6b9ce8e4ff4b5692566a683ef240e8bc8
  Preparing metadata (setup.py) ... done
Collecting aiohttp==3.10.11 (from exo==0.0.1)
.
.
(Installed many more dependant packages)
.
.
Downloading propcache-0.3.0-cp313-cp313-macosx_11_0_arm64.whl (44 kB)
Building wheels for collected packages: exo, nuitka, numpy, uuid, tinygrad
  Building wheel for exo (setup.py) ... done
  Created wheel for exo: filename=exo-0.0.1-py3-none-any.whl size=901357 sha256=5665297f8ea09d06670c9dea91e40270acc4a3cf99a560bf8d268abb236050f7
  Stored in directory: /private/var/folders/26/dj118r8rl6ztdpc840000gn/T/pip-ephem-wheel-cache-0k8zloo3/wheels/b6/91/fb/c1c7d8ca90cf16b9cd8203c11bb512614bee7f6d34
  Building wheel for nuitka (pyproject.toml) ... done
  Created wheel for nuitka: filename=nuitka-2.5.1-cp313-cp313-macosx_11_0_arm64.whl size=3432720 sha256=ae5a280a1684fde98c334516ee8a99f9f0acb6fc2f625643b7f9c5c0887c2998
  Stored in directory: /Users/satyaki_de/Library/Caches/pip/wheels/f6/c9/53/9e37c6fb34c27e892e8357aaead46da610f82117ab2825
  Building wheel for numpy (pyproject.toml) ... done
  Created wheel for numpy: filename=numpy-2.0.0-cp313-cp313-macosx_15_0_arm64.whl size=4920701 sha256=f030b0aa51ec6628f708fab0af14ff765a46d210df89aa66dd8d9482e59b5
  Stored in directory: /Users/satyaki_de/Library/Caches/pip/wheels/e0/d3/66/30d07c18e56ac85e8d3ceaf22f093a09bae124a472b85d1
  Building wheel for uuid (setup.py) ... done
  Created wheel for uuid: filename=uuid-1.30-py3-none-any.whl size=6504 sha256=885103a90d1dc92d9a75707fc353f4154597d232f2599a636de1bc6d1c83d
  Stored in directory: /Users/satyaki_de/Library/Caches/pip/wheels/cc/9d/72/13ff6a181eacfdbd6d761a4ee7c5c9f92034a9dc8a1b3c
  Building wheel for tinygrad (setup.py) ... done
  Created wheel for tinygrad: filename=tinygrad-0.10.0-py3-none-any.whl size=1333964 sha256=1f08c5ce55aa3c87668675beb80810d609955a81b99d416459d2489b36a
  Stored in directory: /Users/satyaki_de/Library/Caches/pip/wheels/c7/bd/02/bd91c1303002619dad23f70f4c1f1c15d0c24c60b043e
Successfully built exo nuitka numpy uuid tinygrad
Installing collected packages: uuid, sentencepiece, nvidia-ml-py, zstandard, uvloop, urllib3, typing-extensions, tqdm, tinygrad, scapy, safetensors, regex, pyyaml, pygments, psutil, protobuf, propcache, prometheus-client, pillow, packaging, ordered-set, numpy, multidict, mlx, mdurl, MarkupSafe, idna, grpcio, fsspec, frozenlist, filelock, charset-normalizer, certifi, attrs, annotated-types, aiohappyeyeballs, aiofiles, yarl, requests, pydantic-core, opencv-python, nuitka, markdown-it-py, Jinja2, grpcio-tools, aiosignal, rich, pydantic, huggingface-hub, aiohttp, tokenizers, aiohttp_cors, transformers, mlx-lm, exo
Successfully installed Jinja2-3.1.4 MarkupSafe-3.0.2 aiofiles-24.1.0 aiohappyeyeballs-2.5.0 aiohttp-3.10.11 aiohttp_cors-0.7.0 aiosignal-1.3.2 annotated-types-0.7.0 attrs-25.1.0 certifi-2025.1.31 charset-normalizer-3.4.1 exo-0.0.1 filelock-3.17.0 frozenlist-1.5.0 fsspec-2025.3.0 grpcio-1.67.0 grpcio-tools-1.67.0 huggingface-hub-0.29.2 idna-3.10 markdown-it-py-3.0.0 mdurl-0.1.2 mlx-0.22.0 mlx-lm-0.21.1 multidict-6.1.0 nuitka-2.5.1 numpy-2.0.0 nvidia-ml-py-12.560.30 opencv-python-4.10.0.84 ordered-set-4.1.0 packaging-24.2 pillow-10.4.0 prometheus-client-0.20.0 propcache-0.3.0 protobuf-5.28.1 psutil-6.0.0 pydantic-2.9.2 pydantic-core-2.23.4 pygments-2.19.1 pyyaml-6.0.2 regex-2024.11.6 requests-2.32.3 rich-13.7.1 safetensors-0.5.3 scapy-2.6.1 sentencepiece-0.2.0 tinygrad-0.10.0 tokenizers-0.20.3 tqdm-4.66.4 transformers-4.46.3 typing-extensions-4.12.2 urllib3-2.3.0 uuid-1.30 uvloop-0.21.0 yarl-1.18.3 zstandard-0.23.0
(exo1) satyaki_de@Satyakis-MacBook-Pro-Max exo % 

And, you need to perform the same process in other available devices as well.

Now, we’re ready to proceed with the final command –

(.venv) (exo1) satyaki_de@Satyakis-MacBook-Pro-Max exo % exo
/opt/anaconda3/envs/exo1/lib/python3.13/site-packages/google/protobuf/runtime_version.py:112: UserWarning: Protobuf gencode version 5.27.2 is older than the runtime version 5.28.1 at node_service.proto. Please avoid checked-in Protobuf gencode that can be obsolete.
  warnings.warn(
None of PyTorch, TensorFlow >= 2.0, or Flax have been found. Models won't be available and only tokenizers, configuration and file/data utilities can be used.
Selected inference engine: None

  _____  _____  
 / _ \ \/ / _ \ 
|  __/>  < (_) |
 \___/_/\_\___/ 
    
Detected system: Apple Silicon Mac
Inference engine name after selection: mlx
Using inference engine: MLXDynamicShardInferenceEngine with shard downloader: SingletonShardDownloader
[60771, 54631, 54661]
Chat interface started:
 - http://127.0.0.1:52415
 - http://XXX.XXX.XX.XX:52415
 - http://XXX.XXX.XXX.XX:52415
 - http://XXX.XXX.XXX.XXX:52415
ChatGPT API endpoint served at:
 - http://127.0.0.1:52415/v1/chat/completions
 - http://XXX.XXX.X.XX:52415/v1/chat/completions
 - http://XXX.XXX.XXX.XX:52415/v1/chat/completions
 - http://XXX.XXX.XXX.XXX:52415/v1/chat/completions
has_read=True, has_write=True
╭────────────────────────────────────────────────────────────────────────────────────────────── Exo Cluster (2 nodes) ───────────────────────────────────────────────────────────────────────────────────────────────╮
Received exit signal SIGTERM...
Thank you for using exo.

  _____  _____  
 / _ \ \/ / _ \ 
|  __/>  < (_) |
 \___/_/\_\___/ 
    

Note that I’ve masked the IP addresses for security reasons.


At the beginning, if we trigger the main MacBook Pro Max, the “Exo” screen should looks like this –
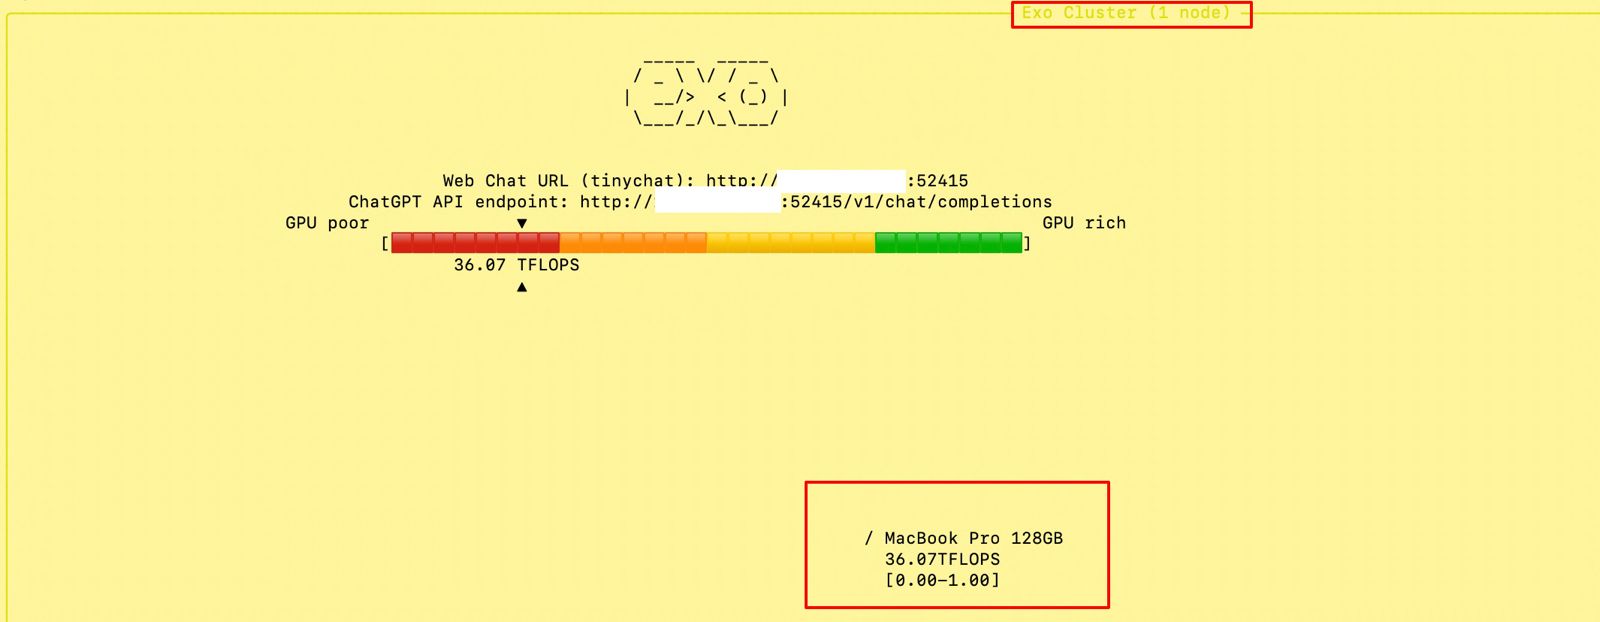
And if you open the URL, you will see the following ChatGPT-like interface –
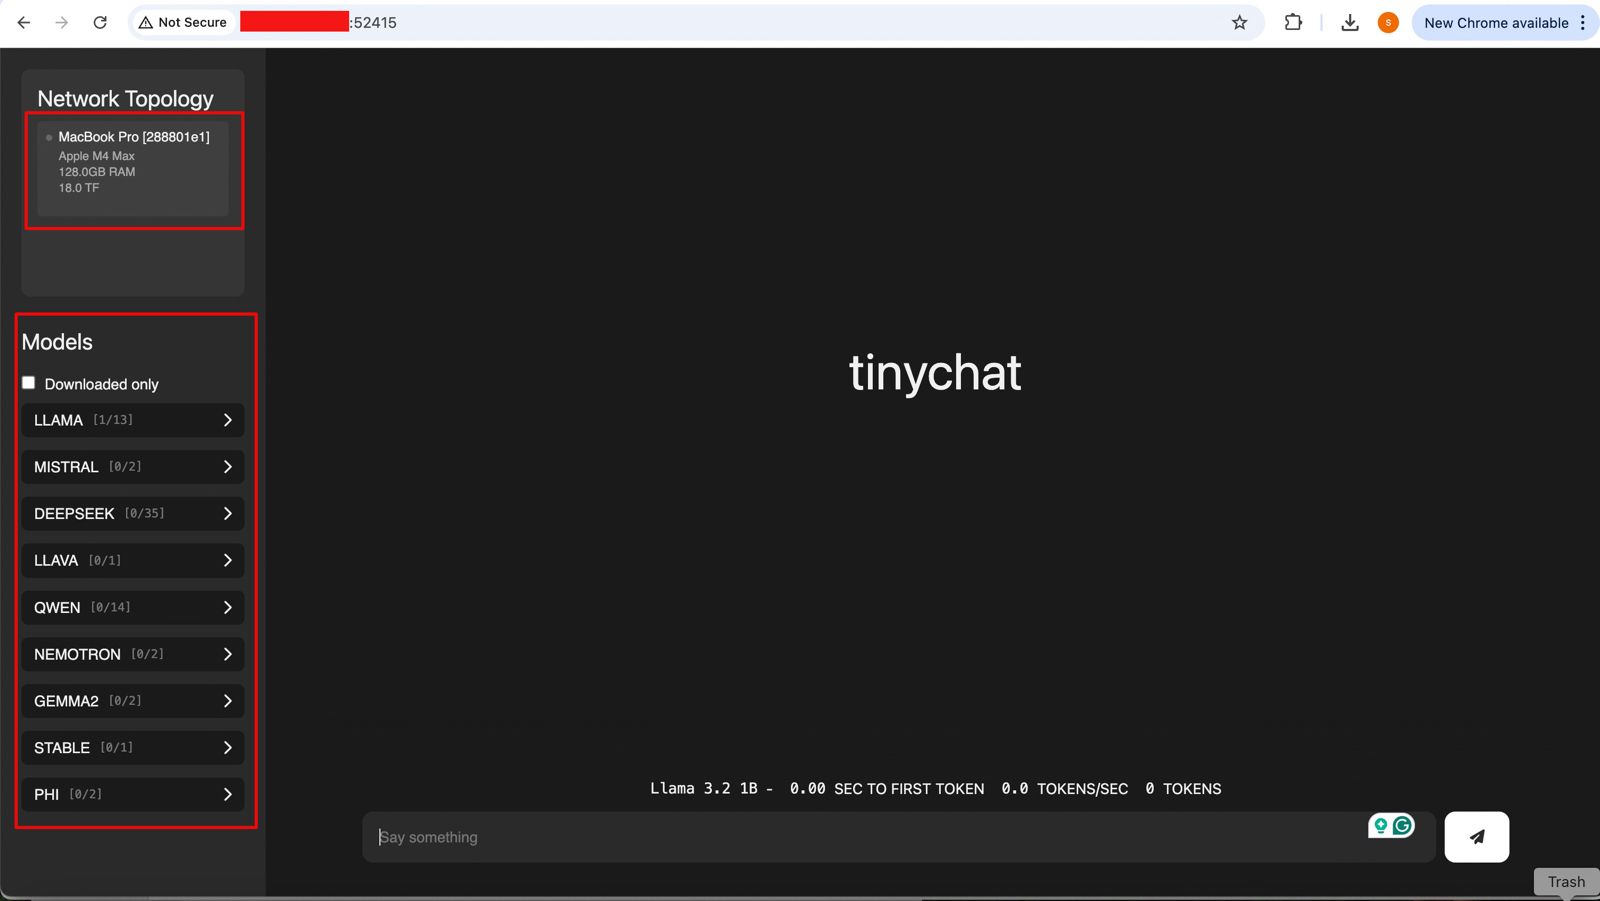
Connecting without the Thunderbolt bridge with the relevant port or a hub may cause performance degradation. Hence, how you connect will play a major role in the success of this intention. However, this is certainly a great idea to proceed with.


So, we’ve done it.

We’ll cover the detailed performance testing, Optimized configurations & many other useful details in our next post.

Till then, Happy Avenging! 🙂

Monitoring & evaluating the leading LLMs (both the established & new) by Python-based evaluator

As we’re leaping more & more into the field of Generative AI, one of the frequent questions or challenges people are getting more & more is the performance & other evaluation factors. These factors will eventually bring the fruit of this technology; otherwise, you will end up in technical debt.

This post will discuss the key snippets of the monitoring app based on the Python-based AI app. But before that, let us first view the demo.

Isn’t it exciting?


Let us deep dive into it. But, here is the flow this solution will follow.

So, the current application will invoke the industry bigshots and some relatively unknown or new LLMs.

In this case, we’ll evaluate Anthropic, Open AI, DeepSeek, and Bharat GPT’s various models. However, Bharat GPT is open source, so we’ll use the Huggingface library and execute it locally against my MacBook Pro M4 Max.

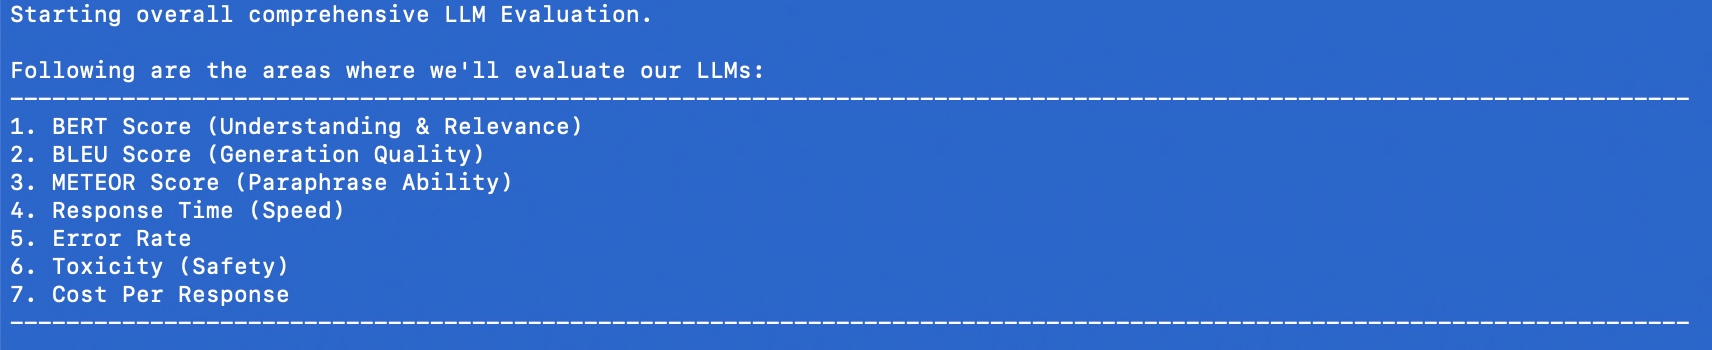
The following are the KPIs we’re going to evaluate:

Here are the lists of dependant python packages that is require to run this application –

pip install certifi==2024.8.30
pip install anthropic==0.42.0
pip install huggingface-hub==0.27.0
pip install nltk==3.9.1
pip install numpy==2.2.1
pip install moviepy==2.1.1
pip install numpy==2.1.3
pip install openai==1.59.3
pip install pandas==2.2.3
pip install pillow==11.1.0
pip install pip==24.3.1
pip install psutil==6.1.1
pip install requests==2.32.3
pip install rouge_score==0.1.2
pip install scikit-learn==1.6.0
pip install setuptools==70.2.0
pip install tokenizers==0.21.0
pip install torch==2.6.0.dev20250104
pip install torchaudio==2.6.0.dev20250104
pip install torchvision==0.22.0.dev20250104
pip install tqdm==4.67.1
pip install transformers==4.47.1
    @retry(stop=stop_after_attempt(3), wait=wait_exponential(multiplier=1, min=4, max=10))
    def get_claude_response(self, prompt: str) -> str:
        response = self.anthropic_client.messages.create(
            model=anthropic_model,
            max_tokens=maxToken,
            messages=[{"role": "user", "content": prompt}]
        )
        return response.content[0].text
  1. The Retry Mechanism
    • The @retry line means this function will automatically try again if it fails.
    • It will stop retrying after 3 attempts (stop_after_attempt(3)).
    • It will wait longer between retries, starting at 4 seconds and increasing up to 10 seconds (wait_exponential(multiplier=1, min=4, max=10)).
  2. The Function Purpose
    • The function takes a message, called prompt, as input (a string of text).
    • It uses a service (likely an AI system like Claude) to generate a response to this prompt.
  3. Sending the Message
    • Inside the function, the code self.anthropic_client.messages.create is the part that actually sends the prompt to the AI.
    • It specifies:Which AI model to use (e.g., anthropic_model).
    • The maximum length of the response (controlled by maxToken).
    • The input message for the AI has a “role” (user), as well as the content of the prompt.
  4. Getting the Response
    • Once the AI generates a response, it’s saved as response.
    • The code retrieves the first part of the response (response.content[0].text) and sends it back to whoever called the function.

Similarly, it will work for Open AI as well.

    @retry(stop=stop_after_attempt(3), wait=wait_exponential(multiplier=1, min=4, max=10))
    def get_deepseek_response(self, prompt: str) -> tuple:
        deepseek_api_key = self.deepseek_api_key

        headers = {
            "Authorization": f"Bearer {deepseek_api_key}",
            "Content-Type": "application/json"
            }
        
        payload = {
            "model": deepseek_model,  
            "messages": [{"role": "user", "content": prompt}],
            "max_tokens": maxToken
            }
        
        response = requests.post(DEEPSEEK_API_URL, headers=headers, json=payload)

        if response.status_code == 200:
            res = response.json()["choices"][0]["message"]["content"]
        else:
            res = "API request failed with status code " + str(response.status_code) + ":" + str(response.text)

        return res
  1. Retry Mechanism:
    • The @retry line ensures the function will try again if it fails.
    • It will stop retrying after 3 attempts (stop_after_attempt(3)).
    • It waits between retries, starting at 4 seconds and increasing up to 10 seconds (wait_exponential(multiplier=1, min=4, max=10)).

  1. What the Function Does:
    • The function takes one input, prompt, which is the message or question you want to send to the AI.
    • It returns the AI’s response or an error message.

  1. Preparing to Communicate with the API:
    • API Key: It gets the API key for the DeepSeek service from self.deepseek_api_key.
    • Headers: These tell the API that the request will use the API key (for security) and that the data format is JSON (structured text).
    • Payload: This is the information sent to the AI. It includes:
      • Model: Specifies which version of the AI to use (deepseek_model).
      • Messages: The input message with the role “user” and your prompt.
      • Max Tokens: Defines the maximum size of the AI’s response (maxToken).

  1. Sending the Request:
    • It uses the requests.post() method to send the payload and headers to the DeepSeek API using the URL DEEPSEEK_API_URL.

  1. Processing the Response:
    • If the API responds successfully (status_code == 200):
      • It extracts the AI’s reply from the response data.
      • Specifically, it gets the first choice’s message content: response.json()["choices"][0]["message"]["content"].
    • If there’s an error:
      • It constructs an error message with the status code and detailed error text from the API.

  1. Returning the Result:
    • The function outputs either the AI’s response or the error message.
    @retry(stop=stop_after_attempt(3), wait=wait_exponential(multiplier=1, min=4, max=10))
    def get_bharatgpt_response(self, prompt: str) -> tuple:
        try:
            messages = [[{"role": "user", "content": prompt}]]
            
            response = pipe(messages, max_new_tokens=maxToken,)

            # Extract 'content' field safely
            res = next((entry.get("content", "")
                        for entry in response[0][0].get("generated_text", [])
                        if isinstance(entry, dict) and entry.get("role") == "assistant"
                        ),
                        None,
                        )
            
            return res
        except Exception as e:
            x = str(e)
            print('Error: ', x)

            return ""
  1. Retry Mechanism:The @retry ensures the function will try again if it fails.
    • It will stop retrying after 3 attempts (stop_after_attempt(3)).
    • The waiting time between retries starts at 4 seconds and increases exponentially up to 10 seconds (wait_exponential(multiplier=1, min=4, max=10)).
  2. What the Function Does:The function takes one input, prompt, which is the message or question you want to send to BharatGPT.
    • It returns the AI’s response or an empty string if something goes wrong.
  3. Sending the Prompt:Messages Structure: The function wraps the user’s prompt in a format that the BharatGPT AI understands:
    • messages = [[{"role": "user", "content": prompt}]]
    • This tells the AI that the prompt is coming from the “user.”
  4. Pipe Function: It uses a pipe() method to send the messages to the AI system.
    • max_new_tokens=maxToken: Limits how long the AI’s response can be.
  5. Extracting the Response:The response from the AI is in a structured format. The code looks for the first piece of text where:
    • The role is “assistant” (meaning it’s the AI’s reply).
    • The text is in the “content” field.
    • The next() function safely extracts this “content” field or returns None if it can’t find it.
  6. Error Handling:If something goes wrong (e.g., the AI doesn’t respond or there’s a technical issue), the code:
    • Captures the error message in e.
    • Prints the error message: print('Error: ', x).
    • Returns an empty string ("") instead of crashing.
  7. Returning the Result:If everything works, the function gives you the AI’s response as plain text.
    • If there’s an error, it gives you an empty string, indicating no response was received.

    def get_model_response(self, model_name: str, prompt: str) -> ModelResponse:
        """Get response from specified model with metrics"""
        start_time = time.time()
        start_memory = psutil.Process(os.getpid()).memory_info().rss / 1024 / 1024

        try:
            if model_name == "claude-3":
                response_content = self.get_claude_response(prompt)
            elif model_name == "gpt4":
                response_content = self.get_gpt4_response(prompt)
            elif model_name == "deepseek-chat":
                response_content = self.get_deepseek_response(prompt)
            elif model_name == "bharat-gpt":
                response_content = self.get_bharatgpt_response(prompt)

            # Model-specific API calls 
            token_count = len(self.bert_tokenizer.encode(response_content))
            
            end_memory = psutil.Process(os.getpid()).memory_info().rss / 1024 / 1024
            memory_usage = end_memory - start_memory
            
            return ModelResponse(
                content=response_content,
                response_time=time.time() - start_time,
                token_count=token_count,
                memory_usage=memory_usage
            )
        except Exception as e:
            logging.error(f"Error getting response from {model_name}: {str(e)}")
            return ModelResponse(
                content="",
                response_time=0,
                token_count=0,
                memory_usage=0,
                error=str(e)
            )

Start Tracking Time and Memory:

    • The function starts a timer (start_time) to measure how long it takes to get a response.
    • It also checks how much memory is being used at the beginning (start_memory).

    Choose the AI Model:

    • Based on the model_name provided, the function selects the appropriate method to get a response:
      • "claude-3" → Calls get_claude_response(prompt).
      • "gpt4" → Calls get_gpt4_response(prompt).
      • "deepseek-chat" → Calls get_deepseek_response(prompt).
      • "bharat-gpt" → Calls get_bharatgpt_response(prompt).

    Process the Response:

    • Once the response is received, the function calculates:
      • Token Count: The number of tokens (small chunks of text) in the response using a tokenizer.
      • Memory Usage: The difference between memory usage after the response (end_memory) and before it (start_memory).

    Return the Results:

    • The function bundles all the information into a ModelResponse object:
      • The AI’s reply (content).
      • How long the response took (response_time).
      • The number of tokens in the reply (token_count).
      • How much memory was used (memory_usage).

    Handle Errors:

    • If something goes wrong (e.g., the AI doesn’t respond), the function:
      • Logs the error message.
      • Returns an empty response with default values and the error message.
        def evaluate_text_quality(self, generated: str, reference: str) -> Dict[str, float]:
            """Evaluate text quality metrics"""
            # BERTScore
            gen_embedding = self.sentence_model.encode([generated])
            ref_embedding = self.sentence_model.encode([reference])
            bert_score = cosine_similarity(gen_embedding, ref_embedding)[0][0]
    
            # BLEU Score
            generated_tokens = word_tokenize(generated.lower())
            reference_tokens = word_tokenize(reference.lower())
            bleu = sentence_bleu([reference_tokens], generated_tokens)
    
            # METEOR Score
            meteor = meteor_score([reference_tokens], generated_tokens)
    
            return {
                'bert_score': bert_score,
                'bleu_score': bleu,
                'meteor_score': meteor
            }

    Inputs:

    • generated: The text produced by the AI.
    • reference: The correct or expected version of the text.

    Calculating BERTScore:

    • Converts the generated and reference texts into numerical embeddings (mathematical representations) using a pre-trained model (self.sentence_model.encode).
    • Measures the similarity between the two embeddings using cosine similarity. This gives the bert_score, which ranges from -1 (completely different) to 1 (very similar).

    Calculating BLEU Score:

    • Breaks the generated and reference texts into individual words (tokens) using word_tokenize.
    • Converts both texts to lowercase for consistent comparison.
    • Calculates the BLEU Score (sentence_bleu), which checks how many words or phrases in the generated text overlap with the reference. BLEU values range from 0 (no match) to 1 (perfect match).

    Calculating METEOR Score:

    • Also uses the tokenized versions of generated and reference texts.
    • Calculates the METEOR Score (meteor_score), which considers exact matches, synonyms, and word order. Scores range from 0 (no match) to 1 (perfect match).

    Returning the Results:

    • Combines the three scores into a dictionary with the keys 'bert_score''bleu_score', and 'meteor_score'.

    Similarly, other functions are developed.

        def run_comprehensive_evaluation(self, evaluation_data: List[Dict]) -> pd.DataFrame:
            """Run comprehensive evaluation on all metrics"""
            results = []
            
            for item in evaluation_data:
                prompt = item['prompt']
                reference = item['reference']
                task_criteria = item.get('task_criteria', {})
                
                for model_name in self.model_configs.keys():
                    # Get multiple responses to evaluate reliability
                    responses = [
                        self.get_model_response(model_name, prompt)
                        for _ in range(3)  # Get 3 responses for reliability testing
                    ]
                    
                    # Use the best response for other evaluations
                    best_response = max(responses, key=lambda x: len(x.content) if not x.error else 0)
                    
                    if best_response.error:
                        logging.error(f"Error in model {model_name}: {best_response.error}")
                        continue
                    
                    # Gather all metrics
                    metrics = {
                        'model': model_name,
                        'prompt': prompt,
                        'response': best_response.content,
                        **self.evaluate_text_quality(best_response.content, reference),
                        **self.evaluate_factual_accuracy(best_response.content, reference),
                        **self.evaluate_task_performance(best_response.content, task_criteria),
                        **self.evaluate_technical_performance(best_response),
                        **self.evaluate_reliability(responses),
                        **self.evaluate_safety(best_response.content)
                    }
                    
                    # Add business impact metrics using task performance
                    metrics.update(self.evaluate_business_impact(
                        best_response,
                        metrics['task_completion']
                    ))
                    
                    results.append(metrics)
            
            return pd.DataFrame(results)
    • Input:
      • evaluation_data: A list of test cases, where each case is a dictionary containing:
        • prompt: The question or input to the AI model.
        • reference: The ideal or expected answer.
        • task_criteria (optional): Additional rules or requirements for the task.
    • Initialize Results:
      • An empty list results is created to store the evaluation metrics for each model and test case.
    • Iterate Through Test Cases:
      • For each item in the evaluation_data:
        • Extract the promptreference, and task_criteria.
    • Evaluate Each Model:
      • Loop through all available AI models (self.model_configs.keys()).
      • Generate three responses for each model to test reliability.
    • Select the Best Response:
      • Out of the three responses, pick the one with the most content (best_response), ignoring responses with errors.
    • Handle Errors:
      • If a response has an error, log the issue and skip further evaluation for that model.
    • Evaluate Metrics:
      • Using the best_response, calculate a variety of metrics, including:
        • Text Quality: How similar the response is to the reference.
        • Factual Accuracy: Whether the response is factually correct.
        • Task Performance: How well it meets task-specific criteria.
        • Technical Performance: Evaluate time, memory, or other system-related metrics.
        • Reliability: Check consistency across multiple responses.
        • Safety: Ensure the response is safe and appropriate.
    • Evaluate Business Impact:
      • Add metrics for business impact (e.g., how well the task was completed, using task_completion as a key factor).
    • Store Results:
      • Add the calculated metrics for this model and prompt to the results list.
    • Return Results as a DataFrame:
      • Convert the results list into a structured table (a pandas DataFrame) for easy analysis and visualization.

    Great! So, now, we’ve explained the code.

    Let us understand the final outcome of this run & what we can conclude from that.

    1. BERT Score (Semantic Understanding):
      • GPT4 leads slightly at 0.8322 (83.22%)
      • Bharat-GPT close second at 0.8118 (81.18%)
      • Claude-3 at 0.8019 (80.19%)
      • DeepSeek-Chat at 0.7819 (78.19%) Think of this like a “comprehension score” – how well the models understand the context. All models show strong understanding, with only a 5% difference between best and worst.
    2. BLEU Score (Word-for-Word Accuracy):
      • Bharat-GPT leads at 0.0567 (5.67%)
      • Claude-3 at 0.0344 (3.44%)
      • GPT4 at 0.0306 (3.06%)
      • DeepSeek-Chat lowest at 0.0189 (1.89%) These low scores suggest models use different wording than references, which isn’t necessarily bad.
    3. METEOR Score (Meaning Preservation):
      • Bharat-GPT leads at 0.4684 (46.84%)
      • Claude-3 close second at 0.4507 (45.07%)
      • GPT4 at 0.2960 (29.60%)
      • DeepSeek-Chat at 0.2652 (26.52%) This shows how well models maintain meaning while using different words.
    4. Response Time (Speed):
      • Claude-3 fastest: 4.40 seconds
      • Bharat-GPT: 6.35 seconds
      • GPT4: 6.43 seconds
      • DeepSeek-Chat slowest: 8.52 seconds
    5. Safety and Reliability:
      • Error Rate: Perfect 0.0 for all models
      • Toxicity: All very safe (below 0.15%) 
        • Claude-3 safest at 0.0007GPT4 at 0.0008Bharat-GPT at 0.0012
        • DeepSeek-Chat at 0.0014
    6. Cost Efficiency:
      • Claude-3 most economical: $0.0019 per response
      • Bharat-GPT close: $0.0021
      • GPT4: $0.0038
      • DeepSeek-Chat highest: $0.0050

    Key Takeaways by Model:

    1. Claude-3: ✓ Fastest responses ✓ Most cost-effective ✓ Excellent meaning preservation ✓ Lowest toxicity
    2. Bharat-GPT: ✓ Best BLEU and METEOR scores ✓ Strong semantic understanding ✓ Cost-effective ✗ Moderate response time
    3. GPT4: ✓ Best semantic understanding ✓ Good safety metrics ✗ Higher cost ✗ Moderate response time
    4. DeepSeek-Chat: ✗ Generally lower performance ✗ Slowest responses ✗ Highest cost ✗ Slightly higher toxicity

    Reliability of These Statistics:

    Strong Points:

    • Comprehensive metric coverage
    • Consistent patterns across evaluations
    • Zero error rates show reliability
    • Clear differentiation between models

    Limitations:

    • BLEU scores are quite low across all models
    • Doesn’t measure creative or innovative responses
    • May not reflect specific use case performance
    • Single snapshot rather than long-term performance

    Final Observation:

    1. Best Overall Value: Claude-3
      • Fast, cost-effective, safe, good performance
    2. Best for Accuracy: Bharat-GPT
      • Highest meaning preservation and precision
    3. Best for Understanding: GPT4
      • Strongest semantic comprehension
    4. Consider Your Priorities: 
      • Speed → Choose Claude-3
      • Cost → Choose Claude-3 or Bharat-GPT
      • Accuracy → Choose Bharat-GPT
      • Understanding → Choose GPT4

    These statistics provide reliable comparative data but should be part of a broader decision-making process that includes your specific needs, budget, and use cases.


    For the Bharat GPT model, we’ve tested this locally on my MacBook Pro 4 Max. And, the configuration is as follows –

    I’ve tried the API version locally, & it provided a similar performance against the stats that we received by running locally. Unfortunately, they haven’t made the API version public yet.

    So, apart from the Anthropic & Open AI, I’ll watch this new LLM (Bharat GPT) for overall stats in the coming days.


    So, we’ve done it.

    You can find the detailed code at the GitHub link.

    I’ll bring some more exciting topics in the coming days from the Python verse.

    Till then, Happy Avenging! 🙂

    Enabling & Exploring Stable Defussion – Part 3

    Before we dive into the details of this post, let us provide the previous two links that precede it.

    Enabling & Exploring Stable Defussion – Part 1

    Enabling & Exploring Stable Defussion – Part 2

    For, reference, we’ll share the demo before deep dive into the actual follow-up analysis in the below section –


    Now, let us continue our discussions from where we left.

    class clsText2Image:
        def __init__(self, pipe, output_path, filename):
    
            self.pipe = pipe
            
            # More aggressive attention slicing
            self.pipe.enable_attention_slicing(slice_size=1)
    
            self.output_path = f"{output_path}{filename}"
            
            # Warm up the pipeline
            self._warmup()
        
        def _warmup(self):
            """Warm up the pipeline to optimize memory allocation"""
            with torch.no_grad():
                _ = self.pipe("warmup", num_inference_steps=1, height=512, width=512)
            torch.mps.empty_cache()
            gc.collect()
        
        def generate(self, prompt, num_inference_steps=12, guidance_scale=3.0):
            try:
                torch.mps.empty_cache()
                gc.collect()
                
                with torch.autocast(device_type="mps"):
                    with torch.no_grad():
                        image = self.pipe(
                            prompt,
                            num_inference_steps=num_inference_steps,
                            guidance_scale=guidance_scale,
                            height=1024,
                            width=1024,
                        ).images[0]
                
                image.save(self.output_path)
                return 0
            except Exception as e:
                print(f'Error: {str(e)}')
                return 1
            finally:
                torch.mps.empty_cache()
                gc.collect()
    
        def genImage(self, prompt):
            try:
    
                # Initialize generator
                x = self.generate(prompt)
    
                if x == 0:
                    print('Successfully processed first pass!')
                else:
                    print('Failed complete first pass!')
                    raise 
    
                return 0
    
            except Exception as e:
                print(f"\nAn unexpected error occurred: {str(e)}")
    
                return 1

    This is the initialization method for the clsText2Image class:

    • Takes a pre-configured pipe (text-to-image pipeline), an output_path, and a filename.
    • Enables more aggressive memory optimization by setting “attention slicing.”
    • Prepares the full file path for saving generated images.
    • Calls a _warmup method to pre-load the pipeline and optimize memory allocation.

    This private method warms up the pipeline:

    • Sends a dummy “warmup” request with basic parameters to allocate memory efficiently.
    • Clears any cached memory (torch.mps.empty_cache()) and performs garbage collection (gc.collect()).
    • Ensures smoother operation for future image generation tasks.

    This method generates an image from a text prompt:

    • Clears memory cache and performs garbage collection before starting.
    • Uses the text-to-image pipeline (pipe) to generate an image:
      • Takes the prompt, number of inference steps, and guidance scale as input.
      • Outputs an image at 1024×1024 resolution.
    • Saves the generated image to the specified output path.
    • Returns 0 on success or 1 on failure.
    • Ensures cleanup by clearing memory and collecting garbage, even in case of errors.

    This method simplifies image generation:

    • Calls the generate method with the given prompt.
    • Prints a success message if the image is generated (0 return value).
    • On failure, logs the error and raises an exception.
    • Returns 0 on success or 1 on failure.
    class clsImage2Video:
        def __init__(self, pipeline):
            
            # Optimize model loading
            torch.mps.empty_cache()
            self.pipeline = pipeline
    
        def generate_frames(self, pipeline, init_image, prompt, duration_seconds=10):
            try:
                torch.mps.empty_cache()
                gc.collect()
    
                base_frames = []
                img = Image.open(init_image).convert("RGB").resize((1024, 1024))
                
                for _ in range(10):
                    result = pipeline(
                        prompt=prompt,
                        image=img,
                        strength=0.45,
                        guidance_scale=7.5,
                        num_inference_steps=25
                    ).images[0]
    
                    base_frames.append(np.array(result))
                    img = result
                    torch.mps.empty_cache()
    
                frames = []
                for i in range(len(base_frames)-1):
                    frame1, frame2 = base_frames[i], base_frames[i+1]
                    for t in np.linspace(0, 1, int(duration_seconds*24/10)):
                        frame = (1-t)*frame1 + t*frame2
                        frames.append(frame.astype(np.uint8))
                
                return frames
            except Exception as e:
                frames = []
                print(f'Error: {str(e)}')
    
                return frames
            finally:
                torch.mps.empty_cache()
                gc.collect()
    
        # Main method
        def genVideo(self, prompt, inputImage, targetVideo, fps):
            try:
                print("Starting animation generation...")
                
                init_image_path = inputImage
                output_path = targetVideo
                fps = fps
                
                frames = self.generate_frames(
                    pipeline=self.pipeline,
                    init_image=init_image_path,
                    prompt=prompt,
                    duration_seconds=20
                )
                
                imageio.mimsave(output_path, frames, fps=30)
    
                print("Animation completed successfully!")
    
                return 0
            except Exception as e:
                x = str(e)
                print('Error: ', x)
    
                return 1

    This initializes the clsImage2Video class:

    • Clears the GPU cache to optimize memory before loading.
    • Sets up the pipeline for generating frames, which uses an image-to-video transformation model.

    This function generates frames for a video:

    • Starts by clearing GPU memory and running garbage collection.
    • Loads the init_image, resizes it to 1024×1024 pixels, and converts it to RGB format.
    • Iteratively applies the pipeline to transform the image:
      • Uses the prompt and specified parameters like strengthguidance_scale, and num_inference_steps.
      • Stores the resulting frames in a list.
    • Interpolates between consecutive frames to create smooth transitions:
      • Uses linear blending for smooth animation across a specified duration and frame rate (24 fps for 10 segments).
    • Returns the final list of generated frames or an empty list if an error occurs.
    • Always clears memory after execution.

    This is the main function for creating a video from an image and text prompt:

    • Logs the start of the animation generation process.
    • Calls generate_frames() with the given pipelineinputImage, and prompt to create frames.
    • Saves the generated frames as a video using the imageio library, setting the specified frame rate (fps).
    • Logs a success message and returns 0 if the process is successful.
    • On error, logs the issue and returns 1.

    Now, let us understand the performance. But, before that let us explore the device on which we’ve performed these stress test that involves GPU & CPUs as well.

    And, here is the performance stats –

    From the above snapshot, we can clearly communicate that the GPU is 100% utilized. However, the CPU has shown a significant % of availability.

    As you can see, the first pass converts the input prompt to intermediate images within 1 min 30 sec. However, the second pass constitutes multiple hops (11 hops) on an avg 22 seconds. Overall, the application will finish in 5 minutes 36 seconds for a 10-second video clip.


    So, we’ve done it.

    You can find the detailed code at the GitHub link.

    I’ll bring some more exciting topics in the coming days from the Python verse.

    Till then, Happy Avenging! 🙂

    Exploring the new Polars library in Python

    Today, I will present some valid Python packages where you can explore most of the complex SQLs by using this new package named “Polars,” which can be extremely handy on many occasions.

    This post will be short posts where I’ll prepare something new on LLMs for the upcoming posts for the next month.

    Why not view the demo before going through it?


    Demo
    pip install polars
    pip install pandas

    Let us understand the key class & snippets.

    • clsConfigClient.py (Key entries that will be discussed later)
    ################################################
    #### Written By: SATYAKI DE                 ####
    #### Written On:  15-May-2020               ####
    #### Modified On: 28-Oct-2023               ####
    ####                                        ####
    #### Objective: This script is a config     ####
    #### file, contains all the keys for        ####
    #### personal OpenAI-based MAC-shortcuts    ####
    #### enable bot.                            ####
    ####                                        ####
    ################################################
    
    import os
    import platform as pl
    
    class clsConfigClient(object):
        Curr_Path = os.path.dirname(os.path.realpath(__file__))
    
        os_det = pl.system()
        if os_det == "Windows":
            sep = '\\'
        else:
            sep = '/'
    
        conf = {
            'APP_ID': 1,
            'ARCH_DIR': Curr_Path + sep + 'arch' + sep,
            'LOG_PATH': Curr_Path + sep + 'log' + sep,
            'DATA_PATH': Curr_Path + sep + 'data' + sep,
            'TEMP_PATH': Curr_Path + sep + 'temp' + sep,
            'OUTPUT_DIR': 'model',
            'APP_DESC_1': 'Polars Demo!',
            'DEBUG_IND': 'Y',
            'INIT_PATH': Curr_Path,
            'TITLE': "Polars Demo!",
            'PATH' : Curr_Path,
            'OUT_DIR': 'data',
            'MERGED_FILE': 'mergedFile.csv',
            'ACCT_FILE': 'AccountAddress.csv',
            'ORDER_FILE': 'Orders.csv',
            'CUSTOMER_FILE': 'CustomerDetails.csv',
            'STATE_CITY_WISE_REPORT_FILE': 'StateCityWiseReport.csv'
        }
    
    • clsSQL.py (Main class file that contains how to use the SQL)
    #####################################################
    #### Written By: SATYAKI DE                      ####
    #### Written On: 27-May-2023                     ####
    #### Modified On 28-Oct-2023                     ####
    ####                                             ####
    #### Objective: This is the main calling         ####
    #### python class that will invoke the           ####
    #### Polar class, which will enable SQL          ####
    #### capabilitites.                              ####
    ####                                             ####
    #####################################################
    
    import polars as pl
    import os
    from clsConfigClient import clsConfigClient as cf
    import pandas as p
    
    ###############################################
    ###           Global Section                ###
    ###############################################
    
    # Disbling Warning
    def warn(*args, **kwargs):
        pass
    
    import warnings
    warnings.warn = warn
    
    ###############################################
    ###    End of Global Section                ###
    ###############################################
    
    class clsSQL:
        def __init__(self):
            self.acctFile = cf.conf['ACCT_FILE']
            self.orderFile = cf.conf['ORDER_FILE']
            self.stateWiseReport = cf.conf['STATE_CITY_WISE_REPORT_FILE']
            self.custFile = cf.conf['CUSTOMER_FILE']
            self.dataPath = cf.conf['DATA_PATH']
    
        def execSQL(self):
            try:
                dataPath = self.dataPath
                acctFile = self.acctFile
                orderFile = self.orderFile
                stateWiseReport = self.stateWiseReport
                custFile = self.custFile
    
                fullAcctFile = dataPath + acctFile
                fullOrderFile = dataPath + orderFile
                fullStateWiseReportFile = dataPath + stateWiseReport
                fullCustomerFile = dataPath + custFile
    
                ctx = pl.SQLContext(accountMaster = pl.scan_csv(fullAcctFile),
                orderMaster = pl.scan_csv(fullOrderFile),
                stateMaster = pl.scan_csv(fullStateWiseReportFile))
    
                querySQL = """
                SELECT orderMaster.order_id,
                orderMaster.total,
                stateMaster.state,
                accountMaster.Acct_Nbr,
                accountMaster.Name,
                accountMaster.Email,
                accountMaster.user_id,
                COUNT(*) TotalCount
                FROM orderMaster
                JOIN stateMaster USING (city)
                JOIN accountMaster USING (user_id)
                ORDER BY stateMaster.state
                """
    
                res = ctx.execute(querySQL, eager=True)
                res_Pandas = res.to_pandas()
    
                print('Result:')
                print(res_Pandas)
                print(type(res_Pandas))
    
                ctx_1 = pl.SQLContext(customerMaster = pl.scan_csv(fullCustomerFile),
                tempMaster=pl.from_pandas(res_Pandas))
    
                querySQL_1 = """
                SELECT tempMaster.order_id,
                tempMaster.total,
                tempMaster.state,
                tempMaster.Acct_Nbr,
                tempMaster.Name,
                tempMaster.Email,
                tempMaster.TotalCount,
                tempMaster.user_id,
                COUNT(*) OVER(PARTITION BY tempMaster.state ORDER BY tempMaster.state, tempMaster.Acct_Nbr) StateWiseCount,
                MAX(tempMaster.Acct_Nbr) OVER(PARTITION BY tempMaster.state ORDER BY tempMaster.state, tempMaster.Acct_Nbr) MaxAccountByState,
                MIN(tempMaster.Acct_Nbr) OVER(PARTITION BY tempMaster.state ORDER BY tempMaster.state, tempMaster.Acct_Nbr) MinAccountByState,
                CASE WHEN tempMaster.total < 70 THEN 'SILVER' ELSE 'GOLD' END CategoryStat,
                SUM(customerMaster.Balance) OVER(PARTITION BY tempMaster.state) SumBalance
                FROM tempMaster
                JOIN customerMaster USING (user_id)
                ORDER BY tempMaster.state
                """
    
                res_1 = ctx_1.execute(querySQL_1, eager=True)
    
                finDF = res_1.to_pandas()
    
                print('Result 2:')
                print(finDF)
    
                return 0
            except Exception as e:
                discussedTopic = []
                x = str(e)
                print('Error: ', x)
    
                return 1
    

    If we go through some of the key lines, we will understand how this entire package works.

    But, before that, let us understand the source data –

    Let us understand the steps –

    1. Join orderMaster, stateMaster & accountMaster and fetch the selected attributes. Store this in a temporary data frame named tempMaster.
    2. Join tempMaster & customerMaster and fetch the relevant attributes with some more aggregation, which is required for the business KPIs.
    ctx = pl.SQLContext(accountMaster = pl.scan_csv(fullAcctFile),
    orderMaster = pl.scan_csv(fullOrderFile),
    stateMaster = pl.scan_csv(fullStateWiseReportFile))

    The above method will create three temporary tables by reading the source files – AccountAddress.csv, Orders.csv & StateCityWiseReport.csv.

    And, let us understand the supported SQLs –

    SELECT  orderMaster.order_id,
            orderMaster.total,
            stateMaster.state,
            accountMaster.Acct_Nbr,
            accountMaster.Name,
            accountMaster.Email,
            accountMaster.user_id,
            COUNT(*) TotalCount
    FROM orderMaster
    JOIN stateMaster USING (city)
    JOIN accountMaster USING (user_id)
    ORDER BY stateMaster.state

    In this step, we’re going to store the output of the above query into a temporary view named – tempMaster data frame.

    Since this is a polar data frame, we’re converting it to the pandas data frame.

    res_Pandas = res.to_pandas()

    Finally, let us understand the next part –

    ctx_1 = pl.SQLContext(customerMaster = pl.scan_csv(fullCustomerFile),
    tempMaster=pl.from_pandas(res_Pandas))

    In the above section, one source is getting populated from the CSV file, whereas the other source is feeding from a pandas data frame populated in the previous step.

    Now, let us understand the SQL supported by this package, which is impressive –

    SELECT  tempMaster.order_id,
            tempMaster.total,
            tempMaster.state,
            tempMaster.Acct_Nbr,
            tempMaster.Name,
            tempMaster.Email,
            tempMaster.TotalCount,
            tempMaster.user_id,
            COUNT(*) OVER(PARTITION BY tempMaster.state ORDER BY tempMaster.state, tempMaster.Acct_Nbr) StateWiseCount,
            MAX(tempMaster.Acct_Nbr) OVER(PARTITION BY tempMaster.state ORDER BY tempMaster.state, tempMaster.Acct_Nbr) MaxAccountByState,
            MIN(tempMaster.Acct_Nbr) OVER(PARTITION BY tempMaster.state ORDER BY tempMaster.state, tempMaster.Acct_Nbr) MinAccountByState,
            CASE WHEN tempMaster.total < 70 THEN 'SILVER' ELSE 'GOLD' END CategoryStat,
            SUM(customerMaster.Balance) OVER(PARTITION BY tempMaster.state) SumBalance
    FROM tempMaster
    JOIN customerMaster USING (user_id)
    ORDER BY tempMaster.state

    As you can see it has the capability of all the advanced analytics SQL using partitions, and CASE statements.

    The only problem with COUNT(*) with the partition is not working as expected. Not sure, whether that is related to any version issues or not.

    COUNT(*) OVER(PARTITION BY tempMaster.state ORDER BY tempMaster.state, tempMaster.Acct_Nbr) StateWiseCount

    I’m trying to get more information on this. Except for this statement, everything works perfectly.

    • 1_testSQL.py (Main class file that contains how to use the SQL)
    #########################################################
    #### Written By: SATYAKI DE                          ####
    #### Written On: 27-Jun-2023                         ####
    #### Modified On 28-Oct-2023                         ####
    ####                                                 ####
    #### Objective: This is the main class that invokes  ####
    #### advanced analytic SQL in python.                ####
    ####                                                 ####
    #########################################################
    
    from clsConfigClient import clsConfigClient as cf
    import clsL as log
    import clsSQL as ccl
    
    from datetime import datetime, timedelta
    
    # Disbling Warning
    def warn(*args, **kwargs):
        pass
    
    import warnings
    warnings.warn = warn
    
    ###############################################
    ###           Global Section                ###
    ###############################################
    
    #Initiating Logging Instances
    clog = log.clsL()
    cl = ccl.clsSQL()
    
    var = datetime.now().strftime(".%H.%M.%S")
    
    documents = []
    
    ###############################################
    ###    End of Global Section                ###
    ###############################################
    def main():
        try:
            var = datetime.now().strftime("%Y-%m-%d_%H-%M-%S")
            print('*'*120)
            print('Start Time: ' + str(var))
            print('*'*120)
    
            r1 = cl.execSQL()
    
            if r1 == 0:
                print()
                print('Successfully SQL-enabled!')
            else:
                print()
                print('Failed to senable SQL!')
    
            print('*'*120)
            var1 = datetime.now().strftime("%Y-%m-%d_%H-%M-%S")
            print('End Time: ' + str(var1))
    
        except Exception as e:
            x = str(e)
            print('Error: ', x)
    
    if __name__ == '__main__':
        main()
    

    As this is extremely easy to understand & self-explanatory.

    To learn more about this package, please visit the following link.


    So, finally, we’ve done it. I know that this post is relatively smaller than my earlier post. But, I think, you can get a good hack to improve some of your long-running jobs by applying this trick.

    I’ll bring some more exciting topics in the coming days from the Python verse. Please share & subscribe to my post & let me know your feedback.

    Till then, Happy Avenging!  🙂

    Tuning your model using the python-based low-code machine-learning library PyCaret

    Today, I’ll discuss another important topic before I will share the excellent use case next month, as I still need some time to finish that one. We’ll see how we can leverage the brilliant capability of a low-code machine-learning library named PyCaret.

    But before going through the details, why don’t we view the demo & then go through it?

    Demo

    Architecture:

    Let us understand the flow of events –

    As one can see, the initial training requests are triggered from the PyCaret-driven training models. And the application can successfully process & identify the best models out of the other combinations.

    Python Packages:

    Following are the python packages that are necessary to develop this use case –

    pip install pandas
    pip install pycaret

    PyCaret is dependent on a combination of other popular python packages. So, you need to install them successfully to run this package.

    CODE:

    • clsConfigClient.py (Main configuration file)


    ################################################
    #### Written By: SATYAKI DE ####
    #### Written On: 15-May-2020 ####
    #### Modified On: 31-Mar-2023 ####
    #### ####
    #### Objective: This script is a config ####
    #### file, contains all the keys for ####
    #### personal AI-driven voice assistant. ####
    #### ####
    ################################################
    import os
    import platform as pl
    class clsConfigClient(object):
    Curr_Path = os.path.dirname(os.path.realpath(__file__))
    os_det = pl.system()
    if os_det == "Windows":
    sep = '\\'
    else:
    sep = '/'
    conf = {
    'APP_ID': 1,
    'ARCH_DIR': Curr_Path + sep + 'arch' + sep,
    'PROFILE_PATH': Curr_Path + sep + 'profile' + sep,
    'LOG_PATH': Curr_Path + sep + 'log' + sep,
    'DATA_PATH': Curr_Path + sep + 'data' + sep,
    'MODEL_PATH': Curr_Path + sep + 'model' + sep,
    'TEMP_PATH': Curr_Path + sep + 'temp' + sep,
    'MODEL_DIR': 'model',
    'APP_DESC_1': 'PyCaret Training!',
    'DEBUG_IND': 'N',
    'INIT_PATH': Curr_Path,
    'FILE_NAME': 'Titanic.csv',
    'MODEL_NAME': 'PyCaret-ft-personal-2023-03-31-04-29-53',
    'TITLE': "PyCaret Training!",
    'PATH' : Curr_Path,
    'OUT_DIR': 'data'
    }

    I’m skipping this section as it is self-explanatory.


    • clsTrainModel.py (This is the main class that contains the core logic of low-code machine-learning library to evaluate the best model for your solutions.)


    #####################################################
    #### Written By: SATYAKI DE ####
    #### Written On: 31-Mar-2023 ####
    #### Modified On 31-Mar-2023 ####
    #### ####
    #### Objective: This is the main class that ####
    #### contains the core logic of low-code ####
    #### machine-learning library to evaluate the ####
    #### best model for your solutions. ####
    #### ####
    #####################################################
    import clsL as cl
    from clsConfigClient import clsConfigClient as cf
    import datetime
    # Import necessary libraries
    import pandas as p
    from pycaret.classification import *
    # Disbling Warning
    def warn(*args, **kwargs):
    pass
    import warnings
    warnings.warn = warn
    ######################################
    ### Get your global values ####
    ######################################
    debug_ind = 'Y'
    # Initiating Logging Instances
    clog = cl.clsL()
    ###############################################
    ### End of Global Section ###
    ###############################################
    class clsTrainModel:
    def __init__(self):
    self.model_path = cf.conf['MODEL_PATH']
    self.model_name = cf.conf['MODEL_NAME']
    def trainModel(self, FullFileName):
    try:
    df = p.read_csv(FullFileName)
    row_count = int(df.shape[0])
    print('Number of rows: ', str(row_count))
    print(df)
    # Initialize the setup in PyCaret
    clf_setup = setup(
    data=df,
    target="Survived",
    train_size=0.8, # 80% for training, 20% for testing
    categorical_features=["Sex", "Embarked"],
    ordinal_features={"Pclass": ["1", "2", "3"]},
    ignore_features=["Name", "Ticket", "Cabin", "PassengerId"],
    #silent=True, # Set to False for interactive setup
    )
    # Compare various models
    best_model = compare_models()
    # Create a specific model (e.g., Random Forest)
    rf_model = create_model("rf")
    # Hyperparameter tuning
    tuned_rf_model = tune_model(rf_model)
    # Evaluate model performance
    plot_model(tuned_rf_model, plot="confusion_matrix")
    plot_model(tuned_rf_model, plot="auc")
    # Finalize the model (train on the complete dataset)
    final_rf_model = finalize_model(tuned_rf_model)
    # Make predictions on new data
    new_data = df.drop("Survived", axis=1)
    predictions = predict_model(final_rf_model, data=new_data)
    # Writing into the Model
    FullModelName = self.model_path + self.model_name
    print('Model Output @:: ', str(FullModelName))
    print()
    # Save the fine-tuned model
    save_model(final_rf_model, FullModelName)
    return 0
    except Exception as e:
    x = str(e)
    print('Error: ', x)
    return 1

    Let us understand the code in simple terms –

    1. Import necessary libraries and load the Titanic dataset.
    2. Initialize the PyCaret setup, specifying the target variable, train-test split, categorical and ordinal features, and features to ignore.
    3. Compare various models to find the best-performing one.
    4. Create a specific model (Random Forest in this case).
    5. Perform hyper-parameter tuning on the Random Forest model.
    6. Evaluate the model’s performance using a confusion matrix and AUC-ROC curve.
    7. Finalize the model by training it on the complete dataset.
    8. Make predictions on new data.
    9. Save the trained model for future use.

    • trainPYCARETModel.py (This is the main calling python script that will invoke the training class of PyCaret package.)


    #####################################################
    #### Written By: SATYAKI DE ####
    #### Written On: 31-Mar-2023 ####
    #### Modified On 31-Mar-2023 ####
    #### ####
    #### Objective: This is the main calling ####
    #### python script that will invoke the ####
    #### training class of Pycaret package. ####
    #### ####
    #####################################################
    import clsL as cl
    from clsConfigClient import clsConfigClient as cf
    import datetime
    import clsTrainModel as tm
    # Disbling Warning
    def warn(*args, **kwargs):
    pass
    import warnings
    warnings.warn = warn
    ######################################
    ### Get your global values ####
    ######################################
    debug_ind = 'Y'
    # Initiating Logging Instances
    clog = cl.clsL()
    data_path = cf.conf['DATA_PATH']
    data_file_name = cf.conf['FILE_NAME']
    tModel = tm.clsTrainModel()
    ######################################
    #### Global Flag ########
    ######################################
    def main():
    try:
    var = datetime.datetime.now().strftime("%Y-%m-%d_%H-%M-%S")
    print('*'*120)
    print('Start Time: ' + str(var))
    print('*'*120)
    FullFileName = data_path + data_file_name
    r1 = tModel.trainModel(FullFileName)
    if r1 == 0:
    print('Successfully Trained!')
    else:
    print('Failed to Train!')
    print('*'*120)
    var1 = datetime.datetime.now().strftime("%Y-%m-%d_%H-%M-%S")
    print('End Time: ' + str(var1))
    except Exception as e:
    x = str(e)
    print('Error: ', x)
    if __name__ == "__main__":
    main()

    The above code is pretty self-explanatory as well.


    • testPYCARETModel.py (This is the main calling python script that will invoke the testing script for PyCaret package.)


    #####################################################
    #### Written By: SATYAKI DE ####
    #### Written On: 31-Mar-2023 ####
    #### Modified On 31-Mar-2023 ####
    #### ####
    #### Objective: This is the main calling ####
    #### python script that will invoke the ####
    #### testing script for PyCaret package. ####
    #### ####
    #####################################################
    import clsL as cl
    from clsConfigClient import clsConfigClient as cf
    import datetime
    from pycaret.classification import load_model, predict_model
    import pandas as p
    # Disbling Warning
    def warn(*args, **kwargs):
    pass
    import warnings
    warnings.warn = warn
    ######################################
    ### Get your global values ####
    ######################################
    debug_ind = 'Y'
    # Initiating Logging Instances
    clog = cl.clsL()
    model_path = cf.conf['MODEL_PATH']
    model_name = cf.conf['MODEL_NAME']
    ######################################
    #### Global Flag ########
    ######################################
    def main():
    try:
    var = datetime.datetime.now().strftime("%Y-%m-%d_%H-%M-%S")
    print('*'*120)
    print('Start Time: ' + str(var))
    print('*'*120)
    FullFileName = model_path + model_name
    # Load the saved model
    loaded_model = load_model(FullFileName)
    # Prepare new data for testing (make sure it has the same columns as the original data)
    new_data = p.DataFrame({
    "Pclass": [3, 1],
    "Sex": ["male", "female"],
    "Age": [22, 38],
    "SibSp": [1, 1],
    "Parch": [0, 0],
    "Fare": [7.25, 71.2833],
    "Embarked": ["S", "C"]
    })
    # Make predictions using the loaded model
    predictions = predict_model(loaded_model, data=new_data)
    # Display the predictions
    print(predictions)
    print('*'*120)
    var1 = datetime.datetime.now().strftime("%Y-%m-%d_%H-%M-%S")
    print('End Time: ' + str(var1))
    except Exception as e:
    x = str(e)
    print('Error: ', x)
    if __name__ == "__main__":
    main()

    In this code, the application uses the stored model & then forecasts based on the optimized PyCaret model tuning.

    Conclusion:

    The above code demonstrates an end-to-end binary classification pipeline using the PyCaret library for the Titanic dataset. The goal is to predict whether a passenger survived based on the available features. Here are some conclusions you can draw from the code and data:

    1. Ease of use: The code showcases how PyCaret simplifies the machine learning process, from data preprocessing to model training, evaluation, and deployment. With just a few lines of code, you can perform tasks that would require much more effort using lower-level libraries.
    2. Model selection: The compare_models() function provides a quick and easy way to compare various machine learning algorithms and identify the best-performing one based on the chosen evaluation metric (accuracy by default). This selection helps you select a suitable model for the given problem.
    3. Hyper-parameter tuning: The tune_model() function automates the process of hyper-parameter tuning to improve model performance. We tuned a Random Forest model to optimize its predictive power in the example.
    4. Model evaluation: PyCaret provides several built-in visualization tools for assessing model performance. In the example, we used a confusion matrix and AUC-ROC curve to evaluate the performance of the tuned Random Forest model.
    5. Model deployment: The example demonstrates how to make predictions using the trained model and save the model for future use. This deployment showcases how PyCaret can streamline the process of deploying a machine-learning model in a production environment.

    It is important to note that the conclusions drawn from the code and data are specific to the Titanic dataset and the chosen features. Adjust the feature engineering, preprocessing, and model selection steps for different datasets or problems accordingly. However, the general workflow and benefits provided by PyCaret would remain the same.


    So, finally, we’ve done it.

    I know that this post is relatively bigger than my earlier post. But, I think, you can get all the details once you go through it.

    You will get the complete codebase in the following GitHub link.

    I’ll bring some more exciting topics in the coming days from the Python verse. Please share & subscribe to my post & let me know your feedback.

    Till then, Happy Avenging! 🙂

    Note: All the data & scenarios posted here are representational data & scenarios & available over the internet & for educational purposes only. Some of the images (except my photo) we’ve used are available over the net. We don’t claim ownership of these images. There is always room for improvement & especially in the prediction quality.

    Python performance improvement with 3.11 Version

    Today, we’ll share another performance improvement incorporating the latest Python 3.11 version. You can consider this significant advancement over the past versions. Last time, I posted for 3.7 in one of my earlier posts. But, we should diligently update everyone regarding the performance upgrade as it is slowly catching up with some of the finest programming languages.

    But, before that, I want to share the latest stats of the machine where I tried these tests (As there is a change of system compared to last time).


    Let us explore the base code –

    ##############################################
    #### Written By: SATYAKI DE               ####
    #### Written On: 06-May-2021              ####
    #### Modified On: 30-Oct-2022             ####
    ####                                      ####
    #### Objective: Main calling scripts for  ####
    #### normal execution.                    ####
    ##############################################
    
    from timeit import default_timer as timer
    
    def vecCompute(sizeNum):
        try:
            total = 0
            for i in range(1, sizeNum):
                for j in range(1, sizeNum):
                    total += i + j
            return total
        except Excception as e:
            x = str(e)
            print('Error: ', x)
    
            return 0
    
    
    def main():
    
        start = timer()
    
        totalM = 0
        totalM = vecCompute(100000)
    
        print('The result is : ' + str(totalM))
        duration = timer() - start
        print('It took ' + str(duration) + ' seconds to compute')
    
    if __name__ == '__main__':
        main()
    

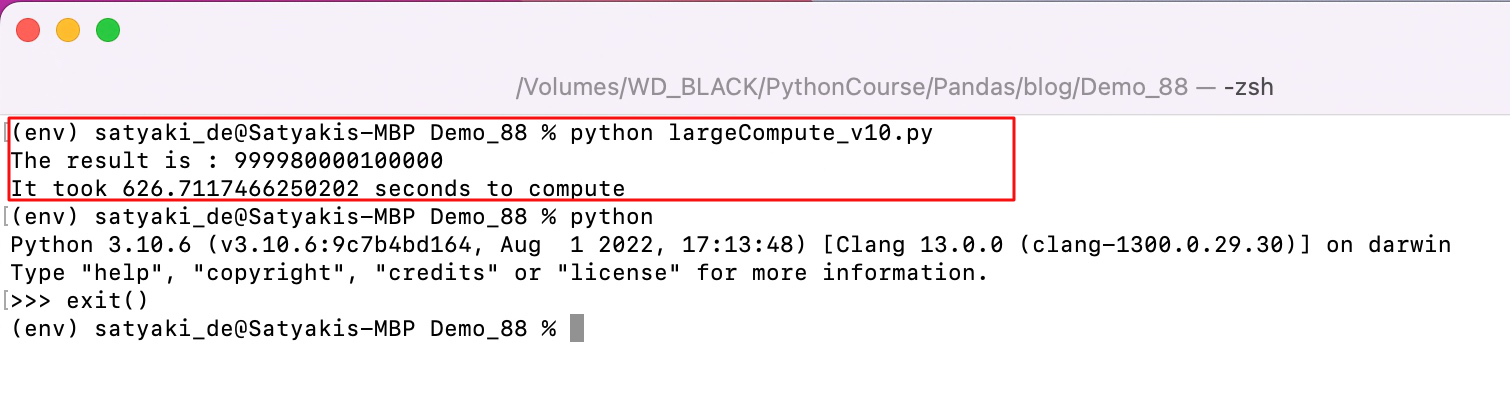
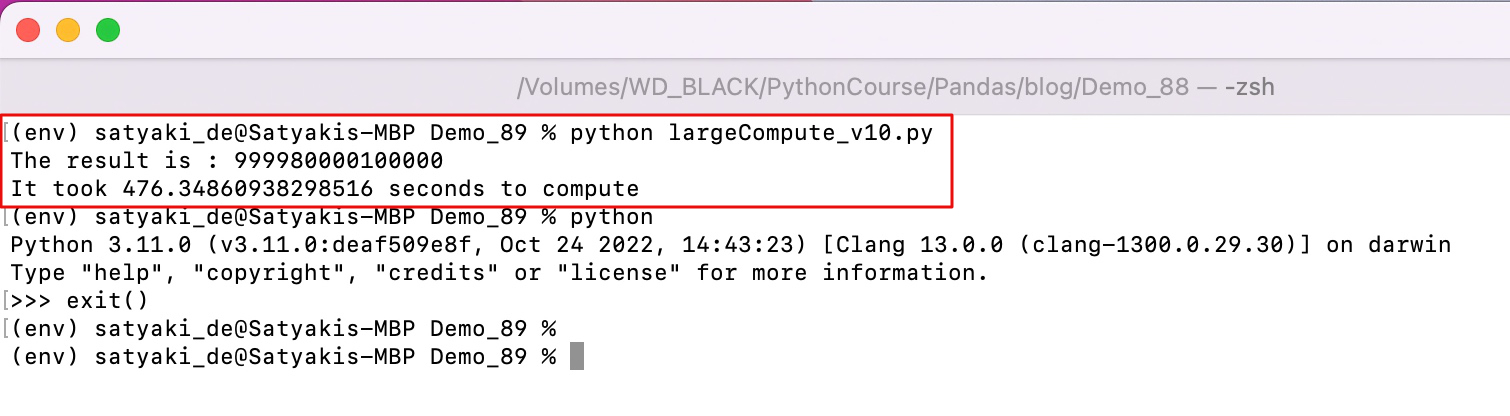
    And here is the outcome comparison between the 3.10 & 3.11 –

    The above screenshot shows an improvement of 23% on an average compared to the previous version.

    These performance stats are highly crucial. The result shows how Python is slowly emerging as the universal language for various kinds of work and is now targetting one of the vital threads, i.e., improvement of performance.


    So, finally, we have done it.

    I’ll bring some more exciting topic in the coming days from the Python verse.

    Till then, Happy Avenging! 🙂

    Note: All the data & scenario posted here are representational data & scenarios & available over the internet & for educational purpose only.
    Realtime reading from a Streaming using Computer Vision

    This week we’re going to extend one of our earlier posts & trying to read an entire text from streaming using computer vision. If you want to view the previous post, please click the following link.

    But, before we proceed, why don’t we view the demo first?

    Demo

    Architecture:

    Let us understand the architecture flow –

    Architecture flow

    The above diagram shows that the application, which uses the Open-CV, analyzes individual frames from the source & extracts the complete text within the video & displays it on top of the target screen besides prints the same in the console.

    Python Packages:

    pip install imutils==0.5.4
    pip install matplotlib==3.5.2
    pip install numpy==1.21.6
    pip install opencv-contrib-python==4.6.0.66
    pip install opencv-contrib-python-headless==4.6.0.66
    pip install opencv-python==4.6.0.66
    pip install opencv-python-headless==4.6.0.66
    pip install pandas==1.3.5
    pip install Pillow==9.1.1
    pip install pytesseract==0.3.9
    pip install python-dateutil==2.8.2

    CODE:

    Let us now understand the code. For this use case, we will only discuss three python scripts. However, we need more than these three. However, we have already discussed them in some of the early posts. Hence, we will skip them here.

    • clsReadingTextFromStream.py (This is the main class of python script that will extract the text from the WebCAM streaming in real-time.)


    ##################################################
    #### Written By: SATYAKI DE ####
    #### Written On: 22-Jul-2022 ####
    #### Modified On 25-Jul-2022 ####
    #### ####
    #### Objective: This is the main class of ####
    #### python script that will invoke the ####
    #### extraction of texts from a WebCAM. ####
    #### ####
    ##################################################
    # Importing necessary packages
    from clsConfig import clsConfig as cf
    from imutils.object_detection import non_max_suppression
    import numpy as np
    import pytesseract
    import imutils
    import time
    import cv2
    import time
    ###############################################
    ### Global Section ###
    ###############################################
    # Two output layer names for the text detector model
    lNames = cf.conf['LAYER_DET']
    # Tesseract OCR text param values
    strVal = "-l " + str(cf.conf['LANG']) + " –oem " + str(cf.conf['OEM_VAL']) + " –psm " + str(cf.conf['PSM_VAL']) + ""
    config = (strVal)
    ###############################################
    ### End of Global Section ###
    ###############################################
    class clsReadingTextFromStream:
    def __init__(self):
    self.sep = str(cf.conf['SEP'])
    self.Curr_Path = str(cf.conf['INIT_PATH'])
    self.CacheL = int(cf.conf['CACHE_LIM'])
    self.modelPath = str(cf.conf['MODEL_PATH']) + str(cf.conf['MODEL_FILE_NAME'])
    self.minConf = float(cf.conf['MIN_CONFIDENCE'])
    self.wt = int(cf.conf['WIDTH'])
    self.ht = int(cf.conf['HEIGHT'])
    self.pad = float(cf.conf['PADDING'])
    self.title = str(cf.conf['TITLE'])
    self.Otitle = str(cf.conf['ORIG_TITLE'])
    self.drawTag = cf.conf['DRAW_TAG']
    self.aRange = int(cf.conf['ASCII_RANGE'])
    self.sParam = cf.conf['SUBTRACT_PARAM']
    def findBoundBox(self, boxes, res, rW, rH, orig, origW, origH, pad):
    try:
    # Loop over the bounding boxes
    for (spX, spY, epX, epY) in boxes:
    # Scale the bounding box coordinates based on the respective
    # ratios
    spX = int(spX * rW)
    spY = int(spY * rH)
    epX = int(epX * rW)
    epY = int(epY * rH)
    # To obtain a better OCR of the text we can potentially
    # apply a bit of padding surrounding the bounding box.
    # And, computing the deltas in both the x and y directions
    dX = int((epX – spX) * pad)
    dY = int((epY – spY) * pad)
    # Apply padding to each side of the bounding box, respectively
    spX = max(0, spX – dX)
    spY = max(0, spY – dY)
    epX = min(origW, epX + (dX * 2))
    epY = min(origH, epY + (dY * 2))
    # Extract the actual padded ROI
    roi = orig[spY:epY, spX:epX]
    # Choose the proper OCR Config
    text = pytesseract.image_to_string(roi, config=config)
    # Add the bounding box coordinates and OCR'd text to the list
    # of results
    res.append(((spX, spY, epX, epY), text))
    # Sort the results bounding box coordinates from top to bottom
    res = sorted(res, key=lambda r:r[0][1])
    return res
    except Exception as e:
    x = str(e)
    print(x)
    return res
    def predictText(self, imgScore, imgGeo):
    try:
    minConf = self.minConf
    # Initializing the bounding box rectangles & confidence score by
    # extracting the rows & columns from the imgScore volume.
    (numRows, numCols) = imgScore.shape[2:4]
    rects = []
    confScore = []
    for y in range(0, numRows):
    # Extract the imgScore probabilities to derive potential
    # bounding box coordinates that surround text
    imgScoreData = imgScore[0, 0, y]
    xVal0 = imgGeo[0, 0, y]
    xVal1 = imgGeo[0, 1, y]
    xVal2 = imgGeo[0, 2, y]
    xVal3 = imgGeo[0, 3, y]
    anglesData = imgGeo[0, 4, y]
    for x in range(0, numCols):
    # If our score does not have sufficient probability,
    # ignore it
    if imgScoreData[x] < minConf:
    continue
    # Compute the offset factor as our resulting feature
    # maps will be 4x smaller than the input frame
    (offX, offY) = (x * 4.0, y * 4.0)
    # Extract the rotation angle for the prediction and
    # then compute the sin and cosine
    angle = anglesData[x]
    cos = np.cos(angle)
    sin = np.sin(angle)
    # Derive the width and height of the bounding box from
    # imgGeo
    h = xVal0[x] + xVal2[x]
    w = xVal1[x] + xVal3[x]
    # Compute both the starting and ending (x, y)-coordinates
    # for the text prediction bounding box
    epX = int(offX + (cos * xVal1[x]) + (sin * xVal2[x]))
    epY = int(offY – (sin * xVal1[x]) + (cos * xVal2[x]))
    spX = int(epX – w)
    spY = int(epY – h)
    # Adding bounding box coordinates and probability score
    # to the respective lists
    rects.append((spX, spY, epX, epY))
    confScore.append(imgScoreData[x])
    # return a tuple of the bounding boxes and associated confScore
    return (rects, confScore)
    except Exception as e:
    x = str(e)
    print(x)
    rects = []
    confScore = []
    return (rects, confScore)
    def processStream(self, debugInd, var):
    try:
    sep = self.sep
    Curr_Path = self.Curr_Path
    CacheL = self.CacheL
    modelPath = self.modelPath
    minConf = self.minConf
    wt = self.wt
    ht = self.ht
    pad = self.pad
    title = self.title
    Otitle = self.Otitle
    drawTag = self.drawTag
    aRange = self.aRange
    sParam = self.sParam
    val = 0
    # Initialize the video stream and allow the camera sensor to warm up
    print("[INFO] Starting video stream…")
    cap = cv2.VideoCapture(0)
    # Loading the pre-trained text detector
    print("[INFO] Loading Text Detector…")
    net = cv2.dnn.readNet(modelPath)
    # Loop over the frames from the video stream
    while True:
    try:
    # Grab the frame from our video stream and resize it
    success, frame = cap.read()
    orig = frame.copy()
    (origH, origW) = frame.shape[:2]
    # Setting new width and height and then determine the ratio in change
    # for both the width and height
    (newW, newH) = (wt, ht)
    rW = origW / float(newW)
    rH = origH / float(newH)
    # Resize the frame and grab the new frame dimensions
    frame = cv2.resize(frame, (newW, newH))
    (H, W) = frame.shape[:2]
    # Construct a blob from the frame and then perform a forward pass of
    # the model to obtain the two output layer sets
    blob = cv2.dnn.blobFromImage(frame, 1.0, (W, H), sParam, swapRB=True, crop=False)
    net.setInput(blob)
    (confScore, imgGeo) = net.forward(lNames)
    # Decode the predictions, then apply non-maxima suppression to
    # suppress weak, overlapping bounding boxes
    (rects, confidences) = self.predictText(confScore, imgGeo)
    boxes = non_max_suppression(np.array(rects), probs=confidences)
    # Initialize the list of results
    res = []
    # Getting BoundingBox boundaries
    res = self.findBoundBox(boxes, res, rW, rH, orig, origW, origH, pad)
    for ((spX, spY, epX, epY), text) in res:
    # Display the text OCR by using Tesseract APIs
    print("Reading Text::")
    print("=" *60)
    print(text)
    print("=" *60)
    # Removing the non-ASCII text so it can draw the text on the frame
    # using OpenCV, then draw the text and a bounding box surrounding
    # the text region of the input frame
    text = "".join([c if ord(c) < aRange else "" for c in text]).strip()
    output = orig.copy()
    cv2.rectangle(output, (spX, spY), (epX, epY), drawTag, 2)
    cv2.putText(output, text, (spX, spY – 20), cv2.FONT_HERSHEY_SIMPLEX, 1.2, drawTag, 3)
    # Show the output frame
    cv2.imshow(title, output)
    #cv2.imshow(Otitle, frame)
    # If the `q` key was pressed, break from the loop
    if cv2.waitKey(1) == ord('q'):
    break
    val = 0
    except Exception as e:
    x = str(e)
    print(x)
    val = 1
    # Performing cleanup at the end
    cap.release()
    cv2.destroyAllWindows()
    return val
    except Exception as e:
    x = str(e)
    print('Error:', x)
    return 1

    Please find the key snippet from the above script –

    # Two output layer names for the text detector model
    
    lNames = cf.conf['LAYER_DET']
    
    # Tesseract OCR text param values
    
    strVal = "-l " + str(cf.conf['LANG']) + " --oem " + str(cf.conf['OEM_VAL']) + " --psm " + str(cf.conf['PSM_VAL']) + ""
    config = (strVal)

    The first line contains the two output layers’ names for the text detector model. Among them, the first one indicates the outcome possibilities & the second one use to derive the bounding box coordinates of the predicted text.

    The second line contains various options for the tesseract APIs. You need to understand the opportunities in detail to make them work. These are the essential options for our use case –

    • Language – The intended language, for example, English, Spanish, Hindi, Bengali, etc.
    • OEM flag – In this case, the application will use 4 to indicate LSTM neural net model for OCR.
    • OEM Value – In this case, the selected value is 7, indicating that the application treats the ROI as a single line of text.

    For more details, please refer to the config file.

    print("[INFO] Loading Text Detector...")
    net = cv2.dnn.readNet(modelPath)

    The above lines bring the already created model & load it to memory for evaluation.

    # Setting new width and height and then determine the ratio in change
    # for both the width and height
    (newW, newH) = (wt, ht)
    rW = origW / float(newW)
    rH = origH / float(newH)
    
    # Resize the frame and grab the new frame dimensions
    frame = cv2.resize(frame, (newW, newH))
    (H, W) = frame.shape[:2]
    
    # Construct a blob from the frame and then perform a forward pass of
    # the model to obtain the two output layer sets
    blob = cv2.dnn.blobFromImage(frame, 1.0, (W, H), sParam, swapRB=True, crop=False)
    net.setInput(blob)
    (confScore, imgGeo) = net.forward(lNames)
    
    # Decode the predictions, then apply non-maxima suppression to
    # suppress weak, overlapping bounding boxes
    (rects, confidences) = self.predictText(confScore, imgGeo)
    boxes = non_max_suppression(np.array(rects), probs=confidences)

    The above lines are more of preparing individual frames to get the bounding box by resizing the height & width followed by a forward pass of the model to obtain two output layer sets. And then apply the non-maxima suppression to remove the weak, overlapping bounding box by interpreting the prediction. In short, this will identify the potential text region & put the bounding box surrounding it.

    # Initialize the list of results
    res = []
    
    # Getting BoundingBox boundaries
    res = self.findBoundBox(boxes, res, rW, rH, orig, origW, origH, pad)

    The above function will create the bounding box surrounding the predicted text regions. Also, we will capture the expected text inside the result variable.

    for (spX, spY, epX, epY) in boxes:
      # Scale the bounding box coordinates based on the respective
      # ratios
      spX = int(spX * rW)
      spY = int(spY * rH)
      epX = int(epX * rW)
      epY = int(epY * rH)
    
      # To obtain a better OCR of the text we can potentially
      # apply a bit of padding surrounding the bounding box.
      # And, computing the deltas in both the x and y directions
      dX = int((epX - spX) * pad)
      dY = int((epY - spY) * pad)
    
      # Apply padding to each side of the bounding box, respectively
      spX = max(0, spX - dX)
      spY = max(0, spY - dY)
      epX = min(origW, epX + (dX * 2))
      epY = min(origH, epY + (dY * 2))
    
      # Extract the actual padded ROI
      roi = orig[spY:epY, spX:epX]

    Now, the application will scale the bounding boxes based on the previously computed ratio for actual text recognition. In this process, the application also padded the bounding boxes & then extracted the padded region of interest.

    # Choose the proper OCR Config
    text = pytesseract.image_to_string(roi, config=config)
    
    # Add the bounding box coordinates and OCR'd text to the list
    # of results
    res.append(((spX, spY, epX, epY), text))

    Using OCR options, the application extracts the text within the video frame & adds that to the res list.

    # Sort the results bounding box coordinates from top to bottom
    res = sorted(res, key=lambda r:r[0][1])

    It then sends a sorted output to the primary calling functions.

    for ((spX, spY, epX, epY), text) in res:
      # Display the text OCR by using Tesseract APIs
      print("Reading Text::")
      print("=" *60)
      print(text)
      print("=" *60)
    
      # Removing the non-ASCII text so it can draw the text on the frame
      # using OpenCV, then draw the text and a bounding box surrounding
      # the text region of the input frame
      text = "".join([c if ord(c) < aRange else "" for c in text]).strip()
      output = orig.copy()
    
      cv2.rectangle(output, (spX, spY), (epX, epY), drawTag, 2)
      cv2.putText(output, text, (spX, spY - 20), cv2.FONT_HERSHEY_SIMPLEX, 1.2, drawTag, 3)
    
      # Show the output frame
      cv2.imshow(title, output)

    Finally, it fetches the potential text region along with the text & then prints on top of the source video. Also, it removed some non-printable characters during this time to avoid any cryptic texts.

    • readingVideo.py (Main calling script.)


    #####################################################
    #### Written By: SATYAKI DE ####
    #### Written On: 22-Jul-2022 ####
    #### Modified On 25-Jul-2022 ####
    #### ####
    #### Objective: This is the main calling ####
    #### python script that will invoke the ####
    #### clsReadingTextFromStream class to initiate ####
    #### the reading capability in real-time ####
    #### & display text via Web-CAM. ####
    #####################################################
    # We keep the setup code in a different class as shown below.
    import clsReadingTextFromStream as rtfs
    from clsConfig import clsConfig as cf
    import datetime
    import logging
    ###############################################
    ### Global Section ###
    ###############################################
    # Instantiating all the main class
    x1 = rtfs.clsReadingTextFromStream()
    ###############################################
    ### End of Global Section ###
    ###############################################
    def main():
    try:
    # Other useful variables
    debugInd = 'Y'
    var = datetime.datetime.now().strftime("%Y-%m-%d_%H-%M-%S")
    var1 = datetime.datetime.now()
    print('Start Time: ', str(var))
    # End of useful variables
    # Initiating Log Class
    general_log_path = str(cf.conf['LOG_PATH'])
    # Enabling Logging Info
    logging.basicConfig(filename=general_log_path + 'readingTextFromVideo.log', level=logging.INFO)
    print('Started reading text from videos!')
    # Execute all the pass
    r1 = x1.processStream(debugInd, var)
    if (r1 == 0):
    print('Successfully read text from the Live Stream!')
    else:
    print('Failed to read text from the Live Stream!')
    var2 = datetime.datetime.now()
    c = var2 – var1
    minutes = c.total_seconds() / 60
    print('Total difference in minutes: ', str(minutes))
    print('End Time: ', str(var1))
    except Exception as e:
    x = str(e)
    print('Error: ', x)
    if __name__ == "__main__":
    main()

    view raw

    readingVideo.py

    hosted with ❤ by GitHub

    Please find the key snippet –

    # Instantiating all the main class
    
    x1 = rtfs.clsReadingTextFromStream()
    
    # Execute all the pass
    r1 = x1.processStream(debugInd, var)
    
    if (r1 == 0):
        print('Successfully read text from the Live Stream!')
    else:
        print('Failed to read text from the Live Stream!')

    The above lines instantiate the main calling class & then invoke the function to get the desired extracted text from the live streaming video if that is successful.

    FOLDER STRUCTURE:

    Here is the folder structure that contains all the files & directories in MAC O/S –

    You will get the complete codebase in the following Github link.

    Unfortunately, I cannot upload the model due to it’s size. I will share on the need basis.

    I’ll bring some more exciting topic in the coming days from the Python verse. Please share & subscribe my post & let me know your feedback.

    Till then, Happy Avenging! 🙂

    Note: All the data & scenario posted here are representational data & scenarios & available over the internet & for educational purpose only. Some of the images (except my photo) that we’ve used are available over the net. We don’t claim the ownership of these images. There is an always room for improvement & especially the prediction quality.

    Real-time augmented reality (AR) using Python-based Computer Vision

    Hi Team,

    Today, I’m going to discuss another Computer Vision installment. I’ll discuss how to implement Augmented Reality using Open-CV Computer Vision with full audio. We will be using part of a Bengali OTT Series called “Feludar Goendagiri” entirely for educational purposes & also as a tribute to the great legendary director, late Satyajit Roy. To know more about him, please click the following link.

    Why don’t we see the demo first before jumping into the technical details?


    Demo

    Architecture:

    Let us understand the architecture –

    Process Flow

    The above diagram shows that the application, which uses the Open-CV, analyzes individual frames from the source & blends that with the video trailer. Finally, it creates another video by correctly mixing the source audio.

    Python Packages:

    Following are the python packages that are necessary to develop this brilliant use case –

    pip install opencv-python
    pip install pygame

    CODE:

    Let us now understand the code. For this use case, we will only discuss three python scripts. However, we need more than these three. However, we have already discussed them in some of the early posts. Hence, we will skip them here.

    • clsAugmentedReality.py (This is the main class of python script that will embed the source video with the WebCAM streams in real-time.)


    ##################################################
    #### Written By: SATYAKI DE ####
    #### Written On: 20-Jun-2022 ####
    #### Modified On 25-Jun-2022 ####
    #### ####
    #### Objective: This is the main class of ####
    #### python script that will embed the source ####
    #### video with the WebCAM streams in ####
    #### real-time. ####
    ##################################################
    # Importing necessary packages
    import numpy as np
    import cv2
    from clsConfig import clsConfig as cf
    # Initialize our cached reference points
    CACHED_REF_PTS = None
    class clsAugmentedReality:
    def __init__(self):
    self.TOP_LEFT_X = int(cf.conf['TOP_LEFT_X'])
    self.TOP_LEFT_Y = int(cf.conf['TOP_LEFT_Y'])
    self.TOP_RIGHT_X = int(cf.conf['TOP_RIGHT_X'])
    self.TOP_RIGHT_Y = int(cf.conf['TOP_RIGHT_Y'])
    self.BOTTOM_RIGHT_X = int(cf.conf['BOTTOM_RIGHT_X'])
    self.BOTTOM_RIGHT_Y = int(cf.conf['BOTTOM_RIGHT_Y'])
    self.BOTTOM_LEFT_X = int(cf.conf['BOTTOM_LEFT_X'])
    self.BOTTOM_LEFT_Y = int(cf.conf['BOTTOM_LEFT_Y'])
    def getWarpImages(self, frame, source, cornerIDs, arucoDict, arucoParams, zoomFlag, useCache=False):
    try:
    # Assigning values
    TOP_LEFT_X = self.TOP_LEFT_X
    TOP_LEFT_Y = self.TOP_LEFT_Y
    TOP_RIGHT_X = self.TOP_RIGHT_X
    TOP_RIGHT_Y = self.TOP_RIGHT_Y
    BOTTOM_RIGHT_X = self.BOTTOM_RIGHT_X
    BOTTOM_RIGHT_Y = self.BOTTOM_RIGHT_Y
    BOTTOM_LEFT_X = self.BOTTOM_LEFT_X
    BOTTOM_LEFT_Y = self.BOTTOM_LEFT_Y
    # Grab a reference to our cached reference points
    global CACHED_REF_PTS
    if source is None:
    raise
    # Grab the width and height of the frame and source image,
    # respectively
    # Extracting Frame from Camera
    # Exracting Source from Video
    (imgH, imgW) = frame.shape[:2]
    (srcH, srcW) = source.shape[:2]
    # Detect Aruco markers in the input frame
    (corners, ids, rejected) = cv2.aruco.detectMarkers(frame, arucoDict, parameters=arucoParams)
    print('Ids: ', str(ids))
    print('Rejected: ', str(rejected))
    # if we *did not* find our four ArUco markers, initialize an
    # empty IDs list, otherwise flatten the ID list
    print('Detecting Corners: ', str(len(corners)))
    ids = np.array([]) if len(corners) != 4 else ids.flatten()
    # Initialize our list of reference points
    refPts = []
    refPtTL1 = []
    # Loop over the IDs of the ArUco markers in Top-Left, Top-Right,
    # Bottom-Right, and Bottom-Left order
    for i in cornerIDs:
    # Grab the index of the corner with the current ID
    j = np.squeeze(np.where(ids == i))
    # If we receive an empty list instead of an integer index,
    # then we could not find the marker with the current ID
    if j.size == 0:
    continue
    # Otherwise, append the corner (x, y)-coordinates to our list
    # of reference points
    corner = np.squeeze(corners[j])
    refPts.append(corner)
    # Check to see if we failed to find the four ArUco markers
    if len(refPts) != 4:
    # If we are allowed to use cached reference points, fall
    # back on them
    if useCache and CACHED_REF_PTS is not None:
    refPts = CACHED_REF_PTS
    # Otherwise, we cannot use the cache and/or there are no
    # previous cached reference points, so return early
    else:
    return None
    # If we are allowed to use cached reference points, then update
    # the cache with the current set
    if useCache:
    CACHED_REF_PTS = refPts
    # Unpack our Aruco reference points and use the reference points
    # to define the Destination transform matrix, making sure the
    # points are specified in Top-Left, Top-Right, Bottom-Right, and
    # Bottom-Left order
    (refPtTL, refPtTR, refPtBR, refPtBL) = refPts
    dstMat = [refPtTL[0], refPtTR[1], refPtBR[2], refPtBL[3]]
    dstMat = np.array(dstMat)
    # For zoom option recalculating all the 4 points
    refPtTL1_L_X = refPtTL[0][0]-TOP_LEFT_X
    refPtTL1_L_Y = refPtTL[0][1]-TOP_LEFT_Y
    refPtTL1.append((refPtTL1_L_X,refPtTL1_L_Y))
    refPtTL1_R_X = refPtTL[1][0]+TOP_RIGHT_X
    refPtTL1_R_Y = refPtTL[1][1]+TOP_RIGHT_Y
    refPtTL1.append((refPtTL1_R_X,refPtTL1_R_Y))
    refPtTD1_L_X = refPtTL[2][0]+BOTTOM_RIGHT_X
    refPtTD1_L_Y = refPtTL[2][1]+BOTTOM_RIGHT_Y
    refPtTL1.append((refPtTD1_L_X,refPtTD1_L_Y))
    refPtTD1_R_X = refPtTL[3][0]-BOTTOM_LEFT_X
    refPtTD1_R_Y = refPtTL[3][1]+BOTTOM_LEFT_Y
    refPtTL1.append((refPtTD1_R_X,refPtTD1_R_Y))
    dstMatMod = [refPtTL1[0], refPtTL1[1], refPtTL1[2], refPtTL1[3]]
    dstMatMod = np.array(dstMatMod)
    # Define the transform matrix for the *source* image in Top-Left,
    # Top-Right, Bottom-Right, and Bottom-Left order
    srcMat = np.array([[0, 0], [srcW, 0], [srcW, srcH], [0, srcH]])
    # Compute the homography matrix and then warp the source image to
    # the destination based on the homography depending upon the
    # zoom flag
    if zoomFlag == 1:
    (H, _) = cv2.findHomography(srcMat, dstMat)
    else:
    (H, _) = cv2.findHomography(srcMat, dstMatMod)
    warped = cv2.warpPerspective(source, H, (imgW, imgH))
    # Construct a mask for the source image now that the perspective
    # warp has taken place (we'll need this mask to copy the source
    # image into the destination)
    mask = np.zeros((imgH, imgW), dtype="uint8")
    if zoomFlag == 1:
    cv2.fillConvexPoly(mask, dstMat.astype("int32"), (255, 255, 255), cv2.LINE_AA)
    else:
    cv2.fillConvexPoly(mask, dstMatMod.astype("int32"), (255, 255, 255), cv2.LINE_AA)
    # This optional step will give the source image a black
    # border surrounding it when applied to the source image, you
    # can apply a dilation operation
    rect = cv2.getStructuringElement(cv2.MORPH_RECT, (3, 3))
    mask = cv2.dilate(mask, rect, iterations=2)
    # Create a three channel version of the mask by stacking it
    # depth-wise, such that we can copy the warped source image
    # into the input image
    maskScaled = mask.copy() / 255.0
    maskScaled = np.dstack([maskScaled] * 3)
    # Copy the warped source image into the input image by
    # (1) Multiplying the warped image and masked together,
    # (2) Then multiplying the original input image with the
    # mask (giving more weight to the input where there
    # are not masked pixels), and
    # (3) Adding the resulting multiplications together
    warpedMultiplied = cv2.multiply(warped.astype("float"), maskScaled)
    imageMultiplied = cv2.multiply(frame.astype(float), 1.0 – maskScaled)
    output = cv2.add(warpedMultiplied, imageMultiplied)
    output = output.astype("uint8")
    # Return the output frame to the calling function
    return output
    except Exception as e:
    # Delibarately raising the issue
    # That way the control goes to main calling methods
    # exception section
    raise

    Please find the key snippet from the above script –

    (imgH, imgW) = frame.shape[:2]
    (srcH, srcW) = source.shape[:2]
    
    # Detect Aruco markers in the input frame
    (corners, ids, rejected) = cv2.aruco.detectMarkers(frame, arucoDict, parameters=arucoParams)

    Identifying the Aruco markers are key here. The above lines help the program detect all four corners.

    However, let us discuss more on the Aruco markers & strategies that I’ve used for several different surfaces.

    As you can see, the right-hand side Aruco marker is tiny compared to the left one. Hence, that one will be ideal for a curve surface like Coffee Mug, Bottle rather than a flat surface.

    Also, we’ve demonstrated the zoom capability with the smaller Aruco marker that will Augment almost double the original surface area.

    Let us understand why we need that; as you know, any spherical surface like a bottle is round-shaped. Hence, detecting relatively more significant Aruco markers in four corners will be difficult for any camera to identify.

    Hence, we need a process where close four corners can be extrapolated mathematically to relatively larger projected areas easily detectable by any WebCAM.

    Let’s observe the following figure –

    Simulated Extrapolated corners

    As you can see that the original position of the four corners is represented using the following points, i.e., (x1, y1), (x2, y2), (x3, y3) & (x4, y4).

    And these positions are very close to each other. Hence, it will be easier for the camera to detect all the points (like a plain surface) without many retries.

    And later, you can add specific values of x & y to them to get the derived four corners as shown in the above figures through the following points, i.e. (x1.1, y1.1), (x2.1, y2.1), (x3.1, y3.1) & (x4.1, y4.1).

    # Loop over the IDs of the ArUco markers in Top-Left, Top-Right,
    # Bottom-Right, and Bottom-Left order
    for i in cornerIDs:
      # Grab the index of the corner with the current ID
      j = np.squeeze(np.where(ids == i))
    
      # If we receive an empty list instead of an integer index,
      # then we could not find the marker with the current ID
      if j.size == 0:
        continue
    
      # Otherwise, append the corner (x, y)-coordinates to our list
      # of reference points
      corner = np.squeeze(corners[j])
      refPts.append(corner)
    
    # Check to see if we failed to find the four ArUco markers
    if len(refPts) != 4:
      # If we are allowed to use cached reference points, fall
      # back on them
      if useCache and CACHED_REF_PTS is not None:
        refPts = CACHED_REF_PTS
    
      # Otherwise, we cannot use the cache and/or there are no
      # previous cached reference points, so return early
      else:
        return None
    
    # If we are allowed to use cached reference points, then update
    # the cache with the current set
    if useCache:
      CACHED_REF_PTS = refPts
    
    # Unpack our Aruco reference points and use the reference points
    # to define the Destination transform matrix, making sure the
    # points are specified in Top-Left, Top-Right, Bottom-Right, and
    # Bottom-Left order
    (refPtTL, refPtTR, refPtBR, refPtBL) = refPts
    dstMat = [refPtTL[0], refPtTR[1], refPtBR[2], refPtBL[3]]
    dstMat = np.array(dstMat)

    In the above snippet, the application will scan through all the points & try to detect Aruco markers & then create a list of reference points, which will later be used to define the destination transformation matrix.

    # For zoom option recalculating all the 4 points
    refPtTL1_L_X = refPtTL[0][0]-TOP_LEFT_X
    refPtTL1_L_Y = refPtTL[0][1]-TOP_LEFT_Y
    
    refPtTL1.append((refPtTL1_L_X,refPtTL1_L_Y))
    
    refPtTL1_R_X = refPtTL[1][0]+TOP_RIGHT_X
    refPtTL1_R_Y = refPtTL[1][1]+TOP_RIGHT_Y
    
    refPtTL1.append((refPtTL1_R_X,refPtTL1_R_Y))
    
    refPtTD1_L_X = refPtTL[2][0]+BOTTOM_RIGHT_X
    refPtTD1_L_Y = refPtTL[2][1]+BOTTOM_RIGHT_Y
    
    refPtTL1.append((refPtTD1_L_X,refPtTD1_L_Y))
    
    refPtTD1_R_X = refPtTL[3][0]-BOTTOM_LEFT_X
    refPtTD1_R_Y = refPtTL[3][1]+BOTTOM_LEFT_Y
    
    refPtTL1.append((refPtTD1_R_X,refPtTD1_R_Y))
    
    dstMatMod = [refPtTL1[0], refPtTL1[1], refPtTL1[2], refPtTL1[3]]
    dstMatMod = np.array(dstMatMod)

    The above snippets calculate the revised points for the zoom-out capabilities as discussed in one of the earlier figures.

    # Define the transform matrix for the *source* image in Top-Left,
    # Top-Right, Bottom-Right, and Bottom-Left order
    srcMat = np.array([[0, 0], [srcW, 0], [srcW, srcH], [0, srcH]])

    The above snippet will create a transformation matrix for the video trailer.

    # Compute the homography matrix and then warp the source image to
    # the destination based on the homography depending upon the
    # zoom flag
    if zoomFlag == 1:
      (H, _) = cv2.findHomography(srcMat, dstMat)
    else:
      (H, _) = cv2.findHomography(srcMat, dstMatMod)
    
    warped = cv2.warpPerspective(source, H, (imgW, imgH))
    
    # Construct a mask for the source image now that the perspective
    # warp has taken place (we'll need this mask to copy the source
    # image into the destination)
    mask = np.zeros((imgH, imgW), dtype="uint8")
    if zoomFlag == 1:
      cv2.fillConvexPoly(mask, dstMat.astype("int32"), (255, 255, 255), cv2.LINE_AA)
    else:
      cv2.fillConvexPoly(mask, dstMatMod.astype("int32"), (255, 255, 255), cv2.LINE_AA)
    
    # This optional step will give the source image a black
    # border surrounding it when applied to the source image, you
    # can apply a dilation operation
    rect = cv2.getStructuringElement(cv2.MORPH_RECT, (3, 3))
    mask = cv2.dilate(mask, rect, iterations=2)
    
    # Create a three channel version of the mask by stacking it
    # depth-wise, such that we can copy the warped source image
    # into the input image
    maskScaled = mask.copy() / 255.0
    maskScaled = np.dstack([maskScaled] * 3)
    
    # Copy the warped source image into the input image by
    # (1) Multiplying the warped image and masked together,
    # (2) Then multiplying the original input image with the
    #     mask (giving more weight to the input where there
    #     are not masked pixels), and
    # (3) Adding the resulting multiplications together
    warpedMultiplied = cv2.multiply(warped.astype("float"), maskScaled)
    imageMultiplied = cv2.multiply(frame.astype(float), 1.0 - maskScaled)
    output = cv2.add(warpedMultiplied, imageMultiplied)
    output = output.astype("uint8")

    Finally, depending upon the zoom flag, the application will create a warped image surrounded by an optionally black border.

    • clsEmbedVideoWithStream.py (This is the main class of python script that will invoke the clsAugmentedReality class to initiate augment reality after splitting the audio & video & then project them via the Web-CAM with a seamless broadcast.)


    ##################################################
    #### Written By: SATYAKI DE ####
    #### Written On: 22-Jun-2022 ####
    #### Modified On 25-Jun-2022 ####
    #### ####
    #### Objective: This is the main class of ####
    #### python script that will invoke the ####
    #### clsAugmentedReality class to initiate ####
    #### augment reality after splitting the ####
    #### audio & video & then project them via ####
    #### the Web-CAM with a seamless broadcast. ####
    ##################################################
    # Importing necessary packages
    import clsAugmentedReality as ar
    from clsConfig import clsConfig as cf
    from imutils.video import VideoStream
    from collections import deque
    import imutils
    import time
    import cv2
    import subprocess
    import os
    import pygame
    import time
    import threading
    import sys
    ###############################################
    ### Global Section ###
    ###############################################
    # Instantiating the dependant class
    x1 = ar.clsAugmentedReality()
    ###############################################
    ### End of Global Section ###
    ###############################################
    class BreakLoop(Exception):
    pass
    class clsEmbedVideoWithStream:
    def __init__(self):
    self.sep = str(cf.conf['SEP'])
    self.Curr_Path = str(cf.conf['INIT_PATH'])
    self.FileName = str(cf.conf['FILE_NAME'])
    self.CacheL = int(cf.conf['CACHE_LIM'])
    self.FileName_1 = str(cf.conf['FILE_NAME_1'])
    self.audioLen = int(cf.conf['audioLen'])
    self.audioFreq = float(cf.conf['audioFreq'])
    self.videoFrame = float(cf.conf['videoFrame'])
    self.stopFlag=cf.conf['stopFlag']
    self.zFlag=int(cf.conf['zoomFlag'])
    self.title = str(cf.conf['TITLE'])
    def playAudio(self, audioFile, audioLen, freq, stopFlag=False):
    try:
    pygame.mixer.init()
    pygame.init()
    pygame.mixer.music.load(audioFile)
    pygame.mixer.music.set_volume(10)
    val = int(audioLen)
    i = 0
    while i < val:
    pygame.mixer.music.play(loops=0, start=float(i))
    time.sleep(freq)
    i = i + 1
    if (i >= val):
    raise BreakLoop
    if (stopFlag==True):
    raise BreakLoop
    return 0
    except BreakLoop as s:
    return 0
    except Exception as e:
    x = str(e)
    print(x)
    return 1
    def extractAudio(self, video_file, output_ext="mp3"):
    try:
    """Converts video to audio directly using `ffmpeg` command
    with the help of subprocess module"""
    filename, ext = os.path.splitext(video_file)
    subprocess.call(["ffmpeg", "-y", "-i", video_file, f"{filename}.{output_ext}"],
    stdout=subprocess.DEVNULL,
    stderr=subprocess.STDOUT)
    return 0
    except Exception as e:
    x = str(e)
    print('Error: ', x)
    return 1
    def processStream(self, debugInd, var):
    try:
    sep = self.sep
    Curr_Path = self.Curr_Path
    FileName = self.FileName
    CacheL = self.CacheL
    FileName_1 = self.FileName_1
    audioLen = self.audioLen
    audioFreq = self.audioFreq
    videoFrame = self.videoFrame
    stopFlag = self.stopFlag
    zFlag = self.zFlag
    title = self.title
    print('audioFreq:')
    print(str(audioFreq))
    print('videoFrame:')
    print(str(videoFrame))
    # Construct the source for Video & Temporary Audio
    videoFile = Curr_Path + sep + 'Video' + sep + FileName
    audioFile = Curr_Path + sep + 'Video' + sep + FileName_1
    # Load the Aruco dictionary and grab the Aruco parameters
    print("[INFO] initializing marker detector…")
    arucoDict = cv2.aruco.Dictionary_get(cv2.aruco.DICT_ARUCO_ORIGINAL)
    arucoParams = cv2.aruco.DetectorParameters_create()
    # Initialize the video file stream
    print("[INFO] accessing video stream…")
    vf = cv2.VideoCapture(videoFile)
    x = self.extractAudio(videoFile)
    if x == 0:
    print('Successfully Audio extracted from the source file!')
    else:
    print('Failed to extract the source audio!')
    # Initialize a queue to maintain the next frame from the video stream
    Q = deque(maxlen=128)
    # We need to have a frame in our queue to start our augmented reality
    # pipeline, so read the next frame from our video file source and add
    # it to our queue
    (grabbed, source) = vf.read()
    Q.appendleft(source)
    # Initialize the video stream and allow the camera sensor to warm up
    print("[INFO] starting video stream…")
    vs = VideoStream(src=0).start()
    time.sleep(2.0)
    flg = 0
    t = threading.Thread(target=self.playAudio, args=(audioFile, audioLen, audioFreq, stopFlag,))
    t.daemon = True
    try:
    # Loop over the frames from the video stream
    while len(Q) > 0:
    try:
    # Grab the frame from our video stream and resize it
    frame = vs.read()
    frame = imutils.resize(frame, width=1020)
    # Attempt to find the ArUCo markers in the frame, and provided
    # they are found, take the current source image and warp it onto
    # input frame using our augmented reality technique
    warped = x1.getWarpImages(
    frame, source,
    cornerIDs=(923, 1001, 241, 1007),
    arucoDict=arucoDict,
    arucoParams=arucoParams,
    zoomFlag=zFlag,
    useCache=CacheL > 0)
    # If the warped frame is not None, then we know (1) we found the
    # four ArUCo markers and (2) the perspective warp was successfully
    # applied
    if warped is not None:
    # Set the frame to the output augment reality frame and then
    # grab the next video file frame from our queue
    frame = warped
    source = Q.popleft()
    if flg == 0:
    t.start()
    flg = flg + 1
    # For speed/efficiency, we can use a queue to keep the next video
    # frame queue ready for us — the trick is to ensure the queue is
    # always (or nearly full)
    if len(Q) != Q.maxlen:
    # Read the next frame from the video file stream
    (grabbed, nextFrame) = vf.read()
    # If the frame was read (meaning we are not at the end of the
    # video file stream), add the frame to our queue
    if grabbed:
    Q.append(nextFrame)
    # Show the output frame
    cv2.imshow(title, frame)
    time.sleep(videoFrame)
    # If the `q` key was pressed, break from the loop
    if cv2.waitKey(2) & 0xFF == ord('q'):
    stopFlag = True
    break
    except BreakLoop:
    raise BreakLoop
    except Exception as e:
    pass
    if (len(Q) == Q.maxlen):
    time.sleep(2)
    break
    except BreakLoop as s:
    print('Processed completed!')
    # Performing cleanup at the end
    cv2.destroyAllWindows()
    vs.stop()
    except Exception as e:
    x = str(e)
    print(x)
    # Performing cleanup at the end
    cv2.destroyAllWindows()
    vs.stop()
    return 0
    except Exception as e:
    x = str(e)
    print('Error:', x)
    return 1

    Please find the key snippet from the above script –

    def playAudio(self, audioFile, audioLen, freq, stopFlag=False):
      try:
        pygame.mixer.init()
        pygame.init()
        pygame.mixer.music.load(audioFile)
    
        pygame.mixer.music.set_volume(10)
    
        val = int(audioLen)
        i = 0
    
        while i < val:
          pygame.mixer.music.play(loops=0, start=float(i))
          time.sleep(freq)
    
          i = i + 1
    
          if (i >= val):
            raise BreakLoop
    
          if (stopFlag==True):
            raise BreakLoop
    
        return 0
      except BreakLoop as s:
        return 0
      except Exception as e:
        x = str(e)
        print(x)
    
        return 1

    The above function will initiate the pygame library to run the sound of the video file that has been extracted as part of a separate process.

    def extractAudio(self, video_file, output_ext="mp3"):
        try:
            """Converts video to audio directly using `ffmpeg` command
            with the help of subprocess module"""
            filename, ext = os.path.splitext(video_file)
            subprocess.call(["ffmpeg", "-y", "-i", video_file, f"{filename}.{output_ext}"],
                            stdout=subprocess.DEVNULL,
                            stderr=subprocess.STDOUT)
    
            return 0
        except Exception as e:
            x = str(e)
            print('Error: ', x)
    
            return 1

    The above function temporarily extracts the audio file from the source trailer video.

    # Initialize the video file stream
    print("[INFO] accessing video stream...")
    vf = cv2.VideoCapture(videoFile)
    
    x = self.extractAudio(videoFile)
    
    if x == 0:
        print('Successfully Audio extracted from the source file!')
    else:
        print('Failed to extract the source audio!')
    
    # Initialize a queue to maintain the next frame from the video stream
    Q = deque(maxlen=128)
    
    # We need to have a frame in our queue to start our augmented reality
    # pipeline, so read the next frame from our video file source and add
    # it to our queue
    (grabbed, source) = vf.read()
    Q.appendleft(source)
    
    # Initialize the video stream and allow the camera sensor to warm up
    print("[INFO] starting video stream...")
    vs = VideoStream(src=0).start()
    
    time.sleep(2.0)
    flg = 0

    The above snippets read the frames from the video file after invoking the audio extraction. Then, it uses a Queue method to store all the video frames for better performance. And finally, it starts consuming the standard streaming video from the WebCAM to augment the trailer video on top of it.

    t = threading.Thread(target=self.playAudio, args=(audioFile, audioLen, audioFreq, stopFlag,))
    t.daemon = True

    Now, the application has instantiated an orphan thread to spin off the audio play function. The reason is to void the performance & video frame frequency impact on top of it.

    while len(Q) > 0:
      try:
        # Grab the frame from our video stream and resize it
        frame = vs.read()
        frame = imutils.resize(frame, width=1020)
    
        # Attempt to find the ArUCo markers in the frame, and provided
        # they are found, take the current source image and warp it onto
        # input frame using our augmented reality technique
        warped = x1.getWarpImages(
          frame, source,
          cornerIDs=(923, 1001, 241, 1007),
          arucoDict=arucoDict,
          arucoParams=arucoParams,
          zoomFlag=zFlag,
          useCache=CacheL > 0)
    
        # If the warped frame is not None, then we know (1) we found the
        # four ArUCo markers and (2) the perspective warp was successfully
        # applied
        if warped is not None:
          # Set the frame to the output augment reality frame and then
          # grab the next video file frame from our queue
          frame = warped
          source = Q.popleft()
    
          if flg == 0:
    
            t.start()
            flg = flg + 1
    
        # For speed/efficiency, we can use a queue to keep the next video
        # frame queue ready for us -- the trick is to ensure the queue is
        # always (or nearly full)
        if len(Q) != Q.maxlen:
          # Read the next frame from the video file stream
          (grabbed, nextFrame) = vf.read()
    
          # If the frame was read (meaning we are not at the end of the
          # video file stream), add the frame to our queue
          if grabbed:
            Q.append(nextFrame)
    
        # Show the output frame
        cv2.imshow(title, frame)
        time.sleep(videoFrame)
    
        # If the `q` key was pressed, break from the loop
        if cv2.waitKey(2) & 0xFF == ord('q'):
          stopFlag = True
          break
    
      except BreakLoop:
        raise BreakLoop
      except Exception as e:
        pass
    
      if (len(Q) == Q.maxlen):
        time.sleep(2)
        break

    The final segment will call the getWarpImages function to get the Augmented image on top of the video. It also checks for the upcoming frames & whether the source video is finished or not. In case of the end, the application will initiate a break method to come out from the infinite WebCAM read. Also, there is a provision for manual exit by pressing the ‘Q’ from the MacBook keyboard.

    # Performing cleanup at the end
    cv2.destroyAllWindows()
    vs.stop()

    It is always advisable to close your camera & remove any temporarily available windows that are still left once the application finishes the process.

    • augmentedMovieTrailer.py (Main calling script)


    #####################################################
    #### Written By: SATYAKI DE ####
    #### Written On: 22-Jun-2022 ####
    #### Modified On 25-Jun-2022 ####
    #### ####
    #### Objective: This is the main calling ####
    #### python script that will invoke the ####
    #### clsEmbedVideoWithStream class to initiate ####
    #### the augmented reality in real-time ####
    #### & display a trailer on top of any surface ####
    #### via Web-CAM. ####
    #####################################################
    # We keep the setup code in a different class as shown below.
    import clsEmbedVideoWithStream as evws
    from clsConfig import clsConfig as cf
    import datetime
    import logging
    ###############################################
    ### Global Section ###
    ###############################################
    # Instantiating all the main class
    x1 = evws.clsEmbedVideoWithStream()
    ###############################################
    ### End of Global Section ###
    ###############################################
    def main():
    try:
    # Other useful variables
    debugInd = 'Y'
    var = datetime.datetime.now().strftime("%Y-%m-%d_%H-%M-%S")
    var1 = datetime.datetime.now()
    print('Start Time: ', str(var))
    # End of useful variables
    # Initiating Log Class
    general_log_path = str(cf.conf['LOG_PATH'])
    # Enabling Logging Info
    logging.basicConfig(filename=general_log_path + 'augmentedMovieTrailer.log', level=logging.INFO)
    print('Started augmenting videos!')
    # Execute all the pass
    r1 = x1.processStream(debugInd, var)
    if (r1 == 0):
    print('Successfully identified human emotions!')
    else:
    print('Failed to identify the human emotions!')
    var2 = datetime.datetime.now()
    c = var2 – var1
    minutes = c.total_seconds() / 60
    print('Total difference in minutes: ', str(minutes))
    print('End Time: ', str(var1))
    except Exception as e:
    x = str(e)
    print('Error: ', x)
    if __name__ == "__main__":
    main()

    The above script will initially instantiate the main calling class & then invoke the processStream function to create the Augmented Reality.


    FOLDER STRUCTURE:

    Here is the folder structure that contains all the files & directories in MAC O/S –

    Directory Structure

    You will get the complete codebase in the following Github link.

    If you want to know more about this legendary director & his famous work, please visit the following link.

    I’ll bring some more exciting topic in the coming days from the Python verse. Please share & subscribe my post & let me know your feedback.

    Till then, Happy Avenging! 🙂

    Note: All the data & scenario posted here are representational data & scenarios & available over the internet & for educational purpose only. Some of the images (except my photo) that we’ve used are available over the net. We don’t claim the ownership of these images. There is an always room for improvement & especially the prediction quality.

    Real-time Zoom-In/Zoom-Out using Python-based Computer Vision

    Hi Guys,

    Today, I’ll be using another exciting installment of Computer Vision. The application will read the real-time human hand gesture to control WebCAM’s zoom-in or zoom-out capability.

    Why don’t we see the demo first before jumping into the technical details?

    Demo

    Architecture:

    Let us understand the architecture –

    Broad Diagram

    As one can see, the application reads individual frames from WebCAM & then map the human hand gestures with a media pipe. And finally, calculate the distance between particular pipe points projected on human hands.

    Let’s take another depiction of the experiment to better understand the above statement.

    Camera & Subject Position

    Python Packages:

    Following are the python packages that are necessary to develop this brilliant use case –

    pip install mediapipe
    pip install opencv-python

    CODE:

    Let us now understand the code. For this use case, we will only discuss three python scripts. However, we need more than these three. However, we have already discussed them in some of the early posts. Hence, we will skip them here.

    1. clsConfig.py (Configuration script for the application.)


    ################################################
    #### Written By: SATYAKI DE ####
    #### Written On: 15-May-2020 ####
    #### Modified On: 24-May-2022 ####
    #### ####
    #### Objective: This script is a config ####
    #### file, contains all the keys for ####
    #### Machine-Learning & streaming dashboard.####
    #### ####
    ################################################
    import os
    import platform as pl
    class clsConfig(object):
    Curr_Path = os.path.dirname(os.path.realpath(__file__))
    os_det = pl.system()
    if os_det == "Windows":
    sep = '\\'
    else:
    sep = '/'
    conf = {
    'APP_ID': 1,
    'ARCH_DIR': Curr_Path + sep + 'arch' + sep,
    'PROFILE_PATH': Curr_Path + sep + 'profile' + sep,
    'LOG_PATH': Curr_Path + sep + 'log' + sep,
    'REPORT_PATH': Curr_Path + sep + 'report',
    'SRC_PATH': Curr_Path + sep + 'data' + sep,
    'FINAL_PATH': Curr_Path + sep + 'Target' + sep,
    'APP_DESC_1': 'Hand Gesture Zoom Control!',
    'DEBUG_IND': 'N',
    'INIT_PATH': Curr_Path,
    'SUBDIR': 'data',
    'SEP': sep,
    'TITLE': "Human Hand Gesture Controlling App",
    'minVal':0.01,
    'maxVal':1
    }

    view raw

    clsConfig.py

    hosted with ❤ by GitHub

    2. clsVideoZoom.py (This script will zoom the video streaming depending upon the hand gestures.)


    ##################################################
    #### Written By: SATYAKI DE ####
    #### Written On: 23-May-2022 ####
    #### Modified On 24-May-2022 ####
    #### ####
    #### Objective: This is the main calling ####
    #### python script that will invoke the ####
    #### clsVideoZoom class to initiate ####
    #### the model to read the real-time ####
    #### human hand gesture from video ####
    #### Web-CAM & control zoom-in & zoom-out. ####
    ##################################################
    import mediapipe as mp
    import cv2
    import time
    import clsHandMotionScanner as hms
    import math
    import imutils
    import numpy as np
    from clsConfig import clsConfig as cf
    class clsVideoZoom():
    def __init__(self):
    self.title = str(cf.conf['TITLE'])
    self.minVal = float(cf.conf['minVal'])
    self.maxVal = int(cf.conf['maxVal'])
    def zoomVideo(self, image, Iscale=1):
    try:
    scale=Iscale
    #get the webcam size
    height, width, channels = image.shape
    #prepare the crop
    centerX,centerY=int(height/2),int(width/2)
    radiusX,radiusY= int(scale*centerX),int(scale*centerY)
    minX,maxX=centerX-radiusX,centerX+radiusX
    minY,maxY=centerY-radiusY,centerY+radiusY
    cropped = image[minX:maxX, minY:maxY]
    resized_cropped = cv2.resize(cropped, (width, height))
    return resized_cropped
    except Exception as e:
    x = str(e)
    return image
    def runSensor(self):
    try:
    pTime = 0
    cTime = 0
    zRange = 0
    zRangeBar = 0
    cap = cv2.VideoCapture(0)
    detector = hms.clsHandMotionScanner(detectionCon=0.7)
    while True:
    success,img = cap.read()
    img = imutils.resize(img, width=720)
    #img = detector.findHands(img, draw=False)
    #lmList = detector.findPosition(img, draw=False)
    img = detector.findHands(img)
    lmList = detector.findPosition(img, draw=False)
    if len(lmList) != 0:
    print('*'*60)
    #print(lmList[4], lmList[8])
    #print('*'*60)
    x1, y1 = lmList[4][1], lmList[4][2]
    x2, y2 = lmList[8][1], lmList[8][2]
    cx, cy = (x1+x2)//2, (y1+y2)//2
    cv2.circle(img, (x1,y1), 15, (255,0,255), cv2.FILLED)
    cv2.circle(img, (x2,y2), 15, (255,0,255), cv2.FILLED)
    cv2.line(img, (x1,y1), (x2,y2), (255,0,255), 3)
    cv2.circle(img, (cx,cy), 15, (255,0,255), cv2.FILLED)
    lenVal = math.hypot(x2-x1, y2-y1)
    print('Length:', str(lenVal))
    print('*'*60)
    # Hand Range is from 50 to 270
    # Camera Zoom Range is 0.01, 1
    minVal = self.minVal
    maxVal = self.maxVal
    zRange = np.interp(lenVal, [50, 270], [minVal, maxVal])
    zRangeBar = np.interp(lenVal, [50, 270], [400, 150])
    print('Range: ', str(zRange))
    if lenVal < 50:
    cv2.circle(img, (cx,cy), 15, (0,255,0), cv2.FILLED)
    cv2.rectangle(img, (50, 150), (85, 400), (255,0,0), 3)
    cv2.rectangle(img, (50, int(zRangeBar)), (85, 400), (255,0,0), cv2.FILLED)
    cTime = time.time()
    fps = 1/(cTime-pTime)
    pTime = cTime
    image = cv2.flip(img, flipCode=1)
    cv2.putText(image, str(int(fps)), (10, 70), cv2.FONT_HERSHEY_PLAIN, 3, (255, 0, 255), 3)
    cv2.imshow("Original Source",image)
    # Creating the new zoom video
    cropImg = self.zoomVideo(img, zRange)
    cv2.putText(cropImg, str(int(fps)), (10, 70), cv2.FONT_HERSHEY_PLAIN, 3, (255, 0, 255), 3)
    cv2.imshow("Zoomed Source",cropImg)
    if cv2.waitKey(1) == ord('q'):
    break
    cap.release()
    cv2.destroyAllWindows()
    return 0
    except Exception as e:
    x = str(e)
    print('Error:', x)
    return 1

    view raw

    clsVideoZoom.py

    hosted with ❤ by GitHub

    Key snippets from the above scripts –

    def zoomVideo(self, image, Iscale=1):
        try:
            scale=Iscale
    
            #get the webcam size
            height, width, channels = image.shape
    
            #prepare the crop
            centerX,centerY=int(height/2),int(width/2)
            radiusX,radiusY= int(scale*centerX),int(scale*centerY)
    
            minX,maxX=centerX-radiusX,centerX+radiusX
            minY,maxY=centerY-radiusY,centerY+radiusY
    
            cropped = image[minX:maxX, minY:maxY]
            resized_cropped = cv2.resize(cropped, (width, height))
    
            return resized_cropped
    
        except Exception as e:
            x = str(e)
    
            return image

    The above method will zoom in & zoom out depending upon the scale value that the human hand gesture will receive.

    cap = cv2.VideoCapture(0)
    detector = hms.clsHandMotionScanner(detectionCon=0.7)

    The following lines will read the individual frames from webCAM. Instantiate another open-source customized class, which will find the hand’s position.

    img = detector.findHands(img)
    lmList = detector.findPosition(img, draw=False)

    And captured the hand position depending upon the movements.

    x1, y1 = lmList[4][1], lmList[4][2]
    x2, y2 = lmList[8][1], lmList[8][2]
    
    cx, cy = (x1+x2)//2, (y1+y2)//2
    
    cv2.circle(img, (x1,y1), 15, (255,0,255), cv2.FILLED)
    cv2.circle(img, (x2,y2), 15, (255,0,255), cv2.FILLED)

    To understand the above lines, let’s look into the following diagram –

    Source: Mediapipe

    As one can see, the thumbs tip value is 4 & Index fingertip is 8. The application will mark these points with a solid circle.

    lenVal = math.hypot(x2-x1, y2-y1)

    The above line will calculate the distance between the thumbs tip & index fingertip.

    # Camera Zoom Range is 0.01, 1
    
    minVal = self.minVal
    maxVal = self.maxVal
    
    zRange = np.interp(lenVal, [50, 270], [minVal, maxVal])
    zRangeBar = np.interp(lenVal, [50, 270], [400, 150])

    In the above lines, the application will translate the values captured between the two fingertips & then translate them into a more meaningful camera zoom range from 0.01 to 1.

    if lenVal < 50:
        cv2.circle(img, (cx,cy), 15, (0,255,0), cv2.FILLED)

    The application will not consider a value below 50 as 0.01 for the WebCAM start value.

    cTime = time.time()
    fps = 1/(cTime-pTime)
    pTime = cTime
    
    
    image = cv2.flip(img, flipCode=1)
    cv2.putText(image, str(int(fps)), (10, 70), cv2.FONT_HERSHEY_PLAIN, 3, (255, 0, 255), 3)
    cv2.imshow("Original Source",image)
    
    # Creating the new zoom video
    cropImg = self.zoomVideo(img, zRange)
    cv2.putText(cropImg, str(int(fps)), (10, 70), cv2.FONT_HERSHEY_PLAIN, 3, (255, 0, 255), 3)
    cv2.imshow("Zoomed Source",cropImg)

    The application will capture the frame rate & share the original video frame and the test frame, where it will zoom in or out depending on the hand gesture.

    3. clsHandMotionScanner.py (This is an enhance version of open source script, which will capture the hand position.)


    ##################################################
    #### Written By: SATYAKI DE ####
    #### Modified On 23-May-2022 ####
    #### ####
    #### Objective: This is the main calling ####
    #### python class that will capture the ####
    #### human hand gesture on real-time basis ####
    #### and that will enable the video zoom ####
    #### capability of the feed directly coming ####
    #### out of a Web-CAM. ####
    ##################################################
    import mediapipe as mp
    import cv2
    import time
    class clsHandMotionScanner():
    def __init__(self, mode=False, maxHands=2, detectionCon=0.5, modelComplexity=1, trackCon=0.5):
    self.mode = mode
    self.maxHands = maxHands
    self.detectionCon = detectionCon
    self.modelComplex = modelComplexity
    self.trackCon = trackCon
    self.mpHands = mp.solutions.hands
    self.hands = self.mpHands.Hands(self.mode, self.maxHands,self.modelComplex,self.detectionCon, self.trackCon)
    # it gives small dots onhands total 20 landmark points
    self.mpDraw = mp.solutions.drawing_utils
    def findHands(self, img, draw=True):
    try:
    # Send rgb image to hands
    imgRGB = cv2.cvtColor(img,cv2.COLOR_BGR2RGB)
    self.results = self.hands.process(imgRGB)
    # process the frame
    if self.results.multi_hand_landmarks:
    for handLms in self.results.multi_hand_landmarks:
    if draw:
    #Draw dots and connect them
    self.mpDraw.draw_landmarks(img,handLms,self.mpHands.HAND_CONNECTIONS)
    return img
    except Exception as e:
    x = str(e)
    print('Error: ', x)
    return img
    def findPosition(self, img, handNo=0, draw=True):
    try:
    lmlist = []
    # check wether any landmark was detected
    if self.results.multi_hand_landmarks:
    #Which hand are we talking about
    myHand = self.results.multi_hand_landmarks[handNo]
    # Get id number and landmark information
    for id, lm in enumerate(myHand.landmark):
    # id will give id of landmark in exact index number
    # height width and channel
    h,w,c = img.shape
    #find the position
    cx,cy = int(lm.x*w), int(lm.y*h) #center
    #print(id,cx,cy)
    lmlist.append([id,cx,cy])
    # Draw circle for 0th landmark
    if draw:
    cv2.circle(img,(cx,cy), 15 , (255,0,255), cv2.FILLED)
    return lmlist
    except Exception as e:
    x = str(e)
    print('Error: ', x)
    lmlist = []
    return lmlist

    Key snippets from the above script –

    def findHands(self, img, draw=True):
        try:
            # Send rgb image to hands
            imgRGB = cv2.cvtColor(img,cv2.COLOR_BGR2RGB)
            self.results = self.hands.process(imgRGB)
    
            # process the frame
            if self.results.multi_hand_landmarks:
                for handLms in self.results.multi_hand_landmarks:
    
                    if draw:
                        #Draw dots and connect them
                        self.mpDraw.draw_landmarks(img,handLms,self.mpHands.HAND_CONNECTIONS)
    
            return img
        except Exception as e:
            x = str(e)
            print('Error: ', x)
    
            return img

    The above function will identify individual key points & marked them as dots on top of human hands.

    def findPosition(self, img, handNo=0, draw=True):
          try:
              lmlist = []
    
              # check wether any landmark was detected
              if self.results.multi_hand_landmarks:
                  #Which hand are we talking about
                  myHand = self.results.multi_hand_landmarks[handNo]
                  # Get id number and landmark information
                  for id, lm in enumerate(myHand.landmark):
                      # id will give id of landmark in exact index number
                      # height width and channel
                      h,w,c = img.shape
                      #find the position - center
                      cx,cy = int(lm.x*w), int(lm.y*h) 
                      lmlist.append([id,cx,cy])
    
                  # Draw circle for 0th landmark
                  if draw:
                      cv2.circle(img,(cx,cy), 15 , (255,0,255), cv2.FILLED)
    
              return lmlist
          except Exception as e:
              x = str(e)
              print('Error: ', x)
    
              lmlist = []
              return lmlist

    The above line will capture the position of each media pipe point along with the x & y coordinate & store them in a list, which will be later parsed for main use case.

    4. viewHandMotion.py (Main calling script.)


    ##################################################
    #### Written By: SATYAKI DE ####
    #### Written On: 23-May-2022 ####
    #### Modified On 23-May-2022 ####
    #### ####
    #### Objective: This is the main calling ####
    #### python script that will invoke the ####
    #### clsVideoZoom class to initiate ####
    #### the model to read the real-time ####
    #### hand movements gesture that enables ####
    #### video zoom control. ####
    ##################################################
    import time
    import clsVideoZoom as vz
    from clsConfig import clsConfig as cf
    import datetime
    import logging
    ###############################################
    ### Global Section ###
    ###############################################
    # Instantiating the base class
    x1 = vz.clsVideoZoom()
    ###############################################
    ### End of Global Section ###
    ###############################################
    def main():
    try:
    # Other useful variables
    debugInd = 'Y'
    var = datetime.datetime.now().strftime("%Y-%m-%d_%H-%M-%S")
    var1 = datetime.datetime.now()
    print('Start Time: ', str(var))
    # End of useful variables
    # Initiating Log Class
    general_log_path = str(cf.conf['LOG_PATH'])
    # Enabling Logging Info
    logging.basicConfig(filename=general_log_path + 'visualZoom.log', level=logging.INFO)
    print('Started Visual-Zoom Emotions!')
    r1 = x1.runSensor()
    if (r1 == 0):
    print('Successfully identified visual zoom!')
    else:
    print('Failed to identify the visual zoom!')
    var2 = datetime.datetime.now()
    c = var2 – var1
    minutes = c.total_seconds() / 60
    print('Total difference in minutes: ', str(minutes))
    print('End Time: ', str(var1))
    except Exception as e:
    x = str(e)
    print('Error: ', x)
    if __name__ == "__main__":
    main()

    The above lines are self-explanatory. So, I’m not going to discuss anything on this script.


    FOLDER STRUCTURE:

    Here is the folder structure that contains all the files & directories in MAC O/S –

    Directory

    So, we’ve done it.


    You will get the complete codebase in the following Github link.

    I’ll bring some more exciting topic in the coming days from the Python verse. Please share & subscribe my post & let me know your feedback.

    Till then, Happy Avenging! 🙂

    Note: All the data & scenario posted here are representational data & scenarios & available over the internet & for educational purpose only. Some of the images (except my photo) that we’ve used are available over the net. We don’t claim the ownership of these images. There is an always room for improvement & especially the prediction quality.

    Detecting real-time human emotions using Open-CV, DeepFace & Python

    Hi Guys,

    Today, I’ll be using another exciting installment of Computer Vision. Our focus will be on getting a sense of human emotions. Let me explain. This post will demonstrate how to read/detect human emotions by analyzing computer vision videos. We will be using part of a Bengali Movie called “Ganashatru (An enemy of the people)” entirely for educational purposes & also as a tribute to the great legendary director late Satyajit Roy. To know more about him, please click the following link.

    Why don’t we see the demo first before jumping into the technical details?

    Demo

    Architecture:

    Let us understand the architecture –

    Process Flow

    From the above diagram, one can see that the application, which uses both the Open-CV & DeepFace, analyzes individual frames from the source. Then predicts the emotions & adds the label in the target B&W frames. Finally, it creates another video by correctly mixing the source audio.

    Python Packages:

    Following are the python packages that are necessary to develop this brilliant use case –

    pip install deepface
    pip install opencv-python
    pip install ffpyplayer

    CODE:

    Let us now understand the code. For this use case, we will only discuss three python scripts. However, we need more than these three. However, we have already discussed them in some of the early posts. Hence, we will skip them here.

    • clsConfig.py (This script will play the video along with audio in sync.)


    ################################################
    #### Written By: SATYAKI DE ####
    #### Written On: 15-May-2020 ####
    #### Modified On: 22-Apr-2022 ####
    #### ####
    #### Objective: This script is a config ####
    #### file, contains all the keys for ####
    #### Machine-Learning & streaming dashboard.####
    #### ####
    ################################################
    import os
    import platform as pl
    class clsConfig(object):
    Curr_Path = os.path.dirname(os.path.realpath(__file__))
    os_det = pl.system()
    if os_det == "Windows":
    sep = '\\'
    else:
    sep = '/'
    conf = {
    'APP_ID': 1,
    'ARCH_DIR': Curr_Path + sep + 'arch' + sep,
    'PROFILE_PATH': Curr_Path + sep + 'profile' + sep,
    'LOG_PATH': Curr_Path + sep + 'log' + sep,
    'REPORT_PATH': Curr_Path + sep + 'report',
    'FILE_NAME': 'GonoshotruClimax',
    'SRC_PATH': Curr_Path + sep + 'data' + sep,
    'FINAL_PATH': Curr_Path + sep + 'Target' + sep,
    'APP_DESC_1': 'Video Emotion Capture!',
    'DEBUG_IND': 'N',
    'INIT_PATH': Curr_Path,
    'SUBDIR': 'data',
    'SEP': sep,
    'VIDEO_FILE_EXTN': '.mp4',
    'AUDIO_FILE_EXTN': '.mp3',
    'IMAGE_FILE_EXTN': '.jpg',
    'TITLE': "Gonoshotru – Emotional Analysis"
    }

    view raw

    clsConfig.py

    hosted with ❤ by GitHub

    All the above inputs are generic & used as normal parameters.

    • clsFaceEmotionDetect.py (This python class will track the human emotions after splitting the audio from the video & put that label on top of the video frame.)


    ##################################################
    #### Written By: SATYAKI DE ####
    #### Written On: 17-Apr-2022 ####
    #### Modified On 20-Apr-2022 ####
    #### ####
    #### Objective: This python class will ####
    #### track the human emotions after splitting ####
    #### the audio from the video & put that ####
    #### label on top of the video frame. ####
    #### ####
    ##################################################
    from imutils.video import FileVideoStream
    from imutils.video import FPS
    import numpy as np
    import imutils
    import time
    import cv2
    from clsConfig import clsConfig as cf
    from deepface import DeepFace
    import clsL as cl
    import subprocess
    import sys
    import os
    # Initiating Log class
    l = cl.clsL()
    class clsFaceEmotionDetect:
    def __init__(self):
    self.sep = str(cf.conf['SEP'])
    self.Curr_Path = str(cf.conf['INIT_PATH'])
    self.FileName = str(cf.conf['FILE_NAME'])
    self.VideoFileExtn = str(cf.conf['VIDEO_FILE_EXTN'])
    self.ImageFileExtn = str(cf.conf['IMAGE_FILE_EXTN'])
    def convert_video_to_audio_ffmpeg(self, video_file, output_ext="mp3"):
    try:
    """Converts video to audio directly using `ffmpeg` command
    with the help of subprocess module"""
    filename, ext = os.path.splitext(video_file)
    subprocess.call(["ffmpeg", "-y", "-i", video_file, f"{filename}.{output_ext}"],
    stdout=subprocess.DEVNULL,
    stderr=subprocess.STDOUT)
    return 0
    except Exception as e:
    x = str(e)
    print('Error: ', x)
    return 1
    def readEmotion(self, debugInd, var):
    try:
    sep = self.sep
    Curr_Path = self.Curr_Path
    FileName = self.FileName
    VideoFileExtn = self.VideoFileExtn
    ImageFileExtn = self.ImageFileExtn
    font = cv2.FONT_HERSHEY_SIMPLEX
    # Load Video
    videoFile = Curr_Path + sep + 'Video' + sep + FileName + VideoFileExtn
    temp_path = Curr_Path + sep + 'Temp' + sep
    # Extracting the audio from the source video
    x = self.convert_video_to_audio_ffmpeg(videoFile)
    if x == 0:
    print('Successfully Audio extracted from the source file!')
    else:
    print('Failed to extract the source audio!')
    # Loading the haarcascade xml class
    faceCascade = cv2.CascadeClassifier(cv2.data.haarcascades + 'haarcascade_frontalface_default.xml')
    # start the file video stream thread and allow the buffer to
    # start to fill
    print("[INFO] Starting video file thread…")
    fvs = FileVideoStream(videoFile).start()
    time.sleep(1.0)
    cnt = 0
    # start the FPS timer
    fps = FPS().start()
    try:
    # loop over frames from the video file stream
    while fvs.more():
    cnt += 1
    # grab the frame from the threaded video file stream, resize
    # it, and convert it to grayscale (while still retaining 3
    # channels)
    try:
    frame = fvs.read()
    except Exception as e:
    x = str(e)
    print('Error: ', x)
    frame = imutils.resize(frame, width=720)
    cv2.imshow("Gonoshotru – Source", frame)
    # Enforce Detection to False will continue the sequence even when there is no face
    result = DeepFace.analyze(frame, enforce_detection=False, actions = ['emotion'])
    frame = cv2.cvtColor(frame, cv2.COLOR_BGR2GRAY)
    frame = np.dstack([frame, frame, frame])
    faces = faceCascade.detectMultiScale(image=frame, scaleFactor=1.1, minNeighbors=4, minSize=(80,80), flags=cv2.CASCADE_SCALE_IMAGE)
    # Draw a rectangle around the face
    for (x, y, w, h) in faces:
    cv2.rectangle(frame, (x, y), (x + w, y + h), (0,255,0), 2)
    # Use puttext method for inserting live emotion on video
    cv2.putText(frame, result['dominant_emotion'], (50,390), font, 3, (0,0,255), 2, cv2.LINE_4)
    # display the size of the queue on the frame
    #cv2.putText(frame, "Queue Size: {}".format(fvs.Q.qsize()), (10, 30), font, 0.6, (0, 255, 0), 2)
    cv2.imwrite(temp_path+'frame-' + str(cnt) + ImageFileExtn, frame)
    # show the frame and update the FPS counter
    cv2.imshow("Gonoshotru – Emotional Analysis", frame)
    fps.update()
    if cv2.waitKey(2) & 0xFF == ord('q'):
    break
    except Exception as e:
    x = str(e)
    print('Error: ', x)
    print('No more frame exists!')
    # stop the timer and display FPS information
    fps.stop()
    print("[INFO] Elasped Time: {:.2f}".format(fps.elapsed()))
    print("[INFO] Approx. FPS: {:.2f}".format(fps.fps()))
    # do a bit of cleanup
    cv2.destroyAllWindows()
    fvs.stop()
    return 0
    except Exception as e:
    x = str(e)
    print('Error: ', x)
    return 1

    Key snippets from the above scripts –

    def convert_video_to_audio_ffmpeg(self, video_file, output_ext="mp3"):
        try:
            """Converts video to audio directly using `ffmpeg` command
            with the help of subprocess module"""
            filename, ext = os.path.splitext(video_file)
            subprocess.call(["ffmpeg", "-y", "-i", video_file, f"{filename}.{output_ext}"],
                            stdout=subprocess.DEVNULL,
                            stderr=subprocess.STDOUT)
    
            return 0
        except Exception as e:
            x = str(e)
            print('Error: ', x)
    
            return 1

    The above snippet represents an Audio extraction function that will extract the audio from the source file & store it in the specified directory.

    # Loading the haarcascade xml class
    faceCascade = cv2.CascadeClassifier(cv2.data.haarcascades + 'haarcascade_frontalface_default.xml')

    Now, Loading is one of the best classes for face detection, which our applications require.

    fvs = FileVideoStream(videoFile).start()

    Using FileVideoStream will enable our application to process the video faster than cv2.VideoCapture() method.

    # start the FPS timer
    fps = FPS().start()

    The application then invokes the FPS.Start() that will initiate the FPS timer.

    # loop over frames from the video file stream
    while fvs.more():

    The application will check using fvs.more() to find the EOF of the video file. Until then, it will try to read individual frames.

    try:
        frame = fvs.read()
    except Exception as e:
        x = str(e)
        print('Error: ', x)

    The application will read individual frames. In case of any issue, it will capture the correct error without terminating the main program at the beginning. This exception strategy is beneficial when there is no longer any frame to read & yet due to the end frame issue, the entire application throws an error.

    frame = imutils.resize(frame, width=720)
    cv2.imshow("Gonoshotru - Source", frame)

    At this point, the application is resizing the frame for better resolution & performance. Furthermore, identify this video feed as a source.

    # Enforce Detection to False will continue the sequence even when there is no face
    result = DeepFace.analyze(frame, enforce_detection=False, actions = ['emotion'])

    Finally, the application has used the deepface machine-learning API to analyze the subject face & trying to predict its emotions.

    frame = cv2.cvtColor(frame, cv2.COLOR_BGR2GRAY)
    frame = np.dstack([frame, frame, frame])
    
    faces = faceCascade.detectMultiScale(image=frame, scaleFactor=1.1, minNeighbors=4, minSize=(80,80), flags=cv2.CASCADE_SCALE_IMAGE)

    detectMultiScale function can use to detect the faces. This function will return a rectangle with coordinates (x, y, w, h) around the detected face.

    It takes three common arguments — the input image, scaleFactor, and minNeighbours.

    scaleFactor specifies how much the image size reduces with each scale. There may be more faces near the camera in a group photo than others. Naturally, such faces would appear more prominent than the ones behind. This factor compensates for that.

    minNeighbours specifies how many neighbors each candidate rectangle should have to retain. One may have to tweak these values to get the best results. This parameter specifies the number of neighbors a rectangle should have to be called a face.

    # Draw a rectangle around the face
    for (x, y, w, h) in faces:
        cv2.rectangle(frame, (x, y), (x + w, y + h), (0,255,0), 2)

    As discussed above, the application is now calculating the square’s boundary after receiving the values of x, y, w, & h.

    # Use puttext method for inserting live emotion on video
    cv2.putText(frame, result['dominant_emotion'], (50,390), font, 3, (0,0,255), 2, cv2.LINE_4)

    Finally, capture the dominant emotion from the deepface API & post it on top of the target video.

    # display the size of the queue on the frame
    cv2.imwrite(temp_path+'frame-' + str(cnt) + ImageFileExtn, frame)
    
    # show the frame and update the FPS counter
    cv2.imshow("Gonoshotru - Emotional Analysis", frame)
    fps.update()

    Also, writing individual frames into a temporary folder, where later they will be consumed & mixed with the source audio.

    if cv2.waitKey(2) & 0xFF == ord('q'):
        break

    At any given point, if the user wants to quit, the above snippet will allow them by simply pressing either the escape-button or ‘q’-button from the keyboard.

    • clsVideoPlay.py (This script will play the video along with audio in sync.)


    ###############################################
    #### Updated By: SATYAKI DE ####
    #### Updated On: 17-Apr-2022 ####
    #### ####
    #### Objective: This script will play the ####
    #### video along with audio in sync. ####
    #### ####
    ###############################################
    import os
    import platform as pl
    import cv2
    import numpy as np
    import glob
    import re
    import ffmpeg
    import time
    from clsConfig import clsConfig as cf
    from ffpyplayer.player import MediaPlayer
    import logging
    os_det = pl.system()
    if os_det == "Windows":
    sep = '\\'
    else:
    sep = '/'
    class clsVideoPlay:
    def __init__(self):
    self.fileNmFin = str(cf.conf['FILE_NAME'])
    self.final_path = str(cf.conf['FINAL_PATH'])
    self.title = str(cf.conf['TITLE'])
    self.VideoFileExtn = str(cf.conf['VIDEO_FILE_EXTN'])
    def videoP(self, file):
    try:
    cap = cv2.VideoCapture(file)
    player = MediaPlayer(file)
    start_time = time.time()
    while cap.isOpened():
    ret, frame = cap.read()
    if not ret:
    break
    _, val = player.get_frame(show=False)
    if val == 'eof':
    break
    cv2.imshow(file, frame)
    elapsed = (time.time() – start_time) * 1000 # msec
    play_time = int(cap.get(cv2.CAP_PROP_POS_MSEC))
    sleep = max(1, int(play_time – elapsed))
    if cv2.waitKey(sleep) & 0xFF == ord("q"):
    break
    player.close_player()
    cap.release()
    cv2.destroyAllWindows()
    return 0
    except Exception as e:
    x = str(e)
    print('Error: ', x)
    return 1
    def stream(self, dInd, var):
    try:
    VideoFileExtn = self.VideoFileExtn
    fileNmFin = self.fileNmFin + VideoFileExtn
    final_path = self.final_path
    title = self.title
    FullFileName = final_path + fileNmFin
    ret = self.videoP(FullFileName)
    if ret == 0:
    print('Successfully Played the Video!')
    return 0
    else:
    return 1
    except Exception as e:
    x = str(e)
    print('Error: ', x)
    return 1

    view raw

    clsVideoPlay.py

    hosted with ❤ by GitHub

    Let us explore the key snippet –

    cap = cv2.VideoCapture(file)
    player = MediaPlayer(file)

    In the above snippet, the application first reads the video & at the same time, it will create an instance of the MediaPlayer.

    play_time = int(cap.get(cv2.CAP_PROP_POS_MSEC))

    The application uses cv2.CAP_PROP_POS_MSEC to synchronize video and audio.

    • peopleEmotionRead.py (This is the main calling python script that will invoke the class to initiate the model to read the real-time human emotions from video.)


    ##################################################
    #### Written By: SATYAKI DE ####
    #### Written On: 17-Jan-2022 ####
    #### Modified On 20-Apr-2022 ####
    #### ####
    #### Objective: This is the main calling ####
    #### python script that will invoke the ####
    #### clsFaceEmotionDetect class to initiate ####
    #### the model to read the real-time ####
    #### human emotions from video or even from ####
    #### Web-CAM & predict it continuously. ####
    ##################################################
    # We keep the setup code in a different class as shown below.
    import clsFaceEmotionDetect as fed
    import clsFrame2Video as fv
    import clsVideoPlay as vp
    from clsConfig import clsConfig as cf
    import datetime
    import logging
    ###############################################
    ### Global Section ###
    ###############################################
    # Instantiating all the three classes
    x1 = fed.clsFaceEmotionDetect()
    x2 = fv.clsFrame2Video()
    x3 = vp.clsVideoPlay()
    ###############################################
    ### End of Global Section ###
    ###############################################
    def main():
    try:
    # Other useful variables
    debugInd = 'Y'
    var = datetime.datetime.now().strftime("%Y-%m-%d_%H-%M-%S")
    var1 = datetime.datetime.now()
    print('Start Time: ', str(var))
    # End of useful variables
    # Initiating Log Class
    general_log_path = str(cf.conf['LOG_PATH'])
    # Enabling Logging Info
    logging.basicConfig(filename=general_log_path + 'restoreVideo.log', level=logging.INFO)
    print('Started Capturing Real-Time Human Emotions!')
    # Execute all the pass
    r1 = x1.readEmotion(debugInd, var)
    r2 = x2.convert2Vid(debugInd, var)
    r3 = x3.stream(debugInd, var)
    if ((r1 == 0) and (r2 == 0) and (r3 == 0)):
    print('Successfully identified human emotions!')
    else:
    print('Failed to identify the human emotions!')
    var2 = datetime.datetime.now()
    c = var2 – var1
    minutes = c.total_seconds() / 60
    print('Total difference in minutes: ', str(minutes))
    print('End Time: ', str(var1))
    except Exception as e:
    x = str(e)
    print('Error: ', x)
    if __name__ == "__main__":
    main()

    The key-snippet from the above script are as follows –

    # Instantiating all the three classes
    
    x1 = fed.clsFaceEmotionDetect()
    x2 = fv.clsFrame2Video()
    x3 = vp.clsVideoPlay()

    As one can see from the above snippet, all the major classes are instantiated & loaded into the memory.

    # Execute all the pass
    r1 = x1.readEmotion(debugInd, var)
    r2 = x2.convert2Vid(debugInd, var)
    r3 = x3.stream(debugInd, var)

    All the responses are captured into the corresponding variables, which later check for success status.


    Let us capture & compare the emotions in a screenshot for better understanding –

    Emotion Analysis

    So, one can see that most of the frames from the video & above-posted frame correctly identify the human emotions.


    FOLDER STRUCTURE:

    Here is the folder structure that contains all the files & directories in MAC O/S –

    Directory

    So, we’ve done it.

    You will get the complete codebase in the following Github link.

    If you want to know more about this legendary director & his famous work, please visit the following link.

    I’ll bring some more exciting topic in the coming days from the Python verse. Please share & subscribe my post & let me know your feedback.

    Till then, Happy Avenging! 😀

    Note: All the data & scenario posted here are representational data & scenarios & available over the internet & for educational purpose only. Some of the images (except my photo) that we’ve used are available over the net. We don’t claim the ownership of these images. There is an always room for improvement & especially the prediction quality.