This site mainly deals with various use cases demonstrated using Python, Data Science, Cloud basics, SQL Server, Oracle, Teradata along with SQL & their implementation. Expecting yours active participation & time. This blog can be access from your TP, Tablet & mobile also. Please provide your feedback.
Today, I’m very excited to demonstrate an effortless & new way to hack the performance of Python. This post will be a super short & yet crisp presentation of improving the overall performance.
Why not view the demo before going through it?
Demo
Isn’t it exciting? Let’s understand the steps to improve your code.
Python Packages:
pipinstallcython
Why this way?
Cython is a Python-to-C compiler. It can significantly improve performance for specific tasks, especially those with heavy computation and loops. Also, Cython’s syntax is very similar to Python, which makes it easy to learn.
Let’s consider an example where we calculate the sum of squares for a list of numbers. The code without optimization would look like this:
Now, let’s optimize it using Cython by installing the abovementioned packages. Then, you will have to create a .pyx file, say “compute.pyx”, with the following code:
############################################################### Written By:SATYAKIDE ######## Written On:31-Jul-2023 ######## ModifiedOn31-Jul-2023 ######## ######## Objective:Thisisthemaincalling ######## pythonscriptthatwillcreatethe ######## compiledlibraryafterexecutingthecompute.pyx. ######## ###############################################################fromsetuptoolsimportsetupfromCython.Buildimportcythonizesetup(ext_modules = cythonize("compute.pyx"))
Compile it using the command:
pythonsetup.pybuild_ext--inplace
This will look like the following –
Finally, you can import the function from the compiled “.pyx” file inside the improved code.
perfTest_2.py (First untuned Python class.)
############################################################# Written By:SATYAKIDE ######## Written On:31-Jul-2023 ######## ModifiedOn31-Jul-2023 ######## ######## Objective:Thisisthemaincalling ######## pythonscriptthatwillinvokethe ######## optimized&precompiledcustomlibrary,which ######## willsignificantlyimprovetheperformance. ######## #############################################################fromclsConfigClientimportclsConfigClientascffromcomputeimportcompute_sum_of_squaresimporttimestart = time.time()n_val = cf.conf['INPUT_VAL']n = n_valprint(compute_sum_of_squares(n))print(f"Test - 2: Execution time with multiprocessing: {time.time() - start} seconds")
By compiling to C, Cython can speed up loop and function calls, leading to significant speedup for CPU-bound tasks.
Please note that while Cython can dramatically improve performance, it can make the code more complex and harder to debug. Therefore, starting with regular Python and switching to Cython for the performance-critical parts of the code is recommended.
So, finally, we’ve done it. I know that this post is relatively smaller than my earlier post. But, I think, you can get a good hack to improve some of your long-running jobs by applying this trick.
I’ll bring some more exciting topics in the coming days from the Python verse. Please share & subscribe to my post & let me know your feedback.
Till then, Happy Avenging! 🙂
Note: All the data & scenarios posted here are representational data & scenarios & available over the internet & for educational purposes only. Some of the images (except my photo) we’ve used are available over the net. We don’t claim ownership of these images. There is always room for improvement & especially in the prediction quality.
Today, I’m very excited to demonstrate an effortless & new way to fine-tune the GPT-3 model using Python with the help of my new build (unpublished) PyPi package. In this post, I plan to deal with the custom website link as a response from this website depending upon the user queries with the help of the OpenAI-based tuned model.
In this post, I’ve directly subscribed to OpenAI & I’m not using OpenAI from Azure. However, I’ll explore that in the future as well.
Before I explain the process to invoke this new library, why not view the demo first & then discuss it?
Demo
Isn’t it exciting? Finally, we can efficiently handle your custom website URL using OpenAI tuned model.
What is ChatGPT?
ChatGPT is an advanced artificial intelligence language model developed by OpenAI based on the GPT-4 architecture. As an AI model, it is designed to understand and generate human-like text-based on the input it receives. ChatGPT can engage in various tasks, such as answering questions, providing recommendations, creating content, and simulating conversation. While it is highly advanced and versatile, it’s important to note that ChatGPT’s knowledge is limited to the data it was trained on, with a cutoff date of September 2021.
When to tune GPT model?
Tuning a GPT or any AI model might be necessary for various reasons. Here are some common scenarios when you should consider adjusting or fine-tuning a GPT model:
Domain-specific knowledge: If you need your model to have a deeper understanding of a specific domain or industry, you can fine-tune it with domain-specific data to improve its performance.
New or updated data: If new or updated information is not part of the original training data, you should fine-tune the model to ensure it has the most accurate and up-to-date knowledge.
Customization: If you require the model to have a specific style, tone, or focus, you can fine-tune it with data that reflects those characteristics.
Ethical or safety considerations: To make the model safer and more aligned with human values, you should fine-tune it to reduce biased or harmful outputs.
Improve performance: If the base model’s performance is unsatisfactory for a particular task or application, you can fine-tune it on a dataset more relevant to the job, often leading to better results.
Remember that tuning or fine-tuning a GPT model requires access to appropriate data and computational resources and an understanding of the model’s architecture and training techniques. Additionally, monitoring and evaluating the model’s performance after fine-tuning is essential to ensure that the desired improvements have been achieved.
FLOW OF EVENTS:
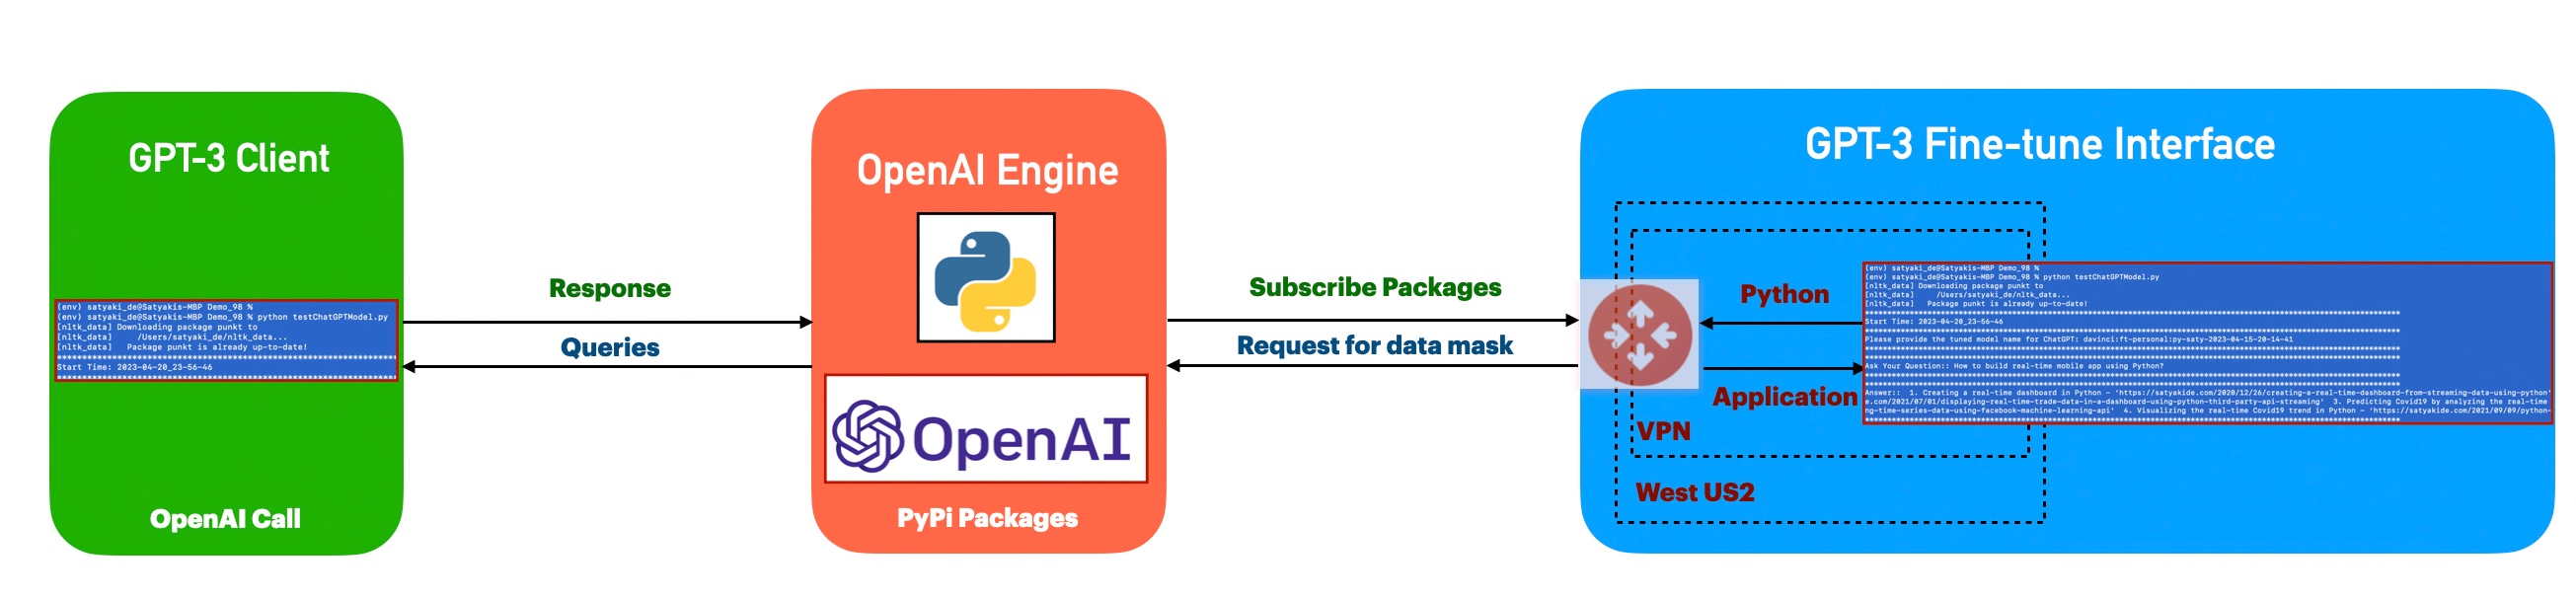
Let us look at the flow diagram as it captures the sequence of events that unfold as part of the process.
The initial Python-based client interacts with the tuned OpenAI models. This process enables it to get a precise response with custom data in a very convenient way. So that anyone can understand.
SOURCE DATA:
Let us understand how to feed the source data as it will deal with your website URL link.
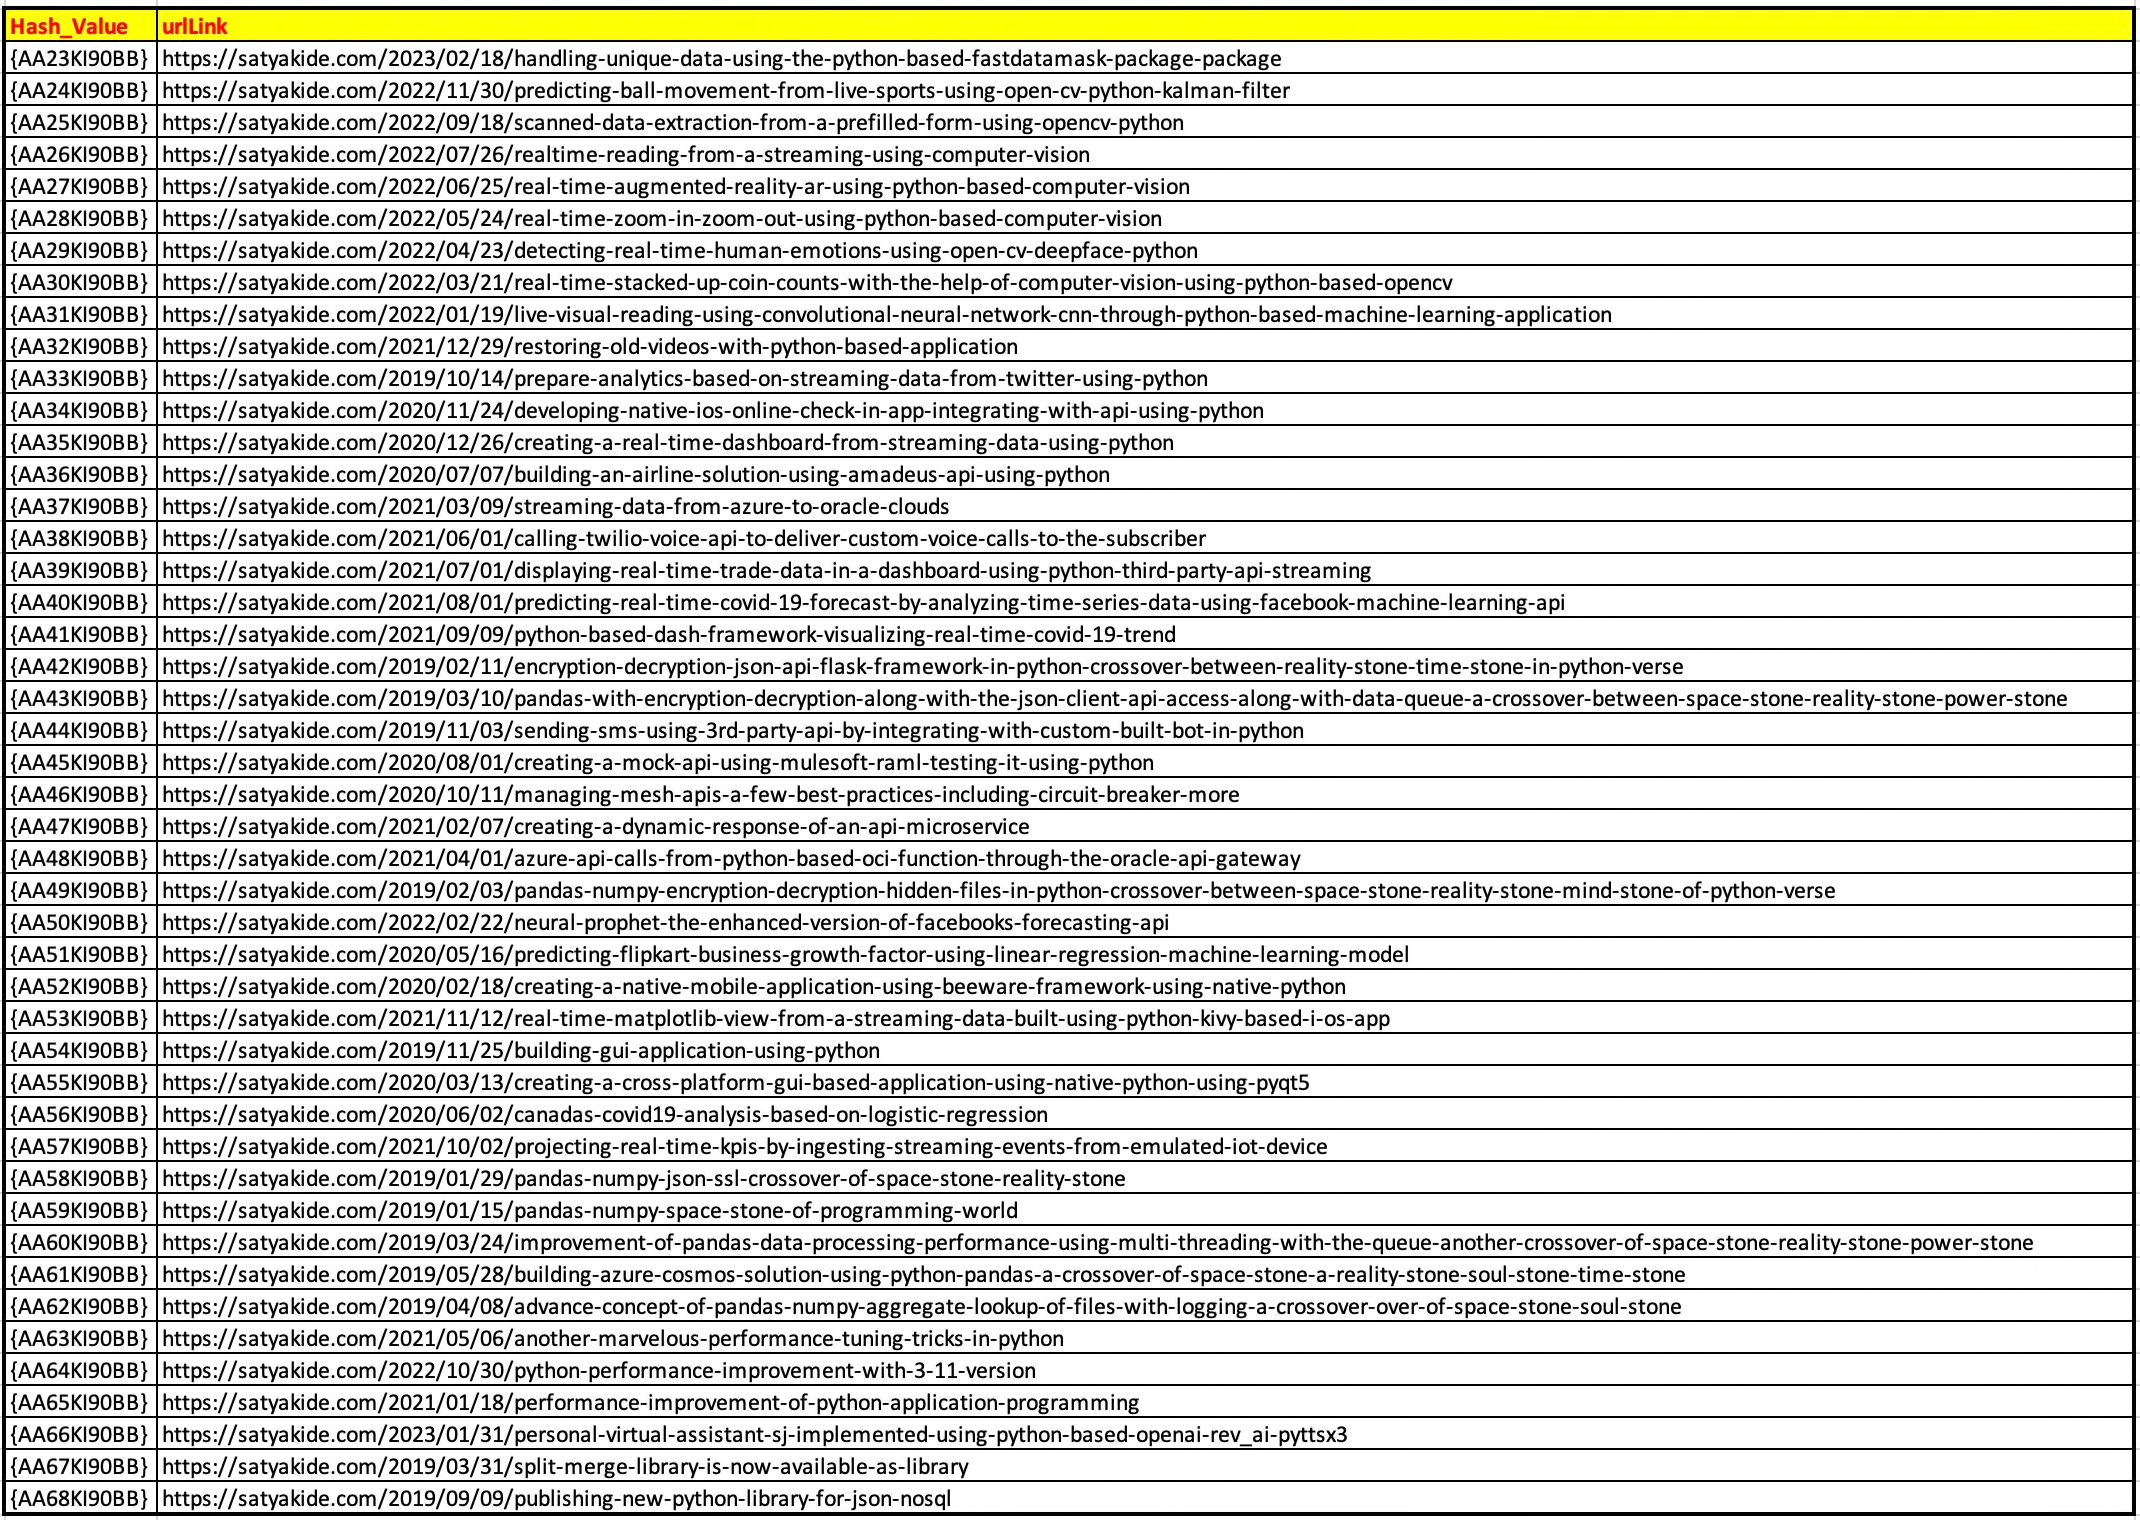
The first data that we are going to talk about is the one that contains the hyperlink. Let us explore the sample here.
From the above diagram, one can easily understand that the application will interpret a unique hash number associated with a specific URL. This data will be used to look up the URL after the OpenAI response from the tuned model as a result of any user query.
Now, let us understand the actual source data.
If we closely check, we’ll see the source file contains two columns – prompt & completion. And the website reference is put inside the curly braces as shown – “{Hash Code that represents your URL}.”
During the response, the newly created library replaces the hash value with the correct URL after the successful lookup & presents the complete answer.
CODE:
Why don’t we go through the code made accessible due to this new library for this particular use case?
clsConfigClient.py (This is the main calling Python script for the input parameters.)
This file contains hidden or bidirectional Unicode text that may be interpreted or compiled differently than what appears below. To review, open the file in an editor that reveals hidden Unicode characters. Learn more about bidirectional Unicode characters
trainChatGPTModel.py (This is the main calling Python script that will invoke the newly created fine-tune GPT-3 enabler.)
This file contains hidden or bidirectional Unicode text that may be interpreted or compiled differently than what appears below. To review, open the file in an editor that reveals hidden Unicode characters. Learn more about bidirectional Unicode characters
As one can see, the package needs only the source data file to fine-tune GPT-3 model.
checkFineTuneChatGPTModelStat.py (This is the main Python script that will check the status of the tuned process that will happen inside the OpenAI-cloud environment.)
This file contains hidden or bidirectional Unicode text that may be interpreted or compiled differently than what appears below. To review, open the file in an editor that reveals hidden Unicode characters. Learn more about bidirectional Unicode characters
To check the status of the fine-tuned job inside the OpenAI environment, one needs to provide the fine tune id, which generally starts with -> “ft-*.” One would get this value after the train script’s successful run.
input_text=str(input("Please provide the fine tune Id (Start with ft-*): "))url=url_part+input_textprint('URL: ',url)r1=tmodel.checkStat(url,open_api_key)
The above snippet is self-explanatory as one is passing the fine tune id along with the OpenAI API key.
testChatGPTModel.py (This is the main testing Python script that will invoke the newly created fine-tune GPT-3 enabler to get a response with custom data.)
This file contains hidden or bidirectional Unicode text that may be interpreted or compiled differently than what appears below. To review, open the file in an editor that reveals hidden Unicode characters. Learn more about bidirectional Unicode characters
In the above lines, the application gets the correct URL value from the look file we’ve prepared for this specific use case.
deleteChatGPTModel.py (This is the main Python script that will delete the old intended tuned model, which is no longer needed.)
This file contains hidden or bidirectional Unicode text that may be interpreted or compiled differently than what appears below. To review, open the file in an editor that reveals hidden Unicode characters. Learn more about bidirectional Unicode characters
We’ve demonstrated that using a straightforward method, one can delete any old tuned model from OpenAI that is no longer required.
KEY FEATURES TO CONSIDER DURING TUNING:
Data quality: Ensure that the data used for fine-tuning is clean, relevant, and representative of the domain you want the model to understand. Check for biases, inconsistencies, and errors in the dataset.
Overfitting: Be cautious of overfitting, which occurs when the model performs exceptionally well on the training data but poorly on unseen data. You can address overfitting by using regularization techniques, early stopping, or cross-validation.
Model size and resource requirements: GPT models can be resource-intensive. Be mindful of the hardware limitations and computational resources available when selecting the model size and the time and cost associated with training.
Hyperparameter tuning: Select appropriate hyperparameters for your fine-tuning processes, such as learning rate, batch size, and the number of epochs. Experiment with different combinations to achieve the best results without overfitting.
Evaluation metrics: Choose suitable evaluation metrics to assess the performance of your fine-tuned model. Consider using multiple metrics to understand your model’s performance comprehensively.
Ethical considerations: Be aware of potential biases in your dataset and how the model’s predictions might impact users. Address ethical concerns during the fine-tuning process and consider using techniques such as data augmentation or adversarial training to mitigate these biases.
Monitoring and maintenance: Continuously monitor the model’s performance after deployment, and be prepared to re-tune or update it as needed. Regular maintenance ensures that the model remains relevant and accurate.
Documentation: Document your tuning process, including the data used, model architecture, hyperparameters, and evaluation metrics. This factor will facilitate easier collaboration, replication, and model maintenance.
Cost: OpenAI fine-tuning can be extremely expensive, even for a small volume of data. Hence, organization-wise, one needs to be extremely careful while using this feature.
COST FACTOR:
Before we discuss the actual spending, let us understand the tested data volume to train & tune the model.
So, we’re talking about a total size of 500 KB (at max). And, we did 10 epochs during the training as you can see from the config file mentioned above.
So, it is pretty expensive. Use it wisely.
So, finally, we’ve done it.
I know that this post is relatively bigger than my earlier post. But, I think, you can get all the details once you go through it.
You will get the complete codebase in the following GitHub link.
I’ll bring some more exciting topics in the coming days from the Python verse. Please share & subscribe to my post & let me know your feedback.
Till then, Happy Avenging! 🙂
Note: All the data & scenarios posted here are representational data & scenarios & available over the internet & for educational purposes only. Some of the images (except my photo) we’ve used are available over the net. We don’t claim ownership of these images. There is always room for improvement & especially in the prediction quality.
Today, I’ll discuss another important topic before I will share the excellent use case next month, as I still need some time to finish that one. We’ll see how we can leverage the brilliant capability of a low-code machine-learning library named PyCaret.
But before going through the details, why don’t we view the demo & then go through it?
Demo
Architecture:
Let us understand the flow of events –
As one can see, the initial training requests are triggered from the PyCaret-driven training models. And the application can successfully process & identify the best models out of the other combinations.
Python Packages:
Following are the python packages that are necessary to develop this use case –
pipinstallpandaspipinstallpycaret
PyCaret is dependent on a combination of other popular python packages. So, you need to install them successfully to run this package.
CODE:
clsConfigClient.py (Main configuration file)
This file contains hidden or bidirectional Unicode text that may be interpreted or compiled differently than what appears below. To review, open the file in an editor that reveals hidden Unicode characters. Learn more about bidirectional Unicode characters
I’m skipping this section as it is self-explanatory.
clsTrainModel.py (This is the main class that contains the core logic of low-code machine-learning library to evaluate the best model for your solutions.)
This file contains hidden or bidirectional Unicode text that may be interpreted or compiled differently than what appears below. To review, open the file in an editor that reveals hidden Unicode characters. Learn more about bidirectional Unicode characters
Import necessary libraries and load the Titanic dataset.
Initialize the PyCaret setup, specifying the target variable, train-test split, categorical and ordinal features, and features to ignore.
Compare various models to find the best-performing one.
Create a specific model (Random Forest in this case).
Perform hyper-parameter tuning on the Random Forest model.
Evaluate the model’s performance using a confusion matrix and AUC-ROC curve.
Finalize the model by training it on the complete dataset.
Make predictions on new data.
Save the trained model for future use.
trainPYCARETModel.py (This is the main calling python script that will invoke the training class of PyCaret package.)
This file contains hidden or bidirectional Unicode text that may be interpreted or compiled differently than what appears below. To review, open the file in an editor that reveals hidden Unicode characters. Learn more about bidirectional Unicode characters
The above code is pretty self-explanatory as well.
testPYCARETModel.py (This is the main calling python script that will invoke the testing script for PyCaret package.)
This file contains hidden or bidirectional Unicode text that may be interpreted or compiled differently than what appears below. To review, open the file in an editor that reveals hidden Unicode characters. Learn more about bidirectional Unicode characters
In this code, the application uses the stored model & then forecasts based on the optimized PyCaret model tuning.
Conclusion:
The above code demonstrates an end-to-end binary classification pipeline using the PyCaret library for the Titanic dataset. The goal is to predict whether a passenger survived based on the available features. Here are some conclusions you can draw from the code and data:
Ease of use: The code showcases how PyCaret simplifies the machine learning process, from data preprocessing to model training, evaluation, and deployment. With just a few lines of code, you can perform tasks that would require much more effort using lower-level libraries.
Model selection: The compare_models() function provides a quick and easy way to compare various machine learning algorithms and identify the best-performing one based on the chosen evaluation metric (accuracy by default). This selection helps you select a suitable model for the given problem.
Hyper-parameter tuning: The tune_model() function automates the process of hyper-parameter tuning to improve model performance. We tuned a Random Forest model to optimize its predictive power in the example.
Model evaluation: PyCaret provides several built-in visualization tools for assessing model performance. In the example, we used a confusion matrix and AUC-ROC curve to evaluate the performance of the tuned Random Forest model.
Model deployment: The example demonstrates how to make predictions using the trained model and save the model for future use. This deployment showcases how PyCaret can streamline the process of deploying a machine-learning model in a production environment.
It is important to note that the conclusions drawn from the code and data are specific to the Titanic dataset and the chosen features. Adjust the feature engineering, preprocessing, and model selection steps for different datasets or problems accordingly. However, the general workflow and benefits provided by PyCaret would remain the same.
So, finally, we’ve done it.
I know that this post is relatively bigger than my earlier post. But, I think, you can get all the details once you go through it.
You will get the complete codebase in the following GitHub link.
I’ll bring some more exciting topics in the coming days from the Python verse. Please share & subscribe to my post & let me know your feedback.
Till then, Happy Avenging! 🙂
Note: All the data & scenarios posted here are representational data & scenarios & available over the internet & for educational purposes only. Some of the images (except my photo) we’ve used are available over the net. We don’t claim ownership of these images. There is always room for improvement & especially in the prediction quality.
Today, I’ll discuss one widespread use case of handling unique & critical data using a new python-based FastDataMask package. But before going through the details, why don’t we view the demo & then go through it?
Demo
Great! Let us understand in detail.
Architecture:
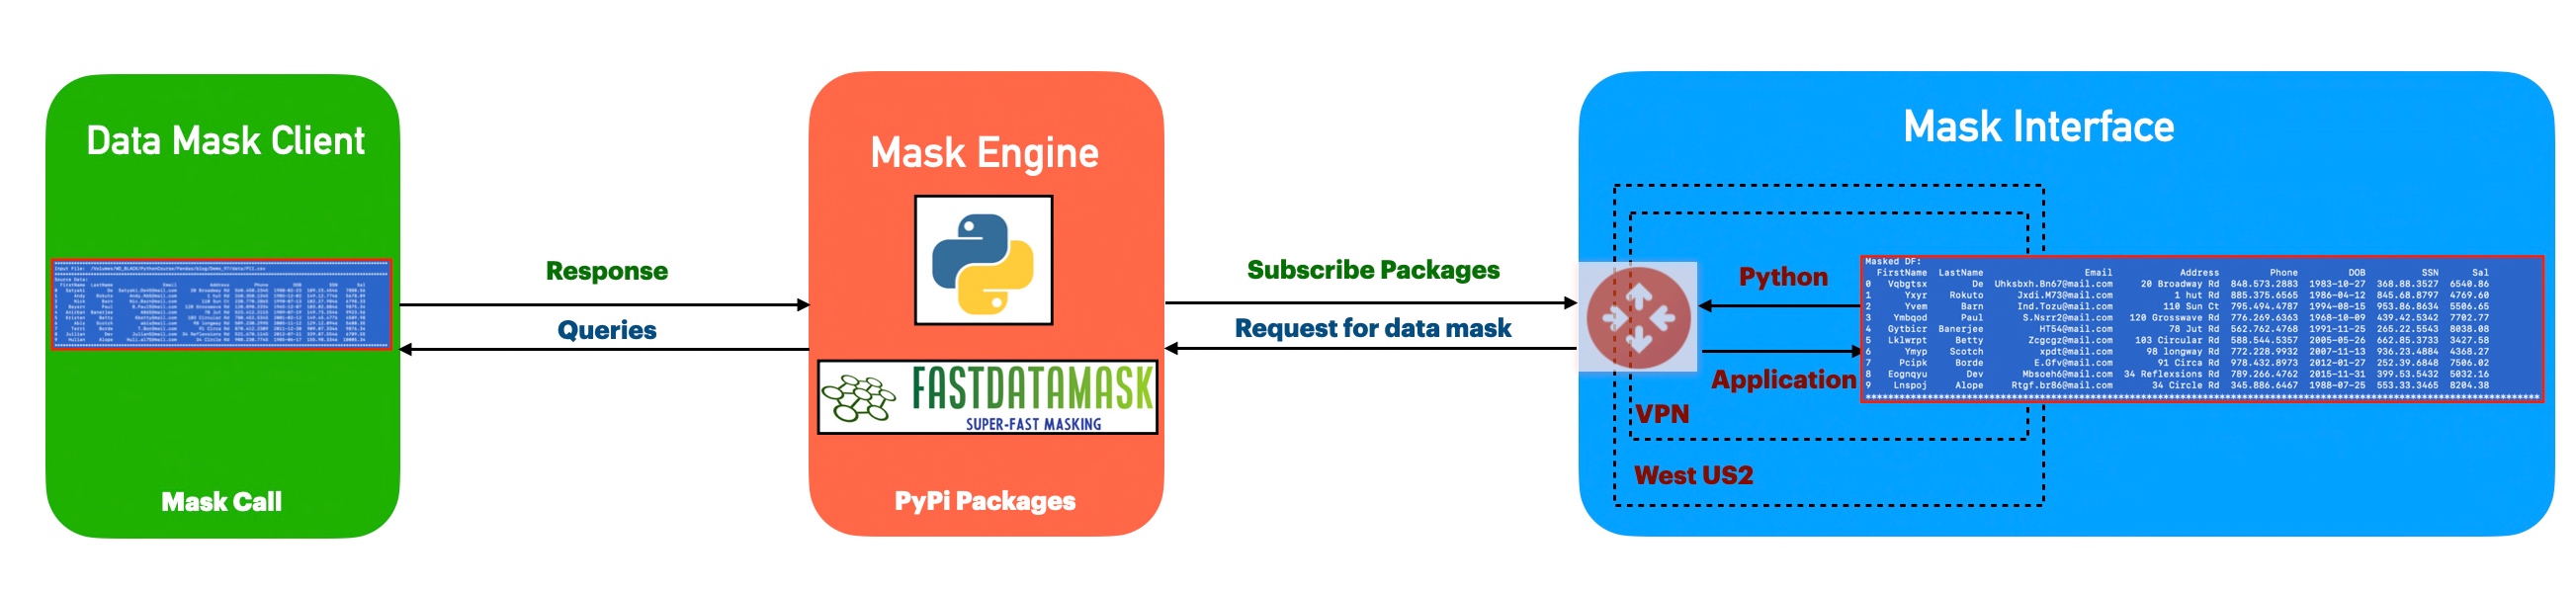
Let us understand the flow of events –
The application first invokes the FastDataMask python package, which accepts individual data in nature & then generates non-recoverable masked data, keeping the data pattern & nature in mind. Hence, anyone can still use the data for their analysis, whereas you can encapsulate the information from unauthorized pairs of eyes. Yet, they can get the essence & close data patterns to decide from any data analysis.
Python Packages:
Following are the python packages that are necessary to develop this brilliant use case –
Let us now understand the code. For this use case, we will only discuss three python scripts. However, we need more than these three. However, we have already discussed them in some of the early posts. Hence, we will skip them here.
clsConfigClient.py (Main configuration file)
This file contains hidden or bidirectional Unicode text that may be interpreted or compiled differently than what appears below. To review, open the file in an editor that reveals hidden Unicode characters. Learn more about bidirectional Unicode characters
Key entries from the above scripts are as follows –
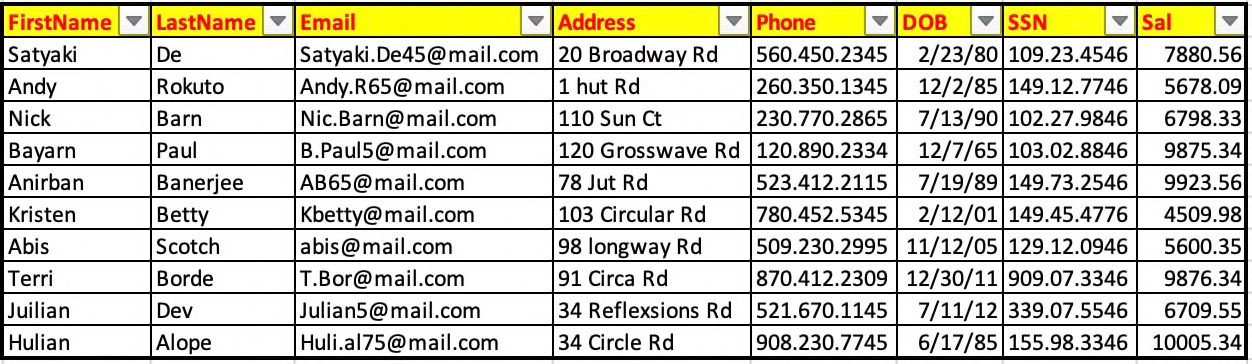
'FILE_NAME': 'PII.csv',
This excel is a dummy input file, which looks like this –
In the above screenshot, our applications will use critical information like – First Name, Email, Address, Phone, Date Of Birth, SSN & Sal.
playPII.py (Main calling python script)
This file contains hidden or bidirectional Unicode text that may be interpreted or compiled differently than what appears below. To review, open the file in an editor that reveals hidden Unicode characters. Learn more about bidirectional Unicode characters
These functions take a value as input and attempt to mask it using the corresponding masking method from the charList module. If the masking is successful, the process will return a masked value per input; otherwise, the application will return an empty string.
More specifically, the functions are:
mask_email: masks the email address provided as input
mask_phone: masks the phone number provided as input
mask_name: masks the first and last name supplied as input
mask_date: masks the date provided as input
mask_uniqueid: masks the unique ID (e.g., Social Security Number) provided as input
mask_sal: masks the salary supplied as input
The functions use a try-except block to handle any exceptions that may arise when calling the corresponding masking method from the charList module. If the masking method raises an exception, the function will return an empty string to handle cases where the input value is invalid, or the masking method fails for another reason.
The first line inputFile = CurrPath + FileName concatenates the current working directory path (CurrPath) with the name of a file (FileName) and assigns the resulting file path to a variable inputFile.
The second line df = p.read_csv(inputFile) – reads the file located at inputFile into a Pandas DataFrame object called df.
The following few lines apply certain functions (mask_name, mask_email, mask_phone, mask_date, mask_uniqueid, and mask_sal) to specific columns in the DataFrame to mask sensitive data. These functions likely perform some data masking or obfuscation on the input data.
The following line df.drop([‘FirstName’,’Email’,’Phone’,’DOB’,’SSN’, ‘Sal’], axis=1, inplace=True) drops the original columns that we are supposed to mask (i.e., ‘FirstName’, ‘Email’, ‘Phone’, ‘DOB’, ‘SSN’, and ‘Sal’) from the DataFrame.
The remaining lines rename the masked columns to their original names (i.e., ‘MaskedFirstName’ is renamed to ‘FirstName’, ‘MaskedEmail’ is renamed to ‘Email’, and so on).
Overall, this code reads in a file, masking specific sensitive columns, then outputting a new file with the masked data.
Now, let’s compare the output against the source data –
As you can see the blue highlighted columns are the masked column & you can compare the data pattern against the source.
So, finally, we’ve done it.
I know that this post is relatively bigger than my earlier post. But, I think, you can get all the details once you go through it.
You will get the complete codebase in the following GitHub link.
I’ll bring some more exciting topics in the coming days from the Python verse. Please share & subscribe to my post & let me know your feedback.
Till then, Happy Avenging! 🙂
Note: All the data & scenarios posted here are representational data & scenarios & available over the internet & for educational purposes only. Some of the images (except my photo) we’ve used are available over the net. We don’t claim ownership of these images. There is always room for improvement & especially in the prediction quality.
Today, I will discuss our Virtual personal assistant (SJ) with a combination of AI-driven APIs, which is now operational in Python. We will use the three most potent APIs using OpenAI, Rev-AI & Pyttsx3. Why don’t we see the demo first?
Great! Let us understand we can leverage this by writing a tiny snippet using this new AI model.
Architecture:
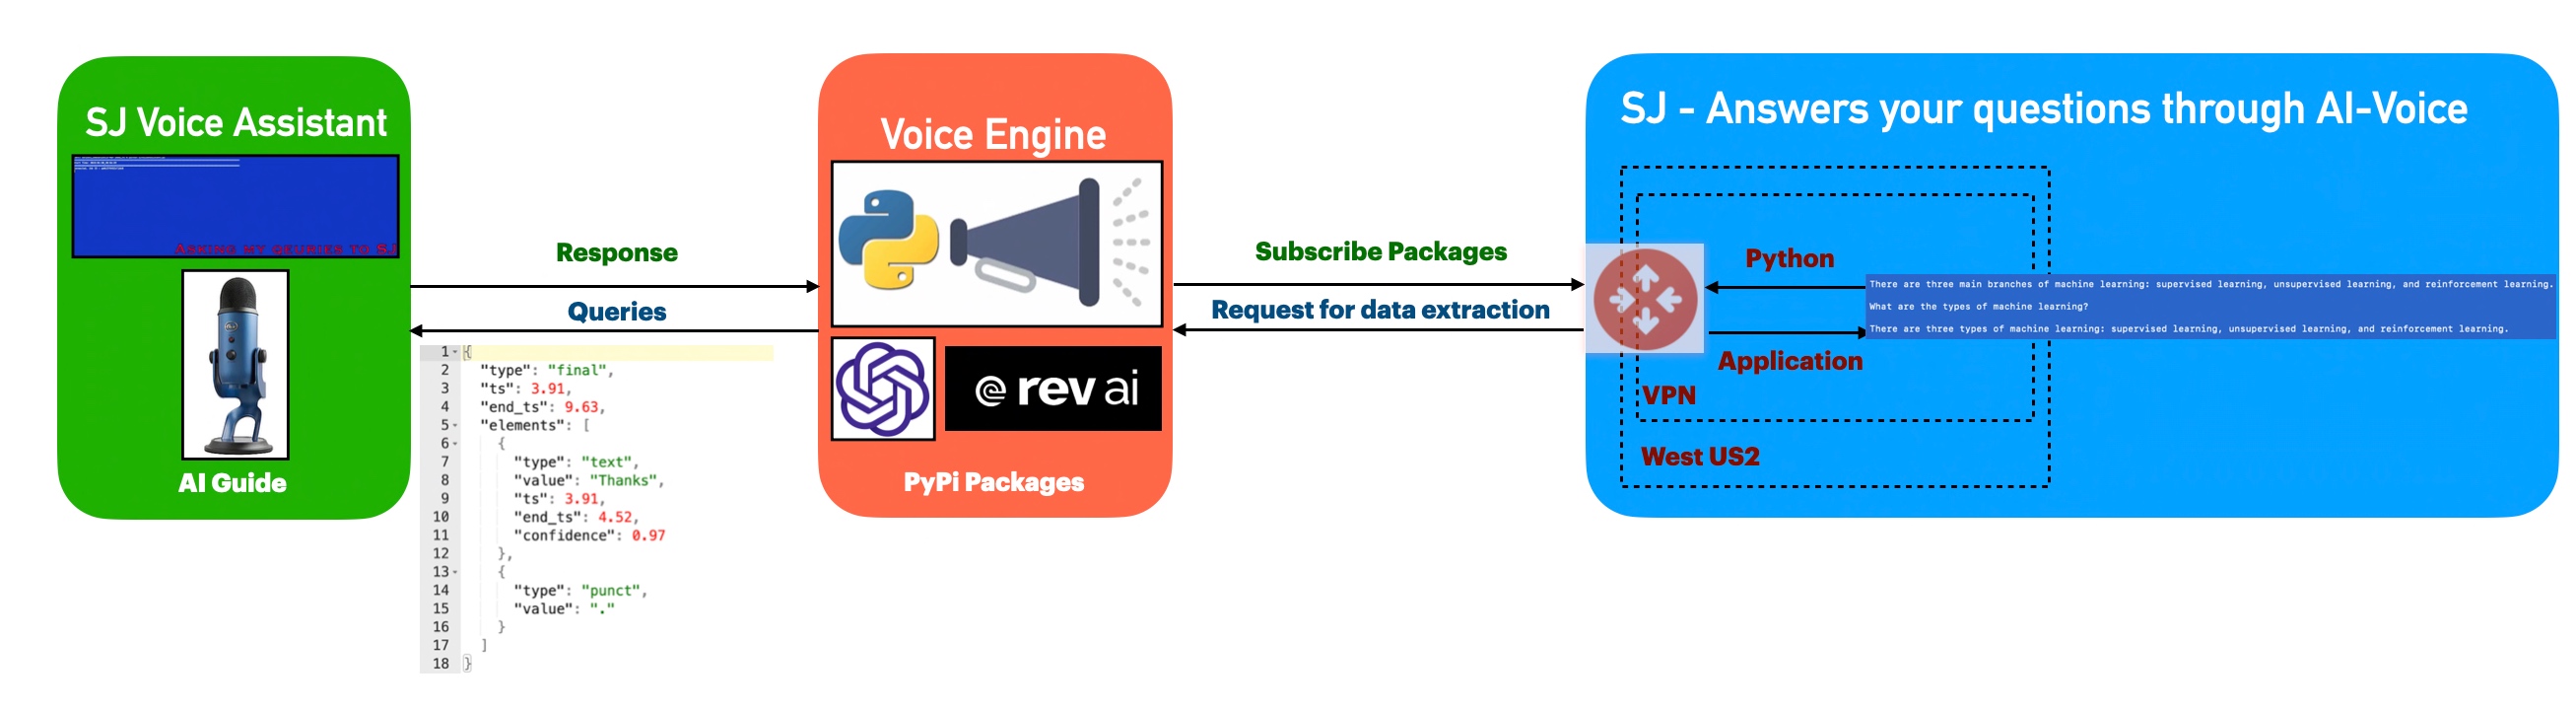
Let us understand the flow of events –
The application first invokes the API to capture the audio spoken through the audio device & then translate that into text, which is later parsed & shared as input by the openai for the response of the posted queries. Once, OpenAI shares the response, the python-based engine will take the response & using pyttsx3 to convert them to voice.
Python Packages:
Following are the python packages that are necessary to develop this brilliant use case –
Let us now understand the code. For this use case, we will only discuss three python scripts. However, we need more than these three. However, we have already discussed them in some of the early posts. Hence, we will skip them here.
clsConfigClient.py (Main configuration file)
This file contains hidden or bidirectional Unicode text that may be interpreted or compiled differently than what appears below. To review, open the file in an editor that reveals hidden Unicode characters. Learn more about bidirectional Unicode characters
Note that, all the API-key are not real. You need to generate your own key.
clsText2Voice.py (The python script that will convert text to voice)
This file contains hidden or bidirectional Unicode text that may be interpreted or compiled differently than what appears below. To review, open the file in an editor that reveals hidden Unicode characters. Learn more about bidirectional Unicode characters
The code is a function that generates speech audio from a given string using the Pyttsx3 library in Python. The function sets the speech rate and pitch using the “speedSpeech” and “speedPitch” properties of the calling object, initializes the Pyttsx3 engine, sets the speech rate and pitch on the engine, speaks the given string, and waits for the speech to finish. The function returns 0 after the speech is finished.
clsChatEngine.py (This python script will invoke the ChatGPT OpenAI class to initiate the response of the queries in python.)
This file contains hidden or bidirectional Unicode text that may be interpreted or compiled differently than what appears below. To review, open the file in an editor that reveals hidden Unicode characters. Learn more about bidirectional Unicode characters
The code is a function that uses OpenAI’s ChatGPT model to generate text based on a given prompt text. The function takes the text to be completed as input and uses an API key stored in the OPENAI_API_KEY property of the calling object to request OpenAI’s API. If the request is successful, the function returns the top completion generated by the model, as stored in the text field of the first item in the choices list of the API response.
The function includes error handling for IOError and Exception. If an IOError occurs, the function checks if the error number is errno.EPIPE and, if it is, returns without doing anything. If an Exception occurs, the function converts the error message to a string and prints it, then returns the string.
clsVoice2Text.py (This python script will invoke the Rev-AI class to initiate the transformation of audio into the text.)
This file contains hidden or bidirectional Unicode text that may be interpreted or compiled differently than what appears below. To review, open the file in an editor that reveals hidden Unicode characters. Learn more about bidirectional Unicode characters
The code is a python function called processVoice() that processes a user’s voice input using the Rev.AI API. The function takes in one argument, “var,” which is not used in the code.
Let us understand the code –
First, the function sets several variables, including the Rev.AI API access token, the sample rate, and the chunk size for the audio input.
Then, it creates a media configuration object for raw microphone input.
A RevAiStreamingClient object is created using the access token and the media configuration.
The code opens the microphone input using a statement and the microphone stream class.
Within the statement, the code starts the server connection and a thread that sends microphone audio to the server.
The code then iterates through the responses from the server, normalizing the JSON response and storing the values in a pandas data-frame.
If the “confidence” column exists in the data-frame, the code joins all the values to form the final text and raises an exception.
If there is an exception, the WebSocket connection is ended, and the final text is returned.
If there is any error, the WebSocket connection is also ended, and an empty string or the error message is returned.
clsMicrophoneStream.py (This python script invoke the rev_ai template to capture the chunk voice data & stream it to the service for text translation & return the response to app.)
This file contains hidden or bidirectional Unicode text that may be interpreted or compiled differently than what appears below. To review, open the file in an editor that reveals hidden Unicode characters. Learn more about bidirectional Unicode characters
This code is a part of a context manager class (clsMicrophoneStream) and implements the __enter__ method of the class. The method sets up a PyAudio object and opens an audio stream using the PyAudio object. The audio stream is configured to have the following properties:
Format: 16-bit integer (paInt16)
Channels: 1 (mono)
Rate: The rate specified in the instance of the ms.clsMicrophoneStream class.
Input: True, meaning the audio stream is an input stream, not an output stream.
Frames per buffer: The chunk specified in the instance of the ms.clsMicrophoneStream class.
Stream callback: The method self._fill_buffer will be called when the buffer needs more data.
The self.closed attribute is set to False to indicate that the stream is open. The method returns the instance of the class (self).
The exit method implements the “exit” behavior of a Python context manager. It is automatically called when the context manager is exited using the statement.
The method stops and closes the audio stream, sets the closed attribute to True, and places None in the buffer. The terminate method of the PyAudio interface is then called to release any resources used by the audio stream.
The _fill_buffer method is a callback function that runs asynchronously to continuously collect data from the audio stream and add it to the buffer.
The _fill_buffer method takes four arguments:
in_data: the raw audio data collected from the audio stream.
frame_count: the number of frames of audio data that was collected.
time_info: information about the timing of the audio data.
status_flags: flags that indicate the status of the audio stream.
The method adds the collected in_data to the buffer using the put method of the buffer object. It returns a tuple of None and pyaudio.paContinue to indicate that the audio stream should continue.
defgenerator(self):whilenotself.closed: ###################################################################### ### Useablockingget() toensurethere's at least one chunk of #### ### data,andstopiterationifthechunkisNone,indicatingthe #### ### endoftheaudiostream. #### ######################################################################chunk=self._buff.get()ifchunkis None:returndata= [chunk] ########################################################## ### Nowconsumewhateverotherdata's still buffered. #### ##########################################################while True:try:chunk=self._buff.get(block=False)ifchunkis None:returndata.append(chunk)exceptqueue.Empty:breakyieldb''.join(data)
The logic of the code “def generator(self):” is as follows:
The function generator is an infinite loop that runs until self.closed is True. Within the loop, it uses a blocking get() method of the buffer object (self._buff) to retrieve a chunk of audio data. If the retrieved chunk is None, it means the end of the audio stream has been reached, and the function returns.
If the retrieved chunk is not None, it appends it to the data list. The function then enters another inner loop that continues to retrieve chunks from the buffer using the non-blocking get() method until there are no more chunks left. Finally, the function yields the concatenated chunks of data as a single-byte string.
SJVoiceAssistant.py (Main calling python script)
This file contains hidden or bidirectional Unicode text that may be interpreted or compiled differently than what appears below. To review, open the file in an editor that reveals hidden Unicode characters. Learn more about bidirectional Unicode characters
defmain():try:spFlag=Truevar=datetime.datetime.now().strftime("%Y-%m-%d_%H-%M-%S")print('*'*120)print('Start Time: '+str(var))print('*'*120)exitComment='THANKS.'while True:try:finalText=''ifspFlag== True:finalText=x4.processVoice(var)else:passval=finalText.upper().strip()print('Main Return: ',val)print('Exit Call: ',exitComment)print('Length of Main Return: ',len(val))print('Length of Exit Call: ',len(exitComment))ifval== exitComment:breakeliffinalText=='':spFlag=Trueelse:print('spFlag::',spFlag)print('Inside: ',finalText)resVal=x2.findFromSJ(finalText)print('ChatGPT Response:: ')print(resVal)resAud=x3.getAudio(resVal)spFlag=FalseexceptExceptionas e:passvar1=datetime.datetime.now().strftime("%Y-%m-%d_%H-%M-%S")print('*'*120)print('End Time: '+str(var1))print('SJ Voice Assistant exited successfully!')print('*'*120)exceptExceptionas e:x=str(e)print('Error: ',x)
The code is a Python script that implements a voice-based chatbot (likely named “SJ Voice Assistant”). The code performs the following operations:
Initialize the string “exitComment” to “THANKS.” and set the “spFlag” to True.
Start an infinite loop until a specific condition breaks the loop.
In the loop, try to process the input voice with a function called “processVoice()” from an object “x4”. Store the result in “finalText.”
Convert “finalText” to upper case, remove leading/trailing whitespaces, and store it in “val.” Print “Main Return” and “Exit Call” with their length.
If “val” equals “exitComment,” break the loop. Suppose “finalText” is an empty string; set “spFlag” to True. Otherwise, perform further processing: a. Call the function “findFromSJ()” from an object “x2” with the input “finalText.” Store the result in “resVal.” b. Call the function “getAudio()” from an object “x3” with the input “resVal.” Store the result in “resAud.” Set “spFlag” to False.
If an exception occurs, catch it and pass (do nothing).
Finally the application will exit by displaying the following text – “SJ Voice Assistant exited successfully!”
If an exception occurs outside the loop, catch it and print the error message.
So, finally, we’ve done it.
I know that this post is relatively bigger than my earlier post. But, I think, you can get all the details once you go through it.
You will get the complete codebase in the following GitHub link.
I’ll bring some more exciting topics in the coming days from the Python verse. Please share & subscribe to my post & let me know your feedback.
Till then, Happy Avenging! 🙂
Note: All the data & scenarios posted here are representational data & scenarios & available over the internet & for educational purposes only. Some of the images (except my photo) we’ve used are available over the net. We don’t claim ownership of these images. There is always room for improvement & especially in the prediction quality.
Today, I’m going to discuss another Computer Vision installment. I’ll use Open CV & Kalman filter to predict a live ball movement of Cricket, one of the most popular sports in the Indian sub-continent, along with the UK & Australia. But before we start a deep dive, why don’t we first watch the demo?
Demo
Isn’t it exciting? Let’s explore it in detail.
Architecture:
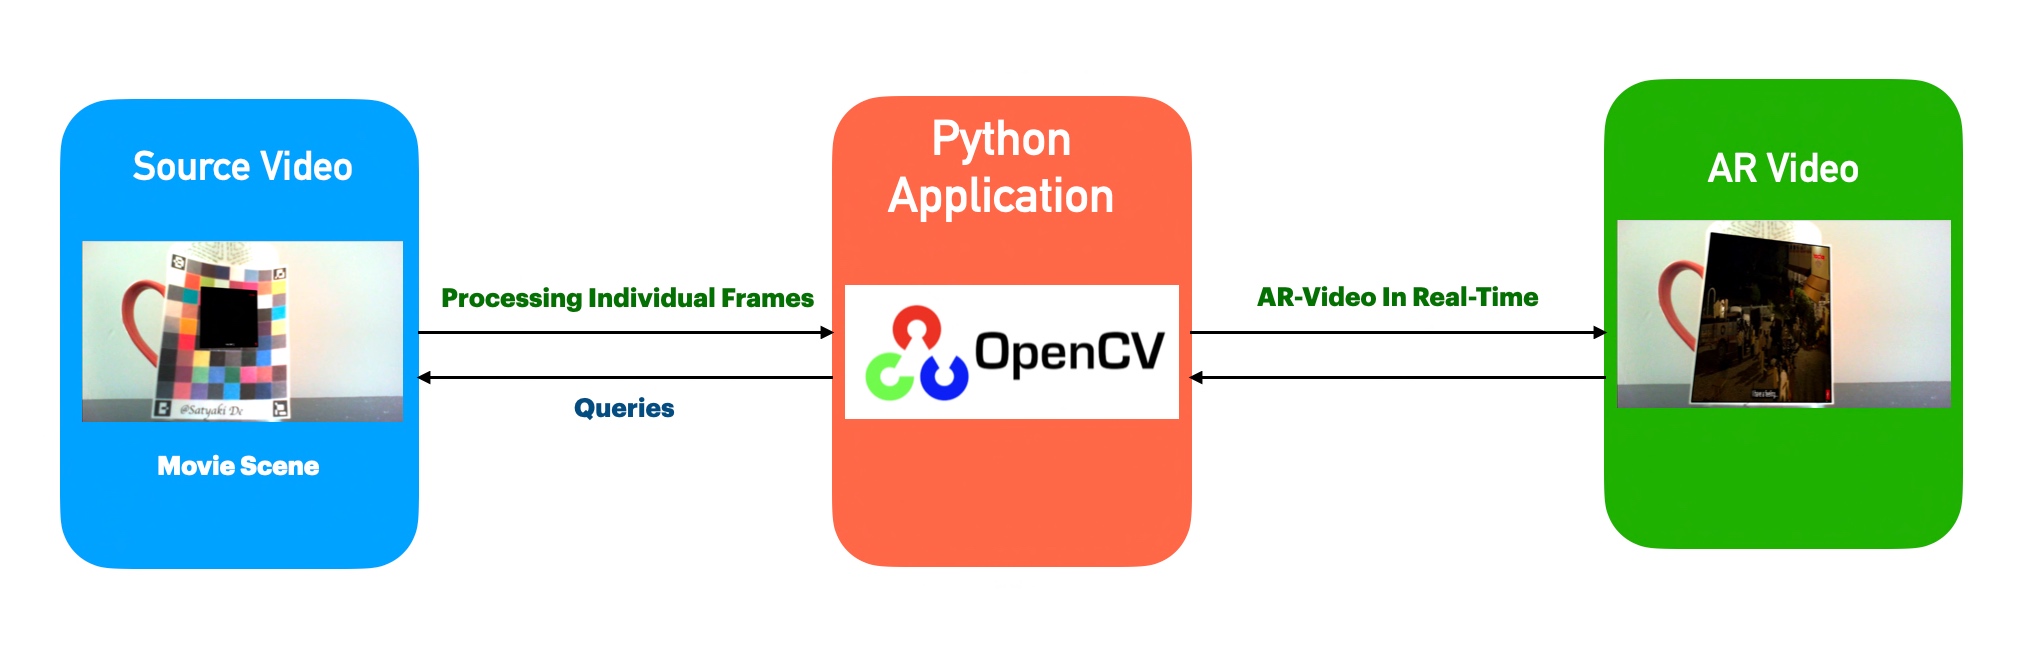
Let us understand the flow of events –
The above diagram shows that the application, which uses Open CV, analyzes individual frames. It detects the cricket ball & finally, it tracks every movement by analyzing each frame & then it predicts (pink line) based on the supplied data points.
Python Packages:
Following are the python packages that are necessary to develop this brilliant use case –
Let us now understand the code. For this use case, we will only discuss three python scripts. However, we need more than these three. However, we have already discussed them in some of the early posts. Hence, we will skip them here.
clsPredictBodyLine.py (The main class that will handle the prediction of Cricket balls in the real-time video feed.)
This file contains hidden or bidirectional Unicode text that may be interpreted or compiled differently than what appears below. To review, open the file in an editor that reveals hidden Unicode characters. Learn more about bidirectional Unicode characters
Please find the key snippet from the above script –
kf = clsKalmanFilter()
The application is instantiating the modified Kalman filter.
myColorFinder = ColorFinder(False)
This command has more purpose than creating a proper mask in debug mode if you want to isolate the color of any object you want to track. To debug this property, one needs to set the flag to True. And you will see the following screen. Click the next video to get the process to generate the accurate HSV.
In the end, you will get a similar entry to the below one –
And you can see the entry that is available in the config for the following parameter –
The four points mentioned above will help us determine the best region for the ball, forcing the batsman to play the shots & a 90% chance of getting caught behind.
The snippets below will apply the mask & identify the contour of the objects which the program intends to track. In this case, we are talking about the pink cricket ball.
#Find the color ball
imgColor, mask = myColorFinder.update(img, hsvVals)

#Find location of the red_ball
imgContours, contours = cvzone.findContours(img, mask, minArea=500)

if contours:
    posListX.append(contours[0]['center'][0])
    posListY.append(contours[0]['center'][1])
The next key snippets are as follows –
if posListX:
    # Find the Coefficients
    A, B, C = np.polyfit(posListX, posListY, 2)

    for i, (posX, posY) in enumerate(zip(posListX, posListY)):
        pos = (posX, posY)
        cv2.circle(imgContours, pos, 10, (0,255,0), cv2.FILLED)

        # Using Karman Filter Prediction
        predicted = kf.predict(posX, posY)
        cv2.circle(imgContours, (predicted[0], predicted[1]), 12, (255,0,255), cv2.FILLED)

        ballDetectFlag = True
        if ballDetectFlag:
            print('Balls Detected!')

        if i == 0:
            cv2.line(imgContours, pos, pos, (0,255,0), 5)
            cv2.line(imgContours, predicted, predicted, (255,0,255), 5)
        else:
            predictedM = kf.predict(posListX[i-1], posListY[i-1])

            cv2.line(imgContours, pos, (posListX[i-1], posListY[i-1]), (0,255,0), 5)
            cv2.line(imgContours, predicted, predictedM, (255,0,255), 5)
The above lines will track the original & predicted lines & then it will plot on top of the frame in real time.
The next line will be as follows –
if len(posListX) < 10:

    # Calculation for best place to ball
    a1 = A
    b1 = B
    c1 = C - pT1

    X1 = int((- b1 - math.sqrt(b1**2 - (4*a1*c1)))/(2*a1))
    prediction1 = pT2 < X1 < pT3

    a2 = A
    b2 = B
    c2 = C - pT4

    X2 = int((- b2 - math.sqrt(b2**2 - (4*a2*c2)))/(2*a2))
    prediction2 = pT2 < X2 < pT3

    prediction = prediction1 | prediction2

if prediction:
    print('Good Length Ball!')
    sMsg = "Good Length Ball - (" + str(FrNo) + ")"
    cvzone.putTextRect(imgContours, sMsg, (50,150), scale=5, thickness=5, colorR=(0,200,0), offset=20)
else:
    print('Loose Ball!')
    sMsg = "Loose Ball - (" + str(FrNo) + ")"
    cvzone.putTextRect(imgContours, sMsg, (50,150), scale=5, thickness=5, colorR=(0,0,200), offset=20)
predictBodyLine.py (The main python script that will invoke the class to predict Cricket balls in the real-time video feed.)
This file contains hidden or bidirectional Unicode text that may be interpreted or compiled differently than what appears below. To review, open the file in an editor that reveals hidden Unicode characters. Learn more about bidirectional Unicode characters
# Passing source data csv file
x1 = pbdl.clsPredictBodyLine()

# Execute all the pass
r1 = x1.processVideo(debugInd, var)

if (r1 == 0):
    print('Successfully predicted body-line deliveries!')
else:
    print('Failed to predict body-line deliveries!')
The above lines will first instantiate the main class & then invoke it.
You can find it here if you want to know more about the Kalman filter.
So, finally, we’ve done it.
FOLDER STRUCTURE:
You will get the complete codebase in the following GitHub link.
I’ll bring some more exciting topics in the coming days from the Python verse. Please share & subscribe to my post & let me know your feedback.
Till then, Happy Avenging! 🙂
Note: All the data & scenarios posted here are representational data & scenarios & available over the internet & for educational purposes only. Some of the images (except my photo) we’ve used are available over the net. We don’t claim ownership of these images. There is always room for improvement & especially in the prediction quality.
This week we will discuss another important topic that many of us had in our mind. Today, we’ll try extracting the texts from scanned, formatted forms. This use case is instrumental when we need to process information prefilled by someone or some process.
To make things easier, I’ve packaged my entire solution & published that as a PyPi package after a long time. But, even before I start, why don’t we see the demo & then discuss it in detail?
Demo
Architecture:
Let us understand the architecture flow –
Reference Pattern
From the above diagram, one can understand the overall flow of this process. We’ll be using our second PyPi package, which will scan the source scanned copy of a formatted page & then tries to extract the relevant information.
Python Packages:
Following are the key python packages that we need apart from these dependent created packages & they are as follows –
To know more about this, please visit the following PyPi link.
CODE:
Let us now understand the code. For this use case, we will only discuss three python scripts. However, we need more than these three. However, we have already discussed them in some of the early posts. Hence, we will skip them here.
clsConfigClient.py (This is the configuration class of the python script that will extract the text from the preformatted scanned copy.)
This file contains hidden or bidirectional Unicode text that may be interpreted or compiled differently than what appears below. To review, open the file in an editor that reveals hidden Unicode characters. Learn more about bidirectional Unicode characters
Let us understand this part, as it is very critical for this entire package.
We need to define the areas in terms of pixel position, which we need to extract. Hence, we follow the following pattern –
"atrib_": {"id": , "bbox": (x-Coordinates, y-Coordinates, Width, Height), "filter_keywords": tuple(["Mention the overlapping printed text that you don't want to capture. Make sure you are following the exact Case to proper detection."])}
You can easily get the individual intended text position by using any Photo editor.
Still not clear how to select?
Let’s watch the next video –
How to fetch the extracted location pixel metadata – Demo
The above demo should explain what we are trying to achieve. Also, you need to understand that if your two values are extremely close, then we’re taking both the non-desired labels & put them under the filter keywords to ensure extracting the correct values.
For example, on the top left side, where the values are very close, we’re putting both closed labels as filter keywords. One such example is as follows –
"filter_keywords": tuple(["FILE", "DEPT"])
The same logic applies to the other labels as well.
readingFormLib.py (This is the main calling python script that will extract the text from the preformatted scanned copy.)
This file contains hidden or bidirectional Unicode text that may be interpreted or compiled differently than what appears below. To review, open the file in an editor that reveals hidden Unicode characters. Learn more about bidirectional Unicode characters
# We keep the setup code in a different class as shown below.
from ReadingFilledForm import clsReadForm as rf

from clsConfigClient import clsConfigClient as cf
The above lines import the newly created PyPi package into the memory.
###############################################
###           Global Section                ###
###############################################
# Instantiating all the main class
scannedImagePath = str(cf.conf['IMAGE_PATH']) + str(cf.conf['FILE_NAME'])
templatePath = str(cf.conf['TEMPLATE_PATH']) + str(cf.conf['TEMPLATE_FILE_NAME'])

x1 = rf.clsReadForm(scannedImagePath, templatePath)

###############################################
###    End of Global Section                ###
###############################################
Now, the application is fetching both the template copy & the intended scanned copy & load them into the memory.
# Getting the dictionary
my_dict = cf.conf['MY_DICT']
After this, the application will try to extract the focus area dictionary, indicating the areas of particular interest.
# Execute all the pass
r1 = x1.startProcess(debugInd, var, my_dict)
Finally, pass it inside the new package to get the correct outcome.
FOLDER STRUCTURE:
Here is the folder structure that contains all the files & directories in MAC O/S –
Directory
Similar structures are present in the Windows environment as well.
You will get the complete calling codebase in the following GitHub link.
I’ll bring some more exciting topics in the coming days from the Python verse. Please share & subscribe to my post & let me know your feedback.
Till then, Happy Avenging! 🙂
Note: All the data & scenarios posted here are representational data & scenarios & available over the internet & for educational purposes only. There is always room for improvement & especially in the prediction quality.
This week we’re going to extend one of our earlier posts & trying to read an entire text from streaming using computer vision. If you want to view the previous post, please click the following link.
But, before we proceed, why don’t we view the demo first?
Demo
Architecture:
Let us understand the architecture flow –
Architecture flow
The above diagram shows that the application, which uses the Open-CV, analyzes individual frames from the source & extracts the complete text within the video & displays it on top of the target screen besides prints the same in the console.
Let us now understand the code. For this use case, we will only discuss three python scripts. However, we need more than these three. However, we have already discussed them in some of the early posts. Hence, we will skip them here.
clsReadingTextFromStream.py (This is the main class of python script that will extract the text from the WebCAM streaming in real-time.)
This file contains hidden or bidirectional Unicode text that may be interpreted or compiled differently than what appears below. To review, open the file in an editor that reveals hidden Unicode characters. Learn more about bidirectional Unicode characters
Please find the key snippet from the above script –
# Two output layer names for the text detector model

lNames = cf.conf['LAYER_DET']

# Tesseract OCR text param values

strVal = "-l " + str(cf.conf['LANG']) + " --oem " + str(cf.conf['OEM_VAL']) + " --psm " + str(cf.conf['PSM_VAL']) + ""
config = (strVal)
The first line contains the two output layers’ names for the text detector model. Among them, the first one indicates the outcome possibilities & the second one use to derive the bounding box coordinates of the predicted text.
The second line contains various options for the tesseract APIs. You need to understand the opportunities in detail to make them work. These are the essential options for our use case –
Language – The intended language, for example, English, Spanish, Hindi, Bengali, etc.
OEM flag – In this case, the application will use 4 to indicate LSTM neural net model for OCR.
OEM Value – In this case, the selected value is 7, indicating that the application treats the ROI as a single line of text.
For more details, please refer to the config file.
print("[INFO] Loading Text Detector...")
net = cv2.dnn.readNet(modelPath)
The above lines bring the already created model & load it to memory for evaluation.
# Setting new width and height and then determine the ratio in change
# for both the width and height
(newW, newH) = (wt, ht)
rW = origW / float(newW)
rH = origH / float(newH)

# Resize the frame and grab the new frame dimensions
frame = cv2.resize(frame, (newW, newH))
(H, W) = frame.shape[:2]

# Construct a blob from the frame and then perform a forward pass of
# the model to obtain the two output layer sets
blob = cv2.dnn.blobFromImage(frame, 1.0, (W, H), sParam, swapRB=True, crop=False)
net.setInput(blob)
(confScore, imgGeo) = net.forward(lNames)

# Decode the predictions, then apply non-maxima suppression to
# suppress weak, overlapping bounding boxes
(rects, confidences) = self.predictText(confScore, imgGeo)
boxes = non_max_suppression(np.array(rects), probs=confidences)
The above lines are more of preparing individual frames to get the bounding box by resizing the height & width followed by a forward pass of the model to obtain two output layer sets. And then apply the non-maxima suppression to remove the weak, overlapping bounding box by interpreting the prediction. In short, this will identify the potential text region & put the bounding box surrounding it.
# Initialize the list of results
res = []

# Getting BoundingBox boundaries
res = self.findBoundBox(boxes, res, rW, rH, orig, origW, origH, pad)
The above function will create the bounding box surrounding the predicted text regions. Also, we will capture the expected text inside the result variable.
for (spX, spY, epX, epY) in boxes:
  # Scale the bounding box coordinates based on the respective
  # ratios
  spX = int(spX * rW)
  spY = int(spY * rH)
  epX = int(epX * rW)
  epY = int(epY * rH)

  # To obtain a better OCR of the text we can potentially
  # apply a bit of padding surrounding the bounding box.
  # And, computing the deltas in both the x and y directions
  dX = int((epX - spX) * pad)
  dY = int((epY - spY) * pad)

  # Apply padding to each side of the bounding box, respectively
  spX = max(0, spX - dX)
  spY = max(0, spY - dY)
  epX = min(origW, epX + (dX * 2))
  epY = min(origH, epY + (dY * 2))

  # Extract the actual padded ROI
  roi = orig[spY:epY, spX:epX]
Now, the application will scale the bounding boxes based on the previously computed ratio for actual text recognition. In this process, the application also padded the bounding boxes & then extracted the padded region of interest.
# Choose the proper OCR Config
text = pytesseract.image_to_string(roi, config=config)

# Add the bounding box coordinates and OCR'd text to the list
# of results
res.append(((spX, spY, epX, epY), text))
Using OCR options, the application extracts the text within the video frame & adds that to the res list.
# Sort the results bounding box coordinates from top to bottom
res = sorted(res, key=lambda r:r[0][1])
It then sends a sorted output to the primary calling functions.
for ((spX, spY, epX, epY), text) in res:
  # Display the text OCR by using Tesseract APIs
  print("Reading Text::")
  print("=" *60)
  print(text)
  print("=" *60)

  # Removing the non-ASCII text so it can draw the text on the frame
  # using OpenCV, then draw the text and a bounding box surrounding
  # the text region of the input frame
  text = "".join([c if ord(c) < aRange else "" for c in text]).strip()
  output = orig.copy()

  cv2.rectangle(output, (spX, spY), (epX, epY), drawTag, 2)
  cv2.putText(output, text, (spX, spY - 20), cv2.FONT_HERSHEY_SIMPLEX, 1.2, drawTag, 3)

  # Show the output frame
  cv2.imshow(title, output)
Finally, it fetches the potential text region along with the text & then prints on top of the source video. Also, it removed some non-printable characters during this time to avoid any cryptic texts.
readingVideo.py (Main calling script.)
This file contains hidden or bidirectional Unicode text that may be interpreted or compiled differently than what appears below. To review, open the file in an editor that reveals hidden Unicode characters. Learn more about bidirectional Unicode characters
# Instantiating all the main class

x1 = rtfs.clsReadingTextFromStream()

# Execute all the pass
r1 = x1.processStream(debugInd, var)

if (r1 == 0):
    print('Successfully read text from the Live Stream!')
else:
    print('Failed to read text from the Live Stream!')
The above lines instantiate the main calling class & then invoke the function to get the desired extracted text from the live streaming video if that is successful.
FOLDER STRUCTURE:
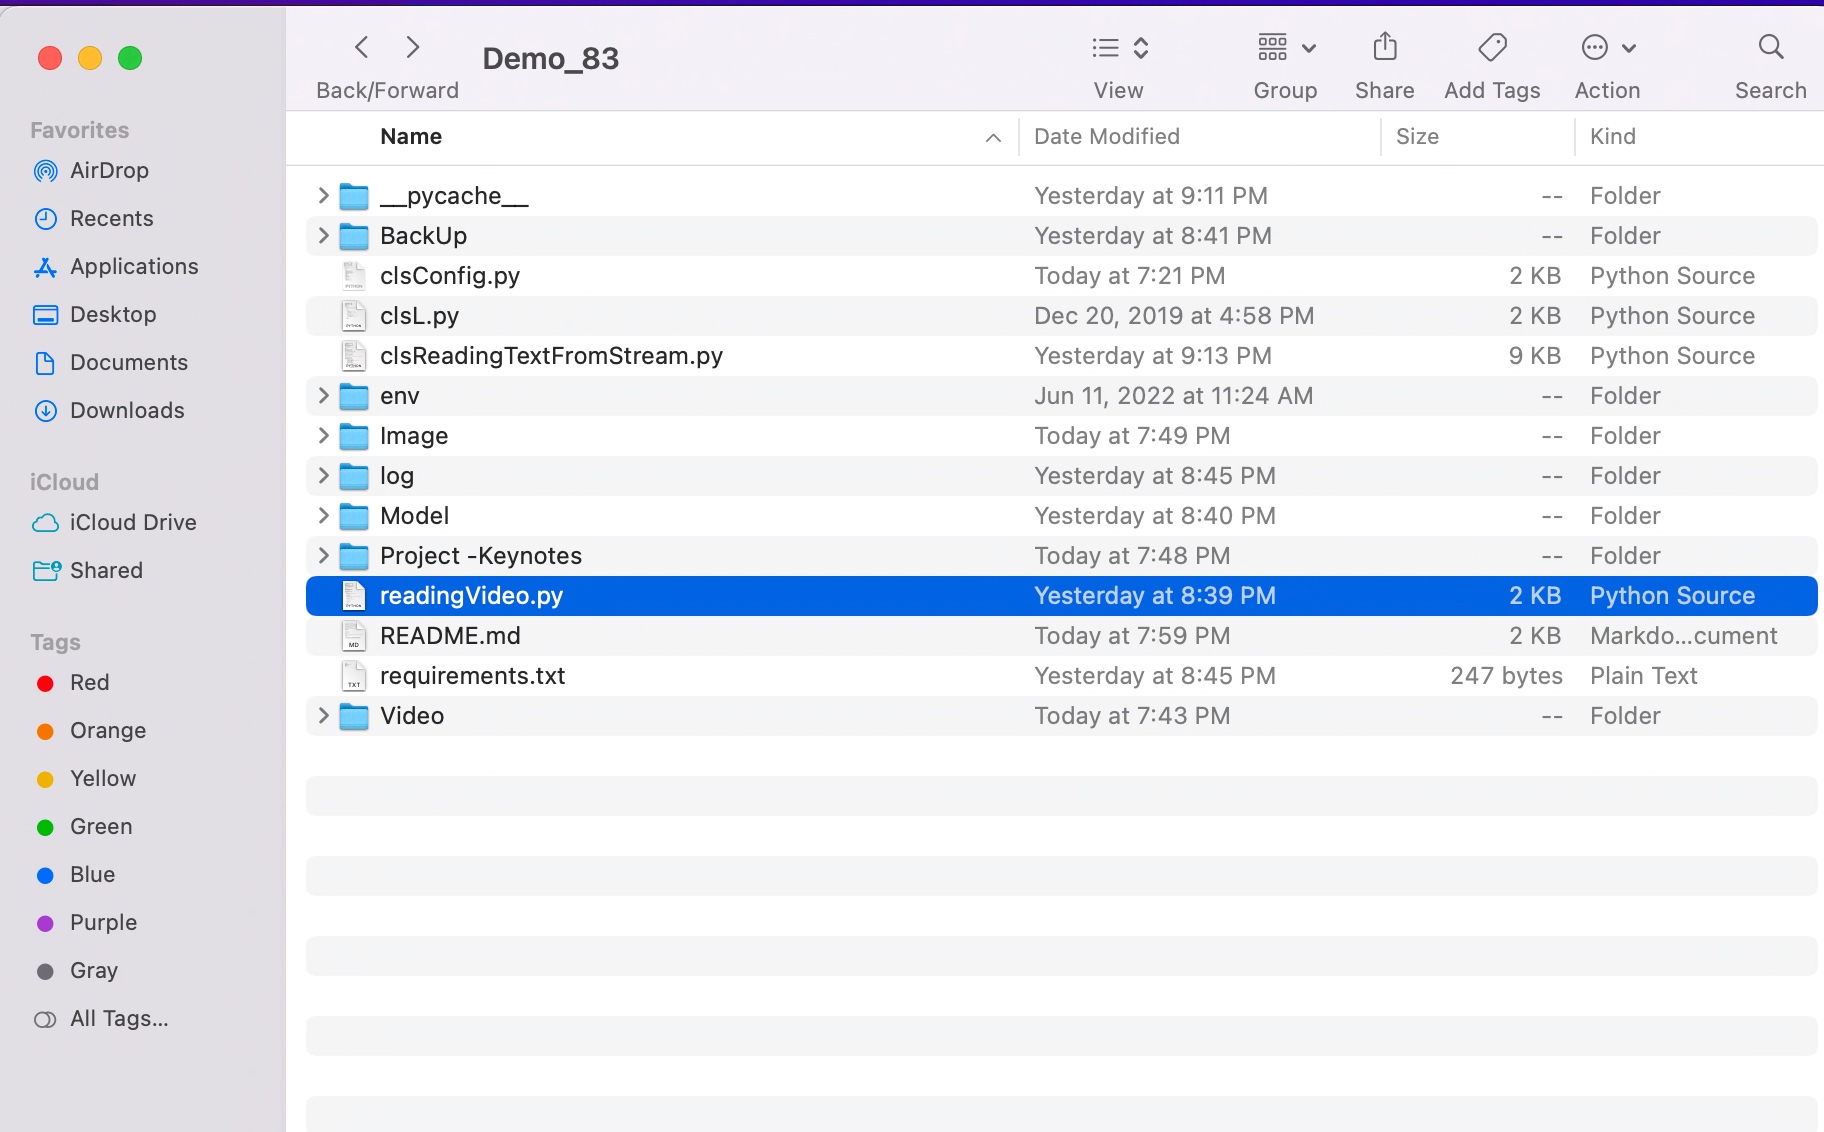
Here is the folder structure that contains all the files & directories in MAC O/S –
You will get the complete codebase in the following Github link.
Unfortunately, I cannot upload the model due to it’s size. I will share on the need basis.
I’ll bring some more exciting topic in the coming days from the Python verse. Please share & subscribe my post & let me know your feedback.
Till then, Happy Avenging! 🙂
Note: All the data & scenario posted here are representational data & scenarios & available over the internet & for educational purpose only. Some of the images (except my photo) that we’ve used are available over the net. We don’t claim the ownership of these images. There is an always room for improvement & especially the prediction quality.
Today, I’m going to discuss another Computer Vision installment. I’ll discuss how to implement Augmented Reality using Open-CV Computer Vision with full audio. We will be using part of a Bengali OTT Series called “Feludar Goendagiri” entirely for educational purposes & also as a tribute to the great legendary director, late Satyajit Roy. To know more about him, please click the following link.
Why don’t we see the demo first before jumping into the technical details?
Demo
Architecture:
Let us understand the architecture –
Process Flow
The above diagram shows that the application, which uses the Open-CV, analyzes individual frames from the source & blends that with the video trailer. Finally, it creates another video by correctly mixing the source audio.
Python Packages:
Following are the python packages that are necessary to develop this brilliant use case –
pip install opencv-python
pip install pygame
CODE:
Let us now understand the code. For this use case, we will only discuss three python scripts. However, we need more than these three. However, we have already discussed them in some of the early posts. Hence, we will skip them here.
clsAugmentedReality.py (This is the main class of python script that will embed the source video with the WebCAM streams in real-time.)
This file contains hidden or bidirectional Unicode text that may be interpreted or compiled differently than what appears below. To review, open the file in an editor that reveals hidden Unicode characters. Learn more about bidirectional Unicode characters
Identifying the Aruco markers are key here. The above lines help the program detect all four corners.
However, let us discuss more on the Aruco markers & strategies that I’ve used for several different surfaces.
Aruco Markers
As you can see, the right-hand side Aruco marker is tiny compared to the left one. Hence, that one will be ideal for a curve surface like Coffee Mug, Bottle rather than a flat surface.
Also, we’ve demonstrated the zoom capability with the smaller Aruco marker that will Augment almost double the original surface area.
Let us understand why we need that; as you know, any spherical surface like a bottle is round-shaped. Hence, detecting relatively more significant Aruco markers in four corners will be difficult for any camera to identify.
Hence, we need a process where close four corners can be extrapolated mathematically to relatively larger projected areas easily detectable by any WebCAM.
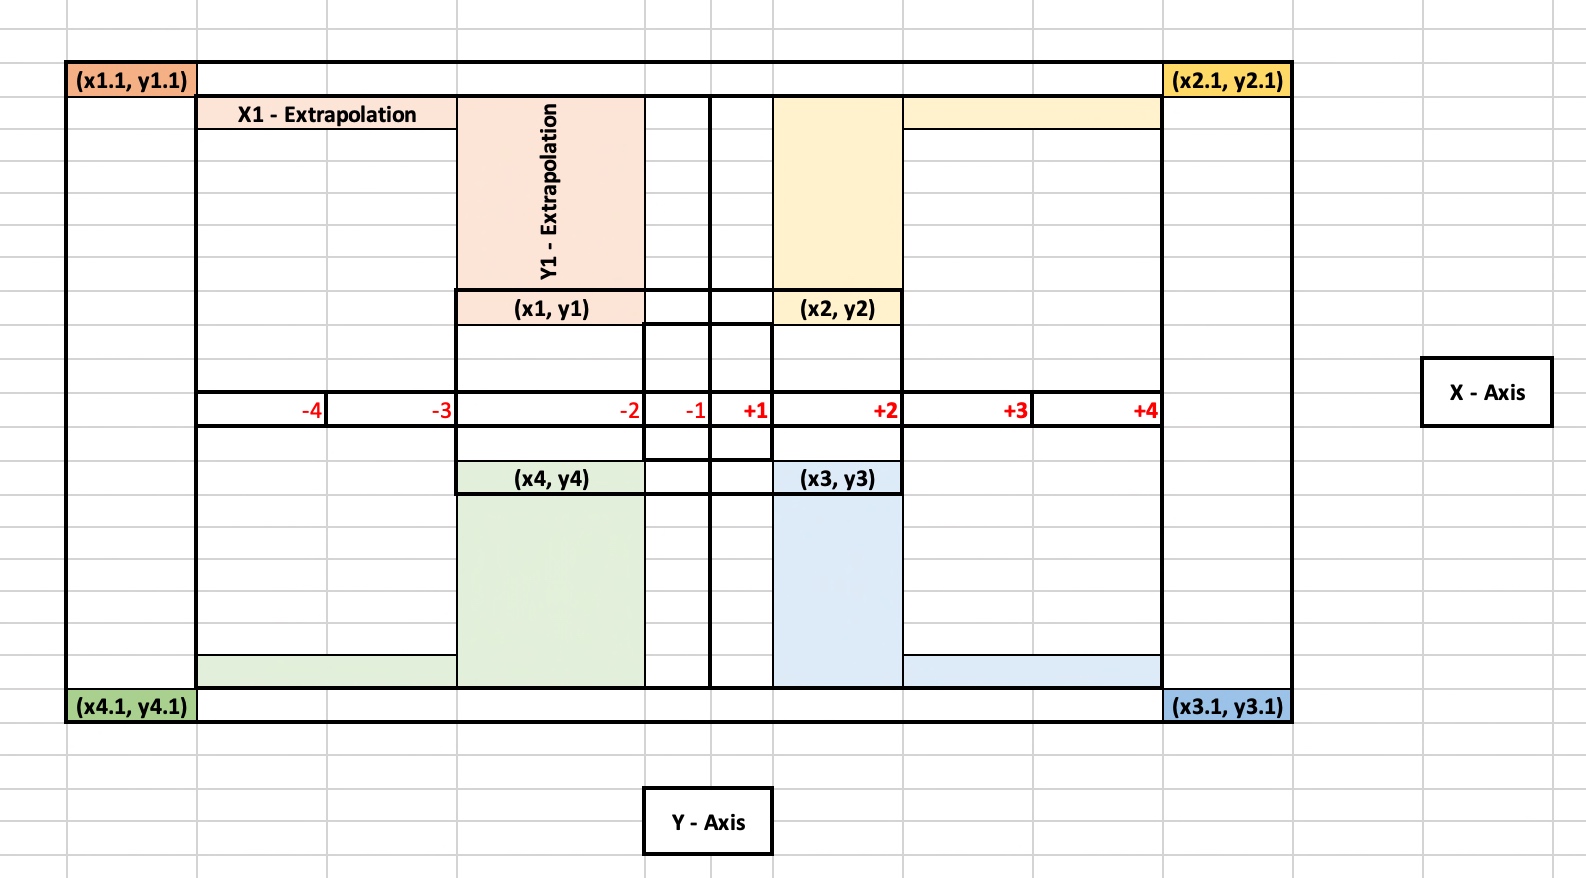
Let’s observe the following figure –
Simulated Extrapolated corners
As you can see that the original position of the four corners is represented using the following points, i.e., (x1, y1), (x2, y2), (x3, y3) & (x4, y4).
And these positions are very close to each other. Hence, it will be easier for the camera to detect all the points (like a plain surface) without many retries.
And later, you can add specific values of x & y to them to get the derived four corners as shown in the above figures through the following points, i.e. (x1.1, y1.1), (x2.1, y2.1), (x3.1, y3.1) & (x4.1, y4.1).
# Loop over the IDs of the ArUco markers in Top-Left, Top-Right,
# Bottom-Right, and Bottom-Left order
for i in cornerIDs:
  # Grab the index of the corner with the current ID
  j = np.squeeze(np.where(ids == i))

  # If we receive an empty list instead of an integer index,
  # then we could not find the marker with the current ID
  if j.size == 0:
    continue

  # Otherwise, append the corner (x, y)-coordinates to our list
  # of reference points
  corner = np.squeeze(corners[j])
  refPts.append(corner)

# Check to see if we failed to find the four ArUco markers
if len(refPts) != 4:
  # If we are allowed to use cached reference points, fall
  # back on them
  if useCache and CACHED_REF_PTS is not None:
    refPts = CACHED_REF_PTS

  # Otherwise, we cannot use the cache and/or there are no
  # previous cached reference points, so return early
  else:
    return None

# If we are allowed to use cached reference points, then update
# the cache with the current set
if useCache:
  CACHED_REF_PTS = refPts

# Unpack our Aruco reference points and use the reference points
# to define the Destination transform matrix, making sure the
# points are specified in Top-Left, Top-Right, Bottom-Right, and
# Bottom-Left order
(refPtTL, refPtTR, refPtBR, refPtBL) = refPts
dstMat = [refPtTL[0], refPtTR[1], refPtBR[2], refPtBL[3]]
dstMat = np.array(dstMat)
In the above snippet, the application will scan through all the points & try to detect Aruco markers & then create a list of reference points, which will later be used to define the destination transformation matrix.
The above snippets calculate the revised points for the zoom-out capabilities as discussed in one of the earlier figures.
# Define the transform matrix for the *source* image in Top-Left,
# Top-Right, Bottom-Right, and Bottom-Left order
srcMat = np.array([[0, 0], [srcW, 0], [srcW, srcH], [0, srcH]])
The above snippet will create a transformation matrix for the video trailer.
# Compute the homography matrix and then warp the source image to
# the destination based on the homography depending upon the
# zoom flag
if zoomFlag == 1:
  (H, _) = cv2.findHomography(srcMat, dstMat)
else:
  (H, _) = cv2.findHomography(srcMat, dstMatMod)

warped = cv2.warpPerspective(source, H, (imgW, imgH))

# Construct a mask for the source image now that the perspective
# warp has taken place (we'll need this mask to copy the source
# image into the destination)
mask = np.zeros((imgH, imgW), dtype="uint8")
if zoomFlag == 1:
  cv2.fillConvexPoly(mask, dstMat.astype("int32"), (255, 255, 255), cv2.LINE_AA)
else:
  cv2.fillConvexPoly(mask, dstMatMod.astype("int32"), (255, 255, 255), cv2.LINE_AA)

# This optional step will give the source image a black
# border surrounding it when applied to the source image, you
# can apply a dilation operation
rect = cv2.getStructuringElement(cv2.MORPH_RECT, (3, 3))
mask = cv2.dilate(mask, rect, iterations=2)

# Create a three channel version of the mask by stacking it
# depth-wise, such that we can copy the warped source image
# into the input image
maskScaled = mask.copy() / 255.0
maskScaled = np.dstack([maskScaled] * 3)

# Copy the warped source image into the input image by
# (1) Multiplying the warped image and masked together,
# (2) Then multiplying the original input image with the
#     mask (giving more weight to the input where there
#     are not masked pixels), and
# (3) Adding the resulting multiplications together
warpedMultiplied = cv2.multiply(warped.astype("float"), maskScaled)
imageMultiplied = cv2.multiply(frame.astype(float), 1.0 - maskScaled)
output = cv2.add(warpedMultiplied, imageMultiplied)
output = output.astype("uint8")
Finally, depending upon the zoom flag, the application will create a warped image surrounded by an optionally black border.
clsEmbedVideoWithStream.py (This is the main class of python script that will invoke the clsAugmentedReality class to initiate augment reality after splitting the audio & video & then project them via the Web-CAM with a seamless broadcast.)
This file contains hidden or bidirectional Unicode text that may be interpreted or compiled differently than what appears below. To review, open the file in an editor that reveals hidden Unicode characters. Learn more about bidirectional Unicode characters
Please find the key snippet from the above script –
def playAudio(self, audioFile, audioLen, freq, stopFlag=False):
  try:
    pygame.mixer.init()
    pygame.init()
    pygame.mixer.music.load(audioFile)

    pygame.mixer.music.set_volume(10)

    val = int(audioLen)
    i = 0

    while i < val:
      pygame.mixer.music.play(loops=0, start=float(i))
      time.sleep(freq)

      i = i + 1

      if (i >= val):
        raise BreakLoop

      if (stopFlag==True):
        raise BreakLoop

    return 0
  except BreakLoop as s:
    return 0
  except Exception as e:
    x = str(e)
    print(x)

    return 1
The above function will initiate the pygame library to run the sound of the video file that has been extracted as part of a separate process.
def extractAudio(self, video_file, output_ext="mp3"):
    try:
        """Converts video to audio directly using `ffmpeg` command
        with the help of subprocess module"""
        filename, ext = os.path.splitext(video_file)
        subprocess.call(["ffmpeg", "-y", "-i", video_file, f"{filename}.{output_ext}"],
                        stdout=subprocess.DEVNULL,
                        stderr=subprocess.STDOUT)

        return 0
    except Exception as e:
        x = str(e)
        print('Error: ', x)

        return 1
The above function temporarily extracts the audio file from the source trailer video.
# Initialize the video file stream
print("[INFO] accessing video stream...")
vf = cv2.VideoCapture(videoFile)

x = self.extractAudio(videoFile)

if x == 0:
    print('Successfully Audio extracted from the source file!')
else:
    print('Failed to extract the source audio!')

# Initialize a queue to maintain the next frame from the video stream
Q = deque(maxlen=128)

# We need to have a frame in our queue to start our augmented reality
# pipeline, so read the next frame from our video file source and add
# it to our queue
(grabbed, source) = vf.read()
Q.appendleft(source)

# Initialize the video stream and allow the camera sensor to warm up
print("[INFO] starting video stream...")
vs = VideoStream(src=0).start()

time.sleep(2.0)
flg = 0
The above snippets read the frames from the video file after invoking the audio extraction. Then, it uses a Queue method to store all the video frames for better performance. And finally, it starts consuming the standard streaming video from the WebCAM to augment the trailer video on top of it.
t = threading.Thread(target=self.playAudio, args=(audioFile, audioLen, audioFreq, stopFlag,))
t.daemon = True
Now, the application has instantiated an orphan thread to spin off the audio play function. The reason is to void the performance & video frame frequency impact on top of it.
while len(Q) > 0:
  try:
    # Grab the frame from our video stream and resize it
    frame = vs.read()
    frame = imutils.resize(frame, width=1020)

    # Attempt to find the ArUCo markers in the frame, and provided
    # they are found, take the current source image and warp it onto
    # input frame using our augmented reality technique
    warped = x1.getWarpImages(
      frame, source,
      cornerIDs=(923, 1001, 241, 1007),
      arucoDict=arucoDict,
      arucoParams=arucoParams,
      zoomFlag=zFlag,
      useCache=CacheL > 0)

    # If the warped frame is not None, then we know (1) we found the
    # four ArUCo markers and (2) the perspective warp was successfully
    # applied
    if warped is not None:
      # Set the frame to the output augment reality frame and then
      # grab the next video file frame from our queue
      frame = warped
      source = Q.popleft()

      if flg == 0:

        t.start()
        flg = flg + 1

    # For speed/efficiency, we can use a queue to keep the next video
    # frame queue ready for us -- the trick is to ensure the queue is
    # always (or nearly full)
    if len(Q) != Q.maxlen:
      # Read the next frame from the video file stream
      (grabbed, nextFrame) = vf.read()

      # If the frame was read (meaning we are not at the end of the
      # video file stream), add the frame to our queue
      if grabbed:
        Q.append(nextFrame)

    # Show the output frame
    cv2.imshow(title, frame)
    time.sleep(videoFrame)

    # If the `q` key was pressed, break from the loop
    if cv2.waitKey(2) & 0xFF == ord('q'):
      stopFlag = True
      break

  except BreakLoop:
    raise BreakLoop
  except Exception as e:
    pass

  if (len(Q) == Q.maxlen):
    time.sleep(2)
    break
The final segment will call the getWarpImages function to get the Augmented image on top of the video. It also checks for the upcoming frames & whether the source video is finished or not. In case of the end, the application will initiate a break method to come out from the infinite WebCAM read. Also, there is a provision for manual exit by pressing the ‘Q’ from the MacBook keyboard.
# Performing cleanup at the end
cv2.destroyAllWindows()
vs.stop()
It is always advisable to close your camera & remove any temporarily available windows that are still left once the application finishes the process.
augmentedMovieTrailer.py (Main calling script)
This file contains hidden or bidirectional Unicode text that may be interpreted or compiled differently than what appears below. To review, open the file in an editor that reveals hidden Unicode characters. Learn more about bidirectional Unicode characters
The above script will initially instantiate the main calling class & then invoke the processStream function to create the Augmented Reality.
FOLDER STRUCTURE:
Here is the folder structure that contains all the files & directories in MAC O/S –
Directory Structure
You will get the complete codebase in the following Github link.
If you want to know more about this legendary director & his famous work, please visit the following link.
I’ll bring some more exciting topic in the coming days from the Python verse. Please share & subscribe my post & let me know your feedback.
Till then, Happy Avenging! 🙂
Note: All the data & scenario posted here are representational data & scenarios & available over the internet & for educational purpose only. Some of the images (except my photo) that we’ve used are available over the net. We don’t claim the ownership of these images. There is an always room for improvement & especially the prediction quality.
Today, I’ll be using another exciting installment of Computer Vision. The application will read the real-time human hand gesture to control WebCAM’s zoom-in or zoom-out capability.
Why don’t we see the demo first before jumping into the technical details?
Demo
Architecture:
Let us understand the architecture –
Broad Diagram
As one can see, the application reads individual frames from WebCAM & then map the human hand gestures with a media pipe. And finally, calculate the distance between particular pipe points projected on human hands.
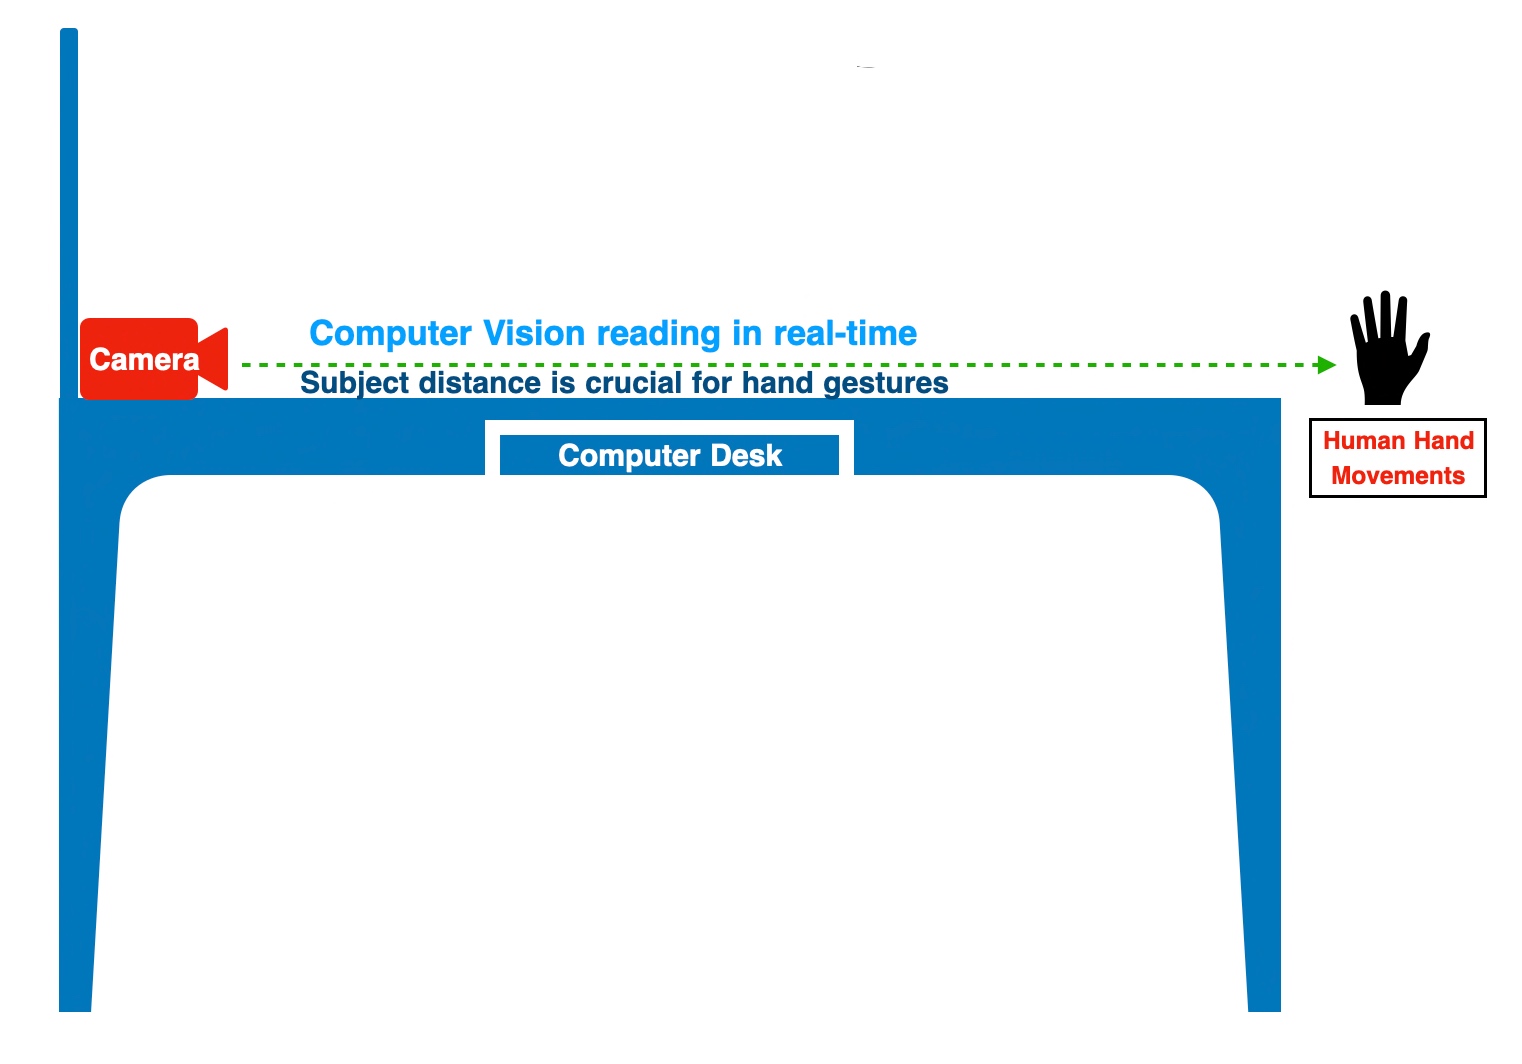
Let’s take another depiction of the experiment to better understand the above statement.
Camera & Subject Position
Python Packages:
Following are the python packages that are necessary to develop this brilliant use case –
pip install mediapipe
pip install opencv-python
CODE:
Let us now understand the code. For this use case, we will only discuss three python scripts. However, we need more than these three. However, we have already discussed them in some of the early posts. Hence, we will skip them here.
clsConfig.py (Configuration script for the application.)
This file contains hidden or bidirectional Unicode text that may be interpreted or compiled differently than what appears below. To review, open the file in an editor that reveals hidden Unicode characters. Learn more about bidirectional Unicode characters
2. clsVideoZoom.py (This script will zoom the video streaming depending upon the hand gestures.)
This file contains hidden or bidirectional Unicode text that may be interpreted or compiled differently than what appears below. To review, open the file in an editor that reveals hidden Unicode characters. Learn more about bidirectional Unicode characters
The above method will zoom in & zoom out depending upon the scale value that the human hand gesture will receive.
cap = cv2.VideoCapture(0)
detector = hms.clsHandMotionScanner(detectionCon=0.7)
The following lines will read the individual frames from webCAM. Instantiate another open-source customized class, which will find the hand’s position.
To understand the above lines, let’s look into the following diagram –
Source: Mediapipe
As one can see, the thumbs tip value is 4 & Index fingertip is 8. The application will mark these points with a solid circle.
lenVal = math.hypot(x2-x1, y2-y1)
The above line will calculate the distance between the thumbs tip & index fingertip.
# Camera Zoom Range is 0.01, 1

minVal = self.minVal
maxVal = self.maxVal

zRange = np.interp(lenVal, [50, 270], [minVal, maxVal])
zRangeBar = np.interp(lenVal, [50, 270], [400, 150])
In the above lines, the application will translate the values captured between the two fingertips & then translate them into a more meaningful camera zoom range from 0.01 to 1.
if lenVal < 50:
    cv2.circle(img, (cx,cy), 15, (0,255,0), cv2.FILLED)
The application will not consider a value below 50 as 0.01 for the WebCAM start value.
The application will capture the frame rate & share the original video frame and the test frame, where it will zoom in or out depending on the hand gesture.
3. clsHandMotionScanner.py (This is an enhance version of open source script, which will capture the hand position.)
This file contains hidden or bidirectional Unicode text that may be interpreted or compiled differently than what appears below. To review, open the file in an editor that reveals hidden Unicode characters. Learn more about bidirectional Unicode characters
def findHands(self, img, draw=True):
    try:
        # Send rgb image to hands
        imgRGB = cv2.cvtColor(img,cv2.COLOR_BGR2RGB)
        self.results = self.hands.process(imgRGB)

        # process the frame
        if self.results.multi_hand_landmarks:
            for handLms in self.results.multi_hand_landmarks:

                if draw:
                    #Draw dots and connect them
                    self.mpDraw.draw_landmarks(img,handLms,self.mpHands.HAND_CONNECTIONS)

        return img
    except Exception as e:
        x = str(e)
        print('Error: ', x)

        return img
The above function will identify individual key points & marked them as dots on top of human hands.
def findPosition(self, img, handNo=0, draw=True):
      try:
          lmlist = []

          # check wether any landmark was detected
          if self.results.multi_hand_landmarks:
              #Which hand are we talking about
              myHand = self.results.multi_hand_landmarks[handNo]
              # Get id number and landmark information
              for id, lm in enumerate(myHand.landmark):
                  # id will give id of landmark in exact index number
                  # height width and channel
                  h,w,c = img.shape
                  #find the position - center
                  cx,cy = int(lm.x*w), int(lm.y*h)
                  lmlist.append([id,cx,cy])

              # Draw circle for 0th landmark
              if draw:
                  cv2.circle(img,(cx,cy), 15 , (255,0,255), cv2.FILLED)

          return lmlist
      except Exception as e:
          x = str(e)
          print('Error: ', x)

          lmlist = []
          return lmlist
The above line will capture the position of each media pipe point along with the x & y coordinate & store them in a list, which will be later parsed for main use case.
4. viewHandMotion.py (Main calling script.)
This file contains hidden or bidirectional Unicode text that may be interpreted or compiled differently than what appears below. To review, open the file in an editor that reveals hidden Unicode characters. Learn more about bidirectional Unicode characters
The above lines are self-explanatory. So, I’m not going to discuss anything on this script.
FOLDER STRUCTURE:
Here is the folder structure that contains all the files & directories in MAC O/S –
Directory
So, we’ve done it.
You will get the complete codebase in the following Github link.
I’ll bring some more exciting topic in the coming days from the Python verse. Please share & subscribe my post & let me know your feedback.
Till then, Happy Avenging! 🙂
Note: All the data & scenario posted here are representational data & scenarios & available over the internet & for educational purpose only. Some of the images (except my photo) that we’ve used are available over the net. We don’t claim the ownership of these images. There is an always room for improvement & especially the prediction quality.


You must be logged in to post a comment.